Assa Abloy KESO KEK i-pin Mounting Instruction
- Typ
- Mounting Instruction

KESO AG KESO S.A. KESO GmbH
Sicherheitssysteme Succursale Suisse romande Maurerstrasse 6
Untere Schwandenstrasse 22 Zl. Le Trési 9B D-21244 Buchholz i.d.N
CH-8805 Richterswil CH-1028 Préverenges
Telefon +41 44 787 34 34 Telefon +41 21 811 29 29 Telefon +49 4181 924-0
Telefax +41 44 787 35 35 Telefax +41 21 811 29 00 Telefax +49 4181 924-100
Internet www.keso.com Internet www.keso.com Internet www.keso.de
ASSA ABLOY is the global leader in door opening solutions, dedicated to satisfying end-user needs for security, safety and convenience.
KESO KEK i-pin
Montageanleitung / Mounting Instruction / Instructions de montage
Version
Aus
g
abedatum: 18.07.2011
Version: 001
BA.01.034/INT
ASSA ABLOY,
the global leader in
door opening solutions

KESO KEK i-pin
KESO AG Änderungen vorbehalten / Subject to change without notice / Sous réserve de modifications
Montageanleitung / Mounting Instruction / Instructions de montage
Ausführung Feller EDIZIO Ausführung Feller Aussenbereich
Version: Feller EDIZIO Version: Feller outdoor
Exécution Feller EDIZIO Exécution Feller Extérieur
Deutsch
Deutsch
1. Frontprint (mit Folie) von EDIZIO -Rahmen
entfernen
2. Verdrahtung KESO KEK i-pin inkl.
Stromversorgung
3. Print mit 4 Senkkopfschrauben auf Wand
oder AP/UP-Dose montieren
4. die vier schwarzen Spreiznieten bei
Print einsetzen
5. EDIZIO-Rahmen aufsetzen
6. Frontprint vorsichtig aufsetzen, dass die
vier Führungsbolzen und die
12-Pol-Stiftleiste passen
1. Verdrahtung KESO KEK i-pin inkl.
Stromversorgung
2. Print mit 4 Senkkopfschrauben auf Wand
oder AP/UP-Dose montieren
3. die vier schwarzen Spreiznieten bei
Print einsetzen
4. Frontprint vorsichtig aufsetzen, dass die
vier Führungsbolzen und die
12-Pol-Stiftleiste passen
5. Frontprint mit den vier Schrauben befestigen
English
English
1. Remove the front print (with sheet) from
the EDI frame
2. Wiring KESO KEK i-pin incl. power supply
3. Use four countersunk head screws to
attach the print to the wall or the AP/UP
socket
4. Insert the four black expanding rivets into
the print
5. Position the EDIZIO frame
6. Carefully affix the front print so that the
four guide bolts and the 12-pin contact
trip fit
1. Wiring KESO KEK i-pin incl. power supply
2. Use four countersunk head screws to attach
the print to the wall or the AP/UP socket
3. Insert the four black expanding rivets into
the print
4. Carefully affix the front print so that the four
guide bolts and the 12-pin contact strip fit
5. Attach the front print with the four screws
Française
Française
1. Retirer le frontprint (avec la pellicule) du
cadre EDIZIO
2. Câblage KESO KEK i-pin avec alimentation
3. Monter le print sur la paroi, le boîtier en
applique ou encastré à l’aide des 4 vis à
tête fraisée
4. Monter les quatre rivets noirs sur le print
5. Monter le cadre EDIZIO
6. Placer le print avec précaution, afin que les
quatre goupilles et le listeau à 12 pôles
soient bien ajustés
1. Câblage KESO KEK i-pin avec alimentation
2. Monter le print sur la paroi, le boîtier en
applique ou encastré à l’aide des 4 vis à tête
fraisée
3. Monter les quatre rivets noirs sur le print
4. Placer le print avec précaution, afin que les
quatre goupilles et le listeau à 12 pôles soient
bien ajustés
5. Fixer le print avec les quatre vis
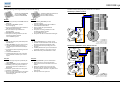
Anschlussschema / Wiring diagram / Schéma de raccordement
KESO KEK i-pin / KESO AccessPoint
KESO KEK i-pin / KESO KEK i-reader / KESO AccessPoint
Symbol für verdrillte Adernpaare
Icon for twisted pair cables
Symbole des paires torsadées
Symbol für verdrillte Adernpaare
Icon for twisted pair cables
Symbole des paires torsadées
-
 1
1
-
 2
2


Assa Abloy KESO KEK i-pin Mounting Instruction
- Typ
- Mounting Instruction
in anderen Sprachen
- English: Assa Abloy KESO KEK i-pin
- français: Assa Abloy KESO KEK i-pin
