Levenhuk 65617 Benutzerhandbuch
- Kategorie
- Teleskope
- Typ
- Benutzerhandbuch

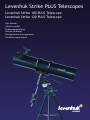
Levenhuk Strike PLUS Telescopes
Levenhuk Strike 100 PLUS Telescope
Levenhuk Strike 120 PLUS Telescope
User Manual
Návod k použití
Bedienungsanleitung
Instrukcja obsługi
Инструкция по эксплуатации
Посібник користувача


1
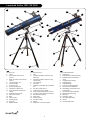
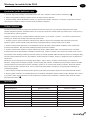
Levenhuk Strike 100/120 PLUS
1. Dust cap
2. Front
3. Declination slow-motion
control
4. Right Ascension slow-motion
control
5. Counterweight rod
6. Counterweight
7. Accessory tray
8. Tripod locking knob
9. Adjustable rubber feet
10. Fully adjustable aluminum
tripod
11. Azimuth locking knob
12. Equatorial mount
13. Back
14. Optical tube
15. Locking knobs
16. Eyepiece
17. Red dot nder
EN
1. Ochranný kryt
2. Čelo
3. Ovládání jemného nastavení osy
deklinace
4. Ovládání jemného nastavení osy
rektascenze
5. Tyč protiváhy
6. Protiváha
7. Odkládací přihrádka pro příslušen-
ství
8. Aretační šroub stativu
9. Stavitelná pryžová patka
10. Plně nastavitelný hliníkový stativ
11. Aretační šroub nastavení azimutu
12. Paralaktická montáž
13. Zadní část
14. Optický tubus
15. Aretační šrouby
16. Okulár
17. Hledáček s červenou tečkou
СZ
1. Staubschutzkappe
2. Vorderseite
3. Deklinations-Feinabstimmung
4. Rektaszensions-Feinabstim-
mung
5. Gegengewichtsstange
6. Gegengewicht
7. Zubehörablage
8. Stativ-Verriegelungsknopf
9. Verstellbare Gummifüße
10. Vollständig verstellbares Alu-
miniumstativ
11. Azimut-Verriegelungsknopf
12. Äquatorialmontierung
13. Rückseite
14. Optischer Tubus
15. Verriegelungsknöpfe
16. Okular
17. Leuchtpunktsucher
DE
1
2
3
5
6
7
8
9
10
11
12
13
14
15
16
17
4
1
2
3
5
6
7
8
9
10
11
12
13
14
15
16
17
4
1

2
1. Osłona przeciwpyłowa
2. Przód
3. Pokrętło mikroruchów w osi
deklinacji
4. Pokrętło mikroruchów w osi
rektascensji
5. Pręt przeciwwagi
6. Przeciwwaga
7. Tacka na akcesoria
8. Pokrętło blokujące statyw
9. Regulowana podkładka gumowa
10. W pełni regulowany statyw
aluminiowy
11. Pokrętło blokujące teleskop w
poziomie
12. Montaż paralaktyczny
13. Tył
14. Tuba optyczna
15. Pokrętła blokujące
16. Okular
17. Szukacz Red Dot
PL
1. Крышка трубы
2. Передняя часть трубы телескопа
3. Ручка тонких движений по оси
склонения
4. Ручка тонких движений по оси
прямого восхождения
5. Ось противовеса
6. Противовес
7. Лоток для аксессуаров
8. Фиксатор треноги
9. Резиновый наконечник ноги
треноги
10. Алюминиевая раздвижная тренога
11. Фиксатор монтировки по азимуту
12. Экваториальная монтировка
13. Задняя часть трубы телескопа
14. Труба телескопа
15. Винты крепежных колец
16. Окуляр
17. Искатель с красной точкой
RU
1. Пилозахисний ковпачок
2. Передня частина труби
телескопа
3. Регулятор руху по осі нахилу
4. Регулятор руху по осі прямого
сходження
5. Стрижень противаги
6. Противага
7. Лоток для аксесуарів
8. Фіксатор триноги
9. Регульована гумова підніжка
10. Повністю регульована
алюмінієва тринога
11. Фіксатор по азимуту
12. Екваторіальне монтування
13. Задня частина труби телескопа
14. Труба телескопа
15. Фіксатори
16. Окуляр
17. Шукач з червоною крапкою
UA
2
3
4
5
6
7
8
10
12
9

3
11 13
17
14
15
16
1819
21
22
23
20

4
EN
Levenhuk Strike PLUS Telescopes
EN
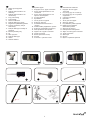
Red dot nder:
2
Used to locate objects before using the telescope tube.
Please note that the red dot nder has to be aligned to the telescope tube prior to any observations.
2x Barlow lens:
3
Used to double the power of any given eyepiece.
Eyepieces:
4
• 25mm eyepiece. Yields the lowest power, but the resulting images are the brightest
• Zoom eyepiece F6.8-F16mm
5
Counterweight
6
Declination slow-motion control
7
Right ascension slow-motion control
8
Note: Levenhuk reserves the right to modify or discontinue any product without prior notice.
Accessories
Congratulations on your purchase of a high-quality Levenhuk telescope!
These instructions will help you set up, properly use, and care for your telescope. Please read them thoroughly before getting
started.
CAUTION! Never look directly at the Sun — even for an instant — through your telescope or nderscope without a professionally
made solar lter that completely covers the front of the instrument, or permanent eye damage may result. To avoid damage to
the internal parts of your telescope, make sure the front end of the nderscope is covered with aluminum foil or another non-
transparent material. Children should use the telescope under adult supervision only.
All parts of the telescope will arrive in one box. Be careful when unpacking it. We recommend keeping the original shipping
containers. In the event that the telescope needs to be shipped to another location, having the proper shipping containers will
help ensure that your telescope survives the journey intact. Make sure all the parts are present in the packaging. Be sure to
check the box carefully, as some parts are small. No tools are needed other than those provided. All screws should be tightened
securely to eliminate exing and wobbling, but be careful not to overtighten them, as that may strip the threads.
During assembly (and anytime, for that matter), do not touch the surfaces of the optical elements with your ngers. The optical
surfaces have delicate coatings on them that can easily be damaged if touched. Never remove mirrors from their housing, or the
product warranty will be null and void.
It is important to properly assemble your telescope in order to allow it to function properly. Take the time to become familiar
with your new telescope. Learn the names of the various parts, where they are located and their function. It is the best to
perform these functions during the day time. When setting up for a viewing session, place the telescope in an area sheltered
from the wind if possible. The best night time viewing will be away from city light and when the atmosphere is «steady». With
a little practice you will learn to judge when viewing conditions are good. Look for the nights when the stars shine brightly with
little or no twinkling.
Consider using the telescope for earth (terrestrial) viewing before attempting to view astronomical objects. This will familiarize
you with how powerful each eyepiece will be, as well as introducing you to the functions of your accessory lenses. We
recommend you begin with the lowest power eyepiece, 25mm, when using your telescope. As you increase the power, the image
will appear darker; this is due to the basic physical properties of the telescope. The higher the power you use the darker the
image will appear and your viewing eld will be narrower. Please be patient when using your telescope. It is a very sensitive
instrument that is capable of using high powers. However, the more power you use, the more sensitive the telescope becomes.
As a result, the slightest movement of the telescope could cause you to lose the image you have in your eyepiece. Practice will
enable you to know how much movement to expect with each eyepiece and its corresponding power.
1

5
EN
Levenhuk Strike PLUS Telescopes
EN
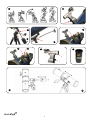
1. Remove the contents from the box and identify the parts.
• tripod • red dot nder • counterweight
• accessory tray • eyepieces: 1.25” 25mm, F6.8-F16mm zoom • right ascension slow-motion control
• telescope tube • 2x Barlow lens • declination slow-motion control
2. Adjust the tripod height by loosening the locking knobs, adjusting and leveling the tripod, then retightening the locking
knobs.
9
3. Loosen the azimuth locking knob on the equatorial mount (located at the bottom of the mount).
4. Place the equatorial mount on the tripod.
10
5. Secure the mount by tightening the locking knob
6. Attach the telescope to the mount.
11
7. Attach accessory tray.
12
1. Spread tripod legs apart so the accessory tray ts underneath
2. Push the hooks of the tray into the holders on the tripod
3. Tighten the locking knobs to secure the accessory tray in place
8. Loosen the screws of the red dot nder and slide it into the bracket. Tighten locking screws. (Please see further instructions
on red dot nder).
13
9. Attach counterweight to equatorial mount.
14
10. Attach right ascension slow-motion control to equatorial mount.
15
11. Attach declination slow-motion control to equatorial mount.
16
Assembly Instructions
How to use the eyepieces & accessories
It is recommended to follow this order when assembling your telescope for the rst time. It will help you better understand
what each piece does.
1. Focuser
17
Rotate the focus knob away from you until the focus tube goes no further. To focus the view, slowly rotate the focus knobs
toward you until the image is sharp.
Note that the eyepiece has to be inserted otherwise you will not see the image.
2. Eyepiece
18
Insert an eyepiece into the receiving end of the focuser. It is recommended to begin with the lowest power eyepiece. Remember
that the longer the focal length, the lower the power the eyepiece yields. Keep in mind that increasing the power will decrease
the apparent eld of view and the brightness and sharpness of your images.
3. Barlow lens
19
The Barlow lens is used to achieve the highest practical power of your telescope. Insert the Barlow lens into the focuser and
then place an eyepiece into the receiving end of your Barlow lens. You will have to refocus the view after this.
Red dot nder assembly
To attach the nder:
1. Remove the red dot nder from the box.
2. Loosen thumbscrews on the side of your nder and slide it into a dovetail mount located at the top of the telescope tube.
3. Tighten thumbscrews.
To align to the telescope:
1. Aim the telescope at an object at least 300 yards away and bring it into focus. This is best done in daylight.
2. Make sure the object is in the center of your view, and tighten all the knobs to prevent any movement.
3. Open the battery compartment underneath the nder and remove the cover from the battery (it is recommended to replace
Levenhuk Strike PLUS Telescopes

6
EN
Levenhuk Strike PLUS Telescopes
EN
Using the Barlow lens
The Barlow lens is used to double the power of the eyepieces. To use it, simply insert the Barlow lens into the focuser and then
place the desired eyepiece into the receiving end of the Barlow lens. Note that the higher the power you use the dark er the
image appears.
Model Eyepiece Power Power with 2x Barlow lens
Levenhuk Strike 100 PLUS 25mm 26x 52x
F6.8-F16mm 94x-40x 188x-80x
Levenhuk Strike 120 PLUS 25mm 28x 56x
F6.8-F16mm 103x-44x 206x-88x
Getting the most from your telescope
Take the time to become familiar with your new telescope. Learn the names of various parts and accessories, where they have
to go and what they do. It is easier to do this in daylight.
Before beginning your observations, take the telescope outside for around 30 minutes. This allows the telescope to adapt to the
outside air temperature and perform at its best during observations.
Try to set up your telescope in an area sheltered from wind. Move as far away from the city lights as possible. The best
conditions for observations include still air and clear nights when stars are out and shine brightly with little or no twinkling.
When beginning your observations, use low power eyepieces to take advantage of the wider eld of view and higher contrast of
the image. High power eyepieces are best used on nights when viewing conditions are perfect for detailed observations.
the battery cover when not using the telescope)
4. Turn the nder on by sliding the On/O switch forward. The switch is located on the right side of the nder.
5. Look through the nder and locate the red dot.
6. If the object in the nder is not the object you see through the main telescope tube, you have to align it. To move the red
dot up and down, simply turn the elevation screw located in the back of the nder. To move the red dot left and right, turn the
windage screw located at the front left part of the nder.
20
Balancing the telescope
The telescope should be balanced before each observing session. Balancing reduces stress on the mount and allows precise
micro-adjustment control.
R.A. Balancing
1. Before balancing, make sure the telescope is securely attached to the mount.
2. While holding the telescope with one hand, loosen the R.A. and Dec. lock knobs with the other. Rotate the telescope until
the counterweight is horizontal to the ground
3. Tighten the Dec. lock knob.
4. Loosen the counterweight thumbscrew and move the counterweight along the rod until the telescope is balanced and
remains stationary when released.
5. Tighten the counterweight thumbscrew. Now your telescope is perfectly balanced.
21

7
EN
Levenhuk Strike PLUS Telescopes
EN
Dec. Balancing
1. Tighten the R.A. lock knob when the counterweight rod is horizontal to the ground.
2. While holding the telescope with one hand, loosen the Dec. lock knob with the other.
3. Loosen the telescope tube rings and slide the telescope forward or backward until it is balanced even when you release the
telescope tube. Tighten the tube rings the Dec. lock knob.
22
The equatorial mount allows for compensating the rotation of Earth around its axis and easily tracking celestial objects during
observations. To achieve this, the R.A. axis has to be aligned to the rotation axis of Earth. This process is known as polar
alignment.
Look north and nd Polaris. As it is located within 1° of the rotation axis of Earth (North Celestial Pole), you will be aligning your
telescope to this star.
1. Loosen one of the adjustment screws and tighten the other until your latitude is shown on the latitude scale by the indicator
pin (while doing this the mount ascend or descend. You can look up the latitude of your location on a map.
2. Loosen the Dec. lock knob and rotate the telescope tube until it is parallel to the R.A. axis. Tighten the lock knob. Doing this
will make it easier to aim your telescope at Polaris.
3. Loosen the azimuth locking knob and rotate the mount until both the tube and the R.A. axis are pointed at Polaris. Retighten
the azimuth locking knob. If you cannot nd Polaris, try pointing the telescope and the R.A. axis due north.
Upon doing this, no further adjustments in the azimuth and latitude of the mount should be made during the observing session,
nor should you move the tripod. Only movements in R.A. and Dec. axes should be made in order to keep the telescope aligned.
Now, to aim the telescope at an object (the Moon, Jupiter, Saturn, etc.) loosen the R.A. & Dec. lock knobs, point the telescope
tube toward the object, and retighten the lock knobs. Look at the object through the nder and aim the telescope precisely
with slow-motion controls. Make sure the red dot is pointing at the object. Start observing by using the 25mm eyepiece and
focus your view. To study the details of the Moon or planets, just follow this simple procedure.
1. With a low power eyepiece, make sure that the observed object is directly in the center of the eyepiece crosshairs.
2. Remove the eyepiece and replace it with a high power one. You can also use a Barlow lens to achieve maximum power. To do
that, rst insert the Barlow lens in the focuser and then place an eyepiece into the receiving end of your Barlow lens.
23
Polar alignment
Levenhuk Strike 100 PLUS Levenhuk Strike 120 PLUS
Optical design Newtonian reector Newtonian reector
Objective lens diameter (aperture), mm 102 114
Focal length, mm/in 640/25.1 700/27.5
Focal ratio f/6.27 f/6.14
Highest practical power, x 160 186
Limiting stellar magnitude 12.1 12.4
Resolution threshold 1.14 1.02
Mount Equatorial EQ1 Equatorial EQ1
Eyepieces diameter 1.25" 1.25"
Eyepieces KF 25mm, Zoom 6.8-16mm KF 25mm, Zoom 6.8-16mm
Finder scope Red dot Red dot
Tripod steel steel
Barlow lens 2x 2x
Specications
Levenhuk Strike PLUS Telescopes

8
EN
Levenhuk Strike PLUS Telescopes
EN
Batteries safety instructions
• Always purchase the correct size and grade of battery most suitable for the intended use.
• Always replace the whole set of batteries at one time; taking care not to mix old and new ones, or batteries of dierent
types.
• Clean the battery contacts and also those of the device prior to battery installation.
• Make sure the batteries are installed correctly with regard to polarity (+ and -).
• Remove batteries from equipment that is not to be used for an extended period of time.
• Remove used batteries promptly.
• Never attempt to recharge primary batteries as this may cause leakage, re, or explosion.
• Never short-circuit batteries as this may lead to high temperatures, leakage, or explosion.
• Never heat batteries in order to revive them.
• Remember to switch o devices after use.
• Keep batteries out of the reach of children, to avoid risk of ingestion, suocation, or poisoning.
Care and maintenance
• Never, under any circumstances, look directly at the Sun through this device without a special lter, or look at another
bright source of light or at a laser, as this may cause PERMANENT RETINAL DAMAGE and may lead to BLINDNESS.
• Take necessary precautions when using the device with children or people who have not read or who do not fully understand
these instructions.
• Do not try to disassemble the device on your own for any reason, including to clean the mirror. For repairs and cleaning of
any kind, please contact your local specialized service center.
• Protect the device from sudden impact and excessive mechanical force.
• Do not touch the optical surfaces with your ngers. To clean the telescope exterior, use only special cleaning wipes and
special optics cleaning tools from Levenhuk.
• Store the device in a dry, cool place away from hazardous acids and other chemicals, away from heaters, open re and
other sources of high temperatures.
• Replace the dust cap over the front end of the telescope whenever it is not in use. This prevents dust from settling on the
mirror or lens surfaces.
• Seek medical advice immediately if a small part or a battery is swallowed.

9
All Levenhuk telescopes, microscopes, binoculars and other optical products, except for accessories, carry a lifetime
warranty against defects in materials and workmanship. All Levenhuk accessories are warranted to be free of defects in
materials and workmanship for six months from date of retail purchase. Levenhuk will repair or replace such product or part
thereof which, upon inspection by Levenhuk, is found to be defective in materials or workmanship. As a condition to the
obligation of Levenhuk to repair or replace such product, the product must be returned to Levenhuk together with proof of
purchase satisfactory to Levenhuk.
This warranty does not cover consumable parts, such as batteries.
A Return Authorization (RA) Number must be obtained in advance of return. Contact the local Levenhuk branch to receive the
RA number to be displayed on the outside of your shipping container. All returns must be accompanied by a written statement
setting forth the name, address and telephone number of the owner, including a description of any claimed defects. Parts or
products for which replacement is made will become the property of Levenhuk.
The customer will be responsible for all costs of transportation and insurance to and from Levenhuk or its authorized dealers
and will be required to prepay such costs.
Levenhuk will use reasonable eorts to repair or replace any product covered by this warranty within thirty days of receipt. If
a repair or replacement will require more than thirty days, Levenhuk will notify the customer accordingly. Levenhuk reserves
the right to replace any product that has been discontinued from its product line with a new product of comparable value and
function.
This warranty does not apply to any defects or damages resulting from alteration, modication, neglect, misuse, usage
of improper power sources, damage in transportation, abuse, or any cause other than normal use, or to malfunction or
deterioration due to normal wear. Levenhuk disclaims all warranties, express or implied, whether of merchantability or tness
for a particular use, except as expressly set forth herein. The sole obligation of Levenhuk under this limited warranty will be to
repair or replace the covered product, in accordance with the terms set forth herein. Levenhuk disclaims liability for any loss of
prots, loss of information, or for any general, special, direct, indirect or consequential damages which may result from breach
of any warranty, or arising out of the use or inability to use any Levenhuk product. Any warranties which are implied and which
cannot be disclaimed will be limited in duration to a term of six months for accessories from the date of retail purchase.
Some states/provinces do not allow the exclusion or limitation of incidental or consequential damages, so the above limitations
and exclusions may not apply to you. This warranty gives you specic legal rights, and you may have other rights which vary
from state to state or province to province.
Levenhuk reserves the right to modify or discontinue any product without prior notice.
NOTE: This warranty is valid to USA and Canadian customers who have purchased this product from an authorized Levenhuk
dealer in the USA or Canada. Warranty outside the USA or Canada is valid only to customers who purchased from an authorized
Levenhuk dealer in the specic country or international distributor. Please contact them for any warranty service.
If warranty problems arise, or if you need assistance in using your product, contact the local Levenhuk branch:
Levenhuk Worldwide:
USA: www.levenhuk.com
Canada: www.levenhuk.ca
Czech Republic: www.levenhuk.cz
Netherlands: www.levenhuk.nl
Poland: www.levenhukoptics.pl
Russia: www.levenhuk.ru
Ukraine: www.levenhuk.ua
EU: www.levenhuk.eu
Purchase date _________________________________________Signature __________________________________________ Stamp
Warranty
EN
Levenhuk Strike PLUS Telescopes
EN

10
Blahopřejeme vám k nákupu vysoce kvalitního teleskopu značky Levenhuk!
Tento návod vám ukáže, jak teleskop sestavit, správně používat a pečovat o něj. Proto si jej nejprve důkladně pročtěte.
Všechny součásti teleskopu jsou dodávány v jediné krabici. Při jejím vybalování postupujte opatrně. Doporučujeme vám uscho-
vat si originální přepravní obaly. V případě, že bude potřeba teleskop přepravit do jiného místa, mohou správné přepravní obaly
pomoci předejít poškození teleskopu při přepravě. Přesvědčte se, zda jsou v obalu všechny součásti. Obsah důkladně zkontro-
lujte, neboť některé součásti jsou malé. Kromě nástrojů, jež jsou součástí dodávky, nepotřebujete žádné jiné pomůcky. Abyste
vyloučili deformace a viklání, musejí být všechny šrouby pevně utaženy, ale dbejte na to, abyste je nepřetáhli, neboť může dojít
ke stržení závitů.
Během montáže (ani nikdy jindy) se svými prsty nedotýkejte povrchu optických součástí. Povrchy optických prvků jsou potaženy
speciální choulostivou vrstvou, kterou lze při doteku snadno poškodit. Zrcadla nikdy nevyjímejte z jejich pouzdra; nedodržení
tohoto pokynu má za následek neplatnost záruky.
Pro správnou funkci teleskopu je důležité, aby byl správně sestaven. Teleskop si nejprve dobře prohlédněte. Naučte se pojmen-
ovat jednotlivé části a příslušenství, jejich umístění a funkce. S teleskopem se seznamujte na denním světle. Před samotným
pozorováním umístěte teleskop pokud možno na místě chráněném před větrem. Nejlepší podmínky pro noční pozorování jsou
mimo městské osvětlení a za klidného počasí. Dobré podmínky pro pozorování se naučíte poznávat, jakmile získáte trochu praxe.
Snažte se vybírat takové noci, kdy hvězdy jasně záři a téměř neblikají.
Než začnete pozorovat astronomické objekty, zacvičte se na pozemních objektech. Tak se seznámíte s okuláry různého zvětšení
a naučíte se ovládat základní funkce teleskopu a příslušenství. Doporučujeme, abyste při práci s teleskopem začínali od ne-
jmenšího zvětšení okuláru, tj. 25 mm. Při použití 6,8 mm okuláru sice dosáhnete většího přiblížení, ale obraz se bude jevit
tmavší, což je dáno základními fyzikálními vlastnostmi teleskopu. Čím vyšší je zvětšení, tím je obraz tmavší a zorné pole užší. S
teleskopem zacházejte opatrně. Jedná se o velmi citlivý přístroj, schopný velkého zvětšení. Pamatujte, že čím vyšší je zvětšení,
tím je teleskop citlivější. Proto může sebemenší pohyb teleskopu nebo vliv na teleskop (náraz, posun) vést ke ztrátě obrazu ze
zorného pole okuláru. Při delší praxi brzy zjistíte, jak určit zvětšení poskytované jednotlivými okuláry a jakou sílu je přípustné
vyvíjet na teleskop, aby se neztratil obraz ze zorného pole okuláru.
1
VÝSTRAHA! Nikdy — ani na okamžik — se přes teleskop nebo pointační dalekohled (hledáček) nedívejte přímo do slunce,
aniž byste použili odborně vyrobený solární ltr, který bude zcela překrývat objektiv přístroje. Nedodržením tohoto
pokynu se vystavujete nebezpečí trvalého poškození zraku. Abyste zabránili poškození vnitřních součástí svého teleskopu,
zakryjte čelní stranu pointačního dalekohledu (hledáčku) hliníkovou fólií nebo jiným neprůhledným materiálem. Děti by
měly teleskop používat pouze pod dohledem dospělé osoby.
Příslušenství
EN
Teleskopy Levenhuk Strike PLUS
CZ
Hledáček s červenou tečkou:
2
Používá se k lokalizaci objektů před použitím tubusu teleskopu.
Upozornění: Hledáček je nutné před zahájením pozorování seřídit s teleskopem
Barlowův člen 2x:
3
Používá se ke zdvojnásobení zvětšení libovolného okuláru.
Okuláry:
4
• Okulár 25 mm. Nabízí nejnižší zvětšení, ale výsledný obraz je nejostřejší
• Okulár s proměnlivou ohniskovou vzdáleností F6,8-F16 mm
5
Protiváha
6
Ovládání jemného nastavení osy deklinace
7
Ovládání jemného nastavení osy rektascenze
8
Poznámka: Společnost Levenhuk si vyhrazuje právo provádět bez předchozího upozornění úpravy.

11
Návod k sestavení
1. Vyjměte obsah krabice a zkontrolujte jednotlivé součásti.
• stativ • Barlowův člen 2x
• odkládací přihrádka pro příslušenství • protiváha
• tubus teleskopu • ovládání jemného nastavení osy rektascenze
• hledáček s červenou tečkou • ovládání jemného nastavení osy deklinace
• okuláry: 1,25” 25 mm, zoom F6,8-F16 mm
2. Nastavení výšky stativu se provede tak, že uvolníte aretační šrouby, nastavíte výšku a rovinu stativu a následně aretační šrouby
znovu utáhnete.
9
3. Uvolněte aretační šroub azimutu na paralaktické montáži (nachází se na spodní straně montáže)
4. Paralaktickou montáž uložte na stativ.
10
5. Utažením aretačního šroubu montáž upevněte.
6. K montáži připevněte teleskop.
11
7. Připevněte odkládací přihrádku na příslušenství.
12
1. Nohy stativu roztáhněte tak, aby se mezi ně dala připevnit přihrádka na příslušenství
2. Háčky na přihrádce zasuňte do držáků na stativu
3. Utažením aretačních šroubů přihrádku na příslušenství upevněte
8. Uvolněte šrouby na hledáčku a nasuňte jej na držák. Aretační šrouby opět utáhněte. (Viz další pokyny týkající se hledáčku).
13
9. K paralaktické montáži připevněte protiváhu.
14
10. K paralaktické montáži připevněte ovládání jemného nastavení osy rektascenze.
15
11. K paralaktické montáži připevněte ovládání jemného nastavení osy deklinace.
16
Při prvním sestavování teleskopu vám doporučujeme postupovat v uvedeném pořadí. Pomůže vám to lépe porozumět funkci
jednotlivých součástí.
1. Mechanismus zaostřování
17
Zaostřovacím kolečkem otáčejte od sebe tak dlouho, dokud není zaostřovací trubice v krajní poloze. Zaostření pohledu se
provádí pomalým otáčením zaostřovacího kolečka směrem k sobě, dokud není obraz ostrý.
Nezapomeňte, že musí být instalován okulár, jinak obraz neuvidíte.
2. Okulár
18
Okulár vložte do otevřeného konce zaostřovacího mechanismu. K prvnímu pozorování doporučujeme použít nejslabší okulár.
Pamatujte, že čím delší je ohnisková vzdálenost, tím nižší zvětšení okulár poskytuje. Mějte prosím na paměti, že s rostoucím
zvětšením se snižuje zdánlivé zorné pole i jas a ostrost obrazu.
3. Barlowův člen
19
Barlowův člen (nazývaný rovněž Barlowův násobič) se používá k dosažení nejvyššího praktického zvětšení vašeho teleskopu.
Barlowův člen vložte do volného konce zaostřovacího mechanismu a následně vložte okulár do volného konce Barlowova členu.
Po tomto úkonu bude nutné opět zaostřit obraz.
Jak používat okuláry a příslušenství
EN
Teleskopy Levenhuk Strike PLUS
CZ
Připevnění hledáčku:
1. Hledáček vyjměte z krabice.
2. Uvolněte křídlaté šrouby na straně hledáčku a zasuňte jej do rybinového držáku na horní straně tubusu teleskopu.
3. Křídlaté šrouby utáhněte.
Seřízení teleskopu:
1. Teleskop zaměřte na objekt ve vzdálenosti nejméně 300 m a zaostřete jej. To se nejlépe provádí za denního světla.
Montáž hledáčku

12
Barlowův člen se používá ke zdvojnásobení zvětšení okuláru. Chcete-li jej použít, vložte Barlowův člen do volného konce
zaostřovacího mechanismu a následně vložte do volného konce Barlowova členu okulár. Nezapomeňte na to, že čím vyšší
zvětšení používáte, tím tmavší se jeví výsledný obraz.
Model Okulár Zvětšení Zvětšení s Barlowovým členem 2x
Levenhuk Strike 100 PLUS 25 mm 26x 52x
F6,8-F16 mm 94x-40x 188x-80x
Levenhuk Strike 120 PLUS 25 mm 28x 56x
F6,8-F16 mm 103x-44x 206x-88x
Věnujte čas seznámení se s novým teleskopem. Naučte se názvy jednotlivých součástí a příslušenství, kam patří a jaká je jejich
funkce. To je snadnější za denního světla.
Asi 30 minut před zahájením pozorování teleskop přeneste do vnějšího prostředí. Tím umožníte, aby se teleskop adaptoval na
teplotu venkovní atmosféry a během pozorování podával optimální výkon.
Je-li to možné, teleskop sestavujte v místě chráněném před větrem. Přesuňte se na místo co nejvzdálenější od veřejného
osvětlení. Nejlepší podmínky pro pozorování jsou za jasných nocí při bezvětří, kdy jsou hvězdy viditelné a jasně září s
minimálním nebo žádným kolísáním jasu.
Při úvodním pozorování používejte okuláry s malým zvětšením, abyste mohli využít výhod širšího zorného pole a vyššího
kontrastu obrazu. Okuláry s vysokým zvětšením lze nejlépe použít za nocí, kdy jsou dokonalé podmínky umožňující detailní
pozorování.
Vyvažování teleskopu
Není-li teleskop vyvážen z předchozího pozorování, musí se nejdříve vyvážit. Vyvážením se snižuje namáhání montáže a
umožňuje přesné ovládání v drobných krocích.
Použití Barlowova členu
Tipy pro optimální použití teleskopu
1. Před vyvažováním se ujistěte, zda je teleskop řádně upevněn k montáži.
21
2. Jednou rukou přidržte teleskop a druhou uvolněte aretační šrouby osy rektascenze a deklinace. Teleskopem otáčejte,
dokud nebude protiváha horizontálně vůči zemi.
3. Utáhněte aretační šroub osy deklinace.
4. Uvolněte křídlatý šroub protiváhy a protiváhu posouvejte po tyči tak dlouho, dokud není teleskop vyvážený, tj. když jej
pustíte, zůstane v klidu.
5. Utáhněte křídlatý šroub protiváhy. Nyní je váš teleskop dokonale vyvážený.
Vyvažování osy rektascenze
EN
Teleskopy Levenhuk Strike PLUS
CZ
2. Ujistěte se, že je objekt ve středu vašeho zorného pole a utažením všech šroubů zamezte veškerému pohybu.
3. Otevřete skříňku na baterie pod hledáčkem a sejměte kryt baterie (pokud teleskop nepoužíváte, doporučujeme kryt vrátit
zpět)
4. Posunem vypínače ZAP/VYP hledáček zapněte. Tento vypínač se nachází na pravé straně hledáčku.
5. Podívejte se do hledáčku a vyhledejte červenou tečku.
6. Není-li objekt v hledáčku stejný jako ten, který vidíte přes hlavní tubus teleskopu, musíte jej seřídit. Zvedání a spouštění
červené tečky se provádí otáčením elevačního šroubu na zadní straně hledáčku. Posun červené tečky doleva a doprava se provádí
pomocí šroubu stranového nastavení na levé straně hledáčku.
20

13
1. Ve chvíli, kdy je tyč protiváhy v horizontální poloze vůči zemi, utáhněte aretační šroub osy rektascenze.
22
2. Jednou rukou přidržte teleskop a druhou uvolněte aretační šroub osy deklinace.
3. Uvolněte kroužky tubusu dalekohledu a posuňte jej dopředu nebo dozadu, dokud není v rovnováze, i když tubus teleskopu
nepřidržujete. Kroužky na tubusu a aretační šroub osy deklinace utáhněte.
Vyvažování podle deklinační osy
Paralaktická montáž umožňuje kompenzovat zemskou rotaci kolem vlastní osy a při pozorování snadno kopírovat pohyb
nebeských objektů po obloze. K dosažení tohoto cíle se musí osa rektascenze nastavit podle osy zemské rotace. Tento proces je
znám pod názvem „polární ustavení“.
Podívejte se směrem na sever a najděte Polárku. Vzhledem k tomu, že se nachází v rozmezí 1° od rotační osy Země (severní
nebeský pól), budete svůj teleskop nastavovat vůči této hvězdě.
1. Uvolňujte jeden ze stavěcích šroubů a utahujte druhý, dokud na stupnici není zeměpisná šířka vaší polohy proti hrotu
ukazatele (přitom se bude montáž zvedat nebo klesat). Zeměpisnou šířku své polohy můžete najít na mapě.
2. Uvolněte aretační šroub deklinační osy a teleskopem otáčejte tak dlouho, dokud nebude rovnoběžně s osou rektascenze.
Aretační šroub utáhněte. Díky tomu bude snadnější teleskop orientovat na Polárku.
3. Uvolněte aretační šroub azimutu a otáčejte montáží tak dlouho, dokud nebude tubus i osa rektascenze mířit na Polárku.
Aretační šroub azimutu opět utáhněte. Nemůžete-li Polárku najít, snažte se teleskop a osu rektascenze namířit přímo na sever.
Po provedení těchto kroků by se během pozorování neměly na montáži provádět žádné další úpravy azimutu ani zeměpisné šířky,
ani byste neměli pohybovat stativem. Aby nedošlo k narušení nastavení teleskopu, měly by se pohybovat pouze osy deklinace a
rektascenze.
Pokud nyní chcete teleskop namířit na nějaký objekt (Měsíc, Jupiter, Saturn), uvolněte aretační šrouby osy rektascenze a
deklinace, namiřte tubus teleskopu na objekt a aretační šrouby opět utáhněte. Hledáčkem pozorujte objekt a pomocí ovládání
jemného nastavení proveďte přesné zacílení teleskopu. Ujistěte se, že červená tečka ukazuje na objekt. Pozorování zahajte
pomocí okuláru 25 mm a zaostřete obraz. Chcete-li pozorovat detaily Měsíce nebo planet, postupujte podle následujících
jednoduchých pokynů:
1. Pomocí okuláru s nízkým zvětšením proveďte přesné vycentrování pozorovaného objektu na střed nitkového kříže okuláru.
2. Okulár vyjměte a nahraďte jej silnějším okulárem. Pro dosažení maximálního zvětšení můžete využít i Barlowův člen. Chcete-
li jej použít, vložte nejprve Barlowův člen do volného konce zaostřovacího mechanismu a následně vložte okulár do volného
konce Barlowova členu.
23
Polární ustavení
EN
Teleskopy Levenhuk Strike PLUS
CZ
Levenhuk Strike 100 PLUS Levenhuk Strike 120 PLUS
Optická konstrukce Newtonův reektor Newtonův reektor
Průměr objektivu (apertura), mm 102 114
Ohnisková vzdálenost, mm 640 700
Světelnost f/6,27 f/6,14
Maximální zvětšení, x 160 186
Limitní hvězdná velikost 12,1 12,4
Rozlišení 1,14 1,02
Montáž EQ1 EQ1
Okulárový výtah 1,25" 1,25"
Specikace

14
EN
Teleskopy Levenhuk Strike PLUS
CZ
• Vždy nakupujte baterie správné velikosti a typu, které jsou nejvhodnější pro zamýšlený účel.
• Při výměně vždy nahrazujte celou sadu baterií a dbejte na to, abyste nemíchali staré a nové baterie, případně baterie
různých typů.
• Před instalací baterií vyčistěte kontakty na baterii i na přístroji.
• Ujistěte se, zda jsou baterie instalovány ve správné polaritě (+ resp. -).
• V případě, že zařízení nebudete delší dobu používat, vyjměte z něj baterie.
• Použité baterie včas vyměňujte.
• Baterie se nikdy nepokoušejte dobíjet, mohlo by dojít k úniku obsahu baterie, požáru nebo k explozi.
• Baterie nikdy nezkratujte, mohlo by to vést ke zvýšení teploty, úniku obsahu baterie nebo k explozi.
• Baterie se nikdy nepokoušejte oživit zahříváním.
• Po použití nezapomeňte přístroj vypnout.
• Baterie uchovávejte mimo dosah dětí, abyste předešli riziku spolknutí, vdechnutí nebo otravy.
Bezpečnostní pokyny týkající se baterií
• Nikdy, za žádných okolností, se tímto přístrojem bez speciálního ltru nedívejte přímo do slunce, jiného jasného světelného
zdroje nebo laseru, neboť hrozí nebezpečí TRVALÉHO POŠKOZENÍ SÍTNICE a případně i OSLEPNUTÍ.
• Při použití tohoto přístroje dětmi nebo osobami, které tento návod nečetly nebo s jeho obsahem nebyly plně srozuměny,
přijměte nezbytná preventivní opatření.
• Z žádného důvodu se nepokoušejte přístroj rozebírat, a to ani za účelem vyčištění zrcadla. S opravami veškerého druhu se
obracejte na své místní specializované servisní středisko.
• Přístroj chraňte před prudkými nárazy a nadměrným mechanickým namáháním.
• Nedotýkejte se svými prsty povrchů optických prvků. K vyčištění vnějších částí teleskopu používejte výhradně speciální
čisticí ubrousky a speciální nástroje k čištění optiky dodávané společností Levenhuk.
• Přístroj ukládejte na suchém, chladném místě, mimo dosah nebezpečných kyselin nebo jiných chemikálií, topných těles,
otevřeného ohně a jiných zdrojů vysokých teplot.
• Pokud teleskop nepoužíváte, zakryjte jeho čelní stranu prachovým víčkem. Tím zabráníte usazování prachu na povrchu
zrcadla nebo čoček.
• Při náhodném požití malé součásti nebo baterie ihned vyhledejte lékařskou pomoc.
Péče a údržba
Okuláry KF 25 mm, Zoom 6,8-16 mm KF 25 mm, Zoom 6,8-16 mm
Hledáček s červenou tečkou s červenou tečkou
Stativ kovový kovový

15
EN
Teleskopy Levenhuk Strike PLUS
CZ
Na veškeré teleskopy, mikroskopy, triedry a další optické výrobky značky Levenhuk, s výjimkou příslušenství, se poskytuje
celoživotní záruka pokrývající vady materiálu a provedení. Na veškeré příslušenství značky Levenhuk se poskytuje záruka
toho, že je dodáváno bez jakýchkoli vad materiálu a provedení, a to po dobu dvou let od data zakoupení v maloobchodní
prodejně. Společnost Levenhuk provede opravu či výměnu výrobku nebo jeho části, u nichž se po provedení kontroly společností
Levenhuk prokáže výskyt vad materiálu nebo provedení. Nezbytnou podmínkou toho, aby společnost Levenhuk splnila svůj
závazek provést opravu nebo výměnu takového výrobku, je předání výrobku společně s dokladem o nákupu vystaveným ve formě
uspokojivé pro Levenhuk.
Tato záruka se nevztahuje na spotřební součásti, jako jsou například baterie.
Ke všem vráceným výrobkům musí být přiloženo písemné prohlášení, na němž bude uvedeno jméno, adresa a telefonní číslo
majitele výrobku, včetně popisu veškerých reklamovaných závad. Součásti nebo výrobky, za něž bude poskytnuta výměna, se
stávají majetkem společnosti Levenhuk.
Zákazník je povinen předem uhradit veškeré náklady na dopravu a pojištění do společnosti Levenhuk, případně k jejím
autorizovaným dealerům, a zpět.
Společnost Levenhuk vyvine přiměřené úsilí k tomu, aby výrobek, na nějž se vztahuje tato záruka, opravila nebo vyměnila do 30
dnů od jeho obdržení. V případě, že bude oprava nebo výměna trvat déle než 30 dní, bude o tom společnost Levenhuk zákazníka
informovat. Společnost Levenhuk si vyhrazuje právo jakýkoli výrobek, jehož výroba byla zastavena, nahradit novým výrobkem
srovnatelné hodnoty a funkce.
Tato záruka se nevztahuje na závady nebo poškození vyplývající z pozměňování, úprav, nedbalosti, nesprávného použití, použití
nevhodných zdrojů napájení, poškození při dopravě, nedodržení pokynů, případně z jakékoliv jiné příčiny mimo rozsah běžného
užívání, nebo z důvodu poruchy či zhoršení funkčnosti v důsledku běžného opotřebení.
Společnost Levenhuk odmítá jakékoliv jiné záruky, výslovně uvedené i mlčky předpokládané, týkající se obchodovatelnosti nebo
vhodnosti pro konkrétní účel, kromě těch, jež jsou výslovně uvedeny v této omezené záruce. Jediným závazkem společnosti
Levenhuk v rámci této omezené záruky bude provedení opravy nebo výměny výrobku, na který se tato záruka vztahuje, a to v
souladu s podmínkami v ní uvedenými. Společnost Levenhuk nepřebírá odpovědnost za žádné ušlé zisky, ztrátu informací, ani za
žádné všeobecné, speciální, přímé, nepřímé či následné škody, jež mohou vyplynout z porušení jakékoliv záruky, případně nastat
v důsledku užívání nebo nemožnosti použití jakéhokoliv výrobku značky Levenhuk. Veškeré mlčky předpokládané záruky, jež
nelze vyloučit, budou časově omezeny na období dvou let v případě příslušenství, a to vždy od data zakoupení v maloobchodní
prodejně.
Společnost Levenhuk si vyhrazuje právo provádět bez předchozího upozornění úpravy jakéhokoliv výrobku, případně zastavit
jeho výrobu.
Záruka mimo území USA nebo Kanady platí pouze pro zákazníky, kteří provedli nákup u autorizovaného dealera společnosti
Levenhuk v příslušné zemi nebo od mezinárodního distributora. S veškerými záručními opravami se obracejte na tyto subjekty.
V případě problémů s uplatněním záruky, nebo pokud budete potřebovat pomoc při používání svého výrobku, obraťte se na
místní pobočku společnosti Levenhuk:
Levenhuk ve světě:
USA: www.levenhuk.com
Kanada: www.levenhuk.ca
Česká republika: www.levenhuk.cz
Nizozemsko: www.levenhuk.nl
Polsko: www.levenhukoptics.pl
Rusko: www.levenhuk.ru
Ukrajina: www.levenhuk.ua
EU: www.levenhuk.eu
Datum nákupu _____________________________________________ Podpis _______________________________________ Razítko
Mezinárodní záruka
Teleskopy Levenhuk Strike PLUS

16
EN
Levenhuk Strike PLUS Teleskops
DE
Herzlichen Glückwunsch zum Kauf eines hochwertigen Teleskops von Levenhuk!
Diese Anleitung unterstützt Sie bei der Inbetriebnahme, Bedienung und Pege Ihres Teleskops. Bitte lesen Sie die Anleitung vor
der ersten Verwendung sorgfältig durch.
Alle Teile des Teleskops werden in einer Schachtel ausgeliefert. Packen Sie sie vorsichtig aus! Bewahren Sie die Original-
Versandverpackung auf. Sollte später ein Transport des Teleskops an einen anderen Standort notwendig werden, trägt die
Versandverpackung dazu bei, dass das Teleskop wohlbehalten ankommt. Überprüfen Sie den Lieferumfang auf Vollständigkeit.
Sehen Sie sorgfältig in der Schachtel nach, da einige Teile klein sind. Alles erforderliche Werkzeug ist im Lieferumfang en-
thalten. Ziehen Sie alle Schrauben fest an, um Durchbiegen und Taumelbewegungen zu vermeiden. Achten Sie jedoch auch
darauf, das Gewinde nicht durch zu festes Anziehen zu überdrehen.
Berühren Sie bei der Montage (und auch sonst) die Flächen der optischen Elemente nicht mit den Fingern. Die empndliche
Vergütung der optischen Flächen kann bei Berührung leicht Schaden nehmen. Entfernen Sie die Spiegel nicht aus ihrem Gehäuse
— dies führt zu Garantieverlust.
Eine ordnungsgemäße Montage ist wichtig, damit Ihr Teleskop korrekt funktionieren kann. Nehmen Sie sich Zeit, um sich mit
Ihrem neuen Teleskop vertraut zu machen. Prägen Sie sich die Namen der verschiedenen Teile, ihren Ort und ihre Funktion ein.
Das Kennenlernen des Teleskops sollte am besten im Voraus und tagsüber erfolgen. Wenn Sie eine Observation vorbereiten,
stellen Sie das Teleskop in einem möglichst windgeschützten Bereich auf. Nächtliche Observationen gelingen am besten abseits
beleuchteter Ballungszentren bei „ruhiger“ Atmosphäre. Mit ein wenig Übung wird es Ihnen leicht fallen, zu beurteilen, wann
die Bedingungen günstig sind. Wählen Sie Nächte, in denen die Sterne hell leuchten und nicht bzw. kaum funkeln.
Observieren Sie zunächst einige terrestrische Objekte, bevor Sie mit der Beobachtung astronomischer Objekte beginnen. Dies
gibt Ihnen die Gelegenheit, sich mit den unterschiedlichen Vergrößerungsstufen der einzelnen Okulare und den Funktionen des
Teleskops und der Zubehörlinsen vertraut zu machen. Wir empfehlen Ihnen, bei der Benutzung Ihres Teleskops mit dem schwäch-
sten Okular (Brennweite: 20 mm) zu beginnen. Wenn Sie die Brennweite schrittweise reduzieren, nimmt die Vergrößerung
zu, aber das Bild wird dunkler. Dies liegt an den grundlegenden physikalischen Eigenschaften des Teleskops: Je höher die
Vergrößerung, desto dunkler das Bild und desto kleiner das Gesichtsfeld. Bitte gehen Sie sorgsam und geduldig mit Ihrem
Teleskop um. Es ist ein sehr empndliches Instrument, das mit sehr hoher Vergrößerung arbeiten kann. Jedoch wird das Teleskop
umso empndlicher, je stärker die eingestellte Vergrößerung ist. Infolgedessen könnte schon die geringste Einwirkung auf das
Teleskop (Stoß oder Verschiebung) dazu führen, dass Sie das Zielobjekt aus dem Gesichtsfeld verlieren. Durch Übung nden Sie
schnell heraus, welches Okular wie stark vergrößert, und wie viel Kraft Sie jeweils noch auf das Teleskop anwenden können,
ohne das anvisierte Objekt aus dem Gesichtsfeld zu verlieren.
1
VORSICHT! Schauen Sie mit dem Teleskop oder Sucherrohr nie — auch nicht kurzzeitig — ohne einen professionell hergestell-
ten Sonnenlter, der die Vorderseite des Instruments vollständig abdeckt, direkt in die Sonne. Erblindungsgefahr! Achten Sie
darauf, dass das vordere Ende des Sucherrohrs mit Aluminiumfolie oder einem anderen nichttransparenten Material abgedeckt
ist, um Beschädigungen an den internen Komponenten des Teleskops zu vermeiden. Kinder dürfen das Teleskop nur unter
Aufsicht Erwachsener verwenden.
Leuchtpunktsucher:
2
Dient zur Lokalisierung von Objekten vor der Verwendung des Teleskoptubus.
Bitte beachten Sie, dass der Leuchtpunktsucher vor Beginn der Observationen am Teleskoptubus ausgerichtet werden muss.
2x-Barlowlinse:
3
Verdoppelt die Auösung des verwendeten Okulars.
Okulare:
4
• 25-mm-Okular. Liefert die niedrigste Vergrößerung, dafür aber die hellsten Bilder.
• Zoom-Okular, 6,8 bis 16 mm
5
Gegengewicht
6
Zubehör

17
EN
Levenhuk Strike PLUS Teleskops
DE
Deklinations-Feinabstimmung
7
Rektaszensions-Feinabstimmung
8
Hinweis: Levenhuk behält sich das Recht vor, Produkte ohne vorherige Ankündigung zu modizieren oder einzustellen.
1. Nehmen Sie den Inhalt aus der Verpackung und identizieren Sie die Teile.
• Stativ • Leuchtpunktsucher • Gegengewicht
• Zubehörablage • Okulare: 1,25 Zoll; 25 mm, und Zoom 6,8 bis 16 mm • Rektaszensions-Feinabstimmung
• Teleskoptubus • 2x-Barlowlinse • Deklinations-Feinabstimmung
2. Höhenanpassung des Stativs: Lösen Sie die Verriegelungsknöpfe, stellen Sie die gewünschte Höhe ein und nivellieren Sie das
Stativ, und ziehen Sie die Verriegelungsknöpfe wieder an.
9
3. Lösen Sie den Azimut-Verriegelungsknopf an der Äquatorialmontierung (an der Unterseite der Montierung).
10
4. Platzieren Sie die Äquatorialmontierung auf dem Stativ.
5. Arretieren Sie die Montierung durch Anziehen des Verriegelungsknopfes.
6. Bringen Sie das Teleskop an der Montierung an.
11
7. Bringen Sie die Zubehörablage an.
12
1. Spreizen Sie die Beine des Stativs, bis die Ablage eingesetzt werden kann.
2. Drücken Sie die Haken der Ablage in die Halterungen am Stativ.
3. Arretieren Sie die Zubehörablage durch Festziehen der Verrieglungsknöpfe.
8. Lösen Sie die Schrauben des Leuchtpunktsuchers, und schieben Sie ihn in die Halteklammer. Ziehen Sie die
13
Verriegelungsschrauben an. (Beachten Sie die weiteren Hinweise zum Leuchtpunktsucher unten).
9. Bringen Sie das Gegengewicht an der Äquatorialmontierung an.
14
10. Befestigen Sie die Rektaszensions-Feinabstimmung an der Äquatorialmontierung.
15
11. Befestigen Sie die Deklinations-Feinabstimmung an der Äquatorialmontierung.
16
Montageanweisungen
Wenn Sie Ihr Teleskop zum ersten Mal montieren, gehen Sie in der folgenden Reihenfolge vor. Auf diese Weise können Sie die
Funktion der einzelnen Teile am besten verstehen.
1. Fokussierer
17
Drehen Sie den Fokussierknopf von sich weg, bis der Fokussiertubus ganz ausgefahren ist. Drehen Sie den Fokussierknopf jetzt
langsam wieder zu sich hin, bis das Bild scharf ist.
Achtung: Damit Sie ein Bild sehen können, muss das Okular eingesetzt sein.
2. Okular
18
Setzen Sie ein Okular in das aufnehmende Ende des Fokussierers ein. Beginnen Sie mit dem schwächsten Okular. Merken Sie
sich, dass die Vergrößerung des Okulars umso kleiner ist, je größer die Brennweite ist. Denken Sie auch daran, dass sich bei
höheren Vergrößerungen das Sichtfeld verkleinert und Helligkeit und Schärfe der Bilder nachlassen.
3. Barlowlinse
19
Mit der Barlowlinse erreichen Sie die maximale sinnvolle Vergrößerung Ihres Teleskops. Setzen Sie die Barlowlinse in den
Fokussierer ein und platzieren Sie anschlie¬ßend ein Okular auf dem aufnehmenden Ende der Barlow¬linse. Anschließend
müssen Sie das Bild neu fokussieren.
Verwendung der Okulare und Zubehörteile
Levenhuk Strike PLUS Teleskops

18
EN
Levenhuk Strike PLUS Teleskops
DE
Mit der Barlowlinse können Sie die Vergrößerung der Okulare verdoppeln. Setzen Sie dazu einfach die Barlowlinse in den
Fokussierer ein und platzieren Sie anschließend das gewünschte Okular auf dem aufnehmenden Ende der Barlowlinse. Achtung:
Je höher die Vergrößerungsstufe, desto dunkler wird das Bild.
Modell Okular Vergrößerung Vergrößerung mit 2x-Barlowlinse
Levenhuk Strike 100 PLUS 25 mm 26x 52x
F6,8-F16 mm 94x-40x 188x-80x
Levenhuk Strike 120 PLUS 25 mm 28x 56x
F6,8-F16 mm 103x-44x 206x-88x
Nehmen Sie sich Zeit, um sich mit Ihrem neuen Teleskop vertraut zu machen. Prägen Sie sich die Namen der verschiedenen Teile
und des Zubehörs, ihren Ort und ihre Funktion ein. Am einfachsten gelingt dies bei Tageslicht.
Lassen Sie das Teleskop ca. 30 min im Freien stehen, bevor Sie mit der Observation beginnen. Dadurch kann sich das Teleskop an
die Außentemperatur anpassen und während der Observation die besten Ergebnisse liefern.
Stellen Sie das Teleskop in einem möglichst windgeschützten Bereich weitab von städtischer Nachtbeleuchtung auf. Die besten
Bedingungen für Observationen liegen in klaren, windstillen Nächten vor, in denen die Sterne hell leuchten und nicht bzw. kaum
funkeln.
Machen Sie sich zu Beginn der Observation das breitere Sichtfeld und den höheren Bildkontrast des schwachen Okulars zunutze.
Das starke Okular eignet sich für Detailbeobachtungen in Nächten mit perfekter Sicht.
Das Teleskop muss vor jeder Observation ausgewuchtet werden. Das Auswuchten verringert die auf die Montierung einwirkende
Belastung und erlaubt eine präzise Feinjustierung.
Verwendung der Barlowlinse
Hinweise für eine optimale Teleskopleistung
Auswuchten des Teleskops
Montage des Leuchtpunktsuchers
So bringen Sie den Sucher an:
1. Nehmen Sie den Leuchtpunktsucher aus der Verpackung.
2. Lösen Sie die Flügelschauben auf der Seite des Suchers und schieben Sie ihn in die Schwalbenschwanzführung an der
Oberseite des Teleskoptubus.
3. Ziehen Sie die Flügelschrauben an.
So richten Sie den Sucher am Teleskop aus:
1. Richten Sie das Teleskop auf ein 300 m oder mehr entferntes Objekt und stellen Sie das Objekt scharf. Dies gelingt am besten
bei Tageslicht.
2. Vergewissern Sie sich davon, dass sich das Objekt in der Mitte des Sichtfeldes bendet. Ziehen Sie alle Knöpfe an, um ein
Verrutschen zu verhindern.
3. Önen Sie das Batteriefach an der Unterseite des Suchers und nehmen Sie die Schutzkappe von der Batterie. (In Zeiten, in
denen das Teleskop nicht benutzt wird, sollten Sie die Schutzkappe wieder aufsetzen.)
4. Schieben Sie den ON/OFF-Schalter nach vorn, um den Sucher einzuschalten. Der Schalter bendet sich auf der rechten Seite
des Suchers.
5. Sehen Sie durch den Sucher und achten Sie auf den roten Leuchtpunkt.
6. Falls das Objekt im Sucher nicht dasselbe Objekt ist, das Sie durch den Teleskoptubus sehen, müssen Sie den Sucher
ausrichten. Drehen Sie einfach an der Höhenschraube hinten am Sucher, um den Leuchtpunkt nach oben oder unten zu bewegen.
Um den Leuchtpunkt nach links oder rechts zu bewegen, drehen Sie an der Seitenstellschraube vorne links am Sucher.
20
Seite wird geladen ...
Seite wird geladen ...
Seite wird geladen ...
Seite wird geladen ...
Seite wird geladen ...
Seite wird geladen ...
Seite wird geladen ...
Seite wird geladen ...
Seite wird geladen ...
Seite wird geladen ...
Seite wird geladen ...
Seite wird geladen ...
Seite wird geladen ...
Seite wird geladen ...
Seite wird geladen ...
Seite wird geladen ...
Seite wird geladen ...
Seite wird geladen ...
Seite wird geladen ...
Seite wird geladen ...
Seite wird geladen ...
Seite wird geladen ...
Seite wird geladen ...
Seite wird geladen ...
-
 1
1
-
 2
2
-
 3
3
-
 4
4
-
 5
5
-
 6
6
-
 7
7
-
 8
8
-
 9
9
-
 10
10
-
 11
11
-
 12
12
-
 13
13
-
 14
14
-
 15
15
-
 16
16
-
 17
17
-
 18
18
-
 19
19
-
 20
20
-
 21
21
-
 22
22
-
 23
23
-
 24
24
-
 25
25
-
 26
26
-
 27
27
-
 28
28
-
 29
29
-
 30
30
-
 31
31
-
 32
32
-
 33
33
-
 34
34
-
 35
35
-
 36
36
-
 37
37
-
 38
38
-
 39
39
-
 40
40
-
 41
41
-
 42
42
-
 43
43
-
 44
44


Levenhuk 65617 Benutzerhandbuch
- Kategorie
- Teleskope
- Typ
- Benutzerhandbuch
in anderen Sprachen
- slovenčina: Levenhuk 65617 Používateľská príručka
- polski: Levenhuk 65617 Instrukcja obsługi
Verwandte Artikel
Andere Dokumente
-
Celestron AstroMaster EQ Telescope Series Benutzerhandbuch
-
Celestron Power Seeker 80eq Benutzerhandbuch
-
Bresser TAURUS 90/500 NG Bedienungsanleitung
-
-
Bresser 4650750 Bedienungsanleitung
-
-
Bresser 96-18760 Bedienungsanleitung
-
ISA AZ Bedienungsanleitung
-