Beko RCNE 365 E20DZX Bedienungsanleitung
- Kategorie
- Gefrierschränke
- Typ
- Bedienungsanleitung

www.beko.com.trwww.beko.com
RCNE365E20DZX
EN ES DE FR

Please read this manual before using the product!
Dear Customer,
We'd like you to make the best use of our product, which has been manufactured in
modern facilities with care and meticulous quality controls.
Thus, we advice you to read the entire user manual before you use the product. In
case the product changes hands, do not forget to hand the guide to its new owner
along with the product.
This guide will help you use the product quickly and safely.
• Please read the user guide carefully before installing and operating the product.
• Always observe the applicable safety instructions.
• Keep the user guide within easy reach for future use.
• Please read any other documents provided with the product.
Keep in mind that this user guide may apply to several product models. The guide
clearly indicates any variations of different models.
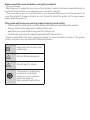
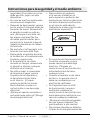
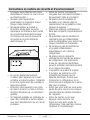
C
Important nformaton and
useful tps.
A
Rsk of lfe and property.
B
Rsk of electrc shock.
The product’s packagng
s made of recyclable
materals, n accordance
wth the Natonal
Envronment Legslaton.

4 / 25 EN
Refrigerator/User Manual
1. Safety and environment
instructions 4
General safety ...............................................4
Intended use .................................................. 6
Child safety ..................................................... 6
Compliance with WEEE Directive and
Disposing of the Waste Product ............6
Compliance with RoHS Directive.............7
Package information ....................................7
2 Your Freezer 8
3 Installation 9
Appropriate Installation Location .......... 9
Adjusting the Feet .....................................10
Electrical Connection ................................10
4 Preparation 11
5 Operating the product 12
Indicator panel ............................................. 12
Freezing fresh food ...................................14
Recommendations for preserving the
frozen food .................................................... 15
Deep-freeze information ........................15
Placing the food ..........................................16
Door open warning ....................................16
Changing the door opening direction 16
Blue light ........................................................16
Humidity controlled crisper .................... 17
Icematic and ice storage container ..... 17
Using the water dispenser .....................18
Filling the water dispenser's tank .......18
Cleaning the water tank ........................19
Drip tray ..........................................................20
6 Maintenance and cleaning 21
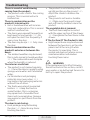
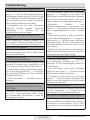
7 Troubleshooting 22

5 / 25 EN
Refrigerator/User Manual
1. Safety and environment instructions
Ths secton provdes the safety
nstructons necessary to prevent
the rsk of njury and materal
damage. Falure to observe these
nstructons wll nvaldate all
types of product warranty.
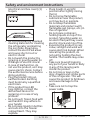
Intended use
A
WARNING:
Keep ventlaton
openngs, n the applance
enclosure or n the bult-
nstructure, clear of
obstructon.
A
WARNING:
Do not use mechancal
devces or other means
to accelerate the
defrostng process,
other than those
recommended by the
manufacturer.
A
WARNING:
Do not damage the
refrgerant crcut.
A
WARNING:
Do not use electrcal
applances nsde
the food storage
compartments of
the applance, unless
they are of the type
recommended by the
manufacturer.
Ths applance s ntended to be
used n household and smlar
applcatons such as
– staff ktchen areas n shops,
offces and other workng
envronments;
– farm houses and by clents
n hotels, motels and other
resdental type envronments;
– bed and breakfast type
envronments;
– caterng and smlar non-retal
applcatons.
1.1. General safety
• Ths product should not
be used by persons wth
physcal, sensory and mental
dsabltes, wthout suffcent
knowledge and experence
or by chldren. The devce
can only be used by such
persons under supervson
and nstructon of a person
responsble for ther safety.
Chldren should not be allowed
to play wth ths devce.
• In case of malfuncton, unplug
the devce.
• After unpluggng, wat at least
5 mnutes before pluggng n
agan.
• Unplug the product when not
n use.
• Do not touch the plug wth
wet hands! Do not pull the
cable to plug off, always hold
the plug.
• Do not plug n the refrgerator
f the socket s loose.
• Unplug the product durng
nstallaton, mantenance,
cleanng and repar.
• If the product wll not be used
for a whle, unplug the product
and remove any food nsde.
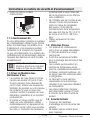
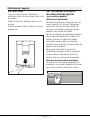
• Do not use the product when
the compartment wth crcut
cards located on the upper
back part of the product

6 / 25 EN
Refrigerator/User Manual
Safety and envronment nstructons
(electrcal card box cover) (1)
s open.
1
1
• Do not use steam or steamed
cleanng materals for cleanng
the refrgerator and meltng
the ce nsde. Steam may
contact the electrfed areas
and cause short crcut or
electrc shock!
• Do not wash the product by
sprayng or pourng water on
t! Danger of electrc shock!
• In case of malfuncton, do
not use the product, as t may
cause electrc shock. Contact
the authorsed servce before
dong anythng.
• Plug the product nto an
earthed socket. Earthng
must be done by a qualfed
electrcan.
• If the product has LED
type lghtng, contact the
authorsed servce for
replacng or n case of any
problem.
• Do not touch frozen food wth
wet hands! It may adhere to
your hands!
• Do not place lquds n bottles
and cans nto the freezer
compartment. They may
explode.
• Place lquds n uprght
poston after tghtly closng
the ld.
• Do not spray flammable
substances near the product,
as t may burn or explode.
• Do not keep flammable
materals and products wth
flammable gas (sprays, etc.) n
the refrgerator.
• Do not place contaners
holdng lquds on top of the
product. Splashng water on
an electrfed part may cause
electrc shock and rsk of fre.
• Exposng the product to ran,
snow, sunlght and wnd wll
cause electrcal danger. When
relocatng the product, do
not pull by holdng the door
handle. The handle may come
off.
• Take care to avod trappng
any part of your hands or body
n any of the movng parts
nsde the product.
• Do not step or lean on the
door, drawers and smlar parts
of the refrgerator. Ths wll
cause the product to fall down
and cause damage to the
parts.
• Take care not to trap the
power cable.

7 / 25 EN
Refrigerator/User Manual
Safety and envronment nstructons
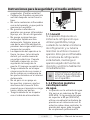
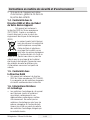
1.1.1 HC warning
If the product comprses a coolng
system usng R600a gas, take
care to avod damagng the
coolng system and ts ppe whle
usng and movng the product.
Ths gas s flammable. If the
coolng system s damaged, keep
the product away from sources
of fre and ventlate the room
mmedately.
C
The label on the nner
left sde ndcates the
type of gas used n the
product.
1.1.2 For models with
water dispenser
• Pressure for cold water nlet
shall be maxmum 90 ps (6.2
bar). If your water pressure
exceeds 80 ps (5.5 bar), use a
pressure lmtng valve n your
mans system. If you do not
know how to check your water
pressure, ask for the help of a
professonal plumber.
• If there s rsk of water
hammer effect n your
nstallaton, always use a
water hammer preventon
equpment n your nstallaton.
Consult Professonal plumbers
f you are not sure that there
s no water hammer effect n
your nstallaton.
• Do not nstall on the hot water
nlet. Take precautons aganst
of the rsk of freezng of the
hoses. Water temperature
operatng nterval shall be
33°F (0.6°C) mnmum and
100°F (38°C) maxmum.
• Use drnkng water only.
1.2. Intended use
• Ths product s desgned for
home use. It s not ntended
for commercal use.
• The product should be used to
store food and beverages only.
• Do not keep senstve
products requrng controlled
temperatures (vaccnes,
heat senstve medcaton,
medcal supples, etc.) n the
refrgerator.
• The manufacturer assumes no
responsblty for any damage
due to msuse or mshandlng.
• Orgnal spare parts wll
be provded for 10 years,
followng the product
purchasng date.
1.3. Child safety
• Keep packagng materals out
of chldren’s reach.
• Do not allow the chldren to
play wth the product.
• If the product’s door comprses
a lock, keep the key out of
chldren’s reach.
1.4. Compliance with WEEE
Directive and Disposing
of the Waste Product
Ths product comples wth
EU WEEE Drectve (2012/19/EU).
Ths product bears a classfcaton
symbol for waste electrcal and
electronc equpment (WEEE).
Ths product has been
manufactured wth hgh
qualty parts and
materals whch can be
reused and are sutable
for recyclng. Do not
dspose of the waste
product wth normal domestc

8 / 25 EN
Refrigerator/User Manual
Safety and envronment nstructons
and other wastes at the end of ts
servce lfe. Take t to the
collecton center for the recyclng
of electrcal and electronc
equpment. Please consult your
local authortes to learn about
these collecton centers.
1.5. Compliance with
RoHS Directive
• Ths product comples wth EU
WEEE Drectve (2011/65/EU).
It does not contan harmful and
prohbted materals specfed
n the Drectve.
1.6. Package information
Packaging materials of the
product are manufactured from
recyclable materials in accordance
with our National Environment
Regulations. Do not dispose of the
packaging materials together with
the domestic or other wastes. Take
them to the packaging material
collection points designated by
the local authorities.

9 / 25 EN
Refrigerator/User Manual
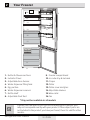
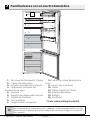
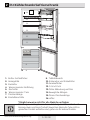
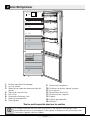
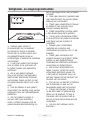
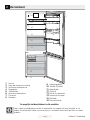
2 Your Freezer
C
Figures that take place in this instruction manual are schematic and
may not correspond exactly with your product. If the subject parts are
not included in the product you have purchased, then it is valid for other
models.
* May not be available in all models
6
8
9
*10
11
12
13
14
*4
*15
*16
2
*1
*7
5
3
1. Butter & Cheese sections
2. Indıcator Panel
3. Adjustable door shelves
4. Water dispenser filling tank
5. Egg section
6. Water dispenser reservoir
7. Bottle shelf
8. Adjustable front feet
9. Freezer compartment
10.Ice cube tray & Ice bank
11.Crisper
12.Chiller
13.Chiller cover and glass
14.Adjustable shelves
15.Wine cellar
16.Fan

10 / 25 EN
Refrigerator/User Manual
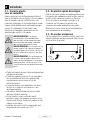
3 Installation
3.1. Appropriate
Installation Location
Contact an Authorized Service for the
installation of the product. In order to
prepare the product for use, refer the
information in the user manual and
ensure that electrical installation and
water installation are appropriate. If not,
call a qualified electrician and technician
to have any necessary arrangements
carried out.
B
WARNING:Manufacturer shall
not be held lable for damages
that may arse from procedures
carred out by unauthorzed
persons.
B
WARNING:Product must
not be plugged n durng
nstallaton. Otherwse, there
s the rsk of death or serous
njury!
A
WARNING:
If the door clearance of the
room where the product shall
be place s so tght to prevent
passng of the product, remove
the door of the room and pass
the product through the door
by turnng t to ts sde; f ths
does not work, contact the
authorzed servce.
• Placetheproductonanevenfloor
surface to prevent jolts.
• Installtheproductatleast30cm
away from heat sources such as hobs,
heater cores and stoves and at least 5
cm away from electrical ovens.
• Productmustnotbesubjectedto
direct sun light and kept in humid
places.
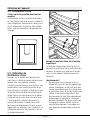
• Appropriateairventilationmustbe
provided around your product in order
to achieve an efficient operation. If the
product is to be placed in a recess in
the wall, pay attention to leave at least
5 cm distance with the ceiling and side
walls.
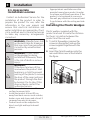
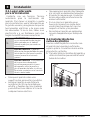
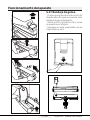
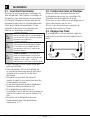
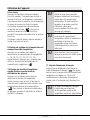
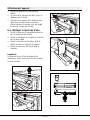
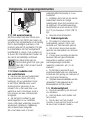
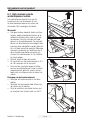
Installing the Plastic Wedges
Plastc wedges suppled wth the
product are used to create the dstance
for the ar crculaton between the
product and the rear wall.
1. To install the wedges, remove the
screws on the product and use the
screws supplied together with the
wedges.
2. Insert the 2 plastic wedges onto the
rear ventilation cover as illustrated in
the figure.

11 / 25 EN
Refrigerator/User Manual
Installaton
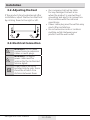
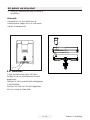
3.2. Adjusting the Feet
If the product stands unbalanced after
nstallaton, adjust the feet on the front
by rotatng them to the rght or left.
3.3. Electrical Connection
A
WARNING: Do not make
connectons va extenson
cables or mult-plugs.
B
WARNING:Damaged
power cable must be
replaced by the Authorzed
Servce Agent.
C
If two coolers are to be
nstalled sde by sde, there
should be at least 4 cm
dstance between them.
• Our company shall not be lable
for any damages that wll arse
when the product s used wthout
groundng and electrcal connecton
n accordance wth the natonal
regulatons.
• Power cable plug must be wthn easy
reach after nstallaton.
• Do not extenson cords or cordless
multple outlets between your
product and the wall outlet.

12 / 25 EN
Refrigerator/User Manual
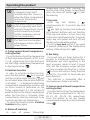
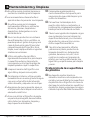
4 Preparation
• Your refrigerator should be installed at
least 30 cm away from heat sources
such as hobs, ovens, central heater
and stoves and at least 5 cm away
from electrical ovens and should not be
located under direct sunlight.
• The ambient temperature of the room
where you install your refrigerator
should at least be -5°C. Operating your
refrigerator under cooler conditions is
not recommended with regard to its
efficiency.
• Please make sure that the interior of
your refrigerator is cleaned thoroughly.
• If two refrigerators are to be installed
side by side, there should be at least 2
cm distance between them.
• When you operate your refrigerator
for the first time, please observe the
following instructions during the initial
six hours.
• The door should not be opened
frequently.
• It must be operated empty without any
food in it.
• Do not unplug your refrigerator. If
a power failure occurs out of your
control, please see the warnings in
the “Recommended solutions for the
problems” section.
• Original packaging and foam
materials should be kept for future
transportations or moving.
• The baskets/drawers that are
provided with the chill compartment
must always be in use for low energy
consumption and for better storage
conditions.
• Food contact with the temperature
sensor in the freezer compartment may
increase energy consumption of the
appliance. Thus any contact with the
sensor(s) must be avoided.
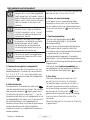
• In some models, the instrument panel
automatically turns off 5 minutes
after the door has closed. It will be
reactivated when the door has opened
or pressed on any key.
• Due to temperature change as a result
of opening/closing the product door
during operation, condensation on
the door/body shelves and the glass
containers is normal

13 / 25 EN
Refrigerator/User Manual
C
Fgures n ths user manual are schematc and may not match the product
exactly. If the subject parts are not ncluded n the product you have
purchased, then those parts are vald for other models.
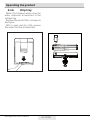
5 Operating the product
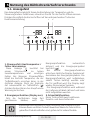
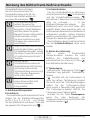
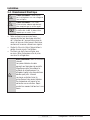
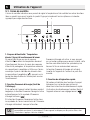
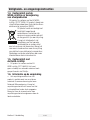
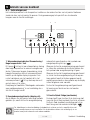
5.1. Indicator panel
Indicator panel allows you to set the temperature and control the other
functions related to the product without opening the door of the product. Just
press the inscriptions on relevant buttons for function settings.
1
2
3
5
4
6
78
10
11
9
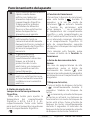
1. Power failure/High temperature /
error warning indicator
This indicator ( ) illuminates during
power failure, high temperature failures
and error warnings. During sustained
power failures, the highest temperature
that the freezer compartment reaches
will flash on the digital display. After
checking the food located in the freezer
compartment (
) press the alarm off
button to clear the warning.
2. Energy saving function (display
off):
If the product doors are kept closed
for a long time energy saving function
is automatically activated and energy
saving symbol is illuminated. ( )
When energy saving function is
activated, all symbols on the display
other than energy saving symbol will turn
off. When the Energy Saving function is
activated, if any button is pressed or the
door is opened, energy saving function
will be canceled and the symbols on
display will return to normal.
Energy saving function is activated
during delivery from factory and cannot
be canceled.
3.Quick fridge function
The button has two functons. To
actvate or deactvate the quck cool
functon press t brefly. Quck Cool
ndcator wll turn off and the product
wll return to ts normal settngs. ( )
C
Use quck coolng functon
when you want to quckly cool
the food placed n the frdge
compartment. If you want to
cool large amounts of fresh
food, actvate ths functon
before puttng the food nto
the product.

14 / 25 EN
Refrigerator/User Manual
Operatng the product
C
If you do not cancel t, quck
coolng wll cancel tself
automatcally after 1 hours or
when the frdge compartment
reaches to the requred
temperature.
C
If you press the quck coolng
button repeatedly wth short
ntervals, the electronc crcut
protecton wll be actvated
and the compressor wll not
start up mmedately.
C
Ths functon s not recalled
when power restores after a
power falure.
4. Fridge compartment temperature
setting button
Press this button to set the temperature
of the fridge compartment to 8,7,6, 5,4,3,
2 ,1 ,8... respectively. Press this button to
set the fridge compartment temperature
to the desired value. (
) )
5.Vacation Function
In order to activate vacation function,
press the this button ( ) for 3 seconds,
and the vacation mode indicator (
) will
be activated. When the vacation function
is activated, “- -” is displayed on the fridge
compartment temperature indicator and
no active cooling is performed on the
fridge compartment. It is not suitable to
keep the food in the fridge compartment
when this function is activated. Other
compartments shall be continued to be
cooled as per their set temperature.
To cancel this function press Vacation
function button again.
6. Alarm off warning:
In case of power failure/high
temperature alarm, after checking the
food located in the freezer compartment
press the alarm off button (
) to clear
the warning.
7. Key lock,
Press key lock button ( )
simultaneously for 3 seconds. Key lock
symbol
( ) will light up and key lock mode will
be activated. Buttons will not function
if the Key lock mode is active. Press key
lock button simultaneously for 3 seconds
again. Key lock symbol will turn off and
the key lock mode will be exited.
Press the key lock button if you want
to prevent changing of the temperature
setting of the refrigerator ( ).
8. Eco fuzzy
Press and hold eco fuzzy button for 1
seconds to activate eco fuzzy function.
Refrigerator will start operating in the
most economic mode at least 6 hours
later and the economic usage indicator
will turn on when the function is active
(
). Press and hold eco fuzzy function
button for 3 seconds to deactivate eco
fuzzy function.
This indicator is illuminated after 6
hours when eco fuzzy is activated.
9. Freezer compartment temperature
setting button
Press this button to set the temperature
of the freezer compartment to -18,-19,-
20,-21, -22, -23,-24, -18... respectively.
Press this button to set the freezer
compartment temperature to the desired
value.( )

15 / 25 EN
Refrigerator/User Manual
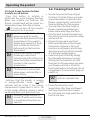
Operatng the product
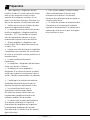
5.2. Freezing fresh food
• In order to preserve the qualty of
the food, t shall be frozen as quckly
as possble when t s placed n the
freezer compartment, use the fast
freezng feature for ths purpose.
• You may store the food longer n
freezer compartment when you
freeze them whle they are fresh.
• Pack the food to be frozen and close
the packng so that t would not allow
entrance of ar.
• Ensure that you pack your food
before puttng them n the freezer.
Use freezer contaners, fols and
mosture-proof papers, plastc bags
and other packng materals nstead
of tradtonal packng papers.
• Label each pack of food by addng
the date before freezng. You may
dstngush the freshness of each
food pack n ths way when you open
your freezer each tme. Store the
food frozen before n the front sde of
compartment to ensure that they are
used frst.
C
The freezer compartment
defrosts automatcally.
• Frozen food must be used
mmedately after they are thawed
and they should not be re-frozen.
• Do not freeze too large quanttes of
food at one tme.
10. Quick freeze function button/
icematic on-off button
Press this button to activate or
deactivate the quick freezing function.
When you activate the function, the
freezer compartment will be cooled to a
temperature lower than the set value.
(
)To turn on and off the icematic
press and hold it for 3 seconds.
C
Use the quck freeze functon
when you want to quckly
freeze the food placed n frdge
compartment. If you want to
freeze large amounts of fresh
food, actvate ths functon
before puttng the food nto
the product.
C
If you do not cancel t, Quck
Freeze wll cancel tself
automatcally after 24 hours or
when the frdge compartment
reaches to the requred
temperature.
C
Ths functon s not recalled
when power restores after a
power falure.
11. Economic usage indicator
Indicates that the product is running
in energy-efficient mode. (
)This
indicator will be active if the Freezer
Compartment temperature is set to -18
or the energy efficient cooling is being
performed due to Eco-Extra function.
C
Economc usage ndcator s
turned off when quck coolng
or quck freeze functons are
selected.

16 / 25 EN
Refrigerator/User Manual
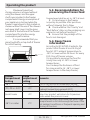
Operatng the product
Freezer
Compartment
Settng
Frdge
compartment
Settng
Remarks
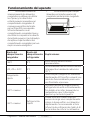
-18°C 4°C This is the normal recommended setting.
-20,-22 or -24°C 4°C
These settings are recommended when the
ambient temperature exceeds 30°C.
Quick Freeze 4°C
Use when you wish to freeze your food in a short
time. Your product will return to its previous
mode when the process is over.
-18°C or colder 2°C
Use these settings if you think that your fridge
compartment is not cold enough because of the
hot ambient conditions or frequent opening and
closing of the door.
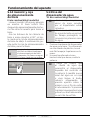
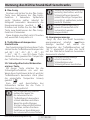
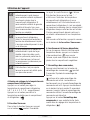
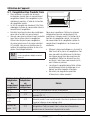
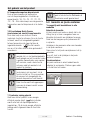
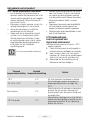
• Maximum frozen food
storage volume is achieved without
using the drawers and the upper
shelf cover provided in the freezer
compartment. Energy consumption of
your appliance is declared while the
freezer compartment is fully loaded on
shelves without the use of the drawers
and upper shelf cover. Use the given
wire shelf at the bottom of the freezer
compartment for a better energy
consumption performance.
• It is recommended that you
place foodstuffs on top shelf of freezer
for initial freezing.
wire shelf
5.3. Recommendations for
preserving the frozen food
Compartment shall be set to -18°C at least.
1. Put packages in the freezer
as quickly as possible after purchase
without allowing the to thaw.
2. Check whether the "Use By" and
"Best Before" dates on the packaging are
expired or not before freezing it.
3. Ensure that the package of the
food is not damaged.
5.4. Deep-freeze
information
Accordng to IEC 62552 standards, the
product shall freeze at least 4.5 kg of
food at 32°C ambent temperature to
-18°C or lower wthn 24 hours for every
100-ltres of freezer volume.
It s possble to preserve the food for
a long tme only at -18°C or lower
temperatures.
You can keep the freshness of food
for many months (at -18°C or lower
temperatures n the deep freeze).

17 / 25 EN
Refrigerator/User Manual
Operatng the product
Freezer
Compartment
Settng
Frdge
compartment
Settng
Remarks
-18°C 4°C This is the normal recommended setting.
-20,-22 or -24°C 4°C
These settings are recommended when the
ambient temperature exceeds 30°C.
Quick Freeze 4°C
Use when you wish to freeze your food in a short
time. Your product will return to its previous
mode when the process is over.
-18°C or colder 2°C
Use these settings if you think that your fridge
compartment is not cold enough because of the
hot ambient conditions or frequent opening and
closing of the door.
Foods to be frozen should not be allowed
to come n contact wth the prevously
frozen tems to prevent them from
gettng thawed partially.
Boil the vegetables and drain their water
in order to store vegetables for a longer
time as frozen. After draining their
water, put them in air-proof packages
and place them inside the freezer. Food
such as bananas, tomatoes, lettuce,
celery, boiled eggs, potatoes are not
suitable for freezing. When these foods
are frozen, only their nutritional value
and taste shall be affected negatively.
They shall not be spoiled so that they
would create a risk for human health.
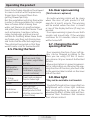
5.5. Placing the food
Freezer
compartment
shelves
Various frozen food
such as meat, fish,
ice cream, vegetables
and etc.
Refrigerator
compartment
shelves
Food in pans, covered
plates and closed
containers, eggs (in
closed container)
Door shelves
of fridge
compartment
Small and packaged
food or beverage
Crisper Vegetables and fruits
Fresh zone
compartment
Delicatessen
(breakfast food,
meat products that
shall be consumed in
a short time)
5.6. Door open warning
(This feature is optional)
An audio warning signal will be given
when the door of your product is left
open for at least 1 minute. This warning
will be muted when the door is closed
or any of the display buttons (if any) are
pressed.
Door open warning is given to user both
visually and acoustically. If the warning
continues for 10 minutes, interior lights
will be turned off.
5.7. Changing the door
opening direction
Door openng drecton of your refrge-
rator can be changed accordng to the
place you are usng t.If ths s neces-
sary, please call your nearest Authorzed
Servce.
Above descrpton s a general express-
on.For nformaton on changng the ope-
nng drecton of the door, you must refer
to the warnng label located on the nner
sde of the door.
5.8. Blue light
* May not be available in all models
Foodstuff stored in the crispers that are
enlightened with a blue light continue
their photosynthesis by means of the
wavelength effect of blue light and thus,
preserve their freshness and increase
their vitamin content.

18 / 25 EN
Refrigerator/User Manual
Operatng the product
5.9. Humidity
controlled crisper
(FreSHelf)
May not be available in all models
Humdty rates of the vegetables and
frut are kept under control wth the fe-
ature of humdty-controlled crsper and
the food s ensured to stay fresh for lon-
ger.
We recommend you to place the leafy
vegetables such as lettuce, spnach and
the vegetables whch are senstve to
humdty loss, n a horzontal manner as
much as possble nsde the crsper, not
on ther roots n a vertcal poston.
Whle the vegetables are beng placed,
specfc gravty of the vegetables sho-
uld be taken nto consderaton. Heavy
and hard vegetables should be put at the
bottom of the crsper and the lghtwe-
ght and soft vegetables should be pla-
ced over.
Never leave the vegetables nsde the
crsper n ther bags. If the vegetables
are left nsde ther bags, ths wll cau-
se them to decompose n a short per-
od of tme. In case contactng wth ot-
her vegetables s not preferred for hyge-
ne concerns, use a perforated paper and
other smlar packagng materals nste-
ad of a bag.
Do not place together the pear, aprcot,
peach, etc. and apple n partcular whch
have a hgh level of generaton of ethyle-
ne gas n the same crsper wth the other
vegetables and frut. The ethylene gas
whch s emtted by these frut may cau-
se the other frut to rpen faster and de-
compose n a shorter tme.
5.10. Icematic and
ice storage container
May not be available in all models
Using the Icematic
Fill the Icematic with water and place
it into its seat. Your ice will be ready ap-
proximately in two hours. Do not remove
the Icematic from its seating to take ice.
Turn the knobs on the ice reservoirs
clockwise by 90 degrees.
Ice cubes in the reservoirs will fall down
into the ice storage container below.
You may take out the ice storage con-
tainer and serve the ice cubes.
If you wish, you may keep the ice cubes
in the ice storage container.
Ice storage container
Ice storage container is only intended
for accumulating the ice cubes. Do not
put water in it. Otherwise, it will break.

19 / 25 EN
Refrigerator/User Manual
Operatng the product
5.11. Using the
water dispenser
* May not be available in all models
C
It is normal for the first few
glasses of water taken from
the dispenser to be warm.
C
If the water dispenser is
not used for a long period
of time, dispose of first few
glasses of water to obtain
fresh water.
1. Push in the lever of the water
dispenser with your glass. If you
are using a soft plastic cup, pushing
the lever with your hand will be
easier.
2. After filling the cup up to the level
you want, release the lever.
C
Please note, how much
water flows from the
dispenser depends on how
far you depress the lever. As
the level of water in your cup
/ glass rises, gently reduce
the amount of pressure on
the lever to avoid overflow.
If you slightly press the
arm, the water will drip; this
is quite normal and not a
failure.
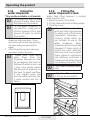
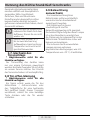
5.12. Filling the
water dispenser's tank
Water tank filling reservoir is located
inside the door rack.
1. Open the cover of the tank.
2. Fill the tank with fresh drinking water.
3. Close the cover.
C
Do not fill the water tank
with any other liquid except
for water such as fruit juices,
carbonated beverages or
alcoholic drinks which are
not suitable to use in the
water dispenser. Water
dispenser will be irreparably
damaged if these kinds of
liquids are used. Warranty
does not cover such usages.
Some chemical substances
and additives contained in
these kinds of drinks/liquids
may damage the water tank.
C
Use clean drinking water
only.
C
Capacity of the water tank
is 3 litres; do not overfill.

20 / 25 EN
Refrigerator/User Manual
Operatng the product
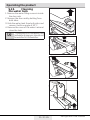
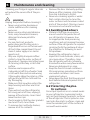
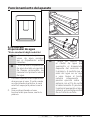
5.13. Cleaning
the water tank
1. Remove the water filling reservoir inside
the door rack.
2. Remove the door rack by holding from
both sides.
3. Grab the water tank from both sides and
remove it with an angle of 45°C.
4. Remove the cover of the water tank and
clean the tank.
C
Components of the water tank
and water dispenser should not
be washed in dishwasher.

21 / 25 EN
Refrigerator/User Manual
Operatng the product
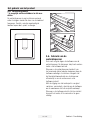
5.14. Drip tray
Water that dripped while using the
water dispenser accumulates in the
spillage tray.
Remove the plastic filter as shown in
the figure.
With a clean and dry cloth, remove
the water that has accumulated.
Seite laden ...
Seite laden ...
Seite laden ...
Seite laden ...
Seite laden ...
Seite laden ...
Seite laden ...
Seite laden ...
Seite laden ...
Seite laden ...
Seite laden ...
Seite laden ...
Seite laden ...
Seite laden ...
Seite laden ...
Seite laden ...
Seite laden ...
Seite laden ...
Seite laden ...
Seite laden ...
Seite laden ...
Seite laden ...
Seite laden ...
Seite laden ...
Seite laden ...
Seite laden ...
Seite laden ...
Seite laden ...
Seite laden ...
Seite laden ...
Seite laden ...
Seite laden ...
Seite laden ...
Seite laden ...
Seite laden ...
Seite laden ...
Seite laden ...
Seite laden ...
Seite laden ...
Seite laden ...
Seite laden ...
Seite laden ...
Seite laden ...
Seite laden ...
Seite laden ...
Seite laden ...
Seite laden ...
Seite laden ...
Seite laden ...
Seite laden ...
Seite laden ...
Seite laden ...
Seite laden ...
Seite laden ...
Seite laden ...
Seite laden ...
Seite laden ...
Seite laden ...
Seite laden ...
Seite laden ...
Seite laden ...
Seite laden ...
Seite laden ...
Seite laden ...
Seite laden ...
Seite laden ...
Seite laden ...
Seite laden ...
Seite laden ...
Seite laden ...
Seite laden ...
Seite laden ...
Seite laden ...
Seite laden ...
Seite laden ...
Seite laden ...
Seite laden ...
Seite laden ...
Seite laden ...
Seite laden ...
Seite laden ...
Seite laden ...
Seite laden ...
Seite laden ...
Seite laden ...
Seite laden ...
Seite laden ...
Seite laden ...
Seite laden ...
Seite laden ...
Seite laden ...
Seite laden ...
Seite laden ...
Seite laden ...
Seite laden ...
Seite laden ...
Seite laden ...
Seite laden ...
Seite laden ...
Seite laden ...
Seite laden ...
Seite laden ...
Seite laden ...
Seite laden ...
Seite laden ...
Seite laden ...
Seite laden ...
Seite laden ...
Seite laden ...
Seite laden ...
-
 1
1
-
 2
2
-
 3
3
-
 4
4
-
 5
5
-
 6
6
-
 7
7
-
 8
8
-
 9
9
-
 10
10
-
 11
11
-
 12
12
-
 13
13
-
 14
14
-
 15
15
-
 16
16
-
 17
17
-
 18
18
-
 19
19
-
 20
20
-
 21
21
-
 22
22
-
 23
23
-
 24
24
-
 25
25
-
 26
26
-
 27
27
-
 28
28
-
 29
29
-
 30
30
-
 31
31
-
 32
32
-
 33
33
-
 34
34
-
 35
35
-
 36
36
-
 37
37
-
 38
38
-
 39
39
-
 40
40
-
 41
41
-
 42
42
-
 43
43
-
 44
44
-
 45
45
-
 46
46
-
 47
47
-
 48
48
-
 49
49
-
 50
50
-
 51
51
-
 52
52
-
 53
53
-
 54
54
-
 55
55
-
 56
56
-
 57
57
-
 58
58
-
 59
59
-
 60
60
-
 61
61
-
 62
62
-
 63
63
-
 64
64
-
 65
65
-
 66
66
-
 67
67
-
 68
68
-
 69
69
-
 70
70
-
 71
71
-
 72
72
-
 73
73
-
 74
74
-
 75
75
-
 76
76
-
 77
77
-
 78
78
-
 79
79
-
 80
80
-
 81
81
-
 82
82
-
 83
83
-
 84
84
-
 85
85
-
 86
86
-
 87
87
-
 88
88
-
 89
89
-
 90
90
-
 91
91
-
 92
92
-
 93
93
-
 94
94
-
 95
95
-
 96
96
-
 97
97
-
 98
98
-
 99
99
-
 100
100
-
 101
101
-
 102
102
-
 103
103
-
 104
104
-
 105
105
-
 106
106
-
 107
107
-
 108
108
-
 109
109
-
 110
110
-
 111
111
-
 112
112
-
 113
113
-
 114
114
-
 115
115
-
 116
116
-
 117
117
-
 118
118
-
 119
119
-
 120
120
-
 121
121
-
 122
122
-
 123
123
-
 124
124
-
 125
125
-
 126
126
-
 127
127
-
 128
128
-
 129
129
-
 130
130


Beko RCNE 365 E20DZX Bedienungsanleitung
- Kategorie
- Gefrierschränke
- Typ
- Bedienungsanleitung
in anderen Sprachen
- English: Beko RCNE 365 E20DZX Owner's manual
- français: Beko RCNE 365 E20DZX Le manuel du propriétaire
- español: Beko RCNE 365 E20DZX El manual del propietario
- Nederlands: Beko RCNE 365 E20DZX de handleiding
Verwandte Papiere
-
Beko RFNE312E43WN Bedienungsanleitung
-
Beko GN1416231JX Benutzerhandbuch
-
Beko HS 221521 Bedienungsanleitung
-
-
-
-
Beko RFNE312E23W Bedienungsanleitung
-
Beko RFNE 312E23X Bedienungsanleitung
-
-
Beko RSNE445E33WN Bedienungsanleitung
Sonstige Unterlagen
-
Teka TKI3 150 Benutzerhandbuch
-
Grundig GFNI 12410 User Instructions
-
-
Küppersbusch FKGF8860.0i Benutzerhandbuch
-
Grundig GKNI25940N Benutzerhandbuch
-
Blomberg KQD1250XA Benutzerhandbuch
-
-
-
Blomberg DND 1977 XT Benutzerhandbuch
-