Elgato Eye TV DTT Benutzerhandbuch
- Kategorie
- Notizbücher
- Typ
- Benutzerhandbuch
Dieses Handbuch eignet sich auch für

Quick Start Guide
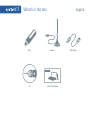
What’s in the box
CD Quick Start Guide
Stick Antenna USB Cable
Safety warning
Warning:
This product contains a rod antenna with a magnetic base, and the electromagnetic fi eld emitted by the base can:
a) Damage any equipment which is affected by electromagnetic fi elds (such as a portable computer, a disk drive, a magnetic card, etc.).
Please do not place the antenna on top of susceptible equipment. Elgato Systems is not liable for damages caused by improper usage
of the antenna.
b) Interfere with pacemakers. In general, a distance of at least 20 centimeters should be maintained between the magnet and your
pacemaker. If you feel that the antenna’s magnetic base interferes with your pacemaker, please move away from the antenna. Please
discuss this matter with your doctor.
Please leave suffi cient space between the antenna and any equipment which is affected by electromagnetic fi elds (such as a portable
computer, a disk drive, a magnetic card, etc.). Elgato Systems is not liable for damages caused by improper usage of this product.
Achtung:
Diesem Produkt liegt eine Stabantenne mit Magnetfuß bei. Das von diesem Bauteil ausgehende elektromagnetische Feld kann eine
Störquelle darstellen für:
a) Geräte, die auf elektromagnetische Felder reagieren (etwa einem Notebook, einer Festplatte, einer Magnetkarte usw.). Bitte befesti-
gen Sie den Magnetfuß der Antenne nicht an Geräten dieser Art. Elgato Systems haftet nicht für Schäden, die durch unsachgemäßen
Gebrauch dieses Produkts entstanden sind.
b) Herzschrittmacher. Wenn Sie als Träger eines Herzschrittmachers eine durch den Magnetfuß der Antenne verursachte Störung
feststellen, entfernen Sie sich von der Antenne. Sprechen Sie darüber auch mit Ihrem Arzt.
Attention!
Ce produit inclus une antenne tige avec pied magnétique. Le champ électromagnétique émanant de ce composant peut constituer une
source de brouillage pour :
a) Les appareils qui réagissent aux champs électromagnétiques (par exemple un ordinateur portable, un disque dur, une carte magné-
tique, etc.). Veillez à ne pas poser le pied magnétique de l’antenne sur des appareils de ce genre. Elgato Systems ne peut être tenu
responsable des dommages consécutifs à un usage inapproprié de ce produit.
b) Les stimulateurs cardiaques (pacemaker). Si, étant porteur d’un stimulateur cardiaque, vous constatez une perturbation occasionnée
par le pied magnétique de l’antenne, éloignez-vous de l’antenne. De manière générale, le stimulateur cardiaque devrait être situé à au
moins 20 centimètres de l’aimant. Parlez-en aussi avec votre médecin.
EN
DE
FR

Quick Start Guide
What’s in the box
CD Quick Start Guide
Stick Antenna USB Cable
Safety warning
Warning:
This product contains a rod antenna with a magnetic base, and the electromagnetic fi eld emitted by the base can:
a) Damage any equipment which is affected by electromagnetic fi elds (such as a portable computer, a disk drive, a magnetic card, etc.).
Please do not place the antenna on top of susceptible equipment. Elgato Systems is not liable for damages caused by improper usage
of the antenna.
b) Interfere with pacemakers. In general, a distance of at least 20 centimeters should be maintained between the magnet and your
pacemaker. If you feel that the antenna’s magnetic base interferes with your pacemaker, please move away from the antenna. Please
discuss this matter with your doctor.
Please leave suffi cient space between the antenna and any equipment which is affected by electromagnetic fi elds (such as a portable
computer, a disk drive, a magnetic card, etc.). Elgato Systems is not liable for damages caused by improper usage of this product.
Achtung:
Diesem Produkt liegt eine Stabantenne mit Magnetfuß bei. Das von diesem Bauteil ausgehende elektromagnetische Feld kann eine
Störquelle darstellen für:
a) Geräte, die auf elektromagnetische Felder reagieren (etwa einem Notebook, einer Festplatte, einer Magnetkarte usw.). Bitte befesti-
gen Sie den Magnetfuß der Antenne nicht an Geräten dieser Art. Elgato Systems haftet nicht für Schäden, die durch unsachgemäßen
Gebrauch dieses Produkts entstanden sind.
b) Herzschrittmacher. Wenn Sie als Träger eines Herzschrittmachers eine durch den Magnetfuß der Antenne verursachte Störung
feststellen, entfernen Sie sich von der Antenne. Sprechen Sie darüber auch mit Ihrem Arzt.
Attention!
Ce produit inclus une antenne tige avec pied magnétique. Le champ électromagnétique émanant de ce composant peut constituer une
source de brouillage pour :
a) Les appareils qui réagissent aux champs électromagnétiques (par exemple un ordinateur portable, un disque dur, une carte magné-
tique, etc.). Veillez à ne pas poser le pied magnétique de l’antenne sur des appareils de ce genre. Elgato Systems ne peut être tenu
responsable des dommages consécutifs à un usage inapproprié de ce produit.
b) Les stimulateurs cardiaques (pacemaker). Si, étant porteur d’un stimulateur cardiaque, vous constatez une perturbation occasionnée
par le pied magnétique de l’antenne, éloignez-vous de l’antenne. De manière générale, le stimulateur cardiaque devrait être situé à au
moins 20 centimètres de l’aimant. Parlez-en aussi avec votre médecin.
EN
DE
FR

Connect DVB-T antenna
Connect active antenna
Connect roof antenna
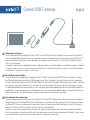
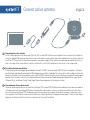
Connecting a rod antenna
Pull off the grey protective cap and connect EyeTV for DTT to a free USB 2.0 port on your computer. You can connect the stick directly
or via the supplied USB extension. Now connect the coaxial connector of the supplied antenna to the antenna socket of EyeTV for DTT.
Choose an elevated location for the antenna, preferably near a window. Insert the software CD, install EyeTV and follow the instruc-
tions in the setup wizard.
This product’s rod antenna was developed to provide reliable signal quality, even under conditions unfavorable for reception. It might be
necessary in some cases to use an active antenna or a roof antenna – instead of the rod antenna – if there is an insuffi cient number of
transmitters or if the nearest transmitter is too far away.
Eine Stabantenne anschließen
Ziehen Sie die graue Schutzkappe ab und verbinden Sie EyeTV für DVB-T mit einem freien USB 2.0 Port Ihres Computers. Sie können
den Stick direkt oder über die mitgelieferte USB-Verlängerung anschließen. Verbinden Sie nun den Koaxialstecker der mitgelieferten
Antenne mit der Antennenbuchse von EyeTV für DVB-T. Wählen Sie einen erhöhten Standort für die Antenne, wenn möglich in der Nähe
eines Fensters. Legen Sie die Software-CD ein, installieren Sie EyeTV und folgen Sie den Anweisungen des Einrichtungsassistenten.
Die beiliegende Stabantenne wurde entwickelt, um auch unter ungünstigen Empfangsbedingungen eine ausreichende Signalqualität zu
gewährleisten. In manchen Bereichen kann es bedingt durch eine nicht ausreichende Senderdichte bzw. eine zu große Entfernung vom
Sender notwendig sein, statt der Stabantenne eine aktive Antenne oder eine Dachantenne zu verwenden.
Raccordement d’une antenne tige
Retirez le capuchon protecteur gris et connectez EyeTV pour TNT à un port USB 2.0 libre de votre ordinateur. Vous pouvez raccorder le
stick directement ou via la rallonge USB incluse. Raccordez alors le connecteur coaxial de l’antenne incluse avec la prise d’antenne de
EyeTV pour TNT. Choisissez un emplacement surélevé pour l’antenne, si possible à proximité d’une fenêtre. Insérez le CD du logiciel,
démarrez l’installation d’EyeTV et suivez les instructions de l’assistant d’installation.
L’antenne ci-jointe a été conçue pour garantir une qualité du signal suffi sante même dans des conditions de réception défavorables.
Dans certaines régions, à cause d’une densité insuffi sante des émetteurs ou d’un trop grand éloignement de l’émetteur, il peut s’avérer
nécessaire d’utiliser une antenne active ou une antenne de toit à la place de l’antenne tige.
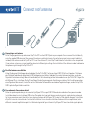
Connecting an active antenna
Pull off the grey protective cap and connect EyeTV for DTT to a free USB 2.0 port on your computer. You can connect the stick directly
or via the supplied USB extension. Now connect your active antenna using a coaxial cable (not included) with to the antenna socket of
EyeTV for DTT. Please note that the antenna requires its own power supply. Please read the accompanying documentation for this as
well as for setup of the active antenna. Insert the software CD, install EyeTV and follow the instructions in the setup wizard.
Eine aktive Antenne anschließen
Ziehen Sie die graue Schutzkappe ab und verbinden Sie EyeTV für DVB-T mit einem freien USB 2.0 Port Ihres Computers. Sie können
den Stick direkt oder über die mitgelieferte USB-Verlängerung anschließen. Verbinden Sie nun Ihre aktive Antenne über ein Koaxialka-
bel (nicht enthalten) mit der Antennenbuchse von EyeTV für DVB-T. Beachten Sie bitte, dass die Antenne eine eigene Stromversorgung
benötigt. Lesen Sie hierzu sowie zur Einrichtung der aktiven Antenne die diesem Produkt beiliegende Dokumentation. Legen Sie die
Software-CD ein, installieren Sie EyeTV und folgen Sie den Anweisungen des Einrichtungsassistenten.
Raccordement d’une antenne active
Retirez le capuchon protecteur gris et connectez EyeTV pour TNT à un port USB 2.0 libre de votre ordinateur. Vous pouvez raccorder le
stick directement ou via la rallonge USB incluse. Raccordez alors votre antenne active via un connecteur coaxial (non inclus) avec la
prise d’antenne de EyeTV pour TNT. N’oubliez pas que l’antenne a besoin de sa propre alimentation électrique. Concernant ce sujet
ainsi que pour l’installation de l’antenne active, référez-vous à la documentation accompagnant votre produit. Insérez le CD du logiciel,
démarrez l’installation d’EyeTV et suivez les instructions de l’assistant d’installation.
Connecting a roof antenna
Pull off the grey protective cap and connect EyeTV for DTT to a free USB 2.0 port on your computer. You can connect the stick directly
or via the supplied USB extension. Now connect the antenna socket which carries the roof antenna signal using a coaxial cable (not
included) to the antenna socket of EyeTV for DTT. Insert the software CD, install EyeTV and follow the instructions in the setup wizard.
If your antenna system uses a signal amplifi er, please test different gain settings after installation of the software in order to determine
the optimum signal strength for EyeTV for DTT.
Eine Dachantenne anschließen
Ziehen Sie die graue Schutzkappe ab und verbinden Sie EyeTV für DVB-T mit einem freien USB 2.0 Port Ihres Computers. Sie können
den Stick direkt oder über die mitgelieferte USB-Verlängerung anschließen. Verbinden Sie nun die Antennensteck-dose, an der das
Signal der Dachantenne anliegt, über ein Koaxialkabel (nicht im Lieferumfang) mit der Antennenbuchse von EyeTV für DVB-T. Legen Sie
die Software-CD ein, installieren Sie EyeTV und folgen Sie den Anweisungen des Einrichtungsassistenten. Falls Ihre Antennenanlage
einen Signalverstärker einsetzt, testen Sie nach Installation der Software bitte verschiedene Pegeleinstellungen, um die für EyeTV für
DVB-T optimale Signalstärke zu ermitteln.
Raccordement d’une antenne de toit
Retirez le capuchon protecteur gris et connectez EyeTV pour TNT à un port USB 2.0 libre de votre ordinateur. Vous pouvez raccorder
le stick directement ou via la rallonge USB incluse. Raccordez alors la prise d’antenne murale où arrive le signal de votre antenne de
toit via un connecteur coaxial (non inclus) avec la prise d’antenne de EyeTV pour TNT. Insérez le CD du logiciel, démarrez l’installation
d’EyeTV et suivez les instructions de l’assistant d’installation. Au cas ou votre installation d’antenne utilise un amplifi cateur, testez
différents niveaux d’amplifi cation après l’installation du logiciel de façon à fournir à EyeTV pour TNT une intensité de signal optimale.
EN
DE
FR
EN
DE
FR
EN
DE
FR
Seite wird geladen ...

Connect DVB-T antenna
Connect active antenna
Connect roof antenna
Connecting a rod antenna
Pull off the grey protective cap and connect EyeTV for DTT to a free USB 2.0 port on your computer. You can connect the stick directly
or via the supplied USB extension. Now connect the coaxial connector of the supplied antenna to the antenna socket of EyeTV for DTT.
Choose an elevated location for the antenna, preferably near a window. Insert the software CD, install EyeTV and follow the instruc-
tions in the setup wizard.
This product’s rod antenna was developed to provide reliable signal quality, even under conditions unfavorable for reception. It might be
necessary in some cases to use an active antenna or a roof antenna – instead of the rod antenna – if there is an insuffi cient number of
transmitters or if the nearest transmitter is too far away.
Eine Stabantenne anschließen
Ziehen Sie die graue Schutzkappe ab und verbinden Sie EyeTV für DVB-T mit einem freien USB 2.0 Port Ihres Computers. Sie können
den Stick direkt oder über die mitgelieferte USB-Verlängerung anschließen. Verbinden Sie nun den Koaxialstecker der mitgelieferten
Antenne mit der Antennenbuchse von EyeTV für DVB-T. Wählen Sie einen erhöhten Standort für die Antenne, wenn möglich in der Nähe
eines Fensters. Legen Sie die Software-CD ein, installieren Sie EyeTV und folgen Sie den Anweisungen des Einrichtungsassistenten.
Die beiliegende Stabantenne wurde entwickelt, um auch unter ungünstigen Empfangsbedingungen eine ausreichende Signalqualität zu
gewährleisten. In manchen Bereichen kann es bedingt durch eine nicht ausreichende Senderdichte bzw. eine zu große Entfernung vom
Sender notwendig sein, statt der Stabantenne eine aktive Antenne oder eine Dachantenne zu verwenden.
Raccordement d’une antenne tige
Retirez le capuchon protecteur gris et connectez EyeTV pour TNT à un port USB 2.0 libre de votre ordinateur. Vous pouvez raccorder le
stick directement ou via la rallonge USB incluse. Raccordez alors le connecteur coaxial de l’antenne incluse avec la prise d’antenne de
EyeTV pour TNT. Choisissez un emplacement surélevé pour l’antenne, si possible à proximité d’une fenêtre. Insérez le CD du logiciel,
démarrez l’installation d’EyeTV et suivez les instructions de l’assistant d’installation.
L’antenne ci-jointe a été conçue pour garantir une qualité du signal suffi sante même dans des conditions de réception défavorables.
Dans certaines régions, à cause d’une densité insuffi sante des émetteurs ou d’un trop grand éloignement de l’émetteur, il peut s’avérer
nécessaire d’utiliser une antenne active ou une antenne de toit à la place de l’antenne tige.
Connecting an active antenna
Pull off the grey protective cap and connect EyeTV for DTT to a free USB 2.0 port on your computer. You can connect the stick directly
or via the supplied USB extension. Now connect your active antenna using a coaxial cable (not included) with to the antenna socket of
EyeTV for DTT. Please note that the antenna requires its own power supply. Please read the accompanying documentation for this as
well as for setup of the active antenna. Insert the software CD, install EyeTV and follow the instructions in the setup wizard.
Eine aktive Antenne anschließen
Ziehen Sie die graue Schutzkappe ab und verbinden Sie EyeTV für DVB-T mit einem freien USB 2.0 Port Ihres Computers. Sie können
den Stick direkt oder über die mitgelieferte USB-Verlängerung anschließen. Verbinden Sie nun Ihre aktive Antenne über ein Koaxialka-
bel (nicht enthalten) mit der Antennenbuchse von EyeTV für DVB-T. Beachten Sie bitte, dass die Antenne eine eigene Stromversorgung
benötigt. Lesen Sie hierzu sowie zur Einrichtung der aktiven Antenne die diesem Produkt beiliegende Dokumentation. Legen Sie die
Software-CD ein, installieren Sie EyeTV und folgen Sie den Anweisungen des Einrichtungsassistenten.
Raccordement d’une antenne active
Retirez le capuchon protecteur gris et connectez EyeTV pour TNT à un port USB 2.0 libre de votre ordinateur. Vous pouvez raccorder le
stick directement ou via la rallonge USB incluse. Raccordez alors votre antenne active via un connecteur coaxial (non inclus) avec la
prise d’antenne de EyeTV pour TNT. N’oubliez pas que l’antenne a besoin de sa propre alimentation électrique. Concernant ce sujet
ainsi que pour l’installation de l’antenne active, référez-vous à la documentation accompagnant votre produit. Insérez le CD du logiciel,
démarrez l’installation d’EyeTV et suivez les instructions de l’assistant d’installation.
Connecting a roof antenna
Pull off the grey protective cap and connect EyeTV for DTT to a free USB 2.0 port on your computer. You can connect the stick directly
or via the supplied USB extension. Now connect the antenna socket which carries the roof antenna signal using a coaxial cable (not
included) to the antenna socket of EyeTV for DTT. Insert the software CD, install EyeTV and follow the instructions in the setup wizard.
If your antenna system uses a signal amplifi er, please test different gain settings after installation of the software in order to determine
the optimum signal strength for EyeTV for DTT.
Eine Dachantenne anschließen
Ziehen Sie die graue Schutzkappe ab und verbinden Sie EyeTV für DVB-T mit einem freien USB 2.0 Port Ihres Computers. Sie können
den Stick direkt oder über die mitgelieferte USB-Verlängerung anschließen. Verbinden Sie nun die Antennensteck-dose, an der das
Signal der Dachantenne anliegt, über ein Koaxialkabel (nicht im Lieferumfang) mit der Antennenbuchse von EyeTV für DVB-T. Legen Sie
die Software-CD ein, installieren Sie EyeTV und folgen Sie den Anweisungen des Einrichtungsassistenten. Falls Ihre Antennenanlage
einen Signalverstärker einsetzt, testen Sie nach Installation der Software bitte verschiedene Pegeleinstellungen, um die für EyeTV für
DVB-T optimale Signalstärke zu ermitteln.
Raccordement d’une antenne de toit
Retirez le capuchon protecteur gris et connectez EyeTV pour TNT à un port USB 2.0 libre de votre ordinateur. Vous pouvez raccorder
le stick directement ou via la rallonge USB incluse. Raccordez alors la prise d’antenne murale où arrive le signal de votre antenne de
toit via un connecteur coaxial (non inclus) avec la prise d’antenne de EyeTV pour TNT. Insérez le CD du logiciel, démarrez l’installation
d’EyeTV et suivez les instructions de l’assistant d’installation. Au cas ou votre installation d’antenne utilise un amplifi cateur, testez
différents niveaux d’amplifi cation après l’installation du logiciel de façon à fournir à EyeTV pour TNT une intensité de signal optimale.
EN
DE
FR
EN
DE
FR
EN
DE
FR
-
 1
1
-
 2
2
-
 3
3
-
 4
4
-
 5
5
-
 6
6


Elgato Eye TV DTT Benutzerhandbuch
- Kategorie
- Notizbücher
- Typ
- Benutzerhandbuch
- Dieses Handbuch eignet sich auch für
in anderen Sprachen
- English: Elgato Eye TV DTT User manual
- français: Elgato Eye TV DTT Manuel utilisateur