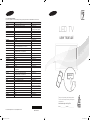
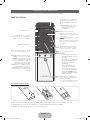
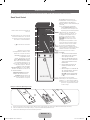
Samsung UE-40ES7000 Bedienungsanleitung
- Kategorie
- Empfänger
- Typ
- Bedienungsanleitung
Dieses Handbuch eignet sich auch für

LED TV
user manual
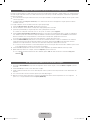
Thank you for purchasing this Samsung product.
To receive more complete service, please register
your product at
www.samsung.com/register
Model _____________Serial No. _____________
SUPPORT
© 2012 Samsung Electronics Co., Ltd. All rights reserved.
BN68-04060G-03
Contact SAMSUNG WORLDWIDE
If you have any questions or comments relating to Samsung products, please contact the SAMSUNG customer care centre.
Country
Customer Care Centre
Web Site
ALBANIA 42 27 5755 -
AUSTRIA 0810 - SAMSUNG (7267864, € 0.07/min) www.samsung.com
BELGIUM 02-201-24-18 www.samsung.com/be (Dutch)
www.samsung.com/be_fr (French)
BOSNIA 05 133 1999 -
BULGARIA 07001 33 11 www.samsung.com
CROATIA 062 SAMSUNG (062 726 7864) www.samsung.com
CZECH 800 - SAMSUNG (800-726786) www.samsung.com
Samsung Zrt., česká organizační složka, Oasis Florenc, Sokolovská394/17, 180 00, Praha 8
DENMARK 70 70 19 70 www.samsung.com
FINLAND 030 - 6227 515 www.samsung.com
FRANCE 01 48 63 00 00 www.samsung.com
GERMANY 01805 - SAMSUNG (726-7864 0,14 €/Min. aus dem dt.
Festnetz, aus Mobilfunknetzen max. 0,42 €/Min.)
www.samsung.com
CYPRUS From landline : 8009 4000 www.samsung.com
GREECE From landline : 80111-SAMSUNG(7267864)
From landline & mobile : (+30) 210 6897691
www.samsung.com
HUNGARY 06-80-SAMSUNG (726-7864) www.samsung.com
ITALIA 800-SAMSUNG (726-7864) www.samsung.com
KOSOVO +381 0113216899 -
LUXEMBURG 261 03 710 www.samsung.com
MACEDONIA 023 207 777 -
MONTENEGRO 020 405 888 -
NETHERLANDS 0900-SAMSUNG (0900-7267864) (€ 0,10/Min) www.samsung.com
NORWAY 815-56 480 www.samsung.com
POLAND 0 801-1SAMSUNG (172678)
+48 22 607-93-33
www.samsung.com
PORTUGAL 808 20-SAMSUNG (808 20 7267) www.samsung.com
ROMANIA From landline : 08010-SAMSUNG (7267864)
From landline & mobile : (+40) 21 206 01 10
www.samsung.com
SERBIA 0700 Samsung (0700 726 7864) www.samsung.com
SLOVAKIA 0800 - SAMSUNG (0800-726 786) www.samsung.com/sk
SPAIN 902 - 1 - SAMSUNG (902 172 678) www.samsung.com
SWEDEN 0771 726 7864 (SAMSUNG) www.samsung.com
SWITZERLAND 0848 - SAMSUNG(7267864, CHF 0.08/min) www.samsung.com/ch
www.samsung.com/ch_fr/(French)
U.K 0330 SAMSUNG (7267864) www.samsung.com
EIRE 0818 717100 www.samsung.com
LITHUANIA 8-800-77777 www.samsung.com
LATVIA 8000-7267 www.samsung.com
ESTONIA 800-7267 www.samsung.com
TURKEY 444 77 11 www.samsung.com
0_BN68_04060G_Cover.indd 1 2012-04-20 5:52:54

English - 2
A detailed User’s Manual is built into your TV.
For more information about how to view this e-Manual see page 19.
Figures and illustrations in this User Manual are provided for reference only and may differ from actual product appearance. Product design and
specifications may be changed without notice.
Digital TV notice
1. Functionalities related to Digital TV (DVB) are only available in countries/areas where DVB-T (MPEG2 and MPEG4 AVC) digital terrestrial signals are
broadcasted or where you are able to access to a compatible DVB-C (MPEG2 and MPEG4 AAC) cable-TV service. Please check with your local
dealer the possibility to receive DVB-T or DVB-C signal.
2. DVB-T is the DVB European consortium standard for the broadcast transmission of digital terrestrial television and DVB-C is that for the broadcast
transmission of digital TV over cable. However, some differentiated features like EPG (Electric Programme Guide), VOD (Video On Demand) and so
on, are not included in this specification. So, they cannot be workable at this moment.
3. Although this TV set meets the latest DVB-T and DVB-C standards, as of [August, 2008], the compatibility with future DVB-T digital terrestrial and
DVB-C digital cable broadcasts cannot be guaranteed.
4. Depending on the countries/areas where this TV set is used some cable-TV providers may charge an additional fee for such a service and you may
be required to agree to terms and conditions of their business.
5. Some Digital TV functions might be unavailable in some countries or regions and DVB-C might not work correctly with some cable service providers.
6. For more information, please contact your local Samsung customer care centre.
✎
The reception quality of TV may be affected due to differences in broadcasting method between the countries. Please check the TV
performance in the local SAMSUNG Authorized Dealer, or the Samsung Call Centre whether it can be improved by reconfiguring TV setting
or not.
Still image warning
Avoid displaying still images (like jpeg picture files) or still image element (like TV programme logo, panorama or 4:3 image format, stock or news bar at
screen bottom etc.) on the screen. Constant displaying of still picture can cause ghosting of LED screen, which will affect image quality. To reduce risk
of this effect, please follow below recommendations:
• Avoid displaying the same TV channel for long periods.
• Always try do display any image on full screen, use TV set picture format menu for best possible match.
• Reduce brightness and contrast values to minimum required to achieve desired picture quality, exceeded values may speed up the burnout process.
• Frequently use all TV features designed to reduce image retention and screen burnout, refer to e-Manual for details.
[UE7000-ZT]BN68-04060G-L03.indb 2 2012-03-08 4:14:06

English - 3
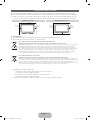
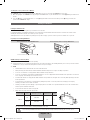
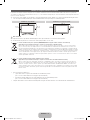
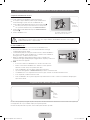
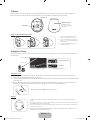
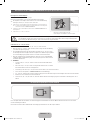
Providing Proper Ventilation for Your TV
When you install your TV, maintain a distance of at least 4 inches between the TV and other objects (walls, cabinet sides, etc.) to ensure proper
ventilation. Failing to maintain proper ventilation may result in a fire or a problem with the product caused by an increase in its internal temperature.
✎
Whether you install your TV using a stand or a wall-mount, we strongly recommend you use parts provided by Samsung Electronics only.
• If you use parts provided by another manufacturer, it may cause difficulties with the product or result in injury caused by the product falling.
Installation with a stand. Installation with a wall-mount.
10 cm10 cm
10 cm
10 cm
10 cm
10 cm
10 cm
[
Other Warnings
✎
The actual appearance of the TV may differ from the images in this manual, depending on the model.
✎
Be careful when you touch the TV. Some parts can be somewhat hot.
Correct Disposal of This Product (Waste Electrical & Electronic Equipment)
(Applicable in the European Union and other European countries with separate collection systems)
This marking on the product, accessories or literature indicates that the product and its electronic accessories (e.g. charger, headset,
USB cable) should not be disposed of with other household waste at the end of their working life. To prevent possible harm to
the environment or human health from uncontrolled waste disposal, please separate these items from other types of waste and
recycle them responsibly to promote the sustainable reuse of material resources. Household users should contact either the retailer
where they purchased this product, or their local government office, for details of where and how they can take these items for
environmentally safe recycling. Business users should contact their supplier and check the terms and conditions of the purchase
contract. This product and its electronic accessories should not be mixed with other commercial wastes for disposal.
Correct disposal of batteries in this product
(Applicable in the European Union and other European countries with separate battery return systems)
This marking on the battery, manual or packaging indicates that the batteries in this product should not be disposed of with other
household waste at the end of their working life. Where marked, the chemical symbols Hg, Cd or Pb indicate that the battery contains
mercury, cadmium or lead above the reference levels in EC Directive 2006/66. If batteries are not properly disposed of, these
substances can cause harm to human health or the environment. To protect natural resources and to promote material reuse, please
separate batteries from other types of waste and recycle them through your local, free battery return system.
• An administration fee may be charged if either
− (a) an engineer is called out at your request and there is no defect in the product
(i.e. where you have failed to read this user manual)
− (b) you bring the unit to a repair centre and there is no defect in the product
(i.e. where you have failed to read this user manual).
• The amount of such administration charge will be advised to you before any work or home visit is carried out.
[UE7000-ZT]BN68-04060G-L03.indb 3 2012-03-08 4:14:06

English - 4
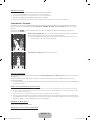
List of Features
• 3D: This exciting new feature enables you to view 3D content from some broadcasting or 3D BD players.
• SMART HUB: The Gateway to all content integrated in one place
− It’s all integrated to guide you to easier and diverse entertainment choices
− Control your entertainment life with easy and simple user friendly UI
− Access to diverse Apps that are adding up every day
− Customize your TV, by App grouping & sorting to your taste
• AllShare Play: AllShare Play lets you access, view, or play photos, videos, or music located on USB devices, digital cameras, cell phones, and
PCs. PCs, cell phones, and other compatible devices can be accessed wirelessly, through your wireless network.
• Anynet+ (HDMI-CEC): Allows you to control all connected Samsung devices that support Anynet+ with your Samsung TV’s remote.
• e-Manual: Allows you to read on screen full manual. (p. 19)
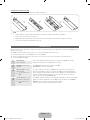
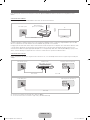
Accessories
✎
Please make sure the following items are included with your TV. If any items are missing, contact your dealer.
✎
The items’ colours and shapes may vary depending on the models.
✎
Cables not included in the package contents can be purchased separately.
✎
Check that there is no accessory hidden behind packing materials when you open the box.
[
CAUTION: INSERT SECURELY LEST SHOULD BE DETACHED IN SET
• Smart Touch Control & Batteries (AA x 2)
• IR Blaster & Batteries (AA x 4)
• Remote Control & Batteries (AAA x 2)
• Warranty Card (Not available in some locations) / Safety Guide
• Power Cord
• Cleaning-Cloth
• Samsung 3D Active Glasses
• User Manual
Scart Adapter Holder-Wire stand Holder Ring x 4 CI Card Adapter
Assembling the Stand Wire Holder
Wireless Keyboard (Sold Separately)
Wireless Keyboard
[UE7000-ZT]BN68-04060G-L03.indb 4 2012-03-08 4:14:07

English - 5
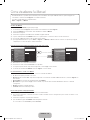
Using the TV's Controller (Panel Key)
The TV's Controller, a small joy stick like button on the rear right side of the TV, lets you control the TV without the remote control.
✎
The product colour and shape may vary depending on the model.
mR
P
Remote control sensor
TV Controller
Function menu
Camera
✎
Follow these instructions facing the front of your TV.
✎
When you use a TV camera, you should check whether a tape attached or not in rear of the TV camera, and then you can use a TV camera
after adjust a camera angle. If you do not intend to use the TV camera, move the camera lens upwards so that the lens is not revealed. In this
case, Face recognition and Motion control are not available.
Power on Turn the TV on by pressing the Controller when the TV is in standby mode.
Adjusting the volume Adjust the volume by moving the Controller from side to side when the power is on.
Selecting a channel Select a channel by moving the Controller upwards and downwards when the power is on.
Using the Function menu To view and use the Function menu, press and release the Controller when the power is on. To close
the Function menu, press and release the Controller again.
Selecting the MENU (
m
) With the Function menu visible, select the MENU (
m
) by moving the Controller to the left. The OSD
(On Screen Display) Menu appears. Select an option by moving the Controller to the right. Move the
Controller to the right or left, or backwards and forwards to make additional selections. To change a
parameter, select the it, and then press the Controller.
additional selections. To change a parameter, select the it, and then press the Controller.
Selecting the SMART HUB (
™
) With the Function menu visible, select SMART HUB (
™
) by moving the Controller upwards. The
SMART HUB main screen appears. Select an application by moving the Controller, and then pressing
the Controller.
Selecting a Source (
s
) With the Function menu visible, open the Source (
s
) by moving the Controller to the right. The
Source screen appears. To select a Source, move the Controller back and forth. When the source you
want is highlighted, press the Controller.
Power off (
P
) With the Function menu visible, select Power off (
P
) by moving the Controller downwards, and then
press the Controller.
✎
To close the Menu, Smart Hub, or Source, press the Controller for more than 1 second.
Standby mode
Your TV enters Standby mode when you turn it off and continues to consume a small amount of electric power. To be safe and to decrease power
consumption, do not leave your TV in standby mode for long periods of time (when you are away on vacation, for example). It is best to unplug the
power cord.
Connecting to an Aerial
✎
Plug the power cord into a wall outlet only after you have made all other connections.
✎
If you are connecting your TV to a cable or satellite box using HDMI, Component, or Composite connections, you do not need to connect the
ANT IN jack to an aerial or a cable connection.
✎
Using two-way radio mobile and portable units or amateur radio or AM radio near your TV may cause the TV to malfunction.
✎
Use caution when you move or swivel the TV if the aerial cable is tightly connected. You could break the aerial jack off the TV.
VHF/UHF Aerial CableSatellite
or
[UE7000-ZT]BN68-04060G-L03.indb 5 2012-03-08 4:14:07

English - 6
The Smart Touch Control / IR Blaster Guide
✎
For more detailed information about Smart Touch Control, see "Using the Smart Touch Control" in e-Manual.
Smart Touch Control
TV STB BD
RETURN VOICE NUMBER
Š
: Displays a list of recently used
functions. You can select a function again
using the Touch Pad easily and quickly.
Y
: Adjusts the Volume.
Brings up the Smart Hub applications.
See the e-Manual chapter Advanced
Features → Smart Hub.
✎
To exit an application that is running
easily, press the
™
button.
Turns the TV on and off.
Touch Pad
• You can use the Touch Pad in the
same way you use the Touch Pad
on a laptop.
• If you don't press any button within
30 seconds, the Smart Touch
Control is set to Sleep mode
automatically.
• To wake up the Smart Touch
Control, press the Touch Pad.
• If you press the Touch Pad for 2
seconds, it has the same effect as
pressing the MUTE
M
button on
your remote. (Available only when
Source is set to TV.)
Displays Colour and playing control
functions. You can select a function using
the Touch Pad.
: Use these buttons according to
the directions on screen.
playing control buttons: Use these buttons
in a specific feature. For details, refer to
the e-Manual.
Displays the shortcut functions list. You can
select a function using the Touch Pad.
<
P
>
: Changes channels.
RETURN
R
: Returns to the previous menu.
VOICE
˜
: Lets you access the Voice
Control function. When you press the
button, the TV displays the command
list. You can speak using the microphone
embedded in your remote.For more
detailed information about the Voice
Control function, see "SMART Interaction"
in the e-manual or see page 14.
NUMBER
š
: Displays the Number button
screen. You can select a number using the
Touch Pad.
LED to show the active device.
You can speak a voice command that
displayed to the TV using MIC. To use
MIC, press the VOICE
˜
button on your
remote.
✎
Voice Control function can be
affected recognition by unclear
pronunciation, voice level, or
surrounding noise.
T
: Quickly select frequently used
functions. Use this button in a specific
feature. For details, refer to e-Manual.
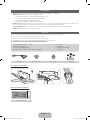
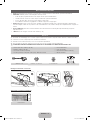
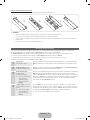
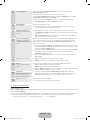
Installing batteries (Battery size : AA)
11
2
1. Press the back of the remote at the very bottom with both thumbs, and then slide the battery cover up in the direction of the arrow.
2. Install two batteries so that the polarity of the batteries (+/-) matches the illustration in the battery compartment.
3. Slide the cover down in the direction of the arrow to close the battery cover.
[UE7000-ZT]BN68-04060G-L03.indb 6 2012-03-08 4:14:08

English - 7
IR Blaster
To control to external devices connected to your TV, setting up the Universal Remote.
If you control Smart Touch Control to adjust to the external device, the IR Blaster will send the IR signal to an external device.
Pairing Button
Power Switch
Device Indicator LED
IR Blaster shows the pairing
state.
OPEN
ON
OFF
PAIRING
OPEN
1
2
1
Installing batteries (Battery size : AA)
OPEN
OPEN
OPEN
OPEN
1
1
2
1. Hold the both sides of the battery holder
and pull it out.
2. Install four batteries so that the polarity of
the batteries (+/-) matches the illustration
in the battery compartment.
3. Push it back.
Initial Pairing
When you connect an IR Blaster with your TV, you can control connected external devices with your TV using the Smart Touch Control.
TV STB BD
RETURN VOICE NUMBER
TVSTB BD
RETURN VOICE NUMBER
<Pairing complete>
<Connecting>
30cm ~ 4m
IR receiver
• Smart Touch Control
• IR Blaster
Smart Touch Control
After you have run the Initial Setup on your TV, you should connect your Smart Touch Control to your TV.
1. Turn the TV on by pressing the
P
button on.
2. The connection icons appear on the bottom left of the screen, and the TV connects to your Smart Touch Control automatically.
✎
If you want to perform the pairing process again, press the reset button in the centre of the back cover using a pin or the tip of an unbent
paper clip. The Smart Touch Control will be initialized.
• Smart Touch Control PAIRING Reset button
IR Blaster
OPEN
OPEN
ON
OFF
PAIRING
1. Turn on the IR Blaster. When Indicator LED blinks, you should connect IR Blaster to TV.
2. Move the IR Blaster to the direction of your TV's IR receiver, and then press the PAIRING button once
shortly on the bottom of the IR Blaster.
3. The connection icons appear on the bottom left of the screen, and the TV connects to IR Blaster
automatically.
✎
If the connection process failed, please turn off and on the IR Blaster, try again from step2.
[UE7000-ZT]BN68-04060G-L03.indb 7 2012-03-08 4:14:10

English - 8
Calibrating the Touch Pad
To calibrate the touch pad on the Smart Touch Control, follow these steps:
1. Press the NUMBER
š
button for 3 seconds. The calibration starts.
2. When done, all the LEDs on the top of the Smart Touch Control blink twice simultaneously.
✎
While calibrating, don't touch the touch pad.
✎
If the touch pad looses accuracy, re-calibrate the touch pad by repeating Steps 1 and 2.
Using the Touch Pad
To display the shortcut functions list on the bottom of the screen, press the ‹ button at the bottom of the touch pad. This list includes Menu,
Source, CH List, 3D, AllShare Play, Support, and a number of other functions.
To display the colour and playing control functions on the top of the screen, press the
button on the top of the touch pad.
RETURN VOICE NUMBER
To Move the Highlight: Rest your finger on the touch pad, and then slide it from one side to the other, from top
to bottom, or bottom to top.
✎
To move the Highlight continuously, flick your finger across the touch pad from right to left, left to right,
top to bottom, or bottom to top.
RETURN VOICE NUMBER
To Select an item: Press the Touch Pad.
Using the Scroll mode
If you press the Touch Pad when using Smart Hub, Web Browser, and AllShare Play, the Touch Pad switches to the Scroll mode.
In the Scroll mode, slide your finger in the Touch Pad from one side to the other, the highlight moves page units.
✎
To return to the general mode of the Touch Pad, press the Touch Pad or RETURN
R
button on your Smart Touch Control.
To Enter a channel number through Smart Touch Control
1. While watching a broadcast, press the NUMBER
š
button on the Smart Touch Control. The TV displays the number button screen.
2. Using the touch pad, highlight a number, and then press the touch pad. The TV displays a list of channels that start with the number you
selected.
3. Using the touch pad, highlight the channel in the list you want, and then press the touch pad.
✎
You can also change the channel by touching the up or down channel icon on the touch pad. If you touch the touch pad immediately after, the
TV displays the list of memorized channels. Select a channel by moving or flicking your finger up or down, and then pressing the touch pad.
To Display the Tools Menu
Press the
T
button on the right side of the touch pad.
To Display a History of the Channels You Watched
Press the
Š
button on the left side of the touch pad.
[UE7000-ZT]BN68-04060G-L03.indb 8 2012-03-08 4:14:10

English - 9
Setting up Smart touch control to use as a Universal Remote Control
Lets you control a Set-Top-Box (STB) or a BD player or both connected to the TV using your Smart Touch Control. After you connect the device to the
TV, the Smart Touch Control can control the navigation, number, and other keys needed to operate and control the device.
✎
The Universal Remote Control can adjust TV's volume, but STB's volume cannot be adjusted. Watch STB after adjusting STB's volume to
appropriate level.
✎
Depending on the version of an application, the Universal remote setup instructions may differ. In this case, please follow the instructions on
the screen.
To connect the external device to your Smart Touch Control, follow these steps:
1. Select Set up a device to control, and then press the Touch Pad.
2. Select an external device from the connected devices, and then press the Touch Pad.
3. Select the port used to connect the external device, and then press the Touch Pad.
✎
Make sure that the selected device is on. If it is turned off, turn the power on and press Refresh.
4. Select Search brands/TV service providers, and then press the Touch Pad. A keyboard and an entry fi eld appear. Enter the fi rst few letters of
the brand name of your device using the Smart Touch Control, and then select Done at the bottom of the keyboard. In the list that appears below
the entry fi eld, select the brand name of your device, and then press the Touch Pad.
If you want to search the brand of STB (Set-Top box), you can search the STB by using the brand name or a cable provider.
5. Select Search model, and then press the Touch Pad. A keyboard and an entry fi eld appear. Enter the fi rst few letters and numbers of the model
name of your device using the Touch Control, and then select Done at the bottom of the keyboard. In the list that appears below the entry fi eld,
select the model name of your device, and then press the Touch Pad.
✎
If the search for model name does not work properly, search with a part of the model name or use the search for recommended model
code.
6. Select Download, and then press the Touch Pad. Download the confi guration data for the IR Blaster in the same way.
7. When all the settings are complete, select the Complete button and press the Touch Pad.
✎
To reset IR Blaster and Smart Touch Control, press the
‹
button on Smart Touch Control, and then select Universal remote setup.
Using the Search for recommended model code.
1. In the Search model name step in the integrated remote control setup, select the Recommended model and press the Touch Pad.
2. Select Download to download the recommended model code.
3. Point the Smart Touch Control forward to the IR sensor of the external device and press the Touch Pad to test if the device works.
4. If the downloaded recommended model code does not work, repeat the steps from step 3.
✎
When you use the BD home theater by using Universal Remote, some buttons may not be supported. In this case, we recommend to use
Anynet+ (HDMI-CEC) function.
1_BN68_04060G_ENG.indd 9 2012-04-02 2:15:37

English - 10
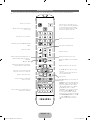
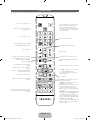
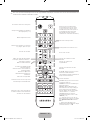
Viewing the Remote Control
✎
This is a special remote control for the visually impaired persons and has Braille points on the Power, Channel and Volume buttons.
AD/SUBT.
BACK
RETURN
S
HISTORY
CAMERA
D
Turns the TV on and off.
Displays and selects the available video
sources. (p. 14)
Have direct access to channels.
Alternately select Teletext ON, Double, Mix
or OFF.
Adjusts the volume.
Brings up the Smart Hub applications. See
e-Manual chapter Advanced Features →
Smart Hub.
Opens the OSD.
Quickly select frequently used functions.
Use this button in a specific feature.
Selects the on-screen menu items and
changes the values seen on the menu.
Use these buttons in a specific feature. For
details, refer to e-Manual.
Use these buttons according to the
direction on screen.
Returns to the previous menu.
Turns the remote control light on or off.
When on, the buttons become illuminated
for a moment when pressed. (Using the
remote control with this button set to On
will reduce the battery usage time.)
Returns to the previous channel.
Cuts off the sound temporarily.
Changes channels.
Displays channel lists on the screen.
Displays the EPG (Electronic Programme
Guide).
Displays information on the TV screen.
u
/
d
/
l
/
r
: Move the cursor on-screen
menu item.
E
: Selects the menu and changes the
corresponding item value.
Exits the menu.
HISTORY: Displays a list of recently used
functions.
CAMERA: Connect to Camera application.
AD/SUBT.: Turns the audio description on
and off (not available in some locations).
/ Displays digital subtitles. See e-Manual
chapter Other Features → Subtitle.
SUPPORT: Lets you use various support
functions including e-Manual. (p. 19)
A
: Use this button when using data
broadcast service. This function is available
when Auto RunData Service is set to Off.
W
: Turns the 3D image on or off. See
e-Manual chapter Advanced Features →
3D.
[UE7000-ZT]BN68-04060G-L03.indb 10 2012-03-08 4:14:11

English - 11
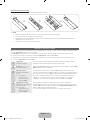
Installing batteries (Battery size: AAA)
Match the polarity of the batteries to the symbols in the battery compartment.
1
3
2
✎
NOTE
• Install the batteries so that the polarity of the batteries (+/-) matches the illustration in the battery compartment.
• Use the remote control within 23 feet of the TV.
• Bright light may affect the performance of the remote control. Avoid using when near special fluorescent lights or neon signs.
• The colour and shape may vary depending on the model.
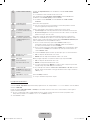
Setup (Initial Setup)
When you turn the TV on for the first time, a sequence of prompts and screens will assist you in configuring basic settings. To begin Setup, press the
P
button on your remote.
✎
Setup is available only when the input source is set to TV. See "Changing the Input Source" (p. 14).
✎
To return to the previous step in the Setup sequence, Select Previous.
✎
Before you begin, make sure you have connected the TV to an aerial or a cable connection and that the TV is plugged in. (p. 5).
✎
To start the Setup select Start.
1
Menu Language:
Select a Language.
Select a menu language you want using your remote, and then select Next. The TV will be
displayed a menu using the selected language since next step.
2
Use Mode: Select the Home
Use Mode.
Select Home Use using your remote, and then select Next.
Store Demo mode is for retail environments.
3
Network Settings: Configure
network settings
✎
To connect later, select
Skip.
To set up your network connection, select Start using your remote. If you do not know your
network set up information or want to set to it later, select Skip. For more detailed information,
refer to “Setting up the Wired or Wireless Network” in the e-Manual for set up requirements and
instructions, and the Network Connection section of this manual (p. 18). You can set up the
network connection later using the Network menu.
4
Software Upgrade: Upgrading
the software to latest version
✎
To upgrade later, select
Skip.
Select Next to upgrade TV software. Your TV will automatically upgrade, if your TV need a software
upgrade. If you want to upgrade later, select the Skip. For more information, refer to Software
Upgrade (Preference Features → Support Menu) in the e-Manual.
✎
This may take some time, depending on network status.
[UE7000-ZT]BN68-04060G-L03.indb 11 2012-03-08 4:14:11

English - 12
5
Terms of Service Agreement When the Network Settings is completed, The Terms of Service Agreement screen appears.
✎
The screen can take a few seconds to appear.
The General Disclaimer screen appears. Select Agree. The Privacy policy screen appears. Select
Agree.
✎
To use the Smart Hub, you should select Agree from the Terms of Service Agreement.
6
Select Country.
(Depending on the country)
Select the appropriate country.
✎
After selecting the country in the Country menu, some models may proceed with an
additional option to setup the pin number.
7
Auto Tuning (1): Selecting how
you watch your TV
Let’s find and store channels on your TV. Do you need to search for channels?
• Yes, I need to.: All the channels available will be found and stored on your TV.
• No, I don’t need to.: My set-top box provides all the channels that are available, so I don't
need to search for channels.
8
Auto Tuning (2):
Selecting a search options and
Region Selection (Depending
on the country)
Select the channel source to memorise. When setting the aerial source to Cable, a step appears
allowing you to assign numerical values (channel frequencies) to the channels. For more information,
refer to Auto Tuning (Channel Menu → Memorizing Channels) in the e-Manual.
✎
When Air or Cable is selected first: After all Air or Cable channels are stored, the step for
storing Satellite channels is displayed.
✎
When Satellite is selected first: After all Satellite channels are stored, the step for storing
Air or Cable channels is displayed.
✎
Select Stop at any time to interrupt the memorization process.
9
Clock: Setting the Clock Mode • Auto: Set the current time automatically.
• Manual: Allows you to manually set the current date and time.
10
Time Zone
(Depending on the country):
Setting the your Time Zone
This step is only available when the clock mode is set to Auto.
• Auto: Set the time zone automatically.
• Manual: Set the time zone manually.
✎
If you selected Manual, you can select whether to turn DST (Daylight Savings Time) On or
Off. (Depending on the country)
11
Voice and motion control:
Setting the Voice and Gesture
Control function.
✎
You can turn the Voice and motion control function On or Off. Select Off or On, and then
select Next. For more detailed information, refer to “SMART Interaction” (p.14)
12
Setup Complete Select Close to finish.
✎
The completed settings are displayed.
If You Want to Reset This Feature...
Menu → System →Setup
Select System - Setup (Initial Setup). Enter your 4 digit PIN number. The default PIN number is “1-1-1-1”. If you want to change the PIN number, use
the Change PIN function.
You should do Setup (Menu → System) again at home although you did in shop.
✎
If you forget the PIN code, press the remote control buttons in the following sequence in Standby mode, which resets the PIN to “1-1-1-1”:
MUTE → 8 → 2 → 4 → POWER (on).
[UE7000-ZT]BN68-04060G-L03.indb 12 2012-03-08 4:14:12

English - 13
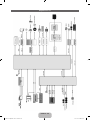
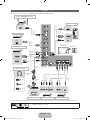
Connections
✎
For more information, refer to Connecting the TV in the e-Manual.
HDMI OUT
DVI OUT
AUDIO OUT
R-AUDIO-L
EXT
AUDIO OUT
R-AUDIO-L
P
R
P
B
Y
COMPONENT OUT
Y
B
B
W
R
Y
Y
W
R
R
R
W
R
AUDIO OUT
R-AUDIO-L
VIDEO OUT
OPTICAL
DVI OUT
AUDIO OUT
HDMI OUT
HDMI connection
HDMI to DVI connection
SCART connection
Component connection
Headphones connection
DVD home theatre connection
PC connection
AV connection
BD Player
BD Player
HDMI Cable
(Not Supplied)
AUDIO Cable
(Not Supplied)
Scart Adapter
(Supplied)
Scart Cable
(Not Supplied)
Component Cable
(Not Supplied)
Audio Cable
(Not Supplied)
Audio Cable
(Not Supplied)
Video Cable
(Not Supplied)
VCR or DVD
BD Player
BD Player
HDMI Cable
(Not Supplied)
Optical Cable
(Not Supplied)
Not Supplied
Audio Cable
(Not Supplied)
HDMI to DVI Cable
(Not Supplied)
HDMI Cable
(Not Supplied)
TV Rear
SERVICE: Connector for service only.
Power Input
✎
For best cable connection to this product, be sure to use cables with a maximum thickness as below:
• Maximum thickness - 0.55 inches (14mm)
[UE7000-ZT]BN68-04060G-L03.indb 13 2012-03-08 4:14:13

English - 14
Changing the Input Source
Source
™
→ Source
When you are watching TV and you want to watch a movie on your
DVD player or Blu-ray player or switch to your cable box or STB satellite
receiver, you need to change the Source.
■ TV / Ext. / HDMI1/DVI / HDMI2 / HDMI3 / AV / Component
1. Press the
™
button on your remote. The Smart Hub screen
appears.
2. Select Source. The Source screen appears.
3. Select a desired external input source.
✎
Alternatively, you can access the Source screen by selecting the
Source
s
button on your standard remote or selecting Source
with the Smart Touch Control (see page 6).
✎
You can only choose external devices that are connected to the
TV. In the displayed Source list, connected inputs are highlighted.
How to Use Edit Name
Edit Name lets you associate a device name to an input source. To
access Edit Name, open the Tools menu when the Source list is
displayed. The following selections appear under Edit Name:
■ VCR / DVD / Cable STB / Satellite STB / PVR STB / AV
Receiver / Game / Camcorder / PC / DVI PC / DVI Devices /
TV / IPTV / Blu-ray / HD DVD / DMA: Select an input jack, and
then select the name of the device connected to that jack from
the list that appears. For example, if you have your Blu-ray player
attached to HDMI IN 2, select Blu-ray for that input.
✎
If you connect a PC to the HDMI IN 1 (DVI) port with an HDMI
cable, assign PC to HDMI1/DVI in Edit Name.
✎
If you connect a PC to the HDMI IN 1 (DVI) port with an HDMI to
DVI cable, assign DVI PC to HDMI1/DVI in Edit Name.
✎
If you connect an AV device to the HDMI IN 1 (DVI) port with an
HDMI to DVI cable, assign DVI Devices to HDMI1/DVI in Edit
Name.
Information
You can see detailed information about the selected external device.
Refresh
If the external devices are not displayed in the Source list, open the
Tools menu, and then select Refresh. The list will display all connected
devices.
✎
Alternatively, you can refresh the Source list screen by selecting
a
using your remote.
SMART Interaction
Using this function, you can access and control menu options and
functions using speech, gestures or face recognition.
INFORMATION BOOKLET DISCLAIMER
• Face Recognition Log-in
In order for Face recognition to function, a thumbnail image of your
face will be stored in your TV for logging-in purposes.
Logging into the Smart Hub using Face recognition may be less
secure than using an ID and password.
• TV Camera Usage
Before using the TV Camera, you should be aware that under some
circumstances and under certain legal conditions your misuse of
the TV Camera can result in legal liability for you. By using the TV
Camera, you agree that you will not use the camera (i) in locations
where cameras are generally prohibited (such as bathrooms, locker
rooms or changing rooms), (ii) in any manner that will result in an
invasion of a person’s privacy or (iii) in violation of any applicable
laws, regulations or statutes.
Voice Control
Menu → System → Voice and motion control → Voice Control
Enable or disable the voice recognition function. Lets you access and
control menu options and functions using speech.
✎
Voice Control function can be affected recognition by unclear
pronunciation, voice level, or surrounding noise.
✎
To use Voice Control, you must pronounce words and phrases
clearly and correctly in the language you selected in Language.
✎
Ambient noise may cause Voice Control to malfunction.
Your TV can "hear" your voice commands in two ways:
− Using the TV’s microphone. (Distant Recognition)
✎
We are recommended using Voice Control function within about
13 ft with your TV. You can check the usable distance by using
Voice Control Environment Test (System → Voice and motion
control → Voice Control → Voice Control Environment Test).
− Using the VOICE
˜
button on your remote. (Close Proximity
Recognition)
✎
When you use the TV's microphone, the words may not be
recognized because of ambient noise. If this occurs, try using the
VOICE
˜
button on your remote. The TV will be able to recognize
a voice command more easily.
✎
The VOICE
˜
button on your remote is always activated. If you
want to use the TV's microphone, turn on Voice Control (System
→ Voice and motion control → Voice Control).
✎
If a menu option or function is not supported by the Voice
Control function, we suggest trying the Motion control function.
To use gestures, spread your hand in the direction of the camera,
and shake it three or four times from a side to side.
■ Voice Control
Turns the Voice Control function on or off.
✎
The VOICE
˜
button on your remote is always activated.
■ Language
Select the recognition language you want to use.
[UE7000-ZT]BN68-04060G-L03.indb 14 2012-03-08 4:14:13

English - 15
■ Trigger words
You can select the Trigger words that start the Voice Control
function. Alternatively you can turn on your TV using the Trigger
words if Voice Control function is set to On.
If the Trigger words is set to Hi TV, say Hi TV Power On.
If the Trigger words is set to Smart TV, say Smart TV Power On.
■ Voice command bar size
Set the Voice command bar size mode to Minimum or Full.
Minimum displays the least number of words and phrases you
can use.
Full displays all the words and phrases.
■ Voice Sensitivity
Set the sensitivity of Voice recognition.
− Howling: Set echo level.
− Recognition responsiveness: Set the responsiveness level
of Voice recognition.
■ Voice Control Environment Test
You can test the noise level on the TV microphone.
− Noise Test: This test checks the noise level of the TV
microphone. Select Next using your remote. The test will start
and should only take a few seconds. Please keep as quiet as
possible during the test.
− Mic & Speaker Test: This test checks the noise level of the
TV microphone and speaker. Select Start using your remote.
The test will start and should only take a few seconds. Please
keep as quiet as possible during the test.
✎
Available only when Speaker Select is set to TV
Speaker.
− Voice Control Test: This test checks the volume level and
clarity of your voice when using Voice Control. Select Start
using your remote. The test will start. Please say a guide
message as loud and clearly as you can to complete this test.
✎
If the test is not completed, select Retest, and then say
a guide message loudly and clearly again.
To use the Voice Control function, follow these steps:
✎
If Voice Control function is set to On, the TV may be turned on
automatically by effect of the ambient environment.
1. Speak the Trigger words that you selected using the microphone
embedded in the TV or press and hold the VOICE
˜
button on
your remote. The TV displays the Voice Control Environment
Test.
✎
If you use the Voice Control, the volume will be set to 5
automatically.
2. Speak a word or phrase listed in the Voice Control Environment
Test. If you use the VOICE
˜
button on your remote, release the
button.
✎
Pronounce the word or phrase clearly and correctly in the
language you selected in Language.
3. Wait until recognition is complete, and then speak the next
command.
✎
To exit the Voice Control mode, speak a Trigger words or
"Cancel" using the TV's microphone, or press the VOICE
˜
button on your remote again.
Using the Voice Text Input Mode
1. Speak "Search All" while in the Voice Control mode.
✎
When you use a QWERTY keypad screen, you can use the
Voice Text Input Mode. Speak the Trigger words that you
selected using the microphone embedded in the TV or press
and hold the VOICE
˜
button on your remote.
2. Say the word or phrase you wish to search for.
3. The TV executes the spoken function.
✎
Voice Control performance levels will vary based on the
language spoken.
Motion control
Menu → System → Voice and motion control → Motion control
Enable or disable the Motion control function. Lets you control your TV
by moving the TV cursor using specific gestures.
✎
Some applications may not support Motion control.
✎
We are recommended using Motion control function within
about 5 - 13 ft with your TV. TV Camera's recognition range may
differ depending on the angle of camera or other conditions. You
can check the recognition range of TV camera by using Motion
control environment test (System → Voice and motion control
→ Motion control → Motion control environment test).
■ Motion control
Turns the Motion control function on or off.
■ Motion guide bar size
Set the Motion guide bar size mode between Minimum or Full.
■ Motion control environment test
You can test the brightness of room and the camera angle.
− Brightness Test: This test checks to see if your room is bright
enough for Motion control to work properly. Select Start
using your remote. The test will start and should take only a
few seconds.
− Camera Angle Test: Start Camera Angle Test Select Start
using your remote. Please put yourself in the rectangle on
the screen by adjusting the camera or moving around. If you
are not located in the correct position, the test may not work
properly. When done, please spread your hand in the direction
of the camera, and shake it three or four times from a side
to side.
To use the Motion control function, follow these steps:
1. To use the Motion control, raise your hand while opening it toward
the screen, hold it for a moment and then wave it 3 – 4 time to the
left and right. Motion control starts. If the Motion control starts,
the cursor is displayed at the center of the screen and the Motion
guide bar size is at the bottom of the screen.
2. Control the TV using your hands.
✎
Note that the Motion control function closes if your hands go out
of the camera range.
✎
While using the Motion control, if you use the other device (i.e.
remote control, keyboard, etc.), Motion control closes.
Controlling the TV with your hands using Motions
■ Access Motion Control
− Action: Spread your hand in the direction of the camera, and
shake it three or four times from a side to side.
■ Pointing Navigation
Moves the cursor to the position you want.
− Action: Spread your hand and guide the cursor to position
you want.
■ Run
Selects an item or executes a command that is indicated by the
cursor or is highlighted.
− Action: Clench your fist.
1_BN68_04060G_ENG.indd 15 2012-04-02 2:15:37

English - 16
■ Back
Return to the previous menu.
− Action: Spread your hand and rotate it counter clockwise.
■ Channel / Volume Control
Changes the channel or adjust the volume.
✎
If you use the Motion control function while watching a
channel, the channel / volume control screen appears.
− Action: Use the Pointing Navigation gesture to move the
cursor to the channel or volume controller, and then uses the
Run gesture to adjust the channel or volume.
✎
If you use the Run gesture once, it has the same effect
as pressing a button on your remote. If you hold the
Run gesture, it has the same effect as pressing and
holding a button on your remote.
■ Scroll
Scroll the page in the direction you want. For example, suppose
that you want to scroll down.
✎
Some applications may not support this function.
1. Move the cursor to the bottom of the screen (page scroll zone)
using the Pointing Navigation gesture.
2. Move the cursor to the centre of the screen using the
Pointing Navigation gesture.
3. The page will move down.
Face recognition
™
→ Tools → Settings → Account Manager → Change account
information → Register face
Enable or disable the Face recognition function. Lets you register your
face in your Samsung account. Also, you can log in to the Samsung
account using the Face recognition function without inputting your
account ID or your account password.
✎
You can register your face in only one account.
To register your face in your Samsung account, follow these steps:
✎
To use this function, you must log into Smart Hub. If you don't
have a Samsung Account, you should create one before using
this function. To create your Samsung Account, refer to “Creating
an Account” (Advanced Features → Smart Hub) in the e-Manual.
1. On the Smart Hub screen, open the Tools menu using your
remote, and then select Settings.
2. Select Account Manager. The Account Manager screen appears.
3. Select Change account information. The Change account
information screen appears.
4. Select Register face. If you agree to use facial recognition, select
OK.
5. Enter your account password.
6. Move your face into the facial lines at the centre of the screen, and
then wait until the facial lines changes from red to green.
✎
If Face recognition fails, select Retry and try again.
7. When finished, your face is now registered in your Samsung
account.
To log in to your Samsung account using Face recognition, follow
these steps:
If you use Face recognition to log into Smart Hub, it may be less
secure than logging in with a password.
1. With the Smart Hub screen displayed, select
a
using your
remote. The ID/password screen appears.
2. Select Face Recognition Mode. The Face recognition screen
appears.
✎
To return to the ID/password screen, select Password
mode.
3. The TV starts Face recognition. Face the front of the TV screen.
The TV will recognize your face automatically.
✎
If the TV fails to recognize your face, try again.
4. The TV logs you into your Samsung account automatically.
✎
If the TV recognizes two or more registered faces, the
Samsung account list appears. Select your account to log in.
✎
If your face is unregistered, you can register your face in
your Samsung account. Follow steps 4 through 5 in the “To
register your face to your Samsung account” procedure
above.
✎
If you have no account, you can create one. For more
detailed information, refer to “Creating an Account”
(Advanced Features → Smart Hub) in the e-Manual.
1_BN68_04060G_ENG.indd 16 2012-04-20 2:24:20

English - 17
Connecting to a COMMON INTERFACE slot (Your TV viewing Card Slot)
Attaching the CI Card Adapter
Attach the adapter as shown below.
To connect the CI CARD Adapter, follow these steps.
✎
We recommend attaching the adapter before installing the wall mount, or
inserting the “CI or CI+ CARD”.
✎
To install the CI card adapter, please remove the sticker attached to the TV.
1. Insert the CI CARD Adapter into the two holes on the product 1.
✎
Please find a two holes on the rear of the TV. A two holes is beside
the COMMON INTERFACE port.
2. Connect the CI CARD Adapter into the COMMON INTERFACE port on the
product 2.
3. Insert the “CI or CI+ CARD”.
We recommend that you insert the CI card before you mount the TV on a wall. It may be difficult to insert after the mounting. Insert
the card after attaching the CI Card Adapter on TV. It is difficult to attach the module if you insert the card before attaching.
Using the “CI or CI+ CARD”
To watch paid channels, the “CI or CI+ CARD” must be inserted.
• If you don’t insert the “CI or CI+ CARD”, some channels will display the message
“Scrambled Signal”.
• The pairing information containing a telephone number, the “CI or CI+ CARD” ID the Host
ID and other information will be displayed in about 2~3 minutes. If an error message is
displayed, please contact your service provider.
• When the configuration of channel information has finished, the message “Updating
Completed” is displayed, indicating the channel list is updated.
✎
NOTE
• You must obtain a “CI or CI+ CARD” from a local cable service provider.
• When removing the “CI or CI+ CARD”, carefully pull it out with your hands since
dropping the “CI or CI+ CARD” may cause damage to it.
• Insert the “CI or CI+ CARD” in the direction marked on the card.
• The location of the COMMON INTERFACE slot may be different depending on the model.
• “CI or CI+ CARD” is not supported in some countries and regions; check with your authorized dealer.
• If you have any problems, please contact a service provider.
• Insert the “CI or CI+ CARD” that supports the current aerial settings. The screen will be distorted or will not be seen.
The Evolution Kit Slot (Kit Sold Separately)
TV Rear
This socket is designed to accept an extension device called Evolution Kit. The Evolution Kit enables the TV to run a variety of the latest applications
for a better user experience.
The Evolution Kit, which may not be available depending on the product, will be sold separately in 2013 or later.
TV Rear
To install the CI card adapter, please
remove the sticker attached to the TV.
[UE7000-ZT]BN68-04060G-L03.indb 17 2012-03-08 4:14:16

English - 18
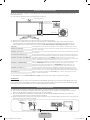
Network Connection
You can set up your TV so that it can access the SMART TV applications. through your local area network (LAN) using a wired or wireless connection.
Network Connection - Wireless
You can connect your TV to your LAN through a standard wireless router or modem.
LAN Cable
The LAN Port on
the Wall
Wireless IP sharer
(Router having DHCP server)
TV
Samsung’s Wireless LAN adapter supports the IEEE 802.11a/b/g and n communication protocols. Samsung recommends using IEEE 802.11n. When
you play the video over a IEEE 802.11b/g connection, the video may not play smoothly.
Most wireless network systems incorporate a security system that requires devices that access the network through an access point or wireless router
(typically a wireless IP Sharer) to transmit an encrypted security code called an access key.
If Pure High-throughput (Greenfield) 802.11n mode is selected and the Encryption type is set to WEP, TKIP or TKIP AES (WPS2Mixed) for your wireless
router, Samsung TVs will not support a connection in compliance with new Wi-Fi certification specifications.
Network Connection - Wired
There are two main ways to connect your TV to your network using cable, depending on your network setup. They are illustrated below:
LAN CableModem Cable
The Modem Port on the Wall
TV Rear Panel
External Modem
(ADSL / VDSL / Cable TV)
The LAN Port on the Wall
TV Rear Panel
LAN Cable
✎
The TV does not support network speeds less than or equal to 10Mbps.
✎
Use Cat 5 or 6 (STP Type*) cable for the connection. (*Shielded Twisted Pair)
[UE7000-ZT]BN68-04060G-L03.indb 18 2012-03-08 4:14:17

English - 19
How to view the e-Manual
Access the e-Manual
To use the e-Manual, follow these steps:
1. When you need to help, select Support using your remote. The Support screen appears.
2. Select e-Manual using your remote. The e-Manual screen appears.
3. Select a desired category.
4. Select a desired topic. The e-Manual displays the page you want to see.
✎
Blue words in e-Manual refer to menu options or selections in the TV's on screen menu.
✎
Green icons in the e-Manual refers to a button on your remote.
✎
Arrow steps (e.g. Menu → Support → e-Manual) in the e-Manual signify the sequence of steps required to access an option or activate a
function.
How to toggle between an e-Manual topic and the corresponding OSD menu(s).
Picture
Picture Mode
Back Light
Brightness
Colour
Contrast
Sharpness
Tint (G/R) G50
Changing the Preset Picture Mode
Changing the Preset Picture Mode
Picture Mode
Menu → Picture → Picture Mode
• Dynamic
Suitable for a bright room.
• Standard
Suitable for a normal environment.
Picture modes apply preset adjustments to the picture.
N When connecting a PC using the HDMI-DVI cable, you can only
select Entertain and Standard.
Picture
Picture Mode
Back Light
Brightness
Colour
Contrast
Sharpness
Tint (G/R)
Changing the Preset Picture Mode
Changing the Preset Picture Mode
Picture Mode
Menu → Picture → Picture Mode
• Dynamic
Suitable for a bright room.
• Standard
Suitable for a normal environment.
Picture modes apply preset adjustments to the picture.
N When connecting a PC using the HDMI-DVI cable, you can only
select Entertain and Standard.
✎
This function is not enabled in some menus.
✎
You can’t use the Try now function if the menu is not available.
1. To go to the topic's corresponding menu option, select
a
using your remote.
2. To return to the e-Manual screen, select Support using your remote.
Using the coloured and function buttons with the e-Manual
• Scroll bar: Scroll the e-Manual screen up or down.
•
l
/
r
: Moves to the previous or next chapter.
•
a
Try now: Move the OSD menu that corresponds to the topic. To return to the e-Manual screen, select Support using your remote.
•
b
Home: Moves to the e-Manual home screen.
•
{
Position: Each time you select
{
, using your remote, you change the position of the e-Manual screen.
•
}
Index: Displays the Index screen.
•
R
Return: Return to the previous screen.
How to search for a topic on the index page
1. Select
}
using your remote. The Index screen appears.
2. To search for a topic, select a letter. The Index displays a list of topics and keywords that begin with the letter you selected.
3. Select a topic or keyword you want.
4. The e-Manual page with the topic appears.
✎
To close the Index screen, press the RETURN
R
button.
You can fi nd instructions for your TV’s features in the e-Manual. To open the e-Manual, press the SUPPORT button on your standard remote or
select Support using the Smart Touch Control.
You can also access it through the menu:
Menu → Support → e-Manual
[UE7000-ZT]BN68-04060G-L03.indb 19 2012-03-08 4:14:18

English - 20
To Change the screen position of the e-Manual
If the e-Manual screen is not invisible well because the OSD Menus screen, you can change the e-Manual screen's position.
1. Move the Highlight to the e-Manual screen by pressing the SUPPORT button on your standard remote or select Support using the Smart Touch
Control.
2. Press the
{
button on your standard remote, or select
{
using the Smart Touch Control. Each time you select
{
using your remote, the
position of the e-Manual will change.
Installing the Wall Mount
Installing the Wall Mount Kit
The wall mount kit (sold separately) allows you to mount the TV on the wall.
For detailed information on installing the wall mount, see the instructions provided with the wall mount. Contact a technician for assistance when
installing the wall mount bracket. We do not advice you to do it yourself.
Samsung Electronics is not responsible for any damage to the product or injury to yourself or others if you elect to install the TV on your own.
Preparing before installing Wall-Mount
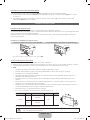
Case A. Installing the SAMSUNG Wall-Mount Case B. Installing another company’s Wall-Mount
1
1
To install a wall-mount, use the Holder-Ring 1.
Wall Mount Kit Specifi cations (VESA)
✎
The wall mount kit is not supplied, but sold separately.
✎
Install your wall mount on a solid wall perpendicular to the floor. When attaching to other building materials, please contact your nearest dealer.
If installed on a ceiling or slanted wall, it may fall and result in severe personal injury.
✎
NOTE
• Standard dimensions for wall mount kits are shown in the table below.
• When purchasing our wall mount kit, a detailed installation manual and all parts necessary for assembly are provided.
• Do not use screws that do not comply with the VESA standard screw specifi cations.
• Do not use screws that are longer than the standard dimension or do not comply with the VESA standard screw specifi cations. Screws that
are too long may cause damage to the inside of the TV set.
• For wall mounts that do not comply with the VESA standard screw specifi cations, the length of the screws may differ depending on the wall
mount specifi cations.
• Do not fasten the screws that are too strongly; this may damage the product or cause the product to fall, leading to personal injury.
Samsung is not liable for these kinds of accidents.
• Samsung is not liable for product damage or personal injury when a non-VESA or non-specifi ed wall mount is used or the consumer fails to
follow the product installation instructions.
• Do not mount the TV at more than a 15 degree tilt.
• Always have two people mount the TV on a wall.
Product Family inches VESA Spec. (A * B) Standard Screw Quantity
LED-TV
40 200 X 200
M8 4
46~60 400 X 400
✎
Unscrew the hole around before installing Wall-Mount on the wall.
Do not install your Wall Mount Kit while your TV is turned on. It may result in personal injury due to electric shock.
[UE7000-ZT]BN68-04060G-L03.indb 20 2012-03-08 4:14:19
Seite wird geladen ...
Seite wird geladen ...
Seite wird geladen ...
Seite wird geladen ...
Seite wird geladen ...
Seite wird geladen ...
Seite wird geladen ...
Seite wird geladen ...
Seite wird geladen ...
Seite wird geladen ...
Seite wird geladen ...
Seite wird geladen ...
Seite wird geladen ...
Seite wird geladen ...
Seite wird geladen ...
Seite wird geladen ...
Seite wird geladen ...
Seite wird geladen ...
Seite wird geladen ...
Seite wird geladen ...
Seite wird geladen ...
Seite wird geladen ...
Seite wird geladen ...
Seite wird geladen ...
Seite wird geladen ...
Seite wird geladen ...
Seite wird geladen ...
Seite wird geladen ...
Seite wird geladen ...
Seite wird geladen ...
Seite wird geladen ...
Seite wird geladen ...
Seite wird geladen ...
Seite wird geladen ...
Seite wird geladen ...
Seite wird geladen ...
Seite wird geladen ...
Seite wird geladen ...
Seite wird geladen ...
Seite wird geladen ...
Seite wird geladen ...
Seite wird geladen ...
Seite wird geladen ...
Seite wird geladen ...
Seite wird geladen ...
Seite wird geladen ...
Seite wird geladen ...
Seite wird geladen ...
Seite wird geladen ...
Seite wird geladen ...
Seite wird geladen ...
-
 1
1
-
 2
2
-
 3
3
-
 4
4
-
 5
5
-
 6
6
-
 7
7
-
 8
8
-
 9
9
-
 10
10
-
 11
11
-
 12
12
-
 13
13
-
 14
14
-
 15
15
-
 16
16
-
 17
17
-
 18
18
-
 19
19
-
 20
20
-
 21
21
-
 22
22
-
 23
23
-
 24
24
-
 25
25
-
 26
26
-
 27
27
-
 28
28
-
 29
29
-
 30
30
-
 31
31
-
 32
32
-
 33
33
-
 34
34
-
 35
35
-
 36
36
-
 37
37
-
 38
38
-
 39
39
-
 40
40
-
 41
41
-
 42
42
-
 43
43
-
 44
44
-
 45
45
-
 46
46
-
 47
47
-
 48
48
-
 49
49
-
 50
50
-
 51
51
-
 52
52
-
 53
53
-
 54
54
-
 55
55
-
 56
56
-
 57
57
-
 58
58
-
 59
59
-
 60
60
-
 61
61
-
 62
62
-
 63
63
-
 64
64
-
 65
65
-
 66
66
-
 67
67
-
 68
68
-
 69
69
-
 70
70
-
 71
71


Samsung UE-40ES7000 Bedienungsanleitung
- Kategorie
- Empfänger
- Typ
- Bedienungsanleitung
- Dieses Handbuch eignet sich auch für
in anderen Sprachen
- English: Samsung UE-40ES7000 Owner's manual
- italiano: Samsung UE-40ES7000 Manuale del proprietario
Verwandte Artikel
-
Samsung PS64E8000 Bedienungsanleitung
-
Samsung PS64E8000GQ Bedienungsanleitung
-
Samsung UE46ES7090S Schnellstartanleitung
-
-
-
-
Samsung UE40ES8090S Benutzerhandbuch
-
-
-