Electrolux ERS3DF18S Benutzerhandbuch
- Kategorie
- Kühlschränke
- Typ
- Benutzerhandbuch


CONTENTS
1. SAFETY INFORMATION....................................................................................2
2. SAFETY INSTRUCTIONS..................................................................................4
3. INSTALLATION.................................................................................................. 6
4. CONTROL PANEL............................................................................................. 9
5. DAILY USE......................................................................................................... 9
6. HINTS AND TIPS............................................................................................. 12
7. CARE AND CLEANING....................................................................................13
8. TROUBLESHOOTING......................................................................................13
9. NOISES............................................................................................................ 17
10. TECHNICAL DATA.........................................................................................17
11. INFORMATION FOR TEST INSTITUTES......................................................17
WE’RE THINKING OF YOU
Thank you for purchasing an Electrolux appliance. You’ve chosen a product that
brings with it decades of professional experience and innovation. Ingenious and
stylish, it has been designed with you in mind. So whenever you use it, you can
be safe in the knowledge that you’ll get great results every time.
Welcome to Electrolux.
Visit our website to:
Get usage advice, brochures, trouble shooter, service and repair information:
www.electrolux.com/support
Register your product for better service:
www.registerelectrolux.com
Buy Accessories, Consumables and Original spare parts for your appliance:
www.electrolux.com/shop
CUSTOMER CARE AND SERVICE
Always use original spare parts.
When contacting our Authorised Service Centre, ensure that you have the
following data available: Model, PNC, Serial Number.
The information can be found on the rating plate.
Warning / Caution-Safety information
General information and tips
Environmental information
Subject to change without notice.
1. SAFETY INFORMATION
Before the installation and use of the appliance, carefully
read the supplied instructions. The manufacturer is not
responsible for any injuries or damage that are the result
www.electrolux.com2

of incorrect installation or usage. Always keep the
instructions in a safe and accessible location for future
reference.
1.1 Children and vulnerable people safety
• This appliance can be used by children aged from 8
years and above and persons with reduced physical,
sensory or mental capabilities or lack of experience
and knowledge if they have been given supervision or
instruction concerning the use of the appliance in a
safe way and understand the hazards involved.
• Children aged from 3 to 8 years are allowed to load
and unload the appliance provided that they have
been properly instructed.
• This appliance may be used by persons with very
extensive and complex disabilities provided that they
have been properly instructed.
• Children of less than 3 years of age should be kept
away from the appliance unless continuously
supervised.
• Do not let children play with the appliance.
• Children shall not carry out cleaning and user
maintenance of the appliance without supervision.
• Keep all packaging away from children and dispose of
it appropriately.
1.2 General Safety
• This appliance is intended to be used in household
and similar applications such as:
– Farm houses; staff kitchen areas in shops, offices
and other working environments;
– By clients in hotels, motels, bed and breakfast and
other residential type environments.
• To avoid contamination of food respect the following
instructions:
– do not open the door for long periods;
– clean regularly surfaces that can come in contact
with food and accessible drainage systems;
ENGLISH 3

– store raw meat and fish in suitable containers in the
refrigerator, so that it is not in contact with or drip
onto other food.
• WARNING: Keep ventilation openings, in the
appliance enclosure or in the built-in structure, clear of
obstruction.
• WARNING: Do not use mechanical devices or other
means to accelerate the defrosting process, other than
those recommended by the manufacturer.
• WARNING: Do not damage the refrigerant circuit.
• WARNING: Do not use electrical appliances inside the
food storage compartments of the appliance, unless
they are of the type recommended by the
manufacturer.
• Do not use water spray and steam to clean the
appliance.
• Clean the appliance with a moist soft cloth. Only use
neutral detergents. Do not use abrasive products,
abrasive cleaning pads, solvents or metal objects.
• When the appliance is empty for long period, switch it
off, defrost, clean, dry and leave the door open to
prevent mould from developing within the appliance.
• Do not store explosive substances such as aerosol
cans with a flammable propellant in this appliance.
• If the supply cord is damaged, it must be replaced by
the manufacturer, its Authorised Service Centre or
similarly qualified persons in order to avoid a hazard.
2. SAFETY INSTRUCTIONS
2.1 Installation
WARNING!
Only a qualified person must
install this appliance.
• Remove all the packaging.
• Do not install or use a damaged
appliance.
• Do not use the appliance before
installing it in the built-in structure due
to safety manner.
• Follow the installation instructions
supplied with the appliance.
• Always take care when moving the
appliance as it is heavy. Always use
safety gloves and enclosed footwear.
• Make sure the air can circulate
around the appliance.
• At first installation or after reversing
the door wait at least 4 hours before
connecting the appliance to the power
supply. This is to allow the oil to flow
back in the compressor.
www.electrolux.com4

• Before carrying out any operations on
the appliance (e.g. reversing the
door), remove the plug from the
power socket.
• Do not install the appliance close to
radiators or cookers, ovens or hobs.
• Do not expose the appliance to the
rain.
• Do not install the appliance where
there is direct sunlight.
• Do not install this appliance in areas
that are too humid or too cold.
• When you move the appliance, lift it
by the front edge to avoid scratching
the floor.
• The appliance contains a bag of
desiccant. This is not a toy. This is not
food. Please dispose of it
immediately.
2.2 Electrical connection
WARNING!
Risk of fire and electric
shock.
WARNING!
When positioning the
appliance, ensure the supply
cord is not trapped or
damaged.
WARNING!
Do not use multi-plug
adapters and extension
cables.
• The appliance must be earthed.
• Make sure that the parameters on the
rating plate are compatible with the
electrical ratings of the mains power
supply.
• Always use a correctly installed
shockproof socket.
• Make sure not to cause damage to
the electrical components (e.g. mains
plug, mains cable, compressor).
Contact the Authorised Service
Centre or an electrician to change the
electrical components.
• The mains cable must stay below the
level of the mains plug.
• Connect the mains plug to the mains
socket only at the end of the
installation. Make sure that there is
access to the mains plug after the
installation.
• Do not pull the mains cable to
disconnect the appliance. Always pull
the mains plug.
2.3 Use
WARNING!
Risk of injury, burns, electric
shock or fire.
The appliance contains flammable
gas, isobutane (R600a), a natural gas
with a high level of environmental
compatibility. Be careful not to cause
damage to the refrigerant circuit
containing isobutane.
• Do not change the specification of this
appliance.
• Do not put electrical appliances (e.g.
ice cream makers) in the appliance
unless they are stated applicable by
the manufacturer.
• If damage occurs to the refrigerant
circuit, make sure that there are no
flames and sources of ignition in the
room. Ventilate the room.
• Do not let hot items to touch the
plastic parts of the appliance.
• Do not store flammable gas and liquid
in the appliance.
• Do not put flammable products or
items that are wet with flammable
products in, near or on the appliance.
• Do not touch the compressor or the
condenser. They are hot.
2.4 Internal lighting
WARNING!
Risk of electric shock.
• Concerning the lamp(s) inside this
product and spare part lamps sold
separately: These lamps are intended
to withstand extreme physical
conditions in household appliances,
such as temperature, vibration,
humidity, or are intended to signal
information about the operational
status of the appliance. They are not
intended to be used in other
applications and are not suitable for
household room illumination.
ENGLISH 5

2.5 Care and cleaning
WARNING!
Risk of injury or damage to
the appliance.
• Before maintenance, deactivate the
appliance and disconnect the mains
plug from the mains socket.
• This appliance contains hydrocarbons
in the cooling unit. Only a qualified
person must do the maintenance and
the recharging of the unit.
• Regularly examine the drain of the
appliance and if necessary, clean it. If
the drain is blocked, defrosted water
collects in the bottom of the
appliance.
2.6 Service
• To repair the appliance contact the
Authorised Service Centre. Use
original spare parts only.
• Please note that self-repair or non-
professional repair can have safety
consequences and might void the
guarantee.
• The following spare parts will be
available for 7 years after the model
has been discontinued: thermostats,
temperature sensors, printed circuit
boards, light sources, door handles,
door hinges, trays and baskets.
Please note that some of these spare
parts are only available to
professional repairers, and that not all
spare parts are relevant for all
models.
• Door gaskets will be available for 10
years after the model has been
discontinued.
2.7 Disposal
WARNING!
Risk of injury or suffocation.
• Disconnect the appliance from the
mains supply.
• Cut off the mains cable and discard it.
• Remove the door to prevent children
and pets to be closed inside of the
appliance.
• The refrigerant circuit and the
insulation materials of this appliance
are ozone-friendly.
• The insulation foam contains
flammable gas. Contact your
municipal authority for information on
how to discard the appliance
correctly.
• Do not cause damage to the part of
the cooling unit that is near the heat
exchanger.
3. INSTALLATION
WARNING!
Refer to Safety chapters.
WARNING!
Refer to installation
instruction document to
install your appliance.
WARNING!
Fix the appliance in
accordance with installation
instruction document to
avoid a risk of instability of
the appliance.
www.electrolux.com6

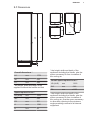
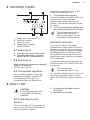
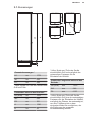
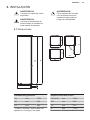
3.1 Dimensions
B
A
H1
W1
D1
W2
D2
W3
D3
90°
Overall dimensions ¹
H1 mm 1772
W1 mm 548
D1 mm 549
¹ the height, width and depth of the
appliance without the handle and feet
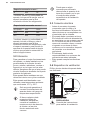
Space required in use ²
H2 (A+B) mm 1816
W2 mm 548
D2 mm 551
A mm 1780
B mm 36
² the height, width and depth of the
appliance including the handle, plus the
space necessary for free circulation of
the cooling air
Overall space required in use ³
H3 (A+B) mm 1816
W3 mm 548
D3 mm 1071
³ the height, width and depth of the
appliance including the handle, plus the
space necessary for free circulation of
the cooling air, plus the space necessary
to allow door opening to the minimum
angle permitting removal of all internal
equipment
ENGLISH 7

3.2 Location
To ensure appliance's best functionality,
you should not install the appliance in the
nearby of the heat source (oven, stoves,
radiators, cookers or hobs) or in a place
with direct sunlight. Make sure that air
can circulate freely around the back of
the cabinet.
This appliance should be installed in a
dry, well ventilated indoor position.
This appliance is intended to be used at
ambient temperature ranging from 10°C
to 38°C.
The correct operation of the
appliance can only be
guaranteed within the
specified temperature range.
If you have any doubts
regarding where to install the
appliance, please turn to the
vendor, to our customer
service or to the nearest
Authorised Service Centre.
It must be possible to
disconnect the appliance
from the mains power
supply. The plug must
therefore be easily
accessible after installation.
3.3 Electrical connection
• Before plugging in, ensure that the
voltage and frequency shown on the
rating plate correspond to your
domestic power supply.
• The appliance must be earthed. The
power supply cable plug is provided
with a contact for this purpose. If the
domestic power supply socket is not
earthed, connect the appliance to a
separate earth in compliance with
current regulations, consulting a
qualified electrician.
• The manufacturer declines all
responsibility if the above safety
precautions are not observed.
• This appliance complies with the
E.E.C. Directives.
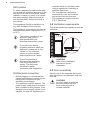
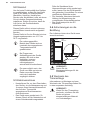
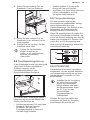
3.4 Ventilation requirements
The airflow behind the appliance must be
sufficient.
5 cm
min.
200 cm
2
min.
200 cm
2
CAUTION!
Refer to the installation
instructions for the
installation.
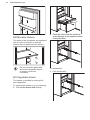
3.5 Door reversibility
Please refer to the separate document
with instructions on installation and door
reversal.
CAUTION!
At every stage of reversing
the door protect the floor
from scratching with a
durable material.
www.electrolux.com8

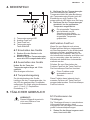
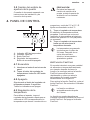
4. CONTROL PANEL
1 2
4 3
1 2
4 3
1. Temperature indicator LED
2. FastCool indicator
3. FastCool button
4. Temperature regulator
ON/OFF button
4.1 Switching on
1. Insert the plug into the wall socket.
2. Touch the temperature regulator
button if all LED indicators are off.
4.2 Switching off
Keep touching the temperature regulator
button for 3 seconds.
All indicators light off.
4.3 Temperature regulation
To operate the appliance, touch the
temperature regulator until the LED
corresponding to the required
temperature lights up. Selection is
progressive, varying from 2°C to 8°C.
Recommended setting is 4°C.
1. Touch temperature regulator.
Current temperature indicator blinks. Any
time you touch the temperature
regulator, the setting moves by one
position. The corresponding LED blinks
for a while.
2. Touch the temperature regulator until
the required temperature is selected.
The set temperature will be
reached within 24 hours.
After a power failure the set
temperature remains stored.
4.4 FastCool function
If you need to insert in the fridge
compartment a large amount of food at
ambient temperature, for example after
doing the grocery shopping, we suggest
activating theFastCool function to chill
the products more rapidly and to avoid
warming the other food which is already
in the refrigerator.
To activate FastCool function press the
FastCool button. The FastCool indicator
switches on.
This function stops
automatically after 6 hours.
It is possible to deactivate the function at
any time by pressing FastCool button
again. The FastCool indicator switches
off.
5. DAILY USE
CAUTION!
This refrigerating appliance
is not suitable for freezing
foodstuffs.
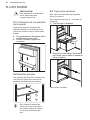
5.1 Positioning the door
shelves
To permit storage of food packages of
various sizes, the door shelves can be
placed at different heights.
1. Gradually pull the shelf up until it
comes free.
2. Reposition as required.
ENGLISH 9

1
2
5.2 Movable shelves
The walls of the refrigerator are equipped
with a series of runners so that the
shelves can be positioned as desired.
Do not move the glass shelf
above the vegetable drawer
to ensure correct air
circulation.
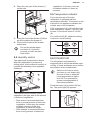
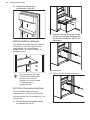
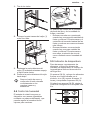
5.3 Vegetable drawer
The drawer is suitable for storing fruit
and vegetables.
To remove the drawer (e.g. for cleaning):
1. Pull out the drawer and lift it up.
2. Push the rails inside the cabinet to
avoid damage to the appliance when
closing the door.
To reassemble:
1. Pull out the rails.
www.electrolux.com10

2. Place the rear part of the drawer (1)
on the rails.
2
1
3. Keep the front of the drawer (2) lifted
up while pushing the drawer in.
4. Press the front part of the drawer
downwards.
Pull out the drawer again
and check if it is placed
correctly on both rear and
front hooks.
5.4 Humidity control
The glass shelf incorporates a device
with slits (adjustable by means of a
sliding lever), which makes it possible to
regulate the humidity in the vegetable
drawer(s).
The position of the humidity control
depends on the type and on the amount
of fruits and vegetables:
• Slots closed: recommended when
there is a small amount of fruits and
vegetables. In this way, the natural
moisture content in fruits and
vegetables is preserved longer.
• Slots opened: recommended when
there is a big amount of fruits and
vegetables. In this way, more air
circulation results in a lower air
moisture.
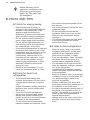
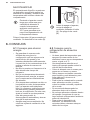
5.5 Temperature indicator
For proper storage of food the
refrigerator is equipped with the
temperature indicator. The symbol on the
side wall of the appliance indicates the
coldest area in the refrigerator.
If OK is displayed (A), put fresh food into
area indicated by symbol, if not (B), wait
at least 12 hours and check if it is OK
(A).
If it is still not OK (B), adjust the setting
control to a colder setting.
OK
OK
A
B
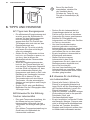
5.6 DYNAMICAIR
The refrigerator compartment is
equipped with a device that allows rapid
cooling of foods and keeps more uniform
temperature in the compartment.
Switch on the device when
you have to cool down a big
amount of food or when the
room temperature is higher
than 35°C to guarantee a
greater homogenization of
internal temperature.
Press the button (A) to switch ON the
fan. The green light (B) appears.
A
B
ENGLISH 11

Before switching off the
appliance, remember to turn
off the fan by pressing the
button (A). The green light
(B) disappears.
6. HINTS AND TIPS
6.1 Hints for energy saving
• Most efficient use of energy is
ensured in the configuration with the
drawers in the bottom part of the
appliance and shelves evenly
distributed. Position of the door bins
does not affect energy consumption.
• Do not open the door frequently or
leave it open longer than necessary.
• Do not set too high temperature to
save energy unless it is required by
the characteristics of the food.
• If the ambient temperature is high and
the temperature control is set to low
temperature and the appliance is fully
loaded, the compressor may run
continuously, causing frost or ice
formation on the evaporator. In this
case, set the temperature control
toward higher temperature to allow
automatic defrosting and to save
energy this way.
• Ensure a good ventilation. Do not
cover the ventilation grilles or holes.
6.2 Hints for fresh food
refrigeration
• Good temperature setting that
ensures preservation of fresh food is
a temperature less than or equal to
+4°C.
Higher temperature setting inside the
appliance may lead to shorter shelf
life of food.
• Cover the food with packaging to
preserve its freshness and aroma.
• Always use closed containers for
liquids and for food, to avoid flavours
or odours in the compartment.
• To avoid the cross-contamination
between cooked and raw food, cover
the cooked food and separate it from
the raw one.
• It is recommended to defrost the food
inside the fridge.
• Do not insert hot food inside the
appliance. Make sure it has cooled
down at room temperature before
inserting it.
• To prevent food waste the new stock
of food should always be placed
behind the old one.
6.3 Hints for food refrigeration
• Meat (all types): wrap in a suitable
packaging and place it on the glass
shelf above the vegetable drawer.
Store meat for at most 1-2 days.
• Fruit and vegetables: clean thoroughly
(eliminate the soil) and place in a
special drawer (vegetable drawer).
• It is advisable not to keep the exotic
fruits like bananas, mangos, papayas
etc. in the refrigerator.
• Vegetables like tomatoes, potatoes,
onions, and garlic should not be kept
in the refrigerator.
• Butter and cheese: place in an airtight
container or wrap in an aluminium foil
or a polythene bag to exclude as
much air as possible.
• Bottles: close them with a cap and
place them on the door bottle shelf, or
(if available) on the bottle rack.
• In order to accelerate cooling down of
the goods, it is advisable to turn on
the fan. The activation of dynamic air
allows greater homogenization of
internal temperatures.
• Always refer to the expiry date of the
products to know how long to keep
them.
www.electrolux.com12

7. CARE AND CLEANING
WARNING!
Refer to Safety chapters.
7.1 Cleaning the interior
Before using the appliance for the first
time, the interior and all internal
accessories should be washed with
lukewarm water and some neutral soap
to remove the typical smell of a brand-
new product, then dried thoroughly.
CAUTION!
Do not use detergents,
abrasive powders, chlorine
or oil-based cleaners as they
will damage the finish.
CAUTION!
The accessories and parts of
the appliance are not
suitable for washing in a
dishwasher.
7.2 Periodic cleaning
The equipment has to be cleaned
regularly:
1. Clean the inside and accessories
with lukewarm water and some
neutral soap.
2. Regularly check the door seals and
wipe them clean to ensure they are
clean and free from debris.
3. Rinse and dry thoroughly.
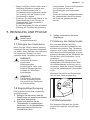
7.3 Defrosting of the
refrigerator
Frost is automatically eliminated from the
evaporator of the refrigerator
compartment during normal use. The
defrost water drains out through a trough
into a special container at the back of the
appliance, over the motor compressor,
where it evaporates.
It is important to periodically clean the
defrost water drain hole in the middle of
the refrigerator compartment channel to
prevent the water overflowing and
dripping onto the food inside.
For this purpose use the tube cleaner
provided with the appliance.
7.4 Period of non-operation
When the appliance is not in use for long
period, take the following precautions:
1. Disconnect the appliance from
electricity supply.
2. Remove all food.
3. Clean the appliance and all
accessories.
4. Leave the door open to prevent
unpleasant smells.
8. TROUBLESHOOTING
WARNING!
Refer to Safety chapters.
ENGLISH 13

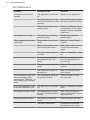
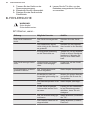
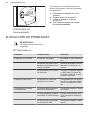
8.1 What to do if...
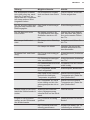
Problem Possible cause Solution
The appliance does not
operate.
The appliance is switched
off.
Switch on the appliance.
The mains plug is not con‐
nected to the mains socket
correctly.
Connect the mains plug to
the mains socket correctly.
There is no voltage in the
mains socket.
Connect a different electri‐
cal appliance to the mains
socket. Contact a qualified
electrician.
The appliance is noisy. The appliance is not sup‐
ported properly.
Check if the appliance
stands stable.
The compressor operates
continually.
Temperature is set incor‐
rectly.
Refer to "Control Panel"
chapter.
Many food products were
put in at the same time.
Wait a few hours and then
check the temperature
again.
The room temperature is
too high.
Refer to "Installation" chap‐
ter.
Food products placed in
the appliance were too
warm.
Allow food products to cool
to room temperature be‐
fore storing.
The door is not closed cor‐
rectly.
Refer to "Closing the door"
section.
The FastCool function is
switched on.
Refer to "FastCool func‐
tion" section.
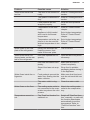
The compressor does not
start immediately after
pressing the "FastCool", or
after changing the temper‐
ature.
The compressor starts af‐
ter a period of time.
This is normal, no error
has occurred.
Door is misaligned or inter‐
feres with ventilation grill.
The appliance is not level‐
led.
Refer to installation instruc‐
tions.
Door does not open easily. You attempted to re-open
the door immediately after
closing.
Wait a few seconds be‐
tween closing and re-open‐
ing of the door.
The lamp does not work. The lamp is in stand-by
mode.
Close and open the door.
The lamp is defective. Contact the nearest Au‐
thorized Service Centre.
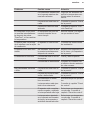
www.electrolux.com14

Problem Possible cause Solution
There is too much frost
and ice.
The door is not closed cor‐
rectly.
Refer to "Closing the door"
section.
The gasket is deformed or
dirty.
Refer to "Closing the door"
section.
Food products are not
wrapped properly.
Wrap the food products
better.
Temperature is set incor‐
rectly.
Refer to "Control Panel"
chapter.
Appliance is fully loaded
and is set to the lowest
temperature.
Set a higher temperature.
Refer to "Control Panel"
chapter.
Temperature set in the ap‐
pliance is too low and the
ambient temperature is too
high.
Set a higher temperature.
Refer to "Control Panel"
chapter.
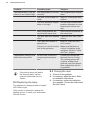
Water flows on the rear
plate of the refrigerator.
During the automatic de‐
frosting process, frost
melts on the rear plate.
This is correct.
There is too much con‐
densed water on the rear
wall of the refrigerator.
Door was opened too fre‐
quently.
Open the door only when
necessary.
Door was not closed com‐
pletely.
Make sure the door is
closed completely.
Stored food was not wrap‐
ped.
Wrap food in suitable
packaging before storing it
in the appliance.
Water flows inside the re‐
frigerator.
Food products prevent the
water from flowing into the
water collector.
Make sure that food prod‐
ucts do not touch the rear
plate.
The water outlet is clog‐
ged.
Clean the water outlet.
Water flows on the floor. The melting water outlet is
not connected to the evap‐
orative tray above the com‐
pressor.
Attach the melting water
outlet to the evaporative
tray.
Temperature cannot be
set.
The "FastCool function" is
switched on.
Switch off "FastCool func‐
tion" manually, or wait until
the function deactivates
automatically to set the
temperature. Refer to
"FastCool function" sec‐
tion.
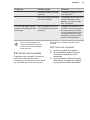
ENGLISH 15

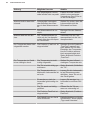
Problem Possible cause Solution
The temperature in the ap‐
pliance is too low/too high.
The temperature is not set
correctly.
Set a higher/lower temper‐
ature.
The door is not closed cor‐
rectly.
Refer to "Closing the door"
section.
The food products' temper‐
ature is too high.
Let the food products tem‐
perature decrease to room
temperature before stor‐
age.
Many food products are
stored at the same time.
Store less food products at
the same time.
The door has been opened
often.
Open the door only if nec‐
essary.
The FastCool function is
switched on.
Refer to "FastCool func‐
tion" section.
There is no cold air circula‐
tion in the appliance.
Make sure that there is
cold air circulation in the
appliance. Refer to "Hints
and Tips" chapter.
Temperature setting LEDs
flash at the same time.
An error has occurred in
measuring the tempera‐
ture.
Contact the nearest Au‐
thorised Service Centre.
The cooling system will
continue to keep food
products cold, but temper‐
ature adjustment will not
be possible.
If the advice does not lead to
the desired result, call the
nearest Authorized Service
Centre.
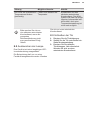
8.2 Replacing the lamp
The appliance is equipped with a longlife
LED interior light.
Only service is allowed to replace the
lighting device. Contact your Authorised
Service Centre.
8.3 Closing the door
1. Clean the door gaskets.
2. If necessary, adjust the door. Refer
to installation instructions.
3. If necessary, replace the defective
door gaskets. Contact the Authorised
Service Centre.
www.electrolux.com16

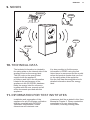
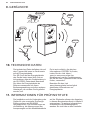
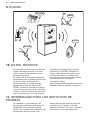
9. NOISES
SSSRRR!
CLICK!
HISSS!
BRRR!
BLUBB!
10. TECHNICAL DATA
The technical information is situated in
the rating plate on the internal side of the
appliance and on the energy label.
The QR code on the energy label
supplied with the appliance
provides a web link to the information
related to the performance of the
appliance in the EU EPREL database.
Keep the energy label for reference
together with the user manual and all
other documents provided with this
appliance.
It is also possible to find the same
information in EPREL using the link
https://eprel.ec.europa.eu
and the model
name and product number that you find
on the rating plate of the appliance.
See the link
www.theenergylabel.eu
for
detailed information about the energy
label.
11. INFORMATION FOR TEST INSTITUTES
Installation and preparation of the
appliance for any EcoDesign verification
shall be compliant with EN 62552.
Ventilation requirements, recess
dimensions and minimum rear
clearances shall be as stated in this User
Manual at Chapter 3. Please contact the
manufacturer for any other further
information, including loading plans.
ENGLISH 17

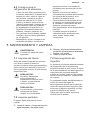
12. ENVIRONMENTAL CONCERNS
Recycle materials with the symbol .
Put the packaging in relevant containers
to recycle it. Help protect the
environment and human health by
recycling waste of electrical and
electronic appliances. Do not dispose of
appliances marked with the symbol
with the household waste. Return the
product to your local recycling facility or
contact your municipal office.
www.electrolux.com18

INHALTSVERZEICHNIS
1. SICHERHEITSHINWEISE................................................................................19
2. SICHERHEITSANWEISUNGEN...................................................................... 22
3. MONTAGE........................................................................................................24
4. BEDIENFELD................................................................................................... 27
5. TÄGLICHER GEBRAUCH................................................................................27
6. TIPPS UND HINWEISE....................................................................................30
7. REINIGUNG UND PFLEGE............................................................................. 31
8. FEHLERSUCHE............................................................................................... 32
9. GERÄUSCHE................................................................................................... 36
10. TECHNISCHE DATEN................................................................................... 36
11. INFORMATIONEN FÜR PRÜFINSTITUTE....................................................36
WIR DENKEN AN SIE
Vielen Dank, dass Sie sich für ein Gerät von Electrolux entschieden haben. Sie
haben ein Produkt gewählt, hinter dem jahrzehntelange professionelle Erfahrung
und Innovation stehen. Bei der Entwicklung dieses großartigen und eleganten
Geräts haben wir an Sie gedacht. So haben Sie bei jedem Gebrauch die
Gewissheit, dass Sie stets großartige Ergebnisse erzielen werden.
Willkommen bei Electrolux.
Besuchen Sie uns auf unserer Website, um:
Anwendungshinweise, Prospekte, Fehlerbehebungs-, Service- und Reparatur-
Informationen zu erhalten:
www.electrolux.com/support
Ihr erworbenes Produkt zu registrieren, um den besten Service für es zu
gewährleisten:
www.registerelectrolux.com
Zubehör, Verbrauchsmaterial und Original-Ersatzteile für Ihr Gerät zu
erwerben:
www.electrolux.com/shop
REPARATUR- UND KUNDENDIENST
Verwenden Sie ausschließlich Original-Ersatzteile.
Halten Sie folgende Angaben bereit, wenn Sie sich an den Kundendienst
wenden: Modell, Produktnummer (PNC), Seriennummer.
Diese Informationen finden Sie auf dem Typenschild.
Warnungs-/Sicherheitshinweise
Allgemeine Informationen und Empfehlungen
Informationen zum Umweltschutz
Änderungen vorbehalten.
1. SICHERHEITSHINWEISE
Lesen Sie vor der Montage und dem Gebrauch des
Geräts zuerst die Bedienungsanleitung. Bei
DEUTSCH 19

Verletzungen oder Schäden infolge nicht
ordnungsgemäßer Montage oder Verwendung
übernimmt der Hersteller keine Haftung. Bewahren Sie
die Anleitung zum Nachschlagen an einem sicheren und
zugänglichen Ort auf.
1.1 Sicherheit von Kindern und schutzbedürftigen
Personen
• Das Gerät kann von Kindern ab 8 Jahren und
Personen mit eingeschränkten physischen,
sensorischen oder geistigen Fähigkeiten oder mit
mangelnder Erfahrung und/oder mangelndem Wissen
nur dann verwendet werden, wenn sie durch eine für
ihre Sicherheit zuständige Person beaufsichtigt
werden oder in die sichere Verwendung des Geräts
eingewiesen wurden und die mit dem Gerät
verbundenen Gefahren verstanden haben.
• Kinder zwischen 3 und 8 Jahren dürfen das Gerät be-
und entladen, vorausgesetzt, sie wurden
ordnungsgemäß eingewiesen.
• Dieses Gerät kann von Personen mit schweren und
komplexen Behinderungen benutzt werden,
vorausgesetzt, sie wurden ordnungsgemäß
eingewiesen.
• Halten Sie Kinder unter 3 Jahren vom Gerät fern,
wenn sie nicht ständig beaufsichtigt werden.
• Kinder dürfen nicht mit dem Gerät spielen.
• Kinder dürfen keine Reinigung und Wartung ohne
Beaufsichtigung durchführen.
• Halten Sie sämtliches Verpackungsmaterial von
Kindern fern und entsorgen Sie es ordnungsgemäß.
1.2 Allgemeine Sicherheit
• Dieses Gerät ist für die Verwendung im Haushalt und
ähnliche Zwecke vorgesehen, wie z. B.:
– Bauernhöfe, Personalküchenbereiche in
Geschäften, Büros und anderen Arbeitsumfeldern;
www.electrolux.com20
Seite wird geladen ...
Seite wird geladen ...
Seite wird geladen ...
Seite wird geladen ...
Seite wird geladen ...
Seite wird geladen ...
Seite wird geladen ...
Seite wird geladen ...
Seite wird geladen ...
Seite wird geladen ...
Seite wird geladen ...
Seite wird geladen ...
Seite wird geladen ...
Seite wird geladen ...
Seite wird geladen ...
Seite wird geladen ...
Seite wird geladen ...
Seite wird geladen ...
Seite wird geladen ...
Seite wird geladen ...
Seite wird geladen ...
Seite wird geladen ...
Seite wird geladen ...
Seite wird geladen ...
Seite wird geladen ...
Seite wird geladen ...
Seite wird geladen ...
Seite wird geladen ...
Seite wird geladen ...
Seite wird geladen ...
Seite wird geladen ...
Seite wird geladen ...
Seite wird geladen ...
Seite wird geladen ...
Seite wird geladen ...
Seite wird geladen ...
-
 1
1
-
 2
2
-
 3
3
-
 4
4
-
 5
5
-
 6
6
-
 7
7
-
 8
8
-
 9
9
-
 10
10
-
 11
11
-
 12
12
-
 13
13
-
 14
14
-
 15
15
-
 16
16
-
 17
17
-
 18
18
-
 19
19
-
 20
20
-
 21
21
-
 22
22
-
 23
23
-
 24
24
-
 25
25
-
 26
26
-
 27
27
-
 28
28
-
 29
29
-
 30
30
-
 31
31
-
 32
32
-
 33
33
-
 34
34
-
 35
35
-
 36
36
-
 37
37
-
 38
38
-
 39
39
-
 40
40
-
 41
41
-
 42
42
-
 43
43
-
 44
44
-
 45
45
-
 46
46
-
 47
47
-
 48
48
-
 49
49
-
 50
50
-
 51
51
-
 52
52
-
 53
53
-
 54
54
-
 55
55
-
 56
56


Electrolux ERS3DF18S Benutzerhandbuch
- Kategorie
- Kühlschränke
- Typ
- Benutzerhandbuch
in anderen Sprachen
- English: Electrolux ERS3DF18S User manual
- español: Electrolux ERS3DF18S Manual de usuario
Verwandte Artikel
-
Electrolux IK3035CZR Benutzerhandbuch
-
Electrolux IK3318CAL Benutzerhandbuch
-
Electrolux IK327SAL Benutzerhandbuch
-
Electrolux IK329SAR Benutzerhandbuch
-
Electrolux IK283SAL Benutzerhandbuch
-
Electrolux IK1555CR Benutzerhandbuch
-
-
Electrolux EK284SARBR Benutzerhandbuch