BEHAbelt RS02 Friction welder Benutzerhandbuch
- Typ
- Benutzerhandbuch

BEDIENUNGSANLEITUNG · INSTRUCTION MANUAL
MODE D'EMPLOI · MANUAL DE INSTRUCCIONES
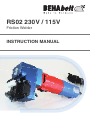
RS02 230 V / 115 V
Reibschweißmaschine · Friction Welder

2
DEUTSCH
INHALTSVERZEICHNIS
1 Sicherheitshinweise
1.1 Allgemeine sicherheitstechnische Hinweise ...................................................... 3
1.2 Bestimmungsgemäße Verwendung.................................................................... 3
1.3 Nicht bestimmungsgemäße Verwendung .......................................................... 3
1.4 EG-Konformitätserklärung (Original) ................................................................. 3
2 Arbeitsablauf
2.1 Vor der Inbetriebnahme ...................................................................................... 4
2.2 Bedienelemente .................................................................................................. 4
2.3 Sicherheitsmaßnahmen...................................................................................... 5
2.4 Arbeitsablauf ...................................................................................................... 6
3 Instandhaltung /Wartung
3.1 Vorbeugende Instandhaltung ............................................................................. 7
3.2 Reparatur ........................................................................................................... 7
3.3 Garantieleistung ................................................................................................. 8
3.4 Lagerung ............................................................................................................ 8
3.5 Entsorgung / Umweltverträglichkeit................................................................... 8
4 Technische Daten ..................................................................................................... 9
AUF DEM GERÄT UND IN DER BEDIENUNGS-
ANLEITUNG VERMERKTE HINWEISE:
Achtung! Warnung vor einer Gefahrenstelle, Bedienungsanleitung beachten.
Hinweis. Bitte unbedingt beachten.
Entsorgung. Umweltfreundliche Entsorgung.
Bedienungsanleitung und Sicherheitshinweise beachten.
Schutzbrille und Gehörschutz tragen.

3
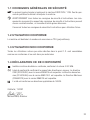
1.1 ALLGEMEINE SICHERHEITSTECHNISCHE
HINWEISE
Diese Betriebsanleitung gilt für die Maschine RS02 230V / 115V. Nur qualifiziertes
Personal darf die Maschine handhaben.
WARNUNG Lesen Sie alle Sicherheitshinweise und Anweisungen. Versäumnisse bei
der Einhaltung der Sicherheitshinweise und Anweisungen können elektrischen Schlag,
Brand und/oder schwere Verletzungen verursachen zur Folge haben.
Bewahren Sie alle Sicherheitshinweise und Anweisungen für die Zukunft auf.
1.2 BESTIMMUNGSGEMÄSSE VERWENDUNG
Die Maschine ist bestimmt zum Verschweißen von Riemen aus TPU (Polyurethan).
1.3 NICHT BESTIMMUNGSGEMÄSSE VERWENDUNG
Alle andern als die unter Pkt. 1.2 beschriebenen Verwendungen gelten als nicht bestim-
mungsgemäße Verwendung und sind deshalb nicht zulässig.
1.4 EG-KONFORMITÄTS ERKLÄRUNG
Durchgängige doppelte oder verstärkte Isolierung entsprechend
Klasse II IEC 536.
Konformitätszeichen, bestätigt die Einhaltung der gültigen Richtlinien. Die EMV-
Richtlinie (2014/30/EU) mit der Norm EN 55014 wird eingehalten. Die Niederspan-
nungsrichtlinie (2014/35/EU) mit der Norm EN61010-1 wird eingehalten.
Die Maschinenrichtlinie (2006/42/EG) mit der Norm EN60745 wird eingehalten.
Das Gerät entspricht den geltenden UKCA-Richtlinien.
Glottertal, 11/2021
Markus Beha, Geschäftsführer

4
2 ARBEITSABLAUF
2.1 VOR DER INBETRIEBNAHME
• Zustand der Maschine vor Gebrauch auf Beschädigung hin überprüfen.
• Länderspezifi sche Vorschriften sind zu beachten.
• Schutzmaßnahmen treffen.
83 32
4
1 7
6
5
710
11
8
2
9
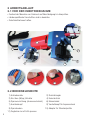
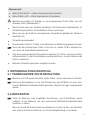
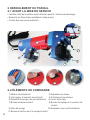
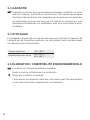
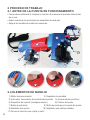
2.2 BEDIENELEMENTE
1) Antriebsmotor 2) Drehzahlregler
3) Ein-/Aus-(Wipp-)Schalter 4) Exzentertrieb
5) Spannvorrichtung (Aussensechskant) 6) Klemmhebel
7) Auslöseknopf 8) Verstellknopf für Anpressdruck
9) Spannbacken 10) Adapter für Standardprofi le
11) Zugbolzen zum Profi l spannen

5
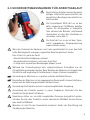
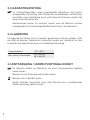
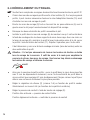
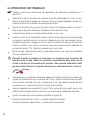
2.3 SICHERHEITSMASSNAHMEN FÜR ARBEITSABLAUF
Bei sämtlichen Arbeiten müssen die jeweils
gültigen Unfallverhütungsvorschriften der
gewerblichen Berufsgenossenschaften be-
achtet werden.
Das Schweißgerät RS02 darf nur an den
dafür vorgesehenen Grifffl ächen gehalten
werden. Ein Hineingreifen in bewegliche
Teile während des Betriebs (oszillierende
Spannbacke) ist unter allen Umständen zu
vermeiden. (siehe Abb. 1)
Das Gerät darf nur an der auf dem Typen-
schild angegebenen Eingangsspannung
angeschlossen werden.
Wenn die Sicherheit des Bedieners nicht mehr gewährleistet ist, muss das Gerät
außer Betrieb gesetzt und gegen ungewolltes Benutzen gesichert werden.
Dies ist der Fall, wenn das Gerät:
· offensichtliche Beschädigungen auf weist
· die gewünschten Funktionen nicht mehr durchführt
· zu lange unter ungünstigen Bedingungen gelagert wurde
Während des Schweißvorgangs kann aufgeschmolzenes Schweißgut aus der
Schweißstelle geschleudert werden. Beim Betreiben der Maschine ist zwingend eine
Schutzbrille und langärmlige Schutzkleidung zu tragen (Verbrennungsgefahr).
Verwendung der Maschine nur in großen und/oder belüfteten Räumen.
Einschalten der Maschine nur bei eingespanntem Riemenprofi l, da sonst die Spann-
backen aus der Halterung geschleudert werden können.
Verwendung des Produkts niemals in explosionsgefährdeter Umgebung.
Verwendung des Produkts niemals in nasser Umgebung. Verhindern Sie den
Kontakt des Geräts direkt mit Wasser.
Reparaturen dürfen nur von dafür ausgebildeten Personen durchgeführt werden.
Schicken Sie dazu das Produkt zu einem autorisierten BEHAbelt Service-Partner
oder direkt zu BEHAbelt.
Maschine ist nicht für den Dauerbetrieb konzipiert. Gefahr der Überhitzung und
Schädigung der Maschine.
1

6
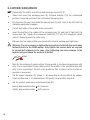
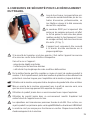
2.4 ARBEITSABLAUF
Bitte beachten Sie die Sicherheits- und Warnhinweise unter Punkt 2.3!
Passende Profilspannbacken auswählen und einsetzen (9). Bei größeren Profi-
len kann es notwendig sein, den weißen Adapterklotz (10) vor dem Einsetzen der
Profilspannbacken zu entfernen.
Spannbacken (9) auseinander fahren, dabei Außensechkant (5) mit Schlüssel nach
links drehen, bis Spannvorrichtung einrastet.
Beide Enden des zu verbindenden Profils plan abschneiden.
Profil in Spannbacke (9) einlegen, so dass das Profil vermittelt zwischen dem
Schweißspalt zwischen den beiden Spannbackenhalterungen ausgerichtet ist. Mit
einer Hand über den Klemmhebel (6) das Profil fixieren und mit der zweiten Hand
und dem Steckschlüssel das Profil über den Zugbolzen (11) spannen. Vorgang für
andere Seite wiederholen.
Zwischen den beiden Profilenden sollte sich nun noch ein minimaler Schweißspalt
befinden (Lichtspalt).
Achtung: Es ist nicht notwendig beim Spannen des Riemens die Zug bolzen auf
den Anschlag zu drehen. Handfestes Einklemmen, um das Herausrutschen des
Riemens aus den Spannbacken zu verhindern genügt. Zu starke Spannung kann
zur Schädigung der Spannbolzen sowie Deformation des Riemens führen.
STOP
Hinweis beim Verschweißen von kleinen Profilen: Profil in der feststehenden Spann-
backe mit nur 2 mm Überstand einspannen, anderes Profilende in der oszillieren-
den Backe mit nur 3 mm Überstand einspannen. Profil nicht quetschen, damit eine
möglichst plane Reibfläche erhalten bleibt.
Drehzahlregler (2) (Stufe 1-6) entsprechend dem zu verschweißenden Profil ein-
stellen. Typischerweise Stufe 4-6 (je nach Materialqualität)
Anpressdruck über Verstellknopf (8) einstellen.
Stark eingedrückte Position -> voller Anpressdruck
Leicht eingedrückte Position -> halber Anpressdruck

7
Allgemein gilt:
große Profile ab Ø 8 -> Halber Anpressdruck (8) einstellen
kleine Profile < Ø 8 -> Voller Anpressdruck (8) einstellen
Maschine einschalten (3) Wichtig: nur mit eingespanntem Profil, Gefahr von sich
lösenden Teilen (Spannbacken)!
Nach Erreichen der max. Drehzahl des Motors mit Drücken des Auslöseknopfs (7)
Schweißvorgang starten (Schweißbacken fahren zusammen).
Wenn sich um das Profil ein durchgehender Schweißwulst gebildet hat, Maschine
abschalten (3).
Schweißvorgang beendet.
Verschweißtes Profil ca. 2-3 Min. in der Maschine zur Abkühlung eingespannt lassen.
Auch nach der Entnahme des Profils, Profil noch ca. weitere 10 Min. abkühlen las-
sen, bevor die Schweißstelle belastet wird.
Zum Herausnehmen des Profils zunächst Zugbolzen (11) öffnen, erst dann mit dem
Außensechskant (5) die Schweißbacken auseinanderfahren, um die Entnahme des
Profil zu erleichtern.
Nächster Schweißvorgang kann ausgeführt werden.
3 INSTANDHALTUNG/WARTUNG
3.1 VORBEUGENDE INSTANDHALTUNG
Maschine und Lüftungsschlitze stets sauber halten, um gut und sicher zu arbeiten.
Nach einer Betriebsdauer von ca. 150 Stunden kann der AC-Motor von einer auto-
risierten BEHAbelt Kundendienststelle gereinigt, überprüft und ggf. ausgewechselt
werden.
3.2 REPARATUR
Sollte die Maschine, trotz sorgfältiger Herstellungs- und Prüfverfahren, einmal
ausfallen, ist die Reparatur von einer autorisierten BEHAbelt-Kundendienststelle
ausführen zu lassen.
Wenn ein Ersatz der Anschlussleitung erforderlich ist, dann ist dies vom Hersteller
oder seinem Vertreter auszuführen, um Sicherheitsgefährdung zu vermeiden.

8
3.3 GARANTIELEISTUNG
Für Schäden/Folgeschäden wegen unsachgemäßer Behandlung, nicht bestim-
mungsgemäßer Verwendung, nicht Einhalten der Instandhaltungs- und Wartungs-
vorschriften sowie Handhabung durch nicht autorisierte Personen besteht kein
Anspruch auf Garantieleistung.
Beanstandungen können nur anerkannt werden, wenn die Maschine unzerlegt
zurückgesandt wird. Kundenseitige Modifikationen führen zu Garantieverlust.
3.4 LAGERUNG
Die Lagerung des Gerätes muss in trockenen, geschlossenen Räumen erfolgen. Sollte
das Gerät bei extremen Temperaturen transportiert worden sein, benötigt es vor dem
Einschalten eine Akklimatisierung bis zur vollständigen Abtrockung.
Temperaturbereich -15°...+50°C
Max. relative Luftfeuchtigkeit 90 % bei 30°C
65 % bei 50°C
3.5 ENTSORGUNG / UMWELTVERTRÄGLICHKEIT
Die Maschine besteht aus Materialien, die einem Recyclingprozess zugeführt
werden können.
Maschine vor der Entsorgung unbrauchbar machen.
Maschine nicht in den Müll werfen.
Gemäß nationalen Vorschriften muss diese Maschine einer umweltgerechten
Wiederverwertung zugeführt werden.

9
4 TECHNISCHE DATEN
4.1 LEISTUNGSDATEN
Spannung 230V / 115V AC ± 10%
Frequenz 50...60 Hz
U/min max. 24.000
Leistung 500 W
Vibration EN 60745 0,5 m/s2, K = 1,5 m/s2
Abmessungen 295 x 111 x 100 mm
Gewicht ca. 2,5 kg
Der angegebene Schwingungswert ist nach einem genormten Prüfverfahren
gemessen worden. Er kann zum Produktvergleich oder zu einer einleitenden Ein-
schätzung der Aussetzung verwendet werden.
Der Schwingungsemissionswert kann sich während der tatsächlichen Benutzung
des Elektrowerkzeugs von dem Angabewert unterscheiden, abhängig von der Art
und Weise, in der das Elektrowerkzeug verwendet wird.
Es sind Sicherheitsmaßnahmen zum Schutz der Bedienperson festzulegen, die
auf einer Abschätzung der Aussetzung während der tatsächlichen Benutzungsbe-
dingungen beruhen. Hierbei sind alle Anteile des Betriebszyklus zu berücksichtigen.
4.2 BETRIEBSBEDINGUNGEN
Temperaturbereich Betrieb 0°...+50°C
Relative Luftfeuchtigkeit 95 % bei 10°C

10

INSTRUCTION MANUAL
RS02 230 V / 115 V
Friction Welder

12
ENGLISH
CONTENT
1 Notes on safety
1.1 General notes on safety .....................................................................................13
1.2 Use of the machine for purposes for which it is intended ................................13
1.3 Incorrect use .....................................................................................................13
1.4 EC declaration of conformity ............................................................................13
2 Work sequence
2.1 Prior to taking the machine into service .......................................................... 14
2.2 Control elements .............................................................................................. 14
2.3 Safety instructions ............................................................................................15
2.4 Work sequence ................................................................................................. 16
3 Service / Maintenance
3.1 Preventive maintenance ....................................................................................17
3.2 Repair ................................................................................................................17
3.3 Warranty ...........................................................................................................18
3.4 Storage ..............................................................................................................18
3.5 Disposal / Environmental compatibility.............................................................18
4 Technical data .........................................................................................................19
REFERENCES MARKED ON TESTER OR
IN INSTRUCTION MANUAL:
Warning of a potential danger, follow with instruction manual
Reference! Please use utmost attention.
Disposal. Friendly-to-the-environment disposal.
Read all safety warnings and all instructions.
Wear safety glasses and ear protection.

13
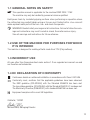
1.1 GENERAL NOTES ON SAFETY
This operation manual is applicable for the machine RS02 230V / 115V.
The machine may only be handled by personnel who are qualified.
Hold power tools by insulated gripping surfaces when performing an operation where
the cutting tool may contact hidden wiring or its own cord. Contact with a «live» wire will
make exposed metal parts of the tool «live» and shock the operator.
WARNING! Read all safety warnings and all instructions. Failure to follow the warn-
ings and instructions may result in electric shock, fire and/or serious injury.
Save all warnings and instructions for future reference.
1.2 USE OF THE MACHINE FOR PURPOSES FOR WHICH
IT IS INTENDED
The machine is designed for welding of belts made from TPU (Polyurethane).
1.3 INCORRECT USE
All uses other than those described under section 1.2 are regarded as incorrect use and
are therefore not admissible.
1.4 EC DECLARATION OF CONFORMITY
Continuous double or reinforced installation in accordance with Class II IEC 536.
Conformity mark, confirms that the applicable guidelines have been observed.
The EMC guideline (2014/30/EU) with the Standard EN55014 has been met.
The low voltage guideline (2014/35/EU) with the Standard EN 61010-1 has been met.
The Machinery Directive (2006/42/EC) with standard EN60745 has been met.
Equipment complies with current UK legislation.
Glottertal, 11/2021
Markus Beha, Managing Director

14
2 WORK SEQUENCE
2.1 PRIOR TO TAKING THE MACHINE INTO SERVICE
Check the condition of the machine for damage before use.
Observe national regulations.
Take protective measures.
83 32
4
1 7
6
5
710
11
8
2
9
2.2 CONTROL ELEMENTS
1) Drive motor 2) Speed regulator
3) On / Off (Toggle) switch 4) Excentric drive
5) Clamping equipment (External hexagon) 6) Centre lever
7) Release button key 8) Adjusting knob for contact pressure
9) Profi le jaws 10) Adapter for standard profi les
11) Hexagonal head bolt to clamp the profi le

15
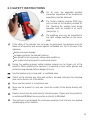
2.3 SAFETY INSTRUCTIONS
For all work, the applicable accident
prevention regulations of the professional
association must be observed.
The friction welding machine RS02 may
only be held on the handles provided for
this. Touching the welding head during
operation must be avoided at all costs.
(see picture 1)
The appliance may only be connected to
the input voltage specifi ed on the name-
plate.
If the safety of the operator can no longer be guaranteed, the appliance must be
taken out of operation and secured against unintended use. This is the case if the
appliance:
displays obvious damage
no longer performs the desired functions
was stored for too long under unfavourable conditions
was subject during transport to mechanical strains.
During the welding process melted welding material can be thrown out of the
machine. While operating the machine it is essential to wear safety glasses and
protective long-sleeved clothes (danger of burns).
Use the machine only in large and / or ventilated areas.
Switch on the machine only when belt profi le is clamped, otherwise the clamping
jaws can be thrown out of the holder.
Never use the product in an explosive area.
Never use the product in a wet area. Avoid the contact to the device directly with
water.
Repairs should only be performed by trained persons. Please send the product to
an authorized BEHAbelt service partner or directly to BEHAbelt.
This machine is not designed for continuous operation. Risk of motor over heating
and damaging of the machine.
1

16
2.4 WORK SEQUENCE
Please note the safety instructions and warnings on point 2.3!
Select and insert the clamping jaws (9). Remove adapter (10) for customised
profiles if required and insert the customised clamping jaws.
Driving jaws (9) apart and rotate the external hex (5) with a key to the left until the
clamping equipment engages.
Cut off both ends of the profile to be connected.
Insert the profile in the middle of the clamping jaws (9) and hold it tight with the
centre lever (6). Tighten the hexagonal head bolt (11) with the hexagonal socket
wrench. Repeat process for other side.
Between the two ends profile now should still minimal welding gap (light gap).
Warning: It is not necessary to tighten the tension bolts to the full stop point when
fastening belts in the RS02 welder. Only tighten the tension bolts as required
to prevent belt slippage in the jaws. Over tightening can cause damage to the
tension bolts and cause the material to deflect.
STOP
Note for the welding of small profiles: Clamp profile in the fixed clamping jaw with
only 2 mm supernatant Clamp other end of the profile in the oscillating jaw with
only 3 mm supernatant. Do not crush profile so that a planar friction surface as
possible is preserved.
Set the speed regulator (2) (steps 1 - 6) depending on the profile to be welded.
Small profiles step 4 - 6; depending on PU quality, large profiles step 5-6.
Set the contact pressure on adjustment knob (8).
Heavily depressed position full pressure
slightly depressed position half pressure

17
General:
large profiles from Ø 8 Half set pressure (8)
small profiles < Ø 8 Full set pressure (8)
Switch on the machine (3) Important: only with clamped profile, risk of voiding
parts (profile jaws)!
After reaching the max. Speed of the motor by pressing the release button (7)
fusion process (welding jaws move together).
When profile swells up, switch off the machine (3)
Welding process is finished
Leave profile clamped for 2-3 min. in the machine to cool off.
Allow to cool profile after removal for about another 10 minutes before the weld is
loaded.
First, open the hex head bolt (11) to take out the profiles. Then move apart with the
external hex (5) the sealing jaws to facilitate the removal of the profile.
Now the next welding process can be performed.
3 SERVICE / MAINTENANCE
3.1 PREVENTIVE MAINTENANCE
To work effectively and surely keep the machine and the ventilation slots clean at all
times.
After operating for about 150 hours, the AC motor could be cleaned, inspected, and,
if necessary, replaced by an authorised BEHAbelt customer service centre.
3.2 REPAIR
If despite strict observance of the manufacturing and testing method the machine
should happen to fail, it must be repaired by an authorized BEHA belt agency.
Any replacement needed for the connecting line must be installed by the manufac-
turer or its agent if safety risks are to be eliminated.

18
3.3 WARRANTY
In the event of the tool being improperly handled, used for purposes for which it is
not intended and/or of the service and maintenance instructions not being observed
by non-authorized persons, no warranty shall be in effect for damages/consequen-
tial damages.
Complaints can only be honored if the machine is returned in the undisassembled
condition.
Customer-specific modifications result in loss of warranty.
3.4 STORAGE
The appliance must be stored in a dry and closed area. If the appliance has been trans-
ported at extremely high temperatures, it needs to be acclimatised until it is completely
dried out before it is switched on.
Temperature range -15°...+50°C
Max. relative air humidity 90 % bei 30°C
65 % bei 50°C
3.5 DISPOSAL / ENVIRONMENTAL COMPATIBILITY
This machine consists of materials which can be disposed of in a recycling process.
Before disposal, render the machine unusable.
Do not throw the machine into the garbage collection.
According to national regulations this machine must be disposed of in an environ-
mentally-compatible recycling process.

19
4 TECHNICAL DATA
4.1 RATING DATA
Voltage 230V / 115V AC ± 10%
Frequency 50...60 Hz
U/min max. 24.000
Power 500 W
Vibration EN 60745 0,5 m/s2, K = 1,5 m/s2
Dimensions 295 x 111 x 100 mm
Weight approx. 2,5 kg
The specified vibration value was measured with a standardised test procedure. It
can be used to compare products or to make an initial assessment of the exposure.
The vibration emissions may differ from the specified value, depending on how the
power tool is used.
Operating personnel must be protected with defined safety measures based on the
estimated exposure under the actual conditions of use.
4.2 OPERATING CONDITIONS
Temperature range during
operation 0°...+50°C
Relative humidity 95 % at 10°C

20
Seite wird geladen ...
Seite wird geladen ...
Seite wird geladen ...
Seite wird geladen ...
Seite wird geladen ...
Seite wird geladen ...
Seite wird geladen ...
Seite wird geladen ...
Seite wird geladen ...
Seite wird geladen ...
Seite wird geladen ...
Seite wird geladen ...
Seite wird geladen ...
Seite wird geladen ...
Seite wird geladen ...
Seite wird geladen ...
Seite wird geladen ...
Seite wird geladen ...
Seite wird geladen ...
Seite wird geladen ...
-
 1
1
-
 2
2
-
 3
3
-
 4
4
-
 5
5
-
 6
6
-
 7
7
-
 8
8
-
 9
9
-
 10
10
-
 11
11
-
 12
12
-
 13
13
-
 14
14
-
 15
15
-
 16
16
-
 17
17
-
 18
18
-
 19
19
-
 20
20
-
 21
21
-
 22
22
-
 23
23
-
 24
24
-
 25
25
-
 26
26
-
 27
27
-
 28
28
-
 29
29
-
 30
30
-
 31
31
-
 32
32
-
 33
33
-
 34
34
-
 35
35
-
 36
36
-
 37
37
-
 38
38
-
 39
39
-
 40
40


