Sound Performance Lab Phonitor 3 DAC Bedienungsanleitung
- Kategorie
- Kopfhörerverstärker
- Typ
- Bedienungsanleitung

More information: spl.audio
Manual
Phonitor 3 DAC
Headphone ampli er, monitoring controller
and DAC with 120V technologie
EN
DE

Phonitor 3 DAC – Manual
2
Getting started
Read the safety instructions starting on page .
Make sure that the mains voltage of the Phonitor DAC corresponds to the voltage of your
region and that the fuse has the correct value for the selected voltage (see specications
on page .)
The power switch on the back of the Phonitor DAC must be in the o position. (O = O /
On = I).
Connect the supplied power cord to the power connector of the Phonitor DAC and to a
power outlet.
If the supplied power cord does not match your mains socket outlet, please contact your dealer.
The devices that are to be connected to the Phonitor DAC must be be switched o.
Connect the outputs of your analog sources to the analog inputs of the Phonitor DAC.
Please use appropriate audio cables (XLR).
Audio cables not included in the scope of delivery.
Connect the outputs of your digital sources (e.g. Mac or PC, CD player) to the digital inputs
of the Phonitor DAC using appropriate digital audio cables (USB, S/PDIF coaxial, S/PDIF
optical, AES/EBU).
Digital audio cables not included in the scope of delivery.
For operation on Windows® computers, please download and install the latest driver from the spl.audio page under the “Driver”
section. Since the USB port is Apple Class 2 compliant, Macs, iPhones and iPads do not require additional drivers.
Connect audio cables between the Phonitor 3 DAC and following ampliers or active moni-
tors (XLR).
Audio cables not included in the scope of delivery.
Connect headphones to the headphone outputs of the Phonitor 3 DAC.
Warning: Never connect a mono jack to the stereo headphone jack and make sure that the plug is fully inserted,
otherwise a short circuit might damage the ampliers.
Power on
Switch on the power switch on the rear panel of the Phonitor DAC (On = I).
The VU meters light up.
Power o
Switch o the power switch on the rear panel of the Phonitor DAC (O = O).
The VU meters no longer light up.

Phonitor 3 DAC – Manual
3
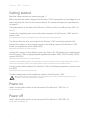
Source selection
Use the Source switch to select an analog or digital input
source.
Phonitor Matrix settings
With the Matrix switch you can activate the Phonitor Matrix
– with the Center function (All) or without (Cr/A). In the O
position, the Phonitor Matrix is deactivated.
The Phonitor Matrix creates a speaker-like listening experience on headphones, by mixing
the le and right signals, each delayed (interaural time dierence) and attenuated (inter-
aural level dierence), to the corresponding opposite side.
Crossfeed
With the Crossfeed switch you can adjust the interaural level
dierence. The level dierence is comparable to the influence
of dierent room sizes and their reflection and absorption
characteristics. The interaural level dierence is frequency-cor-
rected because the sound is reflected and absorbed by the
head in a non-linear fashion.
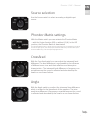
Angle
With the Angle switch you adjust the interaural time dierence
which is related to the placement of the speakers. The inter-
aural time dierence is frequency-corrected because the sound
is reflected and absorbed by the head in a non-linear fashion.
EN
DE

Phonitor 3 DAC – Manual
4
Center
When activated (Matrix switch = All) you control the intensity
of the center signal with the Center switch. If the stereo width
is narrowed through changes in Crossfeed and Angle (so as to
correspond to your actual loudspeaker setup), the phantom
center may likely sound too intense while mixing on head-
phones. You normally would counteract by lowering the center
signals in the mix. However, listening to that mix on loudspea-
kers the phantom center appears to quiet.
Attenuating the center allows the center signal to be adjusted back to the appropriate
ratio of volume in relation to the stereo signal when mixing on headphones, so that the
phantom center gains the correct volume in relation to the stereo signal during speaker
playback.
Phase Ø
With the phase inversion switch the phase the of the le or
right channel can be inverted (180°).
TIP: By using the mono/stereo and L/R phase inversion switch in combination, it is also
possible to only monitor the center or side signal (M/S). When the switch is set to “Mono”
and phase inversion is active for L (or R), only the side signal is played back. If the phase
inversion is switched o, the mono signal corresponding to the “M” signal is played back.
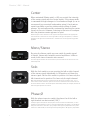
Solo
With the Solo switch you can monitor the le or right channel
of the stereo signal individually. In O position you hear the
stereo signal. Set the Solo switch in position L to hear only the
le channel and in position R to hear only the right channel.
With Solo activated you hear the selected channel only on the respective side – this is
called “Solo-in-Place”. However, if you like to hear the selected channel on both sides set
the stereo switch to mono. This allows you to immediately detect, for example, whether the
mid and high frequencies are similar.
Mono/Stereo
By using the Stereo switch you can switch the audio signal
to Stereo, Stereo with Laterality control and Mono. In Mono
mode, both stereo channels are summed.
The mono signal maintains the same loudness, because both stereo channels are each
reduced by 6 dB.

Phonitor 3 DAC – Manual
5
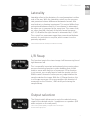
Output selection
The Output switch allows you to route the selected source
signal to the desired output – headphones or speakers (XLR
audio outputs on the rear panel).
In the center position (Mute), no signal reaches the outputs.
The VU meters light up red.
L/R Swap
This function inverts the stereo image. Le becomes right and
right becomes le.
This is especially important and extremely time-saving, when
you are monitoring samples in video dubbing that should
match a scene with direction of movement. If the direction
is not correct, you usually have to load the sample into the
DAW to switch channels. before you can judge whether the
sample matches the image. With the L/R Swap function, this
is no longer necessary. You can now adjust the direction of
movement on the Phonitor 3 DAC while pre-listening the
sample library.
Laterality
Laterality refers to the deviation of sound perception to either
side of the ears. With the Laterality control you can compen-
sate perceived volume dierences between channels that
may be due to a hearing impairment. This control diers from
conventional balance controls. If one channel is attenuated,
the other one is increased at the same time. This means that,
e.g. when hard le, the level of the le channel increases
by 2.25 dB while the right channel is attenuated by 2.25 dB.
This control has a narrower range than conventional balance
controls. Its resolution is very ne, which means it can be
peciseley adjusted.
Set the Stereo switch to Laterality to control the laterality.
EN
DE

Phonitor 3 DAC – Manual
6
VU Meters
The VU meters display the input levels for the selected source.
The meter indicates levels from -20 dB to +5 dB.
0 dB corresponds to +4 dBu.
The ballistics of the VU meters guarantee an optimal visual
perception. The time calibration of the VU meters complies
with the requirements of the BBC.
The rise time up to 0 dB is about 300 ms.
VU Cal
With the VU Cal switch you can lower the sensitivity of the VU
meters by 6 dB or 12 dB. This way the display range can be
adapted to higher input levels.

Phonitor 3 DAC – Manual
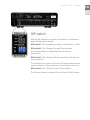
7
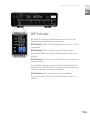
DIP switch
With the DIP switches on the rear of the device, the following
basic settings can be chosen:
DIP switch 1: ON = Headphone output is increased by +12 dB.
DIP switch 2: ON = Preamp Out with Phonitor Matrix
The Phonitor Matrix is activated for the XLR outputs
Preamp Out.
DIP switch 3: ON = Preamp Out becomes Direct Out (without
volume control)
The selected input signal is fed to the XLR output without chan-
ging the volume or other parameters (except phase inversion).
DIP switch 4: ON = Direct Out with Phonitor Matrix
The Phonitor Matrix is activated for the Direct Out XLR outputs.
EN
DE

Phonitor 3 DAC – Manual
8
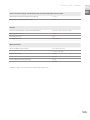
Analog inputs & outputs; XLR (balanced)
Maximaler Ein- und Ausgangspegel 32.5 dBu
Input impedance (XLR) 22 kΩ
Output impedance (XLR) 75 kΩ
Common mode rejection (1 kHz) -82 dB
Frequency range 10 Hz – 100 kHz
THD + N (0 dBu, 1 kHz) 0.0009 %
Noise (A-weighted) -102 dBu
Crosstalk (1 kHz) -95 dB
Dynamic range 134.5 dB
Digital inputs: DAC768 (optional)
AES/EBU (XLR), PCM sample rate: 44,1/48/88.2/96/176.4/192 kHz
Coaxial SPDIF (Cinch), PCM sample rate: 44,1/48/88.2/96/176.4/192 kHz
Optic SPDIF (Toslink F06), PCM sample rate: 44,1/48/88.2/96/mit Glasfaser < 1m: 176.4/192 kHz
USB (B), PCM sample rate: 44,1/48/88.2/96/176.4/192/352.8/384/705.6/768 kHz
USB (B), DSD over PCM (DoP), sample rate: 2.8 (DSD64), 5.6 (DSD128), 11.2 (DSD256) MHz
0 dBfs calibrated to 15 dBu
Standard Headphones Output, 6.35 mm (1/4″) TRS Jack
Wiring Spitze = links, Ring = rechts, Scha = GND
Source impedance 0.18 Ω
Damping factor (40 Ω) 180
Frequency range 10 Hz – 100 kHz
Crosstalk (1 kHz) -91 dB
THD + N (1 kHz, 0 dBu) 0.0003 %
Noise (A-weighted) -102 dBu
Output power (1 kHz, 1% THD, 250 Ω) 2 x 5 W
Output power (1 kHz, 1% THD, 32 Ω) 2 x 1 W
Dynamic range 134.5 dB
Specications

Phonitor 3 DAC – Manual
9
Internal Linear Power Supply with Shielded Toroidal Transformer
Operating voltage for analog audio +/- 60 V
Operating voltage for relays and LEDs + 12 V
Mains Power Supply
Mains voltage (selectable, see fuse chamber) 230 V AC / 50; 115 V AC / 60 Hz
Fuse for 230 V T 0.5 A
Fuse for 115 V T 1 A
Power consumption max. 40 VA
Dimensions & Weight
W x H x D (width x height incl. feet x depth) 278 x 100 x 300 mm
11 x 4 x 11.78 inch
Unit weight 4.15 kg
9.15 lbs
Shipping weight (incl. packaging) 5.5 kg
11.9 lbs
Reference: 0 dBu = 0.775V. All specications are subject to change without notice.
EN
DE

Phonitor 3 DAC – Manual
10
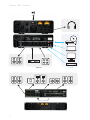
DIGITAL ANALOG

Phonitor 3 DAC – Manual
11
Security Advices
Before starting up the device:
• Read thoroughly and follow the security advices.
• Read thoroughly and follow the Quickstart.
• Observe all warning instructions on the device.
• Please keep the user manual as well as the security
advices in a safe place for future reference.
Warning
Always follow the security advices listed below to avoid
serious injuries or even deadly accidents due to electric
shocks, short circuit, re or other dangers. The following
are examples of such risks and do not represent an
exhaustive list:
Power supply/Power cord
Do not place the power cord near heat sources such
as heaters or radiators and do not excessively bend or
otherwise damage the cord, do not place heavy objects
on it, or place it in a position where anyone could walk
on, trip over, or roll anything over it.
Only use the voltage indicated on the device.
Only use the supplied power cord/plug.
If you intend to use the device in an area other than in
the one you purchased it, the included power cord may
not be compatible. In this case please contact your
dealer.
Be sure to connect the device to an appropriate mains
socket outlet with a protective grounding connection.
Improper grounding can cause electrical shock.
Do not open
This device contains no user-serviceable parts. Do not
open the device or attempt to disassemble the internal
parts or modify them in any way. If it should appear to be
malfunctioning, turn o the power immediately, unplug
the power cord from the mains socket outlet and have it
inspected by a qualied professional.
Water warning
Do not expose the device to rain, or use it near water
or in damp or wet conditions, or place anything on it
(such as vases, bottles or glasses) containing liquids
which might spill into any openings. If any liquid such as
water seeps into the device, turn o the power immedi-
ately and unplug the power cord from the mains socket
outlet. Then have the device inspected by a qualied
professional.
Never insert or remove an electric plug with wet hands.
Fire warning
Do not put burning items, such as candles, on the unit.
A burning item may fall over and cause a re.
Lightning
Before thunderstorms or other severe weather, discon-
nect the device from the mains socket outlet; do not
do this during a storm in order to avoid life threatening
lightning strikes. Similarly, disconnect all the power
connections of other devices, antenna and phone/
network cables which may be interconnected so that no
damage results from such secondary connections.
If you notice any abnormality
When one of the following problems occur, immediately
turn o the power switch and disconnect the electric
plug from the mains socket outlet. Then have the device
inspected by a qualied professional.
• The power cord or plug gets frayed or damaged.
• The device emits unusual smells or smoke.
• An object has fallen into the unit.
• There is a sudden loss of sound during the use of the
the device.
Caution
Always follow the basic precautions listed below to
avoid the possibility of physical injury to you or others,
or damage to the device or other property. These
precautions include, but are not limited to, the following:
Power supply/Power cord
When removing the electric plug from the device or an
mains socket outlet, always pull on the plug itself and
not the cord. Pulling the cord may damage it.
Unplug the device from the mains socket outlet when
the device is not used for a while.
Location
Do not place the device in an unstable position where it
might accidentally fall over.
Do not block the vents. This device has ventilation holes
to prevent the internal temperature from rising too
high. In particular, do not place the device on its side
or upside down. Inadequate ventilation can result in
overheating, possibly causing damage to the device or
even re.
Do not place the device in a location where it may come
into contact with corrosive gases or salty air. This may
result in malfunction.
Before moving the device, remove all connected cables.
When setting up the device, make sure that the mains
socket outlet you are using is easily accessible. If some
trouble or malfunction occurs, immediately turn o the
power switch and disconnect the plug from the mains
socket outlet. Even when the power switch is turned o,
electricity is still flowing to the product at a minimum
rate. When you are not using the device for a long time,
make sure to unplug the power cord from the wall mains
socket outlet.
EN
DE

Phonitor 3 DAC – Manual
12 © 2023 SPL electronics GmbH | www.spl.audio
Connections
Before connecting the device to other devices, power
down all devices. Before power on or o the devices, set
all volume levels to minimum.
Only use appropriate cables to connect the device with
other devices. Make sure that the cables you use are
intact and comply with the electrical specications of
the connection. Other connections can lead to health
risks and damage the equipment.
Handling
Operate the controls and switches only as described in
the manual. Incorrect adjustments outside safe para-
meters can lead to damage. Never use excessive force
on the switches or controls.
Do not insert your ngers or hands in any gaps or open-
ings of the device.
Avoid inserting or dropping foreign objects (paper,
plastic, metal, etc.) into any gaps or openings of the
device. If this happens, power down immediately and
unplug the power cord from the mains socket outlet.
Then have the device inspected by a qualied profes-
sional.
Do not expose the device to excessive dust or vibrations
or extreme cold or heat (such as direct sunlight, near a
heater or in a car during the day) to prevent the possi-
bility of causing damage to the housing, the internal
components or unstable operation.
If the ambient temperature of the device suddenly
changes, condensation can occur (if for example the
device is relocated or is aected by a heater or air condi-
tioning).
Using the device while condensation is present may
result in malfunction. Do not power on the device for a
few hours until the condensation is gone. Only then it is
safe to power on.
Cleaning
Disconnect the device from your mains socket outlet
before cleaning.
Do not use any solvents, as these can damage the
chassis nish. Use a dry cloth, if necessary, with an
acid-free cleaning oil.
Disclaimer
Windows® is a registered trademark of Microso®
Corporation in the United States and other countries.
Apple, Mac and Macintosh are trademarks of Apple Inc.,
registered in the U.S. and other countries.
The company names and product names in this manual
are the trademarks or registered trademarks of their
respective companies.
SPL and the SPL Logo are registered trademarks of SPL
electronics GmbH.
SPL cannot be held responsible for damage caused by
improper use or modication of the device or data that
is lost or destroyed.
Notes on Environmental Protection
At the end of its operating life, this product
must not be disposed with regular household
waste but must be returned to a collection
point for the recycling of electrical and elec-
tronic equipment.
The wheelie bin symbol on the product, user manual
and packaging indicates that.
For proper treatment, recovery and recycling of old
products, please take them to applicable collection
points in accordance with your national legislation and
the Directives 2012/19/EU.
The materials can be reused in accordance with their
markings. Through reuse, recycling of raw materials, or
other forms of recycling of old products, you are making
an important contribution to the protection of our envi-
ronment.
Your local administrative oce can advise you of the
responsible waste disposal point.
This directive only applies to countries inside the EU.
If you wish to discard devices outside the EU, please
contact your local authorities or dealer and ask for the
correct method of disposal.
WEEE-Reg-No.:

Weitere Informationen: spl.audio
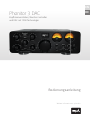
Bedienungsanleitung
EN
DE
Phonitor 3 DAC
Kop örerverstärker, Monitor-Controller
und DAC mit 120V-Technologie
EN
DE

Phonitor 3 DAC – Manual
14
Inbetriebnahme
Lesen Sie die Sicherheitshinweise ab Seite 23.
Stellen Sie sicher, dass der Spannungswahlschalter des Phonitor 3 DAC auf die Netzspan-
nung in Ihrer Region eingestellt ist und dass die Sicherung den für die gewählte Netzspan-
nung richtigen Wert hat (siehe Technische Daten ab Seite 20).
Der Netzschalter auf der Rückseite des Phonitor 3 DAC muss sich in der Aus-Stellung
benden. (Aus = O / Ein = I).
Schließen Sie das mitgelieferte Netzkabel am Netzanschluss des Phonitor 3 DAC und an
eine Steckdose an.
Wenn das mitgelieferte Netzkabel nicht in Ihre Steckdose passt, wenden Sie sich bitte an Ihren Händler.
Die Geräte, die an den Phonitor 3 DAC angeschlossen werden sollen, müssen ausge-
schaltet sein.
Stellen Sie eine Verbindung von den Ausgängen ihrer analogen Quellen zu den analogen
Eingängen des Phonitor 3 DAC mit geeigneten Audiokabeln (XLR) her.
Audiokabel nicht im Lieferumfang enthalten.
Stellen Sie eine Verbindung von den Ausgängen Ihrer digitalen Quellen (z.B. Mac oder PC,
CD-Player) zu den digitalen Eingängen des Phonitor 3 DAC mit geeigneten digitalen Audio-
kabeln (USB, S/PDIF coaxial, S/PDIF optisch, AES/EBU) her.
Digitale Audiokabel nicht im Lieferumfang enthalten.
Für den Betrieb an Windows®-Computern laden Sie bitte den aktuellen Treiber von spl.audio auf der Produktseite und installieren
ihn. Da der USB-Anschluss Apple Class 2-konform ist, benötigen Macs, iPhones und iPads keine zusätzlichen Treiber.
Schließen Sie Audiokabel zwischen dem Phonitor 3 DAC und nachfolgenden Verstärkern
bzw. aktiven Monitoren (XLR) an.
Audiokabel nicht im Lieferumfang enthalten.
Schließen Sie einen Kopörer an den Kopörerausgang des Phonitor 3 DAC an.
Warnung: Stecken Sie niemals Mono-Klinkenstecker in die Stereo-Kopörerbuchse und achten Sie darauf, dass der
Stecker vollständig versenkt ist. Andernfalls kann ein Kurzschluss die Zerstörung der Endstufen nach sich ziehen!
Einschalten
Schalten Sie den Netzschalter auf der Rückseite des Phonitor 3 DAC ein (Ein = I).
Die VU-Meter leuchten.
Ausschalten
Schalten Sie den Netzschalter auf der Rückseite des Phonitor 3 DAC aus (Aus = O).
Die VU-Meter leuchten nicht mehr.

Phonitor 3 DAC – Manual
15
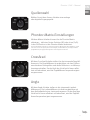
Quellenwahl
Wählen Sie mit dem Source-Schalter eine analoge
oder digitale Eingangsquelle.
Phonitor-Matrix-Einstellungen
Mit dem Matrix-Schalter können Sie die Phonitor-Matrix
aktivieren – inklusive Center-Funktion (All) oder ohne (Cr/A).
In der O-Position ist die Phonitor-Matrix deaktiviert.
Die Phonitor-Matrix erzeugt eine lautsprechergleiche Wiedergabe über Kopörer, indem
das linke und rechte Signal jeweils zeitverzögert (Laufzeitdierenz) und abgeschwächt
(Pegeldierenz) der gegenüberliegenden Seite beigemischt werden.
Crossfeed
Mit dem Crossfeed-Schalter stellen Sie die interaurale Pegeldif-
ferenz ein. Die Pegeldierenz ist vergleichbar mit dem Einfluss
verschiedener Raumgrößen und deren Reflexions- und Absorp-
tionseigenschaen. Da der Kopf den Schall nicht-linear reflek-
tiert und absorbiert, wird die Pegeldierenz frequenzkorrigiert
vorgenommen.
Angle
Mit dem Angle-Schalter stellen sie die interaurale Laufzeit-
dierenz ein. Die Laufzeitdierenz ist direkt vergleichbar mit
dem Aufstellwinkel eines Lautsprecherpaares. Da der Kopf den
Schall nicht-linear reflektiert und absorbiert, wird die Pegeldif-
ferenz frequenzkorrigiert vorgenommen.
EN
DE

Phonitor 3 DAC – Manual
16
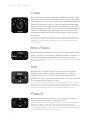
Center
Wenn die Center-Funktion aktiviert ist (Maxtrix-Schalter = All),
dämpfen Sie mit dem Center-Schalter die Intensität des Mitten-
signals. Wenn Sie durch Crossfeed- und Angle-Bearbeitung die
Basisbreite verengen, damit sie der Lautsprecherwiedergabe
entspricht, kann die Phantom-Mitte beim Mischen unter Kopf-
hörer zu intensiv ausfallen. Sie würden dem entgegenwirken,
indem Sie das Mittensignal absenken. Bei der Lautsprecher-
wiedergabe würde die Phantom-Mitte dadurch aber zu leise
erscheinen.
Durch die Center-Dämpfung kann beim Mischen unter Kopörer das Mittensignal wieder
in das richtigen Lautstärkeverhältnis zum Stereosignal gestellt werden, damit die Phan-
tommitte auch bei der Lautsprecherwiedergabe im richtigen Lautstärkeverhältnis zum
Stereosignal steht.
Phase Ø
Mit der Phasenumkehrschaltung können sie die Phase des
linken oder rechten Kanals invertieren (180°).
TIPP: Durch den kombinierten Einsatz des Mono/Stereo- und des L/R-Phaseninvertierung-
Schalters ist es möglich, nur das Mitten- oder Seiten-Signal (M/S) abzuhören. Bei
Schalterstellung „Mono“ und aktiver Phaseninvertierung für L (oder R) wird nur noch das
Seitensignal wiedergegeben. Ist die Phaseninvertierung abgeschaltet, wird das Mono-Si-
gnal wiedergegeben, welches dem „M“-Signal entspricht.
Solo
Mit dem Solo-Schalter können sie den rechten und linken
Kanal des Stereosignals jeweils einzeln abhören. Wählen
sie die mittlere Position O, um das Stereosignal zu hören.
Schalten sie auf L, um nur den linken Kanal zu hören und auf R,
um nur den rechten Kanal zu hören.
Da der auf Solo geschaltete Kanal auch auf der jeweiligen Abhörseite bleibt, nennt man
diese Funktion auch „Solo-In-Place“. Möchten sie aber das Solo-Signal in der Mitte hören
(„Solo-To-Center“), schalten sie die Stereo-Schaltung in die Stellung Mono. So erkennen sie
z.B. sofort, ob beide Kanäle vergleichbare Hoch- und Mittentonanteile enthalten.
Mono/Stereo
Mit dem Stereo-Schalter können sie das Audiosignal zwischen
Stereo, Stereo mit Lateralitätsregelung und Mono schalten. Im
Mono-Modus werden die beiden Stereokanäle summiert.
Da die beiden Stereokanäle jeweils zuerst um 6 dB abgesenkt werden, behält das Monosi-
gnal die gleiche Lautheit.

Phonitor 3 DAC – Manual
17
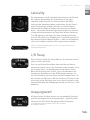
Ausgangswahl
Mit dem Output-Schalter können sie das gewählte Quellensi-
gnal auf den gewünschten Ausgang legen – Kopörer oder
Lautsprecher (XLR-Audio-Ausgänge auf der Rückseite).
In der Mittelstellung (Mute) gelangt kein Signal an die Ausgänge.
Die VU-Meter leuchten rot.
L/R Swap
Diese Funktion kehrt das Stereobild um. Aus links wird rechts
und aus rechts wird links.
Das ist zum Beispiel besonders dann wichtig und extrem
zeitsparend, wenn man in der Videovertonung Samples sucht,
die zu einer Szene mit Bewegungsrichtung passen sollen.
Wenn die Richtung nicht stimmt, muss normalerweise das
Sample zum Kanaltausch in die DAW geladen werden, um
dort die Kanäle zu tauschen bevor beurteilt werden kann, ob
das Sample zum Bild passt. Mit der Funktion L/R Swap ist das
nicht mehr nötig. Man kann jetzt schon beim Vorhören in der
Sample-Bibliothek die Bewegungsrichtung am Phonitor 3 DAC
anpassen.
Laterality
Die Lateralisation (engl. Laterality) bezeichnet in der Akustik
die seitliche Auslenkung des Hörereignisses. Mit dem
Laterality-Regler können sie Unterschiede in der Wahr-
nehmung der Kanallautstärken ausgleichen, die auf Grund
einer Hörschwäche aureten können. Im Unterschied zu
herkömmlichen Balance-Reglern wird nicht nur ein Kanal
leiser – der andere Kanal wird gleichzeitig lauter. Im Linksan-
schlag wird beispielsweise der Pegel des rechten Kanals um
2,25dB reduziert, der Pegel des linken Kanals gleichzeitig
um 2,25dB erhöht. Der Regelbereich ist deutlich geringer als
bei herkömmlichen Balance-Reglern – dafür ist die Regelung
sehr hoch aufgelöst und kann fein vorgenommen werden.
Damit eine Lateralitätsregelung möglich ist, muss sich der Stereo-Schalter in der
Laterality-Stellung benden.
EN
DE

Phonitor 3 DAC – Manual
18
VU-Meter
Die VU-Meter (VU = engl. Volume Unit, Lautstärkeeinheit)
zeigen die Eingangspegel für die gewählten Quellen an. Der
Anzeigenbereich reicht von –20 dB bis +5 dB.
0 dB entspricht +4 dBu.
Dank einer optimalen Ballistik ist eine ausgewogene optische
Wahrnehmung des Audosignals gewährleistet. Die zeitliche
Kalibration der VU-Meter entspricht den BBC-Anforderungen.
Die Anstiegszeit bis 0 dB beträgt ca. 300 ms.
VU Cal
Mit dem VU Cal-Schalter können sie die Empndlichkeit der
VU-Meter um 6 dB oder 12 dB herabsetzen. So kann der Anzei-
genbereich an höhere Eingangspegel angepassst werden.

Phonitor 3 DAC – Manual
19
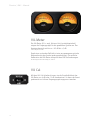
DIP-Schalter
Mit den DIP-Schaltern auf der Geräterückseite lassen sich
folgende Grundeinstellungen vornehmen:
DIP-Schalter 1: ON = Der Kopörerausgang wird um +12 dB
angehoben.
DIP-Schalter 2: ON = Preamp Out mit Phonitor-Matrix
Die Phonitor-Matrix wird für die XLR-Ausgänge Preamp Out
aktiviert.
DIP-Schalter 3: ON = Preamp Out wird Direct Out (ohne Laut-
stärkeregelung)
Das gewählte Eingangssignal wird ohne Änderung der Laut-
stärke oder anderer Parameter (ausgenommen Phasen-Inver-
tierung) an den XLR-Ausgang ausgegeben.
DIP-Schalter 4: ON = Direct Out mit Phonitor-Matrix
Die Phonitor-Matrix wird für die XLR-Ausgänge Direct Out
aktiviert.
EN
DE

Phonitor 3 DAC – Manual
20
Analoge Ein- und Ausgänge; XLR (symmetrisch)
Maximaler Ein- und Ausgangspegel 32,5 dBu
Eingangsimpedanz (XLR) 22 kΩ
Ausgangsimpedanz (XLR) 75 kΩ
Gleichtaktunterdrückung (1 kHz) -82 dB
Frequenzgang (-3 dB) 10 Hz – 100 kHz
THD + N (0 dBu, 10 Hz – 22 kHz) 0,0009 %
Rauschen (A-bewertet) -102 dBu
Übersprechen (1 kHz) -95 dB
Dynamikumfang 134,5 dB
Digitale Eingänge: DAC768 (optional)
AES/EBU (XLR), PCM-Abtastraten: 44,1/48/88,2/96/176,4/192 kHz
Coaxial SPDIF (Cinch), PCM-Abtastraten: 44,1/48/88,2/96/176,4/192 kHz
Optisch SPDIF (Toslink F06), PCM-Abtastraten: 44,1/48/88,2/96/mit Glasfaser < 1m: 176,4/192 kHz
USB (B), PCM-Abtastraten: 44,1/48/88,2/96/176,4/192/352,8/384/705,6/768 kHz
USB (B), DSD over PCM (DoP), Abtastraten 2,8 (DSD64), 5,6 (DSD128), 11,2 (DSD256) MHz
0 dBfs kalibriert auf 15 dBu
Standard-Kopörerausgang, 6,35 mm-TRS-Klinkenbuchse
Pinbelegung Spitze = links, Ring = rechts, Scha = GND
Quellimpedanz 0,18 Ω
Dämpfungsfaktor (40 Ω) 180
Frequenzgang 10 Hz – 100 kHz
Übersprechen (1 kHz) -91 dB
THD +N (1 kHz, 0 dBu) 0,0003 %
Rauschen (A-bewertet) -102 dBu
Ausgangsleistung (1 kHz, 1% THD, 250 Ω) 2 x 5 W
Ausgangsleistung (1 kHz, 1% THD, 32 Ω) 2 x 1 W
Dynamikumfang 134,5 dB
Technische Daten
Seite wird geladen ...
Seite wird geladen ...
Seite wird geladen ...
Seite wird geladen ...
-
 1
1
-
 2
2
-
 3
3
-
 4
4
-
 5
5
-
 6
6
-
 7
7
-
 8
8
-
 9
9
-
 10
10
-
 11
11
-
 12
12
-
 13
13
-
 14
14
-
 15
15
-
 16
16
-
 17
17
-
 18
18
-
 19
19
-
 20
20
-
 21
21
-
 22
22
-
 23
23
-
 24
24


Sound Performance Lab Phonitor 3 DAC Bedienungsanleitung
- Kategorie
- Kopfhörerverstärker
- Typ
- Bedienungsanleitung