EuroLite 5010110A Benutzerhandbuch
- Kategorie
- Stroboskope
- Typ
- Benutzerhandbuch


3
•
DE
INHALT
EINFÜHRUNG ..................................................... 4
Produktmerkmale .................................................... 4
Lieferumfang ........................................................... 4
WICHTIGE SICHERHEITSHINWEISE ................. 5
BESCHREIBUNG DER TEILE .............................. 6
BEDIENUNG ........................................................ 7
AUTOMATIKBETRIEB ......................................... 8
DMX-BETRIEB ..................................................... 8
Anzahl der DMX-Kanäle einstellen ......................... 8
DMX-Startadresse einstellen .................................. 8
Funktionen im DMX-Betrieb .................................... 8
SYSTEMEINSTELLUNGEN ................................. 9
Displayabschaltung ................................................. 9
Software-Version anzeigen ..................................... 9
REINIGUNG UND WARTUNG ............................. 9
Sicherungswechsel ................................................. 9
TECHNISCHE DATEN ......................................... 10
Zubehör ................................................................... 10
UMWELTSCHUTZ................................................ 10
D00147501,
Version 1.0, Stand 26/04/2023
Produkt-Updates, Dokumentation, Software und Support
erhalten Sie unter www.eurolite.de. Die neueste Version
der Bedienungsanleitung finden Sie im Downloadbereich
des Produkts.
© 2023 Eurolite. Alle Rechte vorbehalten.
Dieses Dokument darf ohne schriftliche Genehmigung des
Copyrightinhabers weder ganz noch teilweise reproduziert
werden. Der Inhalt dieses Dokuments kann ohne vorherige
Ankündigung modifiziert werden, wenn Änderungen in
Methodik, Design oder Herstellung dies erforderlich
machen.
Alle in diesem Dokument erwähnten Marken gehören den
jeweiligen Eigentümern.

4
•
DE
EINFÜHRUNG
Erleben Sie Eurolite.
Videos zum Produkt,
passendes Zubehör,
Dokumentation,
Firmware- und Software-
Updates, Support und
News zur Marke. Sie
finden all das und vieles
mehr auf unserer
Website. Besuchen Sie
uns auch auf unserem
YouTube-Kanal und
Facebook.
www.eurolite.de
www.youtube.com/
eurolitevideo
www.facebook.com/
Eurolitefans
Willkommen bei Eurolite! Schön, dass Sie sich für eines unserer Produkte
entschieden haben. Eurolite bietet Ihnen Zugang zur Welt der Showtechnik mit
einer weltweit einzigartigen Vielfalt an Produkten sowohl für professionelle
Anwender als auch für Einsteiger.
Wenn Sie nachfolgende Hinweise beachten, sind wir sicher, dass Sie über viele
Jahre Freude an Ihrem Kauf haben werden. Diese Bedienungsanleitung zeigt
Ihnen, wie Sie Ihr neues Produkt von Eurolite installieren, in Betrieb nehmen
und nutzen.
Damit Sie sich und andere keinen Gefahren aussetzen, beachten Sie bitte
unbedingt alle Sicherheitshinweise und verwenden das Produkt nur wie in
dieser Anleitung beschrieben. Bitte bewahren Sie diese Bedienungsanleitung
für weiteren Gebrauch auf und geben Sie sie ggf. an nachfolgende Besitzer
weiter.
Produktmerkmale
• Elegante Spiegelkugelhalterung für Partys, Hochzeiten und andere Events
• Adapter (Ø 35 mm) zur Befestigung auf Stativen, Ständern und DJ-Tischen
• Rotationsrichtung und Rotationsgeschwindigkeit einstellbar
• Zufällige Rotation
• Schneller, werkzeugloser Aufbau
• Geeignet für Spiegelkugeln bis 30 cm bzw. 50 cm
• Anschlussfertig mit 3 m Netzkabel
• Inkl. Schnellverbindungsglied
• Stabile Stahlausführung
Lieferumfang
• Stativhalterung mit Steuereinheit, DMX- und Netzkabel
• Stativadapter
• diese Bedienungsanleitung

5
•
DE
WICHTIGE SICHERHEITSHINWEISE
WARNUNG!
Lesen Sie aufmerksam die Sicherheitshinweise und benutzen Sie das Produkt nur wie in dieser Anleitung
beschrieben, damit es nicht versehentlich zu Verletzungen oder Schäden kommt.
• Die Spiegelkugelhalterung mit integriertem Motor ist zur Befestigung an Stativen mit 35-mm-Rohrdurchmesser
konzipiert und für Spiegelkugeln mit Ø 30 cm bzw. Ø 50 cm geeignet.
• Das Produkt ist für professionelle Anwendungen im Bereich der Veranstaltungstechnik vorgesehen (z. B. auf
Bühnen). Verwenden Sie das Produkt ausschließlich gemäß den hier gegebenen Vorgaben. Bei Schäden, die
durch Nichtbeachten dieser Anleitung verursacht werden, erlischt jeder Gewährleistungsanspruch. Für
Folgeschäden wird keine Haftung übernommen.
• Aus Sicherheitsgründen ist das eigenmächtige Umbauen oder Verändern des Produkts nicht gestattet und hat
den Verfall der Gewährleistung zur Folge.
Gefahr durch Elektrizität
• Das Gerät ist nur zur Verwendung im Innenbereich geeignet. Benutzen Sie es nicht im Freien. Setzen Sie es
niemals Regen oder Feuchtigkeit aus. Bewahren Sie es nicht in feuchten Räumen auf.
• Um Stromschläge zu vermeiden, niemals irgendeinen Teil des Produkts öffnen. Im Geräteinneren befinden sich
keine vom Benutzer zu wartende Teile.
• Schließen Sie das Gerät nur an eine vorschriftsmäßig installierte Steckdose an, deren Spannung und Frequenz
mit dem Typenschild des Geräts genau übereinstimmt und die über einen Fehlerstromschutzschalter (FI)
abgesichert ist. Wenn der Netzstecker mit einem Schutzkontakt ausgestattet ist, muss er an eine Steckdose mit
Schutzleiter angeschlossen werden. Deaktivieren Sie niemals den Schutzleiter eines Netzkabels. Nichtbeachtung
kann zu Schäden am Gerät und zu Verletzungen des Benutzers führen.
• Die Steckdose muss gut zugänglich sein, damit Sie im Bedarfsfall den Netzstecker schnell ziehen können.
• Fassen Sie den Netzstecker niemals mit nassen Händen an, da die Gefahr eines Stromschlags besteht.
• Das Netzkabel darf nicht geknickt oder gequetscht werden. Halten Sie es von heißen Oberflächen und scharfen
Kanten fern.
• Ziehen Sie den Netzstecker nie am Kabel aus der Steckdose, fassen Sie immer am Stecker an.
• Trennen Sie das Gerät vom Stromnetz bei längerem Nichtgebrauch, bevor Sie es reinigen und wenn Gewitter
auftreten.
• Setzen Sie das Gerät keinen hohen Temperaturen, direktem Sonnenlicht, Tropf- oder Spritzwasser, starken
Vibrationen sowie hohen mechanischen Beanspruchungen aus. Benutzen Sie das Gerät nicht in tropischem
Klima.
• Stellen Sie keine mit Flüssigkeit gefüllten Gegenstände sowie offene Brandquellen wie brennende Kerzen auf
oder direkt neben dem Gerät ab.
• Sorgen Sie dafür, dass keine Gegenstände in das Gerät fallen können, insbesondere Metallteile.
• Lassen Sie Reparaturen am Gerät oder am Netzkabel nur von qualifiziertem Fachpersonal durchführen.
Reparaturen müssen durchgeführt werden, wenn Sichtbare Schäden am Gerät oder am Netzkabel vorhanden
sind, Flüssigkeiten oder Objekte in das Gerät gelangt sind, das Gerät Regen ausgesetzt war, das Gerät
heruntergefallen ist oder wenn Funktionsstörungen auftreten.
• Die Reinigung beschränkt sich auf die Oberfläche. Dabei darf keine Feuchtigkeit in Anschlussräume oder an
Netzspannung führende Teile gelangen. Wischen Sie das Produkt nur mit einem fusselfreien, angefeuchteten
Tuch ab. Niemals Lösungsmittel oder scharfe Reinigungsmittel verwenden.
Warnung vor Verletzungen und Sachschäden
•
Das Produkt ist kein Spielzeug. Halten Sie es vor Kindern fern. Lassen Sie Verpackungsmaterial nicht achtlos liegen.
• Über Kopf installierte Geräte können beim Herabstürzen erhebliche Verletzungen verursachen! Stellen Sie sicher,
dass die Halterung und Spiegelkugel sicher installiert sind und nicht herunterfallen können. Überschreiten Sie
nicht die maximale Belastbarkeit der Halterung.
• Bei gewerblicher Nutzung sind die landesspezifischen Unfallverhütungsvorschriften des Verbandes der
gewerblichen Berufsgenossenschaften für elektrische Anlagen und Betriebsmittel unbedingt zu beachten.
• Achten Sie darauf, dass niemals Seitenkräfte auf die Installation einwirken können und so die Rotation der
Spiegelkugel nicht durch Dekorationsteile etc. abgebremst oder unterbrochen wird.
• Tragen Sie beim Umgang mit Spiegelkugeln grundsätzlich Handschuhe. Beachten Sie die Schnitt- und
Splittergefahr durch Glas!
• Gehen Sie vorsichtig mit dem Produkt um. Durch Stöße, Schläge oder dem Fall aus bereits geringer Höhe wird
es beschädigt.
• Vor der Benutzung auf Beschädigungen prüfen. Bei Beschädigungen darf die Halterung nicht mehr eingesetzt
werden.

6
•
DE
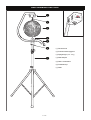
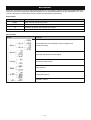
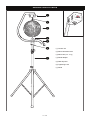
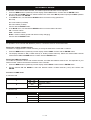
BESCHREIBUNG DER TEILE
(1) Steuereinheit
(2) Schnellverbindungsglied
(3) Spiegelkugel
(max. 10 kg)
(4) Stativadapter
(5) DMX- & Netzkabel
(6) Feststellknopf
(7) Stativ

7
•
DE
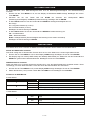
BEDIENUNG
Nach dem Anschluss ans Netz ist das Gerät betriebsbereit. Das Display zeigt die zuletzt eingestellte Betriebsart.
Nehmen Sie nun die notwendigen Menüeinstellungen für die jeweilige Betriebsart mit den Bedientasten vor. Auch
wenn Sie das Gerät vom Stromnetz trennen, bleiben alle Einstellungen gespeichert.
Bedientasten
Taste Funktion
MENU Menü aufrufen und Sprung zurück
ENTER Nächsten Menüpunkt anwählen und Einstellung bestätigen
▲ Einstellen der Werte und Auswahl einer Option
▼ Einstellen der Werte und Auswahl einer Option
Menüstruktur
Modus Funktion
Automatikbetrieb mit einstellbarer Geschwindigkeit und
Rotationsrichtung
Verhalten bei fehlendem DMX-Signal
Anzahl der DMX-Kanäle
DMX-Adresse
Displayabschaltung
Software-Version

8
•
DE
AUTOMATIKBETRIEB
Im Automatikbetrieb ohne DMX-Steuergerät lässt sich die Rotationsgeschwindigkeit und Rotationsrichtung
einstellen.
1 Drücken Sie die Taste MENU so oft, bis das Display die Betriebsart AUTO anzeigt. Bestätigen Sie mit der
Taste ENTER.
2 Wechseln Sie mit den Tasten UP und DOWN die zwischen den Menüpunkten MO-S
(Rotationsgeschwindigkeit) und MO-D (Rotationsrichtung). Bestätigen Sie mit ENTER.
3 Im Menü MO-S stellen Sie mit den Tasten UP und DOWN die Ablaufgeschwindigkeit ein von:
00 = Stopp
01 = Langsame Rotation (0,3 U/min)
32 = Schnelle Rotation (3 U/min)
Bestätigen Sie die Einstellung mit ENTER.
4 Im Menü MO-D stellen Sie mit den Tasten UP und DOWN die Rotationsrichtung ein:
CU = Vorwärtsrotation
CCU = Rückwärtsrotation
M-AU = zufällige Rotation (Geschwindigkeit und Richtung immer wieder wechselnd)
Bestätigen Sie die Einstellung mit ENTER.
DMX-BETRIEB
Zum Betrieb über einen Controller mit DMX512-Protokoll verbinden Sie die Geräte über das DMX-Kabel.
Anzahl der DMX-Kanäle einstellen
Das Gerät verfügt über 2 Steuerkanäle. Es kann aber auch in einen Modus mit 1 Kanal umgeschaltet werden.
1 Drücken Sie die Taste MENU so oft, bis das Display CHMD anzeigt. Bestätigen Sie mit der Taste ENTER.
2 Das Display zeigt nun 1 CH (1 DMX-Kanal) oder 2 CH (2 DMX-Kanäle) an. Wählen Sie mit den Tasten UP und
DOWN den gewünschten DMX-Kanal-Modus. Bestätigen Sie mit der Taste ENTER.
DMX-Startadresse einstellen
Damit das Gerät vom Controller angesteuert werden kann, muss die DMX-Startadresse eingestellt werden. Diese
ist abhängig von Ihrem DMX-Controller. Lesen Sie hierzu die Dokumentation des Controllers.
1 Drücken Sie die Taste MENU so oft, bis das Display ADDR anzeigt. Bestätigen Sie mit der Taste ENTER.
2 Stellen die Adresse (1-512) mit den Tasten UP und DOWN ein und bestätigen Sie mit ENTER.
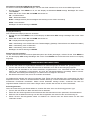
Funktionen im DMX-Betrieb
2-Kanal-Modus
Kanal
Wert
Funktion
1
000 – 127 Vorwärtsrotation
128 – 255 Rückwärtsrotation
2
000 Stopp
001 – 255 Rotationsgeschwindigkeit langsam > schnell
1-Kanal-Modus
Kanal
Wert
Funktion
1
000 Stopp
001 – 127 Vorwärtsrotation langsam > schnell
128 Stopp
129 – 255 Rückwärtsrotation langsam > schnell

9
•
DE
Verhalten bei fehlendem DMX-Signal einstellen
Sie können im Menüpunkt BLND festlegen, wie sich das Gerät verhalten soll, wenn es kein DMX-Signal erhält.
1 Drücken Sie die Taste MENU so oft, bis das Display die Betriebsart BLND anzeigt. Bestätigen Sie mit der
Taste ENTER.
2 Stellen Sie mit den Tasten UP und DOWN den Modus ein:
CU = Vorwärtsrotation
CCU = Rückwärtsrotation
M-AU = zufällige Rotation (Geschwindigkeit und Richtung immer wieder wechselnd)
STOP = keine Rotation
Bestätigen Sie die Einstellung mit ENTER.
SYSTEMEINSTELLUNGEN
Displayabschaltung
Das Verhalten des Displays lässt sich einstellen.
1 Drücken Sie die Taste MENU so oft, bis das Display die Betriebsart DISP anzeigt. Bestätigen Sie mit der Taste
ENTER.
2 Stellen Sie mit den Tasten UP und DOWN den Modus ein:
ON = Display dauerhaft eingeschaltet
10oF
= Abschaltung nach 10 Sekunden ohne Tastenbetätigung (beliebige Taste drücken zum Wiedereinschalten)
30oF = Abschaltung nach 30 Sekunden
60oF = Abschaltung nach 60 Sekunden
Bestätigen Sie die Einstellung mit ENTER.
Software-Version anzeigen
Um die Versionsnummer der Firmware (Betriebssystem des Geräts) anzuzeigen, drücken Sie die Taste MENU so
oft, bis das Display VER anzeigt. Bestätigen Sie mit der Taste ENTER. Die Versionsnummer wird nun im Display
angezeigt.
REINIGUNG UND WARTUNG
Das Gerät sollte äußerlich in regelmäßigen Abständen von Verunreinigungen wie Staub usw. gereinigt werden.
1 Trennen Sie das Gerät vom Netz und lassen Sie es abkühlen, bevor Sie mit der Reinigung beginnen.
2 Reinigen Sie die Oberflächen mit einem fusselfreien, angefeuchteten Tuch. Verwenden Sie auf keinen Fall
Alkohol oder irgendwelche Lösungsmittel, da sonst die Gehäuseoberflächen beschädigt werden könnten.
Vermeiden Sie unbedingt das Eindringen von Nässe oder Feuchtigkeit in das Gerät.
3 Das Gerät muss trocken sein, bevor Sie es wieder einschalten.
Im Geräteinneren befinden sich keine zu wartenden Teile. Öffnen Sie das Gehäuse nicht. Unternehmen Sie keine
Reparaturversuche, da dies ein Sicherheitsrisiko darstellt. Wartungs- und Servicearbeiten sind ausschließlich dem
autorisierten Fachhandel vorbehalten. Sollten einmal Ersatzteile benötigt werden, verwenden Sie bitte nur
Originalersatzteile. Sollten Sie noch weitere Fragen haben, wenden Sie sich bitte an Ihren Fachhändler.
Sicherungswechsel
Wenn die Feinsicherung des Geräts defekt ist, ersetzen Sie diese durch eine Sicherung gleichen Typs.
1 Trennen Sie das Gerät vom Netz und lassen Sie es abkühlen.
2 Öffnen Sie den Sicherungshalter an der Rückseite der Steuereinheit mit einem passenden Schraubendreher.
3 Entfernen Sie die defekte Sicherung aus dem Sicherungshalter und setzen Sie die neue Sicherung ein.
4 Setzen Sie den Sicherungshalter wieder im Gehäuse ein. Danach kann das Gerät wieder mit dem Netz
verbunden werden.

10
•
DE
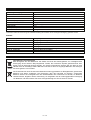
TECHNISCHE DATEN
Spannungsversorgung: 100-240 V AC, 50/60 Hz
Gesamtanschlusswert: 7 W
Stromanschluss: Festes Anschlusskabel mit Schutzkontakt
Rotation: 0-3 U/min
Maximale Spiegelkugelgröße: 50 cm
Maximale Last: 10 kg
DMX-Anschluss: 3-pol XLR (M)
DMX-Kanäle: 1, 2
Maße (BxTxH): 95 x 400 x 825 mm
Gewicht: 2,3 kg
Technische Daten können im Zuge der Weiterentwicklung des Produkts ohne vorherige Ankündigung geändert werden.
Zubehör
Best.-Nr. 5010110A Spiegelkugel 50cm
Best.-Nr. 50120038 Spiegelkugel 50cm gold
Best.-Nr. 50120065 Spiegelkugel 50cm schwarz
Best.-Nr. 32000040 2x Stage Stand 100cm inkl. Cover und Tasche
Best.-Nr. 32000050 2x Stage Stand variabel inkl. Cover und Tasche
Best.-Nr. 32000060 2x Stage Stand 150cm geschwungen inkl. Cover und Tasche
Best.-Nr. 60004164 BS-2 EU Boxenhochständer
Best.-Nr. 60004185 M-4 Boxenhochständer
UMWELTSCHUTZ
Informationen zur Entsorgung
Bitte übergeben Sie das Gerät bzw. die Geräte am Ende der Nutzungsdauer zur umweltgerechten
Entsorgung einem örtlichen Recyclingbetrieb. Geräte, die mit diesem Symbol gekennzeichnet sind,
dürfen nicht im Hausmüll entsorgt werden.
Für weitere Informationen wenden Sie sich bitte an Ihren
Händler oder die zuständige örtliche Behörde. Entnehmen Sie evtl. eingelegte Batterien und entsorgen
Sie diese getrennt vom Produkt.
Als Endverbraucher sind Sie durch die Batterieverordnung gesetzlich zur Rückgabe aller gebrauchten
Batterien und Akkus verpflichtet. Die Entsorgung über den Hausmüll ist verboten. Verbrauchte
Batterien können Sie unentgeltlich bei den Sammelstellen Ihrer Gemeinde und überall, wo Batterien
verkauft werden, abgeben. Mit der Verwertung von Altgeräten und der ordnungsgemäßen Entsorgung
von Batterien und Akkus leisten Sie einen wichtigen Beitrag zum Schutz unserer Umwelt.


12
•
EN
CONTENTS
INTRODUCTION .................................................. 13
Product features...................................................... 13
Package contents ................................................... 13
IMPORTANT SAFETY INSTRUCTIONS .............. 14
DESCRIPTION OF PARTS .................................. 15
OPERATION ........................................................ 16
AUTOMATIC MODE ............................................ 17
DMX OPERATION ............................................... 17
Setting the number of DMX channels ..................... 17
Setting the DMX start address ................................ 17
Functions in DMX mode ......................................... 17
SYSTEM SETTINGS ............................................ 18
Display deactivation ................................................ 18
Indicate software version ........................................ 18
CLEANING AND MAINTENANCE ....................... 18
Replacing the fuse .................................................. 18
TECHNICAL SPECIFICATIONS .......................... 19
Accessories ............................................................. 19
D00147501,
version 1.0, publ. 26/04/2023
For product updates, documentation, software and
support please visit www.eurolite.de. You can find the
latest version of this user manual in the product’s
download section.
© 2023 Eurolite. All rights reserved.
No part of this document may be reproduced in any form
without the written permission of the copyright owner.
The contents of this document are subject to revision
without notice due to continued progress in
methodology, design, and manufacturing. Eurolite shall
have no liability for any error or damage of any
kind resulting from the use of this document.
All trademarks mentioned herein are the property of their
respective owners.

13
•
EN
INTRODUCTION
Experience Eurolite.
Product videos, suitable
accessories, firmware
and software updates,
documentation and the
latest news about the
brand. You will find this
and much more on our
website. You are also
welcome to visit our
YouTube channel and
find us on Facebook.
www.eurolite.de
www.youtube.com/
eurolitevideo
www.facebook.com/
Eurolitefans
Welcome to Eurolite! Thank you for choosing one of our products. Eurolite is
your connection to the world of show with an unparalleled variety of products,
both for professionals and beginners.
If you follow the instructions given in this manual, we are sure that you will enjoy
this product for a long period of time. This user manual will show you how to
install, set up and operate your new Eurolite product.
Users of this product are recommended to carefully read all warnings in order to
protect yourself and others from damage. Please keep this manual for future
needs and pass it on to further owners.
Product features
• Elegant hanging bracket for parties, weddings and special events
• Adapter (Ø 35 mm) for mounting on stands, podiums DJ booths
• Rotation direction and rotation speed adjustable
• Random rotation
• Easy, tool-free assembly
• Applicable for mirror balls up to 30 cm or 50 cm
• Ready for connection with 3 m mains cable
• Incl. quick chain link
• Sturdy steel version
Package contents
• Stand mount with motor, DMX and power cable
• Stand adapter
• these instructions

14
•
EN
IMPORTANT SAFETY INSTRUCTIONS
WARNING!
Please read the safety warnings carefully and only use the product as describe in this manual to avoid
accidental injury or damage.
• The rotating mirror ball mount can be fitted to stands with a tube diameter of 35 mm and is suitable for mirror balls
with Ø30 cm or Ø50 cm in size.
• This device is designed for professional use in the field of event technology, e.g. on stage. Only use the product
according to the instructions given herein. Damages due to failure to follow these operating instructions will void
the warranty! We do not assume any liability for any resulting damage.
• Unauthorized rebuilds or modifications of the product are not permitted for reasons of safety and render the
warranty invalid.
Danger due to electricity
• The device is suitable for indoor use only. Do not use it outdoors. Never expose it to rain or moisture. Do not store
it in rooms exposed to moisture.
• To reduce the risk of electric shock, do not open any part of the device. There are no serviceable parts inside the
device.
• Only connect the device to a properly installed mains outlet. The outlet must be protected by residual current
breaker (RCD). The voltage and frequency must exactly be the same as stated on the device. If the mains cable
is equipped with an earthing contact, then it must be connected to an outlet with a protective ground. Never
defeat the protective ground of a mains cable. Failure to do so could result in damage to the device and possibly
injure the user.
• The mains outlet must be easily accessible so that you can unplug the device quickly if need be.
• Never touch the mains plug with wet or damp hands. There is the risk of potentially fatal electric shock.
• The mains cable must not be bent or squeezed. Keep it away from hot surfaces or sharp edges.
• Never pull the mains cable to disconnect the mains plug from the mains outlet, always seize the plug.
• Unplug the device during lighting storms, when unused for long periods of time or before cleaning.
• Do not expose the device to any high temperatures, direct sunlight, dripping or splashing water, strong vibrations
or heavy mechanical stress.
•
Do not place any objects filled with liquids on the device.
• Do not place any open sources of fire, such as burning candles, on or directly next to the device.
• Make sure that objects cannot fall into the device, in particular metal parts.
• Only have repairs to the device or its mains cable carried out by qualified service personnel. Repairs are required
when the device or the mains cable is visibly damaged, liquid has been spilled or objects have fallen into the
device; when the device has been exposed to rain or moisture, has been dropped or malfunctions occur.
• Cleaning of the device is limited to the surface. Make sure that moisture does not come into contact with any
areas of the terminal connections or mains voltage control parts. Only wipe off the product with a soft lint-free and
moistened cloth. Never use solvents or aggressive detergents.
Warning – risk of injuries and material damage
• This product is not a toy. Keep it out of the reach of children. Do not leave packaging material lying around
carelessly.
• Devices in overhead installations may cause severe injuries when crashing down! Make sure that the mount and
mirror ball are installed securely and cannot fall down. Do not exceed the maximum load capacity specified of the
bracket.
• For commercial use the country-specific accident prevention regulations of the government safety organization for
electrical facilities must be complied with at all times.
• Make sure that no side forces can impact on the installation and the rotation of the mirror ball is never slowed
down or stopped by decoration material etc.
• When handling mirror balls always wear gloves. Observe the danger of cutting and splintering by glass!
• Handle the product with care; it can be damaged by impacts, blows, or accidental falls, even from a low height.
• Before taking into operation, check upon possible damages. If defective, the bracket must not be taken into
operation.

15
•
EN
DESCRIPTION OF PARTS
(1) Control unit
(2) Mirror ball attachment
(3) Mirror ball
(max. 10 kg)
(4) Stand adapter
(5) DMX & power
(6) Tightening knob
(7) Stand

16
•
EN
OPERATION
After connection to the mains, the device is ready for operation. The display shows the last operating mode. Now
make the necessary menu settings for the respective operating mode using the operating buttons. All settings
remain stored even if the device is disconnected from the mains:
Operating buttons
Button Function
MENU Selects the operating mode or returns to the initial screen
ENTER Selects next menu item and confirm setting
▲ Sets values and selects an option
▼ Sets values and selects an option
Menu structure
Mode Function
Automatic operation with adjustable speed and direction of rotation
Behavior when DMX signal is missing
Number of DMX channels
DMX address
Display deactivation
Software version

17
•
EN
AUTOMATIC MODE
In automatic mode without DMX controller, the rotation speed and direction can be adjusted.
1 Press the MENU button repeatedly until the display shows AUTO mode. Confirm with the ENTER button.
2 Use the UP and DOWN buttons to switch between the menu items MO-S (rotation speed) and MO-D (rotation
direction). Confirm with ENTER.
3 In the MO-S menu, use the UP and DOWN buttons to set the running speed from:
00 = stop
01 = slow rotation (0.3 RPM)
32 = fast rotation (3 RPM)
Confirm with the ENTER button.
4 In the MO-D menu, use the UP and DOWN buttons to set the rotation direction:
CU =
forwards rotation
CCU =
backwards rotation
M-AU = random rotation (speed and direction keep changing)
Confirm with the ENTER button.
DMX OPERATION
For operation via a controller with DMX512 protocol, connect the devices via the DMX cable.
Setting the number of DMX channels
The device is equipped with 2 control channels, yet it may be switched to a mode with 1 channel.
1 Press the MENU button repeatedly until the display shows CHMD. Confirm with the ENTER button.
2 The display indicates 1 CH (1 DMX channel) or 2 CH (2 DMX channels). Select the desired DMX channel
mode with the UP and DOWN buttons. Confirm with the ENTER button.
Setting the DMX start address
To be able to operate the device with a DMX controller, the DMX start address must be set. This depends on your
DMX controller. Please read the documentation of the controller.
1 Press the MENU button repeatedly until the display shows ADDR. Confirm with the ENTER button.
2 Use the buttons UP and DOWN to select the desired number of DMX channels (1-512) and confirm with
ENTER.
Functions in DMX mode
2-channel mode
Channel
Value
Function
1
000 – 127
Forwards rotation
128 – 255
Backwards rotation
2
000 Stop
001 – 255 Rotation speed slow > fast
1-channel mode
Channel
Value
Function
1
000 Stop
001 – 127
Forwards rotation
slow > fast
128 Stop
129 – 255
Backwards rotation
slow > fast

18
•
EN
Setting the behavior in case of missing DMX signal
Use the BLND menu to define how the device should behave if it does not receive a DMX signal.
1 Press the MENU button repeatedly until the display shows BLND. Confirm with the ENTER button.
2 Use the buttons UP and DOWN to select a mode:
CU =
forwards rotation
CCU =
backwards rotation
M-AU = random rotation (speed and direction keep changing)
STOP =
no rotation
Press ENTER to confirm the setting.
SYSTEM SETTINGS
Display deactivation
The display can be switched on or off.
1 Press the button MENU so many times until DISP is indicated in the display. Confirm with the ENTER button.
2 Use the buttons UP and DOWN to select a mode:
ON = display will always be on
10oF
=
display off 10 seconds after pressing the last button (press any key to switch back on)
30oF = display off after 30 seconds
60oF = display off after 30 seconds
Press ENTER to confirm the setting.
Indicate software version
To indicate the version number of the firmware (operating system of the unit), press the button MENU so many
times until VER is indicated in the display. Confirm with the ENTER button. The version will be indicated in the
display.
CLEANING AND MAINTENANCE
The outside of the device should be cleaned periodically to remove contaminants such as dust etc.
1 Disconnect the device from power and allow it to cool before cleaning.
2 Clean the surface with a soft lint-free and moistened cloth. Never use alcohol or solvents as these may damage
the surface. Make sure that no liquids can enter the device.
3 The device must be dry before reapplying power.
There are no serviceable parts inside. Do not open the housing. Do not try to repair the device by yourself as this
may result in damage. Maintenance and service operations are only to be carried out by authorized dealers.
Should you need any spare parts, please use genuine parts. Should you have further questions, please contact
your dealer.
Replacing the fuse
If the fine-wire fuse of the device fuses, only replace the fuse by a fuse of same type and rating.
1 Disconnect the device from power and allow it to cool.
2 Open the fuse holder of the mains connection at the rear of the control panel with a fitting screwdriver.
3 Remove the old fuse from the fuse holder and replace it with a new fuse.
4 Carefully push the fuse holder back into its position before reapplying power.

19
•
EN
TECHNICAL SPECIFICATIONS
Power supply: 100-240 V AC, 50/60 Hz
Power consumption: 7 W
Power connection: Fixed power supply cord with safety plug
Rotation: 0-3 RPM
Maximum diameter of mirror ball 50 cm
Maximum load: 10 kg
DMX input: 3-pin XLR (M)
DMX channels: 1, 2
Dimensions 95 x 400 x 825 mm
Weight: 2.3 kg
Specifications are subject to change without notice due to product improvements.
Accessories
No. 5010110A Mirror Ball 50cm silver
No. 50120038 Mirror Ball 50cm gold
No. 50120065 Mirror Ball 50cm black
No. 32000040 2x Stage Stand 100cm incl. Cover and Bag
No. 32000050 2x Stage Stand variable incl. Cover and Bag
No. 32000060 2x Stage Stand 150cm curved incl. Cover and Bag
No. 60004164 BS-2 EU Speaker-System Stand
No. 60004185 M-4 Speaker-System Stand
PROTECTING THE ENVIRONMENT
Disposal of old equipment
When to be definitively put out of operation, take the product to a local recycling plant for a disposal
which is not harmful to the environment. Devices marked with this symbol must not be disposed of as
household waste. Contact your retailer or local authorities for more information. Remove any inserted
batteries and dispose of them separately from the product.
You as the end user are required by law (Battery Ordinance) to return all used batteries/ rechargeable
batteries. Disposing of them in the household waste is prohibited. You may return your used batteries
free of charge to collection points in your municipality and anywhere where batteries/rechargeable
batteries are sold. By disposing of used devices and batteries correctly, you contribute to the
protection of the environment.

Eurolite is a brand of Steinigke
Showtechnic GmbH
·
Andreas
-
Bauer
-
Str. 5
·
97297 Waldbüttelbrunn Germany
D00147501 Version 1.0 Publ. 26/04/2023
-
 1
1
-
 2
2
-
 3
3
-
 4
4
-
 5
5
-
 6
6
-
 7
7
-
 8
8
-
 9
9
-
 10
10
-
 11
11
-
 12
12
-
 13
13
-
 14
14
-
 15
15
-
 16
16
-
 17
17
-
 18
18
-
 19
19
-
 20
20


EuroLite 5010110A Benutzerhandbuch
- Kategorie
- Stroboskope
- Typ
- Benutzerhandbuch
in anderen Sprachen
- English: EuroLite 5010110A User manual
Verwandte Papiere
-
EuroLite LED B-40 Benutzerhandbuch
-
EuroLite LED KLS Laser Bar PRO FX Benutzerhandbuch
-
-
-
-
-
-
-
-
EuroLite AF-7 Benutzerhandbuch