Hama 00040089 Bedienungsanleitung
- Kategorie
- Fernbedienungen
- Typ
- Bedienungsanleitung
Dieses Handbuch ist auch geeignet für

HOME ENTERTAINMENT
00040089
Universal LCD-
Fernbedienung »8in1«
Universal LCD-Remote Control
00040089/12.08
000
All listed brands are trademarks of the corresponding companies. Errors and omissions excepted,
and subject to technical changes. Our general terms of delivery and payment are applied.
Hama GmbH & Co KG
D-86651 Monheim/Germany
www.hama.com

12
3
1
2
4
6
8
15
5
7
16
14
10
11
13
20
19
9
d Bedienungsanleitung
2
Universal LCD Fernbedienung
Funktionstasten
1.
LCD: Anzeige von gewähltem Modus und
Uhrzeit
2. Stummschalten
3. Schaltet das Gerät ein bzw. aus
4. MENU: Entspricht dem Menü (zum
Anpassen bestimmter Funktionen Ihres
Geräts) bzw. dem OSD (On-Screen-
Display) oder der Speichertaste Ihrer
Original-Fernbedienung.
5. TV/Video
6. Seite halten
7. Teletext-Modus
8. TV/Text
9. Entspricht den Tasten NACH-OBEN,
NACH-UNTEN, NACH-LINKS, NACH-
RECHTS, OK, EXIT für Menüfunktionen
Ihrer Original-Fernbedienung. Während
dem Set-up-Modus werden die Pfeiltasten
als Cursor, zum bestätigen und zum
verlassen der Programmierung ihrer
Fernbedienung verwendet.
10. VOL±: Entspricht der LAUTER-/LEISER-
Taste Ihrer Original-Fernbedienung.
11. CH± : Entspricht der Programmwahltaste
Ihrer Original-Fernbedienung.
12. TV, CBL/SAT, VCR, DVD, CD, TAPE, TUNER,
AUX: Dient zum Auswählen des zu
bedienenden Geräts.
13. REW/PLAY/FWD/PAUSE/REC/STOP:
Funktionen für CD, DVD, VCR und TAPE
14. 0-9: Die Zifferntasten haben die gleiche
Funktion wie die Zifferntasten Ihrer
Original-Fernbedienung.
15. A-B: Zum Umschalten zwischen zwei
Szenen eines Films oder einer DVD
16.
(ENTER): Zum sofortigen Ändern der
ausgewählten Kanäle (weniger als drei
Stellen).
17. MAKRO: ermöglicht das Durchführen
mehrerer Vorgänge hintereinander.
18. SET: Einrichten/Konfigurieren der
Fernbedienung oder anzeige des Status
auf ihrem LCD
19. LEARN: Funktionen erlernen.
20. SCAN: Ermöglicht schnelle Übersicht über
alle Geräte
21. Farbtasten: TV-Fast-Text
Allgemeine Beschreibung:
Vielen Dank, dass Sie sich für den Kauf der
Universal LCD-Fernbedienung 8in1 von Hama
entschieden haben. Die Fernbedienung,
mit der bis zu acht Geräte bedient werden
können, verfügt über eine sehr umfangreiche
Codebibliothek. Sie ist für eine Vielzahl von,
auf dem Markt erhältlichen TV-Geräten,
Videorecordern (VCR), DVD-Playern,
CD-Playern, Satellitenreceivern (CBL/
SAT), Kassettenrecordern (Tape), Tunern
(Tuner) und anderen Audiogeräten (AUX)
geeignet. Eine Kontroll-LED erleichtert
das Programmieren der Fernbedienung.
Mit der Universal LCD-Fernbedienung
8in1 von Hama können Sie die wichtigsten
Grundfunktionen Ihrer Geräte steuern. Bitte
lesen Sie die Bedienungsanleitung vor
der ersten Benutzung der Fernbedienung
sorgfältig und vollständig durch. Daneben
verfügt diese Fernbedienung über die
Möglichkeit, neue Codes einer anderen
Fernbedienung zu „erlernen“ und so ggf.
die vorhandenen Codes zu ergänzen. Die
Funktion “MACRO” ermöglicht es Ihnen, mit
nur einer Taste mehrere aufeinanderfolgende
Funktionsschritte auszuführen.
Die “Gerätesperre” schützt Ihr Gerät vor
Veränderungen durch eine Neukonfiguration,
bis Sie diese Sperre wieder aufheben.
Universal LCD-Fernbedienung 8in1 von Hama
verfügt über eine Hintergrundbeleuchtung
für den LCD Bildschirm sowie eine separate,
beleuchtete Anzeige für das momentan
benutzte Gerät.
d Bedienungsanleitung
g
Operating Instruction
Die “Batteriestatusanzeige” erinnert Sie
rechtzeitig an den Batteriewechsel.
Alle Konfigurationsdaten werden dauerhaft
im “Pufferspeicher” gespeichert, Sie
brauchen sich also keine Gedanken über
einen Datenverlust zu machen, wenn Sie die
Batterie auswechseln.
Die Universal LCD-Fernbedienung 8in1
von Hama ist auch mit einer Echtzeituhr
ausgestattet, die Ihnen die Zeit in AM und
PM anzeigt.
Wie Ihnen die oben beschriebenen
Funktionen zeigen, ist die Universal
LCD-Fernbedienung 8in1 von Hama eine
wirklich moderne und leistungsfähige LCD
Universalfernbedienung.
Durch die Funktion „Volume lock“ können
Sie die Taste VOL+/VOL- fi xieren, um damit
ausschließlich den Verstärker Ihres Home-
Theatre-Systems zu steuern.
(Einstellung dieser Funktion, siehe Rubrik
Zusatzfunktion Part A)
Einlegen der Batterien:
Die Stromversorgung der Fernbedienung
erfolgt über 2 AAA Batterien (nicht im
Lieferumfang enthalten).
1. Drehen Sie die Fernbedienung um und
öffnen Sie die Rückabdeckung.
2. Legen Sie die Batterien ein. Beachten Sie
dabei die Polarität (siehe Markierungen (+)
und (–) im Batteriefach).
3. Schließen Sie die Abdeckung wieder.
Achtung: Wenn Sie die Batterie austauschen
müssen, wird Ihnen dies mit folgendem
Symbol auf dem Display angezeigt: “ ”.
Alle Daten bleiben wie oben angegeben
während des Batteriewechsels gespeichert.
Sie müssen lediglich die Uhr neu einstellen.
Die Universal LCD-Fernbedienung 8in1 von
HAMA ist eine neue, für den europäischen
Markt entwickelte vorprogrammierte
Fernbedienung, die über eine umfangreiche
Codebibliothek, leistungsfähige Funktionen
sowie eine solide Qualität verfügt. Sie bietet
folgende Funktionen:
A.Insgesamt 8 Gerätetasten: TV, VCR,
AUX [für Tuner und Tape], DVD,
CBL/SAT, [analoger und digitaler
Satellitenempfänger, Kabel], CD,
TAPE, TUNER [LD, Audioverstärker,
Audioverstärker, Digitaler AudioBand-
Player für AUX.]
B.Drei Betriebsmodi: Setup-Modus,
Automatische Suche und Lernmodus.
C.LED und LCD zur Anzeige der
Signalübertragung
D.LCD Display zur Anzeige von gewähltem
Modus, Datum und Uhrzeit
E.LED und LCD zur Anzeige der
Programmierung
F. Teletext-/Fasttext-Funktion
G.Menüfunktion
H.Sperrfunktion für Lautstärke und
Stummschaltung
I. Gerätesperre
J.Gerätebelegung ändern
K.Einstellen der LCD-Uhr
L. Macro Funktion
M. SCAN Funktion
N. Hintergrundeinstellung
O. Kontrasteinstellung
3
18
17 9
21

d Bedienungsanleitung
4
Codeeinrichtung
A.Einrichten mithilfe von Markennamen
und Code:
1. Schalten Sie das gewünschte Gerät ein
(z.B. TV) . Falls Sie einen Videorekorder
bedienen möchten, legen Sie bitte eine
Kassette ein.
2. Halten Sie die SET-Taste Ihrer
Fernbedienung gedrückt. Drücken Sie
gleichzeitig eine Gerätetaste (z.B. TV)
3. Lassen Sie nun beide Tasten los. Es
erscheint der Markenname im Display.
4. Mit den Tasten CD können Sie den
Markennamen Ihres Gerätes wählen (z.B.
die TV-Marke Philips)
5. Überprüfen Sie die Funktion der
Fernbedienung indem Sie die Standbytaste
1sekunde (rote Taste) drücken. Bleibt das
Gerät eingeschaltet hat dieser Code keine
Funktion!
Versuchen Sie es mit den nächsten
folgenden Code (mit Hilfe der Tasten A B).
Vergessen Sie nicht jeden einzelnen Code
mit der roten Standbytaste (Siehe Punkt
1bis 5) zu testen.
Sollte das Gerät in den Standbymodus
schalten, handelt es sich wahrscheinlich
um einen brauchbaren Code.
Überprüfen Sie nach dem erneuten
einschalten Ihres Gerätes ob bei den
gleichen Code
auch andere Funktionen wie Lautstärke
oder Programmumschalten funktionieren.
Wenn es das tut,
können Sie den Code übernehmen (Punkt
6). Sollte nur eine beschränkte Funktion da
sein wie z.B. nur Standby suchen Sie nach
einen weiteren Code (Punkt 1 bis 5).
6. Wenn Sie den passenden Code gefunden
haben, drücken Sie die OK Taste, um
diesen zu Speichern. Im Display erscheint
„SUCCESS“ und das Setup wird beendet.
Hinweis:
1. Um zum Anfang zurückzukehren, drücken
Sie die EXIT Taste oder die Gerätetaste
(z.B. TV, VCR)
2. Richten Sie Ihre Fernbedienung beim
Tastentest auf das Gerät, das Sie bedienen
möchten.
3. Die Tasten CDA B OK, EXIT sind
während des Programmiervorganges auch
nur zum Programmieren benutzbar; in
diesem Moment haben diese Tasten keine
Menüfunktionen.
4. Ist die Gerätesperre aktiv, so müssen
Sie diese vor einer Neukonfiguration
deaktivieren.
B. Einrichten mithilfe der manuellen Suche:
Sollte die Konfiguration mit Marke und Code
nicht funktionieren, oder sollten Sie den
Markennamen nicht auf dem Bildschirm Ihrer
Fernbedienung fi nden, so können Sie noch
die Funktion Manuel-Search verwenden, um
den für Ihr Gerät passenden Code zu fi nden.
1. Schalten Sie das Gerät ein, das Sie
bedienen möchten (z.B. Fernseher). Falls
es sich um einen Videorekorder handelt,
legen Sie bitte eine Kassette ein.
2. Halten Sie nun die Taste SET auf Ihrer
neuen Fernbedienung etwas länger als
3 Sekunden gedrückt bis CODE SETUP
erscheint. Drücken Sie OK!
3. Wählen Sie mit Hilfe der Pfeiltasten C
oder D den Menüpunkt “DEV SEARCH” im
Display an und bestätigen Sie die Auswahl
mit der Taste OK.
4. Der Bildschirm zeigt z.B. “SAT”
(Gerätesuche) blinkend an. Wählen Sie nun
eine Gerätetaste (TV,SAT,VCR,DVD,CD,TAP
E,Aux) und drücken Sie diese. Bestätigen
Sie das Gerät mit der Taste OK. Nun
beginnt die entsprechende Gerätetaste im
Intervall an zu Blinken, dabei ändert sich
nach Intervall auch der Code.
g
Operating Instruction
Bitte unterbrechen Sie diesen Intervall mit
der Pfeiltaste C oder D!
Mit den Pfeiltasten gehen Sie nun zum
niedrigsten Zahlenwert des Codes.
5. Überprüfen Sie die Funktion der
Fernbedienung indem Sie die Standbytaste
1sekunde (rote Taste) drücken. Bleibt das
Gerät eingeschaltet hat dieser Code keine
Funktion!
Versuchen Sie es mit den nächsten
folgenden Code mit Hilfe der Tasten
C oder D!
Vergessen Sie nicht jeden einzelnen Code
mit der roten Standbytaste zu testen.
6. Sollte das Gerät in den Standbymodus
schalten, handelt es sich wahrscheinlich
um einen brauchbaren Code. Drücken Sie
bitte die Taste OK, um ihn zu speichern. Auf
dem Bildschirm erscheint „SUCCESS“ und
anschließend „DEV SUCCESS“. Sie können
nun wieder die Gerätetaste (z.B. DVD)
drücken, um die Konfiguration zu beenden,
oder wählen Sie mit Hilfe der Pfeiltasten
C oder D weitere Konfigurationen aus.
Mit „EXIT“ können Sie immer einen Punkt
zurück springen bis zum Ausgangspunkt.
7. Überprüfen Sie nach dem erneuten
einschalten Ihres Gerätes ob bei den
gleichen Code auch andere Funktionen
wie Lautstärke oder Programmumschalten
funktionieren.
Sollte dies nicht der Fall sein suchen Sie
wiederum nach einen erneuten Code
(Punkt 1 bis 6).
Hinweis:
1. Falls Sie die Suche nicht rechtzeitig
beendet haben, nachdem das Gerät
reagiert hat, können Sie mit den Pfeiltasten
wieder zurück zu dem passenden Code
gehen.
2. Während der Suchvorgang läuft, sind
die Tasten C und D,OK und EXIT nur
für die Konfiguration benutzbar – in
diesem Moment können Sie damit keine
Menüfunktionen bedienen.
3. Beim Durchsuchen aller Codes endet die
Fernbedienung beim ersten gesuchten
Code.
Falls das Gerät gesperrt ist, entsperren Sie es
vor der Konfiguration.
C. Einrichten mithilfe der Lernfunktion:
Die Lernfunktion ist eine Ergänzung
zur vorprogrammierten Codeliste. Die
Standardcodeliste stellt möglicherweise die
meisten benötigten Funktionen zur Verfügung;
jedoch können Sie Ihrer Fernbedienung noch
einige wenige Zusatzfunktionen hinzufügen.
Auch ein in der Liste nicht enthaltener neuer
Code einer neuen Originalfernbedienung
lässt sich hinzufügen.
Im Lernmodus benötigen Sie eine
Originalfernbedienung von der sie die Codes
in Ihre Universal LCD-Fernbedienung 8in1 von
Hama übernehmen möchten.
Drücken Sie die Taste “LEARN” , um Befehle
zu programmieren, mit den Pfeiltasten
können Sie im Display di Funktion “DELETE
KEY” oder „DELETE ALL“ wählen um
programmierte Befehle wieder zu löschen,
mit OK bestätigen dann erscheint „SURE
DELETE“, dies wieder mit OK bestätigen es
erscheint SUCCESS. Wenn Sie “DELETE DEV”
wählen, werden alle für das betreffende
Gerät gelernten Befehle gelöscht, mit
“DELETE ALL” löschen Sie ALLE gelernten
Befehle für ALLE Geräte!
5

d Bedienungsanleitung
3. Scrollen Sie mit den Pfeiltasten C oder
D bis zur Anzeige “LEARNING” und
bestätigen Sie mit OK. Im Display erscheint
nun “LEARN KEY”.
4. Scrollen Sie mit den Pfeiltasten C oder D
bis zur Anzeige “DELETE DEV” und drücken
Sie anschließend OK.
5. Wählen sie das Gerät aus, das Sie löschen
möchten und drücken Sie anschließend
OK.
6. Die Anzeige “SURE DELETE” erscheint.
Bestätigen Sie mit OK, und im Display
erscheint “SUCCESS” .
7. Wiederholen Sie Schritt 5, um Befehle auf
anderen Gerätetasten zu löschen
8. Durch Drücken der Taste EXIT (z.B. TV)
können Sie den Löschvorgang abbrechen.
Hinweis:
In einigen Fällen kann es ca. 3 Minuten
dauern, bis alle Befehle eines Gerätes
gelöscht sind. Sind nur wenige Befehle
gespeichert, so empfehlen wir, diese einzeln
nacheinander zu löschen.
Alle Tastenprogrammierungen löschen
Wenn Sie alle Tastenprogrammierungen
löschen möchten, folgen Sie bitte den
nachstehend beschriebenen Schritten:
1. Halten Sie die Taste SET für etwas mehr
als 3 Sekunden gedrückt und lassen Sie
wieder los.
2. Scrollen Sie mit den Pfeiltasten C oder
D, bis das Wort “LEARNING” erscheint,
bestätigen Sie mit OK und es erscheint
“LEARN KEY” im Display.
3. Scrollen Sie mit den Pfeiltasten C oder D,
bis im Display “DELETE ALL” erscheint und
bestätigen Sie mit OK.
4. Im Display erscheint nun “SURE DELET”,
was Sie ebenfalls mit OK bestätigen. Der
Löschvorgang ist abgeschlossen, wenn auf
dem Display “SUCCESS” zu lesen ist..
Zusätzliche Funktionen
A. Lautstärke und Stummschaltung sperren/
entsperren
Diese Funktion ist nützlich, wenn Sie die
Lautstärke nur über ein Gerät steuern.
Wenn die Lautstärke z. B. zentral über
einen Verstärker geregelt wird, können
Sie mithilfe dieser Funktion die Lautstärke
und Stummschalttasten des AUX-Geräts
(Verstärker in AUX) oder eines anderen
gerade in Benutzung befindlichen Geräts (z.
B. TV, DVD, VCR usw.) sperren, sodass
Lautstärke bzw. Stummschaltung des
Verstärkers über die Lautstärke- und
Stummschalttaste der Fernbedienung
erfolgen.
a. Drücken Sie die Gerätetaste des Geräts,
dessen Lautstärke- und Stummschalttaste
Sie steuern möchten, z. B. [TV], [CBL/SAT],
[AUX] usw.
b. Halten Sie die SET-Taste mindestens 3
Sekunden lang gedrückt und lassen Sie
diese dann los.
c. Wählen Sie mit den Pfeiltasten C oder D
„CONFIGURE“ aus und drücken Sie dann
die Taste OK.
d. Wählen Sie mit den Pfeiltasten C oder D
„VOL LOCK“ aus und drücken Sie dann die
Taste OK.
e. Auf dem Display wird „TV OFF“ angezeigt.
Wählen sie nun mit den Tasten oder ON
f. Drücken Sie die Taste OK, um die
Einstellung zu speichern. Auf dem Display
wird SUCCESS angezeigt und danach
wechselt die Fernbedienung zurück in den
aktuellen Einstellungszustand.
g. Sie können eine Gerätetaste drücken,
um die Einstellung abzuschließen, mit der
Taste EXIT in den vorhergehenden Zustand
zurückkehren, oder mit der Taste C oder D
jede andere Einstellung auswählen.
7
6
Befehle lernen
1. Drücken Sie die Taste für das Gerät,
(e.g. TV), für das Sie Befehle speichern
möchten.
2. Halten Sie die Taste SET etwas länger als 3
Sekunden und lassen Sie sie wieder los.
3. Sie mit den Pfeiltasten C oder D bis zur
Anzeige “LEARNING”, und drücken Sie die
Taste OK.
4. Sie mit den Pfeiltasten C oder D bis zur
Anzeige “LEARN KEY” und drücken Sie
dann die Taste OK.
5. Wählen Sie die (Ziel-) Taste, die Sie
programmieren möchten (z.B. Power). Im
Display erscheint “SELECT KEY”
6. Richten Sie den Sender der
Originalfernbedienung mit ca. 30 mm
Abstand auf das Empfangsfenster der
Universal LCD-Fernbedienung 8in1 von
Hama.
7. Halten Sie die Taste (z.B. Power) der
Originalfernbedienung 1 Sekunde lang
gedrückt, bis im Display “SUCCESS”
erscheint. Sollte das Display “FAILED”
anzeigen, wiederholen Sie bitte die
Schritte 4-6.
8. Wiederholen Sie die Schritte 4-6, um
weitere Tasten zu programmieren.
Hinweis:
1. Eine ausgewählte Zieltaste kann mehrere
Quelltasten erlernen, Universal LCD-
Fernbedienung 8in1 von Hama speichert
nur das zuletzt programmierte Signal.
2. Sie können alle normalen Funktionstasten
programmieren, mit Ausnahme der Tasten
SCAN und MACRO.
3. Einige Codes können möglicherweise nicht
von dieser Fernbedienung erlernt warden
(Auf Grund von Materialkostengrenze)
4. Man kann rund 100 Befehle für 8
Gerätetasten erlernen.
Tastenprogrammierungen löschen
Um einen programmierten Befehl zu
löschen, führen Sie bitte die nachstehend
beschriebenen Schritte durch:
1. Drücken Sie die Taste für das Gerät (z.B.
TV), für das Sie einen Befehl löschen
möchten.
2. Halten Sie die Taste SET etwas länger als
3 Sekunden gedrückt und lassen Sie sie
wieder los.
3. Scrollen Sie mit den Pfeiltasten C oder
D bis zur Anzeige “LEARNING”, drücken
Sie dann die Taste OK. Auf dem Display
erscheint “LEARN KEY”.
4. Scrollen Sie mit den Pfeiltasten C oder
D bis zur Anzeige “DELETE KEY ” und
bestätigen Sie mit OK.
5. Drücken Sie auf der Universal LCD-
Fernbedienung 8in1 von Hama die Taste,
die Sie löschen möchten. Das Display
zeigt “SURE DELETE” . Bestätigen Sie
mit der Taste OK. Im Display erscheint
“SUCCESS” .
6. Wiederholen Sie Schritt 4 zum Löschen der
nächsten Taste.
7. Nachdem Sie alle gewünschten
Befehle gelöscht haben, drücken Sie
eine Gerätetaste (z.B. TV), um den
Löschvorgang zu beenden.
Alle für ein Gerät gelernten Befehle löschen
Möchten Sie alle für ein Gerät gelernten
Befehle auf einmal löschen (anstatt einzeln
nacheinander), gehen Sie wie folgt vor:
1. Drücken Sie die Taste für das Gerät (z.B.
TV), für das Sie alle Befehle löschen
möchten.
2. Halten Sie die SET Taste für etwas mehr
als 3 Sekunden gedrückt und lassen Sie sie
dann wieder los.

d Bedienungsanleitung
4. Dann die Uhrzeit eingeben mit Pfeiltaste D
auswählen ob AM (vormittags) oder
PM (nachmittags). Dies wider mit OK
bestätigen.
5. Auf dem Display erscheint jetzt
„SUCCESS“.
6. Sie können eine Gerätetaste drücken, um
die Einstellung abzuschließen, mit der
Taste EXIT in den vorhergehenden Zustand
zurückkehren, oder mit den Pfeiltasten
C oder D jede andere Einstellung
auswählen. Nach dem Einrichten wird die
Zeit angezeigt.
E. Makro-Funktion
Die Fernbedienung verfügt über eine Makro-
Funktion, mit der Sie mehrere Vorgänge
hintereinander durchführen können. Dies
wird insbesondere für Home Theatre-
Systeme eingesetzt.
Drücken Sie die MAKRO-Taste und halten Sie
zusammen mit der Zahlentaste 1 (oder Taste 2
oder 3) gedrückt. Lassen Sie dann die Tasten
los. Die LED-Anzeige blinkt. Gleichzeitig wird
ein zuvor von Ihnen programmierter Befehl
von der Fernbedienung gesendet.
Das Einstellen der Makro-Funktion erfolgt
über die folgenden Schritte:
1. Halten Sie die SET-Taste mindestens 3
Sekunden lang gedrückt und lassen Sie
diese dann los.
2. Wählen Sie mit den Pfeiltasten C oder D
„MACRO“ aus und drücken Sie dann die
Taste OK.
3. Wählen Sie mit den Pfeiltasten C oder D
„MACRO1“ aus (oder Makro2 oder Makro3)
und drücken Sie dann die Taste OK.
4. Auf dem Display wird „SETTING“
angezeigt. Drücken Sie die Taste OK.
5. Sie können mehrere Tasten kombinieren,
um mehrere Vorgänge in der gewünschten
Reihenfolge durchzuführen. (Z. B.: TV
+ POWER + MUTE + AV, DVD + PLAY,
VCR + RECORD usw. In diesem Beispiel
würden Sie damit das Fernsehgerät
einschalten, es stumm schalten, in den
AV-Modus wechseln, eine DVD starten und
gleichzeitig mit der Aufnahme über den
Videorekorder beginnen.) Dieses Beispiel
zeigt, wie wirkungsvoll die Makro-Funktion
sein kann, wenn sie effektiv eingesetzt
wird.
6. Drücken Sie die Taste OK, um die
Einstellung zu speichern. Auf dem Display
wird SUCCESS angezeigt und danach
wechselt die Fernbedienung zurück in den
aktuellen Einstellungszustand.
7. Sie können eine Gerätetaste drücken, um
die Einstellung abzuschließen, mit der
Taste EXIT in den vorhergehenden Zustand
zurückkehren, oder mit den Pfeiltasten
C oder D jede andere Einstellung
auswählen.
Hinweis:
1. Sie können bis zu 10 verschiedene
Befehle in einem einzigen MAKRO-Befehl
einstellen.
2. Stellen Sie sicher, dass alle Tasten
ansonsten Signale senden können, auch
wenn Sie diese mit MAKRO programmiert
haben. Sie können die Taste prüfen, indem
Sie diese drücken und prüfen, ob das
entsprechende Gerät blinkt oder nicht,
bevor Sie ein MAKRO einstellen.
3. Stellen Sie sicher, das die Geräte korrekt
verwendet werden, wenn Sie die MAKRO-
Funktion durchführen. Beispielsweise muss
eine DVD eingelegt sein, wenn Sie eine
DVD abspielen und über Videorekorder
aufnehmen wollen.
4. Stellen Sie bitte sicher, dass die
Fernbedienung in „Sichtkontakt“ zu allen
Geräten steht und in die richtige Richtung
weist (also auf das jeweilige Gerät).
9
8
B. Gerätesperre
Mit der Sperrfunktion können Sie den
aktuellen Gerätecode gegen Überschreiben
schützen, sodass dieser bei der
Codeprogrammierung oder Codesuche nicht
überschrieben werden kann. Die Sperre kann
auch wieder aufgehoben werden.
a. Drücken Sie die Gerätetaste für das Gerät,
das Sie gegen Überschreiben schützen
möchten, z. B. [TV], [CBL/SAT], [AUX] usw.
b. Halten Sie die SET-Taste mindestens 3
Sekunden lang gedrückt und lassen Sie
diese dann los.
c. Wählen Sie mit den Pfeiltasten C oder D
„CONFIGURE“ aus und drücken Sie dann
die Taste OK.
d. Wählen Sie mit den Pfeiltasten C oder D
„DEV LOCK“ aus und drücken Sie dann die
Taste OK.
e. Auf dem Display wird „TV OFF“ angezeigt.
Wählen sie nun mit den Tasten A oder B
ON
f. Drücken Sie die Taste OK, um die
Einstellung zu speichern. Auf dem Display
wird SUCCESS angezeigt und danach
wechselt die Fernbedienung zurück in den
aktuellen Einstellungszustand.
g. Sie können eine Gerätetaste drücken,
um die Einstellung abzuschließen, mit der
Taste EXIT in den vorhergehenden Zustand
zurückkehren, oder mit den Pfeiltasten
C oder D jede andere Einstellung
auswählen
C. Gerätebelegung ändern
Wenn Sie einen zweiten Videorekorder
bedienen möchten (oder ein zweites TV-,
SAT/CBL-, CD-, DVD-, Kassettenrekorder,
Radio-Gerät etc.), können Sie dessen Code
auf AUX einstellen um eine Geräteänderung
(CODE SHIFT) durchzuführen. Folgen Sie
hierfür bitte den nachstehend beschriebenen
Schritten:
1. Halten Sie die SET Taste Ihrer neuen
Fernbedienung für etwas mehr als 3
Sekunden gedrückt und lassen Sie sie
dann wieder los. Wählen Sie nun mit
den Pfeiltasten “CODE SETUP” aus und
bestätigen Sie mit OK.
2. Das Display zeigt “DEV SEARCH” im
LCD-Menü; Sie können mit den Pfeiltasten
zur “CODE SHIFT” Anzeige gelangen und
bestätigen diese wieder mit OK. Nun
können Sie mit der Gerätetaste (z.B.VCR)
das gewünschte Gerät auswählen und die
entsprechende Codenummer eingeben.
3. Zum Speichern und Beenden drücken
Sie die Taste OK; im Display erscheint
“SUCCESS”.
4. Sie können nun den zweiten Videorekorder
(oder ein anderes Gerät) mit der AUX-
Gerätetaste bedienen.
D. Einstellen der LCD-Uhr
1. Halten Sie die SET-Taste mindestens 3
Sekunden lang gedrückt und lassen Sie
diese dann los.
2. Wählen Sie mit der Taste C oder D
„CONFIGURE“ aus und drücken Sie dann
die Taste OK.
3. Auf dem Display erscheint nun „TIME
SETUP“, dies wieder mit OK bestätigen.

d Bedienungsanleitung
2. Drücken Sie C oder D um zu
“CONFIGURE” zu gelangen und bestätigen
Sie mit OK.
3. Durch nochmaliges Drücken der Taste
C oder D gelangen Sie zu “CONTRAST”,
bestätigen Sie auch hier wieder mit OK.
4. Stellen Sie nun den Kontrastwert mit
den seitlichen Pfeiltasten A oder B wie
gewünscht ein und bestätigen mit der OK
Taste.
5. Drücken Sie die Taste OK, um Ihre
Einstellungen zu speichern. Im Display
erscheint „SUCCESS“ danach erscheint
wieder der aktuelle Menüpunkt. Sie
können eine Gerätetaste zum beenden der
Einrichtung wählen oder die Taste EXIT
um zum vorigen Menüpunkt zu gelangen.
Hier können sie die Pfeiltasten C oder D
verwenden, um einen anderen Menüpunkt
zu wählen.
Reset
Alle Konfigurationsdaten löschen und
die Fernbedienung auf Kaufzustand
zurücksetzen.
1. Halten Sie die Taste SET etwas länger als
3 Sekunden gedrückt und lassen Sie sie
dann wieder los.
2. Drücken Sie C oder D um zu
“CONFIGURE” zu gelangen und bestätigen
Sie mit der Taste OK.
3. Durch nochmaliges Drücken von C oder D
gelangen Sie zu “CLEAR ALL”. Bestätigen
Sie auch hier wieder mit OK. Im Display
erscheint „SURE CLEAR“.
4. Um alle Einstellungen zu löschen, drücken
Sie nun die Taste OK. Sie kehren hiermit zu
den Original-Standardeinstellungen zurück.
Sonstiges
Nachdem alle Einstellungen vorgenommen
wurden, drücken Sie auf der Fernbedienung
die Gerätetaste für das zu bedienende
Gerät (TV, VCR…). Nun können Sie die
Fernbedienung benutzen.
11
10
Makro-Funktionen löschen
1. Halten Sie die SET-Taste mindestens 3
Sekunden lang gedrückt und lassen Sie
diese dann los.
2. Wählen Sie mit den Pfeiltasten C oder D
„MACRO“ aus und drücken Sie dann die
Taste OK.
3. Wählen Sie mit den Pfeiltasten C oder D
die korrekte MACRO-Einstellung aus,
beispielsweise „MACRO2“ und drücken
Sie dann die Taste OK. Auf der Anzeige
erscheint „SETTING“.
4. Wählen Sie mit den Pfeiltasten C oder D
„DELETE“ aus und drücken Sie dann die
Taste OK.
5. Auf der Anzeige erscheint die Frage „SURE
DELETE“. Bestätigen Sie den Löschvorgang
mit OK. Auf dem Display wird SUCCESS
angezeigt und danach wechselt die
Fernbedienung zurück in den aktuellen
Einstellungszustand.
6. Sie können eine Gerätetaste drücken, um
die Einstellung abzuschließen, mit der
Taste EXIT in den vorhergehenden Zustand
zurückkehren, oder mit den Pfeiltasten
C oder D jede andere Einstellung
auswählen.
F. SCAN Funktion
Die Universal LCD-Fernbedienung 8in1
von Hama hat eine SCAN Funktion um
alle TV oder CAB/SAT Kanäle für Ihre
Schnellansicht.
1. Drücken Sie die Gerätetaste, um das Gerät
(z. B. TV) zu wählen, welches Sie betreiben
wollen.
2. Halten Sie die SCAN Taste mindestens
1 Sekunden lang gedrückt. Wenn
das Geräte-LED blinkt, beginnt es
mit dem SCAN-Modus. Die Universal
LCD-Fernbedienung 8in1 von Hama
sucht automatisch alle Kanäle für ihre
Schnellansicht.
Hinweis:
1. Die Universal LCD-Fernbedienung 8in1 von
Hama muss auf das Gerät gerichtet sein,
bis der SCAN-Modus beendet ist.
2. Wenn Sie den SCAN-Modus beenden
möchten, drücken Sie eine beliebige Taste
auf Ihrer Fernbedienung.
G. Hintergrundbeleuchtung
Wenn die Funktion Hintergrundbeleuchtung
aktiviert ist, leuchtet der Hintergrund auf,
sobald eine beliebige Taste gedrückt wird.
Halten Sie die Taste SET für mehr als 3
Sekunden gedrückt und lassen Sie wieder
los.
1. Wählen Sie durch Drücken der Pfeiltasten
C oder D den Menüpunkt “CONFIGURE”
aus und drücken Sie anschließend OK.
2. Mit den Pfeiltasten C oder D wählen Sie
nun den Menüpunkt “LIGHT ” und drücken
Sie wieder die Taste OK.
3. Mit den seitlichen Pfeiltasten A oder B
können Sie zwischen “ON” und “OFF”
wählen.
4. Drücken Sie die Taste OK, um Ihre
Einstellungen zu speichern. Im Display
erscheint SUCCESS danach erscheint
wieder der aktuelle Menüpunkt. Sie
können eine Gerätetaste zum beenden der
Einrichtung wählen oder die Taste EXIT
um zum vorigen Menüpunkt zu gelangen.
Hier können sie die Pfeiltasten C oder D
verwenden, um einen anderen Menüpunkt
zu wählen.
H. Kontrasteinstellung
Sie können mit den nachstehend
beschriebenen Schritten die Kontraste auf
dem Display Ihrer Fernbedienung einstellen:
1. Halten Sie die SET-Taste etwas länger als
3 Sekunden gedrückt und lassen Sie sie
wieder los.

12
Universal LCD Remote Control
Function buttons
1. LCD: Displays the selected mode and time.
2. Mute
3. Switches the device on or off.
4. MENU: Corresponds to the menu (for
configuring certain device functions) or
the OSD (on-screen display), or the SAVE
button on your original remote control.
5. TV/Video
6. Hold page
7. Teletext mode
8. TV/Text
9. Corresponds to the UP, DOWN, LEFT,
RIGHT, OK, and EXIT buttons for menu
functions on your original remote control.
When in setup mode, the arrow buttons
are used as a cursor and to confirm and
exit the programming of your remote
control.
10. VOL±: Corresponds to the VOLUME UP/
VOLUME DOWN buttons on your original
remote control.
11. CH±: Corresponds to the PROGRAMME
SELECTION button on your original remote
control.
12. TV, CBL/SAT, VCR, DVD, CD, TAPE, TUNER,
AUX: Used for choosing the device you
wish to operate.
13. REW/PLAY/FWD/PAUSE/REC/STOP: Func-
tions for CD, DVD, VCR and TAPE.
14. 0-9: The number buttons have the same
function as the number buttons on your
original remote control.
15. A-B: Switches between two scenes of a
fi lm or DVD.
16.
(ENTER): For instantly switching the
selected channels (less than three digits).
17. MACRO: Enables you to carry out several
processes in succession.
18. SET: Used for setting up and configuring
the remote control or displaying the status
on the LCD.
19. LEARN: Used for learning the functions.
20. SCAN: Enables a fast overview of all
devices.
21. Colour buttons: FASTEXT
General description:
Thank you for purchasing the Hama 8in1
Universal LCD Remote Control. The remote
control, with which you can operate up
to eight devices, is equipped with a very
comprehensive code library. It is suitable for
a variety of TV sets, video cassette recorders
(VCR), DVD players, CD players, satellite
receivers (CBL/SAT), cassette recorders
(TAPE), tuners (TUNER) and other audio
devices (AUX) found on today’s market. An
indicator LED makes it easier to program the
remote control. The Hama 8in1 Universal
LCD Remote Control controls all the essential
basic functions of your devices. Please read
the entire operating manual carefully before
using the remote control for the fi rst time. In
addition, this remote control has the ability
to “learn” new codes from other remote
controls as necessary in order to supplement
the preset codes. The “MACRO” function
allows you to carry out several processes in
succession with just one button.
The “Device lock” function protects your
device from changes caused by a new con-
fi guration until the device is unlocked.
The Hama 8in1 Universal LCD Remote Control
is also equipped with a backlight for the LCD
and a separate illuminated display for the
device currently in use.
The battery status display informs the user in
good time about battery replacement.
All configuration data is saved permanently
in the backup storage, meaning you do not
have to worry about data loss when replac-
ing the battery.
The Hama 8in1 Universal LCD Remote Control
is also equipped with a clock for displaying
the current time in AM and PM.
As the functions detailed above show, the
Hama 8in1 Universal LCD Remote Control is a
modern, high-performance device.
With the “Volume lock” function, you can
lock the VOL+/VOL- button so that it solely
controls the amplifier of your home theatre
system.
(To set up this function, see the Part A of the
“Additional Functions” section.)
Inserting the batteries:
The remote control is powered by 2 AAA
batteries (not included).
1. Turn the remote control over and open the
back cover.
2. Insert the batteries. Pay attention to the
polarity (note the (+) and (-) markings in
the battery compartment).
3. Close the cover.
Note: When the batteries need to be re-
placed, the following symbol is shown in the
display: “ ”.
All data as entered above is stored during
battery replacement. Only the clock needs to
be set again.
The Hama 8in1 Universal LCD Remote Control
is a new pre-programmed remote control
developed for the European market that is
solidly built and equipped with an extensive
code library and powerful functions. It offers
the following functions:
A. A total of 8 device buttons: TV, VCR, AUX
[for tuners and tape players], DVD, CBL/
SAT [analogue and digital satellite receiv-
ers, cable], CD, TAPE, TUNER [LD, audio
amplifier, digital audio tape player for AUX]
B. Three operating modes: Setup mode,
automatic search and learn mode
C. LED and LCD for indicating signal transmis-
sion
D. LCD for displaying the selected mode, date
and time
E. LED and LCD for displaying the program-
ming
F. Teletext/FASTEXT function
G. Menu function
H. Locking function for volume and mute
I. Device lock
J. Changing device assignment
K. Setting up the LCD clock
L. MACRO function
M. SCAN function
N. Background settings
O. Contrast settings
Setting up codes
A. Setting up using brand name and code:
1. Switch on the desired source device (e.g.
TV). Insert a cassette if you wish to oper-
ate a VCR.
2. Press and hold the SET button on the
remote control. At the same time, press a
device button (e.g. TV).
3. Now release both buttons. The brand name
appears in the display.
4. You can then select the brand name of your
device using the CandD buttons (e.g. TV
brand Philips).
5. Check the functionality of the remote con-
trol by pressing the standby button for one
second (red button). If the device remains
switched on, then the selected code has
no function.
Try again with the next available code
(using the A and B buttons).
Remember to check each individual code
with the red standby button (see steps 1 to
5). If the device switches to standby mode,
then the code is most likely suitable for
use. After switching on the device again,
check whether the other functions (e.g.
volume or switching stations)
also work when using the same code.
If this is the case, you can use the code
(see step 6). If functionality is limited (e.g.
standby only), then try again with a differ-
ent code (steps 1 to 5).
6. When you have found a suitable code,
press the OK button to store it. “SUCCESS”
appears in the display and the setup mode
is exited.
13
g Operating Instructions

C. Setting up using the learn function:
The learn function supplements the pre-
programmed code list. Whilst the standard
code list may provide the most necessary
functions, you can also add some additional
functions to your remote control. A new code
for a new original remote control can be
added, even if it is not in the code list.
In learn mode, you need the original remote
control whose codes you wish to store
in your Hama 8in1 Universal LCD Remote
Control.
Press the “LEARN” button to program the
commands. The “DELETE KEY” or “DELETE
ALL” functions for deleting the programmed
commands can be selected in the display us-
ing the arrow buttons. After confirming with
OK, “SURE DELETE” appears on the display.
After confirming once again, “SUCCESS”
appears. When “DELETE DEV” is selected, all
learned commands for the selected device
are deleted. When “DELETE ALL” is selected,
ALL learned commands for ALL devices are
deleted.
Learning commands
1. Press the button for the device where you
wish to save the commands (e.g. TV).
2. Press and hold the SET button for a little
over 3 seconds, then release it.
3. Using the CorD buttons, scroll until
“LEARNING” is displayed and press OK.
4. Using the CorD buttons, scroll until
“LEARN KEY” is displayed, then press OK.
5. Select the desired (target) button you wish
to program (e.g. power). “SELECT KEY”
appears in the display.
6. At a distance of approximately 30 mm,
point the transmitter of the original remote
control at the receiver window of the
Hama 8in1 Universal LCD Remote Control.
7. Press and hold the button (e.g. power) of
the original remote control for about 1
second until “SUCCESS” appears in the
display. If “FAILED” appears in the display,
then repeat steps 4 to 6.
8. Repeat steps 4 to 6 to program further
buttons.
Note:
1. A selected target button can learn several
source buttons. The Hama 8in1 Universal
LCD Remote Control only stores the last
programmed signal.
2. You can program all normal function but-
tons, with the exception of the SCAN and
MACRO buttons.
3. It may not be possible for some codes to
be learned by this remote control (due to
material cost limits).
4. Around 100 commands can be learned for 8
device buttons.
Deleting the button programming
To delete a programmed command, carry out
the following steps:
1. Press the button for the device where you
wish to delete a command (e.g. TV).
2. Press and hold the SET button for a little
over 3 seconds, then release it.
3. Using the CorD buttons, scroll until
“LEARNING” is displayed and press OK.
“LEARN KEY” now appears on the display.
4. Using the CorD buttons, scroll until
“DELETE KEY” is displayed, then confirm
with OK.
5. Press the button you wish to delete on the
Hama 8in1 Universal LCD Remote Control.
“SURE DELETE” appears on the display.
Confirm by pressing the OK button. “SUC-
CESS” appears in the display.
6. Repeat step 4 to delete the next button.
7. After you have deleted the required com-
mands, press a device button (e.g. TV) to
exit the deletion process.
15
14
Note:
1. To start again, press the EXIT button or the
device button (e.g. TV, VCR).
2. When carrying out the button test, aim the
remote control at the device you wish to
use.
3.
The CDA B OK and EXIT buttons can
also only be used for programming during
the programming procedure. These but-
tons have no menu functions at this time.
4.
If the device lock is active, then it must be
deactivated before a new confi
g
uration is
made.
B. Setting up using manual search:
If configuration using brand names and
codes was unsuccessful (or your brand
name cannot be found on the remote control
display), then you can also search for a suit-
able code for your device using the manual
search function.
1. Switch on the device you wish to operate
(e.g. TV). Insert a cassette if you wish to
operate a VCR.
2. Press and hold the SET button on the
remote control for a little over 3 seconds
until CODE SETUP appears on the display.
Press OK.
3. Using the CorD buttons, select the “DEV
SEARCH” menu item in the display and
confirm by pressing the OK button.
4. “SAT” (device search) fl ashes on the
screen (for example). Now select and
press a device button (TV, SAT, VCR,
DVD, CD, TAPE, AUX). Confirm the device
selection using the OK button. The cor-
responding device button then starts to
fl ash in intervals. The code also changes
according to the interval. Please interrupt
this interval using the CorD button. Now
access the lowest code value using the
arrow buttons.
5. Check the functionality of the remote con-
trol by pressing the standby button for one
second (red button). If the device remains
switched on, then the selected code has
no function.
Try again with the next available code
(using the CorD buttons).
Remember to check each individual code
with the red standby button.
6. If the device switches to standby mode,
then the code is most likely suitable for
use. Press the OK button to store the code.
“SUCCESS” then appears on the display,
followed by “DEV SUCCESS”. You can
now press the device button (e.g. DVD)
to exit the configuration or select further
configurations using the CorD buttons.
You can always go back one step until the
starting point by pressing “EXIT”.
7. After switching on the device again, check
whether the other functions (e.g. volume
or switching stations) also work when
using the same code.
If this is not the case, then try again with a
different code (steps 1 to 6).
Note:
1. If the search was not ended in time after
the device has reacted, then you can go
back to the corresponding code using the
arrow buttons.
2. The CandD , OK and EXIT buttons can
also only be used for configuration whilst
the search is running. These buttons have
no menu functions at this time.
3. When all codes have been searched,
the remote control fi nishes on the fi rst
searched code.
If the device is locked, then unlock it
before the configuration is made.

B. Device lock
With the device lock function, you can pro-
tect the current code from being overwritten
when programming or searching for codes.
The lock can also be deactivated.
a. Press the button for the device that you
wish to protect from overwriting, e.g. [TV],
[CBL/SAT], [AUX] etc.
b. Press and hold the SET button for at least 3
seconds, then release it.
c. Using the CorD buttons, select “CONFIG-
URE” and then press the OK button.
d. Using the CorD buttons, select “DEV
LOCK” and then press the OK button.
e. “TV OFF” appears on the display. Using the
A or B buttons, select ON.
f. Press the OK button to save the settings.
“SUCCESS” appears in the display. The
remote control then returns to the current
settings status.
g. To fi nish the setting, press any device but-
ton. To return to the previous status, press
EXIT. To select any other setting, use the
CorD buttons.
C. Changing device assignment
If you wish to operate a second video
recorder (or a second TV, SAT/CBL device,
CD or DVD player, cassette recorder, radio
etc.), then you can move its device code to
AUX in order to carry out a device change
(CODE SHIFT). To do this, carry out the fol-
lowing steps:
1. Press and hold the SET button on the new
remote control for a little over 3 seconds,
then release it. Select “CODE SETUP” us-
ing the arrow buttons and confirm with OK.
2. “DEV SEARCH” is shown on the display
in the LCD menu. You can then access
the CODE SHIFT display using the arrow
buttons and confirm this again with OK.
Now select the device by pressing the
corresponding button (e.g. VCR) and enter
the correct code number.
3. Press the OK button to save the settings
and exit the function. “SUCCESS” appears
in the display.
4. You can now operate the second video
recorder (or another device) using the
AUX device button.
D. Setting up the LCD clock
1. Press and hold the SET button for at least 3
seconds, then release it.
2. Using the CorD buttons, select “CONFIG-
URE” and then press the OK button.
3. “TIME SETUP” appears on the display.
Confirm with OK.
4. Enter the time and select AM or PM using
the D button. Confirm with OK.
5. “SUCCESS” now appears on the display.
6. To fi nish the setting, press any device
button. To return to the previous status,
press EXIT. To select any other setting, use
the CorD buttons. The time is displayed
after setup.
E. MACRO function
The remote control is equipped with a
MACRO function, with which you can carry
out several processes in succession. This is
especially useful for home theatre systems.
Press the MACRO button and hold it down
while you press the number button 1 (or but-
tons 2 or 3). Release both buttons. The LED
fl ashes. A previously programmed command
is sent from the remote control simultane-
ously.
To set up the MACRO function,
carry out the following steps:
1. Press and hold the SET button for at least 3
seconds, then release it.
2. Using the CorD buttons, select “MACRO”
and then press the OK button.
3. Using the CorD buttons, select
“MACRO1” (or “MACRO2” or “MACRO3”)
and then press the OK button.
4. “SETTING” appears on the display. Press
the OK button.
17
16
Deleting all learned commands for a device
To delete all learned commands for a device
at once (instead of individually), proceed as
follows:
1. Press the button for the device where you
wish to delete all commands (e.g. TV).
2. Press and hold the SET button for a little
over 3 seconds, then release it.
3. Using the CorD buttons, scroll until
“LEARNING” is displayed, then confi
r
m
with OK. “LEARN KEY” now appears on
the display
.
4. Using the CorD buttons, scroll until “DE-
LETE DEV” is displayed, then press OK.
5.
Select the device to be deleted, then press OK.
6. “SURE DELETE” appears on the display.
After confirming with OK, “SUCCESS”
appears in the display.
7. Repeat step 5 to delete commands on other
device buttons.
8. You can cancel the deletion process by
pressing the EXIT button.
Note:
In some cases it may take around 3 minutes
before all device commands are deleted. If
only a few commands have been stored, then
we recommend deleting them individually
one after the other.
Deleting all button programming
To delete all button programming, carry out
the following steps:
1. Press and hold the SET button for a little
over 3 seconds, then release it.
2. Using the CorD buttons, scroll until
“LEARNING” is displayed, then confirm
with OK. “LEARN KEY” now appears on
the display.
3. Using the CorD buttons, scroll until
“DELETE ALL” is displayed, then confirm
with OK.“LEARN KEY” now appears on
the display.
4. “SURE DELETE” appears in the display,
which must also be confirmed by pressing
OK. The deletion process is completed
when “SUCCESS” is shown on the display.
Additional functions
A. Locking/unlocking volume and mute
This function is useful if you control the
volume using only one device. If the volume
is centrally controlled via an amplifier, for
example, you can use this function to lock
the volume and mute buttons of the AUX
device (amplifier in AUX) or any other device
currently being used (e.g. TV, DVD, VCR etc.)
so that
the remote control‘s volume or mute buttons
control the corresponding amplifier func-
tions.
a. Press the button for the device whose vol-
ume and mute button you wish to operate,
e.g. [TV], [CBL/SAT], [AUX] etc.
b. Press and hold the SET button for at least 3
seconds, then release it.
c. Using the CorD buttons, select „CONFIG-
URE“ and then press the OK button.
d. Using the CorD buttons, select “VOL
LOCK” and then press the OK button.
e. “TV OFF” appears on the display. Using the
or buttons, select ON.
f. Press the OK button to save the settings.
“SUCCESS” appears in the display. The
remote control then returns to the current
settings status.
g. To fi nish the setting, press any device but-
ton. To return to the previous status, press
EXIT. To select any other setting, use the
CorD buttons.

d Bedienungsanleitung
19
18
5. You can combine several buttons to carry
out several processes in the order you
wish. (Example: TV + POWER + MUTE +
AV, DVD + PLAY, VCR + RECORD, etc. – In
this example, you would turn on the TV set,
switch on mute, change to AV mode, start
a DVD and simultaneously start recording
with the video recorder.) This example
shows how powerful the MACRO function
can be, if used effectively.
6. Press the OK button to save the settings.
“SUCCESS” appears in the display. The
remote control then returns to the current
settings status.
7. To fi nish the setting, press any device but-
ton. To return to the previous status, press
EXIT. To select any other setting, use the
CorD buttons.
Note:
1. You can program up to 10 different com-
mands with only one MACRO command.
2. Please ensure that all buttons can
otherwise send signals, even if you have
programmed them with the MACRO func-
tion. Before setting up a MACRO, you can
test the button by pressing it and checking
if the correct device fl ashes.
3. When carrying out a MACRO function,
please ensure that the device is being
used correctly. For example, if you wish
to play a DVD and record using a video
recorder, a DVD must be inserted.
4. Please ensure that the remote control can
be “seen” by all devices and is pointing in
the right direction (at the device you wish
to operate).
Deleting MACRO functions
1. Press and hold the SET button for at least 3
seconds, then release it.
2. Using the CorD buttons, select “MACRO”
and then press the OK button.
3. Using the CorD buttons, select the
correct MACRO setting (for example,
“MACRO2”) and then press the OK button.
“SETTING” appears on the display.
4. Using the CorD buttons, select “DELETE”
and then press the OK button.
5. “SURE DELETE” appears on the display.
Confirm the deletion procedure with OK.
“SUCCESS” appears in the display. The
remote control then returns to the current
settings status.
6. To fi nish the setting, press any device but-
ton. To return to the previous status, press
EXIT. To select any other setting, use the
CorD buttons.
F. SCAN function
The Hama 8in1 Universal LCD Remote Control
is equipped with a SCAN function for a quick
overview of all TV or CAB/SAT channels.
1. Press the button for the device you wish to
operate (e.g. TV).
2. Press and hold the SCAN button for at
least 1 second. The SCAN mode is started
when the device LED fl ashes. The Hama
8in1 Universal LCD Remote Control then
automatically searches all channels for
the quick overview.
Note:
1. The Hama 8in1 Universal LCD Remote
Control must be pointed at the device until
the SCAN mode is fi nished.
2. To exit the SCAN mode, press any button
on the remote control.
G. LED backlight
When the LED backlight function is activated,
then the display is illuminated as soon as a
button is pressed. Press and hold the SET
button for more than 3 seconds, then release
it.
1. Using the CorD buttons, select the
“CONFIGURE” menu item and then press
the OK button.
2. Using the CorD buttons, select the
“LIGHT” menu item and press the OK
button again.
3. You can switch the function “ON” and
“OFF” using the A or B buttons.
4. Press the OK button to save the settings.
“SUCCESS” appears in the display, fol-
lowed by the current menu item. To fi nish
the setting, press any device button. To
return to the previous menu item, press
EXIT. To select another menu item, use the
CorD buttons.
H. Contrast settings
You can set the display contrast of your
remote control by carrying out the following
steps:
1. Press and hold the SET button for a little
over 3 seconds, then release it.
2. Using the CorD buttons, scroll until
“CONFIGURE” is displayed and confirm
with OK.
3. By pressing the CorD buttons again,
scroll until “CONTRAST” is displayed and
confirm again with OK.
4. Set the desired contrast using the A or B
buttons and confirm with OK.
5. Press the OK button to save the settings.
“SUCCESS” appears in the display, fol-
lowed by the current menu item. To fi nish
the setting, press any device button. To
return to the previous menu item, press
EXIT. To select another menu item, use the
CorD buttons.
Reset
This function deletes all configuration data
and resets the remote control to the original
standard settings.
1. Press and hold the SET button for a little
over 3 seconds, then release it.
2. Using the CorD buttons, scroll until
“CONFIGURE” is displayed and confirm
with OK.
3. By pressing the CorD buttons again,
scroll until “CLEAR ALL” is displayed and
confirm again with OK. “SURE CLEAR”
appears in the display.
4. Press the OK button to delete all stored
settings. The remote control is then reset
to the original standard settings.
Other
Once all settings have been made, press the
device button on the remote control for the
device you wish to operate (TV, VCR etc.). You
can now use the remote control.

20
Universal LCD Τηλεχειριστήριο
Πλήκτρα ρυθμίσεων
1. LCD: δείχνει την επιλεγμένη κατάσταση και
ώρα.
2. Αθόρυβο
3. Ανοίγει / Κλείνει τη συσκευή
4. MENU: αντιστοιχεί στο μενού (για
διαμόρφωση των λειτουργιών της συσκευής
σας) ή την οθόνη ή το πλήκτρο SAVE του
αυθεντικού τηλεχειριστηρίου.
5. TV / Video.
6. Hold Page.
7. Te letext.
8. TV / Te xt
9. Αντιστοιχεί στα UP, DOWN, LEFT, RIGHT, OK
και EXIT πλήκτρα του μενού στο αυθεντικό
τηλεχειριστήριό σας. Αλλά κατά τη διάρκεια
του στησίματος χρησιμοποιούνται σαν
κέρσορας, επιβεβαιώνουν και βγάζουν από
το πρόγραμμα το τηλεχειριστήριό σας.
10. VOL ±: Αντιστοιχεί στα πλήκτρα VOLUME
UP / VOLUME DOWN του αυθεντικού
τηλεχειριστηρίου.
11 .CH ±: Αντιστοιχεί στο πλήκτρο PRO-
GRAMME SELECTION.
12. TV, CBL / SAT, VCR, DVD, CD, TAPE,
TUNER, AUX: Χρησιμοποιούνται για να
επιλέγετε τη συσκευή που επιθυμείτε να
λειτουργήσετε.
13. REW / PLAY / FWD / PAUSE / REC / STOP:
Λειτουργίες για CD, DVD, VCR και TAPE.
14. 0-9: Τα πλήκτρα των αριθμών έχουν την ίδια
λειτουργία όπως τα πλήκτρα των αριθμών
στο αυθεντικό σας τηλεχειριστήριο.
15. Α Β: Για να εναλλάσσεστε μεταξύ δυο
σκηνών σε μια ταινία.
16.
(ENTER): Για άμεση εναλλαγή των
επιλεγμένων καναλιών (λιγότερο από 3
ψηφία).
17. MACRO: Σας δίνει τη δυνατότητα να
διεξάγετε διαφορετικές λειτουργίες τη μια
μετά την άλλη.
18.SET: Για να στήσετε / Συντονίσετε το
τηλεχειριστήριό σας ή να δείξετε την
κατάστασή σας στην οθόνη.
19. LEARN: Για να διαβάσετε τις λειτουργίες.
20.SCAN: Δίνει τη δυνατότητα για μια γρήγορη
επισκόπηση όλων των συσκευών.
21. Χρωματιστά Πλήκτρα: FASTEXT
Γενική Περιγραφή
Αυτό το τηλεχειριστήριο, έχει την ικανότητα
να «μαθαίνει» νέους κωδικούς από άλλα
τηλεχειριστήρια, με σκοπό να συμπληρώσει
τους κωδικούς του παρόντος. H «MACRO»
λειτουργία διεξάγει διαφορετικές συνεχόμενες
λειτουργίες με ένα πλήκτρο για το home
theater. Το «Device lock» μπορεί να κλειδώσει
τη συσκευή ενάντια στις αλλαγές με καινούργιο
στήσιμο μέχρι να την ξεκλειδώσετε.
Αυτό το τηλεχειριστήριο έχει φωτισμό οθόνης
και ξεχωριστό φωτισμό για κάθε συσκευή για
να σας δείχνει ποια συσκευή δουλεύει κάθε
φορά. Η ένδειξη «low buttery» σας υπενθυμίζει
πότε πρέπει να αλλάξετε μπαταρίες. Όλα τα
δεδομένα αποθηκεύονται σε μνήμη, μόνιμα
και δεν πρέπει να ανησυχείτε μήπως χάσετε
δεδομένα κατά την αλλαγή των μπαταριών.
Αυτό το τηλεχειριστήριο έχει επίσης πραγματική
ώρα ρολογιού και σας δείχνει την ώρα πμ μμ.
Με τη λειτουργία «Volume lock» μπορείτε να
κλειδώσετε τα πλήκτρα VOL +, VOL – έτσι ώστε
να ελέγχει αποκλειστικά τον ενισχυτή του home
theater σας.
Εισάγοντας τις μπαταρίες
Αυτό το τηλεχειριστήριο χρειάζεται για
να λειτουργήσει δυο AAA μπαταρίες (δεν
περιλαμβάνονται).
Σημείωση: όποτε οι μπαταρίες χρειάζονται
αντικατάσταση, η LCD θα εμφανίζει στην
οθόνη το ένα σήμα“ ”. Παρακαλούμε
αντικαταστήστε τις μπαταρίες άμεσα. Όλα
τα δεδομένα που έχετε εισάγει στη μονάδα
θα αποθηκευθούν στη μνήμη ακόμη και αν
βγάλετε τις μπαταρίες. Μόνο το ρολόι πρέπει
να στήσετε ξανά.
Το Universal LCD Τηλεχειριστήριο σας παρέχει
τις παρακάτω λειτουργίες:
A. Ένα σύνολο από πλήκτρα 8 συσκευών: TV,
VCR, AUX (για ραδιόφωνα και κασετόφωνα),
DVD, CBL / SAT (αναλογικό και ψηφιακό
δορυφορικό δέκτη, καλώδιο), CD, TAPE,
TUNER (LD, ηχητικό ενισχυτή, ψηφιακό
κασετόφωνο για AUX)
B. Τρεις καταστάσεις λειτουργίας: Κατάσταση
στησίματος, αυτόματη αναζήτηση,
κατάσταση προσαρμογής.
C. LED και LCD για εκπομπή σήματος
D. LCD για ένδειξη της επιλεγμένης
κατάστασης, ημέρας και ώρας.
E. LED και LCD για ένδειξη προγράμματος
F. Teletext / Fasttext λειτουργία.
G. Λειτουργία menu
H. Λειτουργία κλειδώματος / ξεκλειδώματος
για την ένταση φωνής και του αθόρυβου.
I. Κλείδωμα συσκευής
J. Μετατόπιση συσκευής (αλλάζοντας την
συσκευή)
K. Στήσιμο του LCD ρολογιού.
L. Macro λειτουργία.
M. Scan λειτουργία.
N. Ρύθμιση του φόντου
O. Ρύθμιση της αντίθεσης
Στήσιμο
A. Στήσιμο χρησιμοποιώντας το όνομα του
Κατασκευαστή και τον Κωδικό
1. Ανοίξτε τη συσκευή (πχ TV) που επιθυμείτε
να λειτουργήσετε. Αν είναι CVR,
παρακαλούμε εισάγετε μια κασέτα.
2. Πατήστε και κρατήστε το πλήκτρο SET
στο τηλεχειριστήριό σας. Έπειτα πατήστε
(ταυτόχρονα) ένα από τα πλήκτρα συσκευής
(πχ TV)
3. Έπειτα αφήστε τα, το όνομα του
κατασκευαστή θα εμφανιστεί στη οθόνη.
4. Μπορείτε να πατήσετε τα πλήκτρα
C
ή
D
για να επιλέξετε την μάρκα της συσκευής
σας (πχ μάρκα τηλεόρασης: Philips)
5. Ελέγξτε τη λειτουργία των πλήκτρων
πατώντας το πλήκτρο αναμονής για ένα
δευτερόλεπτο (κόκκινο πλήκτρο). Αν
η συσκευή παραμένει ανοιχτή, τότε ο
επιλεγμένος κωδικός δεν έχει καμία ισχύ.
Δοκιμάστε ξανά με τον επόμενο κωδικό
(χρησιμοποιώντας τα πλήκτρα
A
και
B
).
Θυμηθείτε να ελέγξετε κάθε ξεχωριστό
κωδικό με το κόκκινο πλήκτρο αναμονής
(δείτε βήματα 1 με 5). Αν η συσκευή γυρίζει
σε κατάσταση αναμονής, ο κωδικός είναι
περισσότερο πιθανό για χρήση. Μετά το
άνοιγμα της συσκευής ξανά, ελέγξτε αν
οι άλλες λειτουργίες (πχ ήχος) δουλεύουν
επίσης όταν χρησιμοποιείτε τον ίδιο
κωδικό. Αν συμβαίνει αυτό, μπορείτε να
χρησιμοποιήσετε τον κωδικό (βλ. βήμα 6). Αν
η λειτουργία είναι περιορισμένη (πχ αναμονή
μόνο), τότε δοκιμάστε ξανά με διαφορετικό
κωδικό (βήματα 1 με 5).
6. Όταν βρείτε έναν κατάλληλο κωδικό,
πατήστε το πλήκτρο OK για να τον
αποθηκεύσετε. «SUCCESS» εμφανίζετε
στην οθόνη και η συσκευή βγαίνει από
κατάσταση στησίματος.
Σημείωση:
1. Για να επιστρέψετε σε αρχική κατάσταση,
πατήστε το πλήκτρο EXIT ή το πλήκτρο
συσκευής (πχ TV ή VCR..)
2. Όταν θέτετε σε λειτουργία το πλήκτρο test,
σημαδέψτε το τηλεχειριστήριο στη συσκευή
που θέλετε να λειτουργήσετε.
3. Μόνο τα πλήκτρα
CDA B
ΟΚ, ΕΧΙΤ
μπορείτε να χρησιμοποιήσετε κατά τη
διάρκεια του προγραμματισμού του νέου
σας τηλεχειριστηρίου. Δεν μπορείτε να
χρησιμοποιήσετε τη συσκευή όπως στην
κανονική λειτουργία μέχρι να εξέλθετε από
την κατάσταση στησίματος.
4. Αν η συσκευή είναι κλειδωμένη, πρέπει
πρώτα να ξεκλειδώσετε τη συσκευή και
έπειτα να λειτουργήσει.
21
k
Οδηγίες χρήσης

Σε κατάσταση εκμάθησης, πρέπει να
προετοιμάσετε ένα άλλο αυθεντικό
τηλεχειριστήριο από το οποίο θα πάρετε
τους κωδικούς στο δικό σας τηλεχειριστήριο.
Πατήστε το πλήκτρο «LEARN» για να
προγραμματίσετε τις εντολές. Οι λειτουργίες
«DELETE KEY» ή «DELETE ALL» μπορούν
να επιλεγούν στην οθόνη για διαγραφή των
προγραμματισμένων εντολών χρησιμοποιώντας
τα βέλη. Μετά την επιβεβαίωση με το OK,
«SURE DELETE» εμφανίζεται στην οθόνη.
Μετά την επιβεβαίωση για ακόμη μια φορά,
εμφανίζεται «SUCCESS». Όταν επιλεγεί «DE-
LETE DEV», όλες οι εντολές για την επιλεγμένη
συσκευή διαγράφονται. Όταν επιλέγεται
«DELETE ALL», ΟΛΕΣ οι εντολές διαγράφονται
για ΟΛΕΣ τις συσκευές.
Μαθαίνοντας Εντολές
1. Πατήστε το πλήκτρο μιας συσκευής (πχ TV)
για την οποία θέλετε να αποθηκεύσετε τις
εντολές..
2. Πατήστε και κρατήστε το πλήκτρο SET για
περισσότερο από 3 δευτερόλεπτα και έπειτα
αφήστε το.
3. Γυρίστε το πλήκτρο
C
ή
D
στο «LEARNING»
και έπειτα πατήστε το πλήκτρο OK.
4. Γυρίστε το πλήκτρο
C
ή
D
στο «LEARN KEY»
και έπειτα πατήστε το πλήκτρο OK.
5. Επιλέξτε το πλήκτρο που θέλετε να
προγραμματίσετε (πχ Power). Η LCD δείχνει
«SELECT KEY»
6. Δείξτε τον πομπό του αυθεντικού
τηλεχειριστηρίου σας στο πρόσωπο του
δέκτη αυτού του τηλεχειριστηρίου, περίπου
από 30mm απόσταση.
7. Πατήστε και κρατήστε το πλήκτρο του
αυθεντικού πλήκτρου (πχPOWER) περίπου
για 1 δευτερόλεπτο μέχρι η LCD να δείξει
«SUCCESS». Αν η LCD δείξει «FAILED»,
παρακαλούμε να επαναλάβετε τα βήματα
4-6.
8. Επαναλάβετε τα βήματα 4-6 για να μάθετε
περισσότερα πλήκτρα.
Σημείωση:
1. Ένα επιλεγμένο πλήκτρο μπορεί να
μαθευτεί από περισσότερες πηγές, το Hama
8σε1 Universal LCD τηλεχειριστήριο θα
αποθηκεύσει μόνο το τελικό σήμα.
2. Όλα τα συνηθισμένα λειτουργικά πλήκτρα
μπορούν να προγραμματιστούν εκτός από
το Scan και το Macro.
3. Κάποια φόρμα κωδικών μπορεί να μην
μπορείτε να την μάθετε από αυτό το
τηλεχειριστήριο.
4. Μπορείτε να μάθετε περίπου 100 πλήκτρα
συνολικά για 8 συσκευές.
Διαγραφή του Πλήκτρου Προγραμματισμού
Αν επιθυμείτε να διαγράψετε μια
προγραμματισμένη εντολή, μπορείτε να
ακολουθήσετε τα παρακάτω βήματα:
1. Πατήστε το πλήκτρο συσκευής (πχ TV) από
όπου θέλετε να διαγράψετε την εντολή.
2. Πατήστε και κρατήστε το πλήκτρο SET
για περισσότερο από 3 δευτερόλεπτα, και
έπειτα αφήστε το.
3. Γυρίστε το πλήκτρο
C
ή
D
στο «LEARN-
ING» έπειτα πατήστε το πλήκτρο OK και η
LCD δείχνει «LEARN KEY»
4. Γυρίστε το πλήκτρο
C
ή
D
στο «DELETE
KEY» και έπειτα πατήστε το πλήκτρο OK.
5. Πατήστε το πλήκτρο που θέλετε να
διαγράψετε πάνω στο τηλεχειριστήριό
σας, η LCD δείχνει «SURE DELETE» και
έπειτα πατήστε το πλήκτρο OK για να
επιβεβαιώσετε και η LCD θα δείξει «SUC-
CESS».
6. Επαναλάβετε το βήμα 4 για να διαγράψετε
το επόμενο πλήκτρο που επιθυμείτε.
7. Πατήστε το πλήκτρο συσκευής (πχ TV) για
να βγείτε από την λειτουργία διαγραφής
αφού έχετε διαγράψει όλες τις επιθυμητές
εντολές.
23
22
B. Στήσιμο χρησιμοποιώντας την
χειροκίνητη αναζήτηση:
Αν το στήσιμο μέσω της μάρκας και του
κωδικού αποτύχει ή δεν καταφέρετε να βρείτε
το όνομα της μάρκας της συσκευής στην
οθόνη του τηλεχειριστηρίου σας, θα πρέπει να
χρησιμοποιήσετε την Χειροκίνητη Αναζήτηση
για να βρείτε τον κατάλληλο κωδικό για να
λειτουργήσετε την συσκευή
1. Ανοίξτε τη συσκευή (πχ τηλεόραση) που
θέλετε να λειτουργήσετε. Αν είναι VCR ,
παρακαλούμε εισάγετε μια κασέτα.
2. Πατήστε το πλήκτρο SET στο νέο σας
τηλεχειριστήριο για περισσότερο από 3
δευτερόλεπτα μέχρι το CODE SET UP
εμφανιστεί στην οθόνη. Πατήστε OK.
3. Πατήστε το πλήκτρο
C
ή
D
για να
επιλέξετε «CODE SET UP» στο μενού της
οθόνης και πατήστε το πλήκτρο OK για να
επιβεβαιώσετε.
4. «SAT» (αναζήτηση συσκευής) αναβοσβήνει
στην οθόνη (για παράδειγμα). Τώρα
επιλέξτε και πατήστε το πλήκτρο της
συσκευής (TV, SAT, DVD, CD, TAPE,
AUX). επιβεβαιώστε την επιλογή της
συσκευής χρησιμοποιώντας το πλήκτρο
OK. Το αντίστοιχο πλήκτρο συσκευής τότε
αρχίζει να αναβοσβήνει κατά διαλείμματα.
Ο κωδικός αλλάζει ανάλογα με το
διάλειμμα. Παρακαλούμε διακόψτε αυτό
το διάλειμμα χρησιμοποιώντας τα πλήκτρα
C
ή
D
. Τώρα βάλτε τον πιο κοντινό κωδικό
χρησιμοποιώντας τα βέλη.
5. Ελέγξτε τη λειτουργία του τηλεχειριστηρίου
πατώντας το πλήκτρο αναμονής για ένα
δευτερόλεπτο (κόκκινο πλήκτρο). Αν
η συσκευή παραμένει ανοιχτή, τότε ο
επιλεγμένος κωδικός δεν έχει καμία ισχύ.
Δοκιμάστε ξανά με το επόμενο κωδικό
(χρησιμοποιώντας τα πλήκτρα
C
ή
D
).
Θυμηθείτε να ελέγξετε κάθε ξεχωριστό
κωδικό με το κόκκινο πλήκτρο αναμονής
6. Αν η συσκευή γυρίζει σε κατάσταση
αναμονής, τότε ο κωδικός είναι περισσότερο
πιθανό να λειτουργήσει. Πατήστε το
πλήκτρο OK για να αποθηκεύσετε τον
κωδικό. «SUCCESS» εμφανίζεται στην
οθόνη, και ακολουθεί «DEV SUCCESS».
Τώρα μπορείτε να πατήσετε το πλήκτρο
της συσκευής (πχ DVD) για να βγάλετε
τη ρύθμιση ή να επιλέξετε περαιτέρω
ρυθμίσεις χρησιμοποιώντας τα πλήκτρα
C
ή
D
. Μπορείτε συνήθως να πηγαίνετε
πίσω ένα βήμα μέχρι την εκκίνηση πατώντας
«EXIT».
7. Μετά την επανεκκίνηση της συσκευής,
ελέγξτε αν οι υπόλοιπες λειτουργίες (πχ
ήχος) δουλεύουν όταν χρησιμοποιείτε
τον ίδιο κωδικό. Αν αυτό συμβαίνει, τότε
δοκιμάστε ξανά με διαφορετικό κωδικό
(βήματα 1 με 6)
Σημείωση:
1. Σε περίπτωση που η αναζήτηση δεν
σταμάτησε την ώρα που η συσκευή
αντέδρασε, τότε πρέπει να πάτε πίσω στον
αντίστοιχο κωδικό χρησιμοποιώντας τα βέλη.
2. Μόνο τα πλήκτρα
C D
ΟΚ, ΕΧΙΤ
χρησιμοποιούνται κατά τη διάρκεια της
αναζήτησης. Αυτά τα πλήκτρα δεν έχουν
λειτουργία μενού αυτή τη στιγμή.
3. Όταν το τηλεχειριστήριο ψάχνει μέσα σε
όλους τους κωδικούς, αυτό θα σταματήσει
στον αρχικό κωδικό της αναζήτησης.
4. Όταν έχετε ψάξει όλους του κωδικούς, το
τηλεχειριστήριο τελειώνει τη αναζήτηση
στον πρώτο κωδικό. Αν η συσκευή είναι
κλειδωμένη, ξεκλειδώστε την πριν την
διαμόρφωση της συσκευής.
C. Στήσιμο με εκμάθηση
Το χαρακτηριστικό της εκμάθησης
χρησιμοποιείται για να συμπληρώσει τη λίστα
των κωδικών. Η πρότυπη λίστα κωδικών
μπορεί να σας παρέχει τις περισσότερες
από τις λειτουργίες που χρειάζονται,
αλλά μπορείτε να προσθέσετε έναν μικρό
αριθμό από επιπρόσθετες λειτουργίες για
το τηλεχειριστήριό σας. Ή μπορείτε να
προσθέσετε έναν νέο κωδικό από ένα νέο
τηλεχειριστήριο που είναι σε έλλειψη στη λίστα
κωδικών.

g. Για να τερματίσετε τις ρυθμίσεις, πατήστε
οποιοδήποτε πλήκτρο συσκευής. Για να
επιστρέψετε σε προηγούμενη κατάσταση,
πατήστε EXIT. Για να επιλέξετε οποιαδήποτε
άλλη ρύθμιση, χρησιμοποιήστε τα πλήκτρα
C
ή
D
.
B. Κλείδωμα Συσκευής
Χρησιμοποιώντας τη λειτουργία κλειδώματος,
μπορείτε να προστατέψετε τον τρέχοντα
κωδικό από το να αντιγραφεί, ώστε να μην
μπορεί να αντιγραφεί κατά τη διάρκεια
που προγραμματίζετε ή αναζητάτε τους
κωδικούς. Το κλείδωμα μπορεί επίσης να
απενεργοποιηθεί.
a. Πατήστε το πλήκτρο συσκευής εκείνης
που επιθυμείτε να προστατέψετε από την
αντιγραφή του κωδικού πχ (TV), (CBL / SAT),
(AUX), κτλ.
b. Πατήστε και κρατήστε το πλήκτρο SET για
περισσότερο από 3 δευτερόλεπτα και έπειτα
αφήστε το.
c. Χρησιμοποιώντας τα πλήκτρα
C
ή
D
επιλέξτε «CONFIGURE» και έπειτα πατήστε
το πλήκτρο OK.
d. Χρησιμοποιώντας τα πλήκτρα
C
ή
D
επιλέξτε «DEV LOCK» και έπειτα πατήστε το
πλήκτρο OK.
e. «TV OFF» εμφανίζεται στην οθόνη. Τώρα
χρησιμοποιώντας τα πλήκτρα
A
ή
B
,
επιλέξτε ON.
f. Πατήστε το πλήκτρο OK για να
αποθηκεύσετε τις ρυθμίσεις. SUCCESS
εμφανίζεται στη οθόνη και έπειτα το
τηλεχειριστήριο επιστρέφει σε κανονική
κατάσταση ρυθμίσεων.
g. Για να τερματίσετε τις ρυθμίσεις, πατήστε
οποιοδήποτε πλήκτρο. Για να επιστρέψετε
σε προηγούμενη κατάσταση , πατήστε EXIT.
Για να επιλέξετε οποιαδήποτε άλλη ρύθμιση,
χρησιμοποιήστε τα πλήκτρα
C
ή
D
.
C. Αλλάζοντας την Καταχώρηση Συσκευής)
Αν θέλετε να λειτουργήσετε δεύτερη συσκευή
VCR (ή δεύτερη TV, SAT / CBL, CD, DVD, TAPE,
TUNER κτλ.) μπορείτε να ρυθμίσετε τον κωδικό
στο πλήκτρο της συσκευής ΑUX για εναλλαγή
συσκευής (CODE SHIFT). Απλά ακολουθήστε
τα παρακάτω βήματα:
1. Πατήστε και κρατήστε το πλήκτρο SET στο
νέο σας τηλεχειριστήριο για περισσότερο
από 3 δευτερόλεπτα. Έπειτα αφήστε
το. Πατήστε τα πλήκτρα για να επιλέξετε
«CODE SET UP» και πατήστε το πλήκτρο OK
.
2. Η οθόνη δείχνει « DEV SEARCH» στο LCD
μενού. Πατήστε τα πλήκτρα or για να
επιλέξετε «CODE SHIFT» και πατήστε το
πλήκτρο OK, έπειτα πατήστε το πλήκτρο
συσκευής (πχ VCR) για να επιλέξετε την
επιθυμητή συσκευή και εισάγετε τον κωδικό.
3. Παρακαλούμε πατήστε το πλήκτρο OK για
να αποθηκεύσετε και βγείτε, η LCD δείχνει
«SUCCESS».
4. Τώρα μπορείτε να λειτουργήσετε δεύτερη
συσκευή VCR με το πλήκτρο AUX.
Σημείωση:
1. Όλα τα πλήκτρα μπορούν να
επαναπροσδιοριστούν σε άλλες συσκευές
(πχ TV).
2. ΑΝ επιθυμείτε να επιστρέψετε στην
προηγούμενη συσκευή, κρατήστε πατημένο
το (SET) και πατήστε το (AUX). To LED (AUX)
ανάβει. Τέλος, αφήστε και τα δύο πλήκτρα
και πατήστε το AUX ξανά. Το LED σβήνει. Το
AUX λειτουργεί κανονικά.
3. Όταν οι συσκευές επαναπροσδιοριστούν,
δεν μπορείτε να χρησιμοποιήσετε
«SEARCH» ή «VOLUME LOCK» κτλ. Στη
συσκευή. Μπορεί ωστόσο να κλειδωθεί
εισάγοντας τον κωδικό ρυθμίσεων.
25
24
Διαγραφή Όλων των Εντολών Από μια
Συσκευή.
Αν επιθυμείτε να διαγράψετε όλες τις
εντολές σε μια συσκευή με μια εντολή αντί να
διαγράφετε κάθε πλήκτρο το ένα μετά το άλλο,
παρακαλούμε να ακολουθήσετε τα παρακάτω
βήματα:
1. Πατήστε ένα πλήκτρο συσκευής (πχ TV) από
την οποία επιθυμείτε να διαγράψετε όλες τις
εντολές.
2. Πατήστε και κρατήστε το πλήκτρο SET για
περισσότερο από 3 δευτερόλεπτα και έπειτα
αφήστε το.
3. Γυρίστε το πλήκτρο
C
ή
D
στο «LEARNING»
έπειτα πατήστε το πλήκτρο OK και η LCD
δείχνει «LEARN KEY»
4. Γυρίστε το πλήκτρο
C
ή
D
στο «DELETE
DEV» και έπειτα πατήστε το πλήκτρο OK.
5. Επιλέξτε τη συσκευή που επιθυμείτε να
διαγράψετε και έπειτα πατήστε το πλήκτρο
OK.
6. Η LCD δείχνει «SURE DELETE» έπειτα
πατήστε το πλήκτρο OK και η LCD δείχνει
«SUCCESS»
7. Επαναλάβετε το βήμα 5 για να διαγράψετε
τις εντολές σε άλλα πλήκτρα συσκευών.
8. Πατήστε το πλήκτρο EXIT (πχ TV) για να
βγείτε από τη διαδικασία διαγραφής.
Σημείωση: Σε κάποιες περιπτώσεις μπορεί
να πάρει περίπου 3 δευτερόλεπτα πριν
διαγραφούν όλες οι εντολές της συσκευής. Αν
μόνο λίγες εντολές έχουν αποθηκευθεί, τότε
προτείνουμε να διαγράψετε τη μια μετά την
άλλη ξεχωριστά.
Διαγράψτε Όλα τα Πλήκτρα
Προγραμματισμού
Αν επιθυμείτε να διαγράψετε όλες τις εντολές
από τη μονάδα, παρακαλούμε ακολουθήστε τις
παρακάτω εντολές:
1. Πατήστε και κρατήστε το πλήκτρο SET για
περισσότερο από 3 δευτερόλεπτα και έπειτα
αφήστε το.
2. Γυρίστε το πλήκτρο
C
ή
D
στο «LEARNING»
έπειτα πατήστε το πλήκτρο OK και η LCD
δείχνει «LEARN KEY»
3. Γυρίστε το πλήκτρο
C
ή
D
στο «DELETE
ALL» και έπειτα πατήστε το πλήκτρο OK.
4. Η LCD δείχνει «SURE DELETE» έπειτα
πατήστε το πλήκτρο OK και η LCD δείχνει
«SUCCESS» για να τελειώσει η διαγραφή.
Επιπρόσθετες Λειτουργίες
A. Κλείδωμα / Ξεκλείδωμα της Έντασης
της Φωνής και του Αθόρυβου.
Αυτή λειτουργία είναι χρήσιμη αν ελέγχετε
την ένταση της φωνή χρησιμοποιώντας μόνο
μια συσκευή. Αν η ένταση της φωνής ελέγχετε
κεντρικά μέσω ενός ενισχυτή για παράδειγμα,
μπορείτε να χρησιμοποιήσετε αυτή τη
λειτουργία για να κλειδώσετε τα πλήκτρα της
φωνής και του αθόρυβου από την AUX συσκευή
(ενισχυτής AUX) ή οποιαδήποτε άλλη συσκευή
χρησιμοποιείτε (πχ TV, DVD, VCR κτλ) έτσι ώστε
τα πλήκτρα της φωνής και του αθόρυβου του
τηλεχειριστηρίου να ελέγχουν τον ενισχυτή.
a. Πατήστε το πλήκτρο συσκευής της οποίας
τα πλήκτρα της φωνής και του αθόρυβου
επιθυμείτε να λειτουργήσετε πχ (TV), (CBL /
SAT), (AUX), κτλ.
b. Πατήστε και κρατήστε για περισσότερο από
3 δευτερόλεπτα το πλήκτρο SET και έπειτα
αφήστε το.
c. Χρησιμοποιώντας τα πλήκτρα
C
ή
D
επιλέξτε «CONFIGURE» και έπειτα πατήστε
το πλήκτρο OK.
d. Χρησιμοποιώντας τα πλήκτρα
C
ή
D
επιλέξτε «VOL LOCK» και έπειτα πατήστε το
πλήκτρο OK.
e. «TV OFF» εμφανίζεται στην οθόνη. Τώρα
χρησιμοποιώντας τα πλήκτρα
C
ή
D
,
επιλέξτε ON.
f. Πατήστε το πλήκτρο OK για να
αποθηκεύσετε τις ρυθμίσεις. «SUCCESS»
εμφανίζεται στη οθόνη και έπειτα το
τηλεχειριστήριο επιστρέφει σε κανονική
κατάσταση ρυθμίσεων.

d Bedienungsanleitung
27
26
D. Ρυθμίζοντας το Ρολόι
1. Πατήστε και κρατήστε το λιγότερο για 3
δευτερόλεπτα το πλήκτρο SET και έπειτα
αφήστε το.
2. Χρησιμοποιώντας τα πλήκτρα
C
ή
D
,
επιλέξτε «CONFIGURE» και έπειτα πατήστε
το πλήκτρο OK.
3. «TIME SETUP» εμφανίζεται στην οθόνη.
Επιβεβαιώστε με OK.
4. Εισάγετε την ώρα και επιλέξτε AM ή
PM χρησιμοποιώντας το πλήκτρο
D
.
Επιβεβαιώστε τις επιλογές σας με OK.
5. «SUCCESS» τώρα εμφανίζεται στην οθόνη.
6. Για να τερματίσετε τις ρυθμίσεις, πατήστε
οποιοδήποτε πλήκτρο. Για να επιστρέψτε σε
προηγούμενη κατάσταση, πατήστε EXIT. Για
να επιλέξετε οποιαδήποτε άλλη ρύθμιση,
χρησιμοποιήστε τα πλήκτρα
C
ή
D
.
Ή ώρα εμφανίζεται μετά τις ρυθμίσεις.
E. Λειτουργία Marco
Το τηλεχειριστήριο έχει λειτουργία Macro με
την οποία μπορείτε να διεξάγετε διαφορετικές
διαδικασίες σε αλληλουχία. Πατήστε το
πλήκτρο MACRO και κρατήστε το ενώ
πατάτε τον αριθμό 1 ή 2 ή 3. Έπειτα αφήστε
τα πλήκτρα. Το LED αναβοσβήνει. Μια IR
εντολή που προηγουμένως προγραμματίσατε
ταυτόχρονα αποστέλλεται από το
τηλεχειριστήριο.
Για να στήσετε τη ρύθμιση macro,
παρακαλούμε ακολουθήστε τα παρακάτω
βήματα:
1. Πατήστε και κρατήστε το πλήκτρο SET για
περισσότερο από 3 δευτερόλεπτα και έπειτα
αφήστε το.
2. Χρησιμοποιώντας τα πλήκτρα
C
ή
D
,
επιλέξτε «MACRO» και έπειτα πατήστε το
πλήκτρο OK.
3. Χρησιμοποιώντας τα πλήκτρα
C
ή
D
,
επιλέξτε «MACRO 1 (ή MACRO 2 ή MACRO
3) και έπειτα πατήστε το OK.
4. «SETTING» εμφανίζεται στην οθόνη.
Πατήστε το OK.
5. Μπορείτε να συνδυάσετε διαφορετικά
πλήκτρα για να διεξάγετε διαφορετικές
διαδικασίες στην εντολή που επιθυμείτε (πχ
TV + POWER + MUTE + AV, DVD + PLAY, VCR
+ RECORD, κτλ. Σε αυτό το παράδειγμα,
μπορείτε να ανοίξετε την τηλεόραση, το
αθόρυβο, να αλλάξετε σε κατάσταση AV,
να ξεκινήσετε το DVD και ταυτόχρονα να
γράψετε βίντεο).
6. Πατήστε ΟΚ για να αποθηκεύσετε. SUC-
CESS εμφανίζετε στην οθόνη και έπειτα το
τηλεχειριστήριο επανέρχεται σε κατάσταση
ρυθμίσεων.
7. Για να τερματίσετε τις ρυθμίσεις πατήστε
οποιοδήποτε πλήκτρο. Για να επιστρέψετε
στην προηγούμενη κατάσταση, πατήστε
EXIT. Για να αποθηκεύσετε οποιαδήποτε
ρύθμιση, χρησιμοποιήστε
C
ή
D
.
Σημείωση:
1. Μπορείτε να προγραμματίσετε μέχρι 10
διαφορετικές εντολές με μόνο μια εντολή
MACRO.
2. Παρακαλώ βεβαιωθείτε ότι όλα τα πλήκτρα
μπορούν να στείλουν σήματα, ακόμη και αν
τα έχετε προγραμματίσει με τη λειτουργία
MACRO. Πριν ρυθμίσετε τη λειτουργία
MACRO, μπορείτε να δοκιμάσετε τα
πλήκτρα πατώντας τα και ελέγχοντας αν η
σωστή συσκευή αναβοσβήνει.
3. Όταν διεξάγετε μια λειτουργία MACRO,
βεβαιωθείτε ότι η συσκευή χρησιμοποιείται
σωστά. αν επιθυμείτε να παίξετε ένα DVD
και να γράψετε χρησιμοποιώντας ένα VIDEO
RECORDER, για παράδειγμα, πρέπει να
βάλετε ένα DVD.
4. Παρακαλούμε βεβαιωθείτε ότι το
τηλεχειριστήριο «βλέπεται» από όλες
τις συσκευές και ότι δείχνει στη σωστή
κατεύθυνση (στη συσκευή που επιθυμείτε να
λειτουργήσετε)
Διαγράφοντας τη λειτουργία Macro
1. Πατήστε και κρατήστε το πλήκτρο SET για
περισσότερο από 3 δευτερόλεπτα και έπειτα
αφήστε το.
2. Xχρησιμοποιώντας τα πλήκτρα
C
ή
D
,
επιλέξτε «MACRO» και έπειτα πατήστε OK.
3. Xχρησιμοποιώντας τα πλήκτρα
C
ή
D
,
επιλέξτε τη σωστή ρύθμιση MACRO, για
παράδειγμα «MACRO2» και έπειτα πατήστε
OK. «SETTING» εμφανίζεται στην οθόνη.
4. Χρησιμοποιώντας τα πλήκτρα
C
ή
D
,
επιλέξτε «DELETE» και έπειτα πατήστε OK.
5. Η ερώτηση «SURE DELETE» εμφανίζεται
στην οθόνη. Επιβεβαιώστε την διαγραφή
πατώντας OK. SUCCESS εμφανίζεται
στην οθόνη και έπειτα το τηλεχειριστήριο
επιστρέφει σε κατάσταση ρυθμίσεων.
6. Για να τερματίσετε τις ρυθμίσεις, πατήστε
οποιοδήποτε πλήκτρο. Για να επιστρέψετε
σε προηγούμενη κατάσταση, πατήστε
EXIT. Για να επιλέξετε οποιαδήποτε άλλη
λειτουργία, χρησιμοποιήστε
C
ή
D
.
F. Λειτουργία Scan
Το τηλεχειριστήριο έχει μια λειτουργία «Scan»
για να ανιχνεύει όλα τα TV ή CAB / SAT κανάλια
για γρήγορη άποψη.
1. Πατήστε το πλήκτρο συσκευής (όπως TV)
που θέλετε να λειτουργήσετε.
2. Πατήστε και κρατήστε το πλήκτρο Scan
για περίπου 1 δευτερόλεπτο. Όταν το LED
της συσκευής αναβοσβήνει η λειτουργία
ανίχνευσης ξεκινά. Το τηλεχειριστήριο
ανιχνεύει όλα τα κανάλια για μια συνοπτική
έκθεση.
G. Φωτισμός
Αν ο φωτισμός είναι ενεργοποιημένος, θα
ανάβει όταν πατήσετε οποιοδήποτε πλήκτρο.
Πατήστε και κρατήστε το πλήκτρο SET για
περισσότερο από 3 δευτερόλεπτα και έπειτα
αφήστε το.
1. Πατήστε το πλήκτρο
C
ή
D
για να επιλέξετε
το μενού «CONFIGURE» και έπειτα πατήστε
OK.
2. Πατήστε το πλήκτρο
C
ή
D
για να επιλέξετε
το μενού «LIGHT» και έπειτα πατήστε OK.
3. Πατήστε το πλήκτρο
A
ή
B
για να αλλάξετε
την κατάσταση σε «ON» ή «OFF».
4. Πατήστε το OK για να αποθηκεύσετε και η
LCD δείχνει «SUCCESS» έπειτα επιστρέψτε
σε κατάσταση ρυθμίσεων. Μπορείτε να
πατήσετε οποιοδήποτε πλήκτρο για να
τερματίσετε τις ρυθμίσεις ή να πατήσετε
EXIT στο τελευταίο επίπεδο. Ακόμη μπορείτε
να χρησιμοποιήσετε
C
ή
D
για να επιλέξετε
άλλες ρυθμίσεις.
H. Ρύθμιση Αντίθεσης
Μπορείτε να ακολουθήσετε τα παρακάτω
βήματα για να αλλάξετε την αντίθεση της
οθόνης.
1. Πατήστε και κρατήστε το πλήκτρο SET για
περισσότερο από 3 δευτερόλεπτα και έπειτα
αφήστε το.
2. Πατήστε το πλήκτρο
C
ή
D
για να επιλέξετε
«CONFIGURE», έπειτα πατήστε OK.
3. Πατήστε το πλήκτρο
C
ή
D
για να επιλέξετε
«CONTRAST», έπειτα πατήστε OK.
4. Πατήστε το πλήκτρο
A
ή
B
για να επιλέξετε
το επίπεδο αντίθεσης, έπειτα πατήστε το OK
όταν είστε ευχαριστημένος.
5. Πατήστε το OK για να αποθηκεύσετε και η
LCD δείχνει «SUCCESS», έπειτα επιστρέψτε
σε κατάσταση ρυθμίσεων. Μπορείτε να
πατήσετε οποιοδήποτε πλήκτρο για να
τερματίσετε τις ρυθμίσεις ή να πατήσετε
EXIT στο τελευταίο επίπεδο. Ακόμη μπορείτε
να χρησιμοποιήσετε
C
ή
D
για να επιλέξετε
άλλες ρυθμίσεις.

d Bedienungsanleitung
29
28
Επανατοποθέτηση
Διαγράψτε όλα τα δεδομένα, και επιστρέψτε
στις αρχικές εργοστασιακές ρυθμίσεις.
1. Πατήστε και κρατήστε το πλήκτρο SET για
περισσότερο από 3 δευτερόλεπτα και έπειτα
αφήστε το.
2. Πατήστε το πλήκτρο
C
ή
D
για να επιλέξετε
το μενού «CONFIGURE» και έπειτα πατήστε
OK.
3. Πατήστε το πλήκτρο
C
ή
D
για να επιλέξετε
«CLEAR ALL» και έπειτα πατήστε OK και η
LCD δείχνει SURE CLEAR.
4. Πατήστε OK για να σβήσετε όλες τις
ρυθμίσεις και να επιστρέψετε στις αρχικές
εργοστασιακές ρυθμίσεις.
Άλλα
Όταν όλες οι ρυθμίσεις γίνουν, πατήστε
το πλήκτρο της συσκευής που θέλετε να
λειτουργήσετε, πάνω στο τηλεχειριστήριο, (TV,
VCR κλπ). Τώρα μπορείτε να χρησιμοποιήσετε
το τηλεχειριστήριο.
-
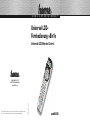 1
1
-
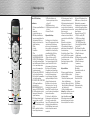 2
2
-
 3
3
-
 4
4
-
 5
5
-
 6
6
-
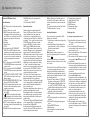 7
7
-
 8
8
-
 9
9
-
 10
10
-
 11
11
-
 12
12
-
 13
13
-
 14
14
-
 15
15


Hama 00040089 Bedienungsanleitung
- Kategorie
- Fernbedienungen
- Typ
- Bedienungsanleitung
- Dieses Handbuch ist auch geeignet für
in anderen Sprachen
- English: Hama 00040089 Owner's manual
Verwandte Papiere
Sonstige Unterlagen
-
König IR-URC30 Benutzerhandbuch
-
-
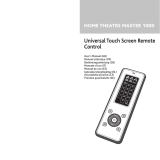 Remotec HOME THEATRE MASTER 1000 Benutzerhandbuch
-
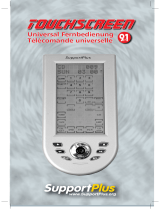 SUPPORTPLUS SP URC F17C LE Bedienungsanleitung
-
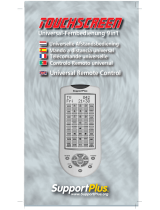 SUPPORTPLUS URC-9IN1 Benutzerhandbuch
-
Silvercrest 274301 User Manual And Service Information
-
-
-
-


