Dell V505 All In One Inkjet Printer Schnellstartanleitung
- Typ
- Schnellstartanleitung
Seite wird geladen ...

If you purchased a Dell Internal Network Adapter 1150, stop here,
and go to your
Owner’s Manual
for wireless setup instructions.
Als u een Dell Internal Network Adapter 1150 hebt aangeschaft, stopt u hier
en raadpleegt u de aanwijzingen voor draadloze configuratie in de
Handleiding
voor eigenaren
.
Si vous avez acheté un adaptateur réseau interne Dell 1150, arrêtez-vous
à cette étape et cherchez les instructions de configuration de l’imprimante
sans fil dans le
Manuel du propriétaire
.
Bei Erwerb eines Dell Internal Network Adapter 1150 erhalten Sie Anweisungen
zur WLAN-Einrichtung im
Benutzerhandbuch
.
Eliminare la pagina di allineamento dopo la stampa. Se è stato acquistato
Dell Internal Network Adapter 1150, terminare qui e vedere il
Manuale del
proprietario
per istruzioni di configurazione wireless.
Si ha comprado un adaptador interno de red Dell 1150, no continúe y consulte
el
Manual del propietario
para ver las instrucciones de configuración inalámbrica.
Setting Up Your Printer
(continued)
Printer instellen
(vervolg)
| Installation de l’imprimante
(suite)
| Einrichten des Druckers
(Fortsetzung)
| Installazione della stampante
(continua)
| Instalación de la impresora
(continuación)
Information in this document is subject to change without notice.
© 2008 Dell Inc. All rights reserved.
Reproduction in any manner whatsoever without the written permission
of Dell Inc. is strictly forbidden.
Dell
and the
DELL
logo are trademarks of Dell Inc.;
Bluetooth
is a registered
trademark owned by Bluetooth SIG, Inc. and is used by Dell Inc. under license.
Dell disclaims proprietary interest in the marks and names of others.
May 2008
Informatie in dit document kan worden gewijzigd zonder voorafgaande
kennisgeving.
© 2008 Dell Inc. Alle rechten voorbehouden.
Reproductie op welke manier dan ook zonder de schriftelijke toestemming
van Dell Inc. is uitdrukkelijk verboden.
Dell
en het logo
DELL
zijn handelsmerken van Dell Inc.;
Bluetooth
is een
gedeponeerd handelsmerk van Bluetooth SIG, Inc. en wordt onder licentie
gebruikt door Dell Inc. Dell doet geen aanspraak op eigendomsrechten van
de logo's en namen van anderen.
mei 2008
Les informations contenues dans ce document peuvent être modifiées
sans préavis.
© 2008 Dell Inc. Tous droits réservés.
Toute reproduction, de quelque manière que ce soit, sans l'autorisation écrite
de Dell Inc. est strictement interdite.
Dell
et le logo
DELL
sont des marques de Dell Inc. ;
Bluetooth
est une marque
déposée de Bluetooth SIG, Inc. et est utilisée par Dell Inc. sous licence. Dell
décline tout intérêt propriétaire vis à vis de marques et noms autres que les siens.
Mai 2008
Die Informationen in diesem Dokument können ohne vorhergehende
Ankündigung geändert werden.
© 2008 Dell, Inc. Alle Rechte vorbehalten.
Jegliche Reproduktion ohne die schriftliche Genehmigung von Dell, Inc.,
ist strengstens verboten.
Dell
und das
DELL
-Logo sind Marken von Dell, Inc.
Bluetooth
ist eine
eingetragene Marke im Besitz von Bluetooth SIG, Inc. und wird von Dell, Inc.
unter Lizenz verwendet. Dell schließt ein urheberrechtliches Interesse an den
Marken und Namen von Dritten aus.
Mai 2008
Le informazioni incluse nel presente documento sono soggette a modifica
senza preavviso.
© 2008 Dell Inc. Tutti i diritti riservati.
Qualsiasi tipo di riproduzione, senza autorizzazione scritta di Dell Inc.
è assolutamente vietata.
Dell
e il logo
DELL
sono marchi di Dell Inc.
Bluetooth
è un marchio registrato
di proprietà Bluetooth SIG, Inc. e viene utilizzato da Dell Inc. su concessione
di licenza. Dell non rivendica alcun diritto di proprietà per i marchi e i nomi di altri.
Maggio 2008
La información que contiene este documento está sujeta a cambios sin
previo aviso.
© 2008 Dell Inc. Reservados todos los derechos.
Queda estrictamente prohibido todo tipo de reproducción sin el permiso por
escrito de Dell Inc.
Dell
y el logotipo de
DELL
son marcas comerciales de Dell Inc.;
Bluetooth
es
una marca comercial registrada propiedad de Bluetooth SIG, Inc. y utilizada por
Dell Inc. en virtud de una licencia. Dell renuncia a los derechos de propiedad
de las marcas y los nombres de terceros.
Mayo de 2008
Printed in the European Union
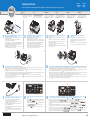
Open the printer unit. The ink cartridge carrier moves to the
center. Remove the tape from both carriers.
Open de printereenheid. De inktcartridgehouder wordt naar het midden
verplaatst. Verwijder de tape van de cartridgehouders.
Ouvrez l’unité de l’imprimante. Le chariot des cartouches se place au centre.
Retirez les bandes protectrices des deux chariots.
Öffnen Sie die Druckerabdeckung. Der Patronenhalter fährt in die Mitte.
Entfernen Sie das Klebeband von beiden Patronenhaltern.
Aprire l'unità stampante. Il supporto della cartuccia di inchiostro si sposta
al centro. Rimuovere il nastro da entrambi i supporti.
Abra la unidad de impresora. El carro del cartucho de impresión se desplaza
al centro. Retire el precinto de los carros.
10
Remove the tape from the ink cartridges, and then install them
(black or photo on the left and color on the right).
Verwijder de tape van de inktcartridges en installeer de cartridges (zwart of foto
links en kleur rechts).
Otez la bande protectrice des cartouches, puis installez-les (cartouche noire
ou photo à gauche, cartouche couleur à droite).
Entfernen Sie das Klebeband von den Tintenpatronen und setzen Sie sie ein
(schwarze Patrone oder Fotopatrone links, Farbpatrone rechts).
Rimuovere il nastro dalle cartucce di inchiostro, quindi installarle
(nera o fotografica a sinistra e a colori a destra).
Quite el precinto a los cartuchos de tinta e instálelos (negro o fotográfico
en la izquierda y color en la derecha).
11
Close the printer unit. An alignment page automatically prints.
Discard the alignment page after printing.
Sluit de printereenheid. Er wordt automatisch een uitlijningspagina afgedrukt.
U kunt de uitlijningspagina weggooien.
Fermez l’unité de l’imprimante. Une page d’alignement s’imprime
automatiquement. Jetez la page d’alignement après l’impression.
Schließen Sie die Druckereinheit. Es wird automatisch eine Ausrichtungsseite
gedruckt. Die Ausrichtungsseite kann nach dem Druck entsorgt oder recycelt
werden.
Chiudere l'unità stampante. Viene stampata automaticamente una pagina
di allineamento.
Cierre la unidad de la impresora. Se imprimirá automáticamente una página
de alineación. Deseche la página de alineación después de imprimirla.
12
13
Insert the
Drivers and Utilities
CD, and then follow the
instructions on your screen.
Plaats de cd
Drivers and Utilities
in de computer en volg de aanwijzingen
op het scherm.
Insérez le
CD Drivers and Utilities
et suivez les instructions qui s'affichent
à l'écran.
Legen Sie die
Drivers and Utilities
-CD ein und befolgen Sie die Anweisungen
auf dem Bildschirm.
Inserire il CD
Drivers and Utilities
, quindi attenersi alla istruzioni visualizzate
sullo schermo.
Introduzca el CD
Drivers and Utilities
y siga las instrucciones que aparecen
en pantalla.
15
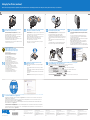
If you are using your printer:
• Without a computer, setup is complete.
• With a new Dell computer, complete step 16.
• With an existing computer, complete step 15.
Als u de printer gebruikt:
• Zonder een computer, is de installatie voltooid.
• Met een nieuwe Dell computer, voert u stap 16 uit.
• Met een bestaande computer, voert u stap 15 uit.
Si vous utilisez l'imprimante :
• Sans ordinateur, l’installation est terminée.
• Avec un nouvel ordinateur Dell, effectuez l’étape 16.
• Avec un ordinateur existant, effectuez l’étape 15.
Bei Verwendung des Druckers:
• ohne Computer ist die Installation abgeschlossen.
• mit einem neuen Dell Computer führen Sie Schritt 16 aus.
• mit einem vorhandenen Computer führen Sie Schritt 15 aus.
Se si utilizza una stampante:
• Senza un computer, l'installazione è completata.
• Con un computer Dell, completare il passaggio 16.
• Con un computer esistente, completare il passaggio 15.
Si está utilizando la impresora:
• Sin un equipo, la instalación finaliza aquí.
• Con un equipo nuevo Dell, lleve a cabo el paso 16.
• Con un equipo existente, lleve a cabo el paso 15.
14
Connect the USB cable (sold separately) between the computer and the USB port on the back of the printer.
If any Found New Hardware screens appear, click Cancel.
Sluit de USB-kabel (los verkrijgbaar) aan op de computer en op de USB-poort aan de achterkant van de printer.
Klik op
AAnnnnuulleerreenn
in elk venster van de wizard
NNiieeuuwwee hhaarrddwwaarree ggeevvoonnddeenn
dat verschijnt.
Connectez le câble USB (vendu séparément) entre l'ordinateur et le port USB qui se trouve à l'arrière de l'imprimante.
Si le message
NNoouuvveeaauu mmaattéérriieell ddéétteeccttéé
apparaît, cliquez sur
AAnnnnuulleerr
.
Schließen Sie das USB-Kabel (separat erhältlich) an den Computer und den USB-Anschluss auf der Rückseite des Druckers an.
Falls der Bildschirm
N
Neeuuee HHaarrddwwaarree ggeeffuunnddeenn
erscheint, klicken Sie auf
AAbbbbrreecchheenn
.
Collegare il cavo USB (venduto separatamente) al computer e alla porta USB sul retro della stampante.
Se viene visualizzata una schermata
TTrroovvaattoo nnuuoovvoo hhaarrddwwaarree
, fare clic su
AAnnnnuullllaa
.
Conecte el cable USB (se adquiere por separado) entre el equipo y el puerto USB que se encuentra en la parte trasera de la impresora.
Si apareciera la pantalla
NNuueevvoo hhaarrddwwaarree eennccoonnttrraaddoo
, haga clic en
CCaanncceellaarr
.
16
For more information on printing, scanning, copying, faxing, PictBridge, Bluetooth™, or memory card functions see the
User's Guide
available
on your
Drivers and Utilities
CD or on support.dell.com.
Raadpleeg de
Gebruikershandleiding
op de cd
Drivers and Utilities
of op support.dell.com voor meer informatie over de functies voor afdrukken, scannen, kopiëren, faxen,
PictBridge, Bluetooth™ of geheugenkaarten.
Pour plus d'informations sur l'impression, la numérisation, la copie, l'envoi de télécopies, PictBridge, Bluetooth™ ou les fonctions de la carte mémoire, reportez-vous au
Guide de l'utilisateur
sur le CD
Drivers and Utilities
ou sur support.dell.com.
Weitere Informationen zum Drucken, Scannen, Kopieren, Faxen, zu PictBridge, Bluetooth™ oder den Speicherkartenfunktionen finden Sie im
Benutzerhandbuch
auf der
Drivers and Utilities
-CD oder unter support.dell.com.
Per ulteriori informazioni sulle funzioni di stampa, acquisizione, copia, invio di fax, PictBridge, Bluetooth™ o sulla scheda di memoria vedere la
Guida per l'utente
disponibile
sul CD
Drivers and Utilities
o sul sito support.dell.com.
Para obtener más información sobre las funciones de impresión, escaneo, copia, fax, PictBridge, Bluetooth™ o de tarjeta de memoria, consulte la
Guía del usuario
que está
disponible en el CD
Drivers and Utilities
o en support.dell.com.
17
*12V0472*
L. P/N 12V0472
E.C. 2V0000A
DRIVERS AND UTILITIES
Dell
V505 Printer
-
 1
1
-
 2
2


Dell V505 All In One Inkjet Printer Schnellstartanleitung
- Typ
- Schnellstartanleitung
in anderen Sprachen
- English: Dell V505 All In One Inkjet Printer Quick start guide
- français: Dell V505 All In One Inkjet Printer Guide de démarrage rapide
- español: Dell V505 All In One Inkjet Printer Guía de inicio rápido
- italiano: Dell V505 All In One Inkjet Printer Guida Rapida
- Nederlands: Dell V505 All In One Inkjet Printer Snelstartgids