Seite wird geladen ...

Publication 1760-IN003C-MU-P
Installation Instructions
Pico Controller
(Catalog Numbers 1760-L12AWA, -L12AWA-NC,
-L12AWA-ND, -L12BWB, -L12BWB-NC, -L12BWB-ND,
-L12DWD)
Pub_IN003C_0907Brandlabel_AB_AWA1654.FM Seite 1 Montag, 1. Oktober 2007 3:19 15
Artisan Technology Group - Quality Instrumentation ... Guaranteed | (888) 88-SOURCE | www.artisantg.com

ATTENTION! Electrical Shock Hazard
Only qualified personnel may perform this
installation.
Observe all electrical safety requirements, including
any applicable laws, regulations, codes and standards
when installing this equipment.
Lebensgefahr durch elektrischen Strom!
Nur Elektrofachkräfte und elektrotechnisch
unterwiesene Personen dürfen die im Folgenden
beschriebenen Arbeiten ausführen. Die Strom-
versorgungsgeräte sind Einbaugeräte.
Beachten Sie für die Installation der Geräte die
länderspezifischen Vorschriften.
Tension électrique dangereuse !
Seules les personnes qualifiées et averties doivent
exécuter les travaux ci-après. Les blocs d’alimentation
sont des appareils faisant partie intégrante d’une
installation. Veuillez respecter les normes de mise en
œuvre spécifiques aux différents pays.
Tensione elettrica: Pericolo di morte!
Solo persone abilitate e qualificate possono eseguire
le operazioni di seguito riportate. Gli alimentatori
sono unità per montaggio interno. Per l’installazione
degli apparecchi è necessario rispettare le normative
specifiche di ciascun paese.
¡Corriente eléctrica! ¡Peligro de muerte!
El trabajo a continuación descrito debe ser realizado
por personas cualificadas y advertidas. Las fuentes de
alimentación son aparatos de montaje. Para la
instalación de los aparatos han de tenerse en cuenta
las normativas/especificaciones a nivel local.
2/16
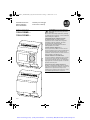
Installation Instructions
Montageanweisung
Notice d’installation
Istruzioni per il montaggio
Instrucciones de montaje
1760-L12AWA-...
1760-L12BWB-...
1760-L12DWD-...
Esc
Ok
Del
Alt
Pub_IN003C_0907Brandlabel_AB_AWA1654.FM Seite 2 Montag, 1. Oktober 2007 3:19 15
Artisan Technology Group - Quality Instrumentation ... Guaranteed | (888) 88-SOURCE | www.artisantg.com

3/16
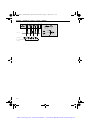
a Voltage supply
1760-L12BWB-...20.4 to 28.8 V dc
1760-L12DWD-...10.2 to 15.6 V dc
1760-L12AWA-...90 to 264 V ac 50/60 Hz
b 8 Inputs
1760-L12BWB-...0 to 28.8 V dc,
1760-L12DWD-...0 to 15.6 V dc
(2 can also be used as 0 to 10 V analog inputs)
1760-L12AWA-...0 to 264 V ac
c
Del
button
Delete contacts/relays/connections/
empty rung
d
Alt
button
Draw connection
Toggle between make or break contact
Insert rung
e Cursor buttons: right, left, up, down
Select contacts, relays, numbers
P button on: Input P1 -> Cursor left
Input P2 -> Cursor up
Input P3 -> Cursor right
Input P4 -> Cursor down
f
Ok
button
Enter menu, accept action
g
Esc
button
One menu back
Exit function relay parameter menu without saving
h Interface (with cover)
Slot for memory card
Socket for PC interface cable
i Contacts, outputs
j Write-on surface
k LCD
I/O status display
Operating states
Circuit diagram
Display of clock
l Power/Run LED
a Spannungsversorgung
1760-L12BWB-...20.4 bis 28.8 V DC
1760-L12DWD-...10.2 bis 15.6 V DC
1760-L12AWA-...90 bis 264 V AC 50/60 Hz
b 8 Eingänge
1760-L12BWB-...0 bis 28.8 V DC,
1760-L12DWD-...0 bis 15.6 V DC
(2 auch als Analog-Eingänge 0 bis 10 V nutzbar)
1760-L12AWA-...0 bis 264 V AC
c
Del
-Taste
Löschen von Kontakten/Relais/
Verbindungen/leerem Strompfad
d
Alt
-Taste
Verbindungen zeichnen
Umschalter: Kontakt = Schließer oder Öffner
Strompfad einfügen
e Cursortasten: rechts, links, oben, unten
Kontakte, Relais, Nummer wählen
P-Taste an: Eingang P1 -> Cursor links
Eingang P2 -> Cursor oben
Eingang P3 -> Cursor rechts
Eingang P4 -> Cursor unten
f
Ok
-Taste
Menü weiterschalten, Aktion übernehmen
g
Esc
-Taste
Ein Menü zurück
Menü, Parameter Funktionsrelais verlassen
Verlassen ohne Speichern
h Schnittstelle (mit Abdeckung)
Steckplatz für Speicherkarte
Buchse für PC-Schnittstellenkabel
i Kontakte Ausgänge
j Gerätekennzeichnungsschild
k LCD
Zustandsanzeige der Ein-/Ausgänge
Betriebszustände
Schaltplan
Anzeige der Uhr
l Power/Run-LED
a
b
l
h
i
j
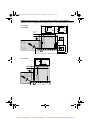
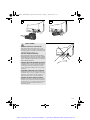
Front view
Frontansicht
Face avant
Vista frontale
Vista de frente
ab
c
d
h
i
j
k
g
f
e
Del Alt
Esc Ok
EN DE
Pub_IN003C_0907Brandlabel_AB_AWA1654.FM Seite 3 Montag, 1. Oktober 2007 3:19 15
Artisan Technology Group - Quality Instrumentation ... Guaranteed | (888) 88-SOURCE | www.artisantg.com
Seite wird geladen ...

5/16
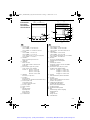
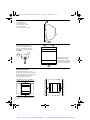
Standard connection, inputs – Standardanschluss, Eingänge – Raccordement
standard, entrées – Collegamento standard, ingressi – Conexión estándar, entradas
+10 V
10 V
5 V
0 V
BWB: +24 V
+.. V
DWD: +12 V
h
0
510
0 V
BWB:
U
e
= 24 V H
(20.4 – 28.8 V H)
I
e
= 80 mA
DWD
U
e
= 12 V H
(10.2 – 15.6 V H)
I
e
= 140 mA
BWB: +24 V
DWD: +12 V
0 V
l7, l8
> 1 A
l1
I2
I3
I4 I5
I6
I7 I8
1 f 15 V
0 F 5 V
28.8 V
l = 3.3 mA/24 V
I7, I8 = 2.2 mA/24 V
1 f 8 V
0 F 4 V
l = 3.3 mA/12 V
I7, I8 = 1.1 mA/12 V
15.6 V
5 – 7 lb-in
3.5 mm
COM
BWB
DWD
1760-L12BWB-...
1760-L12DWD-...
L1
5 – 7 lb-in
3.5 mm
L1
L2
> 1 A
l1
I2
I3
I4 I5
I6
I7 I8
U
e
= 120/240 V h
50/60 Hz
(90 – 264 V h)
I
e
= 40 mA 120 V
20 mA 240 V
l1–I6 = 0.5 mA 240 V
l1–I6 = 0.25 mA 120 V
I7, I8
l = 6 mA 240 V
l = 4 mA 120 V
1 f 79 V
0 F 40 V
264 V
L2
1760-L12AWA-...
Pub_IN003C_0907Brandlabel_AB_AWA1654.FM Seite 5 Montag, 1. Oktober 2007 3:19 15
Artisan Technology Group - Quality Instrumentation ... Guaranteed | (888) 88-SOURCE | www.artisantg.com

6/16
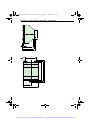
Outputs – Ausgänge – Sorties – Uscite – Salidas
0 V H, N
F 8 A / B 16
L1, L2, L3 (120/240 V h)
+ 24 V H
25
000
R
L
24 V H 8 A
120 V h 8 A
240 V h 8 A
2 A
2 A
2 A
1000 W
10 x 58 W
1
2
1
2
1
2
1
2
10
000
000
Q1
Q2
Q3 Q4
Pub_IN003C_0907Brandlabel_AB_AWA1654.FM Seite 6 Montag, 1. Oktober 2007 3:19 15
Artisan Technology Group - Quality Instrumentation ... Guaranteed | (888) 88-SOURCE | www.artisantg.com

7/16
Language selection for commissioning
Sprachauswahl bei erster Inbetriebnahme
Choix de la langue en cas de première mise en service
Selezione della lingua alla prima messa in servizio
Selección de lenguaje en la puesta en marcha
EN, DE, FR, ES, IT
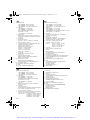
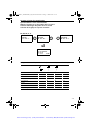
Relays, contacts – Relais, Kontakte – Relais, contacts – Relè, contatti – Relés, contactos
. . .
r R
Inputs
I i 1-8
Outputs
Q Q q 1-4
Internal Marker bits
M M m 1-16
Analog Setpoint Compare
A a 1-8
Real Time Clock
Ö ö 1-4
Counters
C C c 1-8
Timers
T T t 1-8
Soft Inputs-Keypad
P p 1-4
ENGLISH
GB,D,F,E,I,...
DEUTSCH
GB,D,F,E,I,...
ITALIANO
GB,D,F,E,I,...
I 1 2 3 4 5 6 7 8
0 0 0 0 0 0 0 0
0 0 0 0
Q 1 2 3 4 STOP
Pub_IN003C_0907Brandlabel_AB_AWA1654.FM Seite 7 Montag, 1. Oktober 2007 3:19 15
Artisan Technology Group - Quality Instrumentation ... Guaranteed | (888) 88-SOURCE | www.artisantg.com
Seite wird geladen ...

9/16
“RUN“ mode
Anlauf „RUN“
Mode « RUN »
Avviamento con “RUN“
Modo “RUN“
“STOP“ mode
Anlauf im „STOP“
Mode « STOP »
Avviamento con “STOP“
Modo “STOP“
DEBOUNCE OFF
P ON
MODE: STOP
RETENTION ON
I ENTPR. AUS
P TASTEN EIN
ANLAUF STOP
REMANENZ EIN
TEMPO EN. NON
P BOUTON OUI
MODE STOP
REMANENT OUI
ENTR.RETR.PA
P MARCHA
MODO: STOP
RET: MARCHA
RIT.INPT OFF
P TASTO ON
MODAL. STOP
RIMANENZA ON
STOP
RUN
U
e
DEBOUNCE OFF
P ON
MODE: RUN
RETENT. OFF
I ENTPR. AUS
P TASTEN EIN
ANLAUF RUN
REMANENZ AUS
TEMPO EN. NON
P BOUTON OUI
MODE RUN
REMANENT NON
ENTR.RETR.PA
P MARCHA
MODO: RUN
RET: PARO
RIT.INPT.OFF
P TASTO ON
MODAL. RUN
RIMANEN.OFF
STOP
RUN
U
e
Pub_IN003C_0907Brandlabel_AB_AWA1654.FM Seite 9 Montag, 1. Oktober 2007 3:19 15
Artisan Technology Group - Quality Instrumentation ... Guaranteed | (888) 88-SOURCE | www.artisantg.com

10/16
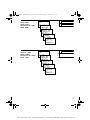
Menu changes – Menü-Änderung – Modification des menus – Modifica menu –
Modificación de menús
1760-CBL-PM02 interface a/1760-MM1 memory card b
Schnittstelle 1760-CBL-PM02 a/Speichermodul 1760-MM1 b
Interface 1760-CBL-PM02 a/carte mémoire 1760-MM1 b
Interfaccia 1760-CBL-PM02 a/scheda di memoria 1760-MM1 b
Interface 1760-CBL-PM02 a/tarjeta de memoria 1760-MM1 b
DEBOUNCE OFF
P ON
MODE: STOP
RETENTION ON
PASSWORD...
SYSTEM
GB D F E I
DEBOUNCE ON
P OFF
MODE: RUN
RETENT.OFF
PASSWORT...
SYSTEM
GB D F E I
I ENTPR. AUS
P TASTEN EIN
ANLAUF STOP
REMANENZ EIN
I ENTPR. EIN
P TASTEN AUS
ANLAUF RUN
REMANENZ AUS
MOT DE PASSE
SYSTEM
GB D F E I
TEMPO EN.NON
P BOUTON OUI
MODE STOP
REMANENT OUI
TEMPO EN.OUI
P BOUTON NON
MODE RUN
REMANENT NON
PASSWORD...
SYSTEM
GB D F E I
ENTR.RETR.PA
P MARCHA
MODO: STOP
RET. MARCHA
ENTR.RETR.MA
P PARADA
MODO: RUN
RET. PARO
PASSWORD...
SYSTEM
GB D F E I
RIT.INPT.OFF
P TASTO ON
MODAL. STOP
RIMANENZA ON
RIT.INPUT ON
P TASTO OFF
MODAL. RUN
RIMANEN.OFF
1
Pub_IN003C_0907Brandlabel_AB_AWA1654.FM Seite 10 Montag, 1. Oktober 2007 3:19 15
Artisan Technology Group - Quality Instrumentation ... Guaranteed | (888) 88-SOURCE | www.artisantg.com
Seite wird geladen ...
Seite wird geladen ...

13/16
Dimensions – Abmessungen – Dimensioni – Dimensiones
47.5
1.87“
56.5 2.22“
58 2.28“
45 1.77“
4.5 0.18“
10.75
M4
35.75
1.41“
71.5
2.81“
90
3.54“
102
4.02“
110
4.33“
0.42“
50
1.97“
Pub_IN003C_0907Brandlabel_AB_AWA1654.FM Seite 13 Montag, 1. Oktober 2007 3:19 15
Artisan Technology Group - Quality Instrumentation ... Guaranteed | (888) 88-SOURCE | www.artisantg.com

14/16
For More Information
If you would like a manual, you can:
– download a free electronic version from the internet: www.ab.com/pico or www.literature.rockwellautomation.com
– order a printed manual by:
contacting your local distributor or Rockwell Automation representative
Weitere Informationen
Zu diesem Produkt gibt es ein Benutzerhandbuch, das Sie wie folgt bestellen können:
– durch kostenloses Herunterladen vom Internet: www.ab.com/pico oder www.literature.rockwellautomation.com
– durch Bestellung:
bei Ihrem Distributor oder einer Niederlassung von Rockwell Automation in Ihrer Nähe
Pour en savoir plus
Pour vous procurer un manuel, vous pouvez :
– le charger gratuitement depuis le site Internet : www.ab.com/pico ou www.literature.rockwellautomation.com
– commander un manuel imprimé. Pour cela :
contactez votre distributeur local Rockwell Automation
For Refer to this Document Pub Number
A more detailed description of how to install and
use your Pico GFX-70 controller.
Pico GFX-70 Controller User Manual 1760-UM002
An introduction to Pico GFX-70 programming. Pico GFX-70 Controllers Quick Start 1760-QS002
A more detailed description of how to install and
use your Pico controller.
Pico Controller User Manual 1760-UM001
A basic overview of Pico and an introduction
to Pico programming.
Pico Controller Getting Results 1760-GR001
More information on proper wiring and grounding techniques. Industrial Automation Wiring
and Grounding Guidelines
1770-4.1
Für Siehe Dokument Pub.-Nr.
Eine ausführlichere Beschreibung der Installation und
Handhabung Ihrer programmierbaren Steuerung Pico GFX-70.
Steuerung Pico GFX-70 Benutzerhandbuch 1760-UM002
Eine Einführung zur Programmierung von Pico GFX-70. Kurzanleitung Pico GFX-70 Regler 1760-QS002
Eine ausführlichere Beschreibung der Installation und
Handhabung Ihrer programmierbaren Steuerung Pico.
Steuerung Pico
TM
Benutzerhandbuch 1760-UM001
Eine grundlegende Übersicht über Pico und eine Einführung in
die Pico-Programmierung.
Steuerung Pico
TM
Praxishandbuch 1760-GR001
Weitere Informationen über ordnungsgemäße Verdrahtungs-
und Erdungsverfahren.
Richtlinien zur Verdrahtung und Erdung von
industriellen Automatisierungssystemen
1770-4.1DE
Pour Lisez ce document Référence
Plus de détails sur l’installation et l’utilisation de l’automate
Pico GFX-70.
Module Pico GFX-70 Manuel utilisateur 1760-UM002
Introduction à la programmation du Pico GFX-70. Guide rapide regulateurs Pico GFX-70 1760-QS002
Plus de détails sur l’installation et l’utilisation de l’automate
Pico.
Module Pico
TM
Manuel utilisateur 1760-UM001
Présentation générale de Pico et introduction
à la programmation Pico.
Module Pico
TM
Guide pratique 1760-GR001
Plus d’informations sur le câblage et les techniques de mise à
la terre.
Directives de câblage et de mise à la terre pour
automatisation industrielle
1770-4.1FR
Pub_IN003C_0907Brandlabel_AB_AWA1654.FM Seite 14 Montag, 1. Oktober 2007 3:19 15
Artisan Technology Group - Quality Instrumentation ... Guaranteed | (888) 88-SOURCE | www.artisantg.com
Seite wird geladen ...
Seite wird geladen ...
Seite wird geladen ...
-
 1
1
-
 2
2
-
 3
3
-
 4
4
-
 5
5
-
 6
6
-
 7
7
-
 8
8
-
 9
9
-
 10
10
-
 11
11
-
 12
12
-
 13
13
-
 14
14
-
 15
15
-
 16
16
-
 17
17
-
 18
18


Allen-Bradley Pico 1760-L12BWB-NC Installation Instructions Manual
- Typ
- Installation Instructions Manual
- Dieses Handbuch eignet sich auch für
in anderen Sprachen
- English: Allen-Bradley Pico 1760-L12BWB-NC
- français: Allen-Bradley Pico 1760-L12BWB-NC
- español: Allen-Bradley Pico 1760-L12BWB-NC
- italiano: Allen-Bradley Pico 1760-L12BWB-NC
Verwandte Artikel


Andere Dokumente
-
 Rockwell Automation 1760-DU Series Installation Instructions Manual
-
 Rockwell Automation 1760-LDFCA Installation Instructions Manual
-
Eaton EASY412-AC Series Bedienungsanleitung
-
Zoom GFX707 Bedienungsanleitung
-
Beta 1760/OHM Bedienungsanleitung
-
-
Lenze 8200 vector Mounting instructions
-
Bushnell Pro X7 Jolt 201400 Benutzerhandbuch
-
ABB CL-LMT Serie Installation Instructions Manual
-
Bushnell 205107 Benutzerhandbuch

