LC-Power LC-ADA-525-4X25-SWAP Bedienungsanleitung
- Kategorie
- HDD / SSD-Gehäuse
- Typ
- Bedienungsanleitung

( 1) ( 2)
( 3) ( 4)
Lo c ke d Un lo c ke d
( 1)
( 2)
( 3) ( 4)
3
2
145
Hinweise & Service
Vermeiden Sie direkte Sonneneinstrahlung sowie hohe Temperaturen. Halten Sie den Laufwerkseinschub
von Feuer und anderen ähnlichen Hitzequellen fern.
Verwahren Sie den Laufwerkseinschub in einer trockenen Umgebung. Halten Sie ihn von Korrosivität
verursachenden Materialien fern.
Wir empfehlen die Handhabung durch Kinder nur unter elterlicher Aufsicht sowie unter Berücksichtigung des
Benutzerhandbuches.
Dieses Produkt hat zwei Jahre Garantie ab Kaufdatum.
Bei Serviceleistungen wenden Sie sich bitte an Ihren Händler.
Sollte der Laufwerkseinschub aufgrund eines Anwendungsfehlers beschädigt werden, erlischt die
zweijährige Garantiezeit sofort.
Besuchen Sie uns unter www.lc-power.com oder kontaktieren Sie uns unter folgender E-Mail-Adresse:
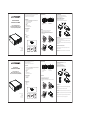
HDD/SSD-Installation
1) Stellen Sie das Schloss mit Hilfe des Schlüssels auf die Position „Unlocked“.
2) Drücken Sie den Schalter neben dem Schloss des Laufwerkseinschubes nach links.
Ziehen Sie nun den Laufwerkseinschub heraus.
3) Schrauben Sie eine 2,5“-HDD/SSD an den Laufwerkseinschub.
4) Schieben Sie den Laufwerkseinschub in das Gehäuse zurück.
5) Initialisieren Sie die Festplatte mit Ihrem Betriebssystem.
Für weitere Informationen schauen Sie bitte in das Handbuch Ihres Betriebssystems.
Produktbeschreibung
Benutzerhandbuch
LC-ADA-525-4x25-SWAP
5,25”-Laufwerkseinschub
mit Hot-Swap-Funktion für bis zu
vier 2,5”-Festplatten (HDD/SSD)
TM
Silent Power Electronics GmbH
Formerweg 8
47877 Willich
support@lc-power.com
www.lc-power.com
Deutschland
Vielen Dank, dass Sie sich für einen Laufwerkseinschub von LC-Power entschieden haben.
Bitte lesen Sie diese Anleitung vor der Benutzung sorgfältig durch.
Spezifikationen können sich ohne vorherige Mitteilung ändern.
Spezifikationen
Verbinden Sie bis zu vier 2,5“-Festplatten (HDD/SSD) mit Ihrem PC dank der Hot-Swap-Funktion
- Für bis zu vier 2,5“-SATA I/II/III-Festplatten (HDD/SSD)
- Übertragungsgeschwindigkeit bis max. 6Gb/s
- Kein Kapazitätslimit
- Plug´n´Play
- Abschließbar
- Hochwertiges Aluminiumgehäuse
- 40 mm-Lüfter auf der Rückseite des Gehäuses
Systemkompatibilität
- Windows XP oder höher
- Mac OS 9.0 oder höher
- Linux 2.4 oder höher
Inhalt
1x 5,25“-Laufwerkseinschub
2x Schlüssel
16x Schrauben
1x Benutzerhandbuch
1x
2x 16x 1x
1) Laufwerkseinschub
2) LED-Indikator für den HDD-Zugriff
3) Schloss
4) SATA-Anschlüsse
5) PATA/4-Pin-Stromversorgung
PC-Einbau
1) Entfernen Sie eine 5,25“-Blende an der Frontblende Ihres Computergehäuses.
2) Schieben Sie den 5,25“-Laufwerkseinschub in Ihr Computergehäuse.
3) Fixieren Sie den 5,25“-Laufwerkseinschub mit Schrauben an Ihrem Computergehäuse.
4) Verbinden Sie den PATA/4-Pin-Stecker Ihres Netzteiles sowie die SATA-Stecker des Mainboards
mit dem Laufwerkseinschub.
User manual
LC-ADA-525-4x25-SWAP
5,25” drive bay rack
with hot swap feature for up to
four 2,5” hard disk drives (HDD/SSD)
TM
Silent Power Electronics GmbH
Formerweg 8
47877 Willich
support@lc-power.com
www.lc-power.com
Germany
Specifications
Connect up to four 2,5“ hard disk drives (HDD/SSD) with your computer thanks to the hot swap feature
- For up to four 2,5“ SATA I/II/III hard disk drives (HDD/SSD)
- Transfer rate up to max. 6Gb/s
- No capacity limit
- Plug´n´Play
- Lockable
- High-quality aluminium housing
- 40 mm fan on the back side of the drive bay rack
System compatibility
- Windows XP or higher
- Mac OS 9.0 or higher
- Linux 2.4 or higher
Included in delivery
1x 5,25“ drive bay rack
2x Keys
16x Screws
1x User manual
1x
2x 16x 1x
( 1) ( 2)
( 3) ( 4)
3
2
145
Product specification
1) Hard disk drive bay
2) LED indicator for HDD access
3) Keylock
4) SATA connection
5) PATA/4 pin power supply
PC installation
1) Remove the 5,25“ bezel from the front panel of your computer.
2) Insert the 5,25“ drive bay rack into the computer case.
3) Use screws to fix the 5,25“ drive bay rack to the computer case.
4) Connect the PATA/4 pin connector of the power supply and the SATA connector of the mainboard to the
drive bay rack.
Lo c ke d Un lo c ke d
( 1)
( 2)
( 3) ( 4)
HDD/SSD installation
1) Use the key to switch the keylock to position „Unlocked“.
2) Push the switch, which is located next to the keylock of the drive bay, to the left.
Pull out the hard disk drive bay.
3) Use screws to mount a 2,5“ HDD/SSD to the drive bay.
4) Push the hard disk drive bay into the 5,25“ drive bay rack.
5) Use your operating system to initialize the hard disk drive before usage.
For further details, please consult the user manual of your operating system.
Notes & Service
Avoid direct sunlight and a high temperature environment, keep the drive bay far away from fire and related
heat sources.
Keep it in dry places, keep it away from corrosiveness causing materials.
We recommend that parents should guide their children using the item, strictly following the notes
in this manual.
The product has a two year warranty period from the date of purchase, service issues will be handled
by your dealer.
If the drive bay is damaged due to improper operation, the warranty period expires immediately.
Check www.lc-power.com or contact us by e-mail at: [email protected].
Thank you for purchasing this drive bay rack from LC-Power.
Please read the manual before usage.
Specifications may be subject to change without prior notice.
-
 1
1

LC-Power LC-ADA-525-4X25-SWAP Bedienungsanleitung
- Kategorie
- HDD / SSD-Gehäuse
- Typ
- Bedienungsanleitung
in anderen Sprachen
Verwandte Artikel
-
LC-Power LC-ADA-525-3X35-SWAP Bedienungsanleitung
-
-
-
-
-
-
-
-
-