


V 2.6
English ................................................................................. 2
Dansk ................................................................................ 22
Deutsch .............................................................................. 42

PARKSIDE PKIK 4.3 A1
2 - English
Table of Contents
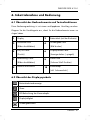
1. Explanation of used symbols ................................................ 4
2. Intended use ......................................................................... 5
3. Package contents ................................................................. 6
4. Technical specifications ......................................................... 7
5. Safety instructions ................................................................ 8
6. Getting started and operation ............................................ 11
6.1 Overview of controls and button functions .............................................. 11
6.2 Overview of display symbols .................................................................... 11
6.3 Inserting or replacing the batteries ........................................................... 12
6.4 Unwinding / winding the goosenec k ....................................................... 13
6.5 Using the Device ........................................................................................ 13
6.5.1 Switching the borescope on/off ....................................................... 13
6.5.2 Lighting ................................................................................................ 13
6.5.3 Display brightness .............................................................................. 14
6.5.4 Zoom function .................................................................................... 14
6.5.5 Customising the display ..................................................................... 14
6.5.6 Switching to black and white display ............................................... 14
6.5.7 Capturing a picture ............................................................................ 14
6.5.8 Playback function ............................................................................... 15
6.5.9 Picture-in-picture function ................................................................... 15
6.5.10 Installing the tools ............................................................................ 16
6.5.11 Transferring pictures to a computer ............................................... 17
6.6 Storage when not in use ............................................................................ 18
7. Troubleshooting ................................................................. 18

PARKSIDE PKIK 4.3 A1
English - 3
8. Cleaning ............................................................................. 18
9. Environmental regulations and disposal information .......... 19
10. Conformity notes .............................................................. 20
11. Copyright ......................................................................... 20
12. Warranty and service information .................................... 20
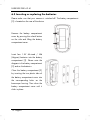
Congratulations!
By purchasing the PARKSIDE PKIK 4.3 A1 borescope (inspection camera), you
have opted for a quality product. The camera with gooseneck and adjustable
LED lighting can be used in areas with poor accessibility as an aid for
inspection and fault analysis.
Before first using it, familiarise yourself with the way the borescope works and
read these operating instructions through carefully. Be careful to follow the
safety instructions and only use the borescope as described in the operating
instructions and for the applications given.
Keep these operating instructions in a safe place. If you pass the borescope on
to someone else, make sure to give them all the relevant documents with it. The
User’s Manual forms part of this product.

PARKSIDE PKIK 4.3 A1
4 - English
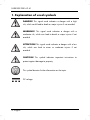
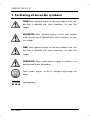
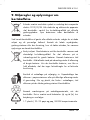
1. Explanation of used symbols
DANGER! This signal word indicates a danger with a high
risk, which could lead to death or major injuries if not avoided.
WARNING! This signal word indicates a danger with a
moderate risk, which can lead to death or major injuries if not
avoided.
ATTENTION! This signal word indicates a danger with a low
risk, which can lead to minor or moderate injuries if not
avoided.
CAUTION! This symbol indicates important instructions to
protect against damage to property.
This symbol denotes further information on the topic.
DC voltage

PARKSIDE PKIK 4.3 A1
English - 5
2. Intended use
The PKIK 4.3 A1 borescope is an optical examination device. The camera with
gooseneck and adjustable LED lighting can be used in areas with poor
accessibility as an aid for inspection and fault analysis.
The gooseneck is waterproof and suitable for use in liquids. Please note that
only the gooseneck may be exposed to moisture, but not the main unit (display
[1]). The device must not be used in oils, alkalis or acids.
The manufacturer accepts no liability if
• the borescope is not used in accordance with the intended use.
• damage to property or personal injury is caused as the result of the
improper handling of the borescope or failure to comply with these
instructions.
• the borescope is damaged or operated when incomplete or modified.
This is an information technology device. It may only be used for private
purposes, not for industrial, commercial or medical purposes.
Observe the regulations and laws in the respective country of use.

PARKSIDE PKIK 4.3 A1
6 - English
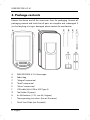
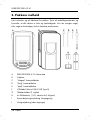
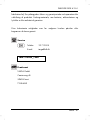
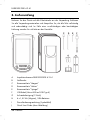
3. Package contents
Remove the device and all the accessories from the packaging. Remove all
packaging material and check that all parts are complete and undamaged. If
you find anything missing or damaged, please contact the manufacturer.
A PARKSIDE PKIK 4.3 A1 borescope
B Fabric bag
C "Magnet" camera tool
D "Hook" camera tool
E "Mirror" camera tool
F USB cable (Mini-USB to USB Type A)
G Tool holder (2 pieces)
H 4x LR6 batteries (1.5V, size AA, Mignon)
I These operating instructions (line-art illustration)
J Quick Start Guide (not illustrated)

PARKSIDE PKIK 4.3 A1
English - 7
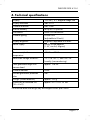
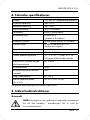
4. Technical specifications
Display 10.9 cm / 4.3" diagonal image size
Display resolution 480 x 272
Camera resolution 640 x 480
Internal memory for up to 100 pictures
Connection Micro USB connection
Camera lighting 6 white LEDs
(adjustable to 8 levels)
Display brightness Brightness adjustable to 9 levels
Power supply 6V 4x LR6 batteries
(1.5V, size AA, Mignon)
Runtime approx. 5 hours
Environment/outdoor
temperature
-10°C to +50°C
Permissible storage conditions -10°C to +50°C, max. 85% rel.
humidity (non-condensing)
Total gooseneck length with
camera head
approx. 106 cm
Camera diameter 8 mm
Flexible gooseneck protection
class
IP67
Weight (without batteries) approx. 330 g
Dimensions of handheld unit
(W x H x D)
approx. 90 x 155 x 35 mm
The technical data and design may be changed without prior notice.

PARKSIDE PKIK 4.3 A1
8 - English
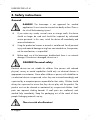
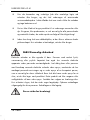
5. Safety instructions
General
DANGER! The borescope is not approved for medical
applications! It must never be inserted into bodily orifices! There is
the risk of life-threatening injuries!
• If you notice any smoke, unusual noise or strange smells, the device
should no longer be used and should be inspected by authorized
service personnel. In this case, switch the device off immediately and
remove the batteries.
• Using the product on humans or animals is not allowed. For all personal
injury and material damage arising from non-intended use, the operator,
not the manufacturer, is responsible!
• Before each use of the borescope, double-check there is no external
damage. If the device is damaged, do not use it.
DANGER! Personal safety
Electrical devices are not suitable for children. Also persons with reduced
physical, sensory or mental capabilities should only use electrical devices in
appropriate circumstances. Never allow children or persons with disabilities to
use electrical devices unsupervised, unless they are instructed accordingly and
supervised by a competent person responsible for their safety. Children should
always be supervised to ensure that they do not play with the product. The
product must not be cleaned or maintained by unsupervised children. Small
parts can represent choking hazards. If small parts are swallowed, seek
medical help immediately. Keep the packaging out of the reach of these
people. Packaging material is no toy.
There is a risk of suffocation!

PARKSIDE PKIK 4.3 A1
English - 9
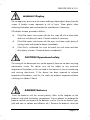
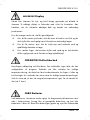
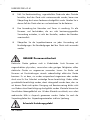
WARNING
! Display
Do not apply any pressure to the screen and keep sharp objects away from the
screen. A broken screen represents a risk of injury. Wear gloves when
collecting the broken parts and contact the manufacturer if necessary.
If fluid does escape, proceed as follows:
• If the fluid comes into contact with the skin, wipe off with a clean cloth
and rinse with plenty of water. Contact a doctor if necessary.
• If the fluid comes into contact with the eyes, rinse them under plenty of
running water and contact a doctor immediately.
• If the fluid is swallowed, first rinse the mouth out with water and then
drink plenty of water. Contact a doctor immediately!
CAUTION! Operational safety
The casing of the borescope must not be opened, there are no parts requiring
maintenance inside. The device must not be subject to any excessive
temperature fluctuations as this can lead to the moisture in the air condensing
and causing short-circuits. If the device has been exposed to extreme
temperature fluctuations, wait for it to reach the ambient temperature before
switching it on (about 2 hours).
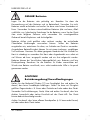
DANGER! Batteries
Insert the batteries with the correct polarity. Refer to the diagram on the
batteries and inside the battery compartment. Do not attempt to recharge the
batteries and do not dispose of the batteries in a fire. Do not mix battery types
(old and new or carbon and alkaline, etc.). Remove the batteries when the

PARKSIDE PKIK 4.3 A1
10 - English
device is not to be used for an extended period. Improper use could cause
explosions or leaks.
Batteries must never be opened or deformed, as this could result in chemicals
leaking out which could cause injuries. If the batteries have leaked, remove
them to prevent damage to the device. You can wipe off any leaked battery
fluid by using a dry, absorbing cloth. Always wear protective gloves! Avoid
any skin contact. If the battery fluid comes into contact with the skin or eyes,
rinse immediately with plenty of water and seek medical aid. Batteries can
represent choking hazards. Batteries are not toys! Keep batteries out of reach
of children. If a battery is swallowed, seek medical help immediately.
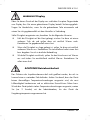
CAUTION! Operating environment/
environmental conditions
Keep the main unit (display [1]) away from moisture and make sure that no
foreign bodies can enter it. Do not place any recipients containing liquids
(beverages, vases, etc.) onto or next to the device. Avoid vibrations, dust and
heat and also make sure that no direct sunlight or bright artificial light reaches
the device, otherwise the device may be damaged.
Make sure that no fire hazards (e.g. burning candles) are placed on or near
the device.

PARKSIDE PKIK 4.3 A1
English - 11
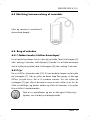
6. Getting started and operation
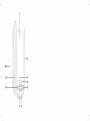
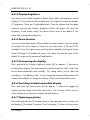
6.1 Overview of controls and button functions
These operating instructions have a fold-out cover. Fold-out the cover so you
can refer to the relevant controls at any time.
1
Display
2
Battery compartment (on the
back)
3
Recording button
(scroll pictures)
4
Playback button
(delete picture)
5
On/Off button
(back)
6
Display brightness button
(rotate / mirror picture)
7
Light button
(scroll pictures)
8
Zoom button
(black and white function)
9
Micro USB connection
10
Camera head
(incl. gooseneck)
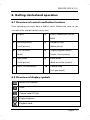
6.2 Overview of display symbols
Battery level indicator
Zoom
Camera head LED light
Display brightness
Playback mode

PARKSIDE PKIK 4.3 A1
12 - English
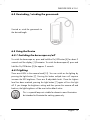
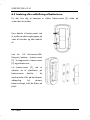
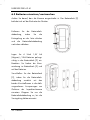
6.3 Inserting or replacing the batteries
Please make sure that your camera is switched off. The battery compartment
[2] is located on the rear of the device.
Remove the battery compartment
cover by pressing the unlock button
on the side and lifting the battery
compartment cover.
Insert four 1.5V AA-sized / LR6
(Mignon) batteries into the battery
compartment [2]. Please note the
diagram in the battery compartment
[2] and on the batteries.
Close the battery compartment [2]
by inserting the two plastic tabs of
the battery compartment cover into
the corresponding holes on the
borescope housing. Then close the
battery compartment cover until it
clicks in place.

PARKSIDE PKIK 4.3 A1
English - 13
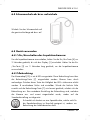
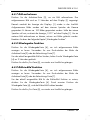
6.4 Unwinding / winding the gooseneck
Unwind or wind the gooseneck to
the desired length.
6.5 Using the Device
6.5.1 Switching the borescope on/off
To switch the borescope on, press and hold the On/Off button [5] for about 3
seconds until the display [1] illuminates. To switch the borescope off, press and
hold the On/Off button [2] for approx. 3 seconds.
6.5.2 Lighting
There are 6 LEDs in the camera head [10]. You can switch on the lighting by
pressing the Light button [7]. Pressing this button multiple times will stepwise
increase the LED brightness. There are 8 adjustable levels. Once the highest
level has been reached, pressing the Light button [7] again will turn the light
off. If you change the brightness setting and then power the camera off and
back on, the light brightness will be reset to the default value.
This is a special lamp not suitable for domestic room illumination
but intended to illuminate the working space only.

PARKSIDE PKIK 4.3 A1
14 - English
6.5.3 Display brightness
You can use the Display brightness button [6] to adjust the brightness of the
display [1]. Pressing this button multiple times will stepwise increase the display
[1] brightness. There are 9 adjustable levels. Once the highest level has been
reached, pressing the Display brightness button [6] again will reset the
brightness to the lowest value. The value will be reset to the default if you
power the camera off and back on.
6.5.4 Zoom function
You can use the Zoom button [8] to enable the zoom function. Press this button
to increase the zoom stepwise. There are two zoom levels (1.5X and 2.0X)
available. Once the highest zoom level has been reached, pressing the Zoom
button [8] again will disable the zoom. The value will also be reset to the
default if you power the camera off and back on.
6.5.5 Customising the display
Press and hold the Display brightness button [6] for approx. 2 seconds to
customise the display. The camera picture can be rotated by 180° and it can
be mirrored horizontally and vertically. This setting allows you to show the
recordings in four different views. If you change the setting and then power the
camera off and back on, the picture display will be reset to the default value.
6.5.6 Switching to black and white display
Press and hold the Zoom button [8] for approx. 2 seconds to toggle the
display between black and white, and colour. The function will be reset to
colour display if you power the camera off and back on.
6.5.7 Capturing a picture
Press the Record button [3] to take a picture. The captured picture is shown on
the display [1] for about 2 seconds. Then the display [1] shows the live picture

PARKSIDE PKIK 4.3 A1
English - 15
again. Any captured pictures are stored in the internal memory of the camera.
You can save up to approx. 100 pictures. If the internal memory is full, "100%"
reads on the display [1]. Before you can capture more pictures, you need to
erase some pictures first. For more on this, see next chapter "Playback
function".
6.5.8 Playback function
Press the Playback button [4] to show any captured pictures. Use the Record
button [3] or the Light button [7] to toggle between the different pictures.
To delete the currently selected picture, press and hold the Playback button [4]
for approx. 2 seconds.
Press the On/Off button [5] to go back to the live picture view.
6.5.9 Picture-in-picture function
Press the Playback button [4] to show any captured pictures. Use the Record
button [3] or the Light button [7] to toggle between the different pictures.
To use the currently selected picture for the picture-in-picture function, press the
Playback button [4]. Press the Playback button [4] again to cancel the picture-
in-picture function.
Press the On/Off button [5] to go back to the live picture view.

PARKSIDE PKIK 4.3 A1
16 - English
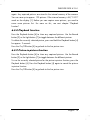
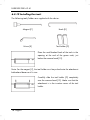
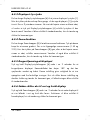
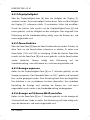
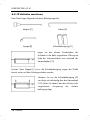
6.5.10 Installing the tools
The following tools/holders are supplied with the device:
Magnet [C] Hook [D]
Mirror [E] Tool holder [G]
Place the small barbed hook of the tools in the
opening at the end of the goose neck, just
below the camera head [10].
Note: For the magnet [C], the tool holder must be pushed onto the attachment
beforehand because of its size.
Carefully slide the tool holder [G] completely
over the camera head [10]. Make sure that the
attachment is in the insertion recess of the tool
holder.

PARKSIDE PKIK 4.3 A1
English - 17
6.5.11 Transferring pictures to a computer
You can use the USB cable [F] supplied to connect the borescope to a
computer and transfer your pictures to it. Proceed as follows:
CAUTION! Loss of data
Be careful when renaming any folders and files. Do NOT try to
change the folder or file names stored on the device from the
computer or you may not be able to read any files contained
here on your borescope.
Once you have copied your files or folders to the computer, you
can rename or edit them on the computer.
Unplug the mass storage device via the operating system's
safely remove hardware feature before disconnecting the USB
cable [F] from the borescope and the computer.
The manufacturer accepts no liability for any loss of data!
•
Plug the USB cable [F] into the Micro USB port [9] and into a free USB
port on your powered-on computer.
•
If the borescope was switched off, it will switch on automatically. A USB
cable symbol appears on the display [1] .
•
The computer will now set up a removable disk that can be used to
access your recordings.
•
Now you can transfer the pictures to your computer.
•
After you have finished transferring the pictures to your computer, safely
unplug the removable storage media using the corresponding function
of your operating system.
•
Unplug the USB cable [F] from the borescope and the computer.
•
The borescope switches automatically off after a few seconds.

PARKSIDE PKIK 4.3 A1
18 - English
6.6 Storage when not in use
If you will not be using the borescope for a long period of time,
remove the batteries to prevent any leaking.
Store the clean and dry borescope and its accessories in the
supplied fabric bag [B] and in a dry, cool place.
7. Troubleshooting
The device does not switch on.
1. The batteries may be empty, fit new batteries.
2. Test that the batteries are fitted with the correct polarity.
8. Cleaning
If dirty, clean the device with a dry cloth or use a slightly damp cloth for
stubborn dirt. Make sure not to apply any strong pressure when cleaning the
display [1] in order to avoid damage to the display [1]. Do not use any
solvents, irritants or gaseous cleaners. No moisture must penetrate into the
main unit.
To clean the gooseneck, use a slightly dampened cloth and, if necessary, with
some dishwashing liquid.
Seite wird geladen ...
Seite wird geladen ...
Seite wird geladen ...
Seite wird geladen ...
Seite wird geladen ...
Seite wird geladen ...
Seite wird geladen ...
Seite wird geladen ...
Seite wird geladen ...
Seite wird geladen ...
Seite wird geladen ...
Seite wird geladen ...
Seite wird geladen ...
Seite wird geladen ...
Seite wird geladen ...
Seite wird geladen ...
Seite wird geladen ...
Seite wird geladen ...
Seite wird geladen ...
Seite wird geladen ...
Seite wird geladen ...
Seite wird geladen ...
Seite wird geladen ...
Seite wird geladen ...
Seite wird geladen ...
Seite wird geladen ...
Seite wird geladen ...
Seite wird geladen ...
Seite wird geladen ...
Seite wird geladen ...
Seite wird geladen ...
Seite wird geladen ...
Seite wird geladen ...
Seite wird geladen ...
Seite wird geladen ...
Seite wird geladen ...
Seite wird geladen ...
Seite wird geladen ...
Seite wird geladen ...
Seite wird geladen ...
Seite wird geladen ...
Seite wird geladen ...
Seite wird geladen ...
Seite wird geladen ...
-
 1
1
-
 2
2
-
 3
3
-
 4
4
-
 5
5
-
 6
6
-
 7
7
-
 8
8
-
 9
9
-
 10
10
-
 11
11
-
 12
12
-
 13
13
-
 14
14
-
 15
15
-
 16
16
-
 17
17
-
 18
18
-
 19
19
-
 20
20
-
 21
21
-
 22
22
-
 23
23
-
 24
24
-
 25
25
-
 26
26
-
 27
27
-
 28
28
-
 29
29
-
 30
30
-
 31
31
-
 32
32
-
 33
33
-
 34
34
-
 35
35
-
 36
36
-
 37
37
-
 38
38
-
 39
39
-
 40
40
-
 41
41
-
 42
42
-
 43
43
-
 44
44
-
 45
45
-
 46
46
-
 47
47
-
 48
48
-
 49
49
-
 50
50
-
 51
51
-
 52
52
-
 53
53
-
 54
54
-
 55
55
-
 56
56
-
 57
57
-
 58
58
-
 59
59
-
 60
60
-
 61
61
-
 62
62
-
 63
63
-
 64
64


Parkside 315439 1904 Operating Instructions And Safety Instructions
- Typ
- Operating Instructions And Safety Instructions
- Dieses Handbuch eignet sich auch für
in anderen Sprachen
- English: Parkside 315439 1904
- dansk: Parkside 315439 1904
Verwandte Artikel
Andere Dokumente
-
QLIMA EPH1200LCD Benutzerhandbuch
-
Schwaiger IPK124 Bedienungsanleitung
-
Bosch UniversalInspect Bedienungsanleitung
-
Bosch GOS 10,8 V-LI Professional Spezifikation
-
VOLTCRAFT 2446356 Benutzerhandbuch
-
PeakTech 5600 Bedienungsanleitung
-
Adam Hall SLED10 Benutzerhandbuch
-
AIPTEK 400442 Bedienungsanleitung
-
Beta 961P6 Bedienungsanleitung
-
 Powerfix Profi PEK 2.3 A2 Bedienungsanleitung
