Muse M-30 BT bleu Bedienungsanleitung
- Kategorie
- CD-Radios
- Typ
- Bedienungsanleitung
Dieses Handbuch ist auch geeignet für

FR
NL
IT
ES
DE
PT
GB
Manuel de l’utilisateur
Lire attentivement les instructions avant de faire fonctionner
l’appareil.
User Manual
Please read the instructions carefully before operating the unit.
Manual do Utilizador
Leia este manual com atenção antes de qualquer utilização.
Benutzerhandbuch
Bitte lesen dieses Handbuch vor dem Gebrauch des Geräts
aufmerksam durch.
Manual de instrucciones
Antes de utilizar este aparato, lea atentamente las siguientes
instrucciones.
Manuale dell’utente
Leggere attentamente le istruzioni prima di utilizzare
l’apparecchio.
Gebruikershandleiding
Gelieve voor gebruik deze handleiding aandachtig te lezen.
M-30 BTB / M-30 BTN

FR - 1
EMPLACEMENT ET DESCRIPTION DES COMMANDES
1. POIGNÉE
2. ANTENNE TÉLESCOPIQUE FM
3. COMPARTIMENT CD
4. AUX. IN: ENTRÉE AUXILIAIRE
5. MARCHE-ARRÊT/SOURCE: FM, AM (MW),
CD, USB, BLUETOOTH (BT), AUX.IN
6. PROGRAMME/STATIONS RADIO
PRÉSÉLECTIONNÉES / RÉPÉTITION
7. / PAIR: LECTURE/PAUSE/COUPLAGE
8. MÉMOIRE / STOP
9. RECHERCHE ET RÉGLAGE ARRIÈRE
10. RECHERCHE ET RÉGLAGE AVANT
11. VOLUME DESCENDANT
12. VOLUME ASCENDANT
13. PORT USB
14. ECRAN LCD
15. AC IN ENTRÉE ALIMENTATION SECTEUR
16. COMPARTIMENT À PILES ET CORDON D’ALIMENTATION SECTEUR
ALIMENTATION
Cet appareil fonctionne sur secteur (230V 50 Hz) ou sur piles ( 9V ) 6 x 1.5V Type UM-2 /R 14 / ’’C’’ (Piles non fournies)
FONCTIONNEMENT SUR SECTEUR:
Branchez le cordon d’alimentation de l’appareil au secteur. Assurez-vous que la tension est compatible avec votre appareil avant de le
mettre en marche.
Nous vous conseillons de déconnecter le cordon d’alimentation du secteur lorsque vous n’utilisez pas l’appareil.
REMARQUE: Dans un souci d'économie d'énergie, à la n de la lecture ou bien encore si le volume d'écoute est réglé à un niveau très
bas et qu’aucune opération n'est eectuée sur l'appareil pendant une période de 10 minutes celui-ci se mettra automatiquement en
mode veille.
FONCTIONNEMENT SUR PILES
Ouvrez la trappe à piles située à l’arrière de l’appareil et insérez les piles en respectant le schéma de polarité indiqué à l’intérieur
du compartiment et refermez le compartiment. Pour passer de l’alimentation secteur à l’alimentation sur piles, débranchez le cordon
d’alimentation.
Remplacement des piles
Les piles doivent être remplacées lorsque le volume diminue ou que le son se déforme.
Remarques relatives aux piles
• Ne mélangez pas des piles de diérents types ou des piles neuves avec des piles usagées.
• Ne rechargez pas, ne chauez pas et ne démontez jamais les piles
• Les piles ne peuvent pas être exposées à des sources de chaleur excessive, comme la lumière du soleil, le feu, etc.
• Veillez au respect de l’environnement lorsque vous vous débarrassez des piles usagées.
REMARQUE
Pour éviter tout écoulement, retirez toujours les piles de l’appareil lorsque celui-ci n’est pas utilisé pendant une période prolongée.
FR - 2
COMMANDES AUDIO
Appuyez sur la touche pour mettre l’appareil en marche. Lorsque l’unité est allumée, appuyez sur la touche pour changer
entre les diérentes sources: RADIO FM, RADIO AM (MW), CD, USB, BLUETOOTH, LINE IN (AUX IN)
ÉCOUTE DE LA RADIO
Pour améliorer la réception radio:
FM: déployez l’antenne FM
AM (MW): pivotez l'appareil horizontalement pour une réception optimale.
RECHERCHE AUTOMATIQUE DES STATIONS
Appuyez sur pour choisir FM ou AM (MW).
Appuyez et maintenez ou pendant environ 2 secondes pour lancer la recherche. La fonction de recherche automatique repère
les stations dont le signal est fort. Appuyez à nouveau sur ou pour continuer la recherche.
Remarque: Les stations dont le signal est faible peuvent être recherchées manuellement. Le son est automatiquement coupé
pendant la recherche.
PREREGLAGE DE STATIONS
1. Sélectionnez une station manuellement ou automatiquement avec ou .
2. Appuyez une fois sur , “P01” clignote à l’écran pendant quelques secondes.
3. Utilisez ou pour sélectionner un numéro de mémoire.
4. Appuyez à nouveau sur pour mémoriser la station radio sur le numéro de mémoire choisi.
5. Répétez les étapes 1 à 4 pour mémoriser d’autres stations.
Remarque: Lorsque vous mémorisez une station sur un numéro de mémoire déjà occupé, la station existante est automatiquement
eacée.
ECOUTE DES STATIONS PRÉRÉGLÉES
Appuyez sur successivement pour sélectionner une station mémorisée.
RECHERCHE MANUELLE DES STATIONS
1. Appuyez sur pour choisir FM ou AM (MW).
2. Appuyez successivement sur ou pour rechercher votre station.
3. Réglez le niveau sonore avec ou .
FONCTION BLUETOOTH
Le mot Bluetooth
®
ainsi que les marques et logo sont des marques commerciales déposées détenues par Bluetooth SIG, Inc. et
l’utilisation de ces marques par New One S.A.S se fait dans le cadre d’une autorisation. Les autres marques et noms commerciaux
sont les propriétés de leurs titulaires respectifs.
• Avant d’utiliser la fonction Bluetooth, assurez-vous que votre téléphone portable prenne en charge la fonction.
• Selon les diérents modèles de téléphone portable, la puissance d’émission Bluetooth est diérente. Il est recommandé de
maintenir une distance de 10 mètres entre le téléphone portable et l’unité.
• Ne mettez aucun objet en métal ou obstacle entre le téléphone portable et l’unité.
COUPLAGE MANUEL
1. Appuyez sur la touche pour choisir le mode Bluetooth. L'écran acher “bt” pendant quelques secondes. L'indicateur
Bluetooth commencera à clignoter rapidement. Puis appuyez sur / PAIR pendant plusieurs secondes, alors l'indicateur
Bluetooth clignotera rapidement.
2. Activez la fonction Bluetooth de votre téléphone mobile. (Veuillez consulter le manuel d’instruction de votre téléphone portable
sur la manière d’utiliser le Bluetooth.)
3. Sélectionnez l’élément de recherche d’appareil Bluetooth. Votre téléphone commence à rechercher les appareils Bluetooth à sa
portée (10 mètres). Sélectionnez « M-30BT » et conrmez.
Remarque:
- Saisissez 0000 pour le mot de passe si nécessaire et conrmez-le.
- Si vous avez déjà eectué des connexions Bluetooth avant, une liste des résultats des recherches précédentes s’acheSelect
“M-30BT” and conrm
4. Lorsque l'appariement est réussi, vous pouvez entendre le son d'association et le logo Bluetooth s'arrête de clignoter.
5. Pendant la lecture, appuyez sur la touche / PAIR pour mettre en pause la lecture, appuyez de nouveau pour reprendre.
6. Pendant la lecture, appuyez sur ou pour sauter les pistes.
7. Tenez la touche / PAIR appuyée jusqu'à ce que bt clignote sur l'écran pour déconnecter la connexion Bluetooth.
RECONNECTER A L’APPAREIL SOURCE AUDIO BLUETOOTH
Si votre appareil source audio Bluetooth a déjà été couple avec le M-30BT mais accidentellement déconnecté, appuyez longuement
sur la touche / PAIR pour vous connecter de nouveau.
Par la présente, NEW ONE S.A.S déclare que l'appareil "MUSE M-30 BTB / M-30 BTN" est conforme aux exigences essentielles
et autres dispositions pertinentes de la directive 2014/53/EU. La déclaration de conformité peut être consultée sur le site
www.muse-europe.com
RADIO LECTEUR DE CD/MP3 AVEC USB ET BLUETOOTH PORTABLE FR
ÉCOUTE DES DISQUES
1. Appuyez sur pour mettre l’appareil en marche.
2. Ouvrez la porte de CD.
3. Insérez le disque, face imprimée vers le haut, puis refermez le compartiment.
4. Appuyez sur pour sélectionner le mode CD.
5. Après quelques secondes, le nombre total de pistes et l’icone CD apparaissent à l’écran.
Pour:
- Mettre la lecture en pause: Appuyez sur / PAIR
- Reprendre la lecture: Appuyez sur / PAIR
- Arrêter dénitivement la lecture: Appuyez sur
- Eectuer une avance ou un retour rapide: Maintenez enfoncé ou
- Aller à la piste suivante ou précédente: Appuyez successivement sur ou
ERREUR DISQUE
Remarque: Si le disque est sale, endommagé ou illisible, ou si celui-ci est placé à l’envers, « NO » s’ache à l’écran. Si cela se
produit, nettoyez le disque, insérez le disque correctement ou essayez un autre disque.

FR - 3 FR - 4
LECTURE PROGRAMMÉE
1. Insérez le disque, face imprimée vers le haut, dans son compartiment et refermez la porte.
2. Appuyez sur .
3. Appuyez sur .
4. Sélectionnez la piste de votre choix avec ou , puis appuyez sur ” ” pour la mémoriser.
5. Répétez l’étape 4 jusqu’à la n de votre programmation
6. Appuyez sur pour commencer la lecture. Cette fonction PROGRAMME s’annule automatiquement à l’ouverture de la porte du
CD ou à la mise en arrêt de l’appareil.
Remarque:
CD: jusqu’à 20 programmes; MP3: jusqu’à 99 programmes.
MAINTENANCE
ÉCOUTE D’UN PERIPHERIQUE USB
FONCTIONNEMENT DE DOSSIERS MP3
NETTOYAGE
ATTENTION: Déconnecter cet appareil de toute source d’alimentation avant de le nettoyer.
- Utilisez un chion doux, propre et sec. Dépoussiérez régulièrement les orices de ventilation à l’arrière ou sur les côtés de
l’appareil.
- L’utilisation de solvants ou de produits abrasifs ou à base d’alcool peut endommager l’appareil.
- Si un objet ou un liquide entre dans l’appareil, débranchez immédiatement ce dernier et faites-le contrôler par un technicien agréé.
Remarques sur les disques
* N’utilisez pas de disques de forme irrégulière (exemple: en forme de cœur, octogonaux). L’appareil pourrait présenter des
dysfonctionnements.
* Ne placez pas plusieurs disques dans le compartiment.
* N’essayez pas d’ouvrir le compartiment du disque pendant la lecture.
* Ne touchez pas la lentille. Vous pourriez provoquer un dysfonctionnement.
* Si le disque est rayé, sale ou maculé de traces de doigts, l’appareil peut ne pas fonctionner. Avant la lecture, essuyez le disque
avec un chion Procédez du centre vers l’extérieur. Ne rangez pas les disques dans des endroits présentant des températures
élevées ou une humidité importante. Ils pourraient se déformer. Après la lecture, replacez vos disques dans leur boîtier.
REMARQUE IMPORTANTE
Retirez le disque du compartiment si l’appareil doit être transporté.
1. Appuyez sur la touche pour mettre l’appareil en marche.
2. Connectez une clé USB contenant des chiers MP3 ou un lecteur MP3 au port USB .
3. Appuyez sur la touche pour sélectionner le mode USB. USB s’ache à l’écran.
4. Au bout de quelques secondes, le nombre total de répertoires et de pistes s’achent, et la lecture commence automatiquement.
NOTE:
- Le nombre total de chiers MP3 sur le disque ne doit pas dépasser 999.
- Le disque ne peut contenir plus de 99 dossiers.
- La durée de chargement nécessite environ 20 secondes ou plus en fonction de la quantité de chiers et de dossiers MP3 présents
sur le disque ou le périphérique USB.
- Le port USB n’est pas conçu pour la charge et le transfert de chiers avec un ordinateur.
- En raison des diérentes normes d’enregistrement, de capacité et d’interfaces présentes sur le marché, le fabricant ne sera en
aucun cas tenu responsable de la compatibilité des périphériques USB et lecteurs MP3.
1. Appuyez sur pour mettre l’appareil en route.
2. Insérez le CD-MP3, face imprimée vers le haut, dans son compartiment et refermez la porte ou, connectez une clé USB avec des
chiers audio MP3 dans le port USB.
3. Appuyez sur pour choisir le mode CD ou USB (l’icône CD ou USB s’ache à l’écran), après quelques secondes, le nombre
total de chiers et de pistes s’achent à l’écran et lecture commence automatiquement.
4. S’il y a plus d’un dossier, appuyez pendant plusieurs secondes sur à l’écran « FXX » s’ache et « FOLDER » clignote.
5. Appuyez sur ou pour choisir le dossier de votre choix et relâchez la touche / PAIR pour entrer dans ce dossier. La lecture
de la première piste du dossier commence automatiquement.
CARACTÉRISTIQUES TECHNIQUES
ALIMENTATION:
Secteur: 230V 50Hz
Piles: 9V 6x 1,5 V type UM-2/R14/ ‘C’
POWER CONSOMMATION: 14 W
PUISSANCE DE SORTIE: 2 x 1 WATTS RMS
RADIO
Gamme de fréquences
FM: 87.5 - 108 MHz
AM (MW): 522 - 1620 kHz
BLUETOOTH
Puissance de sortie des RF (fréquences radios): 2 dBm
Distance de fonctionnement:
Jusqu'à 10 mètres mesurés en espace ouvert (les murs et les structures peuvent aecter la portée de l'appareil)
CONSIGNES DE SÉCURITÉ
ATTENTION:
Pour réduire le risque de choc électrique, ne démontez pas l’appareil. L’appareil ne contient
aucune pièce réparable par l’utilisateur. Conez tout entretien à un technicien qualié.
Le symbole de l’éclair terminé par une eche à l’intérieur d’un triangle avertit l’utilisateur de la présence d’une « tension
dangereuse » dans l’appareil.
Le point d’exclamation à l’intérieur d’un triangle avertit l’utilisateur de la présence d’importantes instructions dans le
manuel accompagnant l’appareil.
AVERTISSEMENT: POUR PRÉVENIR TOUT RISQUE D’INCENDIE OU DE CHOC ÉLECTRIQUE, N’EXPOSEZ PAS CET
APPAREIL À LA PLUIE OU À L’HUMIDITÉ.
ATTENTION: Radiations laser invisibles lorsque les dispositifs de sécurité sont ouverts ou défectueux. Évitez toute exposition aux
rayons.
Appareil à laser de classe 1.
ATTENTION !
- Veillez à assurer une ventilation correcte de l’appareil et ne couvrez pas les orices de ventilation avec des objets tels que
journaux, nappes, rideaux, etc.
- Ne placez aucune source de chaleur, telle qu’une bougie allumée, sur ou à proximité de l’appareil.
- Utilisez cet appareil sous un climat tempéré.
- N’exposez pas l’appareil à des éclaboussures ou à l’humidité.
- Veillez à respecter une distance minimale de 5 cm autour de votre appareil an de permettre une ventilation susante.
- Ne déposez pas d’objets contenant un liquide, tels qu’un vase, sur ou à proximité de l’appareil.
- La plaque signalétique se trouve à l’arrière de cet appareil.
- La che d’alimentation secteur permet de débrancher l’appareil et doit rester facilement accessible. Pour couper complètement
l’alimentation de l’appareil, débranchez complètement la che d’alimentation secteur de la prise secteur. La che d’alimentation
secteur ne peut pas être entravée et doit très facilement accessible durant l’utilisation.
- Sous l’eetde phénomènes électrostatiques et/ou électriques transitoires, le produit peut présenter des dysfonctionnements et une
réinitialisation peut s’avérer nécessaire.
- Il ne faut pas exposer les piles à une chaleur excessive, par exemple aux rayons du soleil, au feu ou à d’autres sources de chaleur.
- Veillez au respect de l’environnement lorsque vous vous débarrassez des piles usagées.
- Pour éviter tout risque d’éclaboussure, ne placez aucun récipient rempli de liquide, tel qu’un vase, à proximité de l’appareil.
Si vous souhaitez vous débarrasser de cet appareil, pensez à le recycler dans une décharge pour appareils ménagers
électriques. Renseignez-vous pour connaître votre centre de recyclage le plus proche. Informez-vous auprès des autorités
locales ou de votre revendeur pour de plus amples détails. (Directive sur les Déchets des équipements électriques et
électroniques)
NEW ONE S.A.S
10, Rue de la Mission, 25480 Ecole Valentin, France
CLASS 1 LASER PRODUCT
APPAREIL À LASER DE CLASSE 1
PRODUCTO LASER DE CLASE 1
PRODUTO LASER CLASSE 1
UTILISATION DE L’ENTRÉE AUXILIAIRE (AUX. IN)
1. Raccordez une extrémité du cordon (non fourni) au connecteur d’entrée auxiliaire de l’appareil.
AUX IN
2. Raccordez l’autre extrémité du cordon sur la prise casque ou la Sortie audio de l’appareil que vous désirez écouter.
3. Appuyez sur la touche pour sélectionner le mode Auxiliaire, « AUX » s’ache à l’écran. Utilisez normalement votre appareil
audio externe, le son passe automatiquement par les haut-parleurs de votre appareil.
4. Réglez le volume sonore au niveau souhaité.
5. Pour arrêter la lecture, déconnectez votre appareil audio externe de l’entrée auxiliaire.
Si vous rencontrez un problème de lecture CD, l'une des deux solutions peut s'avérer utile:
1. Éteignez l'unité. Déconnectez le cordon d'alimentation CA de la prise CA et reconnectez-le de nouveau.
2. Nettoyez votre disque CD.
RÉPÉTITION DE LA LECTURE
Appuyez successivement sur la touche pour sélectionner votre mode de lecture: Répétition de la piste, Répétition totale ou
Répétition du répertoire.
POUR DÉSACTIVER LA FONCTION RÉPÉTITION
Appuyez successivement sur jusqu’à ce que l’indicateur du mode répétition disparaisse de l’écran. Cette fonction répétition
s’annule automatiquement à l’ouverture de la porte du CD ou à la mise en arrêt de l’appareil.
Nos emballages peuvent faire l’objet d’une consigne de tri, pour en savoir plus: www.quefairedemesdechets.fr

EN - 1 EN - 2
GENERAL CONTROLS
1. HANDLE
2. FM TELESCOPIC ANTENNA
3. CD COMPARTMENT
4. AUX. IN: AUXILIARY INPUT
5. POWER ON-OFF/SOURCE: FM, AM (MW),
CD, USB, AUX IN, BLUETOOTH
6. PROGRAM / RADIO PRESET STATIONS
/ REPEAT
7. / PAIR: PLAY / PAUSE /PAIR
8. MEMORY / STOP
9. SKIP/SEARCH /TUNING BACKWARD
10. SKIP/SEARCH /TUNING FORWARD
11. VOLUME DOWN
12. VOLUME UP
13. USB PORT
14. LCD DISPLAY
15. AC IN POWER INPUT
16. BATTERY AND AC POWER CORD COMPARTMENT
POWER SUPPLY
This unit operates on AC (230V 50 Hz) or DC (9V ) 6 x 1.5V Type UM-2 /R 14 / ’’C’’ (Batteries not included).
AC OPERATION
Connect the AC power cord from the unit to the mains. Make sure that the voltage is compatible with your device before turning it on.
Disconnect the AC power cord from the mains when not in use.
NOTE: In a concern of saving energy, when playback has reached to the end or listening volume is set at a very low level and no control
is operated on the device for a period of 10 minutes, the unit will automatically switch to Standby mode.
BATTERY OPERATION:
Open the battery compartment at the rear of the unit and insert 6 batteries, observing the polarity diagram indicated inside the
compartment and close the compartment. To switch from AC power to battery power, disconnect the AC power cord.
BATTERY REPLACEMENT:
Batteries should be replaced when the volume decreases or the sound distorts.
Notes on batteries
• Do not mix batteries of dierent types or new batteries with used batteries
• Do not recharge, heat it and never remove the batteries.
• The batteries cannot be exposed to excessive heat such as sunshine, re or the like
• Please respect the environment when disposing of used batteries.
NOTE:
To prevent leakage, always remove the batteries from the device when it is not used for an extended period.
AUDIO CONTROLS
Press to turn the unit on. When the unit is on, press again to select your listening source: FM, AM (MW), CD, USB, AUX
IN, BLUETOOTH.
LISTENING TO THE RADIO
FOR OPTIMAL RADIO RECEPTION:
FM: Extend and position the telescopic antenna.
AM (MW): Rotate the unit horizontally.
AUTOMATIC SEARCH
Press to select FM or AM (MW).
Press and Hold on or for about 2 seconds to start the search. The automatic search function locates stations whose signal is
strong. Press again or to continue the search.
Note: Stations with weak signals can be searched manually. The sound is automatically muted during search.
RADIO PRESET STATIONS
1. Select a station manually or automatically with or .
2. Press once , “P01” blinks on the display for a few seconds.
3. Press or to select a preset number.
4. Press again to store the radio station on the selected memory number.
5. Repeat steps 1-4 to store other stations.
Note: When you store a station in a memory number already occupied, the existing station is automatically erased.
LISTENING TO PRESET STATIONS
Press button to select a preset station.
MANUAL SEARCH
1. Press to select FM or AM (MW).
2. Press repeatedly or to nd your station
3. Adjust the sound level with or .
BLUETOOTH OPERATION
The Bluetooth
®
word mark and logos are registered trademarks owned by Bluetooth SIG, Inc. and any use of such marks by New
One S.A.S is under license. Other trademarks and trade names are those of their respective owners.
• Before operate the Bluetooth function, make sure your mobile phone supports Bluetooth function.
• For dierent model of mobile phone, Bluetooth emissive power has some dierence. It is recommended that the distance between
the mobile phone and the unit is within 10 meters.
• Don’t put any metal object or any obstacle between the path of the mobile phone and the unit.
MANUAL PAIRING
1. Press to select bt (Bluetooth) mode. The display will show “ bt ” and the Bluetooth indicator will start to blink, then press /
PAIR for several seconds, then the Bluetooth indicator will blink rapidly.
2. Turn on the Bluetooth function of your mobile phone. (Please refer to the instruction manual of your mobile phone on how to
operate Bluetooth.)
3. Select the item of searching the Bluetooth device and enter it. Your mobile phone starts to search for Bluetooth devices within
range (10 meters). Select this radio “M-30BT” and conrm it.
Note:
- Enter 0000 for the password if necessary and conrm it
- If you have made Bluetooth connectivity before, a list of the previous search results is displayed. Select “M-30BT” and conrm
4. When pairing is successful, you can hear pairing sound and Bluetooth logo will stop blinking.
5. During playback, press / PAIR button to pause playback, press again to resume.
6. During playback, press or to skip tracks.
7. Press and hold the / PAIR button until “ bt ” ashes on display to disconnect the Bluetooth connection.
RECONNECT TO THE BLUETOOTH AUDIO SOURCE DEVICE
If your Bluetooth audio source device has already been paired with M-30BT but accidentally disconnected, long press / PAIR
button to do connection again.
Hereby, NEW ONE S.A.S, declares that this MUSE M-30 BTB / M-30 BTN is in compliance with the essential requirements and other
relevant provisions of Directive 2014/53/EU. The declaration of conformity may be consulted at www.muse-europe.com
PORTABLE BLUETOOTH RADIO CD/MP3 PLAYER WITH USB GB
LISTENING TO DISC
1. Press to turn the unit on.
2. Open the CD door.
3. Insert the disc with the label facing up and then close the compartment.
4. Press to select the CD mode.
5. After a few seconds, the total number of tracks and the CD icon will appear on the display.
To:
- Pause Playback: Press once / PAIR
- Resume playback: Press again / PAIR
- Permanently stop playback: Press
- Search forward or backward: Press and hold or .
- To skip to the next or previous track: press or .
DISK ERROR
Note: If the disc is dirty, damaged or unreadable or if it is placed upside down, “NO” is displayed. If this happens, clean the disc,
insert the disc correctly or try another disc.
If you encounter CD playback problem, either of the following ways may help:
1. Turn o the unit. Disconnect the AC power cord from AC outlet and reconnect it again.
2. Clean your CD disc.

EN - 3 EN - 4
PROGRAM PLAYBACK
1. Insert the disc with the label facing up, into the compartment and close the CD door.
2. Press .
3. Press .
4. Select the desired track with or then press to save the program in memory.
5. Repeat step 4 until the end of your programming.
6. Press to start playback. This PROGRAM function is automatically canceled when opening the CD door or shutdown of the unit.
Note:
CD up to 20 programs, MP3 up to 99 programs.
MAINTENANCE
LISTENING TO DEVICE USB
MP3 FOLDER OPERATION
CLEANING
CAUTION: Disconnect this device from any power source before cleaning.
- Use a soft, clean, dry cloth. Dust regularly ventilation holes on the back or sides of the apparatus.
- The use of solvents or abrasive products or with a basis of alcohol can damage the unit.
- If an object or liquid enters the unit, unplug it immediately and have it checked by an authorized engineer.
Notes on discs
* Do not use irregularly shaped discs (example : heart-shaped, octagonal ones). The unit may malfunction.
* Do not place more than one disc in the compartment.
* Do not attempt to open the disc tray during playback.
* Do not touch the lens. You could cause a malfunction.
* If the disc is scratched, dirty or smudged with ngerprints, the device may not work. Before playing, wipe the disc with a cloth.
Proceed from the center outwards. Do not store discs in places with high temperature or high humidity. They could bend. After
reading, replace the disc in its case.
IMPORTANT NOTE
Remove the disc from its compartment if the device is to be transported.
1. Press to turn the unit on.
2. Connect a USB device containing MP3 les or MP3 player to the USB port.
3. Press to select the USB mode. USB appears on the display.
4. After a few seconds, the total number of folders and tracks are displayed, and playback starts automatically.
NOTE:
- The total number of MP3 les on the disc should not exceed 999
- The disc may not contain more than 99 directories.
- The charging time takes about 20 seconds or more depending on the amount of MP3 les and folders on the disc or USB device.
- The USB port is not designed for charging and les transfer with a computer
- Manufacturer is not responsible for the playability of USB key or MP3 due to dierent recording condition, capacity and interface
compatibility, etc...
1. Press to turn the unit on.
2. Place the CD-MP3 disc with label side facing up inside the CD compartment and close the CD door, or, connect a USB key with
MP3 audio les into the USB port.
3. Press to select CD or USB mode (CD or USB icon is displayed), After few seconds, the total number of folders and tracks
appears on the display. The unit will start to play automatically.
4. If there is more than one folder, press and hold for 3 seconds, on the display “FXX” appears and “ FOLDER” ashes.
5. Press or to select the desired folder and release the / PAIR button to enter this folder. the rst track in the folder starts
Playing automatically.
AUXILIARY INPUT ( AUX. IN)
1. Connect one end of the cable (not supplied) to the auxiliary input connector of the device.
AUX IN
2. Connect the other end of the cable to the headphones jack or the line out jack of your external audio appliance.
3. Press to select the auxiliary mode. « AUX » appears on the display. Normally use your external audio appliance; the sound
automatically goes through the speakers of your device.
4. Adjust the volume to the desired level.
5. Disconnect the external appliance from the auxiliary input to stop playback.
REPEAT PLAYBACK
Repeatedly press to select one of the following playback modes. Track Repeat, Repeat All and Repeat Folder .
TO DISABLE THE REPEAT PLAYBACK
Press repeatedly until the repeat mode indicator disappears from the display. The repeat function is automatically canceled at
the opening of the door of the CD or the shutdown of the unit.
SPECIFICATION
POWER SUPPLY:
AC: 230V 50Hz
DC: 9V 6 x 1,5 V type UM-2/R14/ ‘C’
POWER CONSUMPTION: 14 W
OUTPUT POWER: 2 x 1 WATTS RMS
RADIO
Frequency range
FM: 87.5 - 108 MHz
AM (MW): 522 - 1620 kHz
BLUETOOTH
RF Output Power: 2 dBm
Working Distance: Up to 10 meters measured in open space (wall and structures may aect range of device)
SAFETY
CAUTION:
To reduce the risk of electric shock, do not disassemble this product. The unit contains no user
serviceable parts inside . Refer all servicing to a qualied technician.
The lightning ash with arrowhead within a triangle alerts the user to the presence of “dangerous voltage” inside the
product.
The exclamation point within a triangle to alert the user to the presence of important instructions in the literature
accompanying the appliance.
WARNING: TO PREVENT FIRE OR SHOCK HAZARD, DO NOT EXPOSE THIS PRODUCT TO RAIN OR MOISTURE.
ATTENTION: Invisible when safety devices are open or defective laser radiation. Avoid exposure to beam.
Device class 1 laser.
ATTENTION!
- Ensure proper ventilation of the unit and do not cover the ventilation openings with items such as newspapers, tablecloths, curtains,
etc.
- Do not put any heat sources, such as lighted candles, on or near the appliance.
- Use this unit in a temperate climate.
- Do not expose the unit to dripping or moisture.
- Ensure a minimum distance of 5 cm around the unit to allow adequate ventilation.
- Do not place objects lled with liquids, such as vases, on or near the appliance.
- The plate is located at the rear of this unit.
- The mains plug is used to disconnect the device and must be easily accessible. To completely remove power from the unit, unplug
the AC power plug from the outlet completely. The AC power plug cannot be constrained and must be easily accessible during use.
- As a result of electrostatic phenomena and / or electrical transients, the product may malfunction and reset may be necessary.
- Do not expose the batteries to excessive heat such as direct sunlight, re or other sources of heat.
- Please respect the environment when disposing of used batteries.
- To prevent splashing, place objects lled with liquids, such as vases, near the product.
If you want to dispose this product, remember to recycle in a landll for household electric appliances. Learn to know your
recycling center nearest you. Check with local authorities or your dealer for details. (Directive on Waste Electrical and
Electronic Equipment)
NEW ONE S.A.S
10, Rue de la Mission, 25480 Ecole Valentin, France
CLASS 1 LASER PRODUCT
APPAREIL À LASER DE CLASSE 1
PRODUCTO LASER DE CLASE 1
PRODUTO LASER CLASSE 1

PT - 1 PT - 2
DESCRIÇÃO DO APARELHO
1. PEGA
2. ANTENA TELESCÓPICA
3. COMPARTIMENTO PARA CD
4. AUX. IN: TOMADA DE ENTRADA AUX
5. BOTÃO
6. BOTÃO (GUARDAR NA MEMÓRIA /
REPETIÇÃO / PROGRAMAÇÃO)
7. / PAIR: REPRODUZIR / PAUSAR /
EMPARELHAR
8. BOTÃO (MEMÓRIA / PARAR )
9. BOTÃO PULAR- / SINTONIZAR-
10. BOTÃO PULAR+ / SINTONIZAR+
11. ABAIXAR O VOLUME
12. AUMENTAR O VOLUME
13. PORTA USB
14. VISOR LCD
15. AC IN CABO DE ALIMENTAÇÃO DE REDE
16. COMPARTIMENTO DA BATERIA E CABO DE ALIMENTAÇÃO DE REDE
ALIMENTAÇÃO
Este aparelho funciona com alimentação de rede (230V 50 Hz) ou pilhas DC9V (UM-2 1.5V x 6)
ATENÇÃO
• Conecte a fonte de energia AC em sua tomada residencial e ligue a tomada. Certique-se de que a voltagem é compatível com o
aparelho.
• Disconecte o o de energia da tomada quando não estiver utilizando.
OBSERVAÇÃO: No interesse de economizar energia, quando uma reprodução terminar ou o nível de volume for denidocomo muito
baixo e nenhuma operação for realizada por um período de 2 horas, o aparelho entrará automaticamente no modo de Espera.
FUNCIONAMENTO COM PILHAS
Abra o compartimento para pilhas situado na parte de trás do aparelho e insira 6 pilhas (de tipo C) não fornecidas, respeitando o
esquema de polaridade indicado no interior docompartimento; de seguida, volte a fechar o compartimento. Para passar da alimentação
de rede à alimentação com pilhas, desligue o cabo de alimentaçãode rede da tomada de parede e do leitor de CD.
SUBSTITUIÇÃO DAS PILHAS:
As pilhas devem ser substituídas quando o volume diminui ou o som sai deformado durante ofuncionamento do aparelho.
Recomendações relativamente às pilhas
• Não misture as pilhas de diferentes tipos ou pilhas novas com usadas.
• Não recarregue, não aqueça e não desmonte nunca as pilhas.
• Não deve expor as pilhas a fontes de calor excessivo, tais como a luz do sol, o fogo, etc.
• Cumpra as regras ambientais relativamente à disposição de pilhas usadas.
OBSERVAÇÃO:
Para evitar qualquer vazamento, retire sempre as pilhas do aparelho quando este não é usadodurante um período de
tempo prolongado.
CONTROLES DE ÁUDIO
Prima o botão para pôr o aparelho a funcionar. Enquanto o aparelho estiver ligado, pressione o botão para trocar para
uma origem diferente: RÁDIO FM, RÁDIO AM (MW), CD, USB, AUX. IN (ENTRADA AUXILIAR), BLUETOOTH.
OUVIR RÁDIO
BUSCA MANUAL
1. Pressione o botão para selecionar a banda FM ou AM (MW).
2. Selecione a sua estação de rádio desejada através dos botões ou .
3. Ajuste o volume através de (volume +) ou (volume -) para o nível desejado.
RÁDIO DE CD/MP3 PORTÁTIL COM USB/BLUETOOTH PT
PARA MELHORAR A QUALIDADE DE RECEPÇÃO RÁDIO:
FM: Estique a antena .
AM (MW): Rode o aparelho horizontalmente para uma melhor recepção.
BUSCA AUTOMÁTICA
Mantenha pressionado um dos botões / durante cerca de 2 segundos para iniciar a procura no sentido pretendido.
A função de procura automática detecta as estações cujo sinal é forte. As estações cujo sinal é fraco podem ser sintonizadas
manualmente.
Observação: O som é automaticamente cortado durante a procura.
ESTAÇÕES ARMAZENADAS
1. Seleccione uma estação manualmente ou com a ajuda da sintonização automática.
2. Pressione o botão uma vez, o número predenido dígitos “P01” piscará novisor por alguns segundos.
3. Pressione os botões / para selecionar a posição de memória.
4. Pressione mais uma vez o botão para armazenar a estação de rádio na memória selecionada.
5. Volte a executar as operações dos pontos 1 a 4 para memorizar outras estações.
Observação: Quando você armazena uma estação de rádio em uma posição de memória que já está sendo utilizada, a estação
previamente armazenada será apagada.
ESCUTANDO UMA ESTAÇÃO ARMAZENADA
Pressione os botões para selecionar o número da posição de memória.
FUNÇÃO DE BLUETOOTH
O nome Bluetooth
®
e logotipos são marcas registradas de propriedade da Bluetooth SIG, Inc. e quaisquer usos destas marcas pela
New One S.A.S estão licenciados. Outras marcas e nomes registrados pertencem aos seus respectivos proprietários.
• Antes de utilizar a função de Bluetooth, certique-se de que seu aparelho de cellular tem suporte à esta função.
• Para cada tipo de modelo de celular, o Bluetooth potência de transmissão pode ser diferente. Recomenda-se que a distância entre
o celular e o aparelho seja dentro de 10 metros.
• Não coloque quaisquer objetos metálicos ou quaisquer obstáculos entre o celular e o aparelho.
EMPARELHAMENTO MANUAL
1. Pressione o botão para selecionar o modo de Bluetooth. O visor mostrará "bt" e o indicador Bluetooth começará a piscar,
depois pressione / PAIR por vários segundos, então o indicador Bluetooth piscará rapidamente.
2. Ligue a função de Bluetooth do seu celular. (Consulte o manual de instruções do seu celular para mais informações sobre como
utilizar a função de Bluetooth).
3. Selecione o item Procurar dispositivos de Bluetooth e inicie a procura. O seu celular buscará os dispositivos Bluetooth que estão
dentro da área de alcance (10 metros). Selecione o rádio automotivo “M-30BT” e conrme a seleção.
OBSERVAÇÃO:
- Digite 0000 como senha, caso solicitado, e conrme.
- Caso você já tenha feito a conexão anteriormente, uma lista de dispositivos será exibida. Selecione “M-30BT” e conrme.
4. Quando o emparelhamento é bem sucedido, você pode ouvir o som de emparelhamento e o logotipo de Bluetooth deixará de
piscar.
5. Durante a reprodução, pressione o botão / PAIR para pausar a reprodução, e pressione novamente para continuar.
6. Durante a reprodução, pressione ou para pular as faixas.
7. Mantenha o botão / PAIR pressionado até que “bt” pisque na tela, para desconectar a conexão de Bluetooth.
RECONECTANDO AO DISPOSITIVO DE FONTE DE ÁUDIO BLUETOOTH
Caso a sua fonte de áudio Bluetooth já tenha sido pareado anteriormente com o M-30BT mas tenha sido acidentalmente
desconectado, mantenha pressionado o botão / PAIR para conectar novamente.
A NEW ONE S.A.S aqui declara que este produto «MUSE M-30 BTB / M-30 BTN» cumpre os requisitos essenciais e outras
disposições relevantes da Norma 2014/53/EU. A declaração de conformidade pode ser consultada em www.muse-europe.com
UTILIZANDO O CD
1. Prima o botão para pôr o aparelho a funcionar.
2. Abra a porta do CD.
3. Insira o disco no compartimento, com a face impressa virada para cima, e volte a fechar o compartimento.
4. Pressione o botão para selecionar a função de CD.
5. Depois de alguns segundos, o número total de faixas e o ícone “CD” serão exibidos na tela.
PARA:
Colocar a reprodução em pausa: Prima uma primeira vez o botão / PAIR
Retomar a reprodução: Prima uma segunda vez o botão / PAIR
Parar a reprodução: Prima o botão
Efectuar um avanço ou um retorno rápido: Mantenha premido o botão /
Proceder a um salto para a frente ou para trás: Prima o botão /
ERRO DO DISCO
Observação: Caso o disco esteja sujo, danicadoou ilegível, ou tenha sido colocado de cabeça para baixo, o texto “ NO ” será
exibido na tela. Caso isso ocorra, limpe o disco, e volte a colocá-lo de maneira correta ou tente outro disco.
Caso você encontre problemas quando for tocar um CD, uma das seguintes soluções poderá ajudá-lo:
1. Desligue o aparelho. Retire o o da tomada e conecte-o de vlta.
2. Limpe o seu CD.

PT - 3
PT - 4
REPRODUÇÃO PROGRAMADA
1. Coloque o CD no compartimento com a etiqueta do CD voltada para cima e feche a tampa.
2. Pressione o botão .
3. Pressione o botão .
4. Selecione a faixa desejada com / , e então pressione o botão ” ” para armazenar a sua programação na memória.
5. Repita o passo 4 até ter terminado de programar as suas seleções.
6. Pressione o botão para inciar a reprodução. Abra a tampa do CD ou desligue o aparelho para cancelar a programação.
Observação: CD-até 20 programas; MP3-até 99 programas.
MANUTENÇÃO
OPERAÇÃO USB
OPERAÇÃO PASTA MP3
LIMPEZA
ATENÇÃO: Desligue este aparelho de qualquer fonte de alimentação antes de proceder à sua limpeza.
• Utilize um pano macio, limpo e seco. Limpe regularmente os orifícios de ventilação na parte de trás ou nos lados do aparelho para
eliminar as partículas de pó.
• A utilização de solventes ou de produtos abrasivos ou à base de álcool pode danicar o aparelho
• Se um objecto ou líquido entrar no aparelho, desligue-o de imediato e solicite a sua inspecção por um técnico autorizado.
Observações relativas aos discos
* Não utilize discos de forma irregular (exemplo: em forma de coração, octogonais). O aparelho pode car avariado
* Não coloque mais do que um disco no compartimento.
* Não tente abrir o compartimento do disco durante a reprodução.
* Não toque na lente dado que pode causar uma avaria no aparelho.
* Se o disco estiver riscado, sujo ou marcado com dedadas, o aparelho pode não funcionar. Antes da reprodução, limpe o disco com
um pano. Proceda do centro para fora. Não arrume os discos em locais com temperaturas altas ou uma humidade signicativa.
Podem car deformados. Após a reprodução, volte a colocar os discos nas respectivas caixa
OBSERVAÇÃO IMPORTANTE
Retire o disco do compartimento se o aparelho tiver de ser transportado.
1. Prima o botão para pôr o aparelho a funcionar.
2. Conecte um pendrive USB com arquivos MP3 ou um aparelho de MP3 na porta USB .
3. Pressione o botão para selecionar o modo de USB. O símbolo de USB “USB” será exibido.
4. Depois de alguns segundos, o número total de pastas e faixas serão exibidos na tela LCD, e a leitura começa automaticamente.
OBSERVAÇÃO:
- O tempo para carregar é de 20s ou mais, dependendo da quantidade de arquivos MP3 e pastas existentes no disco ou dispositivo USB.
- O número total de arquivos MP3 no disco não poderá ser maior que 999.
- O disco não pode conter mais de 99 directórios.
- A porta USB não deve ser utilizada para recarga ou comunicação com o computador.
- O fabricante não se responsabiliza pela usabilidade de um pendrive ou aparelho de MP3 devido a diferenças nas condições de gravação,
capacidade, compatibilidade de interface, etc.
1. Pressione o botão para ligar o aparelho.
2. Coloque um disco de CD-MP3, com a etiqueta voltada para cima, dentro do compartimento do CD e feche a tampa, ou, conecte
um dispositivo USB com arquivos de áudio em MP3 na porta USB.
3. Pressione o botão para selecionar o modo de CD ou USB (o ícone de CD ou USB será exibido). Depois de alguns segundos
o número total de pastas e faixas será exibido na tela. O aparelho então começará a tocar automaticamente.
4. Caso existam mais de uma pasta, mantenha o botão pressionado por 3 segundos. “FXX” será exibido e “FOLDER”
começará a piscar na parte superior direita da tela.
5. Pressione o botão / para selecionar a pasta desejada, solte o botão para entrar na pasta, e a reprodução começará
automaticamente da primeira faixa na pasta. Pressione o botão / PAIR várias vezes para reproduzir a faixa desejada na pasta.
ENTRADA AUXILIAR
1. Conecte um dos terminais do cabo (não incluído) na conexão AUX. IN (ENTRADA) do aparelho.
AUX IN
2. Conecte o outro terminal do cabo nos fones de ouvido ou na conexão Line Out (Saída) da origem externa..
3. Pressione o botão para selecionar o modo Auxiliar. O símbolo do modo auxiliar “AUX” será exibido. Utilizar normalmente o
aparelho áudio externo.
4. Ajustar o volume para o nível pretendido.
5. Desligar o dispositivo externo da entrada auxiliar para parar a leitura.
REPETIÇÃO
Pressione mais de uma vez o botão para selecionar o modo de repetição seguintes: Repetir 1, Repetir pasta, Repetir todas.
PARA CANCELAR A REPETIÇÃO
Pressione o botão várias vezes repetidamente até que o indicador “REPEAT” desapareça. A função Repetir também será
cancelada quando a bandeja do CD for aberta ou o aparelho for desligado.
CARACTERÍSTICAS TÉCNICAS
ALIMENTAÇÃO:
AC: 230V 50Hz
DC: 9V (UM-2 1.5V x 6)
CONSUMO: 14 W
POTÊNCIA DE SAÍDA: 2 x 1 WATTS RMS
RADIO
GAMA DE FREQUÊNCIAS
FM: 87.5 - 108 MHz
AM (MW): 522 - 1620 kHz
BLUETOOTH
Potência de saíde de RF (Rádio Frequência): 2 dBm
Distância de Funcionamento: Até 10 metros, medido em espaço aberto (paredes e estruturas poderão afetar a distância de
funcionamento do dispositivo).
INSTRUÇÕES DE SEGURANÇA
ATENÇÃO:
Para reduzir o risco de choque eléctrico, não desmonte o aparelho. O aparelho não contém
qualquer peça passível de ser reparada pelo utilizador. Cone todas as operações de manutenção a um técnico
qualicado.
O símbolo do relâmpago com uma seta e situado no interior de um triângulo destina-se a alertar o utilizador para a
presença de uma “tensão perigosa” no aparelho.
O ponto de exclamação no interior de um triângulo destina-se a alertar o utilizador para a presença de instruções
importantes no manual que acompanha o aparelho.
ADVERTÊNCIA: PARA PREVENIR O RISCO DE INCÊNDIO OU DE CHOQUE ELÉCTRICO, NÃO EXPONHA ESTE
APARELHO A CHUVA OU HUMIDADE.
ATENÇÃO: São emitidas radiações invisíveis quando os dispositivos de segurança são abertos ou defeituosos. Evite qualquer
tipo de exposição aos raios laser.
Aparelho com laser de classe 1.
ATENÇÃO
- Certiquese de que garante uma ventilação correcta do aparelho e que não tapa os orifícios de ventilação com objectos como
jornais, toalhas, cortinas, etc.
- Não coloque qualquer fonte de calor, como uma vela acesa, sobre ou na proximidade do aparelho.
- Utilize este aparelho num clima temperado.
- Não exponha o aparelho a salpicos ou a humidade.
- Certique-se de que respeita uma distância mínima de 5 cm à vota do aparelho de modo a permitir uma ventilação suciente
- Não coloque objectos que contenham líquido, como uma jarra, sobre ou na proximidade do aparelho.
- A placa de características situa-se na parte de trás deste aparelho.
- A chade alimentação de rede permite desligar o aparelho e deve carfacilmente acessível. Para cortar a alimentação do aparelho,
desligue de vez a chade alimentação de rede da tomada de rede. A chade alimentação de rede não pode estar tapada e deve
ser facilmente acessível durante a utilização.
- Sob o efeito de fenómenos electrostáticos e/ou eléctricos transitórios, o produto pode apresentar anomalias e pode acabar por ser
necessário proceder-se a uma reinicialização.
- Não exponha as pilhas a calor excessivo, como raios do sol, fogo ou outras fontes de calor semelhantes.
- Certique-se de que respeita o ambiente ao descartar.
- Se das pihas gastas. Para evitar qualquer risco de salpicos, não coloque nenhum recipiente cheio de líquido, como um jarro, na
proximidade do aparelho.
Caso pretenda descartar-se deste aparelho, proceda à sua reciclagem num centro de recolha para electrodomésticos.
Procure obter informações sobre o centro de reciclagem mais próximo. Informe-se junto das autoridades locais ou
do seu revendedor local para a obtenção de pormenores adicionais (Directiva sobre os Resíduos dos Equipamentos
Eléctricos e Electrónicos).
NEW ONE S.A.S
10, Rue de la Mission, 25480 Ecole Valentin, France
CLASS 1 LASER PRODUCT
APPAREIL À LASER DE CLASSE 1
PRODUCTO LASER DE CLASE 1
PRODUTO LASER CLASSE 1

DE - 1 DE - 2
BESCHREIBUNG DES GERÄTES
1. TRAGGRIFF
2. TELESKOPANTENNE
3. CD-FACH
4. AUX. IN: AUX-EINGANG
5. TASTE
6. TASTE (FAVORIT / WIEDERHOLEN /
PROGRAMM )
7. TASTE / PAIR: WIEDERGABE / PAUSE/PAIR
8. TASTE SPEICHER / STOPP
9. SUCHLAUF- / TUNING-
10. SUCHLAUF+ / TUNING+
11. LAUTSTÄRKE VERRINGERN
12. LAUTSTÄRKE ERHÖHEN
13. USB-SCHNITTSTELLE
14. LCD-ANZEIGE
15. AC IN NETZSTROMEINGANG (WECHSELSTROM )
16. BATTERIE- & (AC) NETZKABELFACH
STROMVERSORGUNG
Dieses Gerät funktioniert im Netzbetrieb (230V 50 Hz) oder mit Batterien DC9V (UM-2 1.5V x 6)
NETZSTROMBETRIEB
• Schließen Sie das Netzkabel an eine Steckdose (AC) an und schalten Sie die Stromversorgung ein. Vergewissern Sie sich, dass die
Spannung für das Gerät geeignet ist.
• Trennen Sie das Gerät während des Nichtgebrauchs vom Netz.
HINWEIS: Aus Energiespargründen aktiviert das Gerät automatisch den Standby-Modus, wenn das Ende der Wiedergabe erreicht oder
eine sehr geringe Lautstärke eingestellt ist und 2 Stunden lang keine Eingabe am Gerät erfolgt.
BATTERIEBETRIEB
ÖnenSie das Batteriefach an der Rückseite des Gerätes und legen Sie 6 Batterien ein (Typ C, nicht mitgeliefert), unter Beachtung
des Schemas der Polarität im Innern desBatteriefachs. Schließen Sie das Batteriefach dann wieder.Um vom Netzbetrieb in den
Batteriebetrieb zu wechseln, ziehen Sie das Netzstromkabel ausder Wandsteckdose und vom CD-Player ab.
WECHSELN DER BATTERIEN
Die Batterien müssen gewechselt werden, wenn die Lautstärke geringer wird oder der Klangverformt wird.
Hinweise zu den Batterien
• Verwenden Sie niemals verschiedene Batterietypen gleichzeitig oder neue mit verbrauchtenBatterien.
• Sie dürfen die Batterien niemals auaden, erhitzen oder auseinanderbauen
• Die Batterien dürfen keinen übermäßigen Hitzequellen ausgesetzt werden, wie z.B. demSonnenlicht, dem Feuer, etc
• Bitte achten Sie beim Entsorgen der verbrauchten Batterien auf den Umweltschutz.
ANMERKUNG:
Um jegliches Auslaufen zu vermeiden, entfernen Sie die Batterien immer aus dem Gerät, wenndieses über einen
längeren Zeitraum nicht benutzt wird.
AUDIO-BEDIENELEMENTE
Auf die Taste drücken, um das Gerät einzuschalten.Drücken Sie, wenn das Gerät eingeschaltet ist, die Taste , um den
Betriebsmodus zu wechseln: FM RADIO, AM (MW) RADIO, CD, USB, BLUETOOTH, AUX-EINGANG (AUX. IN).
RADIO HÖREN
MANUELLE SUCHE
1. Drücken Sie zur Auswahl des FM oder AM (MW) Frequenzbands.
2. Stellen Sie mit den Tasten oder einen Radiosender ein.
3. Die Lautstärke stellen Sie mit den Tasten (Lautstärke +) oder (Lautstärke -) entsprechend ein.
TRAGBARER BLUETOOTH-RADIO-CD/MP3-PLAYER MIT USBDE
ZUR VERBESSERUNG DER RADIOEMPFANGSLEISTUNG:
UKW: Ziehen Sie den UKW-Antennendraht vollständig aus.
AM (MW): Zur Erreichung eines optimalen Empfangs drehen Sie die Einheit horizontal.
AUTOMATISCHE SUCHE
Halten Sie die Tasten / etwa 2 Sekunden gedrückt, um die Suche in eine der Richtungen zu starten. Die automatische
Suchfunktion erkennt Sender mit starkem Signal. Sender mit schwachem Signal können manuell eingestellt.
Hinweis: Während der Sendersuche wird der Ton automatisch abgeschaltet.
SENDERSPEICHER
1. Wählen Sie einen Sender manuell oder anhand der automatischen Sendersuche aus.
2. Drücken Sie Taste einmal , die Vorwahlnummer Ziern “P01” wird auf dem Display für einige Sekunden blinken.
3. Benutzen Sie die Tasten / , um einen Senderspeicher zu wählen.
4. Betätigen Sie die erneut, um den Sender unter dem ausgewählten Senderspeicher abzulegen.
5. Wiederholen Sie die Schritte 1 bis 4 zum Speichern weiterer Sender.
Hinweis: Wenn Sie einen Sender auf einem Speicherplatz speichern, unter dem bereits ein Sender gespeichert wurde, wird dieser
automatisch überschrieben.
AUFRUFEN DER GESPEICHERTER SENDER
Benutzen Sie die Tasten zur Auswahl des gewünschten Senders.
BLUETOOTH-FUNKTION
Der Bluetooth
®
-Markenname und damit verbundene Logos sind Eigentum der Firma Bluetooth SIG, Inc. Jegliche Benutzung dieser
Marken durch die Firma New One S.A.S stehen unter Lizenz. Alle anderen Produkt-und Markennamen sind Eigentum ihrer der
jeweiligen Besitzer.
• Vor der Benutzung der Bluetooth-Funktion stellen Sie sicher, dass Ihr Mobiltelefon Bluetooth unterstützt.
• Die Reichweite ist bei verschiedenen Mobiltelefonmodellen unterschiedlich. Wird empfohlen, dass der Abstand zwischen dem Mo-
biltelefon und dem Gerät 10 m nicht überschreitet .
• Stellen Sie keine metallischen Gegenstände oder Hindernisse zwischen dem Mo-biltelefon und dem Gerät auf.
MANUELLES PAIRING
1. Betätigen Sie die -Taste, um den Bluetooth-Modus zu aktivieren. Im Display erscheint einige Sekunden lang die Anzeige
„ bt “ Die Bluetooth-Anzeige beginnt blinken, Drücken Sie dann mehrere Sekunden lang auf / PAIR, dann blinkt die Bluetooth-
Anzeige schnell.
2. Schalten Sie die Bluetooth-Funktion Ihres Mobiltelefons ein. (Bitte lesen Sie für die Bedienung der Bluetooth-Funktion Ihre
Handys dessen Bedienungsanleitung.)
3. Suchen Sie nach dem Bluetooth-Gerät und tippen Sie darauf. Ihr Mobiltelefon sucht nach anderen Bluetooth-Geräten innerhalb
einer Reichweite von 10 Metern. Wählen Sie diese Autoradio (M-30BT) und bestätigen Sie die Auswahl.
- Geben Sie bei Bedarf 0000 als Passwort ein und bestätigen Sie es.
- Wenn Sie die Bluetooth-Verbindung hergestellt ist, wird eine Liste der vorherigen Suchergebnisse angezeigt. Wählen Sie "M-30BT"
und bestätigen Sie Ihre Auswahl.
4. Wenn die Kopplung erfolgreich ist, können Sie den Paarungston hören und das Bluetooth-Logo hört auf zu blinken.
5. Betätigen Sie während der Wiedergabe die Taste / PAIR , um die Wiedergabe zu unterbrechen. Betätigen Sie die Taste erneut,
um mit der Wiedergabe fortzufahren.
6. Betätigen Sie während der Wiedergabe die Tastec oder , um einen Titel zu überspringen.
7. Halten Sie die / PAIR -Taste gedrückt, bis " bt " in der Anzeige anfängt zu blinken, um die Bluetooth-Verbindung zu trennen.
ERNEUTER VERBINDUNGSAUFBAU MIT BLUETOOTH AUDIOGERÄTEN
Wenn Ihr Bluetooth-Audiogerät zuvor bereits mit dem M-30BT verbunden war, aber die Verbindung danach unabsichtlich getrennt
wurde, halten Sie die / PAIR -Taste gedrückt, um die Verbindung wieder aufzubauen.
NEW ONE S.A.S erklärt hiermit, dass dieser „MUSE M-30 BTB / M-30 BTN“ den wesentlichen Anforderungen und anderen geltenden
Vorgaben der Richtlinie 2014/53/EU entspricht. Die Konformitätserklärung lässt sich unter www.muse-europe.com herunterladen.
CD-BETRIEB
1. Drücken Sie die Taste , um das Gerät einzuschalten.
2. Um das CD-Fach zu önen.
3. Legen Sie eine CD mit der bedruckten Seite nach oben ein und schließen Sie das CD-Fach wieder.
4. Betätigen Sie die , um zum CD-Betrieb zu wechseln.
5. Nach einigen Sekunden erscheinen im Display die Gesamtzahl der Tracks und die Anzeige „CD“.
ZUM:
Vorübergehenden Unterbrechen der: drücken Sie einmal auf die Taste / PAIR
Wiedergabe Wiederaufnehmen der Wiedergabe: drücken Sie ein zweites Mal auf die Taste / PAIR
Stoppen der Wiedergabe:
Schnellen Vorwärts- oder Rückwärtslaufen: halten Sie die Taste oder
Springen nach vorn oder zurück: drücken Sie auf die Taste oder
DISC-FEHLER
Hinweis:Wenn die Disc verschmutzt, beschädigt oder nicht mehr lesbar ist oder wenn die Disc falsch herum eingelegt wird, erscheint
“ NO “ in der Anzeige. Wenn dies geschieht, reinigen Sie die Disc, legen Sie die Disc richtig herum ein oder versuchen Sie es mit
einer anderen Disc.
Falls CD-Wiedergabeprobleme auftreten, versuchen Sie sie auf eine der folgenden Weisen zu beheben:
1. Schalten Sie das Gerät aus, trennen Sie es von der Stromversorgung ab und schließen Sie es erneut an.
2. Reinigen Sie Ihre Compact-Disc.

DE - 3
DE - 4
PROGRAMMIERTE WIEDERGABE
1. Legen Sie eine CD mit der bedruckten Seite nach oben in das CD-Fach ein und schließen Sie die Tür.
2. Drücken Sie die Taste .
3. Drücken Sie .
4. Wählen Sie mit den Tasten / den gewünschten Track und drücken Sie „ “, um den Track zu speichern.
5. Wiederholen Sie Schritt 4, bis Sie alle gewünschten Tracks gespeichert haben.
6. Drücken Sie für die Wiedergabe. Önen Sie das CD-Fach oder schalten Sie das Gerät aus, um die programmierte Wiedergabe
zu beenden.
Hinweis: CD-bis zu 20 programmierte Tracks; MP3 -bis zu 99 programmierte Tracks.
WARTUNG
WIEDERGABE EINER USB
MP3 ORDNER BETRIEB
REINIGUNG
CHTUNG: Entfernen Sie alle Geräte von den vorhandenen Stromquellen, bevor Sie das Gerät reinigen.
* Verwenden Sie ein weiches, trockenes und sauberes Tuch. Entfernen Sie regelmäßig den Staub von den Lüftungsönungenhinten
und an den Seiten.
* Die Verwendung von Lösungsmitteln, scharfen Reinigungsmitteln oder alkoholhaltigen Reinigungsmitteln kann das Gerät
beschädigen.
* Wenn ein Gegenstand oder eine Flüssigkeit in das Gerät gelangt, ziehen Sie sofort den Netzstecker und lassen Sie das Gerät von
einem zugelassenen Fachmann prüfen.
HINWEISE ZU DEN DISKS
* Verwenden Sie keine CDs mit speziellen Formen (achteckige, herzförmige CDs...), die Störungen des Gerätes hervorrufen
könnten.
* Legen Sie nicht mehr als eine Disk in das CD-Fach ein.
* Versuchen Sie nicht, das CD-Fach während der Wiedergabe zu öfnen.
* Berühren Sie nicht die Linse, denn dadurch könnten Störungen des Gerätes hervorgerufen werden.
* Eine CD, die Kratzer, Staub oder Fingerspuren aufweist, kann Störungen verursachen. Nach dem Abspielen, reinigen Sie die CD
mit einem Tuch. Reinigen Sie die CD immer von innen nach außen. Räumen Sie CDs nicht an zu heißen oder nassen Stellen auf,
damit sie nicht verformt werden. Räumen Sie Ihre CDs nach dem Abspielen in der zugehörigen Hülle auf.
WICHTIGER HINWEIS
Vor dem Transport des Geräts die eventuell vorhandene Disc herausnehmen.
1. Drücken Sie die -Taste, um das Gerät einzuschalten.
2. Schließen Sie einen USB-Datenträger mit MP3-Inhalten oder einen MP3-Player am USB-Anschluss an .
3. Betätigen Sie die -Taste, um in den USB-Modus zu gelangen. Das USB-Symbol “USB” wird angezeigt.
4. Nach wenigen Sekunden, erscheint die Gesamtzahl der Ordner und Titel in der Anzeige, und die Wiedergabe beginnt automatisch.
HINWEIS:
- Die Einlesezeit beträgt etwa 20 Sekunden oder mehr, abhängig von der Anzahl der MP3-Dateien und Ordner auf der Disc oder dem
USB-Gerät.
- Auf der Disc dürfen höchstens 999 MP3-Dateien gespeichert sein.
- Die Disc darf insgesamt nicht mehr als 99 Verzeichnisse enthalten.
- Der USB-Anschluss ist nicht geeignet zum Auaden und zur Kommunikation mit einem Computer
- Der Hersteller garantiert keine Kompatibilität mit USB-Medien oder MP3-Playern aufgrund der unterschiedlichen Aufnahmebedingungen,
Kapazität, Schnittstelle etc.
1. Drücken Sie die Taste (QUELLE), um das Gerät einzuschalten.
2. Legen Sie die CD-/MP3-Disc mit der bedruckten Seite nach oben in das CD-Fach ein und schließen Sie die Abdeckung. Oder
schließen Sie einen USB-Stickmit MP3-Audiodateien an den USB-Port an.
3. Wählen Sie mit der Taste (QUELLE) den CD- oder USB-Modus aus (im Display erscheint das CD- oder USB-Icon). Nach
einigen Sekunden werden im Display die Gesamtzahl der Ordner und die der Titel angezeigt. Die Wiedergabe startet automatisch.
4. Falls mehr als ein Ordner vorhanden ist, halten Sie die Taste (PROGRAMMIEREN) 3 Sekunden lang gedrückt; „FXX“
erscheint und oben rechts im Display blinkt die Anzeige „FOLDER“.
5. Wählen Sie mit den Tasten / den gewünschten Ordner und lassen Sie die Tasten los, um den jeweiligen Ordner zu önen.
Der erste Titel des ausgewählten Ordners wird automatisch wiedergegeben. Drücken Sie wiederholt die Taste / PAIR, um in
dem aktuellen Ordner einen bestimmten Titel zu suchen.
AUX-EINGANG
1. Stecken Sie das eine Ende des Kabels (nicht im Lieferumfang) am AUX IN-Eingang des Geräts an.
AUX IN
2. Schließen Sie das andere Ende des Kabels am Kopfhörer- oder Line-Out-Ausgang des externen Audiogeräts an.
3. Betätigen Sie die -Taste, um in den Aux-Modus zu wechseln. Die Aux-Symbol “ AUX ” erscheint in der Anzeige. Verwenden
Sie Ihr externes Audiogerät wie gewohnt.
4. Stellen Sie die Lautstärke auf das gewünschte Niveau ein.
5. Wenn Sie die Wiedergabe beenden möchten, trennen Sie die Verbindung des externen Gerätes mit dem Aux-Eingang des Players.
WIEDERHOLUNG
Drücken Sie die -Taste wiederholt, um den Repeat-Modus wählen: Einzelwiederholung, Alles wiederholen, Verzeichnis wiederholen.
ABBRECHEN DER WIEDERHOLUNGSFUNKTION
Betätigen Sie die solange, bis die Anzeige “REPEAT” erlischt. Die wiederholte Wiedergabe wird ebenfalls durch Önen des CD-Fachs
oder durch Ausschalten des Geräts beendet.
EIGENSCHAFTEN
NETZSTROMVERSORGUNG:
AC: 230V 50Hz
DC: 9V (UM-2 1.5V x 6)
VERBRAUCH: 14 W
AUSGANGSLEISTUNG: 2 x 1 WATTS RMS
RADIO
FREQUENZBEREICH
FM: 87.5 - 108 MHz
AM (MW): 522 - 1620 kHz
BLUETOOTH
RF-Ausgangsleistung (Radiofrequenz-Augangsleistung): 2 dBm
Betriebsreichweite: bis zu 10 Meter in offenenRäumen (Wände und Hindernisse können die Reichweite des Geräts
beeinträchtigen)
ISICHERHEITSANWEISUNGEN
ACHTUNG:
Um Elektroschockgefahr zu vermeiden, dürfen Sie dieses Gerät nicht demontieren. Das Gerät
enthält keine Teile, die der Benutzer selbst reparieren kann. Vertrauen Sie die Instandhaltung des Geräts einem
Fachmann an.
Das in einem Pfeil endende Blitzsymbol innerhalb eines Dreiecks weist den Benutzer auf die Gegenwart einer
„gefährlichen Spannung“ im Gerät hin.
Das Ausrufezeichen im Inneren eines Dreiecks weist den Benutzer auf wichtige Anweisungen hin, die sich in dem das
Gerät begleitenden Handbuch benden.
WARNUNG: UM BRAND- UND ELEKTROSCHOCKGEFAHR VORZUBEUGEN, DÜRFEN SIE DIESES GERÄT WEDER
REGEN NOCH FEUCHTIGKEIT AUSSETZEN.
ACHTUNG: Beim Umgehen der Sicherheitsvorrichtungen oder wenn diese defekt sind, kann aus dem Gerät unsichtbare
Laserstrahlung austreten. Vermeiden Sie jede Exposition mit dem Laserstrahl.
Lasergerät der Klasse 1.
Wenn Sie dieses Gerät entsorgen möchten, denken Sie daran, es bei einer Sammelstelle für elektrische Haushaltsgeräte
zu entsorgen. Erkundigen Sie sich nach Ihrer nächstgelegenen Wertstoffsammelstelle. Für detaillierte Informationen
wenden Sie sich an die örtlichen Behörden oder an Ihren Händler. (Richtlinie über elektrische und elektronische
Abfallgeräte).
NEW ONE S.A.S
10, Rue de la Mission, 25480 Ecole Valentin, France
CLASS 1 LASER PRODUCT
APPAREIL À LASER DE CLASSE 1
PRODUCTO LASER DE CLASE 1
PRODUTO LASER CLASSE 1
ACHTUNG
- Stellen Sie eine ausreichende Belüftung des Geräts sicher und behindern Sie die Belüftungsönungen nicht mit Gegenständen wie
z. B. Zeitungen, Tischdecken, Vorhängen, usw.
- Stellen Sie keine Wärmequelle wie eine angezündete Kerze auf oder in der Nähe des Geräts ab.
- Verwenden Sie dieses Gerät in klimatisch gemäßigter Umgebung.
- Setzen Sie das Gerät niemals Wasserspritzern oder Feuchtigkeit aus.
- Achten Sie auf einen Mindestabstand von 5 cm zu Ihrem Gerät, um eine ausreichende Belüftung zu gewährleisten.
- Stellen Sie kein mit Wasser gefülltes Gefäß, wie z. B. Vasen, in der Nähe des Geräts ab.
- Das Typenschild bendet sich auf der Rückseite des Geräts.
- Mit dem Netzstecker kann das Gerät vom Netz getrennt werden, er muss daher leicht zugänglich sein. Um das Gerät vollständig
vom Netz zu trennen, trennen Sie den Netzstecker komplett von der Netzsteckdose. Der Netzstecker darf nicht behindert werden
und muss während der Verwendung leicht zugänglich sein.
- Unter der Einwirkung von elektrostatischen und/oder elektrischen Phänomen kann das Produkt Fehlfunktionen aufweisen. Ein
Zurücksetzen auf die Werkseinstellungen kann sich als notwendig erweisen.
- Eine zu hohe Lautstärke kann zu einem Gehörverlust führen.
- Batterien dürfen keiner übermäßigen Hitze ausgesetzt werden (wie zum Beispiel praller Sonne, Feuer oder anderen ähnlichen
Hitzequellen).
- Bitte achten Sie beim Entsorgen der verbrauchten Batterien auf den Umweltschutz.
- Um Spritzgefahren zu vermeiden, platzieren Sie keine Behältnisse mit Flüssigkeiten,wie zum Beispiel eine Vase, in die Nähe des
Gerätes.

ES - 1 ES - 2
DESCRIPCIÓN DEL APARATO
1. ASA DE TRANSPORTE
2. ANTENA TELESCÓPICA
3. COMPARTIMENTO DEL DISCO
4. AUX. IN: ENTRADA AUXILIAR AUX IN
5. BOTÓN
6. BOTÓN (PRESINTONÍA / REPETIR
/ REPRODUCCIÓN PROGRAMADA)
7. BOTÓN / PAIR: REPRODUCCION /
PAUSE / EMPAREJAMIENTO
8. BOTÓN MEMORIA / PARADA
9. BOTÓN SALTO- / SINTONIZACIÓN-
10. BOTÓN : SALTO+ / SINTONIZACIÓN+
11. BOTÓN VOLUMEN -
12. BOTÓN VOLUMEN +
13. PUERTO USB
14. PANTALLA LCD
15. AC IN ENTRADA DE ALIMENTACIÓN DE RED
16. OMPARTIMENTO PARA LA PILA Y CABLE DE ALIMENTACIÓN
ALIMENTACIÓN
Este aparato funciona con una tensión de 230V 50 Hz o mediante pilas de DC9V (UM-2 1.5V x 6)
FUNCIONAMIENTO CA:
• Conecte el cable de alimentación a la toma de corriente de su hogar. Asegúrese de que el voltaje de ambos es compatible.
• Desconecte el cable de alimentación de la toma de corriente cuando no esté usando el reproductor.
Nota: Con el objetivo de ahorrar energía, cuando la reproducción haya alcanzado el nalo el volumen se encuentre a un nivel muy bajo
y no se use ningún control en el dispositivo por un periodo de 10 minutos, la unidad pasará al modo de espera automáticamente.
FUNCIONAMIENTO MEDIANTE PILAS
Abra el compartimento de las pilas situado en la parte trasera del aparato e Introduzca 6 pilas del tipo C (no incluidas) respetando el
esquema de polaridad que fgura en el interiordel compartimento. A continuación, cierre el compartimento.Para pasar de la alimentación
de red a la alimentación mediante pilas, desenchufe el cablede alimentación de la toma de pared y del aparato.
SUSTITUCIÓN DE LAS PILAS
Las pilas deben cambiarse cuando el nivel de volumen disminuya o cuando el sonido sedistorsione.s.
Notas relativas a las pilas
• No mezcle pilas de diferentes tipos ni pilas nuevas con pilas usadas.
• No recargue, caliente ni desmonte nunca las pilas.
• No exponga las pilas a temperaturas demasiado altas, como las producidas por la exposición al sol, al fuego, etc.
• A la hora de deshacerse de las pilas usadas, respete el medio ambiente.
NOTA: Si no va a utilizar el aparato durante un periodo de tiempo prolongado, retire las pilas paraevitar que se vierta líquido del interior
de las mismas.
CONTROLES DE AUDIO
Pulse el botón para encender el aparato.Con la unidad encendida, pulse el botón para cambiar de fuente: RADIO FM,
RADIO AM (MW), CD, USB, AUX IN, BLUETOOTH.
FUNCIONAMIENTO DE LA RADIO
BÚSQUEDA MANUAL
1. Pulse el botón para seleccionar la banda FM o AM (MW).
2. Seleccione la emisora de radio que desee pulsando o .
3. Ajuste el volumen pulsando (volumen +) o (volumen -) a su gusto.
RADIO CD/MP3 PORTÁTIL CON USB/BLUETOOTHES
Para mejorar la capacidad de recepción de la radio:
FM: Alargar la antena.
AM (MW): Girar el aparato horizontalmente para una recepción óptima.
BÚSQUEDA AUTOMÁTICA
Mantenga pulsado el botón / button durante unos 2 segundos para iniciar la búsqueda en el sentido que desee. La función
de búsqueda automática localizará las emisoras con señal fuerte. Vuelva a pulsarlo si desea detener la búsqueda. Las emisoras
con señal débil se pueden sintonizar de forma manual.
NOTA: El sonido se cortará automáticamente durante la búsqueda.
ESTACIONES MEMORIZADAS
1. Seleccione una emisora de forma manual o con la sintonización automática.
2. Pulse la Tecla una vez, los dígitos de los números predenidos “P01” parpadea en la pantalla durante unos segundos.
3. Pulse el botón / para seleccionar un número de memorización..
4. Pulse el botón de nuevo para memorizar la estación de radio en el número de memorización seleccionado.
5. Repita los pasos 1 a 4 para memorizar otras emisoras de radio.
Nota: Cuando guarde una estación en un número de memorización ya ocupado, la estación anterior se borrará automáticamente.
OÍR LAS ESTACIONES MEMORIZADAS
Pulse el botón para seleccionar una estación memorizada.
FUNCIÓN BLUETOOTH
Los logos y nombres Bluetooth
®
son marcas registradas que pertenecen a Bluetooth SIG, Inc. y cualquier uso de dichas marcas por
parte de New One S.A.S tiene sus respectivas licencias. Otras marcas comerciales y registradas son propiedad de sus respectivos
propietarios.
• Antes de utilizar la función de Bluetooth, asegúrese de que su teléfono móvil permite la función de Bluetooth.
• Para los distintos modelos de teléfono móvil, la potencia emisora del Bluetooth será también distinta. Se recomienda que la
distancia entre el teléfono móvil y la unidad sea inferior a 10 metros.
• No coloque ningún objeto metálico u obstáculo entre la unidad y el teléfono móvil.
EMPAREJAMIENTO MANUAL
1. Pulse el botón para seleccionar el modo Bluetooth. La pantalla mostrará "bt" y el indicador de Bluetooth comenzará a
parpadear, luego presione / PAIR durante varios segundos, luego el indicador de Bluetooth parpadeará rápidamente.
2. Encienda la función de Bluetooth de su teléfono móvil. (Por favor, consulte el manual de uso de su teléfono móvil para saber
cómo operar el Bluetooth.)
3. Seleccione el elemento de búsqueda del dispositivo Bluetooth y entre en él. Su teléfono móvil comenzará a buscar dispositivos
Bluetooth que se encuentren dentro de su radio de alcance (10 metros). Seleccione esta radio para coche “M-30BT” y confírmela.
Nota:
- Si fuera necesario, introduzca 0000 como contraseña y conrme.
- Si hubiera realizado la conexión de Bluetooth anteriormente, se mostrará una lista con los resultados de búsqueda encontrados.
Seleccione “M-30BT” y conrme.
4. Cuando se haya conseguido el emparejamiento, El logotipo de Bluetooth dejará de parpadear.
5. Durante la reproducción, pulse el botón / PAIR para dejar la reproducción en pausa, Púlselo de nuevo para reanudar la
reproducción.
6. Durante la reproducción, pulse o para saltar de una pista a otra.
7. Mantenga pulsado el botón / PAIR hasta que “bt” parpadee en el display para realizar la desconexión de Bluetooth.
RECONEXIÓN AL DISPOSITIVO DE FUENTE DE AUDIO BLUETOOTH
Si su dispositivo de fuente de audio Bluetooth ya ha sido emparejado con M-30BT pero se ha desconectado accidentalmente,
mantenga pulsado el botón / PAIR para establecer de nuevo la conexión.
Por la presente, NEW ONE S.A.S declara que el « MUSE M-30 BTB/M-30 BTN» cumple con los requerimientos esenciales y otras
provisiones aplicables de la Directiva 2014/53/EU. La declaración de conformidad podrá consultarse en www.muse-europe.com
FUNCIONAMIENTO CD
1. Pulse el botón para encender el aparato.
2. Abra el compartimento del disco.
3. Introduzca el disco en el compartimento, con la cara impresa orientada hacia arriba y, a continuación, cierre el compartimento..
4. Pulse el botón para seleccionar la función CD.
5. Pasados unos segundos, el número total de pistas y el icono “CD” aparecerán en el display.
PARA:
Interrumpir momentáneamente la reproducción: Pulse una vez el botón / PAIR
Retomar la reproducción: Pulse de nuevo el botón / PAIR
Detener la reproducción: Pulse el botón
Realizar un avance o un retroceso rápido: Mantenga pulsado el botón /
Realizar un salto hacia delante o hacia atrás: Pulse el botón /
ERROR DE DISCO
Nota: Si el disco está sucio, dañado o es ilegible, o si el disco se puso al revés, “ NO ” se verán en la pantalla. Si esto ocurre, limpie
el disco, insértelo correctamente o intente con otro disco.
Si tuviera problemas con la reproducción del CD, cualquiera de los siguientes procedimientos podría ayudarle:
1. Apague la unidad. Desconecte el cable de alimentación de la toma de corriente y después vuelva a conectarlo.
2. Limpie el CD.

ES - 3
ES - 4
REPRODUCCIÓN PROGRAMADA
1. Coloque un CD con la cara impresa mirando hacia arriba en el interior del alojamiento de CD y cierre la tapa.
2. Pulse el botón .
3. Pulse el botón .
4. Seleccione la pista que desee pulsando / , después pulse el botón ” ” para guardar su programa en la memoria.
5. Repita el paso 4 hasta que haya nalizado programando sus selecciones.
6. Pulse el botón para iniciar la reproducción. Abra la tapa del alojamiento de CD o apague la uindad para cancelar la programación.
Nota: Podrá programar hasta 20 pistas de un CD- y 99 pistas de MP3.
MANTENIMIENTO
PROGRAMACIÓN DE ARCHIVOS DE UN DISPOSITIVO USB
OPERACIÓN DE CARPETA MP3
Limpieza
ATENCIÓN: Desconecte este aparato de toda fuente de alimentación antes de limpiarlo.
- Utilice un paño suave, limpio y seco. Limpie regularmente los oricios de ventilación de la parte trasera del aparato y de los
laterales.
- El uso de disolventes o productos abrasivos o a base de alcohol puede dañar el aparato.
- Si un objeto o un líquido penetra en el aparato, desenchúfelo inmediatamente y póngase en contacto con personal técnico
cualicado.
Notas relativas a los disco
* No utilice discos con formas especiales (octogonales, en forma de corazón, etc.), ya que podrían ocasionar un fallo en el
funcionamiento del aparato.
* No introduzca más de un disco en el compartimento.
* No intente abrir el compartimento del disco durante la reproducción.
* No toque la lente del reproductor; si lo hace, podría producirse un fallo en el funcionamiento del aparato.
* Un disco cuya supercie esté rayada, contenga polvo o huellas puede ocasionar fallos en el funcionamiento del aparato. Antes de
comenzar la reproducción, limpie el disco con un paño limpio. Para ello, frótelo desde el centro hacia los bordes. No guarde los
discos en lugares con temperaturas elevadas o una humedad considerable; podrían deformarse. Una vez que haya escuchado
el disco, guárdelo en su estuche.
Nota importante
• Retire el disco del compartimento cuando transporte el aparato.
1. Pulse el botón para encender el aparato.
2. Conecte un lápiz USB con contenido MP3 o un reproductor MP3 al puerto USB .
3. Pulse el botón para seleccionar el modo USB. El icono USB “USB ” se mostrará.
4. Tras unos segundos, el núm. total de carpetas y archivos se mostrará en la pantalla, y la reproducción comenzará automáticamente.
NOTA:
- El tiempo de carga es de 20 segundos o más dependiendo de la cantidad de archivos MP3 y carpetas en el disco o dispositivo USB.
- El número total de archivos MP3 del disco no deberá ser superior a 999.
- El disco no puede contener más de 99 carpetas.
- El puerto USB no está diseñado para una función de recarga y comunicación con un ordenador.
- El fabricante no se hace responsable de la compatibilidad de las pistas del dispositivo USB o del reproductor MP3 como consecuencia
de las condiciones de grabación, de la capacidad, etc.
1. Pulse el botón para encender la unidad.
2. Coloque el disco CD-MP3 con la cara impresa mirando hacia arriba dentro del compartimento para CD y después cierre la tapa
de dicho compartimento. o conecte una unidad USB con archivos de audio MP3 en el puerto USB.
3. Pulse el botón para seleccionar el modo CD o USB (se mostrará el icono CD o USB). Pasados unos segundos, el número
total de carpetas y pistas se mostrará en el display. La unidad comenzará a reproducir automáticamente.
4. Si hubiera más de una carpeta, mantenga pulsado el botón durante 3 segundos, “FXX” se mostrará y “ FOLDER” parpadeará
en la esquina superior derecha.
5. Pulse el botón / para seleccionar la carpeta que desee, suelte los botones para entrar en la carpeta que desee, después
empezará a reproducir la primera pista de esa carpeta de forma automática. Para reproducir una pista de la carpeta que usted
decida, pulse / PAIR repetidamente para seleccionar la pista que desee.
ENTRADA AUXILIAR
1. Enchufe un extremo del cable (no incluido) en la entrada DE LÍNEA de la unidad.
AUX IN
2. Enchufe le otro extremo del cable en la toma para auriculares o la salida de línea de la fuente externa.
3. Pulse el botón para seleccionar el modo auxiliar. El icono de auxiliar “ AUX ” se mostrará. Utilice el dispositivo de audio
externo del modo habitual.
4. Ajuste el volumen al nivel deseado.
5. Desconecte el dispositivo externo de la entrada auxiliar para detener la reproducción.
MODOS DE REPRODUCCIÓN
Pulse repetidamente el botón para seleccionar uno de los siguientes modos de reproducción: Repetir 1, Repetir todo, Repetir
carpeta.
PARA CANCELAR LA REPRODUCCIÓN REPETIDA
Pulse el botón repetidamente hasta desaparecer el indicador “REPEAT”. La función de repetición se cancelará también
cuando la tapa del alojamiento de CD esté abierta o la unidad apagada.
CARACTERÍSTICAS TÉCNICAS
ALIMENTACIÓN:
AC: 230V 50Hz
DC: 9V (UM-2 1.5V x 6)
CONSUMO: 14 W
POTENCIA DE SALIDA: 2 x 1 WATTS RMS
RADIO
GAMA DE FRECUENCIAS
FM: 87.5 - 108 MHz
AM (MW): 522 - 1620 kHz
BLUETOOTH
RF (radiofrecuencia): 2 dBm
Distancia de rendimiento: Hasta 10 m medidos en espacio abierto (la pared y las estructuras pueden afectar el rango del
dispositivo)
INSTRUCCIONES DE SEGURIDAD
ATENCIÓN:
Para reducir el riesgo de descarga eléctrica, no desmonte el aparato. En el interior de este aparato
no existe ninguna pieza que pueda ser reparada por el usuario. Para cualquier operación de mantenimiento y
reparación, póngase en contacto con personal técnico cualicado.
El símbolo del rayo con una flecha dentro de un triángulo equilátero advierte al usuario de la presencia de voltaje
peligroso en el interior del aparato.
El signo de exclamación dentro de un triángulo equilátero advierte al usuario de la presencia de importantes instrucciones
de funcionamiento y mantenimiento en el manual que acompaña al producto.
ADVERTENCIA: PARA PREVENIR EL RIESGO DE INCENDIO O DE DESCARGA ELÉCTRICA, NO EXPONGA ESTE
APARATO A LA LLUVIA O A LA HUMEDAD.
ATENCIÓN: Radiación láser invisible en caso de apertura o fallo de los cierres de seguridad. Evite la exposición al láser.
Producto láser de clase 1
ATENCIÓN
- Para asegurar una ventilación correcta del aparato, no cubra los oricios de ventilación con objetos tales como periódicos,
manteles, cortinas, etc.
- No coloque ninguna fuente de calor, como por ejemplo una vela encendida, sobre el aparato o cerca de él.
- Utilice este aparato en lugares con climas templados.
- No exponga el aparato a salpicaduras o a la humedad.
- Deje libre alrededor del aparato una distancia mínima de 5 cm para garantizar una correcta ventilación del mismo.
- No coloque objetos que contengan líquido, como un jarrón, encima del aparato.
- La placa de identicación se encuentra en la parte posterior del aparato.
- El acceso al enchufe ha de permanecer despejado. Para cortar por completo la alimentación del aparato, desenchúfelo de la
toma de corriente. Se ha de poder acceder fácilmente al enchufe durante el uso del aparato; procure que el acceso al mismo esté
despejado.
- Como resultado de fenómenos electroestáticos y/o eléctricos transitorios, pueden producirse fallos en el funcionamiento del
producto. En estos casos, el usuario deberá reiniciar el aparato desenchufándolo y volviéndolo a enchufar.
- Un volumen elevado durante el uso de auriculares puede provocar problemas auditivos.
- No exponga las pilas a temperaturas demasiado altas, como las producidas por la exposición directa a los rayos del sol, al fuego
o a otras fuentes de calor.
- A la hora de deshacerse de las pilas usadas, respete el medio ambiente. Para evitar que el aparato se moje, no coloque objetos
que contengan líquido, como unjarrón, cerca del mismo.
Si desea deshacerse de este aparato, recuerde que ha de depositarlo en un lugar destinado al reciclado de
electrodomésticos. Infórmese acerca del centro de reciclaje más cercano. Consulte a las autoridades locales o a su
proveedor para obtener más información al respecto. (Directiva de Residuos de Aparatos Eléctricos y Electrónicos)
NEW ONE S.A.S
10, Rue de la Mission, 25480 Ecole Valentin, France
CLASS 1 LASER PRODUCT
APPAREIL À LASER DE CLASSE 1
PRODUCTO LASER DE CLASE 1
PRODUTO LASER CLASSE 1

IT - 1 IT - 2
DESCRIZONE DEI CONTROLLI
1. MANIGLIA
2. ANTENNA TELESCOPICA
3. COMPARTIMENTO CD
4. INGRESSO AUSILIARIO
5. TASTO
6. (PRESET / RIPETIZIONE / PROGRAMMAZIONE)
7. / PAIR: RIPRODUZIONE/ PAUSA/ PAIR
8. TASTO (MEMORIA / RESTO )
9. TASTO SALTA- / SINTONIA-
10. TASTO SALTA+ / SINTONIA+
11. TASTO VOLUME -
12. TASTO VOLUME +
13. PORTA USB PORT
14. QUADRANTE LCD
15. AC IN PRESA ALIMENTAZIONE AC
16. VANO BATTERIA E CAVO CA
ALIMENTAZIONE
Questo apparecchio funziona con AC (230V 50 Hz) o DC 9V (UM-2 1,5V x 6)
ALIMENTAZIONE AC:
• Collegare il cavo AC a una presa elettrica domestica e attivare l’alimentazione. Accertarsi che il voltaggio sia compatibile.
• Scollegare il cavo di alimentazione dalla rete elettrica quando l’apparecchio non è in uso.
N.B.: Per risparmiare energia, al termine della riproduzione oppure quando il volume è impostato al minimo e nell'arco di 10 minuti non
viene eseguita nessuna operazione, l'apparecchio passa in automatico alla modalità di Standby.
BATTERIE
Aprire il coperchio del vano batterie e inserire sei 6 batterie di tipo C/UM2 (non incluse) avendo cura di rispettare la polarità, quindi
richiudere il coperchio. Per passare dall’alimentazione AC al quella a batterie, scollegare il cavo AC dalla presa elettrica, quindi
dall’apparecchio.
Sostituire le batterie quando:
Il volume si abbassa o il suono è distorto durante l’uso dell’apparecchio.
Note sulle batterie
• Non mischiare batterie di tipi diversi o vecchie con nuove batterie.
• Non ricaricare mai le batterie, o esporle a calore o sezionarle.
• Non esporre le batterie a calore eccessivo (luce solare diretta, fuoco e altro).
• Rispettare l’ambiente quando si decide di disfarsi delle batterie usate.
NOTA: Allo scopo di evitare perdite di liquido, rimuovere sempre le batterie se non si intende usare l’apparecchio per lunghi periodi.
CONTROLLI AUDIO
Premere il tasto (FONTE) per attivare l’apparecchio.Con l’apparecchio attivo, premere (FONTE) per selezionare una fonte
tra: RADIO FM, RADIO AM (MW), CD, USB, AUX IN, BLUETOOTH.
ASCOLTO DELLA RADIO
RICERCA MANUALE
1. Premere il tasto (FONTE) per selezionare una banda tra FM e AM (MW).
2. Selezionare la stazione desiderata premendo o .
3. Regolare il volume con i tasti (volume +) o (volume -).
RADIO CD/MP3 BLUETOOTH PORTATILE CON USBIT
Per migliorare la ricezione della radio:
FM: Estendere l’antenna FM.
AM (MW): Ruotare l’apparecchio sulla sua asse orizzontale.
AUTOMATIC SEARCH
Tenere premuto per circa due secondi il tasto o per avviare una ricerca automatica nella direzione selezionata. La ricerca
automatica individua le stazioni con segnale potente. Per le stazioni con segnale debole, utilizzare la ricerca manuale.
NOTA: Durante la ricerca delle stazioni l’audio viene automaticamente escluso.
PRESELEZIONE DELLE STAZIONI
1. Selezionare una stazione radio con la ricerca automatica o manuale.
2. Premere una volta il tasto , e il numero per la preselezione “P01” lampeggerà brevemente sul quadrante.
3. Premere il tasto / per selezionare un numero della preselezione da assegnare alla stazione.
4. Premere nuovamente per memorizzare la stazione nel numero della preselezione selezionato.
5. Ripetere i punti 1-4 to per memorizzare altre stazioni.
Nota: Quando si seleziona una numero per la preselezione già assegnato, la stazione precedentemente memorizzata verrà
eliminata.
ASCOLTARE UNA STAZIONE DALLA PRESELEZIONE
Premere il tasto per selezionare una delle stazioni dalla preselezione.
FUNZIONALITÀ BLUETOOTH
Il marchio denominativo Bluetooth
®
e i relativi loghi sono marchi registrati di Bluetooth SIG, Inc., utilizzati da New One S.A.S su licenza.
Altri marchi e nomi commerciali sono di proprietà dei rispettivi titolari.
• Prima di attivare la funzionalità Bluetooth, assicuratevi che il telefono cellulare supporti tale funzionalità.
• A seconda del modello di telefono cellulare, la potenza di emissione Bluetooth può variare. Si consiglia di mantenere una distanza tra
il telefono cellulare e l’apparecchio non superiore ai 10 metri.
• Non interponete alcun oggetto metallico o ostacolo nello spazio che separa il telefono cellulare dall’apparecchio.
ASSOCIAZIONE MANUALE
1. Premete il tasto per selezionare la modalità Bluetooth. Il display mostrerà "bt" e l'indicatore Bluetooth inizierà a lampeggiare,
quindi premere / PAIR per alcuni secondi, quindi l'indicatore Bluetooth lampeggerà rapidamente.
2. Attivate la funzione Bluetooth del cellulare (consultate il manuale del cellulare per dettagli su come utilizzare la funzione Bluetooth).
3. Selezionate la ricerca di dispositivi Bluetooth e avviatela. Il cellulare eettuerà una ricerca per tutti i dispositivi Bluetooth nel suo
raggio operativo (10 metri). Selezionate l’autoradio “M-30BT” e confermate.
N.B.:
- Se viene richiesto l'inserimento della password, digitare 0000, quindi confermare.
- Se avete già utilizzato la funzione Bluetooth in precedenza, il dispositivo visualizza un elenco dei precedenti risultati di ricerca.
Selezionate “M-30BT” e confermate.
4. Quando l'abbinamento ha esito positivo, è possibile ascoltare l'audio dell'associazione e il logo Bluetooth smetterà di lampeggiare.
5. Durante la riproduzione, premete il tasto / PAIR per sospendere la riproduzione, quindi premete il tasto di nuovo per riprenderla.
6. Durante la riproduzione, premete o per saltare una traccia.
7. Per disattivare il Bluetooth premere e tenere premuto il tasto / PAIR no a quando l'icona “bt” sul display lampeggierà.
RECONNESSIONE AL DISPOSITIVO BLUETOOTH
Se avete già associato l’origine audio Bluetooth all’altoparlante M-30BT ma si è accidentalmente disconnessa, premete a lungo il tasto
/ PAIR per riconnettere.
Con la presente, NEW ONE S.A.S dichiara che « MUSE M-30 BTB/M-30 BTN » è conforme ai requisiti essenziali e alle altre disposizioni
fondamentali della direttiva 2014/53/EU. La dichiarazione di conformità è consultabile alla pagina www.muse-europe.com
ASCOLTO DI CD
1. Premere il tasto (FONTE) per attivare l’apparecchio.
2. Aprire il vano CD.
3. Inserire un CD con l’etichetta verso l’alto e richiudere lo sportello.
4. Premere il tasto (FONTE) per selezionare la funzione CD.
5. Dopo alcuni secondi, sul quadrante appariranno il numero totale di brani e l’icona “CD” .
PER:
Mettere la riproduzione in pausa: Premete una volta il tasto / PAIR
Riprendere la riproduzione: Premete una seconda volta il tasto / PAIR
Interrompere la riproduzione: Premete il tasto
Andare velocemente in avanti o all’indietro: Premete i tasti /
Fare un salto in avanti o all’indietro: Tenete premuti i tasti /
ERRORE NEL DISC
Nota: Se il disco è sporco, danneggiato o illeggibile, o se è stato inserito capovolto, sul quadrante apparirà la scritta “NO”. In questo
caso, pulire il disco, riposizionarlo o sostituirlo con un altro.
In caso di problemi con la riproduzione di CD audio cercare di risolvere il problema come suggerito di seguito:
1. Spegnere l'unità. Scollegare la presa di alimentazione CA e ricollegare.
2. Pulire il CD.

IT - 3
IT - 4
PROGRAMMAZIONE DEI BRANI
1. Inserire un CD con l’etichetta verso l’alto e richiudere lo sportello.
2. Premere il tasto .
3. Premere il tasto .
4. Selezionare il brano desiderato premendo / , quindi premere il tasto “ ” per memorizzarlo nel programma.
5. Ripetere i quattro punti precedenti per aggiungere ulteriori brani.
6. Premere il tasto per avviare la riproduzione. Aprendo il vano CD o spegnendo l’apparecchio il programma verrà cancellato.
Nota: CD -no a 20 brani programmabili; MP3 -no a 99 brani programmabili.
MANUTENZIONE
RIPRODUZIONE DI UNA PERIFERICA USB
FUNZIONAMENTO CARTELLA MP3
PULIZIA
ATTENZIONE: Scollegare l’apparecchio dalla rete elettrica prima di pulirlo.
- Usare un panno morbido, asciutto e pulito per rimuovere con regolarità la polvere dalle aperture di ventilazione posto sul retro e
sui lati.
- L’uso di solventi, prodotti corrosivi o a base di alcool potrebbe danneggiare l’apparecchio.
- Nel caso di ingresso accidentale di solidi o liquidi all’interno dell’apparecchio , staccare immediatamente la spina e rivolgersi a un
riparatore autorizzato.
Notes on discs
* L’uso di CD di forma irregolare (ad es. ottagonali o a forma di cuore) potrebbero compromettere il buon funzionamento
dell’apparecchio.
* Non inserire più di un CD alla volta.
* Non aprire il vano CD durante la riproduzione.
* Non toccare le lenti, o si potrebbe compromettere il buon funzionamento dell’apparecchio.
* Nel caso di gra, sporcizia o impronte sul CD, il lettore potrebbe saltare alcuni punti. Prima della riproduzione è consigliabile
pulire il CD con un panno apposito. Pulire il CD partendo dal centro e stronando delicatamente verso l’esterno. Non conservare i
CD in locali con temperature estreme o con alta umidità, o potrebbero deformarsi.Dopo l’ascolto, riporre il CD nella sua custodia.
NOTA IMPORTANTE
Prima di trasportare l’apparecchio, rimuovere il disco dal vano CD.
1. Premete il tasto per accendere l’apparecchio.
2. Collegare un dispositiv USB contenente le MP3 o un lettore MP3 alla porta .
3. Premere il tasto per selezionare la modalità USB. L’icona USB “USB” apparirà sul quadrante.
4. Dopo alcuni secondi, sul quadrante si leggerà il numero totale di cartelle e brani, e la riproduzione si avvia automaticamente.
N.B.:
- Il caricamento richiede circa 20 secondi o più, a seconda della quantità di le MP3 e cartelle nel disco o dispositivo USB.
- Il numero totale di le MP3 non può superare le 999 unità.
- Il numero totale di cartelle non può superare le 99 unità.
- La porta USB non è compatibile con la ricarica e il trasferimento dati tramite con un computer.
- Il fabbricante non è responsabile per la compatibilità dei dispositivi USB e dei lettori MP3 con l’apparecchio per cause che includono
dierenze nel formato dei dati, nella capacità e nella compatibilità dell’interfaccia.
1. Druk op om het apparaat in te schakelen.
2. Plaats de CD-MP3-disc met het label naar boven in het CD-compartiment en sluit de CD-deur. Of, steek een USB-stick met MP3-
bestanden in de USB-poort.
3. Druk op om de CD- of USB-modus te selecteren (het CD- of USB-icoontje wordt getoond). Na een paar seconden zal het
totaal aantal mappen en tracks worden getoond op het display en het apparaat zal het afspelen automatisch starten.
4. Als er meer dan een map is, houd dan voor 3 seconden ingedrukt, “FXX” wordt getoond en “ FOLDER ” knippert in de
rechterbovenhoek.
5. Druk op / om de gewenste map te selecteren, laat de knoppen los om de gewenste map te openen, het afspelen zal daarna
automatisch beginnen bij het eerste bestand van deze map. Druk herhaaldelijk op / PAIR om de gewenste track in deze map
te selecteren en deze track af te spelen.
INGRESSO AUSILIARIO
1. Collegare un’estremità del cavo (non incluso) alla presa LINE IN dell’apparecchio.
AUX IN
2. Collegare l’altra estremità alle cue o alla presa Line Out di un dispositivo esterno.
3. Premere il tasto per selezionare la modalità Ausiliaria. La relativa icona “ AUX ” apparirà sul quadrante. Utilizzate normalmente
il vostro apparecchio audio esterno.
4. Regolate il volume sul livello desiderato.
5. Scollegate il dispositivo esterno dall’ingresso ausiliario per interrompere la lettura.
FUNZIONE DI RIPETIZIONE DEI BRANI
Premete ripetutamente il tasto per selezionare una modalità di riproduzione tra le seguenti:: Ripeti 1, Ripeti tutto, Ripeti cartella.
PER ANNULLARE LA FUNZIONE RIPETI
Premere più volte il tasto noa far scomparire l’indicatore della funzione. La funzione ripeti viene inoltre annullata
aprendo il vano CD o spegnendo l’apparecchio.
SPECIFICHE TECNICHE
ALIMENTAZIONE:
AC: 230V 50Hz
DC: 9V (UM-2 1.5V x 6)
CONSUMO ENERGETICO: 14 W
POTENZA IN USCITA: 2 x 1 WATTS RMS
RADIO
GAMME DI FREQUENZA
FM: 87.5 - 108 MHz
AM (MW): 522 - 1620 kHz
BLUETOOTH
RF (radiofrequenza) irradiata: 2 dBm
Raggio d’azione: noa 10 metri in spazi aperti (pareti e altre strutture possono inuiresul raggio d’azione del dispositivo).
INFORMAZIONI AGGIUNTIVE
ATTENZIONE:
Per ridurre il rischio di scossa elettrica, non rimuovere il pannello posteriore. Non contiene parti
riparabili dall’utente. Per le riparazioni, rivolgersi a del personale qualicat.
Il simbolo del fulmine con punta di freccia avvisa l’utente della presenza di “voltaggio pericoloso” all’interno
dell’apparecchio, potenzialmente letale.
Il simbolo del punto esclamativo racchiuso in un triangolo avverte l’utente della presenza di importanti istruzioni per l’uso
nella documentazione allegata all’apparecchio.
ATTENZIONE: ALLO SCOPO DI PREVENIRE INCENDI O SCOSSE ELETTRICHE, NON ESPORRE L’APPARECCHIO A
PIOGGIA O UMIDITÀ.
AVVERTENZA: L’apparecchio può emettere radiazioni laser invisibili se aperto e con le sicure disinserite. Evitare l’esposizione
diretta al raggio laser.
Prodotto laser di classe 1.
IMPORTANTE!
- Non esporre le batterie a calore eccessivo (luce solare diretta, fuoco e altro).
- Rispettare l’ambiente quando si smaltiscono le batterie usate.
- Non ostruire le aperture per la ventilazione, ad esempio coprendole con quotidiani, tovaglie, tende e simili.
- Non collocare amme vive (ad es. un candela) sull’apparecchio.
- L’apparecchio è adatto alluso in climi temperati.
- Non esporre l’apparecchio a spruzzi e schizzi di liquido, e non collocare su di esso oggetti contenti liquidi, come bottiglie o vasi
di ori.
- Lasciare uno spazio libero di almeno cinque (5) intorno all’apparecchio per assicurarne la corretta ventilazione.
- Non collocare sull’apparecchio oggetti contenenti liquidi, come vasi per ori o bottiglie.
- La targhetta identicativa dell’apparecchio è posta sul suo retro.
- La spina di alimentazione funge da dispositivo di scollegamento di emergenza, e deve quindi rimanere costantemente accessibile.
Per scollegare completamente l’alimentazione, la spina di alimentazione deve essere completamente staccata. Non ostruire la
spina di alimentazione e assicurarsi che sia sempre facilmente accssibile durante l’uso.
- A causa di eventuali uttuazionielettriche e/o di fenomeni elettrostatici, l’apparecchio potrebbe non funzionare a dovere o richiedere
all’utente di essere riavviato.
Se in futuro volete sbarazzarvi di questo apparecchio, ricordate che le apparecchiature elettroniche non devono essere
gettate insieme ai riui domestici. Informatevi per sapere dove si trova il centro di riciclaggio più vicino. Per ulteriori
dettagli, rivolgetevi alle autorità locali o al vostro rivenditore. (Direttiva sui rifiutidelle apparecchiature elettriche ed
elettroniche).
NEW ONE S.A.S
10, Rue de la Mission, 25480 Ecole Valentin, France
CLASS 1 LASER PRODUCT
APPAREIL À LASER DE CLASSE 1
PRODUCTO LASER DE CLASE 1
PRODUTO LASER CLASSE 1

NL - 1 NL - 2
BESCHRIJVING VAN HET TOESTEL
1. DRAAGBEUGEL
2. TELESCOPISCHE ANTENNE
3. CD COMPARTMENT
4. AUX. IN: AUXILIARY INPUT
5. TOETS
6. TOETS (VOORKEURSZENDER / HERHALEN /
PROGRAMMEREN)
7. / PAIR: AFSPELEN/ PAUZEREN/ KOPPELEN
8. (GEHEUGEN / STOPPEN )
9. SKIP- / TUNE-
10. SKIP+ / TUNE+
11. VOLUME VERLAGEN
12. VOLUME VERHOGEN
13. USB-POORT
14. LCD-SCHERM
15. AC IN INGANG VOEDINGSSECTOR
16. BATTERIJ- & NETSNOERCOMPARTIMENT
VOEDING
Dit toestel werkt op netspanning (230V 50 Hz) of op batterijen DC9V (UM-2 1.5V x 6)
WERKING OP NETSPANNING:
• Sluit het netsnoer aan op uw stopcontact en schakel de netvoeding in. Zorg ervoor dat de spanning overeenkomt.
• Haal de stekker uit het stopcontact wanneer het apparaat niet wordt gebruikt.
Opmerking: Om energie te besparen zal het apparaat automatisch naar de standbymodus schakelen wanneer het afspelen het eindpunt
heeft bereikt of het volume is ingesteld op een zeer laag niveau en het apparaat niet wordt gebruikt voor een periode van 10 minuten.
WERKING OP BATTERIJEN
Open het compartiment voor batterijen aan de achterkant van het toestel en plaats 6 batterijen van het type C (niet bijgeleverd) volgens
het polariteitschema aan de binnenkantvan het compartiment. Sluit het compartiment vervolgens.Om van netvoeding over te gaan op
batterijen, koppel de netvoedingskabel los van hetstopcontact en de CD-speler.
De batterij vervangen
De batterijen moeten worden vervangen wanneer het volume afneemt of het geluid vervormt.
Opmerking met betrekking tot de batterijen
• Gebruik geen batterijen van verschillende types of nieuwe en gebruikte batterijen tegelijkertijd.
• Herlaad, verwarm of demonteer de batterijen nooit.
• De batterijen mogen niet worden blootgesteld aan hittebronnen zoals zonlicht, vuur, enz
• Gelieve het milieu te respecteren wanneer u gebruikte batterijen weggooit.
OPMERKING: Om te voorkomen dat de batterijen uitlopen, haal ze steeds uit het toestel wanneer dit langetijd niet gebruikt wordt.
MODUS EN VOLUMEREGELING
Druk op de toets om het toestel in werking te zettenDruk als het apparaat is ingeschakeld op om een andere bron te
selecteren: FM RADIO, AM (MW) RADIO, CD, USB, AUX IN, BLUETOOTH.
LUISTER NAAR DE RADIO
HANDMATIG AFSTEMMEN
1. Druk op om de FM- of AM (MW)-band te selecteren.
2. Selecteer de gewenste zender door op of te drukken.
3. Stel het volume naar wens in met behulp van (volume +) of (volume -)
DRAAGBARE RADIO-CD/MP3 SPELER MET USB/BLUETOOTHNL
Om de ontvangst van de radio te optimaliseren:
FM: Strek de FM-draadantenne volledig uit.
AM (MW): Draai het apparaat in horizontale richting.
AUTOMATISCH AFSTEMMEN
Houd een van de / toetsen gedurende ongeveer 2 seconden ingedrukt om het zoeken in de gewenste richting te beginnen.
De automatische zoekfunctie vindt de radiostations die een sterk signaal hebben. De radiostations met een zwak signaal kunnen
handmatig worden afgestemd.
Opmerking: Het geluid wordt automatisch uitgeschakeld tijdens het zoeken.
VOORKEURSZENDERS
1. Kies handmatig of met behulp van de automatische afstemming een radiostation.
2. Druk -knop eenmaal, het vooraf ingestelde nummer digits “P01” zal knipperen op het display voor paar seconden.
3. Druk op de knop / om het nummer van een voorkeurszender te selecteren
4. Druk nogmaals op de knop om de radiozender onder het geselecteerde voorkeurszender nummer op te slaan.
5. Herhaal de stappen 1 tot 4 om andere radiostations te bewaren.
Opmerking: Als je een zender opslaat onder het nummer van een voorkeurszender dat al in gebruik is, dan zal de eerder opgeslagen
zender automatisch worden gewist.
NAAR VOORKEURSZENDERS LUISTEREN:
Druk op de knop om een voorkeurszender te selecteren.
BLUETOOTH-FUNCTIE
De Bluetooth
®
markering en logo’s zijn geregistreerde handelsmerken die eigendom zijn van Bluetooth SIG, Inc. en elk gebruik van
deze merken door New One S.A.S is onder licentie. Andere handelsmerken en handelsnamen zijn eigendom van hun respectieve
eigenaars.
• Zorg er voordat u de Bluetooth-functie gebruikt voor dat uw mobiele telefoon de Blue-tooth-functie ondersteunt.
• De kracht van het Bluetooth-signaal is niet voor elke mobiele telefoon hetzelfde. Er wordt aanbevolen een afstand van 10 meter tussen
de smartphone en het apparaat aan te houden.
• Plaats geen metalen voorwerpen of obstakels op het pad tussen de mobiele telefoon en het apparaat.
HANDMATIG KOPPELEN
1. Druk op om de Bluetooth-modus te selecteren. Op het display verschijnt "bt" en de Bluetooth-indicator begint te knipperen, en
drukt vervolgens enkele seconden op / PAIR , waarna de Bluetooth-indicator snel gaat knipperen.
2. Schakel de Bluetooth-functie van uw mobiele telefoon in. (Raadpleeg de handleiding van uw mobiele telefoon voor informatie over
het bedienen van de Bluetooth-functie.)
3. Selecteer het item voor het zoeken naar Bluetooth-apparaten en open het. Uw mobiele telefoon start met het zoeken naar Bluetooth-
apparaten die zich binnen het bereik van de telefoon (10 meter) bevinden. Selecteer deze autoradio “M-30BT” en bevestig uw keuze.
OPMERKING:
- Voer indien nodig 0000 in als wachtwoord en bevestig het wachtwoord.
- Als u al eerder verbinding heeft gemaakt met Bluetooth, dan wordt een lijst met eerdere zoekresultaten getoond. Selecteer “M-30BT”
en bevestig.
4. Wanneer het koppelen gelukt is, hoort u het paargeluid en stopt het Bluetooth-logo met knipperen.
5. Druk tijdens het afspelen op / PAIR om het afspelen te pauzeren, druk nogmaals op de toets om het afspelen te hervatten.
6. Druk tijdens het afspelen op of om tracks over te slaan.
7. Houd / PAIR ingedrukt tot “ bt ” knippert op het display om de Bluetooth-verbinding te verbreken.
OPNIEUW VERBINDEN MET EEN BLUETOOTH-BRONAPPARAAT
Als uw Bluetooth-bronapparaat al eerder is gepaird met de M-30 BT maar de verbinding per ongeluk is verbroken, druk dan lang op
/ PAIR om opnieuw verbinding te maken.
Hierbij verklaart NEW ONE S.A.S dat deze “MUSE M-30 BTB / M-30 BTN” voldoet aan de essentiële eisen en andere relevante
bepalingen uit richtlijn 2014/53/EU. De verklaring van conformiteit kan worden geraadpleegd op www.muse-europe.com
BEDIENING CD-SPELER
1. Druk op de toets om het toestel in werking te zetten.
2. Open de CD deur.
3. Breng de disk in het diskcompartiment met de bedrukte zijde langs boven, om vervolgens het diskcompartiment te sluiten.
4. Druk op de knop om de CD-functie te selecteren.
5. Na een paar seconden zullen het totaal aantal tracks en het “CD”-icoontje op het display verschijnen.
OM:
De weergave te pauzeren: Druk één keer op de toets / PAIR
De weergave te hervatten: Druk een tweede keer op de toets / PAIR
De weergave te stoppen: Druk op de toets
Snel vooruit of achteruit te springen: Houd de toets of ingedrukt
Een volledige sprong (track) naar voor of naar achter uit te voeren: Druk op de toets /
FOUTMELDING DISK
Opmerking: als de disc vuil, beschadigd of onleesbaar is of als de disc verkeerd om wordt geplaatst, dan zal er “ NO ” op het display
verschijnen. Als dit zich voordoet, maak de disc schoon, plaats de disc juist of probeer een andere disc.
Als u problemen tegenkomt bij het afspelen van CD's, kunt u dit op de volgende manieren verhelpen:
1. Schakel het apparaat uit. Trek de stekker uit het stopcontact en steek hem daarna weer in het stopcontact.
2. Maak de CD schoon.

NL - 3
NL - 4
M-30BTB/IB/V0
GEPROGRAMMEERD AFSPELEN
1. Plaats the CD met het label naar boven gericht in het CD-compartiment en sluit de CD-deur.
2. Druk op .
3. Druk op .
4. Selecteer de gewenste track met behulp van / , en druk daarna op ” ” om de track toe te voegen aan het programma
en het programma op te slaan in het geheugen.
5. Herhaal stap 4 tot u uw programma volledig heeft ingevoerd.
6. Druk op om het afspelen te starten. Open de CD-deur of schakel het apparaat uit om het programma te annuleren.
Opmerking: CD-tot 20 geprogrammeerde nummers; MP3-tot 99 geprogrammeerde nummers.
ONDERHOUD
EEN USB-SLEUTEL AFSPELEN
MP3 MAP OPERATIE
OPGEPAST: Koppel het toestel los van elke voedingsbron vooraleer het schoon te maken.
- Gebruik een propere, zachte, droge doek. Stof de verluchtingsopeningen aan de achterzijde of zijkanten van het toestel regelmatig
af.
- Het gebruik van solventen of bijtende middelen op basis van alcohol kan het toestel beschadigen.
- Als een object of een vloeistof in het toestel loopt, koppel het dan meteen los en laat het nakijken door een gekwaliceerdtechnieker.
Opmerkingen ivm disks
* Gebruik geen disks met een speciale vorm (achthoek, hartvorm, enz.) die het toestel slecht zou doen werken.
* Plaats maar 1 disk in het compartiment.
* Open het compartiment niet tijdens de weergave.
* Raak de lens niet aan om disfunctie van het toestel te vermijden.
* Een disk met krassen, stof of vingerafdrukken kan slecht werken. Gebruik een zachte, droge doek om de disk schoon te maken,
vooraleer de disk weer te geven. Doe dit van het midden uit naar de zijkanten toe. Plaats de disks nooit bloot aan vochtigheid of
extreme temperaturen om ze niet te vervormen. Plaats uw disks na de weergave opnieuw in hun doosjes.
BELANGRIJKE OPMERKING
Haal de disk uit het compartiment als het toestel vervoerd moet worden.
1. Druk op de toets om het toestel in werking te zetten.
2. Sluit een USB-stick met MP3’s of een MP3-speler aan op de USB-poort .
3. Ruk op de knop om de USB-modus te selecteren. Het USB-icoontje “USB ” wordt getoond.
4. Na een paar seconden zal het totaal aantal mappen en tracks worden getoond op het display., en het afspelen begint automatisch.
OPMERKING:
- Het laden duurt ongeveer 20s of langer, afhankelijk van het aantal MP3-bestanden en mappen op de disc of het USB-apparaat.
- Het totaal aantal MP3-bestanden op de disc mag niet hoger zijn dan 999.
- De schijf mag niet meer dan 99 mappen bevatten
- De USB-poort is niet bedoeld voor de oplaadfunctie en communicatie met een computer.
- De fabrikant is niet verantwoordelijk voor de afspeelbaarheid van USB-sticks of MP3-spelers door opnameomstandigheden,
capaciteit, interface compatibiliteit, etc.
1. Druk op om het apparaat in te schakelen.
2. Plaats de CD-MP3-disc met het label naar boven in het CD-compartiment en sluit de CD-deur. Of, steek een USB-stick met MP3-
bestanden in de USB-poort.
3. Druk op om de CD- of USB-modus te selecteren (het CD- of USB-icoontje wordt getoond). Na een paar seconden zal het
totaal aantal mappen en tracks worden getoond op het display en het apparaat zal het afspelen automatisch starten.
4. Als er meer dan een map is, houd dan voor 3 seconden ingedrukt, “FXX” wordt getoond en “ FOLDER ” knippert in de
rechterbovenhoek.
5. Druk op / om de gewenste map te selecteren, laat de knoppen los om de gewenste map te openen, het afspelen zal daarna
automatisch beginnen bij het eerste bestand van deze map. Druk herhaaldelijk op / PAIR om de gewenste track in deze map
te selecteren en deze track af te spelen.
HULPINGANG
1. Steek een uiteinde van de kabel (niet meegeleverd) in de AUX IN-aansluiting van het apparaat.
AUX IN
2. Steek het andere uiteinde van de kabel in de HOOFDTELEFOON- of LINE OUT-uitgang van de externe bron.
3. Druk op de knop om de Auxiliary-modus te selecteren. Het auxiliary-icoontje “AUX” wordt getoond. Gebruik uw extern
audiotoestel zoals normaal.
4. Stel het volume in op het gewenste niveau.
5. Koppel de externe apparatuur los van de hulpingang om het afspelen te beëindigen.
AFSPEELMODI
Druk op de -knop aan een van de volgende manieren van afspelen: Herhaal 1, Herhaal alle, Herhaal map.
OM HET HERHALEN TE STOPPEN
Druk herhaaldelijk op de knop tot de “REPEAT” indicator verdwijnt. De herhaalfunctie wordt ook geannuleerd wanneer de CD-
deur wordt geopend of het apparaat wordt uitgeschakeld.
SPECIFICATION
Netstroom:
AC: 230V 50Hz
DC: 9V (UM-2 1.5V x 6)
VERBRUIK: 14 W
UITGANGSVERMOGEN: 2 x 1 WATTS RMS
RADIO
FREQUENTIEBEREIK:
FM: 87.5 - 108 MHz
AM (MW): 522 - 1620 kHz
BLUETOOTH
RF-vermogen (radiofrequentievermogen): 2 dBm
Werkafstand: Tot 10 meter gemeten in een open ruimte (muren en bouwwerken kunnen invloed hebben op het bereik van de
luidspreker)
VEILIGHEIDSINSTRUCTIES
OPGEPAST:
Om het risico op elektrische schokken te vermijden, mag u het toestel niet demonteren. Het
toestel bevat geen enkel onderdeel dat door de gebruiker zelf kan gerepareerd worden. Contacteer altijd een
gekwaliceerde technieker indien een reparatie nodig is.
Het symbool van een zwarte driehoek met daarin een witte bliksemschicht eindigend in een driehoek, waarschuwt de
gebruiker dat er een gevaarlijke spanning aanwezig is in het toestel.
IHet bovenstaande symbool (zwarte driehoek met daarin een wit uitroepingsteken) waarschuwt de gebruiker dat er
belangrijke gebruiksaanwijzingen in verband met het gebruik en het onderhoud ter beschikking zijn in de bijgeleverde
handleiding.
WAARSCHUWING Stel het toestel niet bloot aan vocht of regen om het risico op brand of elektrische schokken te
vermijden.
OPGEPAST: Onzichtbare laserstralen wanneer het veiligheidsmechanisme open of stuk is. Vermijd blootstelling aan stralen.
Product van laserklasse 1.
OPGELET
- Zorg voor een juiste ventilatie van het toestel en bedek de ventilatie-openingen niet met voorwerpen zoals dagbladen, tafellakens,
gordijnen, enz.
- Plaats geen warmtebron, zoals een brandende kaars, op of in de buurt van het toestel.
- Gebruik dit toestel bij een gematigd klimaat.
- Stel het toestel niet bloot aan waterspatten of vochtigheid.
- Zorg voor een afstand van minimum 5 cm rondom uw toestel voor voldoende ventilatie.
- Plaats geen voorwerpen met vloeistof, zoals een vaas, op of in de buurt van het toestel.
- Het kenmerkenplaatje bevindt zich aan de achterkant van het toestel.
- Met de netspanningsstekker kan het toestel uitgetrokken worden, deze moet dus gemakkelijk toegankelijk blijven. Om de voeding
van het toestel volledig te onderbreken dient u de voedingsstekker helemaal uit het stopcontact te trekken. De netspanningsstekker
mag niet verhinderd worden en moet gemakkelijk toegankelijk zijn tijdens gebruik.
- Onder invloed van tijdelijke elektrostatische en/of elektrische verschijnselen kan het product storingen ondervinden en kan een
heropstart nodig blijken.
- Stel de batterijen niet bloot aan overdreven hitte zoals zonnestralen, vuur of gelijkaardige warmtebronnen.- Respecteer de natuur
als u gebruikte batterijen wegwerpt.
- The apparatus shall not be exposed to dripping or splashing and that no objects lledwith liquids, such as vases, shall be placed
on apparatus.
- Plaats geen recipiënten met vloeistoen zoals vazen in de buurt van het toestel omspatten te voorkomen.
Indien u dit toestel in de toekomst wilt weggooien, denk er dan aan om het te recycleren via een inzamelpunt voor
elektrische huishoudapparaten. Informeer naar het dichtstbijzijnde recyclagecentrum. Voor meer informatie wendt u
zich tot de lokale overheden of uw verdeler (richtlijn met betrekking tot Afval afkomstig van elektrische en elektronische
apparaten).
NEW ONE S.A.S
10, Rue de la Mission, 25480 Ecole Valentin, France
CLASS 1 LASER PRODUCT
APPAREIL À LASER DE CLASSE 1
PRODUCTO LASER DE CLASE 1
PRODUTO LASER CLASSE 1
-
 1
1
-
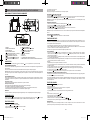 2
2
-
 3
3
-
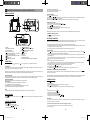 4
4
-
 5
5
-
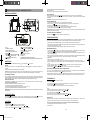 6
6
-
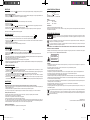 7
7
-
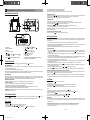 8
8
-
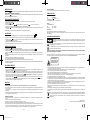 9
9
-
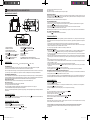 10
10
-
 11
11
-
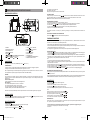 12
12
-
 13
13
-
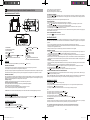 14
14
-
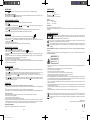 15
15


Muse M-30 BT bleu Bedienungsanleitung
- Kategorie
- CD-Radios
- Typ
- Bedienungsanleitung
- Dieses Handbuch ist auch geeignet für
in anderen Sprachen
- English: Muse M-30 BT bleu Owner's manual
- français: Muse M-30 BT bleu Le manuel du propriétaire
- español: Muse M-30 BT bleu El manual del propietario
- italiano: Muse M-30 BT bleu Manuale del proprietario
- Nederlands: Muse M-30 BT bleu de handleiding
- português: Muse M-30 BT bleu Manual do proprietário
Verwandte Papiere
-
Muse M-28 RDW Bedienungsanleitung
-
Muse M-30 BT Benutzerhandbuch
-
Muse M-29 KDG Benutzerhandbuch
-
Muse M-28 Benutzerhandbuch
-
-
Muse M-29 RDW Benutzerhandbuch
-
Muse M-22 US Benutzerhandbuch
-
-
-