BALDR B0360WST2H2PR-V2 COLOR RADIO-CONTROLLED WEATHER STATION Benutzerhandbuch
- Kategorie
- Wetterstationen
- Typ
- Benutzerhandbuch

COLOR RADIO-CONTROLLED
WEATHER STATION
USER MANUAL
MODEL:B0360WST2H2PR-V2
English Deutsche Français Italiano Español

For the start-up of this device you require:
Main unit by AC Adaptor(included)or 3xAAA batteries(not included)
Sensor by 2xAA batteries(not included)
English
Deutsche
Français
Italiano
Español
English ------------------------------------------03 ~ 25
Deutsche ------------------------------------------26 ~ 52
Français ------------------------------------------53 ~ 77
Italiano ------------------------------------------78 ~ 102
Español ------------------------------------------103 ~ 127
CONTENTS
Für die Inbetriebnahme dieses Gerätes benötigen Sie:
Hauptgerät mit Netzadapter (im Lieferumfang enthalten) oder
3xAAA-Batterien (nicht enthalten)
Sensor mit 2xAA-Batterien (nicht enthalten)
Pour la mise en service de cet appareil, vous avez besoin :
Unité principale avec adaptateur secteur (inclus) ou 3 piles AAA
(non incluses)
Capteur par 2xAA batteries (non incluses)
Per l'avvio di questo dispositivo: Unità principale con
adattatore CA (incluso) o 3 batterie AAA (non incluse) e un sensore
con 2 batterie AA (non incluse).
Para la puesta en marcha de este dispositivo necesitas: Unidad
principal con adaptador CA (incluido) o 3 pilas AAA (no
incluidas) y un sensor con 2 pilas AA (no incluidas).

USER MANUAL
MODEL:B0360WST2H2PR-V3
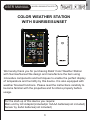
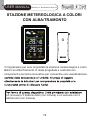
COLOR WEATHER STATION
WITH SUNRISE/SUNSET
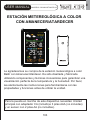
We hereby thank you for purchasing Baldr Color Weather Station
with Sunrise/Sunset.We design and manufacture the item using
innovative components and techniques to enable the perfect display
of temperature and humidity by this device. It is also equipped with
weather forecast functions. Please read the instructions carefully to
become familiar with the properties and functions properly before
usage.
For the start-up of this device you require:
Main unit by AC Adaptor(included)or 3xAAA batteries(not included)
Sensor by 2xAA batteries(not included)
3
EN

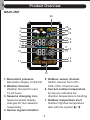
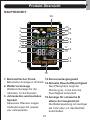
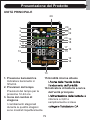
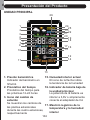
Product Overview
MAIN UNIT
124
2
3
4
56
8
7
9
10
11
13
12
14
15 16
18
19
17
4
1. Barometric pressure
Barometer display in hPa/mb
2. Weather forecast
Weather forecast for next
12-24 hours
3. Seasons changing icon
Seasonal plants display
changes for four seasons
respectively
4. Sensor signal indication
20
21 22
25
23
26
5. Outdoor sensor channel
Switch channel from CH1--
CH2--CH3--Channel scan
6. Current outdoor temperature
Arrow icon indicates the
direction temperature is trending
7. Outdoor temperature alert
Outdoor high/low temperature
alert with the symbol /
EN

5
8. Frosting point icon
9. Comfort level indicator
10.Current indoor temperature
Arrow icon indicates the
direction temperature is
trending.
11.Sunrise time
12. Moon phase
Moon phase will change
automatically with above
time setting
13. City abbreviation
Set your city (limited to 150
cities in Europe) to get the
correct sunrise and sunset
time
14. Sunset time
15. Current indoor humidity
Arrow icon indicates the
direction humidity is trending
16. Low battery indicator of
main unit
Battery power is lower than
3.6V or only connect AC
adaptor
17. Max/min records for indoor
temperature and humidity
Max/min temperature &
humidity records will update
each 24 hour and recorded
from midnight
18. Current outdoor humidity
Arrow icon indicates the
direction humidity is trending.
19. Low battery indicator of
sensor
Battery power is lower than
2.5V
20. Max/min records for outdoor
temperature and humidity
Max/min temperature &
humidity records will update
each 24 hour and recorded
from midnight
21. Weekday display
Weekdays in 7 languages
22. Calendar display
23. Current time
12/24 hour format selectable
24. Snooze indicator
25. Alarm indicator
26. RCC indicator
EN

6
5
2
3
4
1
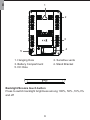
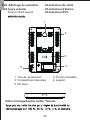
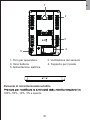
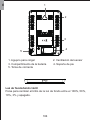
1. Hanging Hole 2. Sensitive vents
3. Battery Compartment 4. Stand Bracket
5. DC Hole
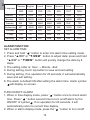
Backlight/Snooze touch button
Press to switch backlight brightness among 100%, 50% ,10%,3%
and off
EN

7
1
2
3
4
5
6
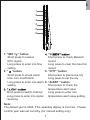
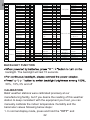
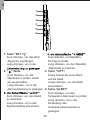
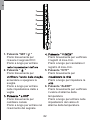
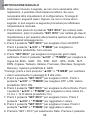
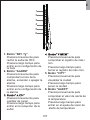
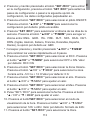
1. “SET / ’’ button
Short press to receive
RCC signal
Long press to enter into time
setting
2. “ ’’button
Short press to check alarm
time, turn on/off alarm
Long press to enter into alarm
setting
Short press to switch channel
Long press to enter into signal
receiving
Note:
The default year is 2020, if the weekday display is incorrect . Please
confirm year was set correctly. (for manual setting only)
Short press to check Max/min
record
Long press to clear the max/min
record
5. “CITY ’’ button
Short press to glance the city
Long press to set the city
6. “ALERT ’’ button
Short press to check the
temperature alert value
Long press to enter into
temperature alert value setting
EN

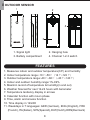
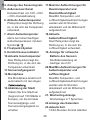
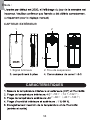
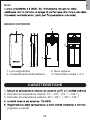
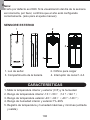
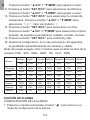
1. Signal light 2. Hanging hole
3. Battery compartment 4. Channel 1-2-3 switch
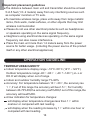
1. Measures indoor and outdoor temperature(C/F) and humidity
2. Indoor temperature range:-10~5014~122
3. Outdoor temperature range:-40~60-40~140
4. Indoor and outdoor humidity range:1%-99%
5. Max/min record of temperature & humidity(in and out)
6. Weather forecast for next 12-24 hours with barometer
7. Temperature tendency display in arrows
8. Calendar function with moon phase
9. Time, alarm and snooze function
10. Time display in 12/24H
11. Weekdays in 7 languages: GER (German), ENG (English), FRE
(French),ITA(Italian), SPA(Spanish),DUT(Dutch),DRN(Denmark)
OUTDOOR SENSOR
12
3
4
8
FEATURES
EN

9
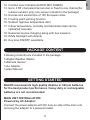
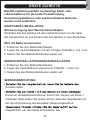
Following contents are included in the package
1xDigital Weather Station
1xRemote Sensor
1xAc Adaptor
1xUser Manual
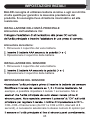
Connect the power adaptor with DC hole on side of the main unit
and plug the adaptor to a powered outlet.
BALDR recommends high quality alkaline or lithium batteries
for the best product performance. Heavy duty or rechargeable
batteries are not recommended.
MAIN UNIT INSTRALLATION
Powered by AC Adaptor:
12. Comfort level indication(GOOD;DRY;HUMID)
13. Up to 3 RF channels(channel scan or fixed to one channel)for
outdoor sensors (only one sensor included in the package)
14. Sunrise and sunset time of 150 European cities
15. Frosting point warning function
16. Outdoor high/low temperature alert
17. Indoor temperature, humidity and barometer data can be
calibrated manually
18. Seasonal scenes changing along with four seasons
19. White backlight with dimmer
20. Key tone ON/OFF selectable
PACKAGE CONTENT
GETTING STARTED
EN

10
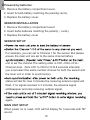
Powered by batteries:
1. Remove the battery compartment cover.
2. Insert 3x AAA battery matching the polarity(+and-).
3. Replace the battery cover.
SENSOR INSTRALLATION
1. Remove the battery compartment cover
2. Insert 2xAA batteries matching the polarity+and-)
3. Replace the battery cover
SENSOR SETUP
For example, you can set to Channel 1 for the sensor. But please
ensure the main unit are set to the same channel before
unit to set the channel.The setting order is CH1--CH2--CH3--
Channel scanfrom CH1 to CH2 to CH3,8 seconds intervals,
you must select the same number choices for both the sensor and
the main unit in order to synchronize)
status will last for max 3 minutes,the receiving antenna signal will
flash, if no signal received in 3 minutes, the antenna signal
willdisappear and stop receiving outdoor signal.
again.
MAIN UNIT SETUP
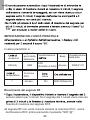
When power on or reset, LCD will full display for 3 seconds with “BI”
sound.
EN

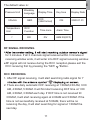
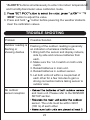
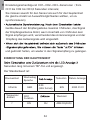
Pressure Unit
hPa/mb GER 0:00
(24H format) ON 2020.01.01
Weekday
Language Display Time Key tone Display Date
Temperature
Unit
ON 0hr AM6:30(OFF)
RCC
Function Time zone Alarm Time
11
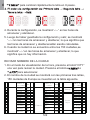
The default value is :
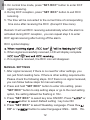
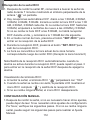
RF SIGNAL RECEIVING
for 3 minutes. If all 3 channels signal received within 3 minutes or
receiving window ends, it will enter into DCF signal receiving window.
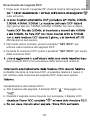
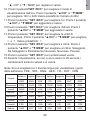
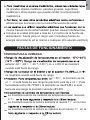
RCC RECEIVING
1. After RF signal receiving, it will start searching radio signal for 7
2. There are daily automatic DCF receiving at 1:00AM,2:00 AM, 3:00
AM, 4:00AM, 5:00AM. It will first start receiving DCF time at 1:00
AM, 2:00AM, 3:00AM each day. If DCF time is not received till
3:00AM, it will start receiving again at 4:00AM and 5:00AM. If the
time is not successfully received at 5:00AM, there will be no
receiving the day, It will start searching for signal at 1:00AM the
next day.
●RF signal will not receive during the RCC reception,please exit the
RCC receiving first by pressing the “SET/ ”Button.
●
EN

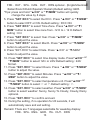
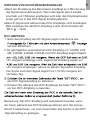
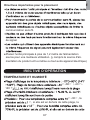
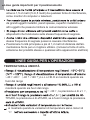
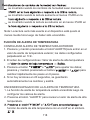
MANUAL SETTINGS
1. After signal received, if there is no need for other settings, you
can just finish reading here. If there is other setting requirements.
Please check the following steps. Or if there is no signal received,
you can follow bellow steps for manual setting.
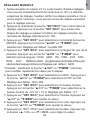
2. Press and hold “SET /RCC’’ button to enter into setting, press
“SET /RCC’’ button to skip setting steps or go to the next setting
option, the setting datawill be flashing in 1Hz.
3. Press “SET /RCC’’ to select key tone ON/OFF. Press or
button to select.Default setting : key tone ON
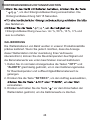
4. Press “SET /RCC’’ to select Weekday Language. Press the
CH’’ or button to select languages: ENGGERIT A
12
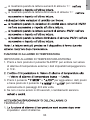
3. On normal time mode, press “SET /RCC’’ button to enter DCF
signal receiving.
4. During DCF reception, press “SET /RCC’’ button to exit RCC
receiving.
5. The time will be converted to the current time of corresponding
time zone after receiving the RCC .(Except 0 time zone)
Remark: It will exit RCC receiving automatically when the alarm is
activated during DCF reception , you can repeat step 3 to enter
DCF signal receiving after turning off the alarm.
RCC symbol display:
b. When signal successfully received, LCD will display complete
c. If no signal is received, the RCC icon will disappear.
EN

13
FREDUTSP ADANDUTDRN optional . (English/German
/Italian/French/Dutch/Spanish/ Danish),Default setting :GER.
*Tips: press and hold “▲/CH’’ or “▼/MEM’’ button will quickly
change the value by 8 steps.
5. Press “SET /RCC’’to select the RCC. Press “▲/CH’’ or “▼/MEM’’
button to select OFF or ON. Default setting : RCC ON.
6. Press “SET /RCC’’ to select Time Zone. Press “▲/CH’’ or“▼/
MEM’’ button to select time zone from -12 H to + 12 H.Default
setting : 0 hr
7. Press “SET /RCC’’ to select Year. Press “▲/CH’’ or “▼/MEM’’
button to adjust the value.
8. Press
9. Press “SET /RCC’’to select Date. Press “▲/CH’’ or “▼/MEM’’
button to adjust the value.
“SET /RCC’’ to select Month. Press “▲/CH’’ or “▼/MEM’’
button to adjust the value.
10. Press “SET /RCC’’ to select time display mode. Press“▲/CH’’ or
“▼/MEM’’ button to select 12hr or 24hr.Default setting : 24hr
format.
11. Press “SET /RCC’’ to select Hours. Press “▲/CH’’ or “▼/MEM’’
button to adjust the value.
12. Press “SET /RCC’’ to select Minutes. Press “▲/CH’’ or“▼/
MEM’’ button to adjust the value.
13. Press “SET /RCC’’ to select temperature unit. Press“▲/CH’’ or
“▼/MEM’’ button to select or .Default setting : .
14. Press “SET /RCC’’ to select weather. Press“▲/CH’’ or“▼/MEM’’
button to select weather: Sunny, Sunny To Cloudy, Cloudy, Rainy
optional.
15. Press “SET /RCC’’ to confirm and exit.
16. During the setting, if no operation for 20 seconds, it will
automatically save and exit setting.
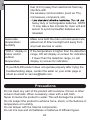
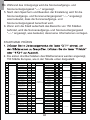
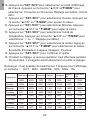
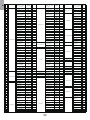
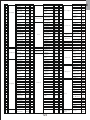
Remark: There are 7 languages selectable for weekday display:
FRESP AENGGERIT ADUTDRN
EN

14
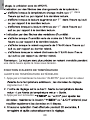
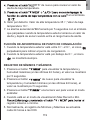
TURN ON/OFF ALARM:
1. When in time display mode, press “ ” button once to check alarm
time. Press “ ” button second time to turn on/off alarm by the
ON/OFF of symbol . If on operation for 20 seconds, it will
automatically return to current time display.
2. When in alarm display mode, press the “ ” button to turn on/off
ALARM FUNCTION
SET ALARM TIME:
1. Press and hold “ ” button to enter into alarm time setting mode.
2. Press “▲/CH’’ or “▼/MEM’’ button to adjust data; press and hold
“▲/CH’’ or “▼/MEM’’ button will quickly change the data by 8
steps.
3. The setting order is: Hour → Minute→Exit.
4. During setting, touch top button to save and exit setting
5. During setting, if no operation for 20 seconds, it will automatically
save and exit setting.
6. The alarm is default ON after setting the alarm time. Alarm symbol
will display on screen.
Language German
GER
Sunday
English
ENG
French
FRE
Italian
ITA
Spanish
SPA
Dutch
DUT
Denmark
DRN
SON SUN DIM DOM DOM ZON ZON
Monday MON MON LUN LUN LUN MRR MRN
Tuesday DIE TUE MAR MAR MAR DIN TIR
Wednesday MIT WED MER MER MIE WOE ONS
Thursday DON THU JEU GIO JUE DON TOR
Friday FRE FRI VEN VEN VIE VRI FRE
Saturday SAM SAT SAT SAB SAB ZRT LOR
EN

SNOOZE FUNCTION
1. When the alarm is ringing, press any other button except top
button to stop the alarm. And the alarm will restart next day.
2. OR when alarm is ringing, press “ ” button to activate snooze
function. And the alarm will repeat in 5 minutes. The “ ” symbol
will be flashing on screen to indicate the snooze mode. Press any
other button except top button to exit the snooze mode. And the
alarm will restart next day.
3. When alarm rings, the ascending “Bibi” alarm sound will last for 2
minutes if no operation.
the alarm by the ON/OFF of symbol If on operation for 20
seconds, it will automatically return to current time display.
15
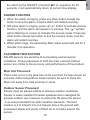
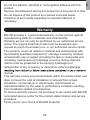
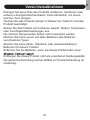
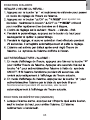
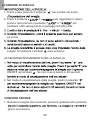
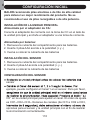
PLACEMENT INSTRUCTION
BALDR sensors are sensitive to surrounding environmental
conditions. Proper placement of both the main unit and outdoor
sensor are critical to the accuracy and performance of this product.
Main Unit Placement
Place main unit in a dry area free of dirt and dust. To help ensure an
accurate indoor temperature measurement, be sure to place the
Main unit away from heat sources or vents.
Outdoor Sensor Placement
Sensor must be placed outside to observe outdoor conditions.
Sensor is water resistant for water splashes and is designed for
general outdoor use, however, to extend its life place the sensor
in an area protected from direct weather elements. The best
location is 4 to 8 feet(1.2 to 2.4 meters) above the ground with
permanent shade and plenty of fresh air to circulate around the
sensor.
EN

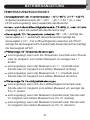
TEMPERATURE&HUMIDITY
● Indoor temperature display range :-10°C~50°C (14°F ~122°F).
Outdoor temperature range:-40~60-40~140 ),LL.L or
HH.H will display when out of range
● Indoor and outdoor humidity range:1%-99%
● Accuracy: For temperature between 10~30,the accuracy is±
1 ,if out of this range the accuracy will be±1.5; For humidity
between 40-70%RH,the accuracy is±5%RH,if out of this range,the
accuracy will be±8%RH.
● Arrow indication for temperature changes:
will display when temperature changes less than 1 within
onehour or compared with last reading.
will display when the reading increase by 1 within one hour or
compared with last reading.
16
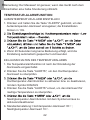
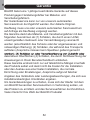
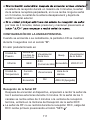
OPERATION GUIDELINE
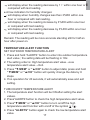
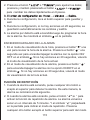
Important placement guidelines
●The distance between main unit and transmitter should be at least
5~6.5 feet (1.5~2 meters) away from any interfering sources such
as computer monitors or TV sets.
●To maximize wireless range, place units away from large metallic
items, thick walls, metal surfaces, or other objects that may limit
wireless communication
● Please do not use other electrical products such as headphones
or speakers operating on the same signal frequency.
● Neighbors using electrical devices operating on the same signal
frequency can also cause interference.
● Place the main unit more than 1.2 meters away from the power
source for better usage. (including the power source of the product
itself or any other electrical appliances)
EN

17
will display when the reading decrease by 1 within one hour or
compared with last reading.
● Arrow indication for humidity changes:
will display when humidity changes less than 3%RH within one
hour or compared with last reading.
will display when the reading increase by 3%RH within one hour
or compared with last reading.
will display when the reading decrease by 3%RH within one hour
or compared with last reading.
Remark: The reading will be more accurate standing still for half an
hour after power on.
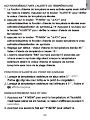
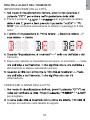
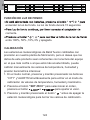
TEMPERATURE ALERT FUNCTION
SET OUTDOOR TEMPERATURE ALERT
1. Press and hold “ALERTS” button to enter into outdoor temperature
alert value ; the setting data will be flashing in 1Hz.
2. The setting order is: High temperature alert value→Low
temperature alert value→ Exit.
3. Press “▼/MEM’’ or “▲/CH’’ button to adjust data; press and hold
“▼/MEM’’ or “▲/CH’’ button will quickly change the data by 8
steps.
4. If no operation for 20 seconds, it will automatically save and exit
setting.
TURN ON/OFF TEMPERATURE ALERT
1. The temperature alert function will be ON after setting the alert
values.
2. Press“ALERTS”button to check the high temperature alert value.
3. Press“▼/MEM’’ or “▲/CH’’ button to turn on/off the high
temperature alert function with on/off of the symbol / .
4. Press “ALERTS” button again to check the low temperature alert
value.
EN

18
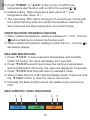
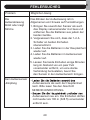
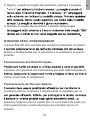
FROSTING POINT WARNING FUNCTION
1. When outdoor temperature reading is between 0~2.9,the icon
will be flashing to indicate the frosting point.
2. When outdoor temperature reading is lower than 0, the icon
will always display.
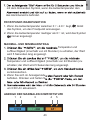
MAX AND MIN RECORD
1. Press “▼/MEM’’ to have maximum temperature and humidity
(within 24 hours), the value will display for 5 seconds.
2. Press “▼/MEM’’second time to have the minimum temperature
and humidity(within 24 hours), the value will display for 5 seconds.
3. Press “▼/MEM’’third time will return to standard mode.
4. When in Max Record or Min Record display mode. Press and hold
the “▼/MEM” button to clear the max or min record.
5. Normally, the Max and Min record will update every 24 hours at
0:00.
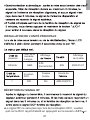
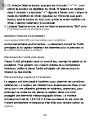
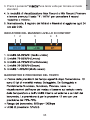
MAX COMFORT LEVEL INDICATION
5. Press“▼/MEM’’ or “▲/CH’’ button to turn on/off the low
temperature alert function with on/off of the symbol / .
6. Default setting : High temperature alert value 35;Low
temperature alert value 10.
7. The ascending “Bibi” alarm will ring for 5 seconds per minute with
the symbol flashing when the outdoor temperature reaches the
alert value and will stop ringing when out of alert range.
1 2 3 4 5
EN

19
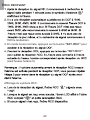
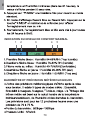
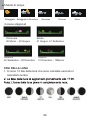
BAROMETER&WEATHER FORECAST
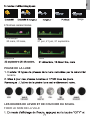
●The weather forecast icon will show after power on. There are 5
kinds of weather modes: Sunny, Sunny To Cloudy, Cloudy, Rainy,
Snow. The weather icon displays are based on the hourly
calculation of indoor/ outdoor temperature, humidity and barometer
data. The forecast is for next 12 hours with 70%-75% accuracy .
●Barometer range: 850hpa~1050hpa
●Pressure Unit: hPa/mb
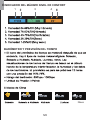
5 Weather Modes
1. Humidity 84-99%RH (Too Wet)
2.Humidity 76-83%RH(Wet)
3. Humidity 40-75%RH(Comfortable)
4. Humidity 26-39%RH(Dry)
5. Humidity 1-25%RH(Too dry)
Sunny Sunny to Cloudy Cloudy Rainy Snow
Spring Summer
20 th,March-20th,Jun 21 th,Jun-21th,September
Autumn
22 th,Septemter-20th,
December
4 Seasonal Scenes
Winter
21th,December-19th,March
EN

20
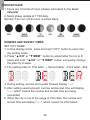
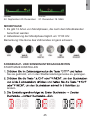
MOON PHASE
1. There are 12 kinds of moon phases calculated by the lunar
calendar
2. Moon phase update at 17:00 daily.
Remark: The icon of full moon is whole black.
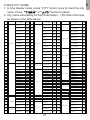
SUNRISE AND SUNSET TIMES
SET CITY NAME
1. In time display mode, press and hold “CITY” button to enter into
city setting mode.
2. Press “▲/CH’’ or “▼/MEM’’ button to adjust letter from A to Z;
press and hold “▲/CH’’ or “▼/MEM’’ button will quickly change
the letter by 8 steps.
3. The setting order is: First letter → Second letter→Third letter→Exit.
4. During setting, sunrise and sunset timewill display “--:--”
5. After setting saved and exit, sunrise and sunset time will display
“--:--”,which means the sunrise and sunset time are being
calculated.
6. When the city is out of the range of 150 cities, the sunrise and
sunset time will display "--:--", which means no information.
EN
Seite wird geladen ...
Seite wird geladen ...
Seite wird geladen ...
Seite wird geladen ...
Seite wird geladen ...
Seite wird geladen ...
Seite wird geladen ...
Seite wird geladen ...
Seite wird geladen ...
Seite wird geladen ...
Seite wird geladen ...
Seite wird geladen ...
Seite wird geladen ...
Seite wird geladen ...
Seite wird geladen ...
Seite wird geladen ...
Seite wird geladen ...
Seite wird geladen ...
Seite wird geladen ...
Seite wird geladen ...
Seite wird geladen ...
Seite wird geladen ...
Seite wird geladen ...
Seite wird geladen ...
Seite wird geladen ...
Seite wird geladen ...
Seite wird geladen ...
Seite wird geladen ...
Seite wird geladen ...
Seite wird geladen ...
Seite wird geladen ...
Seite wird geladen ...
Seite wird geladen ...
Seite wird geladen ...
Seite wird geladen ...
Seite wird geladen ...
Seite wird geladen ...
Seite wird geladen ...
Seite wird geladen ...
Seite wird geladen ...
Seite wird geladen ...
Seite wird geladen ...
Seite wird geladen ...
Seite wird geladen ...
Seite wird geladen ...
Seite wird geladen ...
Seite wird geladen ...
Seite wird geladen ...
Seite wird geladen ...
Seite wird geladen ...
Seite wird geladen ...
Seite wird geladen ...
Seite wird geladen ...
Seite wird geladen ...
Seite wird geladen ...
Seite wird geladen ...
Seite wird geladen ...
Seite wird geladen ...
Seite wird geladen ...
Seite wird geladen ...
Seite wird geladen ...
Seite wird geladen ...
Seite wird geladen ...
Seite wird geladen ...
Seite wird geladen ...
Seite wird geladen ...
Seite wird geladen ...
Seite wird geladen ...
Seite wird geladen ...
Seite wird geladen ...
Seite wird geladen ...
Seite wird geladen ...
Seite wird geladen ...
Seite wird geladen ...
Seite wird geladen ...
Seite wird geladen ...
Seite wird geladen ...
Seite wird geladen ...
Seite wird geladen ...
Seite wird geladen ...
Seite wird geladen ...
Seite wird geladen ...
Seite wird geladen ...
Seite wird geladen ...
Seite wird geladen ...
Seite wird geladen ...
Seite wird geladen ...
Seite wird geladen ...
Seite wird geladen ...
Seite wird geladen ...
Seite wird geladen ...
Seite wird geladen ...
Seite wird geladen ...
Seite wird geladen ...
Seite wird geladen ...
Seite wird geladen ...
Seite wird geladen ...
Seite wird geladen ...
Seite wird geladen ...
Seite wird geladen ...
Seite wird geladen ...
Seite wird geladen ...
Seite wird geladen ...
Seite wird geladen ...
Seite wird geladen ...
Seite wird geladen ...
Seite wird geladen ...
Seite wird geladen ...
-
 1
1
-
 2
2
-
 3
3
-
 4
4
-
 5
5
-
 6
6
-
 7
7
-
 8
8
-
 9
9
-
 10
10
-
 11
11
-
 12
12
-
 13
13
-
 14
14
-
 15
15
-
 16
16
-
 17
17
-
 18
18
-
 19
19
-
 20
20
-
 21
21
-
 22
22
-
 23
23
-
 24
24
-
 25
25
-
 26
26
-
 27
27
-
 28
28
-
 29
29
-
 30
30
-
 31
31
-
 32
32
-
 33
33
-
 34
34
-
 35
35
-
 36
36
-
 37
37
-
 38
38
-
 39
39
-
 40
40
-
 41
41
-
 42
42
-
 43
43
-
 44
44
-
 45
45
-
 46
46
-
 47
47
-
 48
48
-
 49
49
-
 50
50
-
 51
51
-
 52
52
-
 53
53
-
 54
54
-
 55
55
-
 56
56
-
 57
57
-
 58
58
-
 59
59
-
 60
60
-
 61
61
-
 62
62
-
 63
63
-
 64
64
-
 65
65
-
 66
66
-
 67
67
-
 68
68
-
 69
69
-
 70
70
-
 71
71
-
 72
72
-
 73
73
-
 74
74
-
 75
75
-
 76
76
-
 77
77
-
 78
78
-
 79
79
-
 80
80
-
 81
81
-
 82
82
-
 83
83
-
 84
84
-
 85
85
-
 86
86
-
 87
87
-
 88
88
-
 89
89
-
 90
90
-
 91
91
-
 92
92
-
 93
93
-
 94
94
-
 95
95
-
 96
96
-
 97
97
-
 98
98
-
 99
99
-
 100
100
-
 101
101
-
 102
102
-
 103
103
-
 104
104
-
 105
105
-
 106
106
-
 107
107
-
 108
108
-
 109
109
-
 110
110
-
 111
111
-
 112
112
-
 113
113
-
 114
114
-
 115
115
-
 116
116
-
 117
117
-
 118
118
-
 119
119
-
 120
120
-
 121
121
-
 122
122
-
 123
123
-
 124
124
-
 125
125
-
 126
126
-
 127
127
-
 128
128


BALDR B0360WST2H2PR-V2 COLOR RADIO-CONTROLLED WEATHER STATION Benutzerhandbuch
- Kategorie
- Wetterstationen
- Typ
- Benutzerhandbuch
in anderen Sprachen
Verwandte Artikel

Andere Dokumente
-
Bresser 7002510 Bedienungsanleitung
-
Bresser 7002512 Bedienungsanleitung
-
Bresser Weather Center 5-in-1 white Bedienungsanleitung
-
Technoline Model Benutzerhandbuch
-
-
-