
Instructions manual
Montageanleitung
MONTAŽU
UPUTE ZA
Navodila za montažo

2
Radijator
x1
Nosači
x4
Brtva
x4
Vijci
x8
• Pažljivo pročitajte upute prije ugradnje.
• Ugradnju mora izvršiti ovlaštena osoba.
• Molimo Vas da ambalažu zbrinete na prikladan način.
H-ventil, 1 kom
POTREBAN ALAT
Potrebni dodatni dijelovi – nisu uključeni u isporuku:

3
Upute za montažu
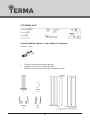
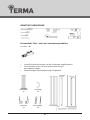
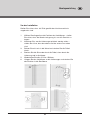
Provjerite jesu li svi dijelovi priloženi prema tablici sadržaja.
1. Odaberite željeni položaj radijatora - osigurajte da je zid
dovoljno čvrst da izdrži težinu.
2. Označite gdje treba postaviti nosače - provjerite jesu li gornji i
donji par u ravnini.
3. Izbušite rupu u zid i umetnite podlošku u nju.
4. Umetnite vijak kroz podlošku, zatim nosač i u čep.
5. Ponovite za sva 4 nosača.
6. Objesite radijator na nosače i uključite radijator u utičnicu.
Prije postavljanja

4
• Pred namestitvijo natančno preberite navodila.
• Namestitev mora opraviti pooblaščena oseba.
• Embalažo zavrzite na primeren način.
H-ventil, 1 kom
POTREBNA ORODJA
Potrebni dodatni deli – niso vključeni v dobavo:
Radiator
x1
Nosilci
x4
Tesnilo
x4
Vijaki
x8

5
Navodila za montažo
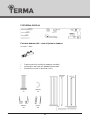
Prepričajte se, da so vsi deli pritrjeni v skladu z vsebino.
1. Izberite želeno lego radiatorja – zagotovite, da je stena dovolj
močna, da prenese težo.
2. Označite, kje naj bodo nosilci nameščeni - poskrbite, da bosta
zgornji in spodnji par poravnana.
3. V steno izvrtajte luknjo in vanjo vstavite podložko.
4. Vstavite vijak skozi podložko, nato nosilec in v pokrovček.
5. Ponovite za vse 4 podpore.
6. Radiator obesite na nosilce in ga vtaknite v vtičnico.
Pred namestitvijo

6
• Read the instructions carefully before installation.
• Installation must be performed by an authorized person.
• Please dispose of the packaging in a suitable manner.
H-valve, 1 pcs
REQUIRED TOOLS
Required parts – not included in the delivery:
Radiator
x1
Brackets
x4
Wascher
x4
Fixing screws
x8

7
Instructions manual
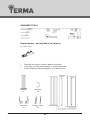
Make sure all parts are attached according to the table of contents.
1. Choose the desired position of the radiator - ensure that the
wall is strong enough to support the weight.
2. Mark where the brackets should be placed - make sure the top
and bottom pair are level.
3. Drill a hole in the wall and insert the washer into it.
4. Insert the screw through the washer, then the bracket and into
the plug.
5. Repeat for all 4 brackets.
6. Hang the radiator on the brackets and plug the radiator into the
socket.
Before installation

8
• Lesen Sie die Anweisungen vor der Installation sorgfältig durch.
• Die Installation muss von einer autorisierten Person
durchgeführt werden.
• Bitte entsorgen Sie die Verpackung sachgerecht.
H-ventil, 1 St.
BENÖTIGTE WERKZEUGE
Erforderliche Teile – nicht im Lieferumfang enthalten:
Heizkörper
x1
Konsole
x4
Dichtung
x4
Schrauben
x8

9
Montageanleitung
Stellen Sie sicher, dass alle Teile gemäß dem Inhaltsverzeichnis
angebracht sind.
1. Wählen Sie die gewünschte Position des Heizkörpers - stellen
Sie sicher, dass die Wand stark genug ist, um das Gewicht zu
tragen.
2. Markieren Sie, wo die Halterungen platziert werden sollen –
stellen Sie sicher, dass das obere und das untere Paar eben
sind.
3. Bohren Sie ein Loch in die Wand und stecken Sie die Dübel
hinein.
4. Stecken Sie die Schraube durch die Dübel, dann durch die
Halterung und in die Kappe.
5. Wiederholen Sie dies für alle 4 Stützen.
6. Hängen Sie den Heizkörper an die Halterungen und stecken Sie
den Strahler in die Steckdose.
Vor der Installation

10

11

Fero-Term d.o.o.
Gospodarska 17
10255 D. Stupnik, Hrvaška
SERVIS
Fero-Term d.o.o.
Gospodarska 17
10255 D. Stupnik, Hrvaška
-
 1
1
-
 2
2
-
 3
3
-
 4
4
-
 5
5
-
 6
6
-
 7
7
-
 8
8
-
 9
9
-
 10
10
-
 11
11
-
 12
12


Andere Dokumente
-
Sencor SHT B332 Benutzerhandbuch
-
-
Zipper ZI-BTM130 Benutzerhandbuch
-
Zipper ZI-BTM160 Concrete Mixer Benutzerhandbuch
-
 Einhell Expert Plus GE-CT 36/30 Li E-Solo Benutzerhandbuch
-
 Somogyi Elektronic KPE 6039G Bedienungsanleitung
-
-
EINHELL GC-CT 18/24 Li (1x2,0Ah) Benutzerhandbuch
-
LG OLED65W7V Benutzerhandbuch

