
Arrière bar
CAB1P
CAB2PC
CAB3P
CAB3PC
SAS CASSELIN
83 rue Marcel Mérieux 69960 Corbas FRANCE
Tél : +33 (0)4 82 92 60 00 - Mail : co[email protected]m

P2M009STD - Ver.1.2
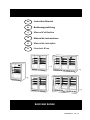
Instruction Manual
Bedienungsanleitung
Manuel d’utilisation
Manual de instrucciones
Manual de instruções
Istruzioni d’uso
GB
DE
IT
FR
PT
ES
BACK BAR RANGE

1 P2M009STD – Ver.1.2
GB
Original Instruction
Dear Customer,
Congratulations on your purchase of this product. This product has also
been developed on the basis the latest technology and produced using
reliable and modern electrical components.
Please take a few minutes before starting operation of the appliance and
read the following operating instructions.
Many thanks.
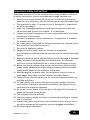
Table of Contents
Important safety instructions.............................................................. 2
Intended use ....................................................................................... 4
Parts ................................................................................................... 5
Controller Operation Instrction ........................................................... 6
Before first use ................................................................................... 9
Cleaning ............................................................................................ 10
Disposal instructions ......................................................................... 11
Technical data ................................................................................... 12
Guarantee ......................................................................................... 12

P2M009STD – Ver.1.2 2
GB
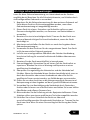
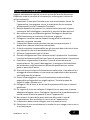
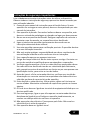
Important safety instructions
Read these instructions for use carefully before using the device. Observe
all safety instructions, so as to avoid damage through improper use.
1. Keep this instruction manual for future use. Should this appliance be
passed on to a third party, this instruction manual must be handed over.
2. This appliance is heavy. To prevent injury or damage to it, unpack and
set up by two people.
3. Never use a damaged appliance! Disconnect the appliance from the
mains outlet and contact your supplier, if it is damaged.
4. Connect and install this appliance in strict compliance with the relevant
instructions in this manual.
5. Only use the appliance for its intended use. The appliance is intended
for commercial use.
6. No responsibility is accepted for damage resulting from improper use or
non-compliance with the instructions.
7. Only use the appliance indoors.
8. Danger of electric shock! Never try to repair the appliance
yourself.Refer to qualified customer service outlet for maintenance and
repairs.
9. Regularly check the power plug and power cord for damage. A damaged
power cord has to be replaced by the manufacturer, his customer
service or a similar qualified person in order to avoid danger of injury.
10. Before inserting the power plug into the mains outlet, check that the
power supply voltage and current rating corresponds with the power
supply details shown on the appliance rating label.
11. Avoid damage to the power cord. Do not squeeze, bend or scour on
sharp edges. Keep away from hot surfaces and naked flames.
12. Please connect the earthing wire to the terminal of equipotentiality by
qualified technician.
13. For your safety, only connect the appliance with a properly earthed
mains outlet. Unplug the appliance immediately if you get an electric
shock when touching the appliance.
14. Do not pull on the power cord. Only pull on the plug. Do not wrap the
power cord around the appliance.
15. This appliance must be earthed!
16. Securely route the power cord that no unintentional pulling or tripping
over it is possible.
17. Connect the power plug with an easy reachable mains outlet so that in
case of an emergency the appliance can be unplugged immediately.
18. Only use original accessories.

3 P2M009STD – Ver.1.2
GB
Important safety instructions
19. The appliance is powered when connected to the power supply.
20. Warning! Do not insert any objects into the casing of the appliance.
21. Do not open the casing.
22. Do not obstruct or cover the ventilation openings. Keep the appliance
well ventilated at all times.
23. Should the cover of the lights fall off or break, unplug the appliance
immediately and contact qualified personnel for repairs.
24. This appliance is not intended for use by persons (including children)
with reduced physical, sensory or mental capabilities, or lack of
experience and knowledge, unless they have been given supervision or
instruction concerning use of the appliance by a person responsible for
their safety.
25. Children should be supervised to ensure that they do not play with the
appliance.
26. Do not keep the keys of the appliance locks near it or within reach of
children.
27. Do not touch the appliance with wet or damp hands. Do not operate
the appliance with wet hands or standing on a wet floor.
28. Warning! During cleaning or operation do not immerse the appliance in
water or other liquids. Do not clean the appliance with a garden hose.
29. Should water flow into the appliance, immediately unplug the appliance
and let it be inspected by qualified personnel before using again.
30. Do not place combustible, explosive or volatile articles, corrosive acids
or alkali in the appliance. Store high-proof spirits only in upright
position and close them properly. Containers with flammable gases and
liquids can leak at low temperatures and catch fire from electrical
appliances’ sparking.D anger of explosion!
31. Warning! This product is for food storage with containers. Do not place
food without container inside.
32. Danger of fire! In event of refrigerant leakage, unplug the appliance,
remove any ignition sources nearby, ventilate the room and contact
your supplier. Avoid contact with the eyes as the refrigerant may cause
serious eye injury. You can find details on the refrigerant on the rating
label.
33. Do not accelerate the defrosting process by using mechanical devices,
heating sources (candles or heaters) or other means. The emerging
steam can cause short circuit and too high temperatures can damage
the synthetic covering of the appliance.

P2M009STD – Ver.1.2 4
GB
Important safety instructions
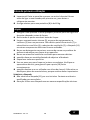
34. Caution: Fire hazard.
35. Warning – keep clear of obstruction all ventilation openings in the
appliance enclosure or in the structure for built-in.
36. Warning – do not use mechanical devices or other means to accelerate
to defrosting process ,other than those recommended by the
manufacturer.
37. Warning – do not damage the refrigerant circuit.
38. Warning – do not use electrical appliances inside the food storage
compartments of the appliance ,unless they are of the type
recommended by the manufacture.
Intended use
1. Only use this appliance for cooling and storage of food and beverage for
commercial purposes.

5 P2M009STD – Ver.1.2
GB
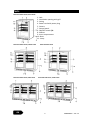
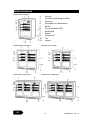
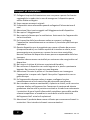
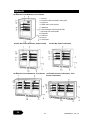
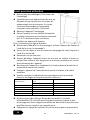
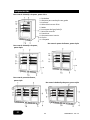
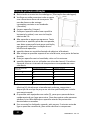
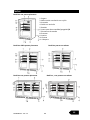
Parts
BACK BAR HINGE DOOR, SINGLE DOOR
1. Lock
2. Ventilation opening with grill
3. Casing
4. Power cord with power plug
5. Castors
7. Control panel
6. ON/OFF switch I/O
8. Shelves
9. Inner compartment
10. Door
11. Lamp
BACK BAR HINGE DOOR, DOUBLE DOOR BACK BAR SLIDE DOOR
BACK BAR HINGE DOOR, THREE DOOR BACK BAR SLIDE DOOR ,THREE DOOR

P2M009STD – Ver.1.2 6
GB
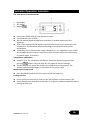
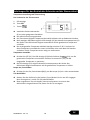
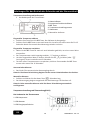
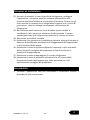
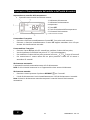
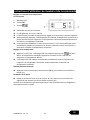
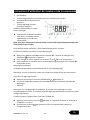
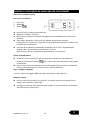
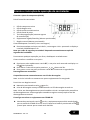
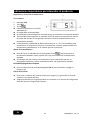
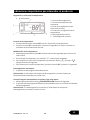
Controller Operation Instrction
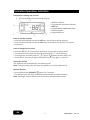
The front panel of the thermostat
1. LED display
2. SET button
3. buttons
Connect the power plug (4) with the mains outlet.
The showcase starts to work.
The thermostat (digital temperature controller) is located at bottom of the
appliance.
After a few seconds the LED display (12) shows the actual inner compartment (9)
temperature. The showcase automatically begins to cool down to the preset
temperature.
The factory pre-set temperature range is between 0°~ 8°C, dependent upon model.
Do not adjust this within the first 24 hours! After 24 hours adjust the temperature
in gradual stages, if necessary.
Temperature adjustment
PressS ET (13). The LED display (12) flashes. Select the desired temperature by
pressing buttons (14) and press SET (13) again to save the settings.
The LED display (12) shows the actual inner compartment temperature. The
showcase automatically begins to cool down to the preset value.
Switching the lamp on/off
Press the ON/OFF switch I/0 (6) to switch on/off the lamp (11).
Locking the door
Insert the key into the lock (1) and turn 90° anticlockwise to lock the door (10).
Please double check and confirm that there is no person inside the appliance before
locking the door (10).

7 P2M009STD – Ver.1.2
GB
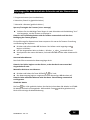
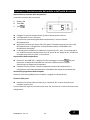
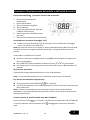
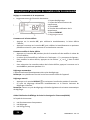
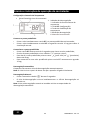
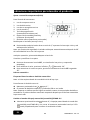
Controller Operation Instrction
Temperature Setting and Control
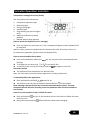
The front panel of the thermostat display:
1.Defrost indicator
2. Compressor operation indicator
3. SET key
4. Temperature modification keys
5. Defrost button
6. Manual defrost
How to see the set point
• Push and immediately release the SET key, the set point will be showed;
• Push and immediately release the SET key or wait about 15s to return to normal
visualisation.
How to change the set point
• Push the SET key for more than 2 seconds to change the set point value;
• The value of the set point will be displayed and the “°C” starts blinking;
• To change the set value push the „ “ (up) or “ ” (down) arrows within 15s.
• To memorise the new set point value push the SET key again or wait 15s.
Automatic defrost
The appliance will automatically run defrost cycles.
Note: The cycle starts from the time the appliance is initially powered up.
Manual Defrost:
• Press and hold the DEFROST button for 5 seconds.
• The defrost cycle will start immediately and the Defrost LED illuminates.
Note: Starting a manual defrost also resets the automatic defrost timer.

P2M009STD – Ver.1.2 8
GB
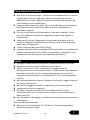
Controller Operation Instrction
Temperature setting and control (EVCO)
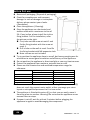
The front panel of the thermostat
1. Compressor operation light
2. Defrosting light
3. Energy saving light
4. Stand-by light
5. Programming key (service agent
only)
6. Machine On/Stand -by (keep
pushed)
7. Manual defrost (keep pushed)
How to unlock the keyboard (»Loc» message)
Push any button for more than 2s, «UnL» message will appear and the keyboard will
be unlocked.
Note:for safety reasons the keyboard locks automatically after 30s of keys inactiv ity.
To execute any operation, please unlock the keyboard first.
How to see and modify the set point
Push and immediately release the key, the set point will be showed and starts
blinking;
To change the set value push or arrows within 20s.
To memorize the new set point value push the key again or wait 20s .
Automatic defrost
The appliance will automatically run defrost cycles.
Note: the cycle starts from the time the appliance is initially powered up.
To manually defrost the applicance:
Press and hold the DEFROST button for 3s;
The defrost cycle will start immediately and the Defrost LED illuminates.
Note: Starting a manual defrost also resets the automatic defrost timer. The next
automatic defrost will start according to the set parameter after the manual defrost
has finished.
How to turn the machine in ON / STAND -BY status
Press and hold the key for 4s, the machine will turn from ON to STAND -BY status
and vice-versa.
During the button hold the LED will blink to show status changing.

9 P2M009STD – Ver.1.2
GB
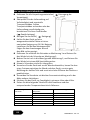
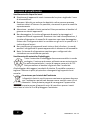
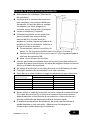
Before first use
Remove all packaging ( Disposal of packaging).
Check for completeness and transport
damage. In case of damage or incomplete
delivery please contact your d ealer
( Guarantee).
Clean the appliance ( Cleaning).
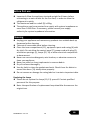
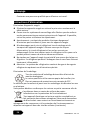
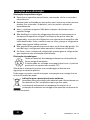
Place the appliance on a horizontal and
stable surface with a maximum incline of
5%. If any incline, please install the incline
fixing bracket. For the installation, refer
the picture on the right.
First, take out the screw at mark 1 and
fix the fixing bracket with the screw at
mark 1.
Drill a hole on the wall at mark 2 and fix
the fixing bracket with M6 expansion bolt.
Note: screws are not included.
Try to position the appliance close to a wall, but leave enough space for
ventilation to ensure good circulation and efficiency of the appliance.
Do not position the appliance in direct sunlight or near any heat sources.
Protect the appliance from moisture, extreme heat or cold.
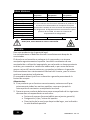
Please see the climate class and matched temperature range for
reference:
Test room climate class
Dry bulb temperature
Relative humidity
°C
%
1
16
80
2
22
65
3
25
60
4
30
55
5
40
40
Never use an extension cord – risk of overheating! If the power cord (5)
does not reach the nearest mains outlet, either rearrange your store
layout or ask qualified personnel to fit a new outlet.
The appliance is fitted with castors (6), so that you can easily move it
from one place to another. Warning! Do not move the appliance across
uneven floors or steps.
If power is cut off, wait for at least 5 minutes before plugging the
appliance in again to avoid damaging the compressor.

P2M009STD – Ver.1.2 10
GB
Before first use
Important! Allow the appliance to stand upright for 8 hours before
connecting to a mains outlet for the first time, in order to allow the
refrigerant to settle.
The maximum load for a shelf (9) is 40kg.
The appliance can be connected to a supply with system impedance no
more than 0.243 Ohm. If necessary, please consult your supply
authority for system impedance information.
Cleaning
Unplug your appliance and remove any products to a suitable back-up
showcase before cleaning.
Take out all removable parts before cleaning.
Clean the inner compartment (12), equipment parts and casing (4 )with
dry cloth. Do not allow the control panel (7), power cord with plug (5),
ventilation openings (3), lamps (10, 13) or other electrical components
to become wet.
Never use corrosive detergents, wire brushes, or abrasive scourers to
clean your appliance.
Never use metal or sharp implements to remove debris.
Dry all surfaces thoroughly.
Use dry cloth to clean the gaskets and seals. Check them for debris to
ensure the doors (11) always close properly.
Do not remove or damage the rating label as it contains important data.
Replacing the lamps
Please do not replace the lamps (10, 13) yourself. Contact qualified
personnel for this purpose.
Note: the specification of replacement lamp should be the same as the
original one.

11 P2M009STD – Ver.1.2
GB
Disposal instructions
Disposal of old appliances
Disable discarded appliances by removing the plug and cutting through
the power cord.
Break any locks in order to avoid children and other persons becoming
trapped. If possible, remove any doors and discard separately.
Warning - hazardous chemicals! Do not allow children to play with the
old appliance.
Do not damage the refrigerant circuit during storage and transportation
of old appliances! Make sure that the evaporator pipes, refrigerant
circuit and surface coverings are not damaged. Avoid contact with the
eyes as the refrigerant may cause serious eye injury.
Do not store old appliance near heat and ignition sources. In event of
leakage the refrigerant of this appliance is highly inflammable.
Please note: the refrigeration system contains gases and refrigerants
which require specialist waste disposal.
Disposal of packaging
All packaging materials should be disposed of in an
environmentally friendly way. The cardboard may be used as
scrap paper. The protective foil and the foam cushions are
CFC – free.
Do not allow children to play with the packaging and destroy plastic bags
safely.
You can break or cut the cardboard into smaller pieces and give to a waste
paper disposal service.
Environmental protection
Discarded electric appliances are recyclable and should not be
discarded in the domestic waste! Please actively supp ort us in
conserving resources and protecting the environment by
returning this appliance to the collection centres (if available).

P2M009STD – Ver.1.2 12
GB
Technical data
Model
1 Door Back Bar
2 Door Back Bar
3 Door Back Bar
Climate Class
4
4
4
Refrigerant Gas
R134a/R600a
R134a/R600a
R134a/R600a/R290
Refrigerant Charge
Please refer to the information indicated on the product. You
will find the information on the rating label on the back of the
unit as well as inside the cooling compartment.
The circuit diagram is displayed on the back of the unit as well
as inside the cooling compartment
Temperature Range
(°C)
Input Power
Rated Frequency
Rated Voltage
Internal volume
Net Weight
Gross Weight
Foaming Agent
CP/IP
CP/IP
CP/IP
CAUTION: RISK OF FIRE AND EXPLOSION WITH
FLAMMABLE REFRIGERANT R600a/ R290.
Guarantee
A statutory warranty applies for this product.
Damages caused by wrong treatment or operation, by false placement or
storage, improper connection or installation, as well as force or other
external influences are not covered by this warranty. We recommend
careful reading of the operating instructions as it contains important
information.
Note:
1. In case this product does not function correctly, please firstly check if
there are other reasons, e.g. for electrical appliances interruption of the
power supply, or generally incorrect handling are the cause.
2. Please note that, where possible, the following documents or rather
information should be provided together with your faulty product:
Purchase receipt
Model description/ Type/ Brand
Describe the fault and problem as detailed as possible In the
case of a claim for guarantee or defects, please contact the
seller.

13 P2M009STD - Ver.1.2
DE
Ü bersetzung der Originalbetriebsanleitung
Sehr geehrte Kundin,
sehr geehrter Kunde,
herzlichen Glückwunsch zum Kauf dieses Produktes. Wie alle Erzeugnisse
von , wurde auch dieses Produkt aufgrund neuester technischer
Erkenntnisse entwickelt und unter Verwendung zuverlässigster und
modernster elektrischer/elektronischer
Bauteile hergestellt.
Bitte nehmen Sie sich einige Minuten Zeit, bevor Sie das Gerät in Betrieb
nehmen und lesen Sie die nachfolgende Gebrauchsanweisung durch.
Inhaltsverzeichnis
Wichtige sicherheitsanweisungen ..................................................... 14
Bestimmungsgemässer gebrauch ..................................................... 16
Bedienelemente ............................................................................... 17
Anleitungen für den Betrieb des Schranks und der Steuereinheit ..... 18
Vor erster inbetriebnahme ............................................................... 21
Reinigung .......................................................................................... 22
Wichtige hinweise zur entsorgung .................................................... 23
Technische daten .............................................................................. 24
Gewährleistung ................................................................................. 24

P2M009STD - Ver.1.2 14
DE
Wichtige sicherheitsanweisungen
Lesen Sie diese Gebrauchsanweisung vor Inbetriebnahme des Gerätes
sorgfältig durch! Beachten Sie alle Sicherheitshinweise, um Schäden durch
nicht sachgemäßen Gebrauch zu vermeiden!
1. Bewahren Sie die Gebrauchsanweisung für den weiteren Gebrauch auf.
Sollte dieses Gerät an Dritte weitergegeben werden, muss diese
Gebrauchsanweisung mit ausgehändigt werden.
2. Dieses Gerät ist schwer. Entpacken und Aufstellen sollte von zwei
Personen durchgeführt werden, um Personen- und Sachschäden zu
vermeiden.
3. Benutzen Sie nie ein beschädigtes Gerät! Trennen Sie das Gerät vom
Netz und benachrichtigen Sie Ihren Kundendienst, wenn das Gerät
beschädigt ist.
4. Montieren und schließen Sie das Gerät nur nach den Angaben dieser
Gebrauchsanweisung an.
5. Verwenden Sie das Gerät nur für den vorgesehenen Zweck. Das Gerät
ist für kommerziellen Gebrauch geeignet.
6. Im Falle von unsachgemäßem Gebrauch oder falscher Handhabung
kann keine Haftung für eventuell auftretende Schäden übernommen
werden.
7. Benutzen Sie das Gerät ausschließlich in Innenräumen.
8. Stromschlaggefahr! Versuchen Sie auf keinen Fall das Gerät selbst zu
reparieren. Wenden Sie sich zur Wartung und Reparatur an einen
qualifizierten Kundendienst.
9. Ü berprüfen Sie regelmäßig den Netzstecker und das Netzkabel auf
Schäden. Wenn das Netzkabel dieses Gerätes beschädigt wird, muss es
durch den Hersteller oder seinen Kundendienst oder eine ähnlich
qualifizierte Person ersetzt werden, um Gefährdungen zu vermeiden.
10. Prüfen Sie vor dem Anschluss an die Netzversorgung ob Stromart und
Netzspannung mit den Angaben auf dem Typenschild übereinstimmen.
11. Vermeiden Sie eine Beschädigung des Netzkabels durch Quetschen,
Knicken oder Scheuern an scharfen Kanten und halten Sie es von heißen
Oberflächen und offenen Flammen fern.
12. Bitte verbinden Sie die Erdleitung mit der Äquipotentialklemme. Diese
Arbeiten sollten von einem qualifizierten Techniker ausgeführt werden.
13. Schließen Sie zu Ihrer Sicherheit das Gerät nur über eine
vorschriftsmäßig geerdete Schutzkontakt-Steckdose an. Trennen Sie das
Gerät vom Netz wenn Sie einen Stromschlag bei Berührung des Geräts
spüren.

15 P2M009STD - Ver.1.2
DE
Wichtige sicherheitsanweisungen
14. Ziehen Sie den Netzstecker nicht am Kabel aus der Steckdose und
wickeln Sie das Netzkabel nicht um das Gerät.
15. Dieses Gerät muss geerdet werden!
16. Verlegen Sie das Netzkabel so, dass ein unbeabsichtigtes Ziehen daran
bzw. ein Darüberstolpern nicht möglich ist.
17. Verbinden Sie den Netzstecker mit einer gut erreichbaren Steckdose,
um im Notfall das Gerät schnell von der Netzversorgung trennen zu
können.
18. Verwenden Sie deshalb nur Original-Zubehör.
19. Das Gerät steht unter Strom, solange es ans Stromnetz angeschlossen
ist.
20. Achtung! Führen Sie Keine fremdartigen Gegenstände in das Innere des
Gehäuses.
21. Ö ffnen Sie unter keinen Umständen das Gehäuse.
22. Blockieren Sie nicht die Ventilationsöffnungen. Stellen Sie sicher, dass
das Gerät immer ausreichend belüftet ist.
23. Sollte die Lampenabdeckung abfallen oder zerbrechen, trennen Sie das
Gerät sofort vom Netz und lassen Sie Reparaturen von qualifizierten
Fachleuten durchführen.
24. Dieses Gerät ist nicht dafür bestimmt, durch Personen (einschließlich
Kinder) mit eingeschränkten physischen, sensorischen oder geistigen
Fähigkeiten oder mangels Erfahrung und/oder mangels Wissen benutzt
zu werden, es sei denn, sie werden durch eine für ihre Sicherheit
zuständige Person beaufsichtigt oder erhielten von ihr Anweisungen,
wie das Gerät zu benutzen ist.
25. Kinder sollten beaufsichtigt werden, um sicherzustellen, dass sie nicht
mit dem Gerät spielen.
26. Bewahren Sie die Schlüssel für dieses Gerät nicht in seiner Nähe oder
für Kinderz ugänglicha uf.
27. Berühren Sie das Gerät nicht mit nassen oder feuchten Händen.
Nehmen Sie das Gerät nicht mit feuchten Händen, oder auf nassem
Boden stehend in Betrieb.
28. Achtung! Tauchen Sie das Gerät während des Reinigens oder des
Betriebs nie in Wasser oder andere Flüssigkeiten. Reinigen Sie das Gerät
nicht mit dem Gartenschlauch!
29. Sollte Wasser in das Gerät gelaufen sein, ziehen Sie sofort den
Netzstecker und lassen Sie das Gerät von Fachpersonal prüfen, bevor
Sie es wieder in Betrieb nehmen.

P2M009STD - Ver.1.2 16
DE
Wichtige sicherheitsanweisungen
30. Lagern Sie keine entflammbaren, explosiven oder flüchtigen Stoffe,
ätzende Säuren oder Alkalien im Gerät. Lagern Sie hochprozentigen
Alkohol nur aufrecht und fest verschlossen in dem Gerät. Gas- und
Flüssigkeitsbehälter können bei niedrigen Temperaturen undicht
werden. Bei der Funkenbildung durch elektrische Bauteile können
austretende entflammbare Stoffe entzündet werdeEns. besteht
Explosionsgefahr!
31. Achtung! Dieses Produkt ist zum Aufbewahren von Lebensmitteln in
Behältern geeignet. Stellen Sie keine Lebensmittel ohne Behälter hinein.
32. Brandgefahr! Beim Austreten des Kühlmittels trennen Sie das Gerät
vom Netz entfernen Sie alle Zündquellen in der Nähe, lüften Sie den
Raum und benachrichtigen Sie Ihren Kundendien st.Seien Sie sehr
vorsichtig, da das herausspritzende Kühlmittel schwere
Augenverletzungen verursachen kann. Details zum verwendeten
Kühlmittel finden Sie auf dem Typenschild.
33. Verwenden Sie keine mechanischen Hilfsmittel, Wärmequellen (wie
Kerzen oder Heizgeräte) oder andere Mittel, um das Abtauen zu
beschleunigen. Durch entstehenden Wasserdampf kann es zu
Kurzschlüssen kommen und zu starke Wärme kann
34. Vorsicht: Brandgefahr
35. Warnung – Halten Sie alle Lüftungsöffnungen im Gerätegehäuse oder in
der Konstruktion für den Einbau des Gerätes frei von Blockierungen.
36. Warnung – Verwenden Sie außer den vom Hersteller empfohlenen
keine mechanischen Vorrichtungen oder andere Hilfsmittel, um den
Abtauvorgang zu beschleunigen.
37. Warnung – Beschädigen Sie nicht den Kältemittelkreislauf.
38. Warnung – Benutzen Sie keine elektrischen Geräte in den Lebensmittel-
Aufbewahrungsfächern des Gerätes, sofern diese nicht von der Art wie
vom Hersteller empfohlen sind.
Bestimmungsgemässer gebrauch
1. Dieses Gerät ist ausschließlich für das Kühlen und Lagern von
Lebensmitteln und Getränken im Gewerbe konzipiert.

17 P2M009STD - Ver.1.2
DE
Bedienelemente
Barkühlschrank, 1 Flügeltür
1. Schloss
2. Ventilationsöffnung mit Rost
3. Gehäuse
4. Netzkabel mit Netzstecker
5. Rollen
6. Ein-/Ausschalter I/O
7. Bedienfeld
8. Regale
9. Innenraum
10. Tür
11. Lampe
Barkühlschrank, 2 Flügeltüren Barkühlschrank, Schiebetür
Barkühlschrank, 3 Flügeltüren Barkühlschrank, 3 Schiebetüren

P2M009STD - Ver.1.2 18
DE
Anleitungen für den Betrieb des Schranks und der Steuereinheit
Temperatureinstellung und Ü berwachung
Die Vorderseite des Thermostates
1. LED-Anzeige
2. Taste SET
3. Tasten
DE
Verbinden Sie den Netzstecker
(4) mit einer geeigneten Steckdose.
Der Kühlschrank ist eingeschaltet.
Das Thermostat (digitale Temperaturkontrolle) befindet sich am Boden des Gerätes.
Nach wenigen Sekunden zeigt die LED-Anzeige (12) die aktuelle Innentemperatur (9)
des Geräts. Der Kühlschrank beginnt automatisch auf die gewünschte Temperatur
zu kühlen.
Die voreingestellte Temperatur ab Werk beträgt zwischen 0°~8°C.J ustieren Sie
diese Temperatur innerhalb der ersten 24 Stunden nicht nach! Nach 24 Stunden
verändern Sie die Temperatur wenn nötig nur stufenweise.
Temperatur einstellen
Drücken Sie SET (13). Die LED-Anzeige (12) blinkt. Drücken Sie (14), um die
gewünschte Temperatur einzustellen. Drücken Sie erneut SET (13), um die
eingestellte Temperatur zu speichern.
Die LED-Anzeige (12) zeigt die aktuelle Innentemperatur des Geräts. Der
Kühlschrank beginnt automatisch auf die gewünschte Temperatur zu kühlen.
Lampe ein-/ausschalten
Drücken Sie den Ein-/Ausschalter I/0 (6), um die Lampe (11) ein- oder auszuschalten.
Tür abschließen
Stecken Sie den Schlüssel in das Schloss (1) und drehen Sie ihn um 90° entgegen
dem Uhrzeigersinn, um die Tür (10) abzuschließen.
Bitte vergewissern Sie sich doppelt, dass keine Personen im Inneren des
Kühlschranks eingeschlossen sind, bevor Sie die Tür verriegeln.
Seite wird geladen ...
Seite wird geladen ...
Seite wird geladen ...
Seite wird geladen ...
Seite wird geladen ...
Seite wird geladen ...
Seite wird geladen ...
Seite wird geladen ...
Seite wird geladen ...
Seite wird geladen ...
Seite wird geladen ...
Seite wird geladen ...
Seite wird geladen ...
Seite wird geladen ...
Seite wird geladen ...
Seite wird geladen ...
Seite wird geladen ...
Seite wird geladen ...
Seite wird geladen ...
Seite wird geladen ...
Seite wird geladen ...
Seite wird geladen ...
Seite wird geladen ...
Seite wird geladen ...
Seite wird geladen ...
Seite wird geladen ...
Seite wird geladen ...
Seite wird geladen ...
Seite wird geladen ...
Seite wird geladen ...
Seite wird geladen ...
Seite wird geladen ...
Seite wird geladen ...
Seite wird geladen ...
Seite wird geladen ...
Seite wird geladen ...
Seite wird geladen ...
Seite wird geladen ...
Seite wird geladen ...
Seite wird geladen ...
Seite wird geladen ...
Seite wird geladen ...
Seite wird geladen ...
Seite wird geladen ...
Seite wird geladen ...
Seite wird geladen ...
Seite wird geladen ...
Seite wird geladen ...
Seite wird geladen ...
Seite wird geladen ...
Seite wird geladen ...
Seite wird geladen ...
Seite wird geladen ...
Seite wird geladen ...
Seite wird geladen ...
Seite wird geladen ...
-
 1
1
-
 2
2
-
 3
3
-
 4
4
-
 5
5
-
 6
6
-
 7
7
-
 8
8
-
 9
9
-
 10
10
-
 11
11
-
 12
12
-
 13
13
-
 14
14
-
 15
15
-
 16
16
-
 17
17
-
 18
18
-
 19
19
-
 20
20
-
 21
21
-
 22
22
-
 23
23
-
 24
24
-
 25
25
-
 26
26
-
 27
27
-
 28
28
-
 29
29
-
 30
30
-
 31
31
-
 32
32
-
 33
33
-
 34
34
-
 35
35
-
 36
36
-
 37
37
-
 38
38
-
 39
39
-
 40
40
-
 41
41
-
 42
42
-
 43
43
-
 44
44
-
 45
45
-
 46
46
-
 47
47
-
 48
48
-
 49
49
-
 50
50
-
 51
51
-
 52
52
-
 53
53
-
 54
54
-
 55
55
-
 56
56
-
 57
57
-
 58
58
-
 59
59
-
 60
60
-
 61
61
-
 62
62
-
 63
63
-
 64
64
-
 65
65
-
 66
66
-
 67
67
-
 68
68
-
 69
69
-
 70
70
-
 71
71
-
 72
72
-
 73
73
-
 74
74
-
 75
75
-
 76
76


Casselin CAB1P Benutzerhandbuch
- Kategorie
- Raumheizungen
- Typ
- Benutzerhandbuch
in anderen Sprachen
- français: Casselin CAB1P Manuel utilisateur
- español: Casselin CAB1P Manual de usuario
- italiano: Casselin CAB1P Manuale utente
- português: Casselin CAB1P Manual do usuário
Verwandte Artikel
Andere Dokumente
-
Outsunny 84D-092 Benutzerhandbuch
-
Outsunny 84D-038CW Benutzerhandbuch
-
 COOL HEAD 712120 Benutzerhandbuch
-
AEG AIK3024R Benutzerhandbuch
-
Electrolux IK245SR Benutzerhandbuch
-
Electrolux IK329SAR Benutzerhandbuch
-
Electrolux IK3029SAL Benutzerhandbuch
-
Electrolux IK3026SAR Benutzerhandbuch
-
-
GGM Gastro TS600ND Bedienungsanleitung
