IKEA VINTERKALL – French Door Fridge Freezer Bedienungsanleitung
- Kategorie
- Gefrierschränke
- Typ
- Bedienungsanleitung

VINTERKALL GB
DE

ENGLISH
Please refer to the last page of this manual for the full list of IKEA
appointed After Sales Service Provider and relative national phone
numbers.
The electronic user manual is available at www.ikea.com.
For more information on energy consumption and other technical data of
this product, access the following web link: https://eprel.ec.europa.eu
Please record your model and serial numbers
below for reference.
Purchase Date
Model Number
Serial Number
Please attach sales receipt here for future
reference.
Installation checklist
Door
Door seals completely to cabinet on all sides
Door is level
Levelling
Refrigerator is level, side-to-side and
tilted ¼ in. (6mm) front-to-back
Cabinet is setting solid on all corners
Distance holder (anti-tip bracket) set
Electrical power
House power turned on
Refrigerator plugged in
Final Checks
Shipping material removed
Refrigerator and freezer temperatures set
Crisper temperature and humidity set

DEUTSCH
Auf der letzten Seite dieses Handbuchs nden Sie die vollständige Liste
der von IKEA ernannten Kundendienstpartner und die entsprechenden
nationalen Telefonnummern.
Das elektronische Benutzerhandbuch ist unter www.ikea.com verfügbar.
Weitere Informationen über den Energieverbrauch und andere
technische Daten dieses Produkts nden Sie unter folgendem Web-Link:
https://eprel.ec.europa.eu
Bitte notieren Sie Ihre Modell- und
Seriennummern unten zur Referenz.
Kaufdatum
Modellnummer
Seriennummer
Bitte fügen Sie den Kaufbeleg hier zur
späteren Bezugnahme bei.
Checkliste zur Installation
Tür
Tür dichtet allseitig vollständig zum Korpus ab
Tür ist ausgerichtet
Nivellierung
Der Kühlschrank ist von Seite zu Seite
ausgerichtet und von vorne nach hinten
6 mm geneigt
Der Korpus steht fest an allen Ecken
Der Abstandhalter (Kippsicherung) ist
montiert
Strom
Strom ist eingeschaltet
Kühlschrank ist angeschlossen
Abschließende Überprüfungen
Transportmaterial entfernt
Kühl- und Gefriertemperaturen eingestellt
Temperatur und Luftfeuchtigkeit der
Gemüseschublade eingestellt

ENGLISH 5
DEUTSCH 25

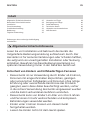
5ENGLISH
Contents
Safety information 5
Safety instructions 7
Installation 9
First use 11
Product description 12
Operation 13
Daily use 15
Hints and tips 17
Care and cleaning 18
Troubleshooting 20
Technical information 22
Environmental concerns 23
IKEA guarantee 23
Subject to change without notice.
Safety information
Before the installation and use of the appliance, carefully read
the supplied instructions. The manufacturer is not responsible
if an incorrect installation and use causes injuries and
damages. Always keep the instructions with the appliance for
future reference.
Children and vulnerable people safety
• This appliance can be used by children aged from 8years
and above and persons with reduced physical, sensory or
mental capabilities or lack of experience and knowledge if
they have been given supervision or instruction concerning
the use of the appliance in a safe way and understand the
hazards involved.
• This appliance may be used by children between 3 and
8years of age and persons with very extensive and complex
disabilities, if they have been properly instructed.
• Children of less than 3 years of age should be kept away
unless continuously supervised.
• Do not let children play with the appliance.
• Children shall not carry out cleaning and user maintenance
of the appliance without supervision.

6ENGLISH
• Children aged from 3 to 8 years are allowed to load and
unload refrigerating appliances.
• Keep all packaging away from children and dispose of it
appropriately.
General Safety
• This appliance is intended to be used in household and
similar applications such as:
- Farm houses; sta kitchen areas in shops, oces and
other working environments;
- By clients in hotels, motels, bed and breakfast and other
residential type environments;
• Keep ventilation openings, in the appliance enclosure or in
the built-in structure, clear of obstruction.
• Do not use mechanical devices or other means to accelerate
the defrosting process, other than those recommended by
the manufacturer.
• Do not damage the refrigerant circuit.
• Do not use electrical appliances inside the food storage
compartments of the appliance, unless they are of the type
recommended by the manufacturer.
• Do not use water spray and steam to clean the appliance.
• Clean the appliance with a moist soft cloth. Only use neutral
detergents. Do not use abrasive products, abrasive cleaning
pads, solvents or metal objects.
• Do not store explosive substances such as aerosol cans with
a ammable propellant in this appliance.
• If the supply cord is damaged, it must be replaced by the
manufacturer, its Authorised Service Centre or similarly
qualied persons in order to avoid a hazard.
• When positioning the appliance, ensure the supply cord is
not trapped or damaged.
• Do not locate multiple portable socket-outlets or portable
power supplies at the rear of the appliance.

7ENGLISH
• Opening the door for long periods can cause a signicant
increase of the temperature in the compartments of the
appliance.
• Clean regularly surfaces that can come in contact with food
and accessible drainage systems.
• Clean water tanks if they have not been used for 48 hours;
ush the water system connected to a water supply if water
has not been drawn for 5 days.
• Store raw meat and sh in suitable containers in the
refrigerator, so that it is not in contact with or drip onto
other food.
• If the refrigerating appliance is left empty for long periods,
switch o, defrost, clean, dry, and leave the door open to
prevent mould developing within the appliance.
• Two-star frozen-food compartments are suitable for storing
pre-frozen food, storing or making ice-cream and making
ice cubes.
• One-, two- and three-star compartments are not suitable for
the freezing of fresh food.
• This refrigerating appliance is not intended to be used as a
built-in appliance.
• The appliance is equipped with a lamp for interior lighting.
Only service is allowed to replace the lighting device.
Contact your Authorised Service Centre.
• WARNING: To avoid a hazard due to instability of the
appliance, it must be xed in accordance with the
instructions.
Safety instructions
Installation
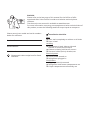
Warning! Only a qualied person can
install this appliance.
• Remove all the packaging and the transit
bolts.
• Do not install or use a damaged appliance.
• Follow the installation instruction supplied
with the appliance.
• Always take care when moving the
appliance as it is heavy. Always use safety
gloves and enclosed footwear.
• Make sure the air can circulate around the
appliance.

8ENGLISH
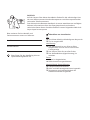
• Do not tilt the refrigerator for more
than 45° form upright during moving it.
• At rst installation wait at least 4 hours
before connecting the appliance to the
power supply. This is to allow the oil to ow
back in the compressor.
• Before carrying out any operations on the
appliance (e.g. re-installing the appliance),
remove the plug from the power socket.
• Do not install the appliance close to
radiators or cookers, oven or hobs.
• The rear of the appliance must stand
against the wall.
• Do not install the appliance where there is
direct sunlight.
• Do not install this appliance in areas that
are too humid or too colds, such as the
construction appendices, garages or wine
cellars.
• When you move the appliance, lift it by the
front edge to avoid scratching the oor.
Electrical connection
Warning! Risk of re and electrical shock.
Warning! When positioning the appliance,
ensure the supply cord is not trapped or
damaged.
Warning! Do not use multi-plug adapters
and extension cables.
• The appliance must be earthed.
• Make sure that the parameters on the rating
plate are compatible with the electrical
ratings of the mains power supply.
• Always use a correctly installed shockproof
socket.
• Make sure not to cause damage to the
electrical components (e.g. mains plug,
mains cable, compressor). Contact the
Authorised Service Centre or an electrician
to change the electrical components.
• The mains cable must stay below the level of
the mains plug.
• Connect the mains plug to the mains socket
only at the end of the installation. Make sure
that there is access to the mains plug after
the installation.
• Do not pull the mains cable to disconnect
the appliance. Always pull the mains plug.
• UK and Ireland only. This appliance is tted
with a 13 A mains plug. If it is necessary to
change the mains plug fuse,use only a
13 A ASTA (BS 1362) fuse.
Use
Warning! Risk of injury, burns, electrical
shock or re.
The appliance contains ammable gas,
isobutane (R600a), a natural gas with a high
level of environmental compatibility. Be careful
not to cause damage to the refrigerant circuit
containing isobutane.
• The surface of the compressor becomes hot:
The surface of the compressor may become
hot under normal operation. Do not touch it
with hands.
• Do not change the specication of this
appliance.
• Do not put electrical appliances (e.g.ice
cream makers) in the appliance unless they
are stated applicable by the manufacturer.
• If damage occurs to the refrigerant circuit,
make sure that there are no ames and
sources of ignition in the room. Ventilate
the room.
• Do not let hot items to touch the plastic
parts of the appliance.
• Do not put soft drinks in the freezer
compartment. This will create pressure on
the drink container.
• Do not store ammable gas and liquid in the
appliance.
• Do not put ammable products or items
that are wet with ammable products in,
near or on the appliance.
• Do not touch the compressor or the
condenser. They are hot.
• Do not remove or touch items from the
freezer compartment if your hands are wet
or damp.
• Do not freeze again food that has been
thawed.
• Follow the storage instructions on the
packaging of frozen food.
Internal lighting
Warning! Risk of electric shock.
• The type of lamp used for this appliance is
for household appliances only. Do not use it
for house lighting.
Care and cleaning
Warning! Risk of injury or damage to the
appliance.

9ENGLISH
• Before maintenance, deactivate the
appliance and disconnect the mains plug
from the mains socket.
• This appliance contains hydrocarbons in the
cooling unit. Only a qualied person can do
the maintenance and the recharging of the
unit.
• Regularly examine the drain of the
appliance and if necessary, clean it. If the
drain is blocked, defrosted water collects in
the bottom of the appliance.
Service
• To repair the appliance contact the
Authorised Service Centre listed at the end
of this manual.
• Use original spare parts only.
Disposal
Warning! Risk of injury or suocation.
• Disconnect the appliance from the mains
supply.
• Cut o the mains cable and discard it.
• Remove the door to prevent children and
pets to be closed inside of the appliance.
• The refrigerant circuit and the insulation
materials of this appliance are ozone-
friendly.
• The insulation foam contains ammable
gas. Contact your municipal authority for
information on how to discard the appliance
correctly.
• Do not cause damage to the part of the
cooling unit that is near the heat exchanger.
Installation
Warning! Refer to Safety chapters.
Positioning
• Follow the separate Assembly Instructions
to install this appliance.
• This appliance should be installed in a dry,
well ventilated indoor where the ambient
temperature corresponds to the climate
class indicated on the rating plate of the
appliance:
Climate class Ambient temperature
SN +10°C to +32°C
N +16°C to +32°C
ST +16°C to +38°C
T +16°C to +43°C
-"SN" indicates that this refrigerating
appliance is intended to be used at ambient
temperatures ranging from 10°C to 32°C.
-"N" indicates that this refrigerating
appliance is intended to be used at ambient
temperatures ranging from 16°C to 32°C.
-"ST" indicates that this refrigerating
appliance is intended to be used at ambient
temperatures ranging from 16°C to 38°C.
-"T" indicates that this refrigerating
appliance is intended to be used at ambient
temperatures ranging from 16°C to 43°C.
Some functional problems might occur
for some types of models when operating
outside of that range. The correct
operation can only be guaranteed within
the specied temperature range.
If you have any doubts regarding
installation, please turn to the vendor, to
our customer service or to the nearest
Authorised Service Centre.
Location
• To ensure best performance, install the
appliance well away from sources of heat
such as radiators, boilers, direct sunlight
etc. Make sure that air can circulate freely
around the back of the cabinet.
• Install the supplied distance holder to allow
enough space between the refrigerator and
the wall (refer to the separate Assembly
Instructions).
If the installation of the supplied distance
holder is not possible, leave a space of at
least 10cm between the appliance and the
wall, and at least 30cm between the top of
the appliance and the ceiling.
• Leave enough space to access and open the
door easily (W x D ≥ 1430 × 1000mm).

10ENGLISH
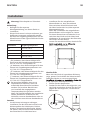
Levelling feet
If the appliance tilts in some way, adjust the
height of the left/right foot of the appliance
to level the appliance. Refer to the separate
Assembly Instructions for detailed installation.
1. Disconnect the mains plug of the appliance
from the power socket.
2. Turn the foot clockwise to raise the
appliance; turn the foot counter clockwise to
lower the appliance.
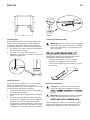
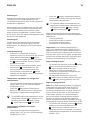
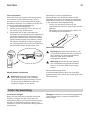
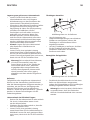
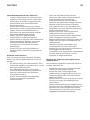
Levelling doors
If the doors of the appliance are not aligned,
adjust the height of the doors to be in a
horizontal level. Refer to the separate Assembly
Instructions for detailed installation.
1. Disconnect the mains plug of the appliance
from the power socket.
2. Raise the low door to align with the higher
door.
3. On the bottom of the low door, use a pair
of pliers (not supplied) to insert a supplied
fastener-ring into the gap between the
hinge and the hinge-grommet. Insert more
supplied fastener-rings for height increase
(if needed) until the two doors are aligned.
Unlevel Hinge-
grommet
Hinge
Installing distance holder
Warning! Serious or fatal crushing injuries
can occur from appliance tip-over. ALWAYS
secure this appliance to the wall using tip-
over restraints.
the appliance to the wall for the following
advantages. Refer to the separate Assembly
Instructions for detailed installation.
• Allow enough space for air circulation
between the appliance and the walls.
• Secure the appliance to the wall for tip-over
prevention.
Electrical connection
Caution! Any electrical work required to
install this appliance should be carried
person.
Warning! This appliance must be earthed.
Failure to follow these instructions can
The manufacturer declines any liability should
these safety measures not be observed. This
appliance complies with the E.E.C. Directives.
W
DD
135°

11ENGLISH
First use
Cleaning the interior
Before using the appliance for the rst
time,wash the interior and all internal
accessories with lukewarm water and same
neutral soap so as to remove the typical smell of
a brand new product, then dry thoroughly.
Important! Do not use detergents or abrasive
powders, as these will damage the nish.

12ENGLISH
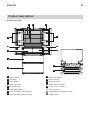
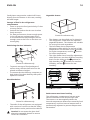
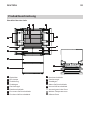
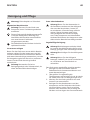
Product description
Product overview
1 2 3
4
5
6
7
8
9
10
11
12
13
1 Glass shelves
2 LED lamp
3 Door gasket
4 Door balconies
5 Bottle balcony
6 Vegetable drawer
7 Door for lower freezer drawer
8 Door for upper freezer drawer
9 Vegetable drawer
10 Bottle balcony
11 Door balconies
12 Upper freezer drawer
13 Lower freezer drawer
Least cold zone
Intermediate temperature zone
Coldest zone

13ENGLISH
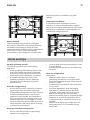
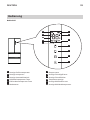
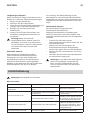
Operation
Control panel
12
11
10
9
8
1
2
3
4
5
6
7
1 Freezer temperature indicator
2 Unlock indicator
3 Auto mode indicator
4 Refrigerator temperature button
5 Freezer temperature button
6 Mode button
7 Unlock button
8 Super freezing indicator
9 Super cooling indicator
10 Temperature display
11 Cooling function o indicator
12 Refrigerator temperature indicator

14ENGLISH
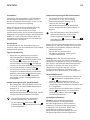
Switching on
Connect the mains plug to the power socket.
The display on the control panel turns on.
To change temperature, refer to the section for
temperature regulation.
When operating the appliance for the rst time,
set the appliance at a colder temperature and
run it without loading any food until it auto
stops at the set temperature. Usually it takes
2or 3 hours, then set a desired temperature and
put food in the appliance.
Switching o
To disconnect the appliance from the power
supply, disconnect the mains plug from the
power socket. The display on the control panel
turns o.
Locking/unlocking
• If the door is closed and no button
operation occurs for 30 seconds, the control
panel will be locked and the 2 unlock
indicator on the display will turn o. When
the 2 unlock indicator turns o, button
operation is invalid.
• To lock or unlock the control panel, press
and hold the 7 Unlock button on the
control panel for 3 seconds. When the
control panel is unlocked, the 2 unlock
indicator on the display turns on and button
operation is available.
Temperature regulation for refrigerator
compartment
• The refrigerator compartment temperature
ranges from 2°C to 8°C, and the default
temperature is 5°C.
• Press the 4 Refrigerator temperature
button on the control panel to change the
refrigerator compartment temperature.
To manually adjust the temperature of the
refrigerator compartment, deactivate the
following functions: 9 super cooling,
8 super freezing and 3 auto mode.
Temperature regulation for freezer
compartment
• The freezer compartment temperature
ranges from -16°C to -24°C, and the default
temperature is -18°C.
• Press the 5 Freezer temperature button
on the control panel to change the freezer
compartment temperature.
To manually adjust the temperature of
the freezer compartment, deactivate the
following functions: 9 super cooling,
8 super freezing and 3 auto mode.
Adjust the temperature setting by keeping in
mind that the temperature inside the appliance
depends on:
• room temperature
• how often the door is opened
• the quantity of food stored
• the location of the appliance
Important! If the ambient temperature is
high or the appliance is fully loaded, and the
appliance is set to the lowest temperatures, it
may run continuously causing frost to form on
the rear wall. In this case a higher temperature
must be set to allow automatic defrosting and
therefore reduced energy consumption.
Super cooling function
• To activate the function, press the 6 Mode
button on the control panel until the
9 super cooling indicator turns on.
• When the function is activated, the
refrigerator compartment temperature is
automatically xed at 2°C.
• To deactivate the function, press the
6 Mode button to select another function.
The 9 super cooling indicator turns o.
Super freezing function
Note: The super freezing function is designed
to maintain the nutritional value of food in
the freezer compartment. It can freeze the
food in the shortest time. If a large amount of
food is frozen at one time or the food needs
to be frozen quickly, it is recommended to
turn on the super freezing function and put
the food in. At this time, freezing speed of
freezer compartment will be increased. Energy
consumption increases while the function is ON.
• To activate the function, press the 6 Mode
button on the control panel until the
8 super freezing indicator turns on.
• When the function is activated, the freezer
compartment temperature is automatically
xed at -24°C.

15ENGLISH
• To deactivate the function, press the
6 Mode button to select another function.
The 8 super freezing indicator turns o.
• The super freezing function will be turned
o automatically after 24h.
Auto mode
• To activate the function, press the 6 Mode
button on the control panel until the
3 auto mode indicator turns on.
• When the function is activated, the
refrigerator compartment temperature is
automatically xed at 5°C, and the freezer
compartment temperature xed at -18°C.
• To deactivate the function, press the
6 Mode button to select another function.
The 3 auto mode indicator turns o.
Door opening sound
• When opening the door, the buzzer will
sound as a reminder.
• Press and hold the 4 and 5 button at the
same time for 3 seconds to deactivate or
activate the door opening sound function.
Door opening alarm
• If the door is left open for two minutes,
the buzzer will sound continuously until
the door is closed. To switch the buzzer o,
close the door or press any button.
Daily use
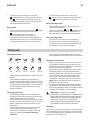
Freezing calendar
3-6
1-2
10 -12
3-4
10 -12
3-6
10 -12
3-6
10 -12
3-6
• The symbols show dierent types of frozen
goods.
• The numbers indicate storage times in
months for the appropriate types of frozen
goods. Whether the upper or lower value of
the indicated storage time is valid depends
on the quality of the foods and treating
before freezing.
Freezing fresh food
• The freezer compartment is suitable for
freezing fresh food and storing frozen and
deep-frozen food for a long time.
• The maximum amount of food that can be
frozen in 24 hours is specied on the rating
plate, a label located on the inside of the
appliance.
• To freeze the maximum amount of food,
super freezing function needs to be
activated. To activate the super freezing
function, please read Super freezing
function.
• The freezing process lasts 24 hours: during
this period do not add other food to be frozen.
Storage of frozen food
• When rst starting-up or after a period out
of use, before putting the products in the
compartment let the appliance run at least
2hours on the colder setting.
• Successful freezing depends on the correct
packaging. When you close and seal the
package you must not allow air or moisture
in or out. If you do, you could have food
odour and taste transfer throughout the
refrigerator, and also dry out frozen food.
• Note: Never put bottled food or drinks in
the freezer compartment.
• For best performance, leave enough space in
the freezer compartment for air to circulate
around the packages. Also let enough room at
the front so the door can close tightly.
Warning! In the event of accidental
defrosting, for example due to a power failure,
if the power has been o for longer than the
value shown in the technical characteristics
chart under “rising time”, the defrosted
food must be consumed quickly or cooked
immediately, cooled and then re-frozen.
Thawing
Deep-frozen or frozen food, prior to being used,
can be thawed in the refrigerator compartment
or at room temperature, depending on the time
available for this operation.

16ENGLISH
Small pieces may even be cooked still frozen,
directly from the freezer: in this case, cooking
will take longer.
Storage of food in the refrigerator
compartment
• Cover or wrap the food, particularly if it has
a strong avour.
• Position the food so that air can circulate
freely around it.
• For best performance, leave enough space
in the refrigerator compartment for air
to circulate around the packages. Also let
enough room at the front so the door can
close tightly.
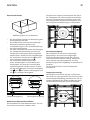
Positioning the door balconies
Picture for reference only
1
1
2
• To permit storage of food packages of
various sizes, the door balconies can be
placed at dierent heights.
• To remove the door balcony, compress on
both sides of the door balcony then pull it
upward to remove.
Movable shelves
Picture for reference only
• The walls of the refrigerator are equipped
with a series of runners so that the safety
glass shelves can be positioned as desired.
Caution! Do not move the glass shelf
above the vegetable drawer to ensure
correct air circulation.
Vegetable drawer
Picture for reference only
• The drawers can be pulled out for cleaning.
• The refrigerator comes with two separate
vegetable drawers. The drawers are suitable
for storing fruit and vegetables.
• The left drawer has a temperature
adjustment slider which can set low or high
temperature. Set the slider to the position
for higher temperature, and the position
for lower temperature.
• The right drawer has a humidity adjustment
slider which can set three dierent humidity
levels. Set the slider to the position for
high humidity, the position for medium
humidity, and the position for low
humidity.
Temperature control Humidity control
Radar sensor monitored cooling
The refrigerator compartment has two radar
sensors installed on the internal right side.
The sensors can automatically detect the
internal temperature dierences caused by food
temperature, and thus internal temperature is
automatically adjusted to prevent temperature
uctuations.

17ENGLISH
Odour removal
The refrigerator compartment is equipped
with a air purier which uses unique platinum
sterilization technology to purify air from
unwanted odours. Natural ions can be released
all the time to create sterile and healthy
environment in the refrigerator compartment.
Platinum fresh has no need for any lter
change.
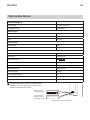
Temperature indicator
In accordance with regulations in some
countries, it must be provided with a special
device (see the gure below) placed in the lower
refrigerator compartment of the appliance to
indicate the coldest zone of it.
Hints and tips
Normal operating sounds
The following sounds are normal during
operation:
• A faint gurgling and bubbling sound from
coils sound when refrigerant is pumped.
• A whirring and pulsating sound from the
compressor when refrigerant is pumped.
• A sudden cracking noise from inside
appliance caused by thermic dilatation
(a natural and not dangerous physical
phenomenon).
Hints for energy saving
• Do not open the door frequently or leave it
open longer than absolutely necessary.
• If the ambient temperature is high and very
low internal temperature is set and the
appliance is fully loaded, the compressor
may run continuously, causing frost or ice
on the evaporator. If this happens, set the
internal temperature toward warmer one to
allow automatic defrosting and so a saving
in electricity consumption.
Hints for fresh food refrigeration
• Do not store warm food or evaporating
liquids in the refrigerator.
• Cover or wrap the food, particularly if it has
a strong avour.
• Position food so that air can circulate freely
around it.
Hints for refrigeration
Useful hints:
• Meat (all types): wrap in a suitable
packaging and place it on the glass shelf
above the vegetable drawer. Store meat for
at most 1-2 days.
• Cooked foods, cold dishes: cover and place
on any shelf.
• Fruit and vegetables: clean thoroughly
and place in a special drawer. Bananas,
potatoes, onions and garlic must not be
kept in the refrigerator if not packed.
• Butter and cheese: place in a special airtight
container or wrap in an aluminium foil or
a polythene bag to exclude as much air as
possible.
• Bottles: close with a cap and place on the
door bottle shelf, or (if available) on the
bottle rack.

18ENGLISH
Cautions for Use
• The more food stu put in or the more and
the longer for once the door is opened, the
more it needs electric consumption, which
even leads malfunction.
• Re-plug in the power plug at the interval of
over ten minutes.
• Do not store bottled drink in the freezer,
so as to prevent from being broken and
damaging the refrigerator.
• Open the door as less as possible during
power-cut.
• When defrosting, never use any sharp or
metallic objects to remove the frost on the
surface of the evaporator as it will damage
the evaporator.
• Do not touch foods and containers in the
freezing compartment with your wet hands
so as to prevent from being frostbitten.
Hints for freezing
To help you make the most of the freezing
process, here are some important hints:
• The maximum quantity of food which can
be frozen in 24hours is shown on the rating
plate.
• The freezing process takes 24hours. No
further food to be frozen should be added
during this period.
• Freeze only top quality, fresh and
thoroughly cleaned, foodstus.
• Prepare food in small portions to enable it
to be rapidly and completely frozen and to
make it possible subsequently to thaw only
the quantity required.
• Wrap up the food in aluminium foil or
polythene and make sure that the packages
are airtight.
• Do not allow fresh, unfrozen food to touch
food which is already frozen, thus avoiding a
rise in temperature of the latter.
• Lean foods store better and longer than
fatty ones; salt reduces the storage life of
food.
• Water ices, if consumed immediately after
removal from the freezer compartment, can
possibly cause the skin to be freeze burnt.
• It is advisable to show the freezing in date
on each individual pack to enable you to
keep tab of the storage time.
Hints for storage of frozen food
To obtain the best performance from this
appliance, you should:
• Make sure that the commercially frozen
foodstus were adequately stored by the
retailer.
• Make sure that frozen foodstus are
transferred from the food store to the
freezer in the shortest possible time.
• Do not open the door frequently or leave it
open longer than absolutely necessary.
• Once defrosted, food deteriorates rapidly
and cannot be refrozen.
• Do not exceed the storage period indicated
by the food manufacturer.
Care and cleaning
Warning! Refer to Safety chapters.
General warnings
Caution! Unplug the appliance before
carrying out any maintenance operation.
This appliance contains hydrocarbons
in its cooling unit; maintenance and
recharging must therefore only be carried
out by authorized technicians.
The accessories and parts of the appliance
are not suitable for washing in a
dishwasher.
Cleaning the interior
Before using the appliance for the rst time, the
interior and all internal accessories should be
washed with lukewarm water and some neutral
soap to remove the typical smell of a brand-new
product, then dried thoroughly.
Caution! Do not use detergents or
abrasive powders, as these will damage
the nish.

19ENGLISH
Initial power on
Caution! Before inserting the power
plug in to the outlet and switching on
the cabinet for the rst time, leave the
appliance standing upright for at least
4hours. This will assure a sucient
amount of time for the oil to return to the
compressor. Otherwise the compressor
or electronic components may sustain
damage.
Periodic cleaning
Caution! Do not pull, move or damage any
pipes and/or cables inside the cabinet.
Caution! Do not damage the cooling
system.
Caution! When moving the cabinet, lift it
by the front edge to avoid scratching the
oor.
The equipment has to be cleaned regularly:
1. Clean the inside and accessories with
lukewarm water and some neutral soap.
2. Regularly check the door gaskets and wipe
clean to ensure they are clean and free from
debris.
3. Rinse and dry thoroughly.
4. If accessible, clean the condenser and the
compressor at the back of the appliance
with a brush. This operation will improve
the performance of the appliance and save
electricity consumption.
Periods of non-operation
When the appliance is not in use for long
periods, take the following precautions:
1. Disconnect the appliance from electricity
supply.
2. Remove all food.
3. Defrost (if necessary) and clean the
appliance and all accessories.
4. Clean the appliance and all accessories.
5. Leave the door/doors open to prevent
unpleasant smells.
Caution! If you want to keep the appliance
switched on, ask somebody to check it
once in a while to prevent the food inside
from spoiling in case of a power failure.
Defrosting fridge compartment
Frost is automatically eliminated from the
evaporator of the refrigerator compartment
every time the motor compressor stops,
during normal use. The defrost water drains
out through a trough into a special container
at the back of the appliance, over the motor
compressor, where it evaporates.
It is important to periodically clean the defrost
water drain hole at the back of the refrigerator
compartment to prevent the water overowing
and dripping onto the food inside.
Defrosting freezer compartment
The freezer compartment has automatic
defrosting function.
Due to seasonal changes, a thick layer of frost
may form. To defrost manually, observe the
followings.
• Disconnect the appliance from the power
supply, and leave open the freezer door.
• Remove all foods, ice cube tray and shelf or
transfer to refrigerator compartment.
• Clean and wipe out the melted frost with a
cloth.
• After defrosting, connect the appliance to
the power supply.
Caution! To avoid damaging the freezer
compartment wall, do not use any sharp
objects to remove the frost or separate the
frozen food.

20ENGLISH
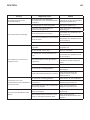
Troubleshooting
Warning! Refer to Safety chapters.
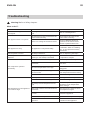
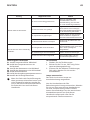
What to do if...
Problem Possible Cause Solution
The doors of the appliance are
not aligned.
The height of the doors are not in a
level. Refer to "Levelling doors".
The appliance does not operate.
The mains plug is not connected to the
mains socket correctly.
Connect the mains plug to the
mains socket correctly.
There is no voltage in the mains socket.
Connect a dierent electrical
appliance to the mains socket.
Contact a qualied electrician.
The appliance is noisy. The appliance is not placed stably.
Level the feet of the appliance
to stabilize it. Refer to "Levelling
feet", or the separate Assembly
Instructions.
The lamp does not work. The lamp is defective. Refer to “Replacing the lamp”.
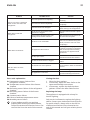
The temperature cannot be
adjusted.
A control mode (super cooling, super
freezing or auto mode) is activated.
Deactivate the control mode. Refer
to “Operation” chapter.
The compressor operates
continually.
Temperature is set incorrectly. Refer to “Operation” chapter.
Many food products were inserted at the
same time.
Insert less food products at the
same time.
The room temperature is too high. Refer to climate class chart on the
rating plate.
Food products placed in the appliance
were too warm.
Allow food products to cool to
room temperature before storing.
The door is not closed correctly. Refer to “Closing the door”.
The temperature in the appliance
is too low/too high.
The temperature is not set correctly. Set a higher/lower temperature.
The door is not closed correctly. Refer to “Closing the door”.
The food products temperature is too
high.
Let the food products temperature
decrease to room temperature
before storage.
Many food products are inserted at the
same time.
Wait some hours and then check
the temperature again.
The thickness of the frost is greater than
4-5mm. Defrost the appliance.
The door has been opened often. Open the door only if necessary.
There is no cold air circulation in the
appliance.
Make sure that there is cold air
circulation in the appliance.
Seite wird geladen ...
Seite wird geladen ...
Seite wird geladen ...
Seite wird geladen ...
Seite wird geladen ...
Seite wird geladen ...
Seite wird geladen ...
Seite wird geladen ...
Seite wird geladen ...
Seite wird geladen ...
Seite wird geladen ...
Seite wird geladen ...
Seite wird geladen ...
Seite wird geladen ...
Seite wird geladen ...
Seite wird geladen ...
Seite wird geladen ...
Seite wird geladen ...
Seite wird geladen ...
Seite wird geladen ...
Seite wird geladen ...
Seite wird geladen ...
Seite wird geladen ...
Seite wird geladen ...
Seite wird geladen ...
Seite wird geladen ...
Seite wird geladen ...
Seite wird geladen ...
Seite wird geladen ...
Seite wird geladen ...
Seite wird geladen ...
Seite wird geladen ...
-
 1
1
-
 2
2
-
 3
3
-
 4
4
-
 5
5
-
 6
6
-
 7
7
-
 8
8
-
 9
9
-
 10
10
-
 11
11
-
 12
12
-
 13
13
-
 14
14
-
 15
15
-
 16
16
-
 17
17
-
 18
18
-
 19
19
-
 20
20
-
 21
21
-
 22
22
-
 23
23
-
 24
24
-
 25
25
-
 26
26
-
 27
27
-
 28
28
-
 29
29
-
 30
30
-
 31
31
-
 32
32
-
 33
33
-
 34
34
-
 35
35
-
 36
36
-
 37
37
-
 38
38
-
 39
39
-
 40
40
-
 41
41
-
 42
42
-
 43
43
-
 44
44
-
 45
45
-
 46
46
-
 47
47
-
 48
48
-
 49
49
-
 50
50
-
 51
51
-
 52
52


IKEA VINTERKALL – French Door Fridge Freezer Bedienungsanleitung
- Kategorie
- Gefrierschränke
- Typ
- Bedienungsanleitung
in anderen Sprachen
Verwandte Artikel
-
IKEA 704.901.23 Benutzerhandbuch
-
IKEA UPPKALLA Benutzerhandbuch
-
IKEA MEDGANG Benutzerhandbuch
-
-
-
-
-
-
-
Andere Dokumente
-
Hisense FV298N4AWE Benutzerhandbuch
-
Haier H3F-320WTAAU1H3F-320WTAAU1 Benutzerhandbuch
-
Haier HFW7918EIMB(UK) Benutzerhandbuch
-
-
Koenic KDD 111 E NF Bedienungsanleitung
-
Emerio SDR-129286 Benutzerhandbuch
-
-
Emerio SDR-129285 Benutzerhandbuch