Haier HAKWBD 60 Benutzerhandbuch
- Kategorie
- Weinkühler
- Typ
- Benutzerhandbuch
Dieses Handbuch ist auch geeignet für


LANGUAGES
SL
GB English
CZ Čeština
DE Deutsch
ES Español
FR Français
IT Italiano
PL Polish
PT Portugues
Slovak

1
INSTRUCTION MANUAL
FOR WINE COOLER
MODEL NO.
JG45B
Thanks for buying our wine cooler, Hope our advanced product will give your wine a
different joyful taste. Before use, please read and follow all safety rules and operating
instructions.
EN

2
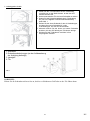
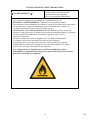
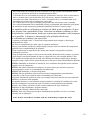
WARNING!
• To prevent damaging the door gasket, make sure to have the door all the way opened when
pulling shelves out of the rail compartment.
•The appliance must be positioned so that the plug is accessible. Release the electric cord.
Move your cabinet to its final location. Do not move your Cabinet while loaded with wine.
You might distort the body. The wine cellar should be installed in a suitable place in order
to avoid Touching the compressor with the hand.
Children should be supervised to ensure that they do not play with the appliance.
•If the supply cord is damaged, it must be replaced by manufacturer of its Service agent or a
similarly qualified person in order to avoid a hazard.
This appliance can be used by children aged from 8 years and above and persons
with reduced physical, sensory or mental capabilities or lack of experience and
knowledge if they have been given supervision or not play with the appliance.
Cleaning and user maintenance shall not be made by children without
supervision.
Children aged from 3 to 8 years are not allowed to load and unload wine cooler.
To avoid contamination of wine, please respect the following instructions:
- Opening the door for long periods can cause a significant increase of the temperature in the
compartments of the appliance.
-Clean regularly surfaces that can come in contact with bottles and accessible drainage
systems.
- Clean water tanks if they have not been used for 48 h; flush the water system connected to a
water supply if water has not been drawn for 5 days.
-
If the refrigerating appliance is left empty for long periods, switch off, defrost, clean, dry, and
leave the door open to prevent mould developing within the appliance.
-WARNING: Keep ventilation openings, in the appliance enclosure or in the built-in
structure, clear of obstruction.
-WARNING: Do not use mechanical devices or other means to accelerate the defrosting
process, other than those recommended by the manufacturer.
-WARNING: Do not damage the refrigerant circuit.
-WARNING: Do not use electrical appliances inside the food storage compartments of the
appliance, unless they are of the type recommended by the manufacturer.
Do not store explosive substances such as aerosol cans with a flammable propellant in this
appliance.
This appliance is intended to be used in household and similar applications such as
- staff kitchen areas in shops, offices and other working environments;
- farm houses and by clients in hotels, motels and other residential type environments;
- bed and breakfast type environments;
-catering and similar non-retail applications.
-WARNING: To avoid a hazard due to instability of the appliance, it must be fixed in
accordance with the instructions.
PLEASE DON’T TRY TO PLUG INTO OR EXTENSION THE CABLE IN ANY
CASE.
EN

3
IMPORTANT SAFETY INSTRUCTIONS
WARNING
To reduce the risk of fire, electrical shock,
or injury when using your appliance,
follow these basic precautions:
•Read all instructions before using the Wine cooler.
•DANGER or WARNING: Risk of child entrapment.
Child entrapment and suffocation are not problems of the past. Junked or abandoned
appliances are still dangerous . . . even if they will “just sit in the garage a few days”.
•Before you throw away your old Wine cooler: Take off the door. Leave the
shelves in place so that children may not easily climb inside.
•Never allow children to operate, play with, or crawl inside the appliance.
•Never clean appliance parts with flammable fluids. The fumes can create a fire
hazard or explosion.
•Do not store or use gasoline or any other flammable vapors and liquids in the vicinity
of this or any other appliance. The fumes can create a fire hazard or explosion.
•If the refrigerant of these appliances are R600a , Flammable and explosive
articles should not be put in or near the cabinet, to avoid the fire or explode
caused.
-Save these instructions-
EN

4
INSTALLATION INSTRUCTIONS
Before Using Your Wine cooler
•Remove the exterior and interior packing.
•Before connecting the Wine cooler to the power source, let it stand upright for approximately 2 hours. This
will reduce the possibility of a malfunction in the cooling system from handling during transportation.
•Clean the interior surface with lukewarm water using a soft cloth.
•When disposing your appliance, please choose an authorized disposal site.
Installation of Your Wine Cooler
•This appliance is designed to be for free standing installation or built-in (fully recessed) (Refer to sticker
location the back of this appliance).
•This appliance is intended to be used exclusively for the storage of wine or beverages.
•Place your Wine cooler on a floor that is strong enough to support it when it is fully loaded. To level your
Wine cooler, adjust the front leveling leg at the bottom of the Wine cooler.
•This appliance is using flammability refrigerant.So never damage the cooling pipework during the
transportation.Locate the Wine cooler away from direct sunlight and sources of heat (stove, heater, radiator,
etc.). Direct sunlight may affect the acrylic coating and heat sources may increase electrical consumption.
Extreme cold ambient temperatures may also cause the unit not to perform properly.
•Avoid locating the unit in moist areas.
•Plug the Wine cooler into an exclusive, properly installed-grounded wall outlet. Do not under any
circumstances cut or remove the third (ground) prong from the power cord. Any questions concerning power
and/or grounding should be directed toward a certified electrician or an authorized Products service center.
Attention
•Store wine in sealed bottles;
•Do not overload the cabinet;
•Do not open the door unless necessary;
•Do not cover shelves with aluminum foil or any other shelf material which may prevent air circulation;
•Should the Wine cooler be stored without use for long periods it is suggested, after a careful cleaning, to leave
the door ajar to allow air to circulate inside the cabinet in order to avoid possible formations of condensation,
mold or odors.
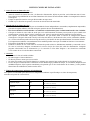
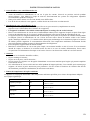
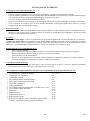
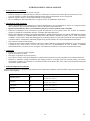
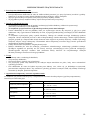
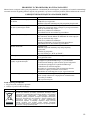
Ambient Room Temperature Limits
This appliance is designed to operate in ambient temperatures specified by its temperature class marked on the rating
plate.
Class Symbol Ambient Temperatures range
Extended Temperate SN +50℉ to + 90℉(+
10℃ to + 32℃)
Temperate N +60℉ to + 90℉(+
16℃ to + 32℃)
Subtropical ST +60℉ to + 100℉
(+ 16℃ to + 38℃)
Tropical T +60℉ to + 110℉
(+ 16℃ to + 43℃)
EN

5
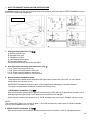
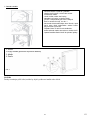
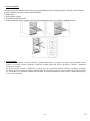
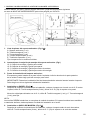
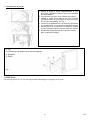
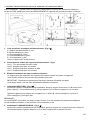
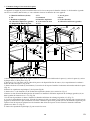
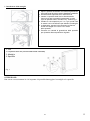
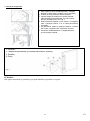
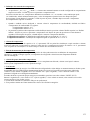
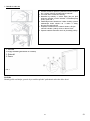
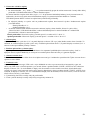
Installing the handle
CAUTION:
Do not over-tighten the screws as this may cause damage to the handle or to the door.
1. Open the door and carefully pull out the door gasket
only at the area where the handle is to be installed.
2. You will be able to see two screws inside the door.
3. Insert the screw cover in the arrow direction (only for
full glass door and slim stainless-steel door). see Fig
1
4. Drive the upper screw for 3 or 4 circles, and then
drive the lower screw for 3 or 4 circles for align the
handle
5. Alternatively tighten the upper and lower screw
until the handle is flush against the door frame.
6. Carefully press the door gasket into its original
position.
Screw
Screw covers (attached to manual bag)
Handle
Door
Fig 1
4
123
4
EN

6
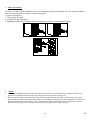
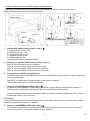
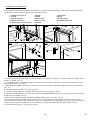
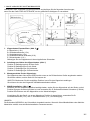
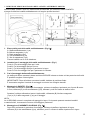
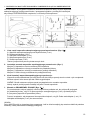
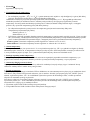
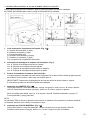
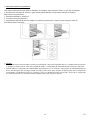
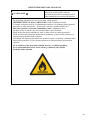
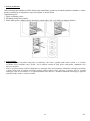
ANTI-TIP BRACKET INSTALLATION INSTRUCTIONS
WARNING: Please use the anti-tip bracket and following below instruction when FREE-STANDING to avoid
the unit TIPPING cause dangerous!
1. Anti-tip bracket parts list: (FigⅡ①)
A: Anti-tip bracket (1pc)
B: Hexagon bolt (1pc)
C: Hexagon nut (1pc)
D: Self-tapping screw (2pcs)
E:Expansion screw(1 pc)
Secure the bracket with the screws provided.
2. Anti-tip bracket mounting hold instruction: (FigⅠ)
Loc A: Fixed mounting hole for unit
Loc B: Fixed mounting holds for Real wall
Loc C: Fixed mounting holds for Wood floor
Loc D: Fixed mounting holds for Concrete floor
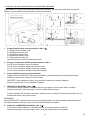
3. Anti-tip bracket installation steps:
The bracket can installed at the left bottom OR right bottom of the back of the unit. You can choose
which side is convenience for you.
IMPORTANT: Determine the final location of the range before attempting to install the bracket.
You need to choose below installation method one of three ways.
1 REAL WALL installation: (FigⅡ②)
After confirmed the install location, place the bracket on the floor with Loc B against the real wall, use D:
Self-tapping screw (2pcs) align Loc B and secure the bracket into real wall.
Move the unit to align to the bracket Loc A, use B: Hexagon bolt (1pc) and C: Hexagon nut (1pc) to fix.
NOTE:
The screws
MUST
enter
into
a wood
sill
plate. If
the wall contains any metal studs
or
similar materials,
then the floor installation must be
used
2. WOOD FLOOR installation: (FigⅡ③)
After confirmed the install location, place the bracket on the wood floor, used D: Self-tapping screw
Back of the
EN

7
(2pcs) align Loc C and secure the bracket into wood floor.
Move the unit to the align to the bracket Loc A, used B: Hexagon bolt (1pc) and C: Hexagon nut (1pc) to
fix.
3.CONCRETE FLOOR installation: (FigⅡ④)
After confirm the installed location, choose any hold of Loc D to secure the bracket into the concrete
floor
Using a
concrete
bit, drill Φ8mm pilot hold 45~55mm deep. Use E: Expansion screw (1 pc) enter
into the concrete, take out the nut, spring washer and washer. Align Loc D to E:Expansion screw(1 pc)
and put back the nut, spring washer and washer to fix on the concrete floor.
Move the unit to the align to the bracket Loc A, used B: Hexagon bolt (1pc) and C: Hexagon nut (1pc) to
fix.
ATTENTION:
Check the bracket: After installing the bracket, please try to using appropriate intensity to tipping the unit. If
the unit not tipping that means the bracket mounted securely, or MUST be reinstalled following these
instruction.
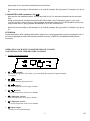
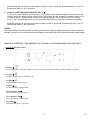
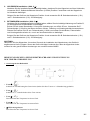
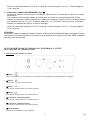
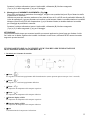
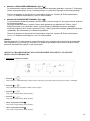
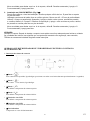
OPERATING YOUR WINE COOLER/BEVERAGE COOLER
AND SETTING THE TEMPERATURE CONTROL
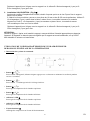
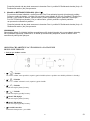
Control System Instruction
•① “ ” Button
To control this appliance turn on/off ( press and hold this buttons for approximately
3 seconds).
•② “ ” Button
To control the inner light turn on/off.
•③ “ ” Button
To set the temperature of the upper chamber.
•④ “ ” Button
To set the temperature of the lower chamber.
•⑤ LED display window
To set the temperature of the upper chamber.
•⑥ LED display window
To set the temperature of the lower chamber.
•⑦ indicator light
Compressor in operation display.
3 sec
1
2
3
4
5
6
7
3 sec
EN

8
Setting The Temperature Controls
•When pressing “ ” or “ ” button, the system will be entering the set up mode in the upper or lower
compartment automatically. The LED will start flashing and display the actual temperature.
Press once the button, the temperature will decrease or increase 1 ℃. When exceeding the minimum value that
can be established, it will jump to the highest adjustable temperature value automatically. After stopping pressing
the button for 5 seconds, LED figure will stop flash, then revert back to display the temperature of the upper or
lower compartment.
After the unit is unplugged, the system will return to the acquiescence temperature, which is set by the
factory. The acquiescence temperature is as below:
Upper compartment: 6 ℃
Lower compartment: 12 ℃
Upper compartment: The temperature setting can be adjusted from 5℃ to 10℃.
Lower compartment: The temperature setting can be adjusted from 10℃ to 18℃.
Temperature Alarm
If the temperature inside is higher than 23 ℃, it will display "HI" on the display panel, and after one hour after the alarm / buzzer
will sound. This indicates that the temperature inside is too high. If the temperature inside is lower than 0 ℃, it will display "LO"
on the display panel and at the same time the alarm also malfunction indicator is active.
Temperature Recollection Function
In the event of a power interruption, wine chiller can remember the previous temperature settings, and when the power
is recovery, the cooler temperature will go back the same setting temperature as power off.
Overtime Open the Door Alarm
When you forget close the door or the door is not closed completely, the buzzer alarm after 5 minutes. Please close the
door completely and avoid the cold energy was lost.
Internal light
In order to reduce energy consumption, the LED light within this wine cabinet will automatically switch off when
closed the door. If you would prefer the LED light to remain on continuously, this is possible. Please press and hold
the “LIGHT” bottom for 5 seconds, the display will show “LP”. After 4 seconds the display will revert back to normal
and the light will remain on until manually switched off.
If you would like to revert back and conserve energy (recommended), press and hold the “LIGHT” button for 5
seconds, the display will show “LF”. After 4 seconds the display will revert back to normal
the light will be on when door open and the light turn off when door closed.
Replaceable (LED only) light source by a professional
This product contains a light source of energy efficiency class G.
EN
If you want to display each actual indoor temperature, press the corresponding button " Set Upper " or " Set
Lower ", and the LED will flash and display the current temperature. After you stop pressing the button for 5
seconds, the LED figure will stop flashing, then revert back to show the set temperature.

9
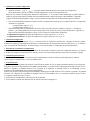
Shelves Instruction
Do not cover shelves with aluminum foil or any other material as this will impede air fl ow inside the cabinet
and can adversely affect the interior cabinet temperature.
To remove the shelves:
1. Fully extend the shelf.
2. Lift up the front of the shelf.
3. Holding the shelf track, push the shelf in and then up to release it from the rear dampers.
NOTE:
•If the unit is unplugged, power lost, or turned off, you must wait 3 to 5 minutes before restarting the unit. If you
attempt to restart before this time delay, the Wine cooler/beverage cooler will not start.
•When you use the Wine cooler/beverage cooler for the first time or restart the Wine cooler/beverage cooler after
having been shut off for a long time, there could be a few degrees variance between the temperature you select and
the one indicated on the LED readout. This is normal and it is due to the length of the activation time. Once the
Wine cooler/beverage cooler is running for a few hours everything will be back to normal.
EN

10
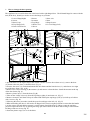
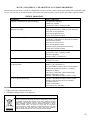
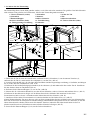
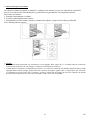
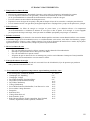
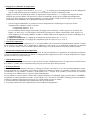
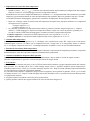
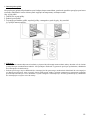
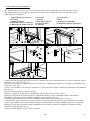
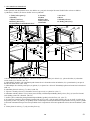
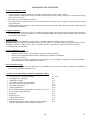
How to change the door opening
This appliance has reversible doors but is delivered with a right hinged door. The left hand hinge kit comes with the
unit (in the box), should you wish to reverse the hinge on your unit.
EN
1.Lower Hinge(Right)
4.Screws
7.Plastic Caps
10.Top Hinge(Left)
12.Door Limit Device
2.Screws
5.Actuator
8.Top Hinge
11.Hole Cover
13.Screw
3.Door Axis
6.Door
9.Hinge Screws
12.Lower Hinge(Left)
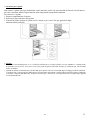
1.Open the door to a 90 degrees angle, take out the 2 screws (2) from lower door axis (3), remove the door
(6), Remove the axis plate (3) from the door. (Fig. A)
2.Unscrew the screw (14) located underneath the door frame and the limit device (13), and relocate it at right
top of the door frame. (Fig. A/B)
3.Remove two screws securing (4) the actuator (5) and remove it from the door. Install the actuator at the top
of the door frame.(Fig. A)
4.Remove plastic caps(7) from the door.(Fig.B)
5.Take out the 3 hinge screws (9) from the top hinge (right) (8) and remove it. (Fig. C)
6.Remove decorative nail from left top of cabinet and install spare top hinge (Left) (10) at left top of cabinet
with 3 screws. (Fig. D)
7.Following the above procedure, install the spare lower hinge to the left (12). (Fig. E)
8.When reinstalling the door, it will need to be flipped 180° from its original position to ensure that the handle
is on the correct side and that the actuator is on the bottom. Install the door by sliding it onto the top hinge
pin, then replace the door axis by placing the hinge pin in the bottom of the door and securing it to the bottom
left hinge with two screws.(Fig. E)
9. Insert the plastic caps(7) to cover the holes.

11
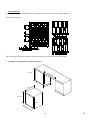
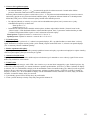
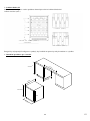
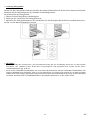
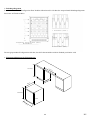
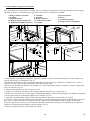
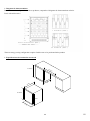
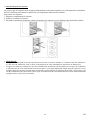
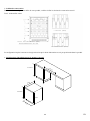
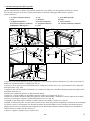
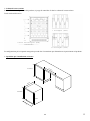
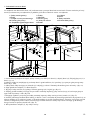
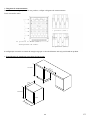
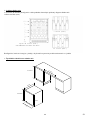
Storage diagram
According to the actual configuration of your product, please check the relative Storage diagram.
Total: 44 bottles (Max)
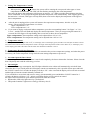
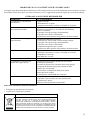
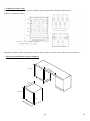
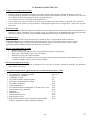
Installation specifications for built-in purposes
=
EN
The most energy-saving configuration requires food box not to be positioned in the product.
min
5
doo
72mm
inc
562mm
min 820mm
min600mm
813-833mm
595mm
723mm

12
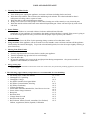
CARE AND MAINTENANCE
Cleaning Your Wine Cooler
•Turn off the power, unplug the appliance, and remove all items including shelves and rack.
•Wash the inside surfaces with a warm water and baking soda solution. The solution should be about 2
tablespoons of baking soda to a quart of water.
•Wash the shelves with a mild detergent solution.
•Wring excess water out of the sponge or cloth when cleaning area of the controls, or any electrical parts.
•Wash the outside cabinet with warm water and mild liquid detergent. Rinse well and wipe dry with a clean
soft cloth.
Power Failure
•Most power failures are corrected within a few hours and should not affect the
temperature of your appliance if you minimize the number of times the door is opened. If the power is going to
be off for a longer period of time, you need to take the proper steps to protect your contents.
Vacation Time
•Short vacations: Leave the Wine Cooler operating during vacations of less than three weeks.
•Long vacations: If the appliance will not be used for several months, remove all items and turn off the appliance.
Clean and dry the interior thoroughly. To prevent odor and mold growth, leave the door open slightly: blocking it
open if necessary.
Moving Your Wine Cooler
•Remove all items.
•Securely tape down all loose items (shelves) inside your appliance.
•Turn the adjustable leg up to the base to avoid damage.
•Tape the door shut.
•Be sure the appliance stays secure in the upright position during transportation. Also protect outside of
appliance with a blanket, or similar item.
Energy Saving Tips
•The Wine Cooler should be located in the coolest area of the room, away from heat producing appliances, and out of the
direct sunlight.
EN
The following (approximate) temperatures are recommended for wine drinking:
•For storing ALL TYPES OF WINES
•Champagne NV, Sparkling
•Champagne Vintage
•Dry White Semillon, Sauvignon Blanc
•Dry White Gewürztraminer, Riesling
•Dry White Chardonnay
•Vintage Chardonnay
•Sweet White Sauternes Monbazillac, Late Harvest ice wine
•Sweet whites vintage Sauternes
•Beaujolais
•Red Pinot Noir
•Vintage Pinot Noir red
•Red Grenache, Syrah
•Red Cabernet, Merlot, French, Australian, New Zealand,
Chilean, Argentinean, Italian, Spanish, Californian
12 – 14 °C
6 °C
10 °C
8 °C
10 °C
10 °C
14 °C
10 °C
14 °C
13 °C
16 °C
18 °C
16 °C
18 °C

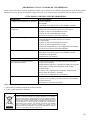
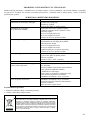
PROBLEMS WITH YOUR WINE COOLER/BEVERAGE COOLER?
You can solve many common Wine cooler/beverage cooler problems easily, saving you the cost of a possible service
call. Try the suggestions below to see if you can solve the problem before calling the servicer.
TROUBLESHOOTING GUIDE
PROBLEM POSSIBLE CAUSE
Wine cooler/beverage cooler does not operate. Not plugged in.
The appliance is turned off.
The circuit breaker tripped or a blown fuse.
Wine cooler/beverage cooler is not cold enough. Check the temperature control setting.
External environment may require a higher
setting.
The door is opened too often.
The door is not closed completely.
The door gasket does not seal properly.
Turns on and off frequently. The room temperature is hotter than normal.
A large amount of contents has been added to the
Wine cooler/beverage cooler.
The door is opened too often.
The door is not closed completely.
The temperature control is not set correctly.
The door gasket does not seal properly.
The light does not work. Not plugged in.
The circuit breaker tripped or a blown fuse.
The bulb has burned out.
The light button is “OFF”.
Vibrations. Check to assure that the Wine cooler/beverage
cooler is level.
The Wine cooler/beverage cooler seems to make
too much noise.
The rattling noise may come from the flow of the
refrigerant, which is normal.
As each cycle ends, you may hear gurgling
sounds caused by the flow of refrigerant in your
Wine cooler/beverage cooler.
Contraction and expansion of the inside walls
may cause popping and crackling noises.
The Wine cooler/beverage cooler is not level.
The door will not close properly. The Wine cooler/beverage cooler is not level.
The door was reversed and not properly installed.
The gasket is dirty.
The shelves are out of position.
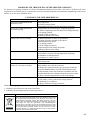
Before disposal of the appliance.
1. Disconnect the main plug from the main socket.
2. Cut off the main cable and discard it.
EN

1
NÁVOD K OBSLUZE VINOTÉKY
Č. MODELU:
JG45B
Děkujeme za nákup naší vinotéky, doufáme, že náš pokročilý produkt dodá vašemu vínu
novou příjemnou chuť. Před použitím si přečtěte a dodržujte všechna bezpečnostní pravidla
a návod k obsluze.
CZ

2
VAROVÁNÍ!
• Aby nedošlo k poškození těsnění dvířek, dbejte na to, abyste při vytahování polic
z kolejnicového prostoru měli dvířka zcela otevřená.
• Spotřebič musí být umístěn tak, aby byla zástrčka přístupná. Odpojte elektrický kabel.
Přemístěte spotřebič na konečné místo. Nepohybujte se spotřebičem naplněným vínem.
Mohlo by dojít k poškození těla spotřebiče. Vinotéka by měla být instalována na vhodném
místě, aby se zabránilo dotyku kompresoru rukou.
Děti by měly být pod dohledem, aby si se spotřebičem nehrály.
• Pokud se poškodí napájecí kabel, výměnu musí provést výrobce, jeho servisní zástupce
nebo osoby s podobnou kvalifikací, aby se vyloučilo riziko.
Tento spotřebič mohou používat děti starší osmi let a osoby s omezenými
fyzickými, smyslovými nebo duševními schopnostmi nebo osoby nezkušené
a neznalé za předpokladu, že jsou pod dohledem nebo si se spotřebičem nehrají.
Děti nesmějí provádět čištění a uživatelskou údržbu bez dozoru.
Děti ve věku od tří do osmi let nesmějí do této vinotéky vkládat potraviny a vyjímat je.
Dodržujte následující pokyny, aby nedošlo ke kontaminaci vína:
- Otevírání dvířek na delší dobu může významně zvýšit teplotu v jednotlivých
prostorech spotřebiče.
- Pravidelně čistěte povrchy, které mohou přijít do styku s lahvemi, a přístupné
vypouštěcí systémy.
- Pokud se nádrže na vodu nepoužívaly po dobu 48 h, vyčistěte je. Pokud nebyla vypuštěna
voda po dobu 5 dnů, propláchněte vodní systém připojený k přívodu vody.
- Pokud je chladicí spotřebič ponechán delší dobu prázdný, vypněte ho, odmrazte, vyčistěte,
vysušte a nechte otevřená dvířka, aby se zamezilo vzniku plísně uvnitř spotřebiče.
-VAROVÁNÍ: Zajistěte, aby ve skříni spotřebiče nebo v konstrukci pro vestavění
nic nezakrývalo větrací otvory.
-VAROVÁNÍ: K rozmrazování nepoužívejte mechanické nástroje ani jiné prostředky.
Používejte pouze prostředky doporučené výrobcem.
-VAROVÁNÍ: Nepoškoďte okruh chladiva.
-VAROVÁNÍ: Uvnitř prostoru pro skladování potravin ve spotřebiči nepoužívejte elektrické
spotřebiče, pokud se nejedná o spotřebiče doporučené výrobcem.
V tomto spotřebiči neskladujte výbušné látky, jako jsou nádoby s aerosolem, v nichž se používá
hořlavý hnací plyn.
Tento spotřebič je určen k používání v domácnostech a podobných oblastech, jako jsou:
- kuchyňky pro personál v obchodech, kancelářích a na dalších pracovištích;
- chalupy a hotely, motely a další obytné objekty, kde je používají zákazníci;
- ubytovací zařízení typu penzionu se snídaní;
- cateringové služby a podobné aplikace, ve kterých se nejedná o maloobchodní prodej.
-VAROVÁNÍ: Spotřebič se musí upevnit podle pokynů, aby se předešlo vzniku rizika
v důsledku jeho nestability.
V ŽÁDNÉM PŘÍPADĚ SE NEPOKOUŠEJTE KABEL ZAPOJOVAT
NEBO PRODLUŽOVAT.
CZ

3
DŮLEŽITÉ BEZPEČNOSTNÍ POKYNY
VAROVÁNÍ
Abyste snížili riziko požáru, úrazu elektrickým
proudem nebo zranění při používání spotřebiče,
dodržujte tato základní bezpečnostní opatření:
• Před používáním vinotéky si přečtěte všechny pokyny.
•NEBEZPEČÍ nebo VAROVÁNÍ: Nebezpečí uzavření dětí.
Uvěznění a udušení dítěte nejsou problémy minulosti. Vyřazené nebo opuštěné
spotřebiče jsou stále nebezpečné, i když „leží jen pár dní leží v garáži“.
•Než vyhodíte svou starou vinotéku: Odstraňte dvířka. Nechte police na místě,
aby děti nemohly snadno vlézt dovnitř.
•Nikdy nedovolte dětem, aby se spotřebičem manipulovaly, hrály si s ním nebo do něj lezly.
• Nikdy nečistěte části spotřebiče hořlavými kapalinami. Výpary mohou způsobit
nebezpečí požáru nebo výbuchu.
• V blízkosti tohoto ani jiného spotřebiče neskladujte ani nepoužívejte benzín nebo jiné
hořlavé výpary a kapaliny. Výpary mohou způsobit nebezpečí požáru nebo výbuchu.
•Pokud je chladivo těchto spotřebičů R600a, neměly by se do skříně nebo do její
blízkosti vkládat hořlavé a výbušné předměty, aby nedošlo k požáru nebo výbuchu.
-Uschovejte si tyto pokyny-
CZ

4
POKYNY PRO INSTALACI
Před použitím vinotéky
•Odstraňte vnější a vnitřní obalový materiál.
•Než připojíte vinotéku k napájení, nechte ji přibližně dvě hodiny stát ve vzpřímené poloze. Tím se sníží
pravděpodobnost závady chladicího systému v důsledku zacházení během přepravy.
•Vyčistěte vnitřní povrch vlažnou vodou a měkkou látkou.
•Při likvidaci spotřebiče zvolte autorizované místo likvidace.
Instalace vinotéky
•Tento spotřebič je určen k volně stojící instalaci nebo k vestavbě (zcela zapuštěné) (viz nálepka umístěná na zadní
straně spotřebiče).
•Tento spotřebič je určen výhradně ke skladování vína nebo nápojů.
•Položte vinotéku na podlahu, která je dostatečně pevná, aby ji unesla i při plném zatížení. Chcete-li vinotéku vyrovnat,
nastavte přední vyrovnávací nohu ve spodní části vinotéky.
•Tento spotřebič používá hořlavé chladivo. Při přepravě proto nikdy nepoškoďte chladicí trubky. Umístěte vinotéku
mimo dosah přímého slunečního světla a zdrojů tepla (sporáku, ohřívače, radiátoru atd.). Přímé sluneční světlo
by mohlo ovlivnit akrylový povlak a zdroje tepla by mohly zvýšit spotřebu elektřiny. Správnou funkčnost spotřebiče
může ovlivňovat také extrémně nízká teplota okolí.
•Neumisťujte spotřebič do vlhkých prostorů.
•Zapojte vinotéku do samostatné, správně nainstalované a uzemněné nástěnné zásuvky. Za žádných okolností
z napájecího kabelu neodstřihávejte ani neodstraňujte třetí (uzemňovací) kolík. S veškerými dotazy ohledně napájení
a/nebo uzemnění byste se měli obracet přímo na kvalifikovaného elektrikáře nebo autorizované servisní středisko.
Pozor
•Víno skladujte v uzavřených lahvích;
•Vinotéku nepřetěžujte;
•Neotvírejte dvířka, pokud to není nutné;
•Nezakrývejte police hliníkovou fólií ani jiným materiálem, který by mohl bránit cirkulaci vzduchu;
•Pokud je vinotéka delší dobu skladována bez použití, doporučujeme po pečlivém vyčištění nechat dvířka pootevřená,
aby uvnitř mohl cirkulovat vzduch a zabránilo se tak možnému vzniku kondenzace, plísní nebo zápachu.
Limity okolní teploty v místnosti
Tento spotřebič je určen k provozu při okolních teplotách, které jsou specifikovány teplotní třídou vyznačenou
na typovém štítku.
Třída
Symbol
Rozsah okolních teplot
Subnormální SN
(+50 °F až +90 °F)
+10 °C až +32 °C
Normální N
(+60 °F až +90 °F)
+16 °C až +32 °C
Subtropická ST
(+60 °F až +100 °F)
+16 °C až +38 °C
Tropická T
(+60 °F až +110 °F)
+16 °C až +43 °C
CZ

5
Instalace madla
1. Otevřete dvířka a opatrně vytáhněte
těsnění dveří pouze v místě, kde má být
instalováno madlo.
2. Uvnitř dvířek uvidíte dva šrouby.
3. Nasaďte kryt šroubu ve směru šipky
(pouze u celoprosklených dveří a úzkých
dveří z nerezové oceli), viz obr. 1.
4. 3krát nebo 4krát zašroubujte horní šroub a poté
3krát nebo 4krát zašroubujte spodní šroub,
aby se madlo vyrovnalo.
5. Případně horní a dolní šroub dotáhněte,
dokud nebude madlo zarovnáno s rámem dveří.
6. Opatrně zatlačte těsnění dveří do původní polohy.
POZOR:
Šrouby neutahujte příliš silně, mohlo by dojít k poškození madla nebo dvířek.
Šroub
Kryty šroubů (přiložené k příruční brašně)
Madlo
Dveře
Obr. 1
CZ
Seite laden ...
Seite laden ...
Seite laden ...
Seite laden ...
Seite laden ...
Seite laden ...
Seite laden ...
Seite laden ...
Seite laden ...
Seite laden ...
Seite laden ...
Seite laden ...
Seite laden ...
Seite laden ...
Seite laden ...
Seite laden ...
Seite laden ...
Seite laden ...
Seite laden ...
Seite laden ...
Seite laden ...
Seite laden ...
Seite laden ...
Seite laden ...
Seite laden ...
Seite laden ...
Seite laden ...
Seite laden ...
Seite laden ...
Seite laden ...
Seite laden ...
Seite laden ...
Seite laden ...
Seite laden ...
Seite laden ...
Seite laden ...
Seite laden ...
Seite laden ...
Seite laden ...
Seite laden ...
Seite laden ...
Seite laden ...
Seite laden ...
Seite laden ...
Seite laden ...
Seite laden ...
Seite laden ...
Seite laden ...
Seite laden ...
Seite laden ...
Seite laden ...
Seite laden ...
Seite laden ...
Seite laden ...
Seite laden ...
Seite laden ...
Seite laden ...
Seite laden ...
Seite laden ...
Seite laden ...
Seite laden ...
Seite laden ...
Seite laden ...
Seite laden ...
Seite laden ...
Seite laden ...
Seite laden ...
Seite laden ...
Seite laden ...
Seite laden ...
Seite laden ...
Seite laden ...
Seite laden ...
Seite laden ...
Seite laden ...
Seite laden ...
Seite laden ...
Seite laden ...
Seite laden ...
Seite laden ...
Seite laden ...
Seite laden ...
Seite laden ...
Seite laden ...
Seite laden ...
Seite laden ...
Seite laden ...
Seite laden ...
Seite laden ...
Seite laden ...
Seite laden ...
Seite laden ...
Seite laden ...
Seite laden ...
Seite laden ...
Seite laden ...
Seite laden ...
Seite laden ...
Seite laden ...
-
 1
1
-
 2
2
-
 3
3
-
 4
4
-
 5
5
-
 6
6
-
 7
7
-
 8
8
-
 9
9
-
 10
10
-
 11
11
-
 12
12
-
 13
13
-
 14
14
-
 15
15
-
 16
16
-
 17
17
-
 18
18
-
 19
19
-
 20
20
-
 21
21
-
 22
22
-
 23
23
-
 24
24
-
 25
25
-
 26
26
-
 27
27
-
 28
28
-
 29
29
-
 30
30
-
 31
31
-
 32
32
-
 33
33
-
 34
34
-
 35
35
-
 36
36
-
 37
37
-
 38
38
-
 39
39
-
 40
40
-
 41
41
-
 42
42
-
 43
43
-
 44
44
-
 45
45
-
 46
46
-
 47
47
-
 48
48
-
 49
49
-
 50
50
-
 51
51
-
 52
52
-
 53
53
-
 54
54
-
 55
55
-
 56
56
-
 57
57
-
 58
58
-
 59
59
-
 60
60
-
 61
61
-
 62
62
-
 63
63
-
 64
64
-
 65
65
-
 66
66
-
 67
67
-
 68
68
-
 69
69
-
 70
70
-
 71
71
-
 72
72
-
 73
73
-
 74
74
-
 75
75
-
 76
76
-
 77
77
-
 78
78
-
 79
79
-
 80
80
-
 81
81
-
 82
82
-
 83
83
-
 84
84
-
 85
85
-
 86
86
-
 87
87
-
 88
88
-
 89
89
-
 90
90
-
 91
91
-
 92
92
-
 93
93
-
 94
94
-
 95
95
-
 96
96
-
 97
97
-
 98
98
-
 99
99
-
 100
100
-
 101
101
-
 102
102
-
 103
103
-
 104
104
-
 105
105
-
 106
106
-
 107
107
-
 108
108
-
 109
109
-
 110
110
-
 111
111
-
 112
112
-
 113
113
-
 114
114
-
 115
115
-
 116
116
-
 117
117
-
 118
118
-
 119
119


Haier HAKWBD 60 Benutzerhandbuch
- Kategorie
- Weinkühler
- Typ
- Benutzerhandbuch
- Dieses Handbuch ist auch geeignet für
in anderen Sprachen
- English: Haier HAKWBD 60 User manual
- français: Haier HAKWBD 60 Manuel utilisateur
- español: Haier HAKWBD 60 Manual de usuario
- italiano: Haier HAKWBD 60 Manuale utente
- slovenčina: Haier HAKWBD 60 Používateľská príručka
- português: Haier HAKWBD 60 Manual do usuário
- polski: Haier HAKWBD 60 Instrukcja obsługi
- čeština: Haier HAKWBD 60 Uživatelský manuál
Sonstige Unterlagen
-
Avintage AVI60CDZA Bedienungsanleitung
-
Avintage AVI97X3ZI Bedienungsanleitung
-
Teka RVI 20041 GBK Benutzerhandbuch
-
Domo DO918WK DO911WK DO909WK Bedienungsanleitung
-
-
-
-
Fagor VIN-6 Bedienungsanleitung
-
AEG SWB66001DG Benutzerhandbuch
-
AEG SWB63001DG Benutzerhandbuch