
1
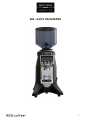
969 - 64/75 ON DEMAND

2
INDICE
Premessa e avvertenze generali pag. 02
Norme per installazione pag. 02
Norme particolari per uso e manutenzione pag. 03
Dati tecnici pag. 03
Installazione pag. 04
Messa in funzione pag. 04
Uso del macinadosatore pag. 05
Accensione della macchina pag. 05
Ciclo di macinatura pag. 05
Programmazione livello utente pag. 06
Lettura e programmazione livello tecnico pag. 07
Preset dati pag. 08
Manutenzione pag. 09
Risoluzione problemi pag. 09
Schema elettrico pag. 10
PREMESSA E AVVERTEN)E GENERALI
Leggee attetaete le aeteze oteute el pesete lietto i uato foisoo ipotati idiazioi iguadati la
siuezza d’istallazioe, d’uso e di autezioe. Coseae o ua uesto lietto pe ogi ulteioe osultazioe.
Quest’appaehio doà essee destiato solo all’uso pe il uale è stato espessaete oepito: Ogi alto uso è da
osideasi ipopio e uidi peioloso.
Il ostuttoe o può essee osideato esposaile di eetuali dai deiati da usi ipopi, eoei ed iagioeoli.
L’uso di ualsiasi appaehio elettio opota l’osseaza d’alue egole fodaetali. I patiolae:
o toae l’appaehio o le ai o i piedi agati o uidi
o usae l’appaehio a piedi udi
o tiae il ao d’alietazioe pe staae la spia dalla pesa di oete
o lasiae esposto l’appaehio ad ageti atosfeii pioggia, sole, gelo
o peettee he l’appaehio sia usato da aii o da iapai.
Pia di effettuae ualsiasi opeazioe di pulizia o di autezioe, disiseie l’appaehio dalla ete d’alietazioe
elettia, staado la spia o apedo l’iteuttoe dell’ipiato.
I aso di guasto o attio fuzioaeto dell’appaehio, spegelo asteedosi da ualsiasi tetatio di ipaazioe o
d’iteeto dietto.
Pe eetuali ipaazioi iolgesi eslusiaete ad u eto Assisteza Teia autoizzato dal poduttoe ihiededo
l’utilizzo di iai oigiali.
Il aato ispetto di uato sopa può opoettee la siuezza dell’appaehio e le odizioi di gaazia. Qualoa si
deidesse di o utilizzae più uesto appaehio si aoada di edelo iopeate, staado il ao d’alietazioe
elettia ed il tuo d’aua dalla ete d’alietazioe; di edee ioue tutte uelle pati susettiili di ostituie u peiolo,
speialete pe i aii he poteeo seisi dell’appaehio fuoi uso pe i loo giohi.

3
NORME PER L’INSTALLA)IONE
L’istallazioe dee essee effettuata seodo le istuzioi del ostuttoe.
U’eata istallazioe può ausae dai a pesoe, aiali o ose, ei ofoti delle uali il ostuttoe o può essee
osideato esposaile.
Dopo ae tolto l’iallaggio, assiuasi dell’itegità dell’appaehio.
I aso di duio o utilizzae l’appaehio e iolgesi ad u Ceto Assisteza autoizzato.
Gli eleeti dell’iallaggio sahetti di plastia, polistiolo, hiodi, e. o deoo essee lasiati alla potata dei aii i
uato poteziali foti di peiolo e o deoo essee dispesi ell’aiete.
Pia di ollegae l’appaehio aetasi he i dati di taga siao ispodeti a uelli della ete di distiuzioe elettia. I
aso d’iopatiilità ta la pesa e la spia dell’appaehio se esiste fae sostituie la pesa o alta di tipo adatto,
aetadosi he la sezioe dei ai sia idoea alla poteza assoita dall’appaehio. I aso di sostituzioe del ao di
alietazioe è oligatoio ipiegae aoa u ao tipo HRN-F.
Assiuasi he la tesioe di liea oispoda a uella pe ui è stata pedisposta la ahia e he la liea sia i gado di
soppotae, olte ai aihi già esisteti, l’assoieto douto alla ahia stessa.
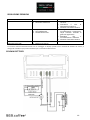
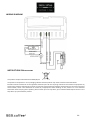
Dopo ae istallato l’iteuttoe di liea o fusiili, ollegae i fili del ao della ahia all’iteuttoe di liea seodo gli
shei allegati.
È sosigliaile l’uso d’adattatoi, pese ultiple e polughe. Qualoa fosse idispesaile, utilizzae solo adattatoi seplii o
ultipli e, polughe ofoi alle igeti oe di siuezza, pestado attezioe a o supeae il liite di oete,
idiato sull’adattatoe seplie e sulle polughe, e uello di assia poteza, idiato sull’adattatoe ultiplo. La siuezza
elettia di uest’appaehio è assiuata soltato uado lo stesso è oettaete ollegato ad u effiae ipiato di
essa a tea, oe peisto dalle igeti oe di siuezza elettia.
È eessaio eifiae uesto fodaetale euisito di siuezza e, i aso di duio, ihiedee u otollo auato
dell’ipiato da pate di pesoale pofessioalete ualifiato.
Il ostuttoe o può essee osideato esposaile pe eetuali dai ausati dalla aaza di essa a tea
dell’appaehio.
Pe eitae suisaldaeti peiolosi, si aoada di solgee pe tutta la sua lughezza il ao d’alietazioe elettia. Il
ao d’alietazioe di uest’appaehio o dee essee sostituito dall’utete.
I aso di daeggiaeto del ao o pe la sua sostituzioe iolgesi eslusiaete ad u eto Assisteza Teia
autoizzato dal poduttoe.
No lasiae l’appaehio iutilete iseito.
Apie l’iteuttoe geeale dell’appaehio uado l’appaehio o sia utilizzato.
No ostuie le apetue o le fessue di etilazioe o di saltieto aloe.
Mateee u’adeguata distaza da paeti, oggetti, e.
CARATTERISTICHE AMBIENTALI PER L’UTILI))O DELLA MACCHINA
Tepeatua aiete : +-+°C
Uidità assia : % uidità elatia
NORME PARTICOLARI PER L’USO E LA MANUTEN)IONE
Pe il oetto fuzioaeto è idispesaile atteesi alle idiazioi del ostuttoe, faedo effettuae da pesoale
ualifiato la autezioe peiodia ed il otollo di tutti i dispositii di siuezza.
No utilizzae il dispositio seza affè.
No lasiae la ahia i loali doe la tepeatua sia ifeioe allo zeo.

4
DATI TECNICI
Modello
99 -
99 -
Alietazioe
V oofase
V oofase
Feueza
/ Hz
/ Hz
Assoieto
A
, A
Poteza otoe
W
W
Gii otoe/i’
.
Diaeto aie
.
.
Capaità taoggia
, kg.
, kg.
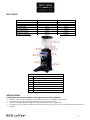
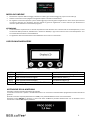
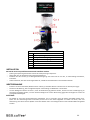
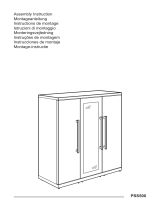
LEGENDA
Taoggia
“eada taoggia
Ghiea egolazioe aiatua
Peo loaggio egolazioe aiatua
Displa LCD
Pulsati
Foella potafilto
Iteuttoe geeale
INSTALLA)IONE
Il dispositio dee essee istallato oe segue da pesoale ualifiato.
Veifiae he la liea di alietazioe sia adeguata alla Poteza e al Voltaggio del dispositio.
Cotollae he la pesa di alietazioe elettia sia foita di essa a tea.
Iseie la taoggia affè ella ghiea di egolazioe e fissala o le apposite iti.
Cotollae he l’iteuttoe luioso oe pesete sia speto e he la spia sia iseita oettaete ella pesa di
oete

5
MESSA IN FUN)IONE
Riuoee il opehio della taoggia, itodue il affè i gai ella taoggia e apie la seada
Aiae la aiatua oe spiegato el seguete apitolo Uso del aiadosatoe
Pe egolae la aiatua peee il peo di loaggio uotae la ghiea di egolazioe i seso oaio pe aiiae
le aie e otteee ua aiatua più fie. Ruotae la ghiea di egolazioe i seso atioaio pe allotaae le
aie e uidi otteee ua aiatua più gossa.
ATTEN)IONE:
Il aiadosatoe è poisto di u sistea di potezioe utile ad eitae he il otoe ada i soatepeatua, i aso
di iteeto della potezioe, attedee he il sistea si affeddi, i ogi aso assiuasi he la soatepeatua o
sia ausata da foti estee al aiadosatoe.
La egolazioe della aiatua dee essee effettuata o le aie i oieto .
USO DEL MACINADOSATORE
ON/OFF - + PROG
TASTO
FUNZIONE
FUNZIONE IN PROGRAMMAZIONE
ON/OFF
ON/OFF Macchina
Usita dall’aiete di pogaazioe
1 (-)
Start macinatura dose singola
Decremento valore (-)
2 (+)
Start macinatura dose doppia
Incremento valore (+)
PROG
Modalità programmazione UTENTE e TECNICO
Selezione modifica dato
ACCENSIONE DELLA MACCHINA
Aedee il sistea taite iteuttoe geeale .
La ahia saà aesa o speta a seoda dello stato i ui si toaa al oeto dello spegieto taite iteuttoe
geeale.
Quado la ahia è speta alietata a i OFF o è possiile effettuae alu ilo di aiatua.
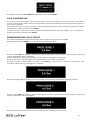
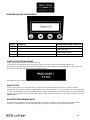
Peedo il tasto ON/OFF la ahia si pota ello stato di ON ed è possiile effettuae dei ili di aiatua. “e la
ahia è i stato di ON il displa isualizza:

6
Pe spegee la ahia OFF- STAND-BY è suffiiete peee il tasto ON/OFF.
CICLO DI MACINATURA
Pe eseguie u ilo di aiatua a dose sigola peee il tasto - Pe eseguie u ilo di aiatua a dose doppia
peee il tasto +. Allo sadee del tepo pogaato si eifia la disattiazioe del otoe ed è possiile eseguie u
uoo ilo di aiatua.
È possiile iteopee u ilo di aiatua i oso pia del tepo pogaato ipeedo il tasto dose elatio al
ilo iteessato, oppue peedo il tasto ON/OFF.
È possiile aiae la aiatua otiua peedo otepoaeaete i tasti - e + pe ia seodi. Pe
aestae la aiatua peee il tasto ON/OFF.
PROGRAMMA)IONE LIVELLO UTENTE
Pe aedee all’aiete di pogaazioe liello utete è eessaio he la ahia sia i ON.
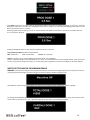
Mateee peuto il tasto PROG pe ia seodi fio a isualizzae la sitta:
Peee il tasto PROG pe ailitae la odifia del tepo di aiatua elatio alla dose dose sigola. Il dato sulla
seoda iga del displa iizia a lapeggiae.
Peee il tasto - pe deeetae il aloe ipostato oppue il tasto + pe ieetalo.
Mateedo peuto i tasti - o + si eifia il deeeto o l’ieeto eloe del dato.
Ua olta ipostato il aloe desideato peee il tasto PROG pe iseie il dato i eoia; il uoo aloe iee
isualizzato a displa o è più lapeggiate, ad esepio:
Peee il tasto - o + pe selezioae il eù di odifia elatio alla dose dose doppia; il displa isualizza:
Peee il tasto PROG pe ailitae la odifia del tepo di aiatua elatio alla dose dose doppia. Il dato sulla
seoda iga del displa iizia a lapeggiae:
Peee il tasto - pe deeetae il aloe ipostato oppue il tasto + pe ieetalo.

7
Mateedo peuto i tasti - o + si eifia il deeeto o l’ieeto eloe del dato.
Ua olta ipostato il aloe desideato peee il tasto PROG pe iseie il dato i eoia; il uoo aloe iee
isualizzato a displa o è più lapeggiate, ad esepio:
Rage aloi pogaaili sia dose sigola he dose doppia:
i: seodi ax: seodi step: , seodi
Nota: o aloe ipostato a il ilo di aiatua elatio a uella dose o iee eseguito
Ua olta etati i pogaazioe UTENTE, se o si pee essu tasto pe seodi oseutii, il sistea ese
autoatiaete dall’aiete di pogaazioe.
È ouue possiile usie iediataete dall’aiete di pogaazioe, seza aspettae lo sadee del tie-out di
seodi, peedo il tasto ON/OFF
LETTURE/PROGRAMMA)IONE LIVELLO TECNICO
NOTA: il liello TECNICO, olte alla pogaazioe della ligua di isualizzazioe dei essaggi a displa, osete di
osultae il totale ed il paziale elatii ai ili di aiatua effettuati sia pe la dose sigola he pe la dose doppia.
Pe aedee all’aiete di lettua/pogaazioe liello TECNICO è eessaio he la ahia sia i stato di OFF
oeo il displa dee isualizzae:
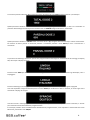
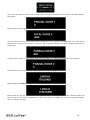
Peee e ateee peuto il tasto PROG pe ia iue seodi fio a isualizzae sul displa l’idiazioe dei ili
TOTALI eseguiti sulla dose , ad esepio:
Questo paaeto idetifia il TOTALE delle aiatue dose - eseguite dalla ahia; il dato o è azzeaile. La
pessioe del tasto - osete di passae alla lettua dei ili PAR)IALI eseguiti sulla dose , ad esepio:
Questo paaeto idetifia il PAR)IALE delle aiatue dose - eseguite dalla ahia dopo l’ultio azzeaeto. Pe
azzeae la lettua paziale è eessaio peee e ateee peuto il tasto PROG pe ia seodi fio a isualizzae:

8
La suessia pessioe del tasto - osete di passae alla lettua dei ili TOTALI eseguiti sulla dose , ad esepio:
Questo paaeto idetifia il TOTALE del le aiatue dose + eseguite dalla ahia; il dato o è azzeaile. La
pessioe del tasto - osete di passae alla lettua dei ili PAR)IALI eseguiti sulla dose , ad esepio:
Questo paaeto idetifia il PAR)IALE delle aiatue dose + eseguite dalla ahia dopo l’ultio azzeaeto.
Pe azzeae la lettua paziale è eessaio peee e ateee peuto il tasto PROG pe ia seodi fio a
isualizzae:
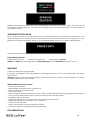
La pessioe del tasto - osete di passae alla pogaazioe della ligua di isualizzazioe dei essaggi sul displa
LCD; ad esepio il displa isualizza:
Peee il tasto PROG pe ailitae la odifia della ligua di isualizzazioe. Il dato sulla seoda iga del displa iizia a
lapeggiae:
Peee il tasto - o il tasto + pe soee le ligue dispoiili: Italiao, Faese, Tedeso, Iglese e “pagolo
Ua olta ipostata la ligua desideata peee il tasto PROG pe ofeae il dato i eoia; la uoa ligua iee
isualizzata a displa, ad esepio:
Ua olta etati i lettua/pogaazioe TECNICO, se o si pee essu tasto pe seodi oseutii, il sistea
ese autoatiaete dall’aiete di pogaazioe.
È ouue possiile usie iediataete dall’aiete di pogaazioe, seza aspettae lo sadee del tie-out di
seodi, peedo il tasto ON/OFF

9
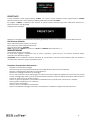
PRESET DATI
I tepi odifiati taite pogaazioe UTENTE, osì oe la ligua ipostata taite pogaazioe TECNICO
possoo essee ipotati ai aloi di faia default ediate l’opeazioe di PRESET.
Pe eseguie il PRESET è suffiiete dae tesioe al sistea taite iteuttoe geeale ateedo peuti o-
tepoaeaete i tasti - e +.
A displa iee isualizzato:
“pegee e iaedee il sistea taite iteuttoe geeale pe ipistiae il oetto fuzioaeto della ahia.
Dati di Peset default:
Duata aiatua dose sigola: , seodi
Duata aiatua dose doppia: , seodi
Ligua di isualizzazioe: ITALIANO
NOTA: l’opeazioe di PRESET o azzea e i TOTALI e i PAR)IALI elatii alfe dosi e
MANUTEN)IONE
Pulie settiaalete la taoggia.
Le uihe pati soggette a sostituzioe soo le aie, otollae i gadi di usua e se eessaio sostituile sepe
etae oe desitto di seguito.
ATTEN)IONE: Pia di effettuae ualsiasi iteeto di autezioe, assiuasi di disoettee dalla ete elettia il
aiadosatoe. “ostituie sepe etae le aie.
Poedua di sostituzioe delle aie :
- Chiudee la seada della taoggia
- Azioae il aiio fio all’esauieto dei hihi di affè all’iteo del opo aiadosatoe.
- “pegee e sollegae dalla ete elettia il aiadosatoe.
- Riuoee la taoggia sitado le iti di fissaggio.
- Co ua ao peee il peo di loaggio e o l’alta ao sitae la ghiea di egolazioe i seso atioaio. “itae
le iti di fissaggio delle aie, uidi iuoele faedo attezioe a pulie la sede da patielle di affè. Posizioae
e fissae le aie uoe sui ispettii suppoti.
- Aitae la ghiea di egolazioe sul opo del aiadosatoe fio a uado le due aie ao i otatto.
- “itae la ghiea di egolazioe di – tahe.
- Iseie e fissae la taoggia.
- Iseie la spia e aedee il aiadosatoe.
- Apie la seada della taoggia e aiado il aiadosatoe, opletae la egolazioe della aiatua.

10
RISOLU)IONE PROBLEMI
PROBLEMA
CAUSA
SOLU)IONE
Il aiadosatoe o si aede
1. “pia oete disiseita
2. Cetalia elettoia
1. Iseie la spia ella pesa di
oete.
2. Cotollae il ao di
alietazioe elettia
3. Chiaae l’assisteza teia
Bloo otoe
1. Copo estaeo ta le aie
2. “uisaldaeto
3. Codesatoe otto
1. “ollegae dalla ete elettia il
aiadosatoe e iuoee il
opo estaeo sitado la
ghiea di egolazioe
2. Attedee he il
aiadosatoe si affeddi
3. Chiaae l’assisteza teia
Polei di affè esolati o
faeti più gadi
1. Maie osuate
2. Maie o plaai
“ostituie le aie
La ahia aiseà autoatiaete o u essaggio sul displa uado saà il oeto di sostituie le aie, si
osiglia di otattae al più pesto l’assisteza pe la sostituzioe delle aie.
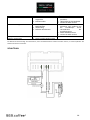
SCHEMA ELETTRICO

11
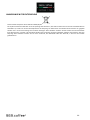
ISTRU)IONI PER IL TRATTAMENTO A FINE VITA
Questo podotto è ofoe alla Diettio EU //EC. Il siolo apposto sull’ appaehiatua o sulla ofezioe idia
he I’ appaehiatua, alla fie della popia ita utile, o doe essee tattata oe u ifiuto doestio geeio a dee
essee potata i u eto di aolta diffeeziata pe appaehiatue elettihe o elettoihe appotati dallo Pulia
aiistazioe. Oppue può essee osegato al ieditoe al oeto dell’auisto di u’appaehiatua uoa
euialete. L’utete è esposaile del ofeieto dell’appaehio a fie ita alle appopiate stuttue di aolta, pea
le sazioi peiste dalle igete legislazioe sui ifiuti. L’adeguata aolta diffeeziata pe l’aio suessio
dell’appaehio disesso al iilaggio, al tattaeto e allo saltieto aietalete opatiile otiuise ad
eitae possiili effetti egatii sull’aiete e sulla salute uaa e faoise il iilo dei ateiali di ui è oposto il
podotto. Pe ifoazioi più dettagliate Ieeti i sistei di aolta dispoiili, iolgesi al seizio loale di saltieto
ifiuti, o al ieditoe i ui è stato effettuato l’auisto. Il poduttoe e/o l’ipotatoe ottepeao alla popia
esposailità pe il iilo, il tattaeto e lo saltieto aietalete opatiile sia idiidualete sia pateipado
a sistei ollettii.

12
CONTENTS
Foreword and general advice page 11
Installation rules page 11
Rules on use and maintenance page 12
Technical data page 12
Installation page 13
Commissioning page 13
Use of the coffee grinder page 14
Starting up the machine page 14
Grinding cycle page 14
User level programming mode page 14
Technician reading and programming mode page 16
Data preset page 17
Maintenance page 17
Troubleshooting page 17
Wiring diagram page 19
Instructions on disposal page 20
FOREWORD AND GENERAL ADVICE
Read carefully the advice in this handbook as it provides important indications regarding safety during installation, use and
maintenance. Make sure to store this handbook for future reference. This appliance has to be exclusively for the use it has
been designed for. ANY OTHER USE IS TO BE CONSIDERED INAPPROPRIATE AND THEREFORE DANGEROUS.
The Manufacturer shall not be considered as responsible for any damages deriving from inappropriate, wrong and
unreasonable use. Operating any electrical appliances requires some fundamental rules to be carefully observed, i.e.:
- do not touch the appliance with wet hands or feet;
-
do not use the appliance with bare feet;
-
do not pull the power cord to unplug the appliance from the socket;
- do not expose the appliance to atmospheric agents;
-
do not let infants, children and incompetent people use the appliance.
Before performing any cleaning or maintenance, unplug the appliance, either by removing the plug from the socket or
disconnecting the main electrical supply.
In case of failure or malfunctioning, turn off the appliance and avoid fixing it directly. For any maintenance operations please
exclusively address an authorized OBEL SRL technical centre requesting exclusively original spare parts to be used.
Failure to comply to what stated above may result in lower safety levels and loss of warranty coverage. If this appliance will
no longer be used, we recommend making it inactive by unplugging the power cord.
INSTALLATION RULES
Installation must be performed in accordance to the indications provided by the Manufacturer. A wrong installation may lead
to damages or injuries to people, animals and objects, which the Manufacturer shall not be considered as responsible for.
Once the packaging has been removed, please make sure that the appliance is intact. In case of doubt do not use the
appliance and address to an authorized Dealer.
Pakagig pats plasti ags, foa, ails, et. ust ot e left ithi hilde’s eah as the ight e hazadous ad ust

13
not be disposed of.
Before plugging in the appliance make sure that its technical features are suitable for the electrical systems it is going to be
used on. If the socket and the plug (if fitted) are not compatible please have the socket replaced with a suitable one, making
sure that the diameter of the cord is suitable to the appliances power absorption . In case of cord replacement it is
compulsory to use a H07RN-F compliant cord.
Make sure that the power supply matches the one the appliance has been designed for and that the existing wiring can bear
the absorption of the newly-installed appliance, as well as of the existing devices. After installing a circuit-breaker with fuses,
connect the cord wires of the appliance to the circuit breaker in accordance to the related schematics.
The Manufacturer advise against using adaptors, multiple sockets and cord extensions. If necessary, use simple or multiple
adaptors only and extensions in compliance to the safety laws and regulations, making sure not to exceed power loads,
indicated on simple adaptors or cord extensions, and maximum load indicated on multiple adaptors.
The electrical safety of this appliance is guaranteed only if it is properly connected to an earth socket, as per the most up to
date electrical safety laws and regulations.
Please have this relevant safety feature carefully checked and, in case of doubt, please have qualified personnel check the
existing power wiring.
The Manufacturer shall not be considered as responsible for any damages occurring when the appliance is not properly
earthed.
To avoid dangerous overheating, we recommend fully unwinding the power cord. The user must not replace the power cord.
If the cord is damaged, or to have it replaced, address an authorized Dealer.
Make sure the appliance is unplugged when not in use. Open the circuit breaker the appliance is connected to, when not in
use.
Do not close or block vents or heat dispersion slits. Keep the appliance away from wall and other objects.
ENVIRONMENTAL CONDITIONS FOR AN APPRPORIATE APPLIANCE USE
Room temperature: 05 – 45 °C Maximum humidity: 80% relative humidity
For a correct functioning please carefully follow the instructions provided, having qualified personnel perform a regular
operations and safety check. Do not use the device without coffee. Do not leave the appliance where temperature goes below
zero.
TECHNICAL DATA
Model
99 -
99 -
“uppl
V sigle phase
V sigle phase
Feue
/ Hz
/ Hz
Poe osuptio
A
, A
Moto poe
W
W
Moto RPM
.
Bus diaete
.
.
Hoppe apait
, kg.
, kg.

14
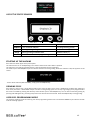
INDEX
Hoppe
Hoppe losue
Gidig adjustet gea
Gidig adjustet lokig pi
Displa LCD
Kes
Filte holde fok
Mai sith
INSTALLATION
THE APPLIANCE HAS TO BE INSTALLED BY QUALIFIED PERSONNEL IN ACCORDANCE TO THE INSTRUCTIONS HERE BELOW:
Make sue that the poe suppl is adeuate to the appliae’s poe atig ad oltage.
Make sure that the socket is properly earthed.
Insert the beans hopper (1) into the adjusting gear and lock it with the screws (supplied).
Make sure that the light switch is off (8) and that the plug is properly inserted into the socket.
COMMISSIONING
Remove the cover on the hopper, put your coffee beans in the hopper (1) and open the outlet (2).
“tat gidig as istuted i the hapte Use of the offee gide.
To adjust grinding, press the locking pin (4), and turn the adjusting screw clockwise to bring the burrs closer for finer grinding.
Turn the adjusting screw anti-clockwise to move the burrs further apart for coarser grinding.
WARNING
The coffee grinder is equipped with a safety device preventing the motor from overheating.
Should the safety device set in, wait for the system to cool down and make sure that overheating is not caused by external
sources.
Grinding grade adjustment is to be performed while burrs are running.

15
USE OF THE COFFEE GRINDER
KEY
FUNCTION
PROGRAMMING FUNCTION
KON/OFF
Turn machine ON/OFF
Exit programming mode
K1 (-)
Starts grinding of single dose
Decrease value (-)
K2 (+)
Starts grinding of double dose
Increase value (+)
KPROG
USER and TECHNICIAN programming mode
Select and edit data
STARTING UP THE MACHINE
Press the main switch (8) to start up the system.
The machine turns on or off depending on its status at the time the main switch is pressed.
The machine is not ready for grinding when it is off (connected to the mains but OFF).
You need to press the KON/OFF key to turn ON the machine and start grinding. When the machine is ON, this appears on the
screen:
To turn off the machine (OFF-STANDBY), simply press the KON/OFF key.
GRINDING CYCLE
Press the K1(-) key to start a single dose grinding cycle. Press the K2(+) key to start a double dose grinding cycle. When the
timer ends, the motor is deactivated and you can start a new grinding cycle. You can stop a grinding cycle in progress before
the timer has ended by pressing the dose key of the relative cycle or the KON/OFF key. You can start continuous grinding by
pressing and holding the K1(-) and K2(+) keys at the same time for about 3 seconds. Press the KON/OFF key to stop grinding.
USER LEVEL PROGRAMMING MODE
The machine needs to be ON for entering user level programming mode. Press and hold the KPROG key for about 3 seconds
until this message appears:

16
Press the KPROG key to enable editing of the grinding time for dose 1 (single dose). The second line of text on the screen starts
blinking:
Press the K1(-) key to decrease the set value, or the K2(+) key to increase it. Press and hold the K1(-) or K2(+) keys to decrease
or increase the value more quickly. Once you have set the required value, press the KPROG key to save it in the memory. The
new value is shown on the screen (no longer blinking). For example:
Press the K1(-) or K2(+) key to select the menu for editing dose 2 (double dose). This appears on the screen:
Press the KPROG key to enable editing of the grinding time for dose 2 (double dose). The second line of text on the screen
starts blinking.
Press the K1(-) key to decrease the set value, or the K2(+) key to increase it. Press and hold the K1(-) or K2(+) keys to decrease
or increase the value more quickly. Once you have set the required value, press the KPROG key to save it in the memory. The
new value is shown on the screen (no longer blinking). For example:
Rage of pogaale alues fo oth sigle dose ad doule dose :
min: 0 seconds max: 50 seconds step: 0, 1 seconds
Please note: settig the alue at disales the gidig le fo the elatie dose.
If you enter USER programming mode and do not press any of the keys within 60 consecutive seconds, the system
automatically exits the programming mode.
You can, however, press the KON/OFF key to exit programming mode before the 60 seconds have elapsed.

17
TECHNICIAN READING AND PROGRAMMING MODE
Please note: in TECHNICIAN mode, you can set the language of the text on the screen and refer to the total and partial
counters of the grinding cycles for both dose 1 (single) and dose 2 (double).
The machine needs to be OFF for entering TECHNICIAN level reading/programming mode. This appears on the screen:
Press and hold the KPROG key for about five seconds until the TOTAL number of cycles for dose 1 appears on the
screen, for example:
This parameter identifies the TOTAL number of dose 1 (K1) grinding cycles completed by the machine. This value is
not resettable. You can press the K1(-) key to switch to the PARTIAL number of dose 1 cycles, for example:
This parameter identifies the PARTIAL number of dose 1 (K1) grinding cycles completed by the machine since the counter was
last reset. To reset the partial counter, press and hold the KPROG key for about 5 seconds until this appears:
You can then press the K1(-) key to switch to the TOTAL number of dose 2 cycles, for example:
This parameter identifies the TOTAL number of dose 2 (K2) grinding cycles completed by the machine. This value is
not resettable. You can press the K1(-) key to switch to the PARTIAL number of dose 2 cycles, for example:
This parameter identifies the PARTIAL number of dose 2 (K2) grinding cycles completed by the machine since the counter was
last reset. To reset the partial counter, press and hold the KPROG key for about 5 seconds until this appears:

18
Press the K1(-) key to switch to programming of the language of the text shown on the LCD screen. For example, this
appears on the screen:
Press the KPROG key to select another language. The second line of text starts blinking:
Press the K1(-) or K2(+) key to scroll through the available languages: Italian, French, German, English and Spanish.
Once you have selected a language, press the KPROG key to save it in the memory. The new language appears on the screen,
for example:
If you enter TECHNICIAN programming mode and do not press any of the keys within 60 consecutive seconds, the system
automatically exits the programming mode.
You can, whenever, press the KON/OFF key to exit programming mode before the 60 seconds have elapsed.
DATA PRESET
The PRESET function is for setting the timers configured in USER mode and the language set in TECHNICIAN mode back to their
factory (default) values.
To perform the PRESET function, turn on the system at the main switch while pressing and holding both the K1(-) and the K2(+)
keys. This appears on the screen:
Turn the system off and then on again at the main switch to restore correct use of the machine.
PRESET (default) DATA:
Duration of grinding for dose 1 (single): 2.5 seconds
Duration of grinding for dose 2 (double): 4.0 seconds
Language used: ITALIAN
Please note: the PRESET function does not reset either the TOTAL or the PARTIAL counters of doses 1 and 2.

19
MAINTENANCE
Clean the hopper on a weekly basis;
The only parts to be replaced are burrs: check if they wore out and replace both at the same time as described here below.
WARNING:
- Before performing any maintenance operations, make sure that the coffee grinder is unplugged.
- Always replace both burrs.
BURRS REPLACEMENT:
- Set in the hopper closure;
- Activate the grinder until no more powder will be dispensed;
- Turn off and unplug the grinder;
- Remove the hopper by unscrewing it;
- Press down the locking rod with one hand and with the other unscrew the burrs housing gear by turning it anti-
clockwise.
- Unscrew the 3 burrs locking screws then remove the burrs; make sure to remove any traces of coffee powder from the
burrs housing;
- Place and lock a new set of burrs in the housing;
- “e the adjustet gea o the gide’s od util the us touh;
- Unscrew the adjustment gear by 5 to 10 stops;
- Insert and lock the beans hopper;
- Plug in the grinder and turn it on;
- Open the hopper closure and set up the grinding grade while the grinder is running.
TROUBLE SHOOTING
PROBLEM
CAUSE
SOLUTION
The offee gide does
ot tu o
1. Plug is ot i the soket
2. Eletoi otol uit fault
1. Chek that the plug is iseted i the
poe soket. Ispet the ale of
the eletoi otol uit.
2. Cotat the tehial assistae
seie.
The oto does ot u
1. Foeig od etee the us.
2. Oeheatig
3. Boke apaito
1. Uplug the offee gide ad tu
the adjustig se to eoe the
foeig od.
2. Wait fo the gide to ool do.
3. Cotat the tehial assistae
seie.
Coffee pode ied i
ith lage fagets.
1. Wo gides
2. Gides out of us
1. Replae the us

20
WIRING DIAGRAM
INSTRUCTIONS ON DISPOSAL
This podut oplies ith EU Dietie // EC.
The sol o the podut o o its pakagig idiates that this podut a ot e teated as household aste.
Istead it shall e haded oe to the appliale olletio poit fo the elig of eletial ad eletoi euipet. B
esuig this podut is disposed of oetl, ou ill help peet potetial egatie oseuees fo the eioet ad
hua health, hih ould otheise e aused iappopiate aste hadlig of this podut. Fo oe detailed
ifoatio aout elig of this podut, please otat ou loal it offie, ou household aste disposal seie o the
shop hee ou puhased the podut.
Seite wird geladen ...
Seite wird geladen ...
Seite wird geladen ...
Seite wird geladen ...
Seite wird geladen ...
Seite wird geladen ...
Seite wird geladen ...
Seite wird geladen ...
Seite wird geladen ...
-
 1
1
-
 2
2
-
 3
3
-
 4
4
-
 5
5
-
 6
6
-
 7
7
-
 8
8
-
 9
9
-
 10
10
-
 11
11
-
 12
12
-
 13
13
-
 14
14
-
 15
15
-
 16
16
-
 17
17
-
 18
18
-
 19
19
-
 20
20
-
 21
21
-
 22
22
-
 23
23
-
 24
24
-
 25
25
-
 26
26
-
 27
27
-
 28
28
-
 29
29


969.Coffee 969-ON DEMAND 75 Benutzerhandbuch
- Typ
- Benutzerhandbuch
- Dieses Handbuch eignet sich auch für
in anderen Sprachen
Andere Dokumente
-
 De Dietrich DKK500X Installationsanleitung
-
Azio KB528U Benutzerhandbuch
-
 EKU GS-540 Bedienungsanleitung
-
 LAVOR Pro LAV360 Benutzerhandbuch
-
Bosch TES503F1DE/13 Bedienungsanleitung
-
Siemens TK69001/02 Bedienungsanleitung
-
Neff C766 Series Operating Instructions Manual
-
Siemens TK68E57GB Bedienungsanleitung
-
Vemer Asso Wi-Fi-INT Benutzerhandbuch
-
ARIETE 1363 Matisse Beige Benutzerhandbuch


