


Please refer to the last page of this
manual for the full list of IKEA appointed
Authorized Service Centre and relative
national phone numbers.
Gehen Sie dazu auf die letzte Seite
dieser Broschüre. Dort nden Sie eine
Übersicht mit den entsprechenden
Telefonnummern und Kontaktdaten
unserer autorisierten Kundendienste.
Consultez la dernière page de ce
manuel pour la liste complète des centre
d’entretien et de réparation agréés
IKEA avec leur numéro de téléphone
respectifs.
Siete pregati di contattare il numero del
Centro Assistenza Autorizzato incaricato
da IKEA riportato sull’ultima pagina di
questo manuale.
ENGLISH 4
DEUTSCH 15
FRANÇAIS 26
ITALIANO 41

4
Before rst use
Your safety and that of others is
paramount.
Remove cardboard protection
pieces, protective lm and
adhesive labels from accessories.
Check the appliance for any
transport damage.
To avoid any damage do
not place any weights on the
appliance. Do not expose the
appliance to atmospheric agents.
This manual and the appliance
itself provide important safety
warnings, to be read and
observed at all times.
This is the attention symbol,
pertaining to safety, which
alerts users to potential risks to
themselves and others.
All safety warnings are preceded
by the attention symbol and the
following terms:
DANGER: indicates a
hazardous situation which, if
not avoided, will cause serious
injury.
WARNING: Indicates a
hazardous situation which, if
not avoided, could cause serious
injury.
All safety warnings give specic
details of the potential danger/
warning present and indicate how
to reduce risk of injury, damage
and electric shock resulting from
improper use of the appliance.
Carefully observe the following
instructions.
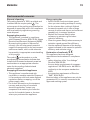
Precautions and general
recommendations
• The electrical installation and
the electrical connection must
be carried out by a qualied
technician according to the
manufacturer’s instructions
and in compliance with the
local safety regulations. Do not
repair or replace any part of
the appliance unless specically
stated in the user manual.
• The appliance must be
disconnected from the power
supply before carrying out any
installation work.
WARNING: Failure to install
the screws or xing device in
accordance with these instructions
may result in electrical hazards.
Safety Information
Contents
GB
ENGLISH
Safety Information 4
Use 7
Product description 8
Control panel 8
Cleaning and maintenance 8
What to do if ... 10
Technical data 11
Environmental concerns 12
IKEA GUARANTEE 13

5ENGLISH
• Earthing of the appliance is
compulsory. (Not possible for
class II hoods identied by the
symbol on the dataplate).
• Do not pull the power supply
cable in order to unplug the
appliance.
• The electrical components must
not be accessible to the user
after installation.
• Do not touch the appliance
with any wet part of the body
and do not operate it when
barefoot.
• This appliance can be used
by children aged from 8 years
and above and persons with
reduced physical, sensory or
mental capabilities or lack of
experience and knowledge
if they have been given
supervision or instruction
concerning use of the appliance
in a safe way and understand
the hazards involved. Children
shall not play with the
appliance. Cleaning and user
maintenance shall not be made
by children without supervision.
• All other maintenance services
must be carried out by a
specialised technician.
• When drilling through the wall
pay attention not to damage
electric connections and/or
pipes.
• Air vents must always discharge
to the outside.
• The manufacturer rejects all
responsibilities for any damage
caused by improper use or
wrong settings.
• Appropriate maintenance
and cleaning ensure the good
working order and the best
performance of the appliance.
Regularly clean all stubborn
surface dirt to avoid grease
build up. Remove and clean
or change the lter regularly.
This must be completed in
accordance with the “Cleaning
and maintenance” instructions
provided.
• Never ame cook food (ambé)
under the appliance. Using free
ames might cause re.
• Failure to observe the
instructions for cleaning the
hood and replacing the lters
may result in a re.
• Exhaust air must not be vented
through a ue used for removal
of fumes produced by gas
combustion appliances or other
combustible materials, but must
have a separate outlet. All
national regulations governing
extraction of fumes must be
observed.
• There shall be adequate
ventilation if the hood is being
used at the same time as other
appliances using gas or other
combustible materials. The
negative pressure of the room

6ENGLISH
must not exceed 4 Pa (4x 10⁻⁵
bars). For this reason ensure
that the room is well ventilated.
In case of doubts, please consult
an autorized service assitance
center or similar qualied
person.
• Do not leave frying pans
unattended when frying, as the
frying oil may catch re.
• Before touching the light bulbs,
ensure that they are cold.
• Do not use or leave the hood
without the light bulb correctly
tted, as this may cause electric
shock.
• The hood is not a work surface,
therefore do not place any
objects on top of it or overload
it.
• During all installation and
maintenance operations wear
appropriate working gloves.
• This appliance is not suitable for
outdoor use.
WARNING: when the hob is in
use, accessible parts of the
hood may become hot.
Installation and connection
In the event of problems, contact
the Authorized Service Centre. To
prevent any damage, only remove
the appliance from its packaging
at the time of installation.
Preparing for installation
WARNING: this is a heavy
product; the hood should only
be lifted and installed by two or
more people.
The minimum distance between
the hob and the bottom part of the
hood must not be less than 65 cm
for burning gas or other fuels and
50cm for electric cookers.
Before installation also check the
minimum distances stated in the
manual of the cooker.
If the installation instructions for the
cooker specify a greater distance
between cooker and hood, this
distance must be observed.
Electrical connection
Make sure the power voltage
specied on the appliance rating
plate is the same as the mains
voltage.
This information can be found
on the inside of the hood, under
the grease lter. Power cable
replacement (type H05 VV-F)
must be carried out by a qualied
electrician. Contact an authorized
service centre.
If the hood is tted with an electric
plug, connect the plug to a socket
complying with current regulations,
located in an accessible place.

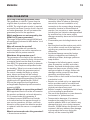
7ENGLISH
The hood has been designed to be
installed and used either as a “Extraction
installation”, or as a “Recirculation
installation”.
Extraction installation (see symbol
in installation booklet)
Cooking steam is sucked and channelled
outside the house through a discharge duct
(not supplied), tted to the hood steam
outlet.
Ensure that the discharge duct is correctly
tted to the air outlet, unit using an
appropriate connection system.
Important: If already installed, remove the
charcoal lter/s.
Recirculation installation
(see symbol in installation booklet)
The air is ltered through one or more the
charcoal lters, and then resent into room.
Important: Ensure appropriate air
circulation around the hood.
Important: If the hood is supplied without
charcoal lters, these must be tted before
the hood can be used. Filters are available
in IKEA shops.
The hood should be installed away from
particularly dirty areas, windows, doors and
heat sources.
The accessories for wall xing are not
included because walls made of different
materials require different types of xing
accessories. Use xing systems suitable for
the walls of your home and the weight of
the appliance. For more details, contact a
specialized dealer.
Keep this booklet for future consultation.
WARNING: if no plug is tted
(direct wiring to the mains), or
if the socket is not located in an
accessible place, a qualied
electrician should install a
standardised double pole power
switch that will enable complete
isolation from the mains in case of
category III overvoltage conditions,
in accordance with wiring rules.
Use

8ENGLISH
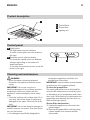
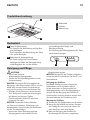
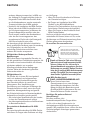
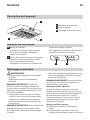
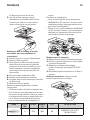
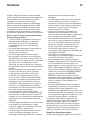
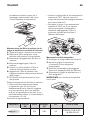
Product description
1 Control Panel.
2 Grease lter.
3 Lighting unit.
Control panel
WARNING:
-Never use steam cleaning equipment.
-Disconnect the appliance from the power
supply.
IMPORTANT: do not use corrosive or
abrasive detergents. If any of these products
accidentally comes into contact with the
appliance, clean immediately with a damp
cloth.
• Clean the surfaces with a damp cloth. If it is
very dirty, add a few drops of washing up
detergent to the water. Finish off with a dry
cloth.
IMPORTANT: do not use abrasive sponges or
metallic scrapers or scourers. Over time, these
can ruin the surface.
• Use detergents specically designed for
Cleaning and maintenance
A Light button.
The light button has two positions.
To switch on the lights: move the button to
the right.
B Extraction power selection button.
The extraction speed switch has different
settings, depending on the amount of
steam and fumes.
To increase the extraction power: move the
button to the right.
cleaning the appliance and follow the
manufacturer instructions.
IMPORTANT: clean the lters at least monthly
to remove any oil or grease residuals.
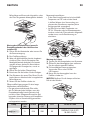
To clean the grease lter
The metal grease lter has an unlimited life
and must be washed once a month by hand
or dishwasher at low temperature and with a
short cycle. With cleaning in a dishwasher the
grease lter may become dull; this does not
effect its ltering capacity.
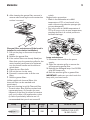
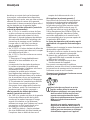
Grease lter maintenance:
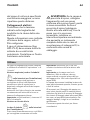
1. Unplug the appliance or disconnect the
power supply.
2. Remove the grease lters: pull the spring
release handle, then remove the lter
downwards.
32
1
AB

9ENGLISH
3. After cleaning the grease lter, remount in
reverse order ensuring the entire extraction
surface is covered.
Charcoal lter maintenance (if the hood is
installed in recirculation installation)
1. Pull out the plug or disconnect the power
supply.
2. Remove the grease lter
3. If the carbon lters are already tted (two
lters that cover the protective grilles for the
motor impeller) and have to be replaced,
turn the central handle anti-clockwise to
unlock them.
4. Open the two lter shells
5. Pull out the two circular mats
6. Proceed in reverse order to t the new
lters.
7. Ret the grease lters.
Unlike traditional charcoal lters, this
charcoal lter can be washed and
reactivated.
Care and cleaning long life Charcoal lter
• The anti-odour lter shall be washed and
regenerated every 3-4 months (or more
frequently if the hood is subject to intensive
use), up to a Max. of 8 regeneration cycles
(in case of particularly intensive use it is
recommended that you do not exceed 5
cycles).
Regeneration procedure:
• Wash in the dishwasher at a MAX
temperature of 70° or hand wash in hot
water without using abrasive sponges (do
not use detergents!)
• Dry in the oven at a MAX temperature of
70° for 2 hours or dry at room temperature,
standing the lter in a vertical position to
facilitate drainage.
Lamp maintenance
1. Disconnect the hood from the power
supply.
2. Open the extractor grille or remove the
self-supporting grease lter.
3. Replace the damaged lamp. Use E14 3W
max LED lamps only.
4. Ret the extractor grille or grease lter.
IMPORTANT: make sure you don’t touch the
lamp with your bare hands.
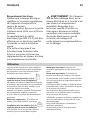
Lamp Power
(W)
Socket Voltage
(V)
LCL ILCOS D Code
3E14 230 55 DRGSB/C/UB-3/27/
1B-230-E14-55

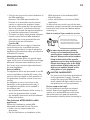
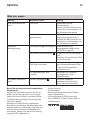
10ENGLISH
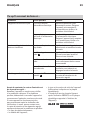
Before contacting the Authorized Service
Centre:
Switch the appliance on again to see if the
problem has disappeared. If not, switch it off
again and repeat the operation after an hour.
If your appliance still does not work properly
after carrying out the checks listed in the
troubleshooting guide and switching the
appliance on again, contact the Authorized
Service Centre, clearly explaining the problem
and specifying:
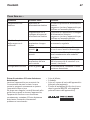
Problem Possible cause Solution
The appliance does not
work
There is no mains
electrical power
Check for the presence of mains
electrical power.
Turn off the appliance and restart it to
see if the faults persists.
The appliance is not
connected to the
electrical supply
Check if the appliance is connected to
the electrical supply.
Turn off the appliance and restart it to
see if the faults persists.
The hood’s suction level
is not enough
The suction speed is too
low
Check the suction speed and adjust as
necessary.
The grease lters are
dirty 2
Check that the lters are clean
If not, clean the lters in the dishwasher.
The anti-odors lters are
dirty
Check that the anti-odour lters are
properly washed as recommended
The air vents ar e
obstructed
Check the air vents for any obstructions
and remove as necessary.
The light does not work The LED is broken 3 For replacement, contact the Authorized
Service Centre.
• the type of fault;
• the model;
• the type and serial number of the appliance
(given on the rating plate);
• the Service number (the number after the
word SERVICE on the rating plate inside the
appliance).
What to do if ...

600
510
132
132
118
LED Bulb
1x3W
E14
650
500
7,2
63,3
1,7
8,1
89
160
180
272
98,5
3
87
na
na
71
11ENGLISH
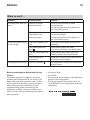
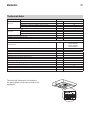
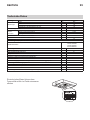
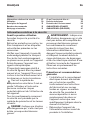
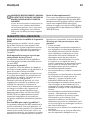
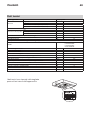
Technical data
The technical information is situated in
the rating plate on the internal side of the
appliance.
Type of product Wall mounted hood
Dimensions
Width mm
Depth mm
Total height in extraction installation version min-max mm
Total height in recirculation installation version min-max mm
Total power W
Lamps info
Type
Number & Power W
Socket
Installation minimum height - gas hob mm
Installation minimum height - elec hob mm
Product Weight Kg
Additional Product Information compliant to commission regulation (EU) No 66/2014
Model identier
LAGAN 50401383
LAGAN 50401398
LAGAN 50401397
LAGAN 90382504
Annual Energy Consumption kWh/a
Time increase factor
Fluid Dynamic Efciency %
Energy Efciency Index
Measured air ow rate at best efciency point m³/h
Measured air pressure at best efciency point Pa
Maximum air ow m³/h
Measured electric power input at best efciency point W
Nominal power of the lighting system W
Average illumination of the lighting system on the cooking surface lux
Power consumption in standby mode W
Power consumption off mode W
A-waighted Sound Power Emission at maximum speed dB(A)

12ENGLISH
Environmental concerns
Disposal of packing
The packing material is 100% recyclable and
is marked with the recycle symbol . The
various parts of the packing must therefore be
disposed of responsibly and in full compliance
with local authority regulations governing
waste disposal.
Scrapping the product
- This appliance is marked in compliance
with European Directive 2012/19/EU, Waste
Electrical and Electronic Equipment (WEEE).
- By ensuring this product is disposed of
correctly, you will help prevent potential
negative consequences for the environment
and human health, which could otherwise
be caused by inappropriate waste handling
of this product.
The symbol on the product or on the
accompanying documentation indicates that
it should not be treated as domestic waste but
must be taken to an appropriate collection
centre for the recycling of electrical and
electronic equipment.
Scrapping of household appliances
• This appliance is manufactured with
recyclable or reusable materials. Dispose of
it in accordance with local waste disposal
regulations. Before scrapping, cut off the
power supply cable.
• For further information on the treatment,
recovery and recycling of household
electrical appliances, contact your
competent local authority, the collection
service for household waste or the store
where you purchased the appliance.
Energy saving tips
• Switch ON the hood at minimum speed
when you start cooking and kept it running
for few minutes after cooking is nished.
• Increase the speed only in case of large
amount of smoke and vapour and use boost
speed(s) only in extreme situations.
• Replace the charcoal lter(s) when
necessary to maintain a good odour
reduction efciency.
• Clean the grease lter(s) when necessary to
maintain a good grease lter efciency.
• Use the maximum diameter of the ducting
system indicated in this manual to optimize
efciency and minimize noise.
Declaration of conformity n
This appliance has been designed,
manufactured and marketed in compliance
with:
- safety objectives of the “Low Voltage”
Directive 2014/35/EU;
- the eco design requirements of european
regulations n. 65/2014, and n. 66/2014 in
conformity to the european standard en
61591 ;
- the protection requirements of Directive
“EMC” 2014/30/EU.
Electrical safety of the appliance can only be
guaranteed if it is correctly connected to an
approved earthing system.

13ENGLISH
How long is the IKEA guarantee valid?
This guarantee is valid for 2 years from the
original date of purchase of your appliance
at IKEA. The original sales receipt, is required
as proof of purchase. If service work is carried
out under guarantee, this will not extend the
guarantee period for the appliance.
Which appliances are not covered by the
IKEA ve (5) years guarantee?
The range of appliances named LAGAN and
all appliances purchased in IKEA before 1st of
August 2007.
Who will execute the service?
IKEA service provider will provide the
service through its own service operations or
authorized service partner network.
What does this guarantee cover?
The guarantee covers faults of the appliance,
which have been caused by faulty construction
or material faults from the date of purchase
from IKEA. This guarantee applies to domestic
use only. The exceptions are specied under
the headline “What is not covered under this
guarantee?” Within the guarantee period,
the costs to remedy the fault e.g. repairs,
parts, labour and travel will be covered,
provided that the appliance is accessible for
repair without special expenditure. On these
conditions the EU guidelines (Nr. 99/44/
EG) and the respective local regulations
are applicable. Replaced parts become the
property of IKEA.
What will IKEA do to correct the problem?
IKEA appointed Service Provider will examine
the product and decide, at its sole discretion,
if it is covered under this guarantee. If
considered covered, IKEA Service Provider
or its authorized service partner through its
own service operations, will then, at its sole
discretion, either repair the defective product
or replace it with the same or a comparable
product.
What is not covered under this guarantee?
• Normal wear and tear.
IKEA GUARANTEE
• Deliberate or negligent damage, damage
caused by failure to observe operating
instructions, incorrect installation or by
connection to the wrong voltage, damage
caused by chemical or electrochemical
reaction, rust, corrosion or water damage
including but not limited to damage caused
by excessive lime in the water supply,
damage caused by abnormal environmental
conditions.
• Consumable parts including batteries and
lamps.
• Non-functional and decorative parts which
do not affect normal use of the appliance,
including any scratches and possible color
differences.
• Accidental damage caused by foreign
objects or substances and cleaning or
unblocking of lters, drainage systems or
soap drawers.
• Damage to the following parts: ceramic
glass, accessories, crockery and cutlery
baskets, feed and drainage pipes, seals,
lamps and lamp covers, screens, knobs,
casings and parts of casings. Unless such
damages can be proved to have been
caused by production faults.
• Cases where no fault could be found during
a technician’s visit.
• Repairs not carried out by our appointed
service providers and/or an authorized
service contractual partner or where non-
original parts have been used.
• Repairs caused by installation which is faulty
or not according to specication.
• The use of the appliance in a non-domestic
environment i.e. professional use.
• Transportation damages. If a customer
transports the product to his home or
another address, IKEA is not liable for any
damage that may occur during transport.
However, if IKEA delivers the product to the
customer’s delivery address, then damage
to the product that occurs during this
delivery will be covered by IKEA.

14ENGLISH
• Cost for carrying out the initial installation of
the IKEA appliance.
However, if an IKEA appointed Service
Provider or its authorized service partner
repairs or replaces the appliance under
the terms of this guarantee, the appointed
Service Provider or its authorized service
partner will reinstall the repaired appliance
or install the replacement, if necessary.
• This does not apply within Ireland, customer
should contact the local IKEA dedicated
after sales line or the appointed Service
Provider for further information.
(just for GB)
These restrictions do not apply to fault-free
work carried out by a qualied specialist
using our original parts in order to adapt the
appliance to the technical safety specications
of another EU country.
How country law applies
The IKEA guarantee gives you specic legal
rights, which cover or exceed all the local legal
demands. However these conditions do not
limit in any way consumer rights described in
the local legislation.
Area of validity
For appliances which are purchased in one EU
country and taken to another EU country, the
services will be provided in the framework of
the guarantee conditions normal in the new
country.
An obligation to carry out services in the
framework of the guarantee exists only if
the appliance complies and is installed in
accordance with:
- the technical specications of the country in
which the guarantee claim is made;
- the Assembly Instructions and User Manual
Safety Information.
The dedicated AFTER SALES for IKEA
appliances
Please don’t hesitate to contact IKEA
appointed Authorized Service Centre to:
• make a service request under this
guarantee;
• ask for clarications on installation of the
IKEA appliance in the dedicated IKEA
kitchen furniture;
• ask for clarication on functions of IKEA
appliances.
To ensure that we provide you with the best
assistance, please read carefully the Assembly
Instructions and/or the User Manual before
contacting us.
How to reach us if you need our service
Please refer to the last page of
this manual for the full list of IKEA
appointed Authorized Service Centre
and relative national phone numbers.
i
In order to provide you a quicker
service, we recommend to use the
specic phone numbers listed on this
manual. Always refer to the numbers
listed in the booklet of the specic
appliance you need an assistance for.
Please also always refer to the IKEA
article number (8 digit code) and 12
digit service number placed on the
rating plate of your appliance.
i
SAVE THE SALES RECEIPT!
It is your proof of purchase and required
for the guarantee to apply. The sales
receipt also reports the IKEA name and
article number (8 digit code) for each of
the appliances you have purchased.
Do you need extra help?
For any additional questions not related
to After Sales of your appliances please
contact your nearest IKEA store call centre.
We recommend you read the appliance
documentation carefully before contacting us.

15
Vor dem ersten Gebrauch
Ihre eigene Sicherheit und die der
Anderen ist sehr wichtig.
Entfernen Sie Kartonteile,
Schutzfolien und Klebeetiketten von
den Zubehörteilen.
Kontrollieren Sie das Gerät auf
eventuelle Transportschäden.
Stellen Sie keine Gegenstände auf
dem Gerät ab, um Beschädigungen
zu vermeiden.
Vermeiden Sie es, das Gerät
Witterungseinüssen auszusetzen.
Diese Anweisungen sowie
das Gerät beinhalten wichtige
Sicherheitshinweise, die Sie
durchlesen und stets beachten
sollten.
Dieses Symbol warnt vor
möglichen Gefahren für die
Sicherheit des Benutzers und
andere Personen.
Alle Warnhinweise beginnen mit
diesem Warnsymbol und enthalten
einen der folgenden Begriffe:
GEFAHR: Weist auf eine
Gefahrensituation hin, die zu
schweren Verletzungen führt, wenn
sie nicht vermieden wird.
Sicherheitshinweise
ACHTUNG: Weist auf eine
Gefahrensituation hin, die bei
mangelnder Vorsicht zu schweren
Verletzungen führt.
Alle Warnhinweise nennen
das mögliche Sicherheitsrisiko
und geben an, wie die Gefahr
von Verletzungen, Schäden
und Stromschlägen durch
bestimmungsfremden Gebrauch
des Gerätes vermieden werden
kann. Halten Sie sich genau an
folgende Anweisungen.
Vorsichtsmaßnahmen und
allgemeine Empfehlungen
• Die Installation muss unter
Beachtung der bestehenden
Vorschriften und Gesetze von
einem konzessionierten
• Fachmann gemäß den
Herstelleranweisungen und
in Übereinstimmung mit den
geltenden Sicherheitsvorschriften
des Landes vorgenommen
werden. Reparieren Sie das
Gerät nicht selbst und tauschen
Sie keine Teile aus, wenn dies
vom Benutzerhandbuch nicht
ausdrücklich vorgesehen ist.
Inhalt
DE
DEUTSCH
Sicherheitshinweise 15
Gebrauch 18
Produktbeschreibung 19
Bedienfeld 19
Reinigung und Pege 19
Was tun, wenn... 22
Technische Daten 23
Hinweise zum Umweltschutz 24
IKEA GARANTIE 25

16DEUTSCH
• Halten Sie das Gerät von der
Stromversorgung getrennt, bis
der Einbau durchgeführt wurde.
WARNUNG: Wenn die
Schrauben oder
Befestigungsvorrichtungen nicht
gemäß dieser Anleitungen
eingebaut werden, kann dies zu
elektrischen Gefahren führen.
• Die Erdung dieses Geräts ist
gesetzlich vorgeschrieben. (Dies
ist jedoch nicht für Dunstabzüge
der Klasse II möglich, die
durch das Symbol auf dem
Typenschild gekennzeichnet
sind).
• Ziehen Sie nicht am Netzkabel
des Gerätes, um den Stecker aus
der Steckdose zu ziehen.
• Nach der Installation dürfen
Strom führende Teile für den
Benutzer nicht mehr zugänglich
sein.
• Berühren Sie das Gerät nicht mit
feuchten Händen und benutzen
Sie es nicht, wenn Sie barfuß
sind.
• Erwachsene mit eingeschränkten
physischen, sensorischen oder
geistigen Fähigkeiten oder
einem Mangel an Erfahrung
oder Kenntnis des Geräts sowie
Kinder ab einem Alter von 8
Jahren dürfen dieses Gerät
benutzen, wenn sie dabei
beaufsichtigt werden oder in
die sichere Verwendung des
Geräts eingewiesen worden
sind und die damit verbundenen
Gefahren begreifen. Kinder
dürfen nicht an dem Gerät
herum spielen. Unbeaufsichtigte
Kinder dürfen das Gerät nicht
reinigen oder warten.
• Alle anderen Wartungsarbeiten
müssen durch einen Fachmann
durchgeführt werden.
• Beim Bohren durch die Wand
darauf achten, keine elektrischen
Verbindungen und/oder
Leitungen zu beschädigen.
• Luftauslässe müssen stets nach
außen geführt werden.
• Der Hersteller übernimmt keine
Verantwortung für Schäden
aufgrund von unsachgemäßer
Verwendung oder falscher
Einstellungen.
• Konstante und sachgemäße
Pege und Reinigung
gewährleisten den
einwandfreien Betrieb und
die Leistungstüchtigkeit Ihrer
Abzugshaube. Säubern Sie
regelmäßig alle verschmutzten
Flächen Ihrer Abzugshaube, um
zu verhindern, dass sich eine
Fettschicht darauf bildet. Sie
sollten den Filter regelmäßig
entfernen und reinigen oder
ersetzen.
Dies muss gemäß den
gegebenen „Reinigungs-
und Wartungsanweisungen“
erfolgen.

17DEUTSCH
• Bereiten Sie keine ambierten
Gerichte unter der Abzugshaube
zu. Bei offenen Flammen besteht
Brandgefahr.
• Das Nichtbeachten der
Reinigungsvorschriften für die
Dunstabzugshaube sowie für
das Auswechseln und Reinigen
der Filter führt zu Brandgefahr.
• Die angesaugte Luft darf nicht in
ein Abluftrohr geleitet werden,
in das die Abluft von mit Gas
oder anderen Brennstoffen
betriebenen Geräten abgeleitet
wird, sondern muss einen
separaten Abzug haben. Dabei
sind alle nationalen Vorschriften
zur Abluftableitung einzuhalten.
• Wird die Dunstabzugshaube
zusammen mit anderen
Geräten betrieben, die mit Gas
oder anderen Brennstoffen
angetrieben werden, darf der
negative Druck im Raum einen
Wert von 4Pa (4 x 10⁻⁵ bar)
nicht überschreiten. Daher muss
für eine ausreichende Belüftung
des Raums gesorgt werden.
Im Zweifelsfall wenden Sie sich
bitte an einen autorisierten
Kundendienst oder eine
qualizierte Fachkraft.
• Lassen Sie beim Frittieren keine
Pfannen unbeaufsichtigt, da
das erhitzte Fett Feuer fangen
könnte.
• Stellen Sie vor dem Anfassen
der Lampen sicher, dass diese
abgekühlt sind.
• Benutzen Sie die Haube nicht
ohne die korrekt montierte
Halogenlampe, da sonst
Stromschlaggefahr besteht.
• Die Abzugshaube ist keine
Arbeitsplatte, stellen Sie daher
keine Gegenstände darauf ab
und belasten Sie sie nicht.
• Tragen Sie bei allen
Installations- und
Wartungsarbeiten stets
Schutzhandschuhe.
• Dieses Gerät eignet sich nicht für
den Gebrauch im Freien.
ACHTUNG: Während des
Betriebs des Kochfelds können
die erreichbaren Teile der
Dunstabzugshaube heiß werden.
Aufstellung und Anschluss
Wenden Sie sich im Falle von
Problemen an einen autorisierten
Kundendienst. Um eventuellen
Schäden vorzubeugen, sollten
Sie das Gerät erst unmittelbar
vor der Installation von der
Verpackungsunterlage nehmen.
Vorbereitung des Einbaus
WARNUNG: Zum Transport
und zur Installation der Haube
sind zwei oder mehrere Personen
erforderlich.
Der Mindestabstand zwischen dem
Kochfeld und dem unteren Teil
der Abzugshaube darf bei Gas-
Kochfeldern oder mit anderem
Brennstoff betriebenen Kochfeldern

18DEUTSCH
Die Dunstabzugshaube wurde so konzipiert,
dass sie entweder als “Absauganlage” oder
als “Umluftanlage” installiert und verwendet
werden kann.
Modell mit Absauganlage (siehe das
Symbol in der Installationsanweisung)
Die Schwaden werden angesaugt und über
das am Dampfauslass der Abzugshaube
befestigte Abluftrohr (nicht mitgeliefert) nach
außen befördert.
Stellen Sie sicher, dass das Abluftrohr korrekt
mit dem Luftauslass verbunden ist, indem Sie
für eine geeignete Verbindung sorgen.
Wichtig: Entfernen Sie die eventuell bereits
installierten Kohlelter.
Modell mit Umluftanlage (siehe das
Symbol in der Installationsanweisung)
Die Luft wird durch einen oder mehrere
Kohlelter angesaugt und geltert und danach
wieder in den Raum entlassen.
Wichtig: Sorgen Sie für ausreichende
Frischluftzufuhr zur Abzugshaube.
Wichtig: Hat die Abzugshaube keine
Kohlelter, sind diese vor dem Gebrauch
zu montieren. Filter sind in IKEA
Einrichtungshäusern erhältlich.
Die Abzugshaube ist fern von stark
verschmutzten Bereichen, Fenstern, Türen und
Wärmequellen zu installieren.
Das Zubehör zur Befestigung an der Wand
wird nicht mitgeliefert, da Wände aus
unterschiedlichen Materialien verschiedene
Typen von Befestigungselementen erfordern.
Bitte Befestigungselemente verwenden,
die für die Wandbeschaffenheit und das
Gerätegewicht ausgelegt sind. Für weitere
Informationen wenden Sie sich bitte an einen
Fachhändler.
Heben Sie diese Anleitung zum späteren
Nachschlagen gut auf.
nicht unter 65 cm, und bei Elektro-
Kochfeldern nicht unter 50 cm
liegen.
Überprüfen Sie vor der Installation
auch die im Handbuch des
Kochfeldes angegebenen
Mindestabstände.
Schreiben die
Installationsanweisungen des
Kochfelds einen größeren Abstand
vor, ist dieser natürlich zu beachten.
Anschluss an das Stromnetz
Die Spannung auf dem Typenschild
des Gerätes muss der Spannung
des Stromnetzes entsprechen.
Diese Information nden Sie im
Inneren der Abzugshaube unter
dem Fettlter.
Das Netzkabel (Typ H05 VV-F)
darf nur durch Fachpersonal ersetzt
werden. Wenden Sie sich an eine
autorisierte Kundendienststelle.
Der Stecker der Dunstabzugshaube
(falls vorhanden) muss an eine
normgerechte und gut zugängliche
Steckdose angeschlossen werden.
WARNUNG: Sollte das Gerät
nicht mit Stecker versehen,
sondern direkt mit dem Stromnetz
verbunden und die Steckdose
unzugänglich sein, müssen Sie
einen normgerechten zweipoligen
Schalter verwenden, der eine totale
Isolierung vom Stromnetz im Falle
von gemäß Klasse 3 auftretenden
Überspannungen gewährleistet und
normgerecht verdrahtet ist.
Gebrauch

19DEUTSCH
Produktbeschreibung
1 Bedienfeld
2 Fettlter
3 Beleuchtung
Bedienfeld
ACHTUNG:
-Verwenden Sie keine
Wasserdampfreinigungsgeräte.
-Trennen Sie die Dunstabzugshaube von der
Stromversorgung.
WICHTIG: Verwenden Sie keine aggressiven
Reinigungs- oder Scheuermittel. Falls ein solches
Mittel doch mit dem Gerät in Kontakt kommt,
reinig en Sie es sofort mit einem feuchten Tuch.
• Reinigen Sie die Flächen mit einem feuchten
Tuch. Entfernen Sie starke Verschmutzungen
mit Wasser und ein paar Tropfen
Geschirrspülmittel. Reiben Sie mit einem
trockenen Tuch nach.
WICHTIG: Vermeiden Sie den Gebrauch
von Scheuerschwämmen, Topfkratzern und
Metallschabern. Diese können die Oberächen
mit der Zeit beschädigen.
• Verwenden Sie zur Reinigung spezielle
Reinigungsmittel und beachten Sie die
Reinigung und Pege
A Taste für Beleuchtung
Die Taste für die Beleuchtung verfügt über
zwei Stellungen.
Zum Einschalten der Beleuchtung die Taste
nach rechts bewegen.
B Wahltaste für Absaugleistung.
Die Taste verfügt über verschiedene
Stellungen zur Wahl der Absaugleistung
in Abhängigkeit der von der Haube
Herstelleranweisungen.
WICHTIG: Reinigen Sie die Fettlter mindestens
einmal monatlich und entfernen Sie alle Öl- und
Fettrückstände.
Reinigung des Fettlters
Der Metall-Fettlter hat eine unbegrenzte
Lebensdauer und ist ein Mal im Monat
mit der Hand oder im Geschirrspüler bei
Niedrigtemperatur und im Schnellspülgang zu
reinigen. Bei der Reinigung des Fettlters im
Geschirrspüler wird sein Aussehen stumpf, doch
dies beeinträchtigt die Filterleistung nicht.
Wartung des Fettlters
1. Trennen Sie die Abzugshaube vom Stromnetz.
2. Bauen Sie die Fettlter aus: ziehen Sie dazu
den Federgriff nach unten und nehmen Sie
dann den Filter nach unten heraus.
3. Nach der Reinigung des Fettlters für
die Montage alle Schritte in umgekehrter
32
1
AB
zu bewältigenden Dampf- und
Rauchentwicklung.
Zur Erhöhung der Absaugleistung die Taste
nach rechts bewegen.

20DEUTSCH
Reihenfolge ausführen und sicherstellen, dass
der Filter die gesamte Absaugäche abdeckt.
Wartung des Aktivkohlelters (wenn die
Dunstabzugshaube in der Umluftversion
installiert ist)
1. Ziehen Sie den Netzstecker oder trennen Sie
die Stromversorgung.
2. Den Fettlter entfernen
3. Wenn die Aktivkohlelter bereits eingebaut
sind (zwei Filter, die die Schutzgitter des
Motorgebläserads abdecken) und ersetzt
werden müssen, drehen Sie den mittleren
Griff gegen den Uhrzeigersinn, um sie zu
entriegeln.
4. Öffnen Sie die beiden Filtergehäuse
5. Entnehmen Sie die beiden runden Einlagen
6. Zum Einsetzen der neuen Filter führen Sie die
beschriebenen Arbeitsschritte in umgekehrter
Reihenfolge aus.
7. Setzen Sie den Fettlter wieder ein.
Pege und Reinigung sorgen für eine lange
Lebensdauer des Kohlelters
• Der geruchsneutralisierende Filter sollte
alle 3-4 Monate (oder häuger, wenn die
Dunstabzugshaube intensiv genutzt wird)
und bis zu max. 8 Regenerationszyklen (bei
besonders intensiver Nutzung wird empfohlen
5 Zyklen nicht zu überschreiten) gewaschen
und regeneriert werden.
Regenerationsverfahren:
• In der Geschirrspülmaschine bei einer MAX-
Temperatur von 70° oder mit der Hand
in heißem Wasser ohne Verwendung von
scheuernden Schwämmen waschen (keine
Reinigungsmittel verwenden!)
• Im Ofen bei einer MAX-Temperatur von
70° für 2 Stunden oder bei Raumtemperatur
trocknen, wobei der Filter senkrecht aufgestellt
werden muss, um die Entwässerung zu
erleichtern.
Wartung der Lampe
1. Trennen Sie die Abzugshaube vom Stromnetz.
2. Öffnen Sie das Absauggitter bzw. entfernen
Sie den selbst tragenden Fettlter.
3. Die beschädigte Lampe austauschen.
Verwenden Sie nur max E14 3W
LED-Lampen.
4. Bauen Sie das Ansauggitter bzw. den
Fettlter wieder ein.
WICHTIG: Berühren Sie die Lampe auf keinen
Fall mit den Händen.
Lamp Power
(W)
Socket Voltage
(V)
LCL ILCOS D Code
3E14 230 55 DRGSB/C/UB-3/27/
1B-230-E14-55
Seite wird geladen ...
Seite wird geladen ...
Seite wird geladen ...
Seite wird geladen ...
Seite wird geladen ...
Seite wird geladen ...
Seite wird geladen ...
Seite wird geladen ...
Seite wird geladen ...
Seite wird geladen ...
Seite wird geladen ...
Seite wird geladen ...
Seite wird geladen ...
Seite wird geladen ...
Seite wird geladen ...
Seite wird geladen ...
Seite wird geladen ...
Seite wird geladen ...
Seite wird geladen ...
Seite wird geladen ...
Seite wird geladen ...
Seite wird geladen ...
Seite wird geladen ...
Seite wird geladen ...
Seite wird geladen ...
Seite wird geladen ...
Seite wird geladen ...
Seite wird geladen ...
Seite wird geladen ...
Seite wird geladen ...
Seite wird geladen ...
Seite wird geladen ...
Seite wird geladen ...
Seite wird geladen ...
Seite wird geladen ...
Seite wird geladen ...
-
 1
1
-
 2
2
-
 3
3
-
 4
4
-
 5
5
-
 6
6
-
 7
7
-
 8
8
-
 9
9
-
 10
10
-
 11
11
-
 12
12
-
 13
13
-
 14
14
-
 15
15
-
 16
16
-
 17
17
-
 18
18
-
 19
19
-
 20
20
-
 21
21
-
 22
22
-
 23
23
-
 24
24
-
 25
25
-
 26
26
-
 27
27
-
 28
28
-
 29
29
-
 30
30
-
 31
31
-
 32
32
-
 33
33
-
 34
34
-
 35
35
-
 36
36
-
 37
37
-
 38
38
-
 39
39
-
 40
40
-
 41
41
-
 42
42
-
 43
43
-
 44
44
-
 45
45
-
 46
46
-
 47
47
-
 48
48
-
 49
49
-
 50
50
-
 51
51
-
 52
52
-
 53
53
-
 54
54
-
 55
55
-
 56
56


in anderen Sprachen
- English: IKEA LAGAN User manual
- français: IKEA LAGAN Manuel utilisateur
- italiano: IKEA LAGAN Manuale utente
Verwandte Artikel
-
IKEA HD KK00 90S Benutzerhandbuch
-
-
-
-
-
IKEA MATTRADITION 00368767 Bedienungsanleitung
-
Whirlpool HO EV W Benutzerhandbuch
-
-
IKEA HOO C00 W Benutzerhandbuch
-