
Doorbell
User Manual
HWD01878 HWD01888
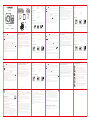
Package Contents
Product Layout
Product Specification
Transmitter installation
HWD01878HWD01888
Battery
2032
x1 x1
User
Manual
x1
Double
Sided
Adhesive
Tape
①
②
③
Setup Button
Music Button
Volume Adjustment
①
②
③
EN
①
②
③
Setup-Taste
Musik-Taste
Lautstärke Regelung
DE
①
②
③
Bouton de configuration
Bouton de musique
Réglage du volume
Receiver working voltage:
Power consumption:
AC100-240V 50/60Hz
1W
FR
①
②
③
Pulsante Setup
Pulsante Musica
Regolazione Volume
IT
①
②
③
Botón de configuración
Botón de música
Ajuste de volumen
ES
1. Receiver
Battery:
1. Remove the battery isolation strip on the back of the transmitter before use.
2. Use the enclosed double-sided tape to stick the transmitter to the wall or door.
DC 3V (CR2032 x1)
Working Current: 30mA
Transmission Power: 10dBm
2. Transmitter
Instructions
1. Press button “ ” to choose from working modes: Flashing only, Ringing only,
Flashing & Ringing
2. “ ” Press the music button once to play the next chime and select the one you like.
Press twice to go back to the previous chime.
3. “ ” Press the button once each time to adjust the 4 volume levels. (Low - High)
4. Pairing Method
a. Choose your favourite melody.
b. Long press the music button “ ” (at least 3 seconds) on the receiver until a
‘dingdong’ tone is heard.
c. Press the transmitter button once, the receiver will play the chosen melody.
5. Press and hold the Volume Adjustment “ ” for at least 5 seconds until a
‘dingdong, dingdong’ tone is heard. (This will clear the pairing)
6. There is a ‘dingdong’ tone when the receiver is plugged in for the first time. This
indicates the power is on.
7. Indicator light the light will flash while the chime is playing on the receiver. The
transmitter indicator light will be lit up when pressing the bellpush.
EN EN EN
Produktspezifikationen
Arbeitsspannung des Empfängers:
Stromverbrauch:
AC100-240V 50/60Hz
1W
1. Empfänger
Senderinstallation
1. Entfernen Sie vor dem Gebrauch den Batterietrennstreifen auf der Rückseite des
Senders.
2. Befestigen Sie den Sender mit dem beiliegenden Klebeband an der Wand oder an
der Tür.
Anweisungen
1. Drücken Sie die Taste “ ” um auszuwählen drei Betriebsarten: Nur blinken, Nur
klingeln, Blinken & Klingeln
2. “ ” Drücken Sie einmal auf die Musiktaste, um das nächste Glockenspiel
abzuspielen, wählen Sie dann das gewünschte aus. Drücken Sie zweimal auf
die Musiktaste, um zum vorherigen Glockenspiel zurückzukehren.
3. “ ”Drücken Sie jedes Mal die Taste, um die 4 Lautstärkepegel anzupassen.
Niedrig - Hoch
4. Pairing-Methode.
a. Wählen Sie Ihre Lieblingsmelodie.
b. Halten Sie die Musik taste am Receiver mindestens “ ” 3 Sekunden lang
gedrückt, bis ein ,Dingdong -Ton zu hören ist.
c. Drücken Sie die Sendertaste einmal, der Empfänger spielt die gewählte Melodie ab.
5. Deaktivieren des Pairings: Halten Sie die Lautstärke Regelung mindestens “ ” 5
Sekunden lang gedrückt, bis ein "Dingdong, Dingdong" -Ton zu hören ist. (Dadurch
wird das Pairing gelöscht.)
6. Beim ersten Anschließen des Receivers ertönt ein Klingelton. Dies zeigt an, dass das
Gerät eingeschaltet ist.
7. Kontollleuchte: Die Leuchte blinkt, während der Signalton auf dem Empfänger
abgespielt wird. Die Senderkontrollleuchte leuchtet auf, wenn Sie die Klingeltaste
drücken.
Batterie: DC 3V (CR2032 x1)
Arbeitsstrom: 30 mA
Sendeleistung 10dBm
2. Sender
DE
DE DE
Spécifications du produit
Installation de l’émetteur
Courant de fonctionnement du récepteur:
consommation d'énergie:
AC100-240V 50/60Hz
1W
1. Récepteur
Batterie:
Courant de travail:
1. Retirez la bande d’isolation à l’arrière de l’émetteur avant de l’utiliser.
2. Utilisez le ruban adhésif double-face inclus pour coller l’émetteur au mur ou à la
porte.
Instructions
1. Appuyez sur le bouton “ ” pour choisir trois modes de travail: clignotant
uniquement, sonnerie uniquement, clignotant et sonnerie
2. “ ” Appuyez une fois sur le bouton musique pour passer à la mélodie suivante
et sélectionnez celle que vous aimez. Appuyez deux fois pour revenir à la mélodie
précédente.
3. “ ” Appuyez sur le bouton à chaque fois pour régler les 4 niveaux de volume.
(Faible - Haute)
4. Méthode d’association
a. Choisissez votre mélodie préférée.
b. Appuyez longuement sur le bouton musique “ ” (au moins 3 secondes) sur le
récepteur jusqu’à ce que vous entendiez un son ‘ding dong’.
c. Appuyez une fois sur le bouton de l’émetteur, le récepteur va jouer la mélodie
choisie.
5. Supprimer l’association : appuyez et retenez le Réglage du volume “ ” pendant
au moins 5 jusqu’à ce que vous entendiez un son ‘ding dong’. (Cela supprimera
l’association)
6. Vous entendez un son ‘ding dong’ quand le récepteur est branché pour la première
fois. Cela indique qu’il est en marche.
7. Voyant indicateurl e voyant va clignoter tandis que le récepteur joue la mélodie.
Le voyant de l’émetteur s’allume quand vous appuyez sur le bouton de sonnerie.
DC 3V (CR2032 x1)
30mA
Puissance de transmission: 10dBm
2. Transmitter
FR FR FR
Especificaciones del producto
Instalación del transmisor
Voltaje de funcionamiento del receptor:
el consumo de energía:
AC100-240V 50/60Hz
1W
1. Receptor
Batería:
Corriente de trabajo:
1. Retire la tira de aislamiento de la batería en la parte posterior del transmisor antes
de usarlo.
2. Use cinta de doble cara incluida para pegar el transmisor a la pared o a la puerta.
Instrucciones
1. Presione el botón “ ” para elegir seleccione el modo de trabajo: intermitente
silencioso / sin parpadeo / Sonando con luces intermitentes
2.“ ”Presione el botón musical una sola vez para reproducir el siguiente timbre y
seleccione el que sea de su agrado. Presione dos veces para volver al timbre anterior.
3. “ ”Presione el botón cada vez para ajustar los 4 niveles de volumen. (Bajo - Alto)
4. Método de emparejamiento
a. Elija su melodía preferida.
b. Mantenga presionado el botón de melodía “ ” (al menos 3 segundos) en el
receptor, hasta que se escuche un tono "dingdong".
c. Presione el botón del transmisor una vez y el receptor reproducirá la melodía.
5. Borrado del emparejamiento: mantenga presionado el Ajuste de volumen “ ” de
melodía durante al menos 5 segundos hasta que se escuche un tono "dingdong,
dingdong". (Esto borrará el emparejamiento)
6. Cuando el receptor se enchufa por primera vez, escuchará un tono "dingdong",
indicando que está encendido.
7. Luz indicadora: la luz parpadeará mientras la melodía se reproduce en el receptor. La
luz indicadora del transmisor se encenderá cuando presione el botón de la melodía.
DC 3V (CR2032 x1)
30mA
Potencia de transmisión: 10dBm
2. Transmisor
ES
ES ES
Specifiche del prodotto
Installazione del trasmettitore
Tensione di funzionamento del ricevitore:
consumo di energia:
AC100-240V 50/60Hz
1W
1. Ricevitore
Batteria:
Corrente di funzionamento:
1. Rimuovere la striscia isolante dalla batteria sul retro del trasmettitore prima dell'uso.
2. Usare il nastro biadesivo fornito per attaccare il trasmettitore alla parete o alla
porta.
Istruzioni
1. Premere il tasto “ ” per scegliere sono disponibili tre modalità: Solo lampeggi-
ante Solo squillo, Lampeggiante e squillo
2.“ ” Premere una volta il tasto della musica per riprodurre la soneria successiva
e sceglierne una che piace. Premere due volte per tornare alla precedente soneria.
3.“ ” Premere il tasto ogni volta per regolare i 4 livelli di volume. (Basso - Alto)
4. Metodo di Accoppiamento
a. Scegliere la melodia preferita.
b. Premere a lungo il tasto musicale “ ”(almeno per 3 secondi) sul ricevitore fino
a quando non viene emesso un tono 'dingdong'.
c. Premere una volta il tasto del trasmettitore, il ricevitore riprodurrà la melodia
scelta.
5. Eliminare l'accoppiamento: tener premuto il Regolazione Volume per almeno “ ”
5 secondi finché non viene emesso un tono 'dingdong, dingdong'. (Questo eliminerà
l'accoppiamento)
6. Si sente un tono 'dingdong' quando il ricevitore viene collegato per la prima volta.
Ciò indica che l'alimentazione è accesa.
7. Indicatore luminoso: l’indicatore lampeggia mentre il cicalino è in riproduzione sul
ricevitore. La spia dell'indicatore del trasmettitore si accende quando si premi il
campanello.
DC 3V (CR2032 x1)
30mA
Potenza di trasmissione: 10dBm
2. Trasmettitore
IT IT IT
IMPORTANT SAFETY INSTRUCTIONS-CAREFULLY
FOLLOW THESE INSTRUCTIONS.
Limited 12-Month Warranty
FCC Statement
1. SAVE THESE INSTRUCTIONS - This sheet contains important safety and
operating instructions.
2. Before using the product, read all instructions and caution markings on
the product, accessories and device using our product.
3. This appliance is not intended for use by persons (including children)
with reduced physical, sensory or mental capabilities, or lack of
experience and knowledge, unless they have been given supervision or
instruction concerning use of the appliance by a person responsible for
their safety.
4. Children should be supervised to ensure that they do not play with the
appliance.
5. Keep the product away from fire or explosion may occur.
6. For proper insertion, please observe polarity indicators ( +/-).
7. Remove the batteries if the product is not going to be used for a long
period of time.
8. Do not place the product in or near any inflammable, explosive or
hazardous object.
9. The doorbell is waterproof to some extent, but it still needs some
protection so that it can function normally, so please do not place it
in or near water, rain, excess moisture, or extreme heat.
10. Do not operate the product with damaged cord or plug.
11. Do not operate the product if it has been damaged in any way.
Warning: Changes or modifications to this unit not expressly approved by the party
responsible for compliance could void the user's authority to operate the equipment.
NOTE: This equipment has been tested and found to comply with the limits for a Class
B digital device, according to Part 15 of the FCC Rules. These limits are designed to
provide reasonable protection against harmful interference in a residential installation.
This equipment generates, uses and can radiate radiofrequency energy and, if not
installed and used in accordance with the instructions, may cause harmful interference
to radio communications.
However, there is no guarantee that interference will not occur in a particular
installation. If this equipment does cause harmful interference to radio or television
Correct Disposal of This Product
( Waste Electrical& Electronic Equipment )
This Marking shown on the product or its literature, indicate that it should not be
disposed with other household wastes at the end of its working life.
To prevent possible harm to the environment or human health from uncontrolled
waste disposal, please separate this from other types of wastes and recycle it
responsibly to promote the sustainable reuse of material resources.Household user
should contact either the retailer where they purchased this product, or their local
government office, for details of where and how they can take this item for
environmentally safe recycling.
Business users should contact their supplier and check the terms and conditions of the
purchase contact. This product should not be mixed with other commercial wastes for
disposal.
What this warranty covers.
Shenzhen Unichain Technology Co., LTD. (Manufacturer: “Unichain”) warrants to the
original purchaser of this TECKNET product that the product shall be free of defects in
design, assembly, material, or workmanship.
What the period of coverage is.
Unichain warrants the TECKNET product for 12 Months.
What will we do to correct problems?
Unichain will repair or replace, at its option, any defective product free of charge
(except for shipping charges for the product).
What is not covered by this warranty?
All above warranties are null and void if the TECKNET product is not provided to
Unichain for inspection upon Unichain’s request at the sole expense of the purchaser,
or if Unichain determines that the TECKNET product has been improperly installed,
altered in any way, or tampered with. The TECKNET Product Warranty does not protect
against acts of God such as flood, earthquake, lightning, war, vandalism, theft,
normal-use wear and tear, erosion, depletion, obsolescence, abuse, damage due to
12. Do not disassemble the product. Disassembly may result in a risk of
safety hazards.
13. Do not throw or shake the product.
14. To reduce the risk of electric shock, unplug the product from the
power supply when not in use or switch off the power supply.
low voltage disturbances (e.g. brownouts or sags), non-authorized program, or system
equipment modification or alteration.
How to claim the warranty
Please contact retailers or visit TECKNET website or email [email protected]
for more information. To extend the warranty period, please visit TECKNET website and
register your TECKNET products within 90 days of purchase.
Disclaimer
Every effort has been made to ensure that the information and procedures in this
guide are accurate and complete, no liability can be accepted for any errors or
omissions and we reserve the right to make any changes without further notice to any
products mentioned herein.
reception, which can be determined by turning the equipment off and on, the user is
encouraged to try to correct the interference by one or more of the following
measures:
~ Reorient or relocate the receiving antenna.
~ Increase the separation between the equipment and receiver.
~ Connect the equipment into an outlet on a circuit different from that to which the
receiver is connected.
~ Consult the dealer or an experienced radio/TV technician for help
The device must not be co-located or operating in conjunction with any other antenna
or transmitter.
This device complies with Part 15 of the FCC Rules. Operation is subject to the
following two conditions :
(1) This device may not cause harmful interference, and
(2) This device must accept any interference received, including interference that may
cause undesired operation.
SIMPLIFIED EU DECLARATION OF CONFORMITY
Hereby, Shenzhen Unichain Technology Co., Ltd. declares that the product type HWD01878 / HWD01888
is in compliance with Directive 2014/53/EU.
The full text of the EU declaration of conformity is available at the following internet address:
https://eu.tecknetonline.com/
12
For home installation scenarios, please read the following
precautions carefully:
1. Make sure that there is no interference from wireless radio devices of the same
frequency (433MHz) within the range of use.
2. DO NOT install the transmitter on metal doors, windows, surfaces, or
semi-closed metal frames, which will severely reduce the transmission distance.
3. The receiver should be installed as far away as possible from metal objects,
household appliances or other electrical equipment. Electromagnetic
interference will affect the wireless signal of the doorbell.
4. Avoid obstacles between the transmitter and receiver as much as possible. The
receiver should be installed as close to the direction of the transmitter as
possible.
5. The wireless signal strength of the doorbell ranks from strong to weak in
houses made of plank, brick, and concrete.
Lesen Sie bei einer Heiminstallation bitte die folgenden
Vorsichtsmaßnahmen sorgfältig durch:
1. Stellen Sie sicher, dass innerhalb des Nutzungsbereichs keine Interferenzen von
drahtlosen Funkgeräten derselben Frequenz (433 MHz) auftreten.
2. Montieren Sie den Sender NICHT auf Metalltüren, Fenstern, Oberflächen oder
halbgeschlossenen Metallrahmen, da dies die Übertragungsreichweite erheblich
verringern würde.
3. Der Empfänger sollte so weit wie möglich von Metallgegenständen,
Haushaltsgeräten oder anderen elektrischen Geräten und/ oder Quellen
entfernt installiert werden. Elektromagnetische Störungen beeinträchtigen das
Funksignal der Türklingel.
4. Vermeiden Sie möglichst Hindernisse zwischen Sender und Empfänger. Der
Empfänger sollte so nah wie möglich in Richtung des Senders installiert werden.
5. Die Funksignalstärke der Türklingel reicht von stark bis schwach in Häusern aus
Brettern, Ziegeln und Beton.
Pour l’installation dans les maisons, veuillez lire attentivement
les précautions suivantes :
1. Vérifiez qu’il n’y ait pas d’interférences provenant d’appareils radio sans fil de la
même fréquence (433MHz) dans le champ d’utilisation.
2. N’installez PAS l’émetteur sur les portes, fenêtres, surfaces ou cadres
semi-fermés en métal, ce qui pourrait réduire fortement la distance de
transmission.
3. Le récepteur devrait être installé aussi loin que possible des objets en métal,
des appareils ménagers ou des équipements électriques. Les interférences
électromagnétiques vont perturber le signal sans fil de la sonnette.
4. Évitez autant que possible les obstacles entre l’émetteur et le récepteur. Le
récepteur devrait être installé le plus près possible de la direction de l’émetteur.
5. La force du signal sans fil de la sonnette passe de fort à faible dans les maisons
en planches, briques et béton.
In caso d’installazione domestica, leggere con la massima
attenzione le seguenti precauzioni:
1. Accertarsi che non vi siano interferenze da dispositivi radio wireless della
medesima frequenza (433 MHz) entro il raggio di utilizzo.
2. NON installare il trasmettitore su porte, finestre, superfici o telai metallici
semichiusi, in quanto far ciò ridurrà non di poco la distanza di trasmissione.
3. Il ricevitore deve essere installato il più lontano possibile da oggetti metallici,
elettrodomestici o altre apparecchiature elettriche. Le interferenze elettromag-
netiche influiscono sul segnale wireless del campanello.
4. Evitare il più possibile la presenza di ostacoli tra il trasmettitore e il ricevitore. Il
ricevitore deve essere installato il più vicino possibile alla direzione del
trasmettitore.
5. La potenza del segnale wireless del campanello varia da forte a debole nelle
case a seconda che abbiano una struttura in legno, in mattoni o in cemento.
Para situaciones de instalación doméstica, por favor lea
detenidamente las siguientes precauciones:
1. Asegúrese de que no haya interferencia de dispositivos de radio en la misma
frecuencia (433MHz) dentro del rango de uso.
2. NO instale el transmisor en puertas o superficies de metal, ventanas o marcos
metálicos semicerrados, pues esto reduciría severamente la distancia de
transmisión.
3. El receptor debe instalarse lo más lejos posible de objetos metálicos,
electrodomésticos y otros equipos eléctricos. La interferencia electromagnética
afectará la señal inalámbrica del timbre.
4. Evite los obstáculos entre el transmisor y el receptor tanto como sea posible. El
receptor debe instalarse lo más cerca posible a la dirección del transmisor.
5. La intensidad de la señal inalámbrica del timbre va de fuerte a débil en las
casas construidas con madera, hormigón y concreto.
-
 1
1

in anderen Sprachen
- English: Tecknet HWD01878 User manual
- français: Tecknet HWD01878 Manuel utilisateur
- español: Tecknet HWD01878 Manual de usuario
- italiano: Tecknet HWD01878 Manuale utente
Verwandte Artikel
Andere Dokumente
-
Trust 71273 Benutzerhandbuch
-
 REV Ritter 0083960103 Bedienungsanleitung
-
DIO BELL-B11 Doorbell Benutzerhandbuch
-
HUMANTECHNIK sinolux Receiver T Benutzerhandbuch
-
HUMANTECHNIK LSA0002617 Benutzerhandbuch
-
 REV Ritter 0082640103 Bedienungsanleitung
-
Perel EDPTW Benutzerhandbuch
-
Velleman DB6 Benutzerhandbuch
-
Perel EDMTWR Benutzerhandbuch

