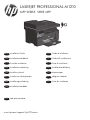
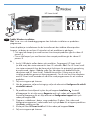
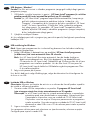
HP HotSpot LaserJet Pro M1218nfs MFP series Installationsanleitung
- Kategorie
- PC / Workstation Barebones
- Typ
- Installationsanleitung
Dieses Handbuch eignet sich auch für
Seite wird geladen ...

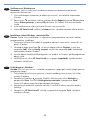
IT
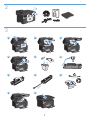
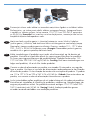
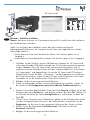
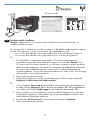
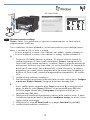
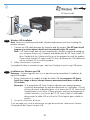
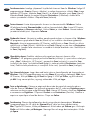
Posizionare il prodotto in un'area piana, ben ventilata, priva di polvere e lontana dalla
luce diretta dei raggi solari.
DE
Stellen Sie das Gerät an einem stabilen, gut durchlüfteten und staubfreien Ort auf,
der direktem Sonnenlicht nicht ausgesetzt ist.
FR
Choisissez un endroit stable, bien ventilé, à l’abri de la poussière, non exposé aux rayons
directs du soleil pour placer le produit.
EN
Select a sturdy, well-ventilated, dust-free area, away from direct sunlight to position the product.
10% - 80%
10 - 32.5°C
(50 - 91°F)
495 mm
(19.5 inches)
419 mm
(16.5 inches)
434 mm
(17.1 inches)
8.9 kg
19.6 lb
1
1
ES
Seleccione un lugar sólido, bien ventilado, sin polvo y alejado de la luz solar directa en
el que colocar el producto.
CA
Seleccioneu una superfície sòlida, ben ventilada, sense pols i allunyada de la llum directa
del sol per situar el producte.
DA
Placer produktet i et stabilt, godt udluftet, støvfrit område uden direkte sollys.
NL
Plaats het apparaat op een stevige, goed geventileerde, stofvrije plek uit direct zonlicht.
ET
Valige toote paigutamiseks tugev pind hästi ventileeritud tolmuvabas alas, otsese
päikesevalguse eest eemal.
FI
Sijoita laite tukevalle alustalle pölyttömään paikkaan, johon aurinko ei paista suoraan ja
jossa on hyvä ilmanvaihto.
LV
Novietojiet ierīci stabilā, labi ventilētā vietā, kur nav putekļu un ko neapspīd tieši saules
stari.
LT
Gaminiui padėti pasirinkite tvirtą pagrindą gerai ventiliuojamoje nedulkėtoje vietoje, kuri
būtų atokiau nuo tiesioginių saulės spindulių.
NO
Plasser produktet i et stabilt, støvfritt område med god ventilasjon og utenfor direkte sollys.
PT
Escolha uma área limpa, arejada, resistente e longe da luz solar direta para posicionar
o produto.
SV
Placera produkten i ett välventilerat, dammfritt utrymme och fritt från direkt solljus.
Seite wird geladen ...

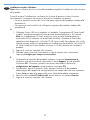
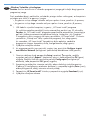
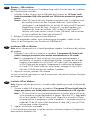
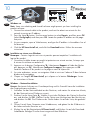
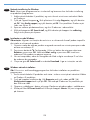
DE
Schließen Sie das Gerät mit einem Netzkabel an einer geerdeten Steckdose an, und
schalten Sie das Gerät anschließend ein. Stellen Sie sicher, dass Ihre Stromquelle für
die Betriebsspannung des Geräts geeignet ist. Die Betriebsspannung nden Sie auf dem
Geräteetikett. Das Gerät verwendet entweder 110 – 127 V (AC) oder 220 – 240 V (AC)
und 50/60 Hz. Vorsicht: Um Schäden am Gerät zu vermeiden, sollten Sie ausschließlich
das Netzkabel verwenden, das im Lieferumfang des Geräts enthalten ist.
FR
Reliez le produit à la prise reliée à la terre à l'aide du cordon d'alimentation, puis mettez
le produit sous tension. Assurez-vous que votre source d'alimentation est adaptée à la
tension nominale du produit. La tension nominale est indiquée sur l'étiquette du produit.
Le produit fonctionne à une tension de 110 - 127 V CA ou 220 - 240 V CA et 50/60 Hz.
Attention! Pour éviter tout endommagement du produit, utilisez uniquement le câble fourni
avec le produit.
EN
Connect the power cord between the product and a grounded AC outlet, and then turn on
the product. Make sure your power source is adequate for the product voltage rating. The
voltage rating is on the product label. The product uses either 110-127 Vac or 220-240 Vac
and 50/60 Hz. Caution: To prevent damage to the product, use only the power cord that
is provided with the product.
21
2 3
1
4
3
2
1
3
5
6
4
Seite wird geladen ...
Seite wird geladen ...

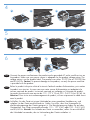
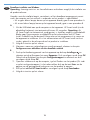
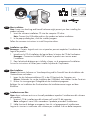
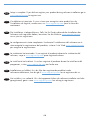
IT
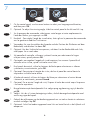
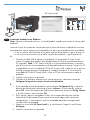
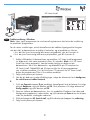
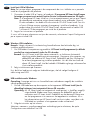
Sul pannello di controllo, utilizzare i pulsanti freccia per selezionare la lingua
e la posizione, quindi premere OK.
Opzionale: per regolare l'angolo di visualizzazione, far scorrere il pannello di
controllo verso sinistra, quindi inclinarlo verso l'alto.
1.
2.
DE
Verwenden Sie zum Auswählen der Sprache und der Position die Pfeiltasten auf dem
Bedienfeld, und drücken Sie dann OK.
Optional: Um den Sichtwinkel anzupassen, schieben Sie das Bedienfeld nach links,
und kippen Sie es nach oben.
1.
2.
FR
Sur le panneau de commande, sélectionnez votre langue et votre emplacement à
l'aide des èches, puis appuyez sur OK.
Facultatif : Pour régler l'angle de visualisation, faites glisser le panneau de commande
vers la gauche et modiez l'inclinaison.
1.
2.
EN
On the control panel, use the arrow buttons to select your language and location,
and then press OK.
Optional: To adjust the viewing angle, slide the control panel to the left and tilt it up.
1.
2.
21
6
7
ES
En el panel de control, utilice los botones de echa para seleccionar su idioma
y ubicación; a continuación, pulse OK.
Opcional: Para ajustar el ángulo de visión, deslice el panel de control hacia la
izquierda e inclínelo hacia arriba.
1.
2.
CA
Al tauler de control, utilitzeu els botons de etxa per seleccionar el vostre idioma
i ubicació; a continuació, premeu D'acord.
Opcional: Per a ajustar l'angle de visió, llisqueu el tauler de control cap a l'esquerra
i inclineu-lo cap amunt.
1.
2.
DA
Brug piletasterne på kontrolpanelet til at vælge sprog og placering, og tryk derefter
på OK.
Valgfrit: Hvis du vil justere betragtningsvinklen, skal du bevæge kontrolpanelet mod
venstre og vippe det opad.
1.
2.
NL
Gebruik de pijlknoppen op het bedieningspaneel om uw taal en locatie te selecteren
en druk vervolgens op OK.
Optioneel: Schuif het bedieningspaneel naar links en kantel het als u de kijkhoek wilt
aanpassen.
1.
2.
Seite wird geladen ...
Seite wird geladen ...
Seite wird geladen ...
Seite wird geladen ...

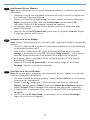
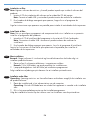
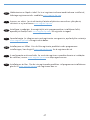
Windows–KabelloseInstallation
Hinweis: Bestimmte Software zur Virenüberprüfung und für Firewalls kann die Installation
der Gerätesoftware verhindern.
Stellen Sie vor Beginn der Installation sicher, dass der Drahtloszugriffspunkt
ordnungsgemäß funktioniert, der Computer an das Netzwerk angeschlossen und das
Gerät eingeschaltet ist.
• Wenn oben am Gerät nicht dauerhaft ein blaues Licht leuchtet, gehen Sie zu
Vorgang A.
• Wenn oben am Gerät dauerhaft ein blaues Licht leuchtet, gehen Sie zu Vorgang B.
A.
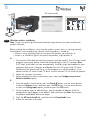
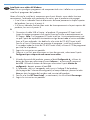
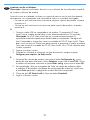
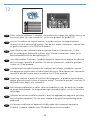
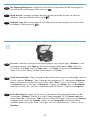
Schließen Sie das Gerät mit einem USB-Kabel am Computer an. HP Smart Install
(siehe obenstehendes Bild) sollte innerhalb von 30 Sekunden automatisch gestartet
werden. Hinweis: Wenn HP Smart Install nicht automatisch gestartet wird, ist
möglicherweise die AutoPlay-Funktion auf dem Computer deaktiviert. Durchsuchen
Sie „Arbeitsplatz“, und doppelklicken Sie auf das HP Smart Install-CD-Laufwerk.
Doppelklicken Sie auf die Datei „SISetup.exe“, um das Programm zum Installieren
des Geräts auszuführen. Wenn Sie das HP Smart Install-CD-Laufwerk nicht nden,
verwenden Sie für die Installation des Geräts die Software-CD.
Befolgen Sie die Anweisungen auf dem Bildschirm.
Wenn Sie aufgefordert werden, einen Verbindungstyp auszuwählen, wählen Sie
die Option für die KongurationzumDruckenüberdasDrahtlosnetzwerk aus.
B.
Drücken Sie auf dem Bedienfeld des Geräts die TasteSetup .Wählen Sie mit den
Pfeiltasten das Menü Berichte aus, und drücken Sie dann die Taste OK. Wählen Sie
mit Hilfe der Pfeiltasten die Option Kong-Bericht aus, und drücken Sie dann die
Taste OK.
Öffnen Sie am Computer einen Webbrowser, geben Sie die IP-Adresse des Geräts
(von der Kongurationsberichtsseite) in das Adressfeld ein, und drücken Sie die
Eingabetaste, um die Seite für den integrierten Webserver des Geräts zu öffnen.
Klicken Sie auf die Registerkarte HPSmartInstall, und klicken Sie auf die
Download-Schaltäche.
Befolgen Sie die Anweisungen auf dem Bildschirm.
1.
2.
3.
1.
2.
3.
4.
DE
HP Smart Install
11
Seite wird geladen ...
Seite wird geladen ...
Seite wird geladen ...
Seite wird geladen ...
Seite wird geladen ...
Seite wird geladen ...
Seite wird geladen ...
Seite wird geladen ...
Seite wird geladen ...
Seite wird geladen ...
Seite wird geladen ...
Seite wird geladen ...
Seite wird geladen ...

IT
InstallazioneUSBconWindows
Nota: alcuni software antivirus e rewall potrebbero impedire l'installazione del software
del prodotto.
Collegare il cavo USB tra il computer e il prodotto.
IlprogrammaHPSmartInstall
(vederel'immagineprecedente)vieneavviatoautomaticamentein30secondi.
Nota:
se il programma HP Smart Install non viene avviato automaticamente, è
possibile che sul computer sia disabilitato AutoPlay. Accedere a Risorse del
computer e fare doppio clic sull'unità CD HP Smart Install. Fare doppio clic
sul le SISetup.exe per eseguire il programma di installazione del prodotto.
Se l'unità CD HP Smart Install non viene rilevata, scollegare il cavo USB e
utilizzare il CD del software per installare il prodotto.
Seguire le istruzioni riportate sullo schermo.
Se viene richiesto di selezionare un tipo di connessione, selezionare l'opzione Congura
per stampa tramite USB.
1.
2.
DE
Windows–USB-Installation
Hinweis: Bestimmte Software zur Virenüberprüfung und für Firewalls kann die Installation
der Gerätesoftware verhindern.
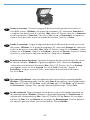
Schließen Sie das Gerät mit einem USB-Kabel am Computer an.
HPSmartInstall
(sieheobenstehendesBild)sollteinnerhalbvon30Sekundenautomatischgestartet
werden.
Hinweis:
Wenn HP Smart Install nicht automatisch gestartet wird, ist möglicherweise
die AutoPlay-Funktion auf dem Computer deaktiviert. Durchsuchen Sie
„Arbeitsplatz“, und doppelklicken Sie auf das HP Smart Install-CD-Laufwerk.
Doppelklicken Sie auf die Datei „SISetup.exe“, um das Programm zum
Installieren des Geräts auszuführen. Falls Sie das HP Smart Install-CD-
Laufwerk nicht nden können, trennen Sie das USB-Kabel, und verwenden
Sie zum Installieren des Geräts die Software-CD.
Befolgen Sie die Anweisungen auf dem Bildschirm.
Wenn Sie aufgefordert werden, einen Verbindungstyp anzugeben, wählen Sie die
Option für die Konguration zum Drucken mit USB-Kabel aus.
1.
2.
25
ES
InstalaciónUSBenWindows
Nota: Algunos software de antivirus y rewall pueden impedir que instale el software del
producto.
Conecte el cable USB al equipo y al producto. ElprogramaHPSmartInstall(véasela
imagenqueaparecemásarriba)deberíainiciarseautomáticamenteen30segundos.
Nota:
Si HP Smart Install no se inicia automáticamente, es posible que la función de
inicio automático esté deshabilitada en el equipo. Vaya a Mi PC y haga doble
clic en la unidad de CD de HP Smart Install. Haga clic en el archivo SISetup.
exe para ejecutar el programa e instalar el producto. Si no puede encontrar la
unidad de CD de HP Smart Install, desconecte el cable USB y utilice el CD de
software para instalar el producto.
Siga las instrucciones en pantalla.
Si se le solicita que seleccione un tipo de conexión, seleccione la opción Conguración
para impresión mediante USB.
1.
2.
Seite wird geladen ...
Seite wird geladen ...
Seite wird geladen ...
Seite wird geladen ...

Windows–Netzwerkinstallation
Hinweis: Bestimmte Software zur Virenüberprüfung und für Firewalls kann die Installation
der Gerätesoftware verhindern.
Schließen Sie das Netzwerkkabel an das Gerät an, und warten Sie etwa eine Minute,
bis das Netzwerk eine IP-Adresse zuweist.
Drücken Sie die Setup-Taste
. Wählen Sie mit den Pfeiltasten dieOption für Berichte
aus, und drücken Sie OK. Wählen Sie die Option
zum Kongurieren des Berichts aus,
und drücken Sie OK. Die IP-Adresse des Geräts nden Sie auf der Seite, die gedruckt
wird.
Öffnen Sie auf Ihrem Computer einen Webbrowser, und geben Sie die IP-Adresse in
die Adresszeile des Browsers ein.
Klicken Sie auf die Registerkarte
HPSmartInstall, und klicken Sie auf dieDownload-
Schaltäche. Befolgen Sie die Anweisungen auf dem Bildschirm.
1.
2.
3.
4.
DE
InstallationenréseausousWindows
Remarque: Certains logiciels anti-virus et pare-feu peuvent empêcher l'installation du
logiciel du produit.
Connectez le câble réseau au produit et patientez une minute environ, le temps que
le réseau lui attribue une adresse IP.
Appuyez sur le bouton Conguration . Sélectionnez Rapports à l'aide des èches
puis appuyez sur OK. Sélectionnez
Congurerlerapport, puis appuyez sur OK.
Localisez l'adresse IP du produit sur la page en cours d'impression.
Sur votre ordinateur, ouvrez un navigateur Web et saisissez l'adresse IP dans la barre
d'adresse du navigateur.
Cliquez sur l'onglet
HPSmartInstall, puis cliquez sur le bouton Télécharger. Suivez
les instructions à l'écran.
1.
2.
3.
4.
FR
Windowsnetworkinstallation
Note: Some virus-checking and rewall software might prevent you from installing the
product software.
Connect the network cable to the product, and wait for about one minute for the
network to assign an IP address.
Press the Setup
button. Use the arrow buttons to select Reports, and then press OK.
Select
Congreport, and then press OK. Locate the product IP address on the page
that prints.
At your computer, open a Web browser, and type the IP address in the address line of
the browser.
Click the
HPSmartInstall tab, and click the Download button. Follow the onscreen
instructions.
1.
2.
3.
4.
EN
30
10
Seite wird geladen ...
Seite wird geladen ...
Seite wird geladen ...
Seite wird geladen ...

IT
InstallazioneconMac
Nota: alcuni software antivirus e rewall potrebbero impedire l'installazione del software
del prodotto.
Inserire il CD di installazione del software nell'unità CD del computer.
Nota: collegare il cavo USB e accendere il prodotto prima dell'installazione.
Nella nestra di dialogo a comparsa, fare clic sul programma di installazione.
Seguire le istruzioni visualizzate sullo schermo per installare il driver della stampante.
1.
2.
DE
Mac-Installation
Hinweis: Bestimmte Software zur Virenüberprüfung und für Firewalls kann die Installation der
Gerätesoftware verhindern.
Legen Sie die Softwareinstallations-CD in das CD-Laufwerk des Computers ein.
Hinweis: Verbinden Sie vor der Installation das USB-Kabel, und schalten Sie das Gerät ein.
Klicken Sie im angezeigten Dialogfeld auf das Installationsprogramm.
Befolgen Sie zur Installation des Druckertreibers die Installationsanweisungen auf dem
Bildschirm.
1.
2.
FR
InstallationsousMac
Remarque: Certains logiciels anti-virus et pare-feu peuvent empêcher l'installation du
logiciel du produit.
Introduisez le CD d'installation du logiciel dans le lecteur de CD de l'ordinateur.
Remarque: Connectez le câble USB et mettez le produit sous tension avant
l'installation.
Dans la boîte de dialogue qui s'afche, cliquez sur le programme d'installation.
Suivez les instructions à l’écran pour installer le pilote de l'imprimante.
1.
2.
EN
Macinstallation
Note: Some virus-checking and rewall software might prevent you from installing the
product software.
Insert the software installation CD into the computer CD drive.
Note: Connect the USB cable and turn the product on before installation.
In the pop-up dialog box, click the installer program.
Follow the onscreen instructions to install the printer driver.
1.
2.
11
35
Seite wird geladen ...
Seite wird geladen ...
Seite wird geladen ...
Seite wird geladen ...

IT
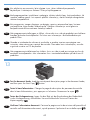
Vericarel'alimentatoredocumenti. Caricare la pagina con la descrizione del pannello di
controllo nell'alimentatore documenti, quindi premere il pulsante di avvio della copia
.
DE
TestendesVorlageneinzugs: Legen Sie das Blatt mit der Beschreibung des Bedienfelds
in den Vorlageneinzug, und drücken Sie anschließend die Taste zum Starten des
Kopiervorgangs
.
FR
Testezlebacd'alimentation. Chargez la page de description du panneau de contrôle
dans le bac d'alimentation, puis appuyez sur le bouton Commencer la copie .
EN
Testthedocumentfeeder. Load the control-panel description page in the document feeder,
and then press the Start Copy
button.
40
13
FI
Kun ohjelmisto on asennettu, laite tulostaa sivun, joka sisältää ohjauspaneelin
käyttöohjeet. Lisätietoja on laitteen CD-levyn käyttöoppaassa.
LV
Kad programmatūras instalēšana ir pabeigta, iekārta izdrukā lapu, kurā paskaidrots, kā
izmantot vadības paneli. Lai saņemtu plašāku informāciju, skatiet lietotāja rokasgrāmatu
iekārtas kompaktdiskā.
LT
Kai programinės įrangos diegimas yra baigtas, gaminys atspausdina lapą, kuriame
yra paaiškinta, kaip naudoti valdymo pultą. Daugiau informacijos rasite gaminio
kompaktiniame diske esančiame vartotojo vadove.
NO
Når programvareinstalleringen er fullført, skrives det ut en side på produktet som forklarer
hvordan du bruker kontrollpanelet. Du nner mer informasjon i brukerhåndboken på
produkt-CDen.
PT
Quando a instalação do software é concluída, o produto imprime uma página com
instruções sobre como usar o painel de controle. Para obter mais informações, consulte
o guia do usuário no CD do produto.
SV
När programvaruinstallationen har slutförts skrivs en sida ut med anvisningar om hur du
använder kontrollpanelen. Mer information nns i användarhandboken på cd-skivan till
produkten.
Seite wird geladen ...

IT
Copiadiprova. Caricare la pagina con la descrizione del pannello di controllo sul vetro
dello scanner, quindi premere il pulsante di avvio della copia
.
DE
Testkopie: Legen Sie das Blatt mit der Beschreibung des Bedienfelds auf das Scannerglas,
und drücken Sie anschließend die Taste zum Starten des Kopiervorgangs
.
FR
Pagedetest. Placez la page de description du panneau de commande sur la vitre du
scanner, puis appuyez sur le bouton Commencer la copie .
EN
Testcopy. Load the control-panel description page on the scanner glass, and then press the
Start Copy
button.
42
14
ES
Pruebeelprocesodecopia. Cargue la página de descripción del panel de control en el
cristal del escáner y, a continuación, pulse el botón Iniciar copia
.
CA
Proveuelprocésdecòpia. Carregueu la pàgina de descripció del tauler de control al
vidre de l'escàner i, a continuació, premeu el botó Inicia una còpia
.
DA
Testkopieringsfunktionen. Læg siden med beskrivelsen af kontrolpanelet på
scannerglaspladen, og tryk derefter på knappen Start kopiering
.
NL
Testdekopieerfunctie. Plaats de pagina met uitleg over het bedieningspaneel op de
glasplaat van de scanner en druk op de knop Kopiëren starten
.
ET
Testkoopia. Laadige juhtpaneeli kirjeldusleht skanneri klaasile ja vajutage nuppu
Start Copy
(Alusta kopeerimist)
FI
Testaakopiotoiminto. Aseta ohjauspaneelin kuvaussivu skannerin lasille ja paina
kopiointipainiketta
.
LV
Pārbaudiet kopiju. Novietojiet vadības paneļa apraksta lapu uz skenera stikla un
nospiediet pogu Start Copy (Sākt kopēšanu)
.
LT
Kopijavimo patikrinimas. Padėkite valdymo pulto aprašymo lapą ant skenerio stiklo
ir paspauskite mygtuką Start copy (pradėti kopijuoti)
.

TestendesScanners: Legen Sie die Seite mit der Beschreibung des Bedienfelds auf das
Scannerglas. Windows: Wählen Sie in der Programmgruppe für HP
Scannennach und
anschließend das Scanziel aus. Mac:
Öffnen Sie den HP Director, klicken Sie auf Scannen
und dann noch einmal auf Scannen. Klicken Sie auf
Fertigstellen und anschließend
auf Ziele. Benennen Sie die Datei, und legen Sie einen Speicherort fest. Klicken Sie auf
Speichern.
DE
Testezlanumérisation. Placez la page de description du panneau de commande contre la
vitre du scanner. Windows:
Dans le groupe de programmes HP, sélectionnez Numériser
vers et sélectionnez une destination de numérisation. Mac: Ouvrez HP Director, cliquez
sur Numériser, puis à nouveau sur Numériser. Cliquez sur Terminer, puis sur Destinations.
Nommez le chier, puis spéciez l'emplacement de destination. Cliquez sur Enregistrer.
FR
Testscan. Load the control-panel description page on the scanner glass. Windows: In the
HP program group, select
Scanto, and select a scanning destination. Mac: Open the
HP Director, click Scan, and click Scan again. Click Finish, and then click Destinations.
Name the le and specify the destination location. Click Save.
EN
43
15
NO
Testkopieringsfunksjonen. Legg beskrivelsessiden for kontrollpanelet på skannerglasset,
og trykk deretter på knappen Start kopiering
.
PT
Cópiadeteste. Carregue a página de descrição do painel de controle no vidro do
scanner e pressione o botão Iniciar cópia
.
SV
Testkopia. Lägg beskrivningssidan för kontrollpanelen på skannerglaset och tryck sedan
på knappen Starta kopiering
.
Seite wird geladen ...
Seite wird geladen ...

IT
La congurazione è stata completata. Se durante l'installazione del software non è
stata eseguita la registrazione del prodotto, visitare il sito Web
www.register.hp.com
per eseguire la registrazione.
DE
Die Installation ist abgeschlossen. Falls Sie Ihr Gerät während der Installation der
Software nicht registriert haben, besuchen Sie die Website
www.register.hp.com
,
um es jetzt zu registrieren.
FR
L’installation est terminée. Si vous n'avez pas enregistré votre produit lors de
l'installation du logiciel, rendez-vous sur
www.register.hp.com
pour le faire dès
maintenant.
EN
Setup is complete. If you did not register your product during software installation go to
www.register.hp.com
to register now.
46
ES
La instalación ha terminado. Si no registró el producto durante la instalación del
software, vaya a
www.register.hp.com
para registrarlo ahora.
CA
La instal·lació ha nalitzat. Si no heu registrat el producte durant la instal·lació del
programari, visiteu
www.register.hp.com
per fer-ho ara.
DA
Installationen er fuldført. Hvis du ikke har registrerede produktet under
softwareinstallationen, kan du gå til
www.register.hp.com
for at registrere det nu.
NL
Het instellen is nu voltooid. Als u het apparaat tijdens de software-installatie niet hebt
geregistreerd, gaat u naar
www.register.hp.com
om alsnog te registreren.
Seite wird geladen ...

IT
Il manuale dell'utente HP LaserJet e l'altra documentazione sono reperibili nel CD fornito
con il prodotto o nella cartella dei programmi HP sul computer. Il manuale dell'utente HP
LaserJet è uno strumento di assistenza che fornisce accesso facilitato alle informazioni sul
prodotto, supporto Web ai prodotti HP, guida alla risoluzione dei problemi e informazioni
relative alla sicurezza e alle normative.
DE
Das HP LaserJet Benutzerhandbuch und weitere Dokumente benden sich auf der mit
dem Gerät mitgelieferten CD-ROM oder im HP Programmordner auf Ihrem Computer.
Das HP LaserJet Benutzerhandbuch ist eine Produkthilfe für einfachen Zugriff auf
Produktinformationen, Web-Support für HP-Produkte, Hinweise zur Fehlerbehebung
sowie Zulassungs- und Sicherheitsinformationen.
FR
Le guide HP LaserJet et d’autres documents se trouvent sur le CD livré avec le produit ou
dans le dossier dédié aux programmes HP sur votre ordinateur. Le guide HP LaserJet est
un outil d'aide du produit ; il permet d'accéder facilement aux informations sur le produit,
à une assistance en ligne pour les produits HP, à un guide de dépannage et à des
informations relatives à la réglementation et à la sécurité.
EN
The HP LaserJet Guide and other documentation are on the CD that came with the product
or in the HP Program folder on your computer. The HP LaserJet Guide is a product help tool
that provides easy access to product information, HP product web support, troubleshooting
guidance, and regulatory and safety information.
4
16
www.hp.com/support/ljm1210series
ES
La guía de HP LaserJet y otra documentación se incluyen en el CD suministrado con
el producto o en la carpeta de programas HP de su equipo. La guía de HP LaserJet es
una guía de ayuda para el producto que permite acceder fácilmente a información del
producto, soporte Web del producto HP, información sobre reglamento y seguridad y una
guía para la solución de problemas.
CA
La guia d'HP LaserJet i d’altra informació es troba al CD subministrat amb el producte
o a la carpeta de programes HP del vostre ordinador. La guia d'HP LaserJet és una
guia d'ajuda per al producte que permet accedir fàcilment a informació del producte,
assistència tècnica web del producte HP, guia per a la solució de problemes i informació
sobre reglament i seguretat.
DA
Vejledningen til HP LaserJet og anden dokumentation ndes på den cd, der leveres
sammen med produktet, eller også kan du nde den i HP-programmappen på computeren.
Vejledningen til HP LaserJet Guide er et hjælpeværktøj til produktet, der giver nem adgang
til produktoplysninger, websupport til HP-produkter, vejledning til fejlnding, lovpligtige
oplysninger og sikkerhedsoplysninger.
Seite wird geladen ...
Seite wird geladen ...
Seite wird geladen ...
-
 1
1
-
 2
2
-
 3
3
-
 4
4
-
 5
5
-
 6
6
-
 7
7
-
 8
8
-
 9
9
-
 10
10
-
 11
11
-
 12
12
-
 13
13
-
 14
14
-
 15
15
-
 16
16
-
 17
17
-
 18
18
-
 19
19
-
 20
20
-
 21
21
-
 22
22
-
 23
23
-
 24
24
-
 25
25
-
 26
26
-
 27
27
-
 28
28
-
 29
29
-
 30
30
-
 31
31
-
 32
32
-
 33
33
-
 34
34
-
 35
35
-
 36
36
-
 37
37
-
 38
38
-
 39
39
-
 40
40
-
 41
41
-
 42
42
-
 43
43
-
 44
44
-
 45
45
-
 46
46
-
 47
47
-
 48
48
-
 49
49
-
 50
50
-
 51
51
-
 52
52


HP HotSpot LaserJet Pro M1218nfs MFP series Installationsanleitung
- Kategorie
- PC / Workstation Barebones
- Typ
- Installationsanleitung
- Dieses Handbuch eignet sich auch für
in anderen Sprachen
- English: HP HotSpot LaserJet Pro M1218nfs MFP series Installation guide
- français: HP HotSpot LaserJet Pro M1218nfs MFP series Guide d'installation
- español: HP HotSpot LaserJet Pro M1218nfs MFP series Guía de instalación
- italiano: HP HotSpot LaserJet Pro M1218nfs MFP series Guida d'installazione
- Nederlands: HP HotSpot LaserJet Pro M1218nfs MFP series Installatie gids
- português: HP HotSpot LaserJet Pro M1218nfs MFP series Guia de instalação
- dansk: HP HotSpot LaserJet Pro M1218nfs MFP series Installationsvejledning
- eesti: HP HotSpot LaserJet Pro M1218nfs MFP series paigaldusjuhend
- svenska: HP HotSpot LaserJet Pro M1218nfs MFP series Installationsguide
- suomi: HP HotSpot LaserJet Pro M1218nfs MFP series Asennusohje
Verwandte Artikel
-
HP LaserJet Pro M1132 Multifunction Printer series Benutzerhandbuch
-
HP LaserJet Pro P1606 Printer series Benutzerhandbuch
-
HP LaserJet Pro M1536 Multifunction Printer series Installationsanleitung
-
-
-
-
-
-
HP LaserJet Enterprise P3015 Printer series Benutzerhandbuch
-