
clik
clik clik
Auto
Boost
Eco
Auto Med
100%
5%
English
Ελληνικ
Espanol
Čeština
中文
한국어
English EnglishEnglish
Eco
Auto
Boost
Eco
Auto Med
100%
5%
English
Ελληνικ
Espanol
Čeština
中文
한국어
English EnglishEnglish
Eco
Auto
Boost
Eco
Auto Med
100%
5%
English
Ελληνικ
Espanol
Čeština
中文
한국어
English EnglishEnglish
Eco
Auto
Boost
Eco
Auto
Med
100%
5%
English
Ελληνικ
Espanol
Čeština
中文
한국어
English EnglishEnglish
Eco
Auto
Boost
Eco
Auto
Med
100%
5%
English
Ελληνικ
Espanol
Čeština
中文
한국어
English EnglishEnglish
Eco
SV14
Operating manual
Bedienungsanleitung
Manual de instrucciones
Assembly
Zusammenbau
Montaje
Assemblage
Montaggio
Assemblage
Montaż
Сборка
Montaža
Quick start
Kurzanleitung
Inicio rápido
Démarrage rapide
Guida rapida
Snelle start
Szybkie uruchomienie
Краткое руководство
Hitri začetek
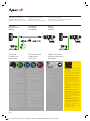
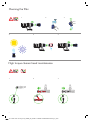
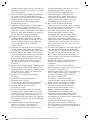
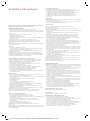
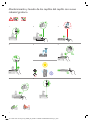
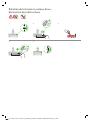
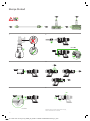
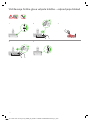
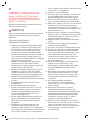
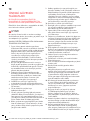
Power modes
Your appliance has three power modes for different tasks.
Change cleaning modes quickly using a single button.
Eco: Maximum run time, for longer cleans.
Auto/Med: The optimum balance to clean all floors.
Attach your High torque cleaner head to activate Auto
mode, which automatically adapts power between carpets
and hard floors.
Boost: Intensive cleaning for ground-in dirt.
Leistungsstufen
Ihr Gerät verfügt über drei Leistungsstufen für
unterschiedliche Aufgaben. Über eine einzige Taste
wechseln Sie rasch zwischen Reinigungsmodi.
Eco: Maximale Betriebsdauer für eine längere Reinigung.
Auto/Med: Das optimale Gleichgewicht für alle Böden.
Stecken Sie die Elektrobürste mit Direktantrieb auf, um
den Automatikmodus zu aktivieren, der die Leistung
automatisch an Teppiche und Hartböden anpasst.
Boost: Intensive Reinigung von tiefsitzendem Staub
und Schmutz.
Modos de potencia
El aparato tiene tres modos de potencia para distintas
tareas. Cambie de modo de limpieza de forma rápida
pulsando un solo botón.
Eco: Tiempo de funcionamiento máximo para limpiezas
más largas.
Auto/Medio: El equilibrio perfecto para limpiar todo tipo
de suelos.
Ponga el cabezal de limpieza Direct Drive para
activar el modo Automático, que adapta la potencia
automáticamente para alfombras y suelos duros.
Boost: Limpieza en profundidad para la suciedad
más difícil.
Modes de puissance
Votre appareil possède trois modes de puissance pour
effectuer différentes tâches. Changez de mode de
nettoyage rapidement à l’aide d’un seul bouton.
Éco: Durée de fonctionnement maximale, pour des
nettoyages plus longs.
Auto/Inter: Le parfait équilibre pour nettoyer tous les sols.
Raccordez votre brosse motorisée pour activer le mode
automatique, qui adapte automatiquement la puissance
entre les tapis et les sols durs.
Boost: Pour les nettoyages intensifs et la poussière incrustée.
Modalità di accensione
L’apparecchio ha tre modalità di accensione per funzioni
diverse. Tramite un unico tasto è possibile cambiare
rapidamente la modalità di pulizia.
Eco: Durata massima, per pulire più a lungo.
Auto/Med: L'equilibrio perfetto per pulire
qualsiasi pavimento.
Collegare la spazzola Torque Head per attivare la modalità
automatica, che consente di adattare automaticamente la
potenza passando dai tappeti alle superfici rigide.
Boost: Pulizia intensa per sporco ostinato.
Vermogensmodi
Uw apparaat heeft drie vermogensmodi voor verschillende
taken. Wijzig snel de reinigingsmodus met gebruik van een
enkele knop.
Eco: Maximale looptijd, voor langere reinigingen.
Auto/Med: De optimale balans voor het reinigen van alle
typen vloeren.
Bevestig uw hoge torque vloerzuigmond voor het
activeren van de Automatische modus, wat het vermogen
automatisch aanpast tussen tapijten en harde vloeren.
Boost: intensieve reiniging voor extra vuile plekken.
Tryby mocy
Urządzenie ma trzy tryby mocy dostosowane do różnych
zadań. Tryb czyszczenia można zmienić szybko za pomocą
jednego przycisku.
Eco: Maksymalny czas pracy, do dłuższego sprzątania.
Auto/Med: Optymalny balans do czyszczenia wszystkich
rodzajów podłóg.
Wystarczy zamocować elektroszczotkę Torque Drive, by
uruchomić tryb automatyczny, w którym poziom mocy
sam dostosuje się rodzaju powierzchni – dywanu lub
twardej podłogi.
Boost: Intensywne czyszczenie uporczywego brudu.
Режимы работы
Устройство может работать в трех режимах в
зависимости от выполняемой задачи. Режимы быстро
переключаются одной кнопкой.
Эко: максимальное время работы, дольше чистка.
Авто/средний: оптимальный баланс для чистки пола
любого типа.
Подключите насадку с высоким крутящим моментом
для активации авторежима, в котором автоматически
осуществляется адаптация мощности между
ковровыми и твердыми напольными покрытиями.
Турбо: интенсивная очистка сложных загрязнений.
Načini porabe energije
Naprava ima tri načine porabe energije za različna
opravila. Način čiščenja lahko hitro spremenite s samo
enim gumbom.
Eko: Najdaljši čas delovanja, primeren za daljša čiščenja.
Auto/Sred: Optimalno ravnovesje za čiščenje vseh
talnih površin.
Namestite čistilno glavo z visokim navorom, da vklopite
samodejni način, ki samodejno prilagaja moč delovanja
med čiščenjem preprog oziroma gladkih površin.
Boost: Intenzivno čiščenje za trdovratno umazanijo.
Manuel d’utilisation
Manuale d’uso
Gebruikershandleiding
Instrukcja obsługi
Руководство по эксплуатации
Priročnik za uporabo
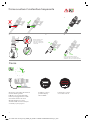
Charging
Your appliance will need to be fully charged before
first use.
Aufladen
Das Gerät muss vor dem ersten Gebrauch vollständig
geladen werden.
Carga
El dispositivo deberá estar totalmente cargado antes de
usarlo por primera vez.
Chargement
Votre appareil doit être complètement chargé avant la
première utilisation.
Carica
Prima del primo utilizzo, la ricarica dell’apparecchio
dovrà essere completa.
Opladen
Uw apparaat moet voor het eerste gebruik volledig
worden opgeladen.
Ładowanie
Przed pierwszym użyciem urządzenie musi być w
pełni naładowane.
Зарядка
Перед первым использованием устройство
необходимо полностью зарядить.
Polnjenje
Pred prvo uporabo mora biti naprava
popolnoma napolnjena.
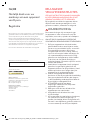
Scan with your phone or QR reader to get the most out
of your machine.
Requires Apple iOS 11 or later, a compatible Android
device or a QR reader.
Scannen Sie den Code mit Ihrem Mobiltelefon oder
einem QR Scanner, um das Beste aus Ihrem Gerät
herauszuholen.
Erfordert mindestens Apple iOS 11, ein kompatibles
Android Gerät oder einen QR Scanner.
Scanee con su teléfono o su lector QR para sacar el
máximo partido a su máquina
Requiere Apple iOS 11 o versiones posteriores, un
dispositivo Android compatible o un lector QR.
Veuillez scanner avec votre téléphone ou votre lecteur
de QR codes pour tirer le meilleur parti de votre
appareil.
Nécessite iOS Apple 11 ou plus récent, un appareil
Android compatible ou un lecteur de QR codes.
Scan with your phone or QR reader to get the most out
of your machine.
Requires Apple iOS 11 or later, a compatible Android
device or a QR reader.
Scan met de camera van uw telefoon of QR-lezer om
het meeste uit uw machine te halen.
Vereist Apple iOS 11 of later, een vergelijkbaar Android
apparaat of een QR lezer.
Zeskanuj telefonem lub czytnikiem kodów QR, aby w
pełni wykorzystać możliwości Twojego urządzenia.
Wymaga systemu iOS 11 lub późniejszego,
kompatybilnego urządzenia z systemem Android lub
czytnika kodów QR.
Используйте камеру вашего телефона или
сканер QR-кодов для получения дополнительной
информации по вашему продукту.
Требуется устройство с операционной системой
Apple iOS 11 или более поздними версиями,
Android-совместимое устройство или сканер
QR-кодов.
Skenirajte s telefonom ali bralnikom QR, da kar
najbolje izkoristite svojo napravo.
Zahteva Apple iOS 11 ali novejšo različico, združljivo
napravo Android ali bralnik QR.
13.11.2018 12:58 - C97400_SV14_OPMAN_EU_X248F-V11-ABSOLUTE-OPMAN-97400.indd_15_4c0s

2
Thank you for choosing to buy
a Dyson appliance
To read your manual in English
go to page 3.
Vielen Dank, dass Sie sich für ein
Dyson Gerät entschieden haben.
Um das Handbuch auf Deutsch zu
lesen, gehen Sie auf Seite 13.
Gracias por elegir una
máquina Dyson.
Para leer el manual en español,
vaya a la página 25.
Merci d’avoir choisi un appareil Dyson.
Pour lire votre manuel en français
rendez-vous à la page 37.
Grazie per aver scelto di acquistare un
apparecchio Dyson
Per leggere il manuale in Italiano,
andare a pagina 49.
Hartelijk dank voor uw aankoop
van een apparaat van Dyson.
Ga naar pagina 61 om uw
gebruikershandleiding in het
Nederlands te lezen.
Dziękujemy za zakup
urządzenia Dyson.
Instrukcja obsługi w języku polskim
jest dostępna na stronie 73.
Благодарим за выбор
устройства Dyson.
Инструкция на русском языке
находится на странице 85.
Hvala, ker ste se odločili za nakup
našega izdelka.
Priročnik v slovenščini je na strani 97
13.11.2018 12:58 - C97400_SV14_OPMAN_EU_X248F-V11-ABSOLUTE-OPMAN-97400.indd_15_4c0s

3
EN
Thank you for choosing
to buy a Dyson appliance
Note your serial number for future reference.
This illustration is for example purposes only.
Register online
Visit our website to register your full
parts and labour guarantee online.
www.dyson.com/register
Register by phone
Call our dedicated Helpline.
Monday to Friday 8am-8pm & Saturday
and Sunday 8am-6pm
08002980298
Registration
After registering your free 2 year guarantee, your Dyson appliance will
be covered for parts and labour (excluding filters) for 2 years from the
date of purchase, subject to the terms of the guarantee.
If you have any queries regarding your Dyson appliance, visit
www.dyson.com/support for online help, support videos, general tips
and useful information about Dyson.
Alternatively, you can call the Dyson Helpline with your serial number
and details of where and when you bought the appliance.
Your serial number can be found on your rating plate which is on the
base of the appliance.
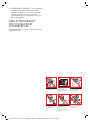
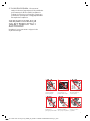
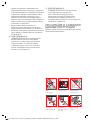
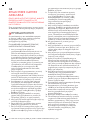
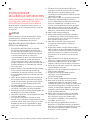
IMPORTANT SAFETY
INSTRUCTIONS
BEFORE USING THIS APPLIANCE READ ALL
INSTRUCTIONS AND CAUTIONARY MARKINGS
IN THIS MANUAL AND ON THE APPLIANCE
When using an electrical appliance, basic
precautions should always be followed, including
the following:
WARNING
These warnings apply to the appliance, and also
where applicable, to all tools, accessories, chargers
or mains adaptors.
TO REDUCE THE RISK OF FIRE, ELECTRIC SHOCK,
OR INJURY:
1. This Dyson appliance can be used by children
aged from 8 years and above and persons
with reduced physical, sensory or reasoning
capabilities, or lack of experience and knowledge,
only if they have been given supervision or
instruction by a responsible person concerning
use of the appliance in a safe way and
understand the hazards involved. Cleaning and
user maintenance should not be performed by
children without supervision.
2. Do not allow to be used as a toy. Close attention
is necessary when used by or near children.
Children should be supervised to ensure that they
do not play with the appliance.
3. Use only as described in this Dyson Operating
Manual. Do not carry out any maintenance other
than that shown in this manual, or advised by the
Dyson Helpline.
4. Suitable for dry locations ONLY. Do not use
outdoors or on wet surfaces.
5. Do not handle any part of the charger or
appliance with wet hands.
6. Do not use with a damaged charger or cable.
7. If the appliance is not working as it should, if it
has received a sharp blow, if it has been dropped,
damaged, left outdoors, or dropped into water,
do not use and contact the Dyson Helpline.
8. Contact the Dyson Helpline when a service
or repair is required. Do not disassemble the
appliance as incorrect reassembly may result in
an electric shock or fire.
9. Do not stretch the cable or place the cable under
strain. Keep the cable away from heated surfaces.
Do not close a door on the cable, or pull the cable
around sharp edges or corners. Arrange the
cable away from traffic areas and where it will not
13.11.2018 12:58 - C97400_SV14_OPMAN_EU_X248F-V11-ABSOLUTE-OPMAN-97400.indd_15_4c0s

4
be stepped on or tripped over. Do not run over
the cable.
10. Do not use to pick up water.
11. Do not use to pick up flammable or combustible
liquids, such as petrol, or use in areas where they
or their vapours may be present.
12. Do not pick up anything that is burning or
smoking, such as cigarettes, matches, or
hot ashes.
13. Keep hair, loose clothing, fingers, and all parts of
the body away from openings and moving parts,
such as the brush bar. Do not point the hose,
wand or tools at your eyes or ears or put them in
your mouth.
14. Do not put any object into openings. Do not use
with any opening blocked; keep free of dust, lint,
hair, and anything that may reduce airflow.
15. Use only Dyson recommended accessories and
replacement parts.
16. Do not use without the clear bin and filter in place.
17. Unplug the charger when not in use for
extended periods.
18. Use extra care when cleaning on stairs.
19. To prevent unintentional starting, be careful to
keep your hands and fingers away from the 'ON'
trigger until you are ready to begin vacuuming,
especially when picking up or carrying the
appliance. Carrying the appliance with your
finger on the 'ON' trigger invites accidents.
20. Do not install, charge or use this appliance
outdoors, in a bathroom or within 3 metres
(10 feet) of a pool. Do not use on wet surfaces
and do not expose to moisture, rain or snow.
21. Use only the Dyson charger Part Number
217160 for charging this Dyson appliance. Use
only Dyson batteries: other types of batteries may
explode, causing injury to persons and damage.
22. When removing or replacing a motorised brush
bar, be careful not to pull the 'ON' trigger until the
cleaner head has been reassembled.
23. Do not use a battery pack or appliance that is
damaged or modified. Damaged or modified
batteries may exhibit unpredictable behaviour
resulting in fire, explosion or risk of injury.
Do not expose battery pack or appliance to
fire or excessive temperatures. Exposure to
fire or temperatures above 60°C (140°F) may
cause explosion.
24. The battery is a sealed unit and under normal
circumstances poses no safety concerns. In the
unlikely event that liquid leaks from the battery,
do not touch the liquid as it may cause irritation or
burns, and observe the following precautions:
• Skin contact – can cause irritation. Wash with
soap and water.
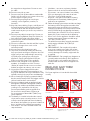
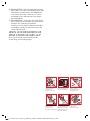
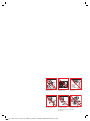
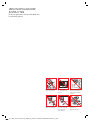
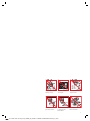
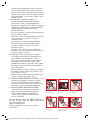
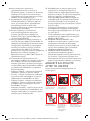
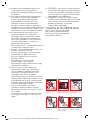
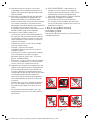
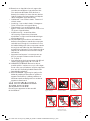
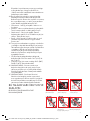
Do not use near
naked flames.
Do not store near
heat sources.
Do not pick up water
or liquids.
Do not pick up
burning objects.
Do not put hands near
the brush bar when the
appliance is in use.
Do not place on or near
the cooker.
• Inhalation – can cause respiratory irritation.
Expose to fresh air and seek medical advice.
• Eye contact – can cause irritation. Immediately
flush eyes thoroughly with water for at least
15 minutes. Seek medical attention.
• Disposal – wear gloves to handle the battery
and dispose of immediately, following local
ordinances or regulations.
25. Follow all charging instructions and do not charge
the battery pack or the appliance outside of the
temperature range specified in the instructions.
Charging improperly or at a temperature outside
of the specified range may damage the battery
and increase the risk of fire. To ensure maximum
battery life, Dyson recommends the following:
• When not in use the appliance should be stored
at room temperature. Recommended range:
18°C (64°F) to 28°C (82°F).
• The ambient temperature range for operation
and charging should be 10°C (50°F) to
30°C (86°F).
26. FIRE WARNING – Do not place this product
on or near a cooker or any other hot surface
and do not incinerate this appliance even if it is
severely damaged. The battery might catch fire
or explode.
27. FIRE WARNING – Do not apply any fragrance or
scented product to the filter(s) of this appliance.
The chemicals in such products are known to
be flammable and can cause the appliance to
catch fire.
READ AND SAVE THESE
INSTRUCTIONS
This Dyson appliance is intended for household
use only.
13.11.2018 12:58 - C97400_SV14_OPMAN_EU_X248F-V11-ABSOLUTE-OPMAN-97400.indd_15_4c0s

Auto
Boost
Eco
Auto Med
100%
5%
English
Ελληνικ
Espanol
Čeština
中文
한국어
English EnglishEnglish
Eco
Auto
Boost
Eco
Auto Med
100%
5%
English
Ελληνικ
Espanol
Čeština
中文
한국어
English EnglishEnglish
Eco
Auto
Boost
Eco
Auto Med
100%
5%
English
Ελληνικ
Espanol
Čeština
中文
한국어
English EnglishEnglish
Eco
Auto
Boost
Eco
Auto Med
100%
5%
English
Ελληνικ
Espanol
Čeština
中文
한국어
English EnglishEnglish
Eco
Auto
Boost
Eco
Auto Med
100%
5%
English
Ελληνικ
Espanol
Čeština
中文
한국어
English EnglishEnglish
Eco
Auto
Boost
Eco
Auto Med
100%
5%
English
Ελληνικ
Espanol
Čeština
中文
한국어
English
EnglishEnglish
Eco
Auto
Boost
Eco
Auto Med
100%
5%
English
Ελληνικ
Espanol
Čeština
中文
한국어
English English
English
Eco
Auto
Boost
Eco
Auto Med
100%
5%
English
Ελληνικ
Espanol
Čeština
中文
한국어
English
English
English
Eco
5
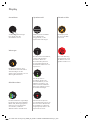
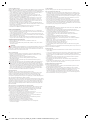
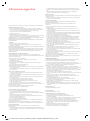
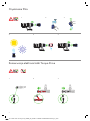
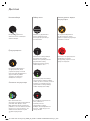
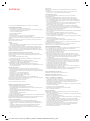
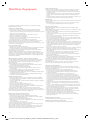
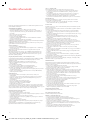
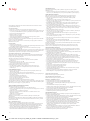
You can control the settings
on your appliance using the
selection button.
Press and hold the selection
button for 5 to 10 seconds to
view the language list.
The screen will alert you
when your battery is
getting low.
The screen will alert you
when your appliance needs
your attention. Follow the
instructions on screen to
maintain performance.
Continued or regular use of
Eco or Auto/Med mode helps
to maximise cleaning time
and prevents overheating,
preserving battery durability
and life.
Press the selection button to
scroll through the languages.
A short (between 2 and
4 seconds) hold press on
the selection button selects
a language.
To confirm the language press
the selection button to scroll
to the tick, then a short hold
press on the selection button
will confirm your selection.
A final alert is shown
when your battery is
empty and needs to
be charged.
If the wrong language is
selected then a short hold
press on the selection button
when the cross is displayed
will return you to the
language list.
Display
Selection button Language selection Low battery
Alerts
Battery health
13.11.2018 12:58 - C97400_SV14_OPMAN_EU_X248F-V11-ABSOLUTE-OPMAN-97400.indd_15_4c0s

clik
clik
clik
clik
clik
clik
clik
clik
clik
clik
clik
clik
2
1
3 4
3-4.5hrs
Auto
Boost
Eco
Auto Med
100%
5%
English
Ελληνικ
Espanol
Čeština
中文
한국어
English EnglishEnglish
Eco
Auto
Boost
Eco
Auto Med
100%
5%
English
Ελληνικ
Espanol
Čeština
中文
한국어
English EnglishEnglish
Eco
6
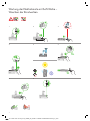
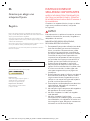
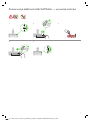
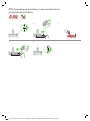
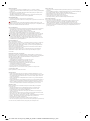
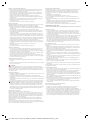
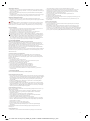
Emptying the clear bin
Be careful not to pull the 'ON'
trigger while the clear bin is
open for emptying.
Close the clear bin by pushing the bin base
upwards until the clear bin and bin base
click into place.
Charging
Battery empty and
needs charging.
Connect to charger either directly
or in the docking station.
The blue LEDs – one on each side
of the battery – will flash on and off
during charging.
When the battery is charged, both
LEDs will light for 5 seconds, then
go out.
Battery is charged
when display shows
battery at 100%.
13.11.2018 12:58 - C97400_SV14_OPMAN_EU_X248F-V11-ABSOLUTE-OPMAN-97400.indd_15_4c0s

clik
clik
clik
clik
1 2
3
5 6
4
3
4
clik
2
1
3
4
clik
2
1
3
4
clik
2
1
3
4
clik
2
1
3
4
clik
2
1
3
4
clik
2
1
3
4
clik
2
1
3
4
clik
2
1
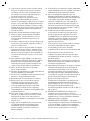
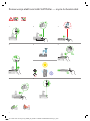
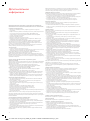
7
Looking for blockages
Close the clear bin by pushing the bin base upwards
until the clear bin and bin base click into place.
13.11.2018 12:58 - C97400_SV14_OPMAN_EU_X248F-V11-ABSOLUTE-OPMAN-97400.indd_15_4c0s

3
21
54 6
1 2 3
3
4
clik
2
1
3
4
clik
2
1
3
4
clik
2
1
3
4
clik
2
1
3
4
clik
2
1
3
4
clik
2
1
3
4
clik
2
1
3
4
clik
2
1
8
Cleaning the filter
High torque cleaner head maintenance
13.11.2018 12:58 - C97400_SV14_OPMAN_EU_X248F-V11-ABSOLUTE-OPMAN-97400.indd_15_4c0s

21 3
54
1
2
1
2
9
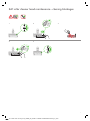
Soft roller cleaner head maintenance - clearing blockages
13.11.2018 12:58 - C97400_SV14_OPMAN_EU_X248F-V11-ABSOLUTE-OPMAN-97400.indd_15_4c0s

1
5 6
7 8
2 3
4
1
2
1
2
2
1
clik
clik
10
Soft roller cleaner head maintenance – washing the brush bars
13.11.2018 12:58 - C97400_SV14_OPMAN_EU_X248F-V11-ABSOLUTE-OPMAN-97400.indd_15_4c0s

11
Please read the ‘Important Safety Instructions’ in this Dyson Operating Manual
before proceeding.
Docking station installation
• Unpack the docking station, charger and installation leaflet.
• Select the location for the docking station and ensure that there is no pipework (gas, water
or air), electrical cables, wires or ductwork directly behind the mounting location.
• Follow the instructions on the installation leaflet.
• Click the attachments into place.
• Place the appliance in the docking station.
• Plug the charger into the mains electricity supply. Switch on (if necessary) to charge
the battery.
• Your appliance will need to be fully charged before first use.
The docking station must be mounted in accordance with regulations and applicable codes/
standards (state and local laws may apply).
Dyson recommends the use of protective clothing, eyewear and materials when installing the
docking station.
Vacuuming
• Remove the appliance from the docking station.
• Check that the underside of the cleaner head or tool is clean and free from foreign objects
that may cause damage.
Before vacuuming your flooring, rugs and carpets, check the manufacturer’s recommended
cleaning instructions.
The brush bar on the appliance can damage certain carpet types and floors. Some carpets
will fuzz if a rotating brush bar is used when vacuuming. If this happens, we recommend
vacuuming without the motorised floor tool and consulting with your flooring manufacturer.
High torque cleaner head – suction control slider
Your High torque cleaner head has a slider control to adjust the suction of the cleaner head.
To select the suction required, move the suction control slider on top of the cleaner head.
Maximum suction for ground in dust and debris (+)
• For vacuuming durable floor coverings, hard floors and heavily soiled carpets and rugs.
Suction for dust and debris (▲)
• For vacuuming of lightly soiled carpets, rugs and hard flooring.
• For vacuuming of large debris such as peanuts or rice.
Suction for deep pile carpets and delicate flooring (-)
• For vacuuming deep pile carpets or rugs and any flooring on which you may experience
greater resistance.
• For vacuuming of lightly soiled floors, including delicate flooring such as vinyl, parquet
and lino.
Emptying the clear bin
• Empty as soon as the dirt reaches the level of the MAX mark – do not overfill.
• Be careful not to pull the 'ON' trigger while the clear bin is open for emptying.
• Remove the wand by pressing the red wand release button and pulling away from the bin.
• To release the dirt:
– Hold the appliance with the bin in a downwards position.
– Firmly push the red bin release button.
– The bin will slide down, cleaning the shroud as it goes.
– The bin base will then open.
– The bin base will not open if the red button is not pushed down fully.
To minimise dust/allergen contact when emptying, encase the clear bin tightly in a dust proof
bag and empty. Remove the clear bin carefully from the bag. Seal the bag tightly, dispose
as normal.
Cleaning the clear bin (optional)
If it is necessary to clean the clear bin:
• Follow the instructions in the 'Emptying the clear bin' section.
• Press the red button located on the bin runner to release the bin and slide the bin off
the runner.
• Clean the clear bin with a damp cloth only.
• Ensure that the clear bin and seals are completely dry before replacing.
• To refit the clear bin:
– Insert the spine on to the bin runner.
Close the clear bin by pushing the bin base upwards until the clear bin and bin base click
into place.
The clear bin is not dishwasher safe and the use of detergents, polishes or air fresheners to
clean the clear bin is not recommended as this may damage your appliance.
Filter and blockage indicators
The display of your appliance will alert you when simple maintenance steps are needed.
• The filter indicator will show when the filter unit is not fitted correctly. Follow the instructions
on how to refit the filter unit in the 'Washing the filter unit' section.
• The filter indicator will show when the filter unit needs washing. Follow the instructions on
how to wash the filter unit in the 'Washing the filter unit' section.
• The blockage indicator will show if there is a blockage. Follow the instructions on how to
clear blockages in the 'Looking for blockages' section.
Washable parts
Your appliance has washable parts, which require regular cleaning. Follow the
instructions below.
• Do not put any part of your appliance in a dishwasher, washing machine, tumble dryer,
oven, microwave or near a naked flame.
Washing the filter unit
Wash the filter unit at least once every month, or whenever the filter maintenance
indicator lights.
Check and wash the filter unit, according to the instructions, to maintain performance.
• Remove the filter unit by twisting it anti-clockwise. Gently pull away from the appliance.
• Gently tap the filter unit to remove any excess dust and debris before washing it.
• Wash the filter unit in cold water only: do not use detergent, or wash it in a dishwasher or
washing machine.
• Wash the pleated paper element of the filter unit first; hold the filter unit under a cold water
tap with the foam element downwards and run cold water over the pleated paper.
• Continue washing until the water runs clear.
• Wash the foam element of the filter unit next; hold the filter unit under a cold water tap with
the foam element downwards so that dirty water does not contaminate the pleated paper
element. Run cold water over the inside and outside of the foam element and squeeze the
foam gently to expel the dirt.
• Continue washing until the water runs clear.
• Wash the outside of the filter unit. Then fill the unit with cold water, place your hands over
the open ends and shake gently.
• Repeat washing the elements and outside of the filter unit until the water runs clear.
• Gently shake the filter unit to remove any excess water and leave to drain with the foam
element end facing up.
• Leave the filter unit to dry completely in a dry environment with good airflow, for a
minimum of 24 hours.
• Check that the filter unit is completely dry.
• To refit, return the filter unit to the main body and twist clockwise until it clicks into place.
The filter unit may require more frequent washing if vacuuming fine dust or if use is mainly in
Boost mode.
Do not put any part of your appliance in a dishwasher, washing machine, tumble dryer, oven,
microwave or near a naked flame.
Washing the brush bars
The soft roller cleaner head of your appliance has two washable brush bars. Check and wash
them regularly, according to the following instructions, to maintain performance:
• Refer to the 'Cleaner head maintenance' illustrations above.
• When removing or replacing a motorised brush bar, be careful not to pull the 'ON' trigger
until the cleaner head has been reassembled.
To remove, wash and replace the brush bars:
• Turn the cleaner head upside down so the underside of the cleaner head is facing you. Use
a coin to turn the end cap a quarter anti-clockwise until it clicks into the unlocked position.
Rotate the end cap to the open position. Gently slide the main brush bar out of the cleaner
head. Remove the end cap from the main brush bar. Do not wash the end cap.
• Gently slide the rear brush bar out of the cleaner head.
• Hold the brush bars under running water and gently rub to remove any lint or dirt.
• Stand the brush bars upright as shown. Leave to dry completely for a minimum of 24 hours.
Before replacing, check that the brush bars are completely dry.
• Slide the rear brush bar back into the cleaner head.
• Slide the main brush bar back into the cleaner head.
• Reattach the end cap to the main brush bar.
• The end cap should be in the open position as shown. Once in place, rotate the end cap
back into the closed position.
• Close the fastener by turning it a quarter clockwise. Ensure that the fastener is fully turned
and the brush bars are secure.
High torque cleaner head
The brush bar of a motorised cleaner head is not washable.
Quick-release mini motorhead tool
The brush bar of a motorised cleaner head is not washable.
Blockages – automatic cut-out
• This appliance is fitted with an automatic cut-out.
• If any part becomes blocked, the appliance may automatically cut out.
• This will happen after the motor pulses a number of times (i.e switches on and off in quick
succession) and the blockage indicator will light.
• Leave to cool down before looking for blockages.
• Be careful not to pull the 'ON' trigger while looking for blockages. Operating the appliance
while it is partially dismantled could result in personal injury.
• Clear any blockage before restarting.
• Refit all parts securely before using.
• Clearing blockages is not covered by your guarantee.
Looking for blockages
The motor will pulse and the blockage indicator will show when there is a blockage.
Please follow the instructions below to locate the blockage:
• Be careful not to pull the 'ON' trigger while looking for blockages. Operating the appliance
while it is partially dismantled could result in personal injury.
• Beware of sharp objects when checking for blockages.
• To check for blockages in the main body of the appliance, remove the clear bin following
the instructions in the 'Emptying the clear bin' section and remove the blockage.
• If you cannot clear an obstruction from the cleaner head, you may need to remove the
brush bar. Use a coin to unlock the fastener, slide the brush bar out of the cleaner head
and remove the obstruction. Replace the brush bar and secure it by tightening the fastener.
Ensure it is fixed firmly before operating the appliance.
• This product has carbon fibre brushes. Take care if coming into contact with them, as they
may cause minor skin irritation. Wash your hands after handling the brushes.
• Refit all parts securely before using.
• Clearing blockages is not covered by your guarantee.
Additional information
13.11.2018 12:58 - C97400_SV14_OPMAN_EU_X248F-V11-ABSOLUTE-OPMAN-97400.indd_15_4c0s

12
Charging and storing
• This appliance will switch ‘OFF’ if the battery temperature is below 10°C (50°F). This is
designed to protect the motor and battery. Do not charge the appliance and then move it to
an area with a temperature below 10°C (50°F) for storage purposes.
• To help prolong battery life, avoid recharging immediately after a full discharge. Allow to
cool for a few minutes.
• Avoid using the appliance with the battery flush to a surface. This will help it run cooler and
prolong battery run time and life.
Battery safety instructions
• If the battery needs replacing, please contact the Dyson Helpline.
• Use only the Dyson charger Part Number 217160 for charging this Dyson appliance.
CAUTION
The battery used in this device may present a risk of fire or chemical burn if mistreated. Do not
short contacts, heat above 60°C(140°F), or incinerate. Keep away from children. Do not
disassemble or dispose of in fire.
Disposal information
• Dyson products are made from high grade recyclable materials. Recycle where possible.
• The battery should be removed from the product before disposal.
• Dispose of or recycle the battery in accordance with local ordinances or regulations.
• Dispose of the exhausted filter unit in accordance with local ordinances or regulations.
• This marking indicates that this product should not be disposed with other household
wastes throughout the EU. To prevent possible harm to the environment or human health
from uncontrolled waste disposal, recycle it responsibly to promote the sustainable reuse of
material resources. To return your used device, please use the return and collection systems
or contact the retailer where the product was purchased. They can take this product for
environmentally safe recycling.
Dyson customer care
Thank you for choosing to buy a Dyson appliance
After registering your 2year guarantee, your Dyson appliance will be covered for parts and
labour for 2years from the date of purchase, subject to the terms of the guarantee. If you have
any queries regarding your Dyson appliance, visit www.dyson.com for online help, general
tips and useful information about Dyson.
Alternatively, you can call the Dyson Helpline with your serial number and details of where and
when you bought the appliance.
If your Dyson appliance needs a repair, call the Dyson Helpline so we can discuss the available
options. If your Dyson appliance is under guarantee, and the repair is covered, it will be
repaired at no cost.
Please register as a Dyson appliance owner
The guarantee for this product is 2 years from the the date of purchase. Please register your
guarantee within 30 days of your purchase date. To help us ensure that you receive prompt
and efficient service, please register immediately after purchase. Please keep the receipt
showing the date of purchase.
There are three ways to do this:
• Online at www.dyson.com
• Telephone the Dyson Helpline.
By registering online or by phone you will:
• Protect your investment with a two year parts and labour guarantee
• Receive helpful tips on using your machine
• Get expert advice from the Dyson helpline
• Be the first to hear about our latest inventions
• Registering only takes a few minutes and all you need is your serial number.
Limited 2 year guarantee
Terms and conditions of the dyson 2 year limited guarantee
What is covered
• The repair or replacement of your Dyson appliance (at Dyson’s discretion) if it is found to
be defective due to faulty materials, workmanship or function within 2 years of purchase or
delivery (if any part is no longer available or out of manufacture Dyson will replace it with a
functional replacement part).
• Where this appliance is sold outside of the EU, this guarantee will only be valid if the
appliance is used in the country in which it was sold.
• Where this appliance is sold within the EU, this guarantee will only be valid (i) if the
appliance is used in the country in which it was sold or (ii) if the appliance is used in Austria,
Belgium, France, Germany, Ireland, Italy, Netherlands, Spain or the United Kingdom and
the same model as this appliance is sold at the same voltage rating in the relevant country.
What is not covered
Dyson does not guarantee the repair or replacement of a product where a defect is the
result of:
• Accidental damage, faults caused by negligent use or care, misuse, neglect, carelessness
or operation or handling of the appliance which is not in accordance with the Dyson
Operating Manual.
• Use of the appliance for anything other than normal domestic household purposes.
• Use of parts not assembled or installed in accordance with the instructions of Dyson.
• Use of parts and accessories which are not genuine Dyson components.
• Faulty installation (except where installed by Dyson).
• Repairs or alterations carried out by parties other than Dyson or its authorised agents.
• Blockages – please refer to the Dyson Operating Manual for details on how to look for and
clear blockages.
• Normal wear and tear (e.g. fuse, brush bar etc.).
• Use of this appliance on rubble, ash, plaster.
• Reduction in battery discharge time due to battery age or use (where applicable).
If you are in any doubt as to what is covered by your guarantee, please contact the
Dyson helpline.
Summary of cover
• The guarantee becomes effective from the date of purchase (or the date of delivery if this
is later).
• You must provide proof of (both the original and any subsequent) delivery/purchase before
any work can be carried out on your Dyson appliance. Without this proof, any work carried
out will be chargeable. Keep your receipt or delivery note.
• All work will be carried out by Dyson or its authorised agents.
• Any parts which are replaced by Dyson will become the property of Dyson.
• The repair or replacement of your Dyson appliance under guarantee will not extend the
period of guarantee.
• The guarantee provides benefits which are additional to and do not affect your statutory
rights as a consumer.
Important data protection information
When registering your Dyson appliance:
• You will need to provide us with basic contact information to register your appliance and
enable us to support your guarantee.
• When you register, you will have the opportunity to choose whether you would like to
receive communications from us. If you opt-in to communications from Dyson, we will
send you details of special offers and news of our latest innovations. We never sell your
information to third parties and only use information that you share with us as defined by
our privacy policies which are available on our website privacy.dyson.com
• We never sell your information to third parties and only use information that you
share with us as defined by our privacy policies which are available on our website at
privacy.dyson.com
13.11.2018 12:58 - C97400_SV14_OPMAN_EU_X248F-V11-ABSOLUTE-OPMAN-97400.indd_15_4c0s

13
DE/AT/CH
Vielen Dank, dass Sie sich für
ein Dyson Gerät entschieden
haben.
Bitte notieren Sie die Seriennummer für eventuelle Rückfragen.
Nur für Illustrationszwecke.
Online-Registrierung
Besuchen Sie unsere Webseite, um Ihre
umfassende Garantie auf Teile und
Reparaturarbeiten online zu registrieren.
DE: www.dyson.de/register
AT: www.dyson.at/register
CH: www.dyson.ch/register
Registrierung per Telefon
Montag bis Freitag, 8:00-20:00 Uhr und
Samstag von 9:00 bis 14:00 Uhr.
0800 - 3131318
0800 - 28 67 45
0800 - 740 183
Registrierung
Nach der Registrierung gewähren wir Ihnen für Ihr Dyson Gerät gemäß
unseren Garantiebestimmungen ab Kaufdatum eine kostenlose 2-Jahres-
Garantie auf alle Teile (ausschließlich Filter) und Arbeiten.
Wenn Sie Fragen zu Ihrem Dyson Gerät haben, besuchen Sie www.dyson.
de/support (DE), www.dyson.at/support (AT) oder www.dyson.ch/support
(CH) um Online-Hilfe, Support-Videos, allgemeine Tipps und nützliche
Informationen zu Dyson zu erhalten.
Alternativ können Sie sich auch telefonisch an den Kundendienst von Dyson
wenden. Geben Sie dazu die Seriennummer Ihres Gerätes sowie das Datum
und den Ort des Gerätekaufs an.
Die Seriennummer finden Sie auf dem Typenschild am Sockel des Produkts.
WICHTIGE
SICHERHEITSHINWEISE
LESEN SIE VOR DER BENUTZUNG DIESES
GERÄTES ZUNÄCHST ALLE ANWEISUNGEN
UND WARNHINWEISE IN DIESER
BEDIENUNGSANLEITUNG SOWIE AM
GERÄT SELBST
Bei der Verwendung von Elektrogeräten sollten
stets grundlegende Vorsichtsmaßnahmen beachtet
werden, einschließlich der folgenden:
ACHTUNG
Diese Warnhinweise beziehen sich auf das Gerät und
gegebenenfalls auf sämtliches Zubehör, Ladegeräte
oder Netzteile.
UM DIE GEFAHR EINES FEUERS, STROMSCHLAGS
ODER VON VERLETZUNGEN ZU VERMEIDEN:
1. Dieses Dyson Gerät kann von Kindern ab
8 Jahren und Personen mit eingeschränkten
physischen, sensorischen oder geistigen
Fähigkeiten bzw. von unerfahrenen und
ungeschulten Personen verwendet werden,
sofern diese von einer verantwortlichen Person
im Hinblick auf die sichere Nutzung des Geräts
beaufsichtigt oder instruiert werden und sich
der möglichen Risiken bewusst sind. Reinigung
und Pflege dürfen von Kindern nicht ohne
Beaufsichtigung durchgeführt werden.
2. Das Gerät darf nicht als Spielzeug verwendet
werden. Wird das Gerät von Kindern oder
in deren Nähe genutzt, muss die Situation
aufmerksam beobachtet werden. Kinder sollten
beaufsichtigt werden, damit sie nicht mit dem
Gerät spielen.
3. Darf nur wie in dieser Dyson Bedienungsanleitung
beschrieben verwendet werden. An dem
Gerät dürfen keine anderen als die in dieser
Anleitung beschriebenen bzw. vom Dyson
Kundendienst empfohlenen Wartungsarbeiten
durchgeführt werden.
4. Verwenden Sie das Gerät NUR an trockenen
Standorten. Verwenden Sie es nicht im Freien
oder auf nassem Untergrund.
5. Die Ladestation bzw. das Gerät nicht mit nassen
Händen anfassen.
6. Nicht verwenden, wenn Ladestation oder Kabel
beschädigt sind.
7. Wenn das Gerät nicht so funktioniert, wie es
sollte, einen heftigen Schlag erhalten hat, fallen
gelassen, beschädigt, im Freien vergessen oder
13.11.2018 12:58 - C97400_SV14_OPMAN_EU_X248F-V11-ABSOLUTE-OPMAN-97400.indd_15_4c0s

14
ins Wasser fallen gelassen wurde, verwenden Sie
das Gerät nicht mehr und wenden Sie sich an den
Dyson Kundendienst.
8. Wenn eine Wartung oder Reparatur erforderlich
ist, wenden Sie sich an den Kundendienst von
Dyson. Nehmen Sie das Gerät nicht eigenständig
auseinander, da es aufgrund eines falschen
Zusammensetzens zu Stromschlägen oder
Bränden kommen kann.
9. Das Kabel darf nicht gespannt werden. Halten
Sie das Kabel von heißen Oberflächen fern.
Klemmen Sie das Kabel nicht in der Tür ein und
ziehen Sie es nicht um scharfe Kanten oder Ecken.
Sorgen Sie dafür, dass das Kabel niemandem im
Weg ist. Fahren Sie nicht über das Kabel.
10. Saugen Sie mit dem Gerät kein Wasser auf.
11. Saugen Sie keine entflammbaren oder leicht
entzündbaren Flüssigkeiten wie Benzin auf und
benutzen Sie das Gerät nicht in Umgebungen,
in denen diese flüssig oder in Dämpfen
auftreten können.
12. Verwenden Sie das Gerät nicht zum Aufsaugen
von brennenden oder rauchenden Substanzen
wie Zigaretten, Streichhölzern oder heißer Asche.
13. Achten Sie darauf, dass Haare, lose Kleidung,
Finger und sonstige Körperteile nicht in die Nähe
von Öffnungen oder beweglichen Teilen wie z.
B. der Bürstwalze gelangen. Richten Sie weder
Schlauch noch Rohr oder Düsen auf Augen
oder Ohren und nehmen Sie nichts davon in
den Mund.
14. Stecken Sie keine Gegenstände in Öffnungen des
Geräts. Benutzen Sie das Gerät nicht, wenn eine
Öffnung blockiert ist. Entfernen Sie Blockierungen
durch Staub, Flusen, Haare usw., da diese den
Luftstrom reduzieren können.
15. Benutzen Sie nur Zubehör und Ersatzteile
von Dyson.
16. Verwenden Sie das Gerät nicht ohne
Auffangbehälter und Filter.
17. Trennen Sie die Ladestation von der Steckdose,
wenn sie längere Zeit nicht verwendet wird.
18. Seien Sie beim Saugen von Treppen
besonders vorsichtig.
19. Um ein versehentliches Starten zu verhindern,
achten Sie darauf, dass Ihre Hände und Finger
den Ein-/Aus-Schalter erst berühren, wenn Sie
bereit sind zu saugen, vor allem auch, wenn Sie
das Gerät aufheben oder tragen. Das Tragen des
Geräts mit dem Finger am Ein-/Aus-Schalter lädt
zu Unfällen ein.
20. Installieren, laden und verwenden Sie dieses
Gerät nicht im Freien, in Feuchträumen
oder in einem Umkreis von 3Metern von
Schwimmbecken. Arbeiten Sie damit nicht auf
feuchten Oberflächen und setzen Sie es nicht
Feuchtigkeit, Regen oder Schnee aus.
21. Verwenden Sie ausschließlich die Dyson
Ladestation, Artikelnr. 217160, für das
Laden dieses Dyson Geräts. Verwenden Sie
ausschließlich Dyson Akkus: Andere Akkus
könnten platzen und zu Verletzungen oder
Beschädigungen des Geräts führen.
22. Wenn Sie die motorisierte Bürstwalze
herausnehmen oder ersetzen, achten Sie darauf,
den Ein-/Aus-Schalter erst zu betätigen, wenn die
Bürste wieder zusammengebaut ist.
23. Verwenden Sie keine Akkus oder Geräte,
die beschädigt oder verändert wurden.
Beschädigte oder veränderte Akkus können
zu unvorhersehbarem Verhalten, Bränden,
Explosionen und Verletzungsgefahr führen.
Setzen Sie den Akku und das Gerät weder Feuer
noch überhöhten Temperaturen aus. Bei Feuer
oder Temperaturen über 60° C kann es zu einer
Explosion kommen.
24. Der Akku mit den Batterien ist versiegelt und stellt
unter normalen Umständen kein Risiko für Ihre
Sicherheit dar. Im unwahrscheinlichen Fall, dass
Flüssigkeit aus dem Akku austritt, berühren Sie
die Flüssigkeit nicht, da sie Hautreizungen und
Verbrennungen verursachen kann, und beachten
Sie folgende Hinweise:
• Hautkontakt – kann zu Hautirritationen führen.
Waschen Sie betroffene Stellen mit Seife
und Wasser.
• Inhalation – kann zu einer Reizung der
Atemwege führen. Sorgen Sie für frische Luft und
konsultieren Sie einen Arzt.
• Kontakt mit den Augen – kann zu einer Reizung
führen. Spülen Sie die Augen unverzüglich
mindestens 15 Minuten lang mit Wasser.
Konsultieren Sie einen Arzt.
• Entsorgung – Handschuhe anziehen
und unverzüglich entsprechend örtlichen
Bestimmungen und Gesetzen entsorgen.
25. Folgen Sie den Anweisungen zum Laden
des Akkus und laden Sie den Akku bzw.
das Gerät nicht außerhalb des in dieser
Bedienungsanleitung angegebenen
Temperaturbereichs. Unsachgemäßes
Laden oder Laden des Akkus außerhalb des
empfohlenen Temperaturbereichs kann zu
Beschädigungen des Akkus führen und das Risiko
eines Feuers erhöhen.
Um die maximale Akkulebensdauer zu
gewährleisten, empfiehlt Dyson Folgendes:
• Wenn das Gerät nicht verwendet wird, bewahren
Sie es bei Zimmertemperatur auf. Empfohlener
Bereich: 18° C bis 28° C.
13.11.2018 12:58 - C97400_SV14_OPMAN_EU_X248F-V11-ABSOLUTE-OPMAN-97400.indd_15_4c0s

15
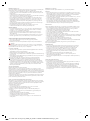
Nicht in der Nähe
einer offenen
Flamme verwenden.
Nicht in der Nähe von
Hitzequellen abstellen.
Saugen Sie kein
Wasser oder andere
Flüssigkeiten auf.
Verwenden Sie das
Gerät nicht zum
Aufsaugen von
brennbaren Substanzen.
Achten Sie darauf,
dass Ihre Hände beim
Gebrauch des Geräts
nicht in die Nähe der
Bürstwalze kommen.
Nicht auf oder
neben einen
Küchenherd stellen.
26. BRANDGEFAHR – Dieses Produkt darf nicht auf
oder neben einen Küchenherd oder andere heiße
Oberflächen gestellt werden. Das Produkt darf
nicht verbrannt werden, selbst wenn es schwer
beschädigt ist. Der Akku könnte Feuer fangen
oder explodieren.
27. BRANDGEFAHR – Verwenden Sie an den Filtern
dieses Geräts keine Duftstoffe oder parfümierten
Produkte. Die in derartigen Produkten
enthaltenen Chemikalien sind bekanntermaßen
entzündbar und können dazu führen, dass das
Gerät in Brand gerät.
LESEN UND BEWAHREN SIE
DIESE ANWEISUNGEN AUF
Dieses Dyson Gerät ist ausschließlich für die
Verwendung im Haushalt geeignet.
13.11.2018 12:58 - C97400_SV14_OPMAN_EU_X248F-V11-ABSOLUTE-OPMAN-97400.indd_15_4c0s

16
13.11.2018 12:58 - C97400_SV14_OPMAN_EU_X248F-V11-ABSOLUTE-OPMAN-97400.indd_15_4c0s

Auto
Boost
Eco
Auto Med
100%
5%
English
Ελληνικ
Espanol
Čeština
中文
한국어
English EnglishEnglish
Eco
Auto
Boost
Eco
Auto Med
100%
5%
English
Ελληνικ
Espanol
Čeština
中文
한국어
English EnglishEnglish
Eco
Auto
Boost
Eco
Auto Med
100%
5%
English
Ελληνικ
Espanol
Čeština
中文
한국어
English EnglishEnglish
Eco
Auto
Boost
Eco
Auto Med
100%
5%
English
Ελληνικ
Espanol
Čeština
中文
한국어
English EnglishEnglish
Eco
Auto
Boost
Eco
Auto Med
100%
5%
English
Ελληνικ
Espanol
Čeština
中文
한국어
English EnglishEnglish
Eco
Auto
Boost
Eco
Auto Med
100%
5%
English
Ελληνικ
Espanol
Čeština
中文
한국어
English
EnglishEnglish
Eco
Auto
Boost
Eco
Auto Med
100%
5%
English
Ελληνικ
Espanol
Čeština
中文
한국어
English English
English
Eco
Auto
Boost
Eco
Auto Med
100%
5%
English
Ελληνικ
Espanol
Čeština
中文
한국어
English
English
English
Eco
17
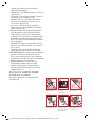
Sie können die Einstellungen
Ihres Geräts über die
Auswahltaste steuern.
Halten Sie die Auswahltaste
5 bis 10 Sekunden
lang gedrückt, um die
Sprachenliste anzuzeigen.
Das Display warnt
Sie, wenn der Akku
leerer wird.
Das Display warnt Sie, wenn
das Gerät Ihre Aufmerksamkeit
erfordert. Folgen Sie den
Anweisungen im Display, um eine
Wartung durchzuführen.
Der dauerhafte bzw. regelmäßige
Einsatz des Spar- bzw. Auto/Med
Modus hilft, die Reinigungszeit zu
optimieren und ein Überhitzen
zu verhindern, sodass die
Akkulebensdauer bewahrt wird.
Drücken Sie die Auswahltaste,
um durch die Sprachen
zu blättern. Durch ein
kurzes Drücken (zwischen
2 und 4 Sekunden) auf die
Auswahltaste wählen Sie eine
Sprache aus.
Um die Sprache zu
bestätigen, drücken Sie
die Auswahltaste, um zum
Häkchen zu blättern, und
halten Sie die Auswahltaste
dann kurz gedrückt, um Ihre
Auswahl zu bestätigen.
Eine finale Warnung
wird angezeigt, wenn
der Akku leer ist und
geladen werden muss.
Falls die falsche Sprache
ausgewählt wurde, kehren Sie
durch ein kurzes Drücken der
Auswahltaste, bis das Kreuz
angezeigt wird, wieder in die
Sprachenliste zurück.
Display
Auswahltaste Sprachauswahl Schwacher Akku
Warnungen
Akkulebensdauer
13.11.2018 12:58 - C97400_SV14_OPMAN_EU_X248F-V11-ABSOLUTE-OPMAN-97400.indd_15_4c0s

clik
clik
clik
clik
clik
clik
clik
clik
clik
clik
clik
clik
2
1
3 4
3-4.5hrs
Auto
Boost
Eco
Auto Med
100%
5%
English
Ελληνικ
Espanol
Čeština
中文
한국어
English EnglishEnglish
Eco
Auto
Boost
Eco
Auto Med
100%
5%
English
Ελληνικ
Espanol
Čeština
中文
한국어
English EnglishEnglish
Eco
18
Behälterentleerung
Achten Sie darauf, nicht
den Ein-/Aus-Schalter zu
betätigen, während der
Auffangbehälter zum Leeren
geöffnet ist.
Schließen Sie den Auffangbehälter, indem Sie
den Behälterboden nach oben drücken, bis
Auffangbehälter und Behälterboden hörbar einrasten.
Aufladen
Der Akku ist leer und
muss geladen werden
gelanden werden.
Schließen Sie das Gerät entweder
direkt oder über die Ladehalterung an
die Ladestation an.
Die blauen LEDs – eine je Seite
des Akkus – blinkt während
des Ladevorgangs.
Wenn der Akku geladen ist, leuchten
beide LEDs 5 Sekunden lang und
erlöschen dann.
Der Akku ist vollständig
geladen, wenn das
Display 100 % anzeigt.
13.11.2018 12:58 - C97400_SV14_OPMAN_EU_X248F-V11-ABSOLUTE-OPMAN-97400.indd_15_4c0s

clik
clik
clik
clik
1 2
3
5 6
4
3
4
clik
2
1
3
4
clik
2
1
3
4
clik
2
1
3
4
clik
2
1
3
4
clik
2
1
3
4
clik
2
1
3
4
clik
2
1
3
4
clik
2
1
19
Blockierungen entfernen
Schließen Sie den Auffangbehälter, indem Sie den
Behälterboden nach oben drücken, bis Auffangbehälter
und Behälterboden hörbar einrasten.
13.11.2018 12:58 - C97400_SV14_OPMAN_EU_X248F-V11-ABSOLUTE-OPMAN-97400.indd_15_4c0s

3
21
54 6
1 2 3
3
4
clik
2
1
3
4
clik
2
1
3
4
clik
2
1
3
4
clik
2
1
3
4
clik
2
1
3
4
clik
2
1
3
4
clik
2
1
3
4
clik
2
1
20
Reinigung des Filters
Wartung der Elektrobürste mit Direktantrieb
13.11.2018 12:58 - C97400_SV14_OPMAN_EU_X248F-V11-ABSOLUTE-OPMAN-97400.indd_15_4c0s
Seite wird geladen ...
Seite wird geladen ...
Seite wird geladen ...
Seite wird geladen ...
Seite wird geladen ...
Seite wird geladen ...
Seite wird geladen ...
Seite wird geladen ...
Seite wird geladen ...
Seite wird geladen ...
Seite wird geladen ...
Seite wird geladen ...
Seite wird geladen ...
Seite wird geladen ...
Seite wird geladen ...
Seite wird geladen ...
Seite wird geladen ...
Seite wird geladen ...
Seite wird geladen ...
Seite wird geladen ...
Seite wird geladen ...
Seite wird geladen ...
Seite wird geladen ...
Seite wird geladen ...
Seite wird geladen ...
Seite wird geladen ...
Seite wird geladen ...
Seite wird geladen ...
Seite wird geladen ...
Seite wird geladen ...
Seite wird geladen ...
Seite wird geladen ...
Seite wird geladen ...
Seite wird geladen ...
Seite wird geladen ...
Seite wird geladen ...
Seite wird geladen ...
Seite wird geladen ...
Seite wird geladen ...
Seite wird geladen ...
Seite wird geladen ...
Seite wird geladen ...
Seite wird geladen ...
Seite wird geladen ...
Seite wird geladen ...
Seite wird geladen ...
Seite wird geladen ...
Seite wird geladen ...
Seite wird geladen ...
Seite wird geladen ...
Seite wird geladen ...
Seite wird geladen ...
Seite wird geladen ...
Seite wird geladen ...
Seite wird geladen ...
Seite wird geladen ...
Seite wird geladen ...
Seite wird geladen ...
Seite wird geladen ...
Seite wird geladen ...
Seite wird geladen ...
Seite wird geladen ...
Seite wird geladen ...
Seite wird geladen ...
Seite wird geladen ...
Seite wird geladen ...
Seite wird geladen ...
Seite wird geladen ...
Seite wird geladen ...
Seite wird geladen ...
Seite wird geladen ...
Seite wird geladen ...
Seite wird geladen ...
Seite wird geladen ...
Seite wird geladen ...
Seite wird geladen ...
Seite wird geladen ...
Seite wird geladen ...
Seite wird geladen ...
Seite wird geladen ...
Seite wird geladen ...
Seite wird geladen ...
Seite wird geladen ...
Seite wird geladen ...
Seite wird geladen ...
Seite wird geladen ...
Seite wird geladen ...
Seite wird geladen ...
Seite wird geladen ...
Seite wird geladen ...
Seite wird geladen ...
Seite wird geladen ...
Seite wird geladen ...
Seite wird geladen ...
Seite wird geladen ...
Seite wird geladen ...
Seite wird geladen ...
Seite wird geladen ...
Seite wird geladen ...
Seite wird geladen ...
Seite wird geladen ...
Seite wird geladen ...
Seite wird geladen ...
Seite wird geladen ...
Seite wird geladen ...
Seite wird geladen ...
Seite wird geladen ...
Seite wird geladen ...
Seite wird geladen ...
Seite wird geladen ...
Seite wird geladen ...
Seite wird geladen ...
Seite wird geladen ...
Seite wird geladen ...
Seite wird geladen ...
Seite wird geladen ...
Seite wird geladen ...
Seite wird geladen ...
Seite wird geladen ...
Seite wird geladen ...
Seite wird geladen ...
Seite wird geladen ...
Seite wird geladen ...
-
 1
1
-
 2
2
-
 3
3
-
 4
4
-
 5
5
-
 6
6
-
 7
7
-
 8
8
-
 9
9
-
 10
10
-
 11
11
-
 12
12
-
 13
13
-
 14
14
-
 15
15
-
 16
16
-
 17
17
-
 18
18
-
 19
19
-
 20
20
-
 21
21
-
 22
22
-
 23
23
-
 24
24
-
 25
25
-
 26
26
-
 27
27
-
 28
28
-
 29
29
-
 30
30
-
 31
31
-
 32
32
-
 33
33
-
 34
34
-
 35
35
-
 36
36
-
 37
37
-
 38
38
-
 39
39
-
 40
40
-
 41
41
-
 42
42
-
 43
43
-
 44
44
-
 45
45
-
 46
46
-
 47
47
-
 48
48
-
 49
49
-
 50
50
-
 51
51
-
 52
52
-
 53
53
-
 54
54
-
 55
55
-
 56
56
-
 57
57
-
 58
58
-
 59
59
-
 60
60
-
 61
61
-
 62
62
-
 63
63
-
 64
64
-
 65
65
-
 66
66
-
 67
67
-
 68
68
-
 69
69
-
 70
70
-
 71
71
-
 72
72
-
 73
73
-
 74
74
-
 75
75
-
 76
76
-
 77
77
-
 78
78
-
 79
79
-
 80
80
-
 81
81
-
 82
82
-
 83
83
-
 84
84
-
 85
85
-
 86
86
-
 87
87
-
 88
88
-
 89
89
-
 90
90
-
 91
91
-
 92
92
-
 93
93
-
 94
94
-
 95
95
-
 96
96
-
 97
97
-
 98
98
-
 99
99
-
 100
100
-
 101
101
-
 102
102
-
 103
103
-
 104
104
-
 105
105
-
 106
106
-
 107
107
-
 108
108
-
 109
109
-
 110
110
-
 111
111
-
 112
112
-
 113
113
-
 114
114
-
 115
115
-
 116
116
-
 117
117
-
 118
118
-
 119
119
-
 120
120
-
 121
121
-
 122
122
-
 123
123
-
 124
124
-
 125
125
-
 126
126
-
 127
127
-
 128
128
-
 129
129
-
 130
130
-
 131
131
-
 132
132
-
 133
133
-
 134
134
-
 135
135
-
 136
136
-
 137
137
-
 138
138
-
 139
139
-
 140
140
-
 141
141
-
 142
142
-
 143
143


in anderen Sprachen
- français: Dyson V11 Complete Manuel utilisateur
- dansk: Dyson V11 Complete Brugermanual
Verwandte Artikel
-
Dyson DC37C ErP Allergy Benutzerhandbuch
-
-
-
-
-
-
-
-
-
