
Installationsanleitung Etagenplatte ETA 64X LED
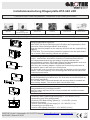
1. Anschluss des Protact Klingeltasters. Connection of the Protact push button
Draht durch Dichtung
führen.
Put wire through seal.
Draht anschließen.
Connect wire.
Entriegelung.
Unlocking.
Dichtung andrücken.
Press on seal.
Schaltung.
Example Circuit.
2. Montage der Aufputz-Etagenplatte. Installation of the surface-mounted shelf plate
Den Montageadapter am Mauerwerk ausrichten und mit dem mitgelieferten
Befestigungsmaterial befestigen.
ACHTUNG: Die Runde Öffnung zeigt die Position des Klingeltasters: Oben
oder unten. Beide Montagevarianten sind möglich.
Align the mounting adapter on the masonry and fix it with the supplied fixing
material.
ATTENTION: The round opening shows the position of the bell push button:
Top or bottom. Both mounting variants are possible.
Nach Befestigung des Montageadapters, den Protact Klingeltaster wie in
Punkt 1. beschrieben anschließen und einen Funktionstest durchführen.
Die Etagenplattenabdeckung wird seitlich eingehakt und über den
Montageadapter gestülpt. Die Runde Öffnung der Montageplatte muss sich
anschließend hinter dem Protact Klingeltaster befinden.
After fixing the mounting adapter, connect the Protact bell push button as
described in point 1 and carry out a function test.
The floor plate cover is hooked in at the side and slipped over the mounting
adapter. The round opening of the mounting plate must then be behind the
Protact bell push button.
Mv556400 I Stand 05.2022
Die Etagenplattenabdeckung wird seitlich mit einer Schraube gesichert, die in
den Montageadapter geschraubt wird. Die Schraube wird anschließend mit
einer Kappe abgedeckt.
The tier plate cover is secured laterally with a screw, which is screwed into
the mounting adapter. The screw is then covered with a cap.
Namensschildeinleger in die dafür vorgesehene Aussparung legen und die
Plexiglasabdeckung vorsichtig einsetzen.
Insert the name tag inlay into the recess provided and carefully insert the
Plexiglas cover.
Draht abisolieren.
Strip wire.
12
3
Elektrischer Anschluss:
1 Zuleitung Taster (Spannungsversorgung) 8 - 12 V AC/DC (1,5 A)
2 Verbindung zum Gong (Klingeldraht)
3 Zuleitung LED Beleuchtung (Masse) 8 - 12 V AC/DC (10 mA)
Electrical connection:
1 Lead to push-button (Power supply) 8 - 12 V AC/DC (1.5 A)
2 Connection to bell (Bell wire)
3 Lead to LED lighting (Ground) 8 - 12 V AC/DC (10 mA)
-
 1
1

in anderen Sprachen
- English: Grothe ETA 64X User manual
Verwandte Artikel
Andere Dokumente
-
Me BELL-401-TXS Assembly Instructions
-
-
-
 REV Ritter 0082600103 Bedienungsanleitung
-
 REV Ritter 0082640103 Bedienungsanleitung
-
-
Byron BY401 Bedienungsanleitung
-
-
Niko 10-505 Benutzerhandbuch
-
 REV Ritter 0082350103 Bedienungsanleitung


