Makita PT001G Benutzerhandbuch
- Kategorie
- Nagelpistole
- Typ
- Benutzerhandbuch

PT001G
EN Cordless Pin Nailer INSTRUCTION MANUAL 5
FR Cloueur Sans Fil MANUEL D’INSTRUCTIONS 12
DE Akku-Pintacker BETRIEBSANLEITUNG 20
IT Chiodatrice per chiodi a spillo
a batteria ISTRUZIONI PER L’USO 28
NL Accunagelpistool GEBRUIKSAANWIJZING 36
ES Clavadora Inalámbrica MANUAL DE
INSTRUCCIONES 44
PT Pinador a Bateria MANUAL DE INSTRUÇÕES 52
DA Akku-stiftepistol BRUGSANVISNING 60
EL 67
TR
KULLANMA KILAVUZU 75

2
1
2
3
1
Fig.1
1
2
Fig.2
1
2
Fig.3
A
B
Fig.4
1
AB
Fig.5
2
13
Fig.6
1
Fig.7
1
2
3
Fig.8

3
2
3
41
Fig.9
1
233
Fig.10
1
2
4
3
5
Fig.11
Fig.12
1
2
4
3
Fig.13
Fig.14
1
2
3
Fig.15
1
Fig.16

4
1
2
3
4
Fig.17
1
2
Fig.18
Fig.19
Fig.20
1 2
Fig.21
1
2
1
3
4
Fig.22
1
Fig.23

5ENGLISH
ENGLISH (Original instructions)
SPECIFICATIONS
Model: PT001G
Pin nail size ø0.6 mm x 15, 18, 25, 30, 35 mm
Pin nail magazine capacity 100 pcs.
Dimensions with BL4025, without hook (L x W x H) 265 mm x 86 mm x 226 mm
Rated voltage D.C. 36 V - 40 V max
Net weight 2.4 - 3.0 kg
without notice.
-
Applicable battery cartridge and charger
Battery cartridge
Charger
residence.
WARNING: Only use the battery cartridges and chargers listed above.
Intended use
The tool is intended for pressing pin nails into construc-
Noise
-
Sound pressure level (L
NOTE:
measured in accordance with a standard test method
NOTE:
The declared noise emission value(s) may
WARNING: Wear ear protection.
WARNING: The noise emission during actual
value(s) depending on the ways in which the
tool is used especially what kind of workpiece is
processed.
WARNING: Be sure to identify safety mea-
sures to protect the operator that are based on an
estimation of exposure in the actual conditions of
use (taking account of all parts of the operating
cycle such as the times when the tool is switched
trigger time).
Vibration
h2 or less
2
NOTE:
measured in accordance with a standard test method
NOTE:
WARNING: The vibration emission during
declared value(s) depending on the ways in which
the tool is used especially what kind of workpiece
is processed.
WARNING: Be sure to identify safety mea-
sures to protect the operator that are based on an
estimation of exposure in the actual conditions of
use (taking account of all parts of the operating
cycle such as the times when the tool is switched
trigger time).
EC Declaration of Conformity
For European countries only
to this instruction manual.

6ENGLISH
SAFETY WARNINGS
General power tool safety warnings
WARNING: Read all safety warnings, instruc-
with this power tool.
Save all warnings and instruc-
tions for future reference.
The term "power tool" in the warnings refers to your
(cordless) power tool.
Cordless nailer safety warnings
1. Always assume that the tool contains fasten-
ers. Careless handling of the nailer can result in
2. Do not point the tool towards yourself or any-
one nearby. Unexpected triggering will discharge
3. Do not actuate the tool unless the tool is
If the tool
is not in contact with the workpiece, the fastener
4. Disconnect the tool from the power source
when the fastener jams in the tool. While
accidentally activated if it is plugged in.
5. Use caution while removing a jammed fas-
tener.
6.
Do not use this nailer for fastening electrical
cables. -
Keep hands and feet away from the ejection port area.
8. Follow instruction for lubricating and chang-
ing accessories.
Always remove the battery cartridge before
loading the fasteners, adjustment, inspection,
maintenance or after operation is over.
10.
Make sure no one is nearby before operation. Never
attempt to drive fasteners from both the inside and
outside of wall at the same time. Fasteners may rip
11. Watch your footing and maintain your balance
with the tool. Make sure there is no one below
when working in high locations.
12. Never use fastener driving tools marked with
-
•
when changing one driving location to another
or ladder alike constructions, e.g. roof laths;
vehicles and wagons.
13.
the like carefully to avoid possible electrical
shock, gas leakage, explosions, etc. caused by
stapling into live wires, conduits or gas pipes.
14.
The use of any other fasteners may cause
malfunction of the tool.
15. Do not tamper with the tool or attempt to use it
for other than driving fasteners.
16. Do not operate the tool without fasteners. It
shortens the service life of the tool.
Stop driving operations immediately if you
notice something wrong or out of the ordinary
with the tool.
18. Never fasten into any materials which may
as a projectile.
Never actuate the switch trigger and contact
element at the same time until you are pre-
pared to fasten workpieces. Allow the work-
piece to depress the contact element. Never
defeat its purpose by securing the contact
element back or by depressing it by hand.
20. Never tamper with the contact element. Check
the contact element frequently for proper
operations.
21. Always remove fasteners from the tool when
not in use.
SAVE THESE INSTRUCTIONS.
WARNING: DO NOT let comfort or familiarity
with product (gained from repeated use) replace
strict adherence to safety rules for the subject
product. MISUSE or failure to follow the safety
rules stated in this instruction manual may cause
serious personal injury.
Important safety instructions for
battery cartridge
1. Before using battery cartridge, read all instruc-
tions and cautionary markings on (1) battery
charger, (2) battery, and (3) product using
battery.
2. Do not disassemble or tamper with the battery
cartridge.
or explosion.
3. If operating time has become excessively
shorter, stop operating immediately. It may
result in a risk of overheating, possible burns
and even an explosion.
4. If electrolyte gets into your eyes, rinse them
out with clear water and seek medical atten-
tion right away. It may result in loss of your
eyesight.
5. Do not short the battery cartridge:
(1) Do not touch the terminals with any con-
ductive material.
(2) Avoid storing battery cartridge in a con-
tainer with other metal objects such as
nails, coins, etc.
(3) Do not expose battery cartridge to water
or rain.

7ENGLISH
A battery short can cause a large current
breakdown.
6. Do not store and use the tool and battery car-
tridge in locations where the temperature may
reach or exceed 50 °C (122 °F).
Do not incinerate the battery cartridge even if
it is severely damaged or is completely worn
8. Do not nail, cut, crush, throw, drop the battery
cartridge, or hit against a hard object to the
battery cartridge. Such conduct may result in a
Do not use a damaged battery.
10. The contained lithium-ion batteries are subject
to the Dangerous Goods Legislation require-
ments.
forwarding agents, special requirement on pack-
-
ing an expert for hazardous material is required.
national regulations.
around in the packaging.
11. When disposing the battery cartridge, remove
it from the tool and dispose of it in a safe
place. Follow your local regulations relating to
disposal of battery.
12. Use the batteries only with the products
-
sive heat, explosion, or leak of electrolyte.
13. If the tool is not used for a long period of time,
the battery must be removed from the tool.
14. During and after use, the battery cartridge may
take on heat which can cause burns or low
temperature burns. Pay attention to the han-
dling of hot battery cartridges.
15. Do not touch the terminal of the tool imme-
diately after use as it may get hot enough to
cause burns.
16. Do not allow chips, dust, or soil stuck into the
terminals, holes, and grooves of the battery
cartridge.
-
Unless the tool supports the use near
high-voltage electrical power lines, do not use
the battery cartridge near a high-voltage elec-
trical power lines. It may result in a malfunction
18. Keep the battery away from children.
SAVE THESE INSTRUCTIONS.
CAUTION: Only use genuine Makita batteries.
also void the Makita warranty for the Makita tool and
charger.
Tips for maintaining maximum
battery life
1. Charge the battery cartridge before completely
discharged. Always stop tool operation and
charge the battery cartridge when you notice
less tool power.
2. Never recharge a fully charged battery car-
tridge. Overcharging shortens the battery
service life.
3. Charge the battery cartridge with room tem-
perature at 10 °C - 40 °C (50 °F - 104 °F). Let
a hot battery cartridge cool down before
charging it.
4. When not using the battery cartridge, remove
it from the tool or the charger.
5. Charge the battery cartridge if you do not use
it for a long period (more than six months).
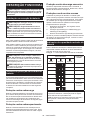
FUNCTIONAL
DESCRIPTION
CAUTION: Always be sure that the tool is
before adjusting or checking function on the tool.
Installing or removing battery
cartridge
CAUTION:
installing or removing of the battery cartridge.
CAUTION: Hold the tool and the battery car-
cartridge.
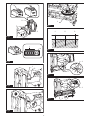
Fig.1: 1. Red indicator 2. Button 3. Battery cartridge
it into place. Insert it all the way until it locks in place
with a little click. If you can see the red indicator as
CAUTION: Always install the battery cartridge
fully until the red indicator cannot be seen. If not,
you or someone around you.
CAUTION: Do not install the battery cartridge
forcibly. If the cartridge does not slide in easily, it is

8ENGLISH
Tool / battery protection system
Overload protection
Overheat protection
Overdischarge protection
Protections against other causes
Protection system is also designed for other causes that could
damage the tool and allows the tool to stop automatically.
Take all the following steps to clear the causes, when the tool
1.
system, then contact your local Makita Service Center.
Indicating the remaining battery capacity
-
light up for a few seconds.
Fig.2: 1. Indicator lamps 2.
Indicator lamps Remaining
capacity
Lighted Blinking
Charge the
may have
malfunctioned.
NOTE: Depending on the conditions of use and the
from the actual capacity.
NOTE:
Trigger-lock button
CAUTION: Before installing the battery car-
tridge into the tool, always check to see that the
switch trigger actuates properly and returns to
the "OFF" position when released.
CAUTION: When not operating the tool,
depress the trigger-lock button from B side to
lock the switch trigger in the OFF position.
Fig.3: 1.2. Switch trigger
Fig.4
To prevent the switch trigger from accidentally pulled,
Adjusting the depth of pin-nailing
WARNING: Always make sure that your
the contact element and the battery cartridge is
removed before adjusting the depth of nailing.
-
lower in the B direction, within a range of up to 1.5 mm.
Fig.5: 1.
Fig.6: 1. Too deep 2. Right depth 3. Too shallow
Lighting up the lamp
CAUTION: Do not look in the light or see the
source of light directly.
Pull the switch trigger or actuate the contact element to
light up the lamp. The lamp remains lit for up to 60 seconds
while pulling the switch trigger or actuating the contact ele-
ment. The lamp goes out approximately 10 seconds after
releasing the switch trigger and the contact element.
Fig.7: 1. Lamp
NOTICE:
lens of the lamp. Be careful not to scratch the lens
of lamp, or it may lower the illumination.
NOTICE:
battery becomes low on power even while the lamp
remains lit. In this case, charge the battery cartridge.
NOTICE: When the tool is overheated, the lamp
and contact element, and then cool down the tool/
battery before operating again.
NOTICE:
The lamp starts blinking if the pin nailer
detects an error during driving pin nails. In this case,
bring the pin nailer to a Factory Service Center.

9ENGLISH
ASSEMBLY
CAUTION: Always make sure that your
the contact element and the battery cartridge is
removed before carrying out any work on the pin
nailer.
Loading and unloading pin nails
CAUTION: -
gers are not placed on the trigger and the battery
cartridge is removed before loading pin nails.
property damage.
CAUTION: Avoid slamming the slide door of
nails especially when working in high places may
1. Press the lock lever and open the slide door of the
magazine.
Fig.8: 1. Lock lever 2. Slide door 3. Magazine
2. Set a pin nail strip with dotted triangles pointing
downwards, aligning the tips of pin nails with the guide
gently slide the pin nail strip towards the driver guide.
Fig.9: 1. Pin nails 2. Dotted triangle 3. Guide
grooves 4. Driver guide
Fig.10: 1. Pin nails 2. Bottom of magazine
3. Clearances
NOTICE: Make sure the tips of pin nails to be
clearances around the tips of pin nails may cause
NOTICE:
Load pin nails in the correct direction.
Loading in wrong direction may cause premature wear
and tear of the driver and damage to the other parts.
NOTICE: Do not use deformed pin nail strips.
Using pin
-
NOTICE:
Avoid loading nail strips of fewer pin
nails, especially when using pin nails in short
lengths.
NOTICE:
or multiple nail strips of fewer pin nails at one time. It
3. Return the slide door to the original position and
lock it in place with the lock lever.
NOTICE: Close the slide door gently.
excessive force may cause deformation to the pin
nails, and the side door may not return to the original
position.
To remove the pin nails, press the lock lever and slide
the slide door open. Take out the pin nails from the
magazine.
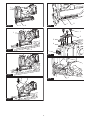
Nose adapter
CAUTION: Always make sure that your
the contact element and the battery cartridge is
removed before installing the nose adapter.
surfaces, use the nose adapter.
Place the nose adapter over the contact top of the driver
Fig.11: 1. Nose adapter 2. Driver guide 3. Guide
4. Guide notches 5. Holder
surfaces
Optional accessory
Use the optional nose adapter designed for fastening
surfaces of workpiece against marks and scratches to
Fig.12
Place the optional nose adapter over the contact top
guide.
Fig.13: 1. Optional nose adapter 2. Driver guide
3.4. Guide notches
Hook
CAUTION: When installing the hook, always
If not, the hook
CAUTION: Use the hanging/mounting parts
for their intended purposes only. Using for unin-
tended purpose may cause accident or personal
CAUTION: Do not hang the hook from the
waist belt. Dropping the pin nailer, which is caused
Fig.14
The hook is convenient for temporarily hanging the tool.
To install the hook, insert it into a groove in the tool
housing on either side and then secure it with a screw.
To remove, loosen the screw and then take it out.
Fig.15: 1. Groove 2. Hook 3. Screw
Hex wrench storage
When not in use, store the hex wrench as shown in the
Fig.16: 1. Hex wrench

10 ENGLISH
OPERATION
Testing the safety system
WARNING: Make sure all safety systems are
in working order before operation. Failure to do
so may cause personal injuries.
Fig.17: 1.2. Switch trigger
3. Contact element 4. Magazine
1. Unload pin nails from the tool and keep the maga-
zine opened.
2.
3. Pull the switch trigger without touching the contact
element against the material.
4. Touch the contact element against the material
without pulling the switch trigger.
safety systems are faulty. Stop using the tool immedi-
ately and ask your local service center.
Driving pin nails
WARNING: Do not use this pin nailer for fas-
tening electrical cables. It is not designed for elec-
WARNING: Continue to place the contact
driven completely.
CAUTION:
CAUTION:
Do not use the tool beyond the
continuous operating time allowed. It otherwise may
NOTICE: The tool will not restart fastening
contact element is placed on the workpiece. Pull
the contact element free from the workpiece and
reposition it in place to restart fastening.
1. Release the trigger lock.
2.
3. Pull the switch trigger fully to drive a pin nail.
4.
Fig.18: 1. Switch trigger 2. Contact element
You can also drive the pin nails when dragging the
tool to the next area with the contact element pressed
against the material and pulling the switch trigger.
Fig.19
surface, drive the pin nail while holding the pin nailer
Fig.20
NOTE:
the workpiece even you hold the pin nailer head,
Continuing to use the pin nailer on such material may
WARNING: Always make sure that your
the contact element and the battery cartridge is
removed before loading the pin nails.
-
pulled again.
NOTE:
insert a new strip of pin nails into the magazine and
Checking remaining pin nails
You can check the amount of remaining pin nails
through the sight window.
Fig.21: 1. Sight window 2. Indicator
Removing jammed pin nails
WARNING: Always make sure that the trigger
is released, and the battery cartridge and pin nails
are removed before removing jammed pin nails.
CAUTION: Do not remove the jammed pin
nails with bare hands.
1. Remove all the pin nails left in the magazine.
2.
cover using the hex wrench.
3.
grooves in the driver guide.
Fig.22: 1.2. Driver guide cover 3. Contact
top cover 4. Driver guide
NOTE:
top cover using the hex wrench and then take the
4.
NOTICE: After clearing jams, always make sure
that the covers on the driver guide have been
reassembled correctly. If the driver guide functions

11 ENGLISH
MAINTENANCE
CAUTION: Always be sure that the tool is
before attempting to perform inspection or
maintenance.
NOTICE:
alcohol or the like. Discoloration, deformation or
cracks may result.
Centers, always using Makita replacement parts.
Clean the inside of the magazine at regular intervals.
accumulated in the guide grooves.
Fig.23: 1. Guide grooves
NOTICE: Dirt and dust in the guide grooves may
OPTIONAL
ACCESSORIES
CAUTION: These accessories or attachments
are recommended for use with your Makita tool
The use of any other
accessories or attachments might present a risk of
for its stated purpose.
If you need any assistance for more details regard-
ing these accessories, ask your local Makita Service
Center.
• Pin nails
NOTE:
tool package as standard accessories. They may

12 FRANÇAIS
FRANÇAIS (Instructions originales)
SPÉCIFICATIONS
Modèle : PT001G
Taille des clous sans tête ø0,6 mm x 15, 18, 25, 30, 35 mm
Capacité du magasin à clous sans tête 100 pièces
Dimensions avec BL4025, sans le crochet (L x l x H) 265 mm x 86 mm x 226 mm
Tension nominale C.C. 36 V - 40 V max.
Poids net 2,4 - 3,0 kg
Batterie et chargeur applicables
Batterie
* : Batterie recommandée
Chargeur
•
AVERTISSEMENT : L’utilisation
Utilisations
L’outil est conçu pour enfoncer des clous sans tête dans
Bruit
Niveau de pression sonore (L
NOTE :-
rées ont été mesurées conformément à la méthode
de test standard et peuvent être utilisées pour com-
parer les outils entre eux.
NOTE :-
rées peuvent aussi être utilisées pour l’évaluation
préliminaire de l’exposition.
AVERTISSEMENT :
AVERTISSEMENT :
AVERTISSEMENT :
sur une estimation de l’exposition dans des condi-
les composantes du cycle d’utilisation, comme par
exemple le moment de sa mise hors tension, lorsqu’il
Vibrations
h2 ou moins
2
NOTE :-
rées ont été mesurées conformément à la méthode
de test standard et peuvent être utilisées pour com-
parer les outils entre eux.
NOTE :-
rées peuvent aussi être utilisées pour l’évaluation
préliminaire de l’exposition.
AVERTISSEMENT :
AVERTISSEMENT :
compte de toutes les composantes du cycle
d’utilisation, comme par exemple le moment de
Pour les pays européens uniquement

13 FRANÇAIS
CONSIGNES DE
SÉCURITÉ
AVERTISSEMENT :
Le non-respect de toutes les instructions
indiquées ci-dessous peut entraîner une électrocu-
-
Le terme « outil électrique » dans les avertissements
fait référence à l’outil électrique alimenté par le secteur
(avec cordon d’alimentation) ou à l’outil électrique fonc-
1.
Une manipu-
lation imprudente du cloueur peut provoquer une
2.
Un déclen-
chement inattendu de la gâchette expulsera un
3.
fermement contre la pièce. Si l’outil n’est pas en
4.
Lorsque vous retirez
déclencher accidentellement le cloueur si celui-ci
5.
Le mécanisme peut être com-
énergiquement pendant que vous essayez de le
décoincer.
6.
Il n’est pas conçu pour la pose de
isolante, ce qui comporte un risque d’électrocution
et d’incendie.
8.
changement des accessoires.
après utilisation.
10.
-
-
11.
-
12. -
•
Lorsque le passage d’un lieu d’utilisation à un
autre implique l’utilisation d’échafaudages,
d’escaliers ou d’échelles ou de structures
similaires, par exemple des lattes de toiture ;
• Pour installer des systèmes assurant la
sécurité lors du transport, par exemple sur
des véhicules ou des wagons.
13. -
-
14.
15.
-
16.
un dysfonctionnement ou une anomalie sur l’outil.
18.
traverser comme des projectiles.
les pièces. Le contact avec la pièce doit enfon-
20.
-
21.
CONSERVEZ CES
INSTRUCTIONS.
AVERTISSEMENT :
-
duit en question. La MAUVAISE UTILISATION de
de graves blessures.

14 FRANÇAIS
pour la batterie
1.
produit utilisant la batterie.
2.
batterie. Cela pourrait entraîner un incendie, une
chaleur excessive ou une explosion.
3.
de fonctionnement devient excessivement
voire d’explosion.
4. -
-
vue.
5.
(1) -
riau conducteur.
(2)
-
liques, par exemple des clous, des pièces
de monnaie, etc.
(3)
pluie.
Un court-circuit de la batterie peut provoquer
-
panne.
6.
-
8.
jeter, laisser tomber la batterie, ou de la heur-
ter contre un objet dur. Cela pourrait entraîner
un incendie, une chaleur excessive ou une
explosion.
10. Les batteries au lithium-ion contenues sont
les marchandises dangereuses.
Lors du transport commercial par des tierces
parties ou des transitaires par exemple, des exi-
Pour la préparation de l’article expédié, il est
nécessaire de consulter un expert en matériau
dangereux. Veuillez également respecter les
plus détaillées.
11. Lors de la mise au rebut de la batterie, reti-
rebut des batteries.
12.
L’insertion de
provoquer un incendie, une chaleur excessive,
une explosion ou une fuite de l’électrolyte.
13.
de l’outil.
14. Pendant et après l’utilisation, la batterie peut
15. -
16.
du sol adhèrent aux bornes, aux trous et aux
rainures de la batterie. Cela peut provoquer un
À moins que l’outil prenne en charge un tel
Cela pourrait
entraîner un dysfonctionnement ou casser l’outil
18.
enfants.
CONSERVEZ CES
INSTRUCTIONS.
ATTENTION :
Makita d’origine.
-
risque d’incendie, de dommages matériels et corpo-
rels. Cela annulera également la garantie Makita pour
l’outil et le chargeur Makita.
de vie optimale de la batterie
1. -
que la puissance de l’outil diminue.
2. -
service de la batterie.
3.
ambiante comprise entre 10 °C et 40 °C. Avant
refroidir.
4. -
5. -
six mois).

15 FRANÇAIS
DESCRIPTION DU
FONCTIONNEMENT
ATTENTION :
l’outil est hors tension et que sa batterie est
fonctionnement.
Insertion ou retrait de la batterie
ATTENTION :
de mettre en place ou de retirer la batterie.
ATTENTION :
batterie lors de la mise en place ou du retrait de
la batterie. Si vous ne tenez pas fermement l’outil
Fig.1: 1. Indicateur rouge 2. Bouton 3. Batterie
pouvez voir l’indicateur rouge comme illustré sur la
ATTENTION :
soit plus visible.-
ATTENTION :
force. Si elle ne glisse pas facilement, c’est que vous
ne l’insérez pas correctement.
Système de protection de l’outil/la
batterie
-
tation vers le moteur pour prolonger la durée de vie de
dans l’une des situations suivantes, l’outil cessera
automatiquement de fonctionner.
Protection contre la surcharge
provoquant un appel de courant anormalement élevé,
l’outil s’arrête automatiquement. Dans ce cas, éteignez
l’outil et arrêtez la tâche ayant provoqué la surcharge
de l’outil. Puis rallumez l’outil pour reprendre la tâche.
s’arrête automatiquement. Dans ce cas, laissez l’outil
de la batterie
-
rie de l’outil et chargez-la.
Protections contre d’autres causes
Le système de protection est également conçu pour
d’autres causes qui pourraient endommager l’outil
et lui permet de s’arrêter automatiquement. Suivez
toutes les étapes ci-dessous pour éliminer les causes,
lorsque l’outil a été arrêté provisoirement ou a cessé de
fonctionner.
1. Éteignez l’outil, puis rallumez-le pour le
redémarrer.
-
tème de protection, contactez votre centre de service
Makita local.
Indication de la charge restante de
la batterie
témoins s’allument pendant quelques secondes.
Fig.2: 1. Témoins 2.
Charge
restante
Éteint Clignotant
Chargez la
NOTE : Selon les conditions d’utilisation et la tem-
NOTE : Le premier témoin (complètement à gauche)
clignotera pendant le fonctionnement du système de

16 FRANÇAIS
Bouton de verrouillage de la
ATTENTION :
-
ATTENTION :
Fig.3: 1. Bouton de verrouillage de la gâchette
2. Gâchette
Fig.4
Pour éviter tout déclenchement accidentel de la
la gâchette.
AVERTISSEMENT :
avant d’ajuster la profondeur d’enfoncement des
clous.
La profondeur d’enfoncement des clous sans tête peut
l’outil. Un clou sans tête s’enfonce plus profondément à
mesure que vous tournez le dispositif de réglage dans
Fig.5: 1. Dispositif de réglage
Fig.6: 1. Trop profond 2. Profondeur adéquate
3. Pas assez profond
Allumage de la lampe
ATTENTION :
le faisceau lumineux ou sa source.
contact pour allumer la lampe. La lampe reste allumée
pendant 60 secondes maximum tant que la gâchette est
enclenchée ou l’élément de contact actionné. La lampe
s’éteint environ 10 secondes après avoir relâché la
gâchette et l’élément de contact.
Fig.7: 1. Lampe
REMARQUE :
REMARQUE :
raison de la faible puissance restante de la batte-
rie. Il faut alors charger la batterie.
REMARQUE :
REMARQUE :
-
ASSEMBLAGE
ATTENTION :
avant toute intervention sur le cloueur.
Chargement et retrait des clous
ATTENTION :
Un déclenchement accidentel peut entraî-
ner des dommages corporels ou matériels.
ATTENTION : -
lissante du magasin en l’ouvrant et la refermant
le magasin. La chute accidentelle de clous sans tête
vous travaillez en hauteur.
1.
porte coulissante du magasin.
Fig.8: 1. Levier de verrouillage 2. Porte coulissante
3. Magasin
2.
pointes des clous sans tête avec les rainures de gui-
guide d’entraînement.
Fig.9: 1. Clous sans tête 2. Triangle en poin-
tillé 3. Rainures de guidage 4. Guide
d’entraînement
Fig.10: 1. Clous sans tête 2. Bas du magasin
3. Dégagements

17 FRANÇAIS
REMARQUE :
du magasin. Tout dégagement autour des pointes
dommages à l’outil.
REMARQUE :
le bon sens. Un chargement dans le mauvais sens
risque de provoquer une usure rapide du méca-
nisme d’entraînement et d’endommager les autres
composants.
REMARQUE :
Si vous utilisez d’autres clous sans tête que ceux
-
dommager l’outil.
REMARQUE :
-
Cela
l’outil.
REMARQUE :
Cela pourrait autrement provoquer
3. Ramenez la porte coulissante à sa position initiale
et verrouillez-la en place avec le levier de verrouillage.
REMARQUE :
coulissante. L’application d’une force excessive peut
entraîner une déformation des clous sans tête, et la
porte coulissante peut ne pas revenir à sa position
initiale.
Pour retirer les clous sans tête, appuyez sur le levier de
verrouillage et faites glisser la porte coulissante pour
l’ouvrir. Retirez les clous sans tête du magasin.
Adaptateur de bec
ATTENTION :
avant d’installer l’adaptateur de bec.
Lorsque vous enfoncez des clous sans tête dans des
matériaux dont la surface marque facilement, utilisez
guide d’entraînement de sorte que les parties saillantes
situé sur la partie arrière du magasin pour éviter de
l’égarer.
Fig.11: 1.2. Guide d’entraî-
nement 3. Parties saillantes du guide
4.5. Support
Adaptateur de bec pour enfoncement
sur des surfaces plates
Accessoire en option
-
tion sur des surfaces plates et régulières. Il protège les
surfaces molles de la pièce des marques et des rayures
laissées par les éléments de contact arrondis.
Fig.12
de contact du guide d’entraînement de sorte que les
parties saillantes du guide à l’intérieur de l’adaptateur
d’entraînement.
Fig.13: 1.2. Guide
d’entraînement 3. Parties saillantes du
guide 4.
Crochet
ATTENTION : -
vis. Sinon, le crochet pourrait se détacher de l’outil et
ATTENTION : -
Leur utilisation à toute autre
corporelles.
ATTENTION :
votre ceinture. Si le crochet se détache accidentelle-
un déclenchement involontaire et d’entraîner des
Fig.14
Le crochet est pratique pour suspendre provisoirement
l’outil. Il s’installe d’un côté comme de l’autre de l’outil.
Pour installer le crochet, insérez-le dans une rai-
nure du carter de l’outil sur l’un des deux côtés, puis
enlevez-le.
Fig.15: 1. Rainure 2. Crochet 3. Vis
Fig.16: 1. Clé hexagonale

18 FRANÇAIS
UTILISATION
AVERTISSEMENT :
-
de vous blesser.
Fig.17: 1. Bouton de verrouillage de la gâchette
2. Gâchette 3. Élément de contact
4. Magasin
-
tèmes de sécurité avant utilisation.
1. Retirez les clous sans tête de l’outil et laissez le
magasin ouvert.
2.
3.
contact contre le matériau.
4.
sans enclencher la gâchette.
Si l’outil fonctionne dans les cas 3 ou 4 ci-dessus, les
systèmes de sécurité sont défaillants. Cessez immé-
d’entretien local.
AVERTISSEMENT :
Il n’est pas conçu
-
mager leur gaine isolante, ce qui comporte un risque
d’électrocution et d’incendie.
AVERTISSEMENT :
Un déclenchement accidentel peut entraîner des
ATTENTION : -
dant l’utilisation.
ATTENTION :
Vous risqueriez autrement d’endommager l’outil et
REMARQUE :
-
1. Déverrouillez la gâchette.
2. Posez à plat l’élément de contact sur le matériau.
3.
clou sans tête.
4. Pour enfoncer le clou suivant, relâchez la gâchette
puis répétez les étapes 2 et 3 ci-dessus.
Fig.18: 1. Gâchette 2. Élément de contact
Vous pouvez aussi enfoncer les clous sans tête
lorsque vous déplacez l’outil vers l’endroit suivant en
maintenant l’élément de contact sur le matériau et en
appuyant sur la gâchette.
Fig.19
Si l’extrémité des clous sans tête dépasse de la surface
de la pièce, enfoncez les clous en maintenant ferme-
ment la tête du cloueur contre la pièce.
Fig.20
NOTE : Si l’extrémité des clous sans tête dépasse de
la surface de la pièce même lorsque vous maintenez
la tête du cloueur, il se peut que le matériau ne soit
pas adapté à l’utilisation d’un cloueur. Si vous conti-
nuez à utiliser le cloueur sur un tel matériau, vous
risquez d’endommager le mécanisme d’entraînement
AVERTISSEMENT :
magasin est compris entre 0 et 3, vous ne pouvez plus
actionner la gâchette. Dans ce cas, insérez une nou-
pourrez ensuite actionner de nouveau la gâchette.
NOTE : Lorsque vous utilisez des clous sans tête de
-
nisme anti-démarrage à vide a fonctionné, insérez
-
restants grâce à la fenêtre de contrôle.
Fig.21: 1.2. Témoin
AVERTISSEMENT :
ATTENTION :
Les clous sans
1. Retirez tous les clous sans tête restant dans le
magasin.
2.
protection du mécanisme d’entraînement avec la clé
hexagonale.

19 FRANÇAIS
3. Retirez les clous sans tête coincés des rainures
du guide-clou dans le guide d’entraînement.
Fig.22: 1. Boulon hexagonal 2. Protection du
mécanisme d’entraînement 3. Partie supé-
rieure de l’élément de contact 4. Guide
d’entraînement
NOTE :-
l’élément de contact au moyen de la clé hexagonale,
d’entraînement.
4.
hexagonaux.
REMARQUE :
-
tement. Si le guide d’entraînement ne fonctionne
hexagonaux.
ENTRETIEN
ATTENTION :
l’outil est hors tension et que la batterie est reti-
d’entretien.
REMARQUE : -
toute réparation, tout travail d’entretien ou de réglage
agréé, avec des pièces de rechange Makita.
Nettoyage du magasin
Nettoyez l’intérieur du magasin à intervalles réguliers.
les rainures de guidage.
Fig.23: 1. Rainures de guidage
REMARQUE :
-
ACCESSOIRES EN
OPTION
ATTENTION : Ces accessoires ou pièces
-
d’emploi. L’utilisation de tout autre accessoire ou
pièce complémentaire peut comporter un risque de
-
contactez votre centre d’entretien local Makita.
• Clous sans tête
plates)
• Batterie et chargeur Makita d’origine
NOTE : Il se peut que certains éléments de la liste
qu’accessoires standard. Ils peuvent varier d’un pays
à l’autre.

20 DEUTSCH
DEUTSCH (Original-Anleitung)
TECHNISCHE DATEN
Modell: PT001G
Stiftnagelgröße ø0,6 mm x 15, 18, 25, 30, 35 mm
100 Stück
265 mm x 86 mm x 226 mm
Nennspannung Gleichstrom 36 V - 40 V max.
Nettogewicht 2,4 - 3,0 kg
WARNUNG: Bei Verwendung irgend-
Vorgesehene Verwendung
Baumaterial, wie z. B. Bauholz, vorgesehen.
Schalldruckpegel (L
HINWEIS:
Standardprüfmethode gemessen und kann (können)
für den Vergleich zwischen Werkzeugen herangezo-
gen werden.
HINWEIS:
Schallemissionswert(e) kann (können) auch für eine
werden.
WARNUNG:
WARNUNG:
-
beiteten Werkstücks, von dem (den) angegebenen
Wert(en) abweichen.
WARNUNG:
-
Schwingungen
2-16 ermittelt:
Schwingungsemission (ah2 oder weniger
2
HINWEIS:
Standardprüfmethode gemessen und kann (können)
für den Vergleich zwischen Werkzeugen herangezo-
gen werden.
HINWEIS:
werden.
Seite wird geladen ...
Seite wird geladen ...
Seite wird geladen ...
Seite wird geladen ...
Seite wird geladen ...
Seite wird geladen ...
Seite wird geladen ...
Seite wird geladen ...
Seite wird geladen ...
Seite wird geladen ...
Seite wird geladen ...
Seite wird geladen ...
Seite wird geladen ...
Seite wird geladen ...
Seite wird geladen ...
Seite wird geladen ...
Seite wird geladen ...
Seite wird geladen ...
Seite wird geladen ...
Seite wird geladen ...
Seite wird geladen ...
Seite wird geladen ...
Seite wird geladen ...
Seite wird geladen ...
Seite wird geladen ...
Seite wird geladen ...
Seite wird geladen ...
Seite wird geladen ...
Seite wird geladen ...
Seite wird geladen ...
Seite wird geladen ...
Seite wird geladen ...
Seite wird geladen ...
Seite wird geladen ...
Seite wird geladen ...
Seite wird geladen ...
Seite wird geladen ...
Seite wird geladen ...
Seite wird geladen ...
Seite wird geladen ...
Seite wird geladen ...
Seite wird geladen ...
Seite wird geladen ...
Seite wird geladen ...
Seite wird geladen ...
Seite wird geladen ...
Seite wird geladen ...
Seite wird geladen ...
Seite wird geladen ...
Seite wird geladen ...
Seite wird geladen ...
Seite wird geladen ...
Seite wird geladen ...
Seite wird geladen ...
Seite wird geladen ...
Seite wird geladen ...
Seite wird geladen ...
Seite wird geladen ...
Seite wird geladen ...
Seite wird geladen ...
Seite wird geladen ...
Seite wird geladen ...
Seite wird geladen ...
Seite wird geladen ...
-
 1
1
-
 2
2
-
 3
3
-
 4
4
-
 5
5
-
 6
6
-
 7
7
-
 8
8
-
 9
9
-
 10
10
-
 11
11
-
 12
12
-
 13
13
-
 14
14
-
 15
15
-
 16
16
-
 17
17
-
 18
18
-
 19
19
-
 20
20
-
 21
21
-
 22
22
-
 23
23
-
 24
24
-
 25
25
-
 26
26
-
 27
27
-
 28
28
-
 29
29
-
 30
30
-
 31
31
-
 32
32
-
 33
33
-
 34
34
-
 35
35
-
 36
36
-
 37
37
-
 38
38
-
 39
39
-
 40
40
-
 41
41
-
 42
42
-
 43
43
-
 44
44
-
 45
45
-
 46
46
-
 47
47
-
 48
48
-
 49
49
-
 50
50
-
 51
51
-
 52
52
-
 53
53
-
 54
54
-
 55
55
-
 56
56
-
 57
57
-
 58
58
-
 59
59
-
 60
60
-
 61
61
-
 62
62
-
 63
63
-
 64
64
-
 65
65
-
 66
66
-
 67
67
-
 68
68
-
 69
69
-
 70
70
-
 71
71
-
 72
72
-
 73
73
-
 74
74
-
 75
75
-
 76
76
-
 77
77
-
 78
78
-
 79
79
-
 80
80
-
 81
81
-
 82
82
-
 83
83
-
 84
84


Makita PT001G Benutzerhandbuch
- Kategorie
- Nagelpistole
- Typ
- Benutzerhandbuch
in anderen Sprachen
- français: Makita PT001G Manuel utilisateur
- español: Makita PT001G Manual de usuario
- italiano: Makita PT001G Manuale utente
- Nederlands: Makita PT001G Handleiding
- português: Makita PT001G Manual do usuário
- dansk: Makita PT001G Brugermanual
- Türkçe: Makita PT001G Kullanım kılavuzu