Silvercrest SPS 1.5 A1 Mini Trimmer Benutzerhandbuch
- Kategorie
- Haarschneider
- Typ
- Benutzerhandbuch

BEAUTY-TRIMMER / RASOIR MULTI-USAGES FEMME
SPS 1.5 A1
RASOIR MULTI-USAGES FEMME
Mode d’emploi
BEAUTY-TRIMMER
Bedienungsanleitung
BEAUTY-TRIMMER
Operating instructions
BEAUTY TRIMMER
Gebruiksaanwijzing
KOSMETICKÝ ZASTŘIHOVAČ
Návod k obsluze
TRYMER BEAUTY
Instrukcja obsługi
RASOIO ELETTRICO
Istruzioni per l’uso
STRIHACÍ STROJČEK BEAUTY
Návod na obsluhu
BEAUTY TRIMMELŐ
Használati utasítás
BEAUTY TRIMMER
Betjeningsvejledning
AFEITADORA CORPORAL
Instrucciones de uso
LEPOTNI STRIŽNIK
Navodila za uporabo
IAN 377200_2110

BEAUTY-TRIMMER / RASOIR MULTI-USAGES FEMME
SPS 1.5 A1
GB / IE Operating instructions Page 1
DE / AT / CH Bedienungsanleitung Seite 23
FR / BE Mode d’emploi Page 47
NL / BE Gebruiksaanwijzing Pagina 75
CZ Návod k obsluze Strana 97
PL Instrukcja obsługi Strona 119
SK Návod na obsluhu Strana 141
ES Instrucciones de uso Página 163
DK Betjeningsvejledning Side 185
IT Istruzioni per l‘uso Pagina 207
HU Használati utasítás Oldal 229
SI Navodila za uporabo Stran 251

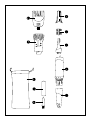
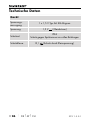
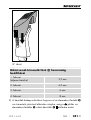
6mm
3.5mm
8mm
4.5mm

SPS 1.5 A1 GB│IE │ 1 ■
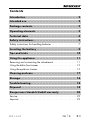
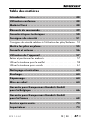
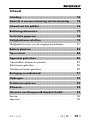
Contents
Introduction ...................................2
Intended use ...................................2
Package contents ...............................2
Operating elements .............................3
Technical data .................................4
Safety instructions ..............................5
Safety instructions for handling batteries ....................7
Inserting the battery ............................9
Tips and tricks ............................... 10
Using the appliance ........................... 11
Removing and connecting the attachments ..................11
Using the bikini line trimmer .............................12
Using the eyebrow trimmer .............................15
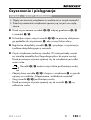
Cleaning and care ............................ 17
Storage ..................................... 18
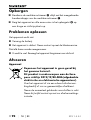
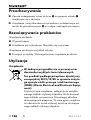
Troubleshooting .............................. 18
Disposal .................................... 18
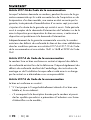
Kompernass Handels GmbH warranty ........... 20
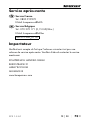
Service .............................................22
Importer ............................................22

SPS 1.5 A1
■ 2 │ GB│IE
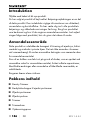
Introduction
Congratulations on the purchase of your new appliance.
You have selected a high-quality product. The operating instructions
are part of this product. They contain important information about
safety, usage and disposal. Before using the product, please familiar-
ise yourself with all operating and safety instructions. Use the product
only as described and for the range of applications specified. Please
also pass these operating instructions on to any future owner.
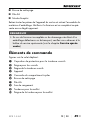
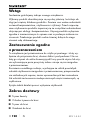
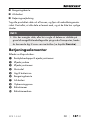
Intended use
This appliance is intended solely for trimming eyebrows, the bikini
line and the underarm area in private households. It is not suitable for
commercial use! The device is not intended for any other purpose, nor
for use beyond the scope described.
Claims of any kind for damages resulting from misuse, improper repairs,
unauthorised modifications or the use of unauthorised spare parts are
excluded.
The risk shall be borne solely by the user.
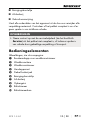
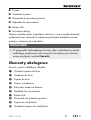
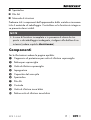
Package contents
■ Beauty trimmer
■ Protective cap for the eyebrow trimmer
■ Eyebrow trimmer
■ Eyebrow comb
■ Trimmer
■ Trimmer comb
■ Storage pouch

SPS 1.5 A1 GB│IE │ 3 ■
■ Cleaning brush
■ AA battery
■ Operating instructions
Extract all parts of the appliance from the carton and remove all
packaging material. Check the package for completeness and signs
of visible damage.
NOTES
► If the delivery is incomplete or damage has occurred as a result
of defective packaging or during transport, contact the Service
hotline (see section Service).
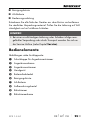
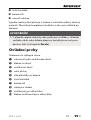
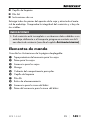
Operating elements
See fold-out page for illustrations:
1 Protective cap for the eyebrow trimmer
2 Eyebrow trimmer comb
3 Eyebrow trimmer
4 Handset
5 Battery compartment cover
6 Cleaning brush
7 AA battery
8 Storage pouch
9 Bikini line trimmer
0 Bikini line trimmer comb

SPS 1.5 A1
■ 4 │ GB│IE
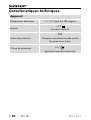
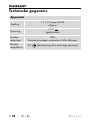
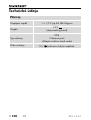
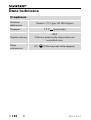
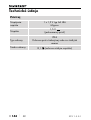
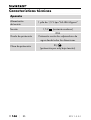
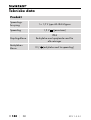
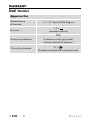
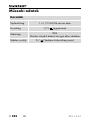
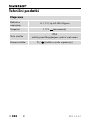
Technical data
Appliance
Voltage supply 1 x 1.5 V, type AA/LR6/Mignon
Voltage 1.5 V (DC)
Protection type
IPX4
Protection against water splashes from
any direction.
Protection class III / (protection through low voltage)

SPS 1.5 A1 GB│IE │ 5 ■
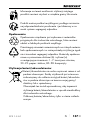
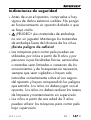
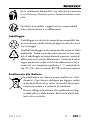
Safety instructions
► Check the device for visible external damage
before use. Do not operate an appliance
which has been damaged or dropped.
► DANGER! Do not allow children to play with
the packaging material! Keep all packaging
materials away from children. There is a risk
of suffocation!
► Hair trimmers may be used by children aged 8
and above and persons with limited physical,
sensory or mental capabilities or lack of ex-
perience and knowledge, provided that they
are under supervision or have been told how
to use the appliance safely and are aware of
the potential risks. Do not allow children to use
the appliance as a toy. Cleaning and mainte-
nance may not be carried out by unsupervised
children.
► Hair trimmers may be used by children aged
3 and above if they are supervised.
► Do not expose the device to direct sunlight or
high temperatures. Otherwise it may overheat
and be irreparably damaged.

SPS 1.5 A1
■ 6 │ GB│IE
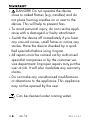
► DANGER! Do not operate the device
close to naked flames (e.g. candles) and do
not place burning candles on or next to the
device. This will help to prevent fires.
► To avoid personal injury, do not use the appli-
ance with a damaged or faulty attachment.
► Switch the device off immediately if you hear
any unusual noises, smell fumes or notice any
smoke. Have the device checked by a quali-
fied specialist before using it again.
► All repairs must be carried out by authorised
specialist companies or by the customer ser-
vice department. Improper repairs may put the
user at risk. It will also invalidate any warranty
claims.
► Do not make any unauthorised modifications
or alterations to the appliance. This appliance
may not be opened by the user.
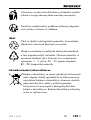
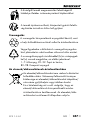
Can be cleaned under running water.

SPS 1.5 A1 GB│IE │ 7 ■
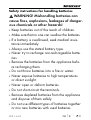
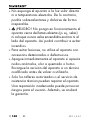
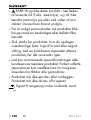
Safety instructions for handling batteries
WARNiNG! Mishandling batteries can
cause fires, explosions, leakages of danger-
ous chemicals or other hazards!
► Keep batteries out of the reach of children.
► Make sure that no one can swallow the batteries.
► If a battery is swallowed, seek medical assis-
tance immediately.
► Always use the stated battery type.
► Never try to recharge non-rechargeable batte-
ries.
► Remove the batteries from the appliance befo-
re recharging them.
► Do not throw batteries into a fire or water.
► Never expose batteries to high temperatures
or direct sunlight.
► Never open or deform batteries.
► Do not short-circuit the terminals.
► Remove depleted batteries from the appliance
and dispose of them safely.
► Do not use different types of batteries together
or mix new batteries with used batteries.

SPS 1.5 A1
■ 8 │ GB│IE
► Always ensure that the batteries are installed
in the appliance with the correctly aligned
polarity.
► If you do not intend to use the appliance for
an extended period, remove the batteries.
► Check the condition of the batteries at regular
intervals. Leaking batteries can cause injuries
as well as damage to the appliance.
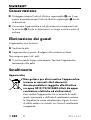
► Always use protective gloves when handling
leaking batteries! Clean the battery and appli-
ance contacts with a dry cloth. Do not let the
chemicals get into contact with your skin and
mucous membranes, especially your eyes. In
the event of exposure to the chemicals, wash
the affected area with plenty of water and
seek medical advice immediately.

SPS 1.5 A1 GB│IE │ 9 ■
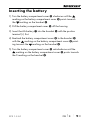
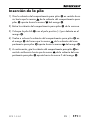
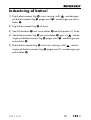
Inserting the battery
1) Turn the battery compartment cover 5 clockwise until the
marking on the battery compartment cover 5 points towards
the marking on the handset 4.
2) Pull the battery compartment cover 5 off the housing.
3) Insert the AA battery 7 into the handset 4 with the positive
terminal (+) first.
4) Reattach the battery compartment cover 5 to the handset 4
with the marking on the battery compartment cover 5 point-
ing towards the marking on the handset 4.
5) Turn the battery compartment cover 5 anticlockwise until the
marking on the battery compartment cover 5 points towards
the 0 marking on the handset 4.

SPS 1.5 A1
■ 10 │ GB│IE
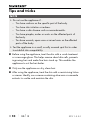
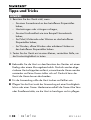
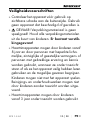
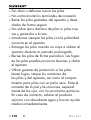
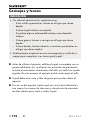
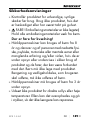
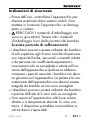
Tips and tricks
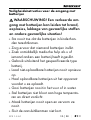
NOTE
► Do not use the appliance if...
― You have sunburn on the specific part of the body.
― You have skin irritation or redness.
― You have a skin disease such as neurodermatitis.
― You have pimples, moles or warts on the affected parts of
the body.
― You have wounds, open sores or raised scars on the affected
parts of the body.
► Test the appliance in a small, usually covered spot first in order
to establish skin compatibility.
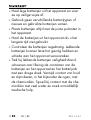
■ Before using the appliance, treat the skin with a scrub treatment
or a massage glove. This helps remove dead skin cells, prevents
ingrowing hair and make fine hair stand up. This enables the
appliance to cut the hair better.
■ Only use the appliance on dry, clean hair.
■ After using the appliance, treat the skin with a moisturising lotion
or cream. Ideally, use a cream containing aloe vera or camomile
extracts to soothe and maintain the skin.

SPS 1.5 A1 GB│IE │ 11 ■
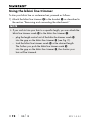
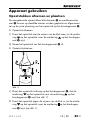
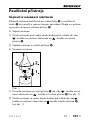
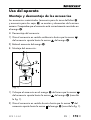
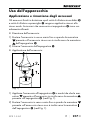
Using the appliance
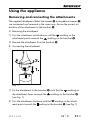
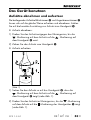
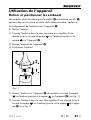
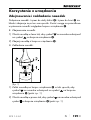
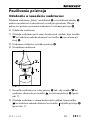
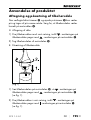
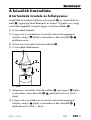
Removing and connecting the attachments
The supplied attachments (bikini line trimmer 9 and eyebrow trimmer3)
are connected and removed in the same way. Ensure the correct ori-
entation of the attachment to the handset 4.
▯ Removing the attachment:
1) Turn the attachment anticlockwise until the marking on the
attachment points towards the marking on the handset 4.
2) Remove the attachment from the handset 4.
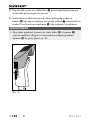
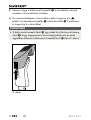
▯ Connecting the attachment:
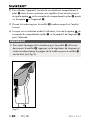
(Fig. 1)
1) Fix the attachment to the handset 4 such that the marking on
the attachment faces towards the marking on the handset 4
(see Fig. 1).
2) Turn the attachment clockwise until the marking on the attach-
ment points towards the marking on the handset 4 (see Fig. 1).

SPS 1.5 A1
■ 12 │ GB│IE
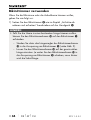
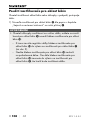
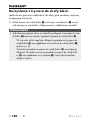
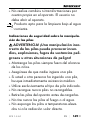
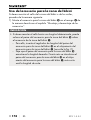
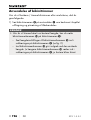
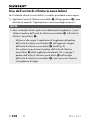
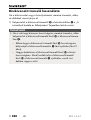
Using the bikini line trimmer
To trim your bikini line or underarm hair, proceed as follows:
1) Attach the bikini line trimmer 9 to the handset 4 as described in
the section “Removing and connecting the attachments”.
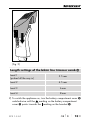
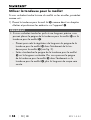
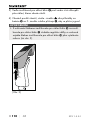
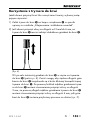
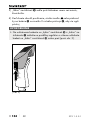
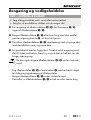
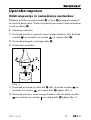
NOTE
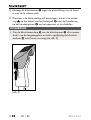
► If you wish to trim your hair to a specific length, you can attach the
bikini line trimmer comb 0 to the bikini line trimmer 9:
― plug the length control unit of the bikini line trimmer comb 0
into the gap on the bikini line trimmer 9 (see Fig. 2).
― Lock the bikini line trimmer comb 0 at the desired length.
The further you push the bikini line trimmer comb 0
into the gap on the bikini line trimmer 9, the shorter your
hair will be trimmed.

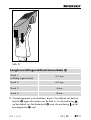
SPS 1.5 A1 GB│IE │ 13 ■
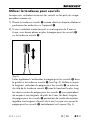
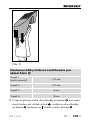
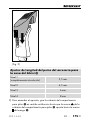
(Fig. 2)
Length settings of the bikini line trimmer comb 0
Level 1
(pushed all the way in) 3.5 mm
Level 2 4.5 mm
Level 3 6 mm
Level 4 8 mm
2) To switch the appliance on, turn the battery compartment cover 5
anticlockwise until the marking on the battery compartment
cover5 points towards the marking on the handset 4.

SPS 1.5 A1
■ 14 │ GB│IE
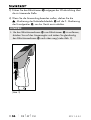
3) Move the bikini line trimmer 9 against the direction of growth
across the patch of skin to be shaved.
4) To switch the appliance off, turn the marking of the battery
compartment cover 5 to the 0 marking on the handset 4.
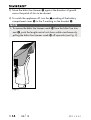
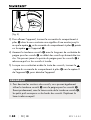
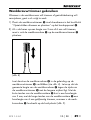
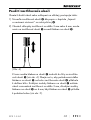
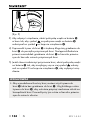
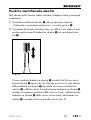
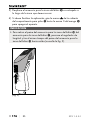
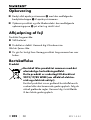
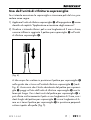
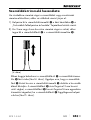
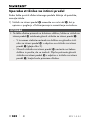
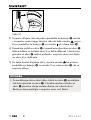
NOTE
► To remove the bikini line trimmer comb 0 from the bikini line trim-
mer 9, push the length control unit down while simultaneously
pulling the bikini line trimmer comb 0 off upwards (see Fig. 3).
(Fig.3)

SPS 1.5 A1 GB│IE │ 15 ■
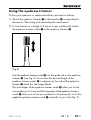
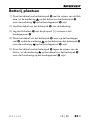
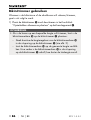
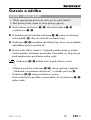
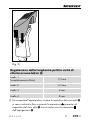
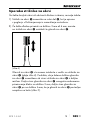
Using the eyebrow trimmer
To trim your eyebrows or remove facial hair, proceed as follows:
1) Attach the eyebrow trimmer 3 to the handset 4 as described in
the section “Removing and connecting the attachments”.
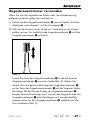
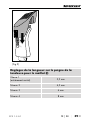
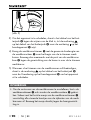
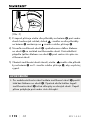
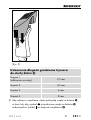
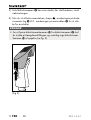
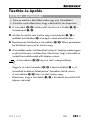
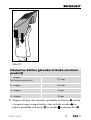
2) To trim the hair to a length of 3mm or 6mm, additionally attach
the eyebrow trimmer comb 2 to the eyebrow trimmer 3:
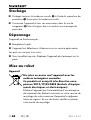
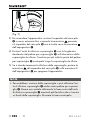
(Fig.4)
Lock the eyebrow trimmer comb 2 into the guide rail on the eyebrow
trimmer 3 (see Fig. 4). Ensure that the desired length of the
eyebrow trimmer comb 2 is adjacent to the side of the eyebrow
trimmer 3 which has the longer blade.
The short edges of the eyebrow trimmer comb 2 allow you to trim
your eyebrows to 3mm and the long edges of the eyebrow trimmer
comb 2 allow you to trim your eyebrows to 6mm evenly; to do this,
apply the eyebrow trimmer comb 2 vertically to your skin (Fig. 5).

SPS 1.5 A1
■ 16 │ GB│IE
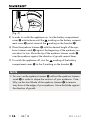
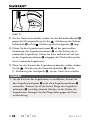
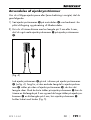
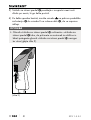
(Fig. 5)
3) In order to switch the appliance on, turn the battery compartment
cover 5 anticlockwise until the marking on the battery compart-
ment cover 5 points towards the marking on the handset4.
4) Place the eyebrow trimmer 3 with the desired length of the eye-
brow trimmer comb 2 against the beginning of the eyebrow you
are about to trim. Move the tip of the eyebrow trimmer comb 2
over the eyebrow against the direction of growth several times.
5) To switch the appliance off, turn the marking of the battery
compartment cover 5 to the 0 marking on the handset 4.
NOTE
► You can use the eyebrow trimmer 3 without the eyebrow trimmer
comb 2 in order to shape the contours of your eyebrows. Care-
fully use the short blade of the eyebrow trimmer 3 to remove
stray hairs at the edges of your eyebrows. Move the blade against
the direction of growth.

SPS 1.5 A1 GB│IE │ 17 ■
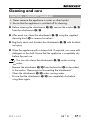
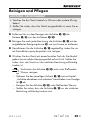
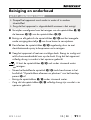
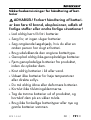
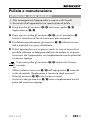
Cleaning and care
CAUTION – SPROPERTY DAMAGE!
► Never immerse the appliance in water or other liquids!
► Ensure that the appliance is switched off for cleaning.
■ Before cleaning the attachments 3/9, remove the combs 2/0
from the attachments 3/9.
■ After each use, clean the attachments 3/9 using the supplied
cleaning brush 6 to remove loose hair.
■ Regularly clean and disinfect the attachments 3/9 with disinfect-
ant spray.
■ Wipe the appliance with a damp cloth. If required, use some mild
detergent on the cloth. Ensure that the appliance is completely dry
before the next use.
You can also clean the attachments 3/9 under running
water:
― Remove the attachment 3/9 from the handset 4 as described
in the section “Removing and connecting the attachments”.
― Clean the attachments 3/9 under running water.
― Ensure that the attachments 3/9 are completely dry before
using them again.
Seite wird geladen ...
Seite wird geladen ...
Seite wird geladen ...
Seite wird geladen ...
Seite wird geladen ...
Seite wird geladen ...
Seite wird geladen ...
Seite wird geladen ...
Seite wird geladen ...
Seite wird geladen ...
Seite wird geladen ...
Seite wird geladen ...
Seite wird geladen ...
Seite wird geladen ...
Seite wird geladen ...
Seite wird geladen ...
Seite wird geladen ...
Seite wird geladen ...
Seite wird geladen ...
Seite wird geladen ...
Seite wird geladen ...
Seite wird geladen ...
Seite wird geladen ...
Seite wird geladen ...
Seite wird geladen ...
Seite wird geladen ...
Seite wird geladen ...
Seite wird geladen ...
Seite wird geladen ...
Seite wird geladen ...
Seite wird geladen ...
Seite wird geladen ...
Seite wird geladen ...
Seite wird geladen ...
Seite wird geladen ...
Seite wird geladen ...
Seite wird geladen ...
Seite wird geladen ...
Seite wird geladen ...
Seite wird geladen ...
Seite wird geladen ...
Seite wird geladen ...
Seite wird geladen ...
Seite wird geladen ...
Seite wird geladen ...
Seite wird geladen ...
Seite wird geladen ...
Seite wird geladen ...
Seite wird geladen ...
Seite wird geladen ...
Seite wird geladen ...
Seite wird geladen ...
Seite wird geladen ...
Seite wird geladen ...
Seite wird geladen ...
Seite wird geladen ...
Seite wird geladen ...
Seite wird geladen ...
Seite wird geladen ...
Seite wird geladen ...
Seite wird geladen ...
Seite wird geladen ...
Seite wird geladen ...
Seite wird geladen ...
Seite wird geladen ...
Seite wird geladen ...
Seite wird geladen ...
Seite wird geladen ...
Seite wird geladen ...
Seite wird geladen ...
Seite wird geladen ...
Seite wird geladen ...
Seite wird geladen ...
Seite wird geladen ...
Seite wird geladen ...
Seite wird geladen ...
Seite wird geladen ...
Seite wird geladen ...
Seite wird geladen ...
Seite wird geladen ...
Seite wird geladen ...
Seite wird geladen ...
Seite wird geladen ...
Seite wird geladen ...
Seite wird geladen ...
Seite wird geladen ...
Seite wird geladen ...
Seite wird geladen ...
Seite wird geladen ...
Seite wird geladen ...
Seite wird geladen ...
Seite wird geladen ...
Seite wird geladen ...
Seite wird geladen ...
Seite wird geladen ...
Seite wird geladen ...
Seite wird geladen ...
Seite wird geladen ...
Seite wird geladen ...
Seite wird geladen ...
Seite wird geladen ...
Seite wird geladen ...
Seite wird geladen ...
Seite wird geladen ...
Seite wird geladen ...
Seite wird geladen ...
Seite wird geladen ...
Seite wird geladen ...
Seite wird geladen ...
Seite wird geladen ...
Seite wird geladen ...
Seite wird geladen ...
Seite wird geladen ...
Seite wird geladen ...
Seite wird geladen ...
Seite wird geladen ...
Seite wird geladen ...
Seite wird geladen ...
Seite wird geladen ...
Seite wird geladen ...
Seite wird geladen ...
Seite wird geladen ...
Seite wird geladen ...
Seite wird geladen ...
Seite wird geladen ...
Seite wird geladen ...
Seite wird geladen ...
Seite wird geladen ...
Seite wird geladen ...
Seite wird geladen ...
Seite wird geladen ...
Seite wird geladen ...
Seite wird geladen ...
Seite wird geladen ...
Seite wird geladen ...
Seite wird geladen ...
Seite wird geladen ...
Seite wird geladen ...
Seite wird geladen ...
Seite wird geladen ...
Seite wird geladen ...
Seite wird geladen ...
Seite wird geladen ...
Seite wird geladen ...
Seite wird geladen ...
Seite wird geladen ...
Seite wird geladen ...
Seite wird geladen ...
Seite wird geladen ...
Seite wird geladen ...
Seite wird geladen ...
Seite wird geladen ...
Seite wird geladen ...
Seite wird geladen ...
Seite wird geladen ...
Seite wird geladen ...
Seite wird geladen ...
Seite wird geladen ...
Seite wird geladen ...
Seite wird geladen ...
Seite wird geladen ...
Seite wird geladen ...
Seite wird geladen ...
Seite wird geladen ...
Seite wird geladen ...
Seite wird geladen ...
Seite wird geladen ...
Seite wird geladen ...
Seite wird geladen ...
Seite wird geladen ...
Seite wird geladen ...
Seite wird geladen ...
Seite wird geladen ...
Seite wird geladen ...
Seite wird geladen ...
Seite wird geladen ...
Seite wird geladen ...
Seite wird geladen ...
Seite wird geladen ...
Seite wird geladen ...
Seite wird geladen ...
Seite wird geladen ...
Seite wird geladen ...
Seite wird geladen ...
Seite wird geladen ...
Seite wird geladen ...
Seite wird geladen ...
Seite wird geladen ...
Seite wird geladen ...
Seite wird geladen ...
Seite wird geladen ...
Seite wird geladen ...
Seite wird geladen ...
Seite wird geladen ...
Seite wird geladen ...
Seite wird geladen ...
Seite wird geladen ...
Seite wird geladen ...
Seite wird geladen ...
Seite wird geladen ...
Seite wird geladen ...
Seite wird geladen ...
Seite wird geladen ...
Seite wird geladen ...
Seite wird geladen ...
Seite wird geladen ...
Seite wird geladen ...
Seite wird geladen ...
Seite wird geladen ...
Seite wird geladen ...
Seite wird geladen ...
Seite wird geladen ...
Seite wird geladen ...
Seite wird geladen ...
Seite wird geladen ...
Seite wird geladen ...
Seite wird geladen ...
Seite wird geladen ...
Seite wird geladen ...
Seite wird geladen ...
Seite wird geladen ...
Seite wird geladen ...
Seite wird geladen ...
Seite wird geladen ...
Seite wird geladen ...
Seite wird geladen ...
Seite wird geladen ...
Seite wird geladen ...
Seite wird geladen ...
Seite wird geladen ...
Seite wird geladen ...
Seite wird geladen ...
Seite wird geladen ...
Seite wird geladen ...
Seite wird geladen ...
Seite wird geladen ...
Seite wird geladen ...
Seite wird geladen ...
Seite wird geladen ...
Seite wird geladen ...
Seite wird geladen ...
Seite wird geladen ...
Seite wird geladen ...
Seite wird geladen ...
Seite wird geladen ...
Seite wird geladen ...
Seite wird geladen ...
Seite wird geladen ...
Seite wird geladen ...
Seite wird geladen ...
Seite wird geladen ...
Seite wird geladen ...
Seite wird geladen ...
Seite wird geladen ...
Seite wird geladen ...
Seite wird geladen ...
-
 1
1
-
 2
2
-
 3
3
-
 4
4
-
 5
5
-
 6
6
-
 7
7
-
 8
8
-
 9
9
-
 10
10
-
 11
11
-
 12
12
-
 13
13
-
 14
14
-
 15
15
-
 16
16
-
 17
17
-
 18
18
-
 19
19
-
 20
20
-
 21
21
-
 22
22
-
 23
23
-
 24
24
-
 25
25
-
 26
26
-
 27
27
-
 28
28
-
 29
29
-
 30
30
-
 31
31
-
 32
32
-
 33
33
-
 34
34
-
 35
35
-
 36
36
-
 37
37
-
 38
38
-
 39
39
-
 40
40
-
 41
41
-
 42
42
-
 43
43
-
 44
44
-
 45
45
-
 46
46
-
 47
47
-
 48
48
-
 49
49
-
 50
50
-
 51
51
-
 52
52
-
 53
53
-
 54
54
-
 55
55
-
 56
56
-
 57
57
-
 58
58
-
 59
59
-
 60
60
-
 61
61
-
 62
62
-
 63
63
-
 64
64
-
 65
65
-
 66
66
-
 67
67
-
 68
68
-
 69
69
-
 70
70
-
 71
71
-
 72
72
-
 73
73
-
 74
74
-
 75
75
-
 76
76
-
 77
77
-
 78
78
-
 79
79
-
 80
80
-
 81
81
-
 82
82
-
 83
83
-
 84
84
-
 85
85
-
 86
86
-
 87
87
-
 88
88
-
 89
89
-
 90
90
-
 91
91
-
 92
92
-
 93
93
-
 94
94
-
 95
95
-
 96
96
-
 97
97
-
 98
98
-
 99
99
-
 100
100
-
 101
101
-
 102
102
-
 103
103
-
 104
104
-
 105
105
-
 106
106
-
 107
107
-
 108
108
-
 109
109
-
 110
110
-
 111
111
-
 112
112
-
 113
113
-
 114
114
-
 115
115
-
 116
116
-
 117
117
-
 118
118
-
 119
119
-
 120
120
-
 121
121
-
 122
122
-
 123
123
-
 124
124
-
 125
125
-
 126
126
-
 127
127
-
 128
128
-
 129
129
-
 130
130
-
 131
131
-
 132
132
-
 133
133
-
 134
134
-
 135
135
-
 136
136
-
 137
137
-
 138
138
-
 139
139
-
 140
140
-
 141
141
-
 142
142
-
 143
143
-
 144
144
-
 145
145
-
 146
146
-
 147
147
-
 148
148
-
 149
149
-
 150
150
-
 151
151
-
 152
152
-
 153
153
-
 154
154
-
 155
155
-
 156
156
-
 157
157
-
 158
158
-
 159
159
-
 160
160
-
 161
161
-
 162
162
-
 163
163
-
 164
164
-
 165
165
-
 166
166
-
 167
167
-
 168
168
-
 169
169
-
 170
170
-
 171
171
-
 172
172
-
 173
173
-
 174
174
-
 175
175
-
 176
176
-
 177
177
-
 178
178
-
 179
179
-
 180
180
-
 181
181
-
 182
182
-
 183
183
-
 184
184
-
 185
185
-
 186
186
-
 187
187
-
 188
188
-
 189
189
-
 190
190
-
 191
191
-
 192
192
-
 193
193
-
 194
194
-
 195
195
-
 196
196
-
 197
197
-
 198
198
-
 199
199
-
 200
200
-
 201
201
-
 202
202
-
 203
203
-
 204
204
-
 205
205
-
 206
206
-
 207
207
-
 208
208
-
 209
209
-
 210
210
-
 211
211
-
 212
212
-
 213
213
-
 214
214
-
 215
215
-
 216
216
-
 217
217
-
 218
218
-
 219
219
-
 220
220
-
 221
221
-
 222
222
-
 223
223
-
 224
224
-
 225
225
-
 226
226
-
 227
227
-
 228
228
-
 229
229
-
 230
230
-
 231
231
-
 232
232
-
 233
233
-
 234
234
-
 235
235
-
 236
236
-
 237
237
-
 238
238
-
 239
239
-
 240
240
-
 241
241
-
 242
242
-
 243
243
-
 244
244
-
 245
245
-
 246
246
-
 247
247
-
 248
248
-
 249
249
-
 250
250
-
 251
251
-
 252
252
-
 253
253
-
 254
254
-
 255
255
-
 256
256
-
 257
257
-
 258
258
-
 259
259
-
 260
260
-
 261
261
-
 262
262
-
 263
263
-
 264
264
-
 265
265
-
 266
266
-
 267
267
-
 268
268
-
 269
269
-
 270
270
-
 271
271
-
 272
272
-
 273
273
-
 274
274
-
 275
275
-
 276
276


Silvercrest SPS 1.5 A1 Mini Trimmer Benutzerhandbuch
- Kategorie
- Haarschneider
- Typ
- Benutzerhandbuch
in anderen Sprachen
- English: Silvercrest SPS 1.5 A1 Mini Trimmer User manual
- français: Silvercrest SPS 1.5 A1 Mini Trimmer Manuel utilisateur
- español: Silvercrest SPS 1.5 A1 Mini Trimmer Manual de usuario
- italiano: Silvercrest SPS 1.5 A1 Mini Trimmer Manuale utente
- Nederlands: Silvercrest SPS 1.5 A1 Mini Trimmer Handleiding
- slovenčina: Silvercrest SPS 1.5 A1 Mini Trimmer Používateľská príručka
- dansk: Silvercrest SPS 1.5 A1 Mini Trimmer Brugermanual
- polski: Silvercrest SPS 1.5 A1 Mini Trimmer Instrukcja obsługi
- čeština: Silvercrest SPS 1.5 A1 Mini Trimmer Uživatelský manuál