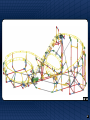
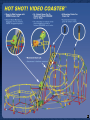
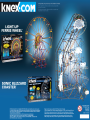
K'Nex HOT SHOT! VIDEO COASTER Benutzerhandbuch
- Kategorie
- Spielzeuge
- Typ
- Benutzerhandbuch


IMPORTANT STUFF
FOR PARENTS & KIDS
Keep these instructions in a handy
location. They contain important
safety information.
Read all warnings and instructions
before you start to build and
operate the model.
WARNING: CHOKING HAZARD -
Small parts. Not for Children under 3 years.
CAUTION: Keep hands, face, hair and clothing
away from all moving parts.
CAUTION: Be careful not to tip the model over.
Model should be placed on a flat and hard surface.
• Share the K'NEX experience with your child
and make building with K'NEX a family fun
adventure.
• Take your time to enjoy the building process.
Don't rush!
• While you’re building make sure you face your
model in the same direction as the pictures
show in the instructions.
• Install all batteries before you start building.
• Product and colors may vary.
• Help the environment by disposing of your
product and packaging responsibly. The wheelie
bin symbol indicates the product and batteries
must not be disposed of in the domestic waste
as they contain substances which can be
damaging to the environment and health. Please
use designated collection points or recycling
facilities when disposing of the item or batteries.
• Video Camera Car System Requirements:
PC: Windows® Vista, XP and 2000
MAC: Macintosh® OS 9.2 or higher
CPU Speed: Intel® Pentium III 800 MHz or higher
Memory: Requires at least 128 MB & 80 MB
of free hard disc space
Software: Supports USB 2.0 and MSDC
(Mass Storage Device Controller)
!
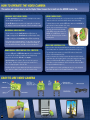
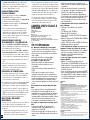
BATTERY INFORMATION
Caution: To Avoid Battery Leakage
• Be sure to insert the batteries correctly and always follow the toy
and battery manufacturers’ instructions.
• Do not mix old and new batteries or alkaline, standard (carbon-
zinc) or rechargeable (nickel-cadmium) batteries. Only batteries
of the same or equivalent type recommended should be used.
• Always remove weak or dead batteries from the product; do not
short-circuit supply terminals.
• Insert batteries with correct polarity (+/-) as shown.
Important Tips:
• Alkaline batteries AA (LR6) are recommended.
• Rechargeable batteries are not recommended.
• Remove rechargeable batteries from toy before charging; they
must be charged only under adult supervision.
• Non-rechargeable batteries must not be recharged.
• Keep components free of dust; do not immerse or use in water.
• Do not dispose of batteries in a fire; they could leak
or explode and cause injury.
• Remove all batteries if the toy will not be used for a long period of time.
• Do not put rods smaller than 2 inches in any openings of the
motor; they will damage the motor, and cannot be removed.
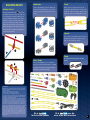
How to Insert the
Motor Batteries:
•
Use a small Phillips head
screwdriver to loosen the
screw. Insert 2 fresh AA
batteries (LR6) into the
compartment with the
correct polarity (+/-) as
shown here.
How to Charge the
Video Camera Car:
•
Battery charging should be done by an adult, follow these
instructions carefully.
•
Use this USB cable, no others. Normal charging time 1-2 hours
(when battery is empty).
•
Do not leave the video car unattended while it is charging.
•
Unplug the USB cord when the video camera car is charged.
•
Overcharging could result in overheating the video camera car.
•
Charge the video camera car on a non-flammable surface, keep it
away from flammable items.
•
Do not place in or near
water, heat or fire.
•
Do not short circuit the
battery terminals.
•
If the video car has been
damaged, immediately
stop use, unplug and
safely move it away from
flammable materials.
2
CONTENTS
Coaster Instructions . . . . . 4
Attaching the Coaster Car . . . . . . .
50
How to Operate the Video
Camera. . . . . . . . . . . . . . . . . . . . .
52
Tips & Troubleshooting . . . . . . . . .
54
CONTENUS
Instructions de Caboteur . . 4
Comment Ajouter la Voiture . . . . .
50
Comment Actionner la Caméra
Vidéo . . . . . . . . . . . . . . . . . . . . . .
52
Tip & Dépannage. . . . . . . . . . . . . .
54
+
-
EN
FR

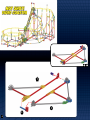
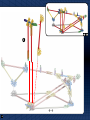
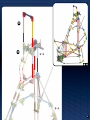
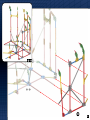
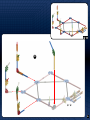
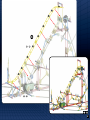
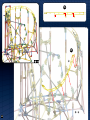
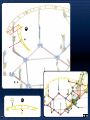
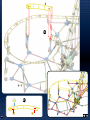
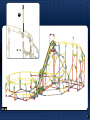
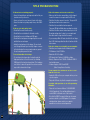
BUILDING BASICS
Getting Started:
To begin your model, find the and follow
the numbers. Each piece has its own shape and
color. Just look at the pictures, find the pieces
in your set that match and then connect them
together. Try to face your model in the same
direction as the instructions while you build.
Faded colors show you this section is already
built. You’ll want to connect the new section to
the place where the arrows are pointing (not all
connections have arrows).
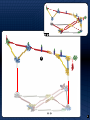
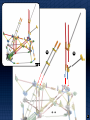
Track:
A
lways connect the track top side to top side
throughout the build. Attach the connectors to the
bottom side of the track exactly as shown. Be sure
to push the connectors on firmly until they “click”.
Connectors:
T
here are blue and gray connectors with special
long slots. They slide together as you see in the
pictures. Push these parts together until you hear
a “click”.
Spacers:
There are places in your model where you need to
add blue and silver spacers. Be sure to use the
right color and count them carefully.
FCC Statements:
WARNING: Changes or modifications to this unit not expressly approved
by the party responsible for the compliance could void the user’s right to
operate the equipment.
This device complies with Part 15 of the FCC Rules.
Operation is subject to the following two conditions:
1. This device may not cause harmful interference and
2. This device must accept any interference received, including interference
that may cause undesired operation. This model is tested to comply with
FCC standards - FOR HOME OR OFFICE USE.
This equipment has been tested and found to comply with the limits for a
Class B digital device, pursuant to part 15 of the FCC Rules. These limits
are designed to provide reasonable protection against harmful interference
in a residential installation. This equipment generates, uses and can radiate
radio frequency energy, and, if not installed and used in accordance with
the instructions, may cause harmful interference to radio communications.
However, there is no guarantee that interference will not occur in a particular
installation. If this equipment does cause harmful interference to radio or
television reception, which can be determined by turning the equipment
off and on, the user is encouraged to try to correct the interference by one
or more of the following measures: (1) Reorient or relocate the receiving
antenna. (2) Increase the separation between the equipment and receiver.
(3) Connect the equipment into an outlet on a circuit different from that to
which the receiver is connected. (4) Consult the dealer or an experienced
radio/TV technician for help. This Class B digital apparatus complies with
Canadian ICES-003.
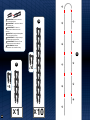
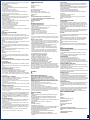
Parts Count:
Before you start building, be sure to compare the
parts in your set with the parts listed here. If anything
is missing, call or write to us using the information
on the back cover. We’re here to help!
3
1
1 3
-
2
1
3
4
Chain:
Be sure to attach all the chain links in the same
direction.
for Instruction Updates
Go to
Va à
mises
`
a jour des instructions
pour des

4
1
2
3
1 3
-

5
1 4
-
4
1 3
-

6
1 5
-
5
1 4
-

7
1 6
-
6
1 5
-

8
7 9
-
7
8
9
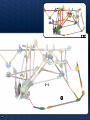
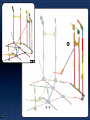
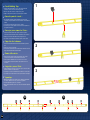
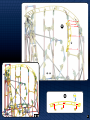
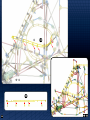
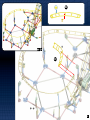
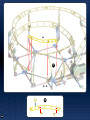
Did you install 2 AA (or LR6) batteries in the motor?
Est-ce que tu as installé 2 piles AA (ou LR6) dans le moteur ?
¿Instalaste dos pilas AA (o LR6) en el motor?
Heb je 2 AA (of LR6) batterijen gestoken in de motor?
Hai installato 2 batterie AA (o LR6) nel motore?
Foram instaladas as pilhas 2 AA (ou LR6) no motor?
Heb je er 2 AA (of LR6) batterijen ingestoken?
NL
PT
IT
DE
ES
FR
EN

9
1 10
-
10
1 6
-
7 9
-

10
1 11
-
1 2
-
11
1 10
-

11
1 13
-
12
13
1 11
-

12
1 14
-
14
1 13
-

1 15
-
13
15
1 14
-

14
16 18
-
16
17
18
1
1

15
1 20
-
19
20
1 15
-
16 18
-

16
21 23
-
21
23
22
21

17
21 24
-
24
21 23
-

18
21 25
-
25
21 24
-

21 26
-
19
26
21 25
-

20
27
1 20
-
21 26
-
Seite wird geladen ...
Seite wird geladen ...
Seite wird geladen ...
Seite wird geladen ...
Seite wird geladen ...
Seite wird geladen ...
Seite wird geladen ...
Seite wird geladen ...
Seite wird geladen ...
Seite wird geladen ...
Seite wird geladen ...
Seite wird geladen ...
Seite wird geladen ...
Seite wird geladen ...
Seite wird geladen ...
Seite wird geladen ...
Seite wird geladen ...
Seite wird geladen ...
Seite wird geladen ...
Seite wird geladen ...
Seite wird geladen ...
Seite wird geladen ...
Seite wird geladen ...
Seite wird geladen ...
Seite wird geladen ...
Seite wird geladen ...
Seite wird geladen ...
Seite wird geladen ...
Seite wird geladen ...
Seite wird geladen ...
Seite wird geladen ...
Seite wird geladen ...
Seite wird geladen ...
Seite wird geladen ...
Seite wird geladen ...
Seite wird geladen ...
Seite wird geladen ...
Seite wird geladen ...
Seite wird geladen ...
Seite wird geladen ...
-
 1
1
-
 2
2
-
 3
3
-
 4
4
-
 5
5
-
 6
6
-
 7
7
-
 8
8
-
 9
9
-
 10
10
-
 11
11
-
 12
12
-
 13
13
-
 14
14
-
 15
15
-
 16
16
-
 17
17
-
 18
18
-
 19
19
-
 20
20
-
 21
21
-
 22
22
-
 23
23
-
 24
24
-
 25
25
-
 26
26
-
 27
27
-
 28
28
-
 29
29
-
 30
30
-
 31
31
-
 32
32
-
 33
33
-
 34
34
-
 35
35
-
 36
36
-
 37
37
-
 38
38
-
 39
39
-
 40
40
-
 41
41
-
 42
42
-
 43
43
-
 44
44
-
 45
45
-
 46
46
-
 47
47
-
 48
48
-
 49
49
-
 50
50
-
 51
51
-
 52
52
-
 53
53
-
 54
54
-
 55
55
-
 56
56
-
 57
57
-
 58
58
-
 59
59
-
 60
60


K'Nex HOT SHOT! VIDEO COASTER Benutzerhandbuch
- Kategorie
- Spielzeuge
- Typ
- Benutzerhandbuch
in anderen Sprachen
- English: K'Nex HOT SHOT! VIDEO COASTER User manual
- français: K'Nex HOT SHOT! VIDEO COASTER Manuel utilisateur
- español: K'Nex HOT SHOT! VIDEO COASTER Manual de usuario
- italiano: K'Nex HOT SHOT! VIDEO COASTER Manuale utente
- Nederlands: K'Nex HOT SHOT! VIDEO COASTER Handleiding
- português: K'Nex HOT SHOT! VIDEO COASTER Manual do usuário
Verwandte Artikel
-
K'Nex Imagine-Build-Play STEEL SCORPION ROLLER COASTER Benutzerhandbuch
-
-
-
-
-
-
-
Andere Dokumente
-
Carrera 20063041 Benutzerhandbuch
-
Carrera 63014 Installationsanleitung
-
Knex 77077 Benutzerhandbuch
-
-
Philips PET705/05 Benutzerhandbuch
-
Philips PET706 Portable DVD Player Benutzerhandbuch
-
Philips PET821 PET825 Benutzerhandbuch
-
Philips PET825/05 Benutzerhandbuch
-
Philips PET725/75 Benutzerhandbuch
-