
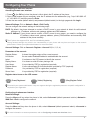
Quick Start Guide
Classic IP Phone
http://support.yealink.com/
SIP-T33P & T33G

Table of Contents
English ..........................................1
Deutsch .........................................7
Español .......................................13
Français .......................................19

1
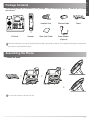
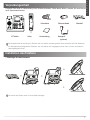
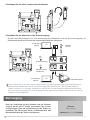
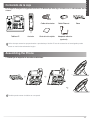
Package Contents
Assembling the Phone
The following items are included in your package. If you find anything missing, contact your system
administrator.
Quick Start Guide Power AdapterIP Phone Handset
Handset Cord Ethernet Cable Stand
1. Attach the stand:
We recommend that you use the accessories provided or approved by Yealink. The unapproved third-party accessories
may result in reduced performance.
You can also mount the phone to a wall.
E
N
G
L
I
S
H
(Optional)
q
q

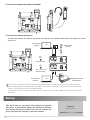
2
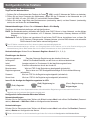
The IP phone should be used with Yealink original power adapter (5V/600mA) only. The use of the third-party
power adapter may cause the damage to the phone. If you are connecting a PC to your phone, we recommend
that you use the Ethernet cable provided by Yealink.
If inline power (PoE) is provided, you don’t need to connect the power adapter. Make sure the hub/switch is PoE-
compliant.
2. Connect the handset and optional headset:
3. Connect the network and power:
You have two options for network and power connections. Your system administrator will advise you which
one to use.
Startup
Welcome
Initializing... Please wait
After the IP phone is connected to the network and supplied
with power, it automatically begins the initialization process.
After startup, the phone is ready for use. You can congure the
phone via phone user interface or web user interface.
A
B
PC
PC
AC Power Option
PoE ( Power over
Ethernet ) Option
PC Connection
(Optional)
PC Connection
(Optional) Power Adapter
(DC 5V)
IEEE 802.3af compliant
PoE Hub/Switch

3
Conguring Your Phone
Conguring via web user interface
Accessing the web user interface:
1. Press (the OK key) when the phone is idle to obtain the IP address of the phone.
2. Open a web browser on your computer, enter the IP address into the address bar (e.g., "http://192.168.0.10"
or "192.168.0.10") and then press the Enter.
3. Enter the user name (default: admin) and password (default: admin) in the login page and click Login.
Network Settings: Click on Network->Basic->IPv4 Cong
You can congure the network settings in the following ways:
DHCP: By default, the phone attempts to contact a DHCP server in your network to obtain its valid network
settings, e.g., IP address, subnet mask, gateway address and DNS address.
Static IP Address: If your phone cannot contact a DHCP server for any reason, you need to congure the
IP address, subnet mask, gateway address, primary DNS address and secondary DNS
address for the phone manually.
The IP phone also supports IPv6, but IPv6 is disabled by default.
Wrong network settings may result in the inaccessibility of your phone and may have an impact on the network
performance. Contact your system administrator for more information.
Account Settings: Click on Account->Register
Parameters of the account:
Register Status: It shows the register status of the current account.
Line Active: You can select Enabled/Disabled to enable/disable the account.
Label: It is shown on the LCD screen to identify the account.
Display Name: It is shown as caller ID when placing a call.
User Name: It is provided by ITSP for registration (required).
Register Name: It is an authenticated ID for authentication provided by ITSP (required).
Password: It is provided by ITSP for registration (required).
Server Host: It is provided by ITSP for registration (required).
Register status icons on the LCD screen:
For more information on account parameters, refer to Conguring via web user interface above.
Check with your system administrator if any error appears during the registration process or a specic conguration is
required for your registration.
Conguring via phone user interface
Network Settings:
Press the Menu soft key when the phone is idle, select Advanced (default password: admin)->Network->
WAN Port->IPv4 to congure the network.
Account Settings:
Press the Menu soft key when the phone is idle, select Advanced (default password: admin)->Accounts to
congure the account.
(Green)Registered (Yellow) Registering (Gray)Register Failed
->Account X (X=1, 2, 3, 4)

4
Placing a Call
Ending a Call
Redial
Call Mute
• Press to mute the microphone during a call.
• Press again to un-mute the call.
Call Hold
Call Transfer
Call Forward
To enable call forward:
1. Press the Menu soft key when the phone is idle,
and then select Features->Call Forward.
2. Select the desired forward type.
3. Enter the number you want to forward to. For No
Answer Forward, select the desired ring time to
wait before forwarding from the After Ring Time
eld.
4. Press the Save soft key to accept the change.
Using the handset:
1. Pick up the handset.
2. Enter the number and press the Send soft key.
Using the speakerphone:
1. With the handset on-hook, press .
2. Enter the number and press the Send soft key.
Using the headset:
1. With the headset connected, press to activate
the headset mode.
2. Enter the number and press the Send soft key.
Answering a Call
Using the handset:
Pick up the handset.
Using the speakerphone:
Press .
Using the headset:
Press .
You can reject an incoming call by pressing the Reject
soft key.
Using the handset:
Hang up the handset or press the EndCall soft key.
Using the speakerphone:
Press or the EndCall soft key.
Using the headset:
Press the EndCall soft key.
• Press to enter the Placed Calls list, select the
desired entry, and press or the Send soft key.
• Press twice when the phone is idle to dial out the
last dialed number.
To place a call on hold:
Press the Hold soft key during an active call.
To resume the call, do one of the following:
• If there is only one call on hold, press the Resume
soft key.
• If there is more than one call on hold, select the
desired call, and press the Resume soft key.
You can transfer a call in the following ways:
Blind Transfer
1. Press the Trans soft key during an active call.
2. Enter the number you want to transfer to.
3. Press the B Trans soft key.
Semi-Attended Transfer
1. Press the Trans soft key during an active call.
2. Enter the number you want to transfer to, and press
the Send soft key.
3. Press the Trans soft key when you hear the ring-
back tone.
Attended Transfer
1. Press the Trans soft key during an active call.
2. Enter the number you want to transfer to, and press
the Send soft key.
3. Press the Trans soft key when the second party
answers.

5
Call Conference
Speed Dial
Voice Message
Call History
Contact Directory
Volume Adjustment
Press to adjust the volume.
1. Press the Conf soft key during an active call. The
call is placed on hold.
2. Enter the number of the second party, and press the
Send soft key.
3. Press the Conf soft key again when the second
party answers. All parties are now joined in the
conference.
4. Press the EndCall soft key to disconnect all parties.
You can split the conference call into two individual calls
by pressing the Split soft key.
To congure a speed dial key:
1. Press the Menu soft key when the phone is idle,
and then select Features->Dsskey.
2. Select the desired DSS key, and press the Enter
soft key.
3. Select SpeedDial from the Type field, select the
desired line from the Account ID eld, enter a label
in the Label field, enter the number in the Value
eld.
4. Press the Save soft key to accept the change.
To use the speed dial key:
Press the speed dial key to dial out the preset number.
Message waiting indicator on the idle screen indicates
that one or more voice messages are waiting at the
message center. The power indicator LED slowly
ashes red.
To listen to voice messages:
1. Press or the Connect soft key.
2. Follow the voice prompts to listen to your voice
messages.
1. Press the History soft key when the phone is idle,
press or to scroll through the list.
2. Select an entry from the list, you can do the
following:
• Press the Send soft key to call the entry.
• Press the Delete soft key to delete the entry from
the list.
If you press the Option soft key, you can also do the
following:
• Select Detail to view detailed information about the
entry.
• Select Add to Contacts to add the entry to the local
directory.
• Select Add to Blacklist to add the entry to the
blacklist.
• Select Delete All to delete all entries from the list.
To add a contact:
1. Press the Dir soft key when the phone is idle, and
then select All Contacts.
2. Press the Add soft key to add a contact.
3. Enter a unique contact name in the Name eld and
contact numbers in the corresponding elds.
4. Press the Save soft key to accept the change.
To edit a contact:
1. Press the Dir soft key when the phone is idle, and
then select All Contacts.
2. Press or to select the desired contact, press
the Option soft key and then select Detail from the
prompt list.
3. Edit the contact information.
4. Press the Save soft key to accept the change.
To delete a contact:
1. Press the Dir soft key when the phone is idle, and
then select All Contacts.
2. Press or to select the desired contact, press
the Option soft key and then select Delete from the
prompt list.
3. Press the OK soft key when the LCD screen
prompts “Delete selected item?”.

Regulatory Notices
Operating Ambient Temperatures
• Operating temperature: +14 to 122°F (-10 to 50°C)
• Relative humidity: 5% to 90%, noncondensing
• Storage temperature: -22 to +160°F (-30 to +70°C)
Warranty
Our product warranty is limited only to the unit itself, when used normally in
accordance with the operating instructions and the system environment. We
are not liable for damage or loss resulting from the use of this product, or for
any claim from a third party. We are not liable for problems with Yealink device
arising from the use of this product; we are not liable for nancial damages, lost
prots, claims from third parties, etc., arising from the use of this product.
DC symbol
is the DC voltage symbol.
Restriction of Hazardous Substances Directive (RoHS)
This device complies with the requirements of the EU RoHS Directive.
Statements of compliance can be obtained by contacting support@yealink.
com.
Safety Instructions
Save these instructions. Read these safety instructions before use!
The following basic safety precautions should always be followed to reduce risk
of re, electrical shock, and other personal injury.
General Requirements
• Before you install and use the device, read the safety instructions
carefully and observe the situation during operation.
• During the process of storage, transportation, and operation, please
always keep the device dry and clean.
• During the process of storage, transportation, and operation, please
avoid collision and crash of the device.
• Please attempt not to dismantle the device by yourself. In case of any
discrepancy, please contact the appointed maintenance center for
repair.
• Without prior written consent, no organization or individual is permitted
to make any change to the structure or the safety design of the device.
Yealink is under no circumstance liable to consequences or legal issues
caused by such changes.
• Please refer to the relevant laws and statutes while using the device.
Legal rights of others should be respected as well.
Environmental Requirements
• Place the device at a well-ventilated place. Do not expose the device
under direct sunlight.
• Keep the device dry and free of dusts.
• Place the device on a stable and level platform.
• Please place no heavy objects on the device in case of damageand
deformation caused by the heavy load.
• Keep at least 10 cm between the device and the closest object for heat
dissipation.
• Do not place the device on or near any inammable or re-vulnerable
object, such as rubber-made materials.
• Keep the device away from any heat source or bare fire, such as a
candle or an electric heater.
• Keep the device away from any household appliance with strong
magnetic eld or electromagnetic eld, such as a microwave oven or a
refrigerator.
Operating Requirements
• Do not let a child operate the device without guidance.
• Do not let a child play with the device or any accessory in case of
accidental swallowing.
• Please use the accessories provided or authorized by the manufacturer
only.
• The power supply of the device shall meet the requirements of the input
voltage of the device. Pleaseusethe provided surge protection power
socket only.
• Before plugging or unplugging any cable, make sure that your hands
are completely dry.
• Do not spill liquid of any kind on the product or use the equipment
near water, for example, near a bathtub, washbowl, kitchen sink, wet
basement or near a swimming pool.
• Do not tread on, pull, or over-bend any cable in case of malfunction of
the device.
• During a thunderstorm, stop using the device and disconnect it from
the power supply. Unplug the power plug and the Asymmetric Digital
Subscriber Line (ADSL) twisted pair (the radio frequency cable) to avoid
lightning strike.
• If the device is left unused for a rather long time, disconnect it from the
power supply and unplug the power plug.
• When there is smoke emitted from the device, or some abnormal noise
or smell, disconnect the device from the power supply, and unplug the
power plug immediately. Contact the specied maintenance center for
repair.
• Do not insert any object into equipment slots that is not part of the
product or auxiliary product.
• Before connecting a cable, connect the grounding cable of the device
first. Do not disconnect the grounding cable until you disconnect all
other cables.
Cleaning Requirements
• Before cleaning the device, stop using it and disconnect it from the
power supply.
• Use a piece of soft, dry and anti-static cloth to clean the device.
• Keep the power plug clean and dry. Using a dirty or wet power plug may
lead to electric shock or other perils.
ENVIRONMENTAL RECYCLING
Never dispose of the device with domestic waste
Ask your Town Council about how to dispose of it in an
environmentally friendly way. The cardboarc box, plastic packaging
and player components may be recycled in accordance with
prevailing recycling regulations in your country.
Always adhere to prevailing regulations
Those who fail to do so may be ned or prosecuted in accordance
with the law. The crossed out garbage can that appears on the
device means that when it has reached the end of its useful life,
it should be taken to a special waste disposal centre and treated
separately to general urban waste.
Troubleshooting
The unit cannot supply power to Yealink device.
There is a bad connection with the plug.
1. Clean the plug with a dry cloth.
2. Connect it to another wall outlet.
The usage environment is out of operating temperature range.
1. Use in the operating temperature range.
The cable between the unit and the Yealink device is connected incorrectly.
1. Connect the cable correctly.
You cannot connect the cable properly.
1. You may have connected a wrong Yealink device.
2. Use the correct power supply.
Some dust, etc., may be in the port.
1. Clean the port.
Contact your dealer or authorized service facility for any further questions.
Contact Information
YEALINK NETWORK TECHNOLOGY CO.,LTD.
309, 3rd Floor, No.16, Yun Ding North Road, Huli District, Xiamen City, Fujian,
P.R.C
YEALINK (EUROPE) NETWORK TECHNOLOGY B.V.
Strawinskylaan 3127, Atrium Building, 8th floor, 1077ZX Amsterdam, The
Netherlands
YEALINK (USA) NETWORK TECHNOLOGY CO., LTD.
999 Peachtree Street Suite 2300, Fulton, Atlanta, GA, 30309, USA
Made in China

7
Verpackungsinhalt
Installation des Telefons
Folgende Teile sind im Lieferumfang Ihres Telefons enthalten. Sollte etwas fehlen, wenden Sie sich bitte an
Ihren Systemadministrator.
Kurzanleitung NetzgerätIP-Telefon Hörer
Hörerkabel Ethernet-Kabel Standfuß
1. Befestigen Sie den Standfuß:
Wir empfehlen die Verwendung von Zubehör, das von Yealink entweder geliefert oder empfohlen wird. Der Gebrauch
von Drittanbietern bereitgestellten Zubehörs, das von Yealink nicht freigegeben wurde, kann zu einer verminderten
Leistungsfähigkeit führen.
Sie können das Telefon auch an einer Wand befestigen.
D
E
U
T
S
C
H
(optional)
q
q

8
Das IP-Telefon darf nur mit dem originalen Yealink Netzteil (5V/600mA) genutzt werden. Die Verwendung eines
Netzteiles eines Drittanbieters kann zu einer Beschädigung des Telefons führen. Falls Sie beabsichtigen, Ihr
Telefon mit einem PC zu verbinden, empfehlen wir, daß Sie das von Yealink gelieferte Ethernet-Kabel benutzen.
Bei einer Online-Versorgung (PoE) muss das Netzgerät nicht angeschlossen werden. Stellen Sie sicher, dass der
Hub/Switch PoE-kompatibel ist.
2. Verbinden Sie den Hörer und das optionale Headset:
3. Verbinden Sie das Netzwerk und die Stromversorgung:
Es gibt zwei Möglichkeiten für die Verbindung des Netzwerks und der Stromversorgung. Ihr
Systemadministrator wird Sie über die entsprechende Methode informieren.
Startvorgang
Welcome
Initializing... Please wait
Nach der Verbindung mit dem Netzwerk und der Stromver-
sorgung startet das IP-Telefon automatisch den Initialis-
ierungsvorgang. Nach der Initialisierung ist das Telefon be-
triebsbereit. Sie können das Telefon via Weboberäche oder
Benutzeroberäche des Telefons kongurieren.
A
B
PC
PC
AC Stromversorgung
PoE-Option (Power
over Ethernet)
PC-Verbindung
(optional)
PC-Verbindung
(optional) Netzgerät
(DC 5V)
PoE Netzwerk-Switch

9
Konguration Ihres Telefons
Konguration über die Weboberäche
Zugriff auf die Weboberäche:
1. Drücken Sie im Ruhezustand des Telefons die Taste (OK), um die IP-Adresse des Telefons zu beziehen.
2. Öffnen Sie an Ihrem Computer den Webbrowser, geben Sie die IP-Adresse in die Adresszeile ein (z.B.
„http://192.168.0.10“ oder „192.168.0.10“) und drücken Sie dann Enter.
3. Geben Sie auf der Login-Seite den Benutzernamen (werksseitig: admin) und das Passwort (werksseitig:
admin) ein und klicken Sie auf Anmeldung.
Netzwerkeinstellungen: Klicken Sie auf Netzwerk->Basis->IPv4-Kong
Sie können die Netzwerkeinstellungen wie folgt kongurieren:
DHCP: Per Standardeinstellung kontaktiert das Telefon einen DHCP-Server in Ihrem Netzwerk, um die gültigen
Netzwerkeinstellungen zu beziehen, z.B. IP-Adresse, Subnetzmaske, Gateway-Adresse und DNS-
Adresse.
Statische IP: Falls Ihr Telefon aus irgendeinem Grund keinen DHCP-Server kontaktieren kann, müssen Sie
die IP-Adresse, Subnetzmaske, Gateway-Adresse, primäre DNS-Adresse und sekundäre
DNS-Adresse für das Telefon manuell kongurieren.
Das IP-Telefon unterstützt auch IPv6, dieses ist jedoch standardmäßig deaktiviert.
Falsche Netzwerkeinstellungen können zur Unzugänglichkeit Ihres Telefons und zu einer Beeinträchtigung der
Netzwerkleistung führen. Bitte wenden Sie sich für weitere Informationen an Ihren Systemadministrator.
Kontoeinstellungen: Klicken Sie auf Account->Register
Einstellungen des Kontos:
Registrierungsstatus: Zeigt den Status der Registrierung des aktuellen Kontos an.
Leitung aktiv: Wählen Sie Enabled/Disabled, um das Konto zu aktivieren/deaktivieren.
Label: Anzeige erscheint im Touchscreen für die Identizierung des Kontos.
Anzeigename: Erscheint während eines Anrufs als Anrufer-ID.
Benutzername: Wird von ITSP für die Registrierung bereitgestellt (erforderlich).
Registrierungsname: Dies ist eine von ITSP bereitgestellte bestätigte ID für die Authentizierung
(erforderlich).
Passwort: Wird von ITSP für die Registrierung bereitgestellt (erforderlich).
Server-Host: Wird von ITSP für die Registrierung bereitgestellt (erforderlich).
Icons für die Anzeige des Registrierungsstatus im LCD:
Weitere Informationen zu den Kontoeinstellungen nden Sie im Abschnitt Konguration via Weboberäche.
Wenden Sie sich an Ihren Systemadministrator, falls während der Registrierung ein Fehler auftritt oder für Ihre
Registrierung eine bestimmte Konguration benötigt wird.
Konguration via Benutzeroberäche des Telefons
Netzwerkeinstellungen:
Drücken Sie im Ruhezustand des Telefons die Bildschirmtaste Menü und wählen Sie Erweitert (Passwort:
admin)->Netzwerk-> WAN-Port->IPv4 zur Konguration des Netzwerks.
Kontoeinstellungen:
Drücken Sie im Ruhezustand des Telefons die Bildschirmtaste Menü und wählen Sie Erweitert (Passwort:
admin)->Konten zur Konguration des Kontos.
(Grün) Registriert (Gelb) Registrierung im
Gang
(Grau) Registrierung
fehlgeschlagen
->Konto X (X=1, 2, 3, 4)

10
Anruf tätigen
Anruf beenden
Wahlwiederholung
Anruf stumm
• Drücken Sie die Taste , um einen Anruf stumm zu
stellen.
• Drücken Sie erneut, um die Funktion zu deaktivieren.
Anruf halten
Rufweiterleitung
Anrufumleitung
Rufweiterleitung aktivieren:
1. Drücken Sie im Ruhezustand des Telefons die
Bildschirmtaste Menü und wählen Sie dann Leist.
Merkm.->Rufweiterleitung.
2. Wählen Sie die gewünschte Art der Rufumleitung.
3. Geben Sie die Nummer ein, an die Anrufe
umgeleitet werden sollen. Wählen Sie für die Option
Keine Antwort mit den Tasten oder den Zeitraum
aus, nach Ablauf dessen der Anruf umgeleitet
werden soll.
4. Drücken Sie die Bildschirmtaste Speichern zur
Übernahme der Änderungen.
Mit dem Hörer:
1. Nehmen Sie den Hörer ab.
2. Geben Sie die Nummer ein und drücken Sie dann im
Bildschirm auf Anrufen.
Mit Freisprecheinrichtung:
1. Drücken Sie bei aufgelegtem Hörer auf die Taste .
2. Geben Sie die Nummer ein und drücken Sie dann im
Bildschirm auf Anrufen.
Mit Headset:
1. Drücken Sie bei angeschlossenem Headset auf die
Taste , um den Kopfhörermodus zu aktivieren.
2. Geben Sie die Nummer ein und drücken Sie dann im
Bildschirm auf Anrufen.
Anruf entgegennehmen
Mit dem Hörer:
Nehmen Sie den Hörer ab.
Mit Freisprecheinrichtung:
Drücken Sie auf die Taste .
Mit Headset:
Drücken Sie auf die Taste .
Sie können einen eingehenden Anruf ignorieren, indem
Sie die Bildschirmtaste Reject drücken.
Mit dem Hörer:
Legen Sie den Hörer auf oder drücken Sie die
Bildschirmtaste Auegen.
Mit Freisprecheinrichtung:
Drücken Sie oder die Bildschirmtaste Auegen.
Mit Headset:
Drücken Sie die Bildschirmtaste Auegen.
• Drücken Sie die Taste , um die Liste Placed
Calls zu öffnen, und drücken Sie dann oder die
Bildschirmtaste Send.
• Drücken Sie im Ruhezustand zweimal die Taste , um
die zuletzt gewählte Nummer erneut zu wählen.
Anruf in Wartestellung versetzen:
Drücken Sie während eines aktiven Anrufs die
Bildschirmtaste Halten.
Gehen Sie wie folgt vor, um den Anruf fortzusetzen:
• Falls sich nur ein Anruf in Wartestellung befindet,
drücken Sie die Bildschirmtaste Fortsetzen.
• Falls sich mehrere Anrufe in Wartestellung befinden,
wählen den gewünschten Anruf und drücken Sie dann
die Bildschirmtaste Resume.
Sie können Anrufe wie folgt weiterleiten:
Direkte Weiterleitung
1. Drücken Sie während eines aktiven Anrufs die
Bildschirmtaste Übergeben.
2. Geben Sie die Nummer ein, an die der Anruf
weitergeleitet werden soll.
3. Drücken Sie die Bildschirmtaste BT-Send.
Weiterleitung mit Rufzeichen
1. Drücken Sie während eines aktiven Anrufs die
Bildschirmtaste Übergeben.
2. Geben Sie die Nummer ein, an die der Anruf
weitergeleitet werden soll und drücken Sie dann
Send.
3. Drücken Sie die Bildschirmtaste Übergeben, sobald
Sie den Rückrufton hören.
Weiterleitung mit Rücksprache
1. Drücken Sie während eines aktiven Anrufs die
Bildschirmtaste Übergeben.
2. Geben Sie die Nummer ein, an die der Anruf
weitergeleitet werden soll und drücken Sie dann
Send.
3. Drücken Sie die Bildschirmtaste Übergeben, sobald
der zweite Teilnehmer den Anruf entgegennimmt.

11
Telefonkonferenz
Kurzwahl
Sprachnachrichten
Anruiste
Telefonbuch
Lautstärke einstellen
Drücken Sie um Lautstärke einzustellen.
1. Drücken Sie während eines aktiven Anrufs die
Bildschirmtaste Konf.. Der Anruf wird in Wartestellung
versetzt.
2. Geben Sie die Nummer des zweiten Teilnehmers ein
und drücken Sie dann im Bildschirm auf Anrufen.
3. Drücken Sie die Bildschirmtaste Konf. erneut, sobald
der zweite Teilnehmer den Anruf entgegennimmt. Alle
Teilnehmer sind nun der Telefonkonferenz zugeschaltet.
4. Drücken Sie die Bildschirmtaste Auflegen um alle
Teilnehmer zu trennen.
Sie können die Telefonkonferenz in zwei separate
Anrufe aufteilen, indem Sie die Bildschirmtaste Split
drücken.
Kurzwahltasten kongurieren:
1. Drücken Sie im Ruhezustand des Telefons die
Bildschirmtaste Menü und wählen Sie dann Leist.
Merkm.->Direktwahltaste.
2. Wählen Sie die gewünschte DSS-Taste und drücken
Sie dann die Bildschirmtaste Eingeben.
3. Wählen Sie im Feld Typ die Option Kurzwahl. Wählen
Sie unter Feld Konto ID die gewünschte Leitung und
geben Sie im Feld Label ein Kürzel und im Feld Wert
die Nummer ein.
4. Drücken Sie die Bildschirmtaste Speichern zur
Übernahme der Änderungen.
Verwendung von Kurzwahltasten:
Drücken Sie auf die Kurzwahltaste, um die zugewiesene
Nummer anzuwählen.
Die Anzeige für eingegangene Nachrichten auf
dem Ruhebildschirm weist darauf hin, dass im
Nachrichtenzentrum eine oder mehrere Sprachnachrichten
eingegangen sind. Die LEDBetriebsanzeige blinkt langsam
rot.
Sprachnachrichten abspielen:
1. Drücken Sie oder die Bildschirmtaste Verbinden.
2. Folgen Sie den Sprachanleitungen, um Ihre Nachrichten
abzuspielen.
1. Drücken Sie im Ruhezustand des Telefons auf die
Bildschirmtaste Historie und drücken Sie dann
oder , um durch die Liste zu scrollen.
2. Wählen Sie einen Eintrag in der Liste. Sie haben dann
folgende Möglichkeiten:
• Drücken Sie die Bildschirmtaste Anrufen, um einen
Anruf zu tätigen.
• Drücken Sie die Bildschirmtaste Löschen, um den
Eintrag aus der Liste zu löschen.
Drücken Sie die Bildschirmtaste Optionen, um eine der
nachfolgenden Funktionen auszuführen:
• Wählen Sie die Option Detail, um detaillierte
Informationen des Eintrags anzuzeigen.
• Wählen Sie die Option Zu den Kontakten hinzufügen,
um einen Eintrag zum lokalen Verzeichnis hinzuzufügen.
• Wählen Sie die Option Zur schw.Li.addn, um den
Eintrag auf die schwarze Liste zu setzen.
• Wählen Sie Alles löschen, um alle Einträge in der Liste
zu löschen.
Kontakt hinzufügen:
1. Drücken Sie im Ruhezustand des Telefons die
Bildschirmtaste Verzeichnis und wählen Sie dann die
gewünschte Gruppe aus.
2. Drücken Sie im Bildschirm auf Hinzufü., um einen
Kontakt hinzuzufügen.
3. Geben Sie in das Feld Name einen unverwechselbaren
Namen und in die jeweiligen Felder die Telefonnummern
ein.
4. Drücken Sie die Bildschirmtaste Speichern zur
Übernahme der Änderungen.
Kontakt bearbeiten:
1. Drücken Sie im Ruhezustand des Telefons die
Bildschirmtaste Verzeichnis und wählen Sie dann die
gewünschte Gruppe aus.
2. Wählen Sie mit oder den gewünschten Eintrag.
Drücken Sie die Bildschirmtaste Optionen und wählen
Sie dann in der geöffneten Liste die Option Detail.
3. Bearbeiten Sie die Kontaktinformationen.
4. Drücken Sie die Bildschirmtaste Speichern zur
Übernahme der Änderungen.
Kontakt löschen:
1. Drücken Sie im Ruhezustand des Telefons die
Bildschirmtaste Verzeichnis und wählen Sie dann die
gewünschte Gruppe aus.
2. Wählen Sie mit oder den gewünschten Eintrag.
Drücken Sie die Bildschirmtaste Optionen und wählen
Sie dann in der geöffneten Liste die Option Löschen.
3. Drücken Sie die Bildschirmtaste OK, wenn im LCD die
Mitteilung „Delete Selected Item?“ erscheint.

Sicherheitshinweise
Betriebsumgebungstemperaturen
• Betriebstemperatur: -10 bis 50 °C
• Relative Luftfeuchtigkeit: 5 % bis 90 %, nicht kondensierend
• Lagertemperatur: -30 bis + 70 °C
Garantie
Unsere Produktgarantie ist auf das Gerät selbst beschränkt, wenn es normal und
gemäß den Betriebsanweisungen und der Systemumgebung verwendet wird. Wir
sind weder für Schäden oder Verluste haftbar, die aus der Verwendung dieses
Produkts entstehen, noch für Ansprüche eines Dritten. Wir sind nicht haftbar
für Probleme mit dem Yealink Gerät, die aus der Verwendung dieses Produkts
entstehen. Wir sind nicht haftbar für nanzielle Schäden, Gewinnverluste, Ansprüche
Dritter etc., die aufgrund der Verwendung dieses Produkts entstehen.
Symbol DC
ist das Symbol für DC-Spannung.
Richtlinie zur Beschränkung der Verwendung bestimmter
gefährlicher Stoffe in Elektro- und Elektronikgeräten (RoHS)
Das Gerät erfüllt die Anforderungen der RoHS-Richtlinie der EU. Für Bestätigungen
der Einhaltung können Sie sich an [email protected] wenden.
Sicherheitshinweise
Bewahren Sie diese Anweisungen auf. Lesen Sie diese
Sicherheitshinweise vor der Verwendung!
Die folgenden grundlegenden Vorsichtsmaßnahmen müssen zur Vermeidung von
Bränden, Stromschlag und anderen Verletzungen immer befolgt werden.
Allgemeine Vorschriften
• Lesen Sie vor der Installation und Verwendung des Geräts die
Sicherheitshinweise sorgfältig durch und beobachten Sie die Situation im
Betrieb.
• Halten Sie das Gerät während der Lagerung, dem Transport und dem Betrieb
stets sauber und trocken.
• Vermeiden Sie während der Lagerung, dem Transport und dem Betrieb stets
Zusammenprallen und Stürze des Geräts.
• Versuchen Sie nicht das Gerät eigenständig zu demontieren. Wenden
Siesich im Falle von Mängeln an das zuständige Wartungscenter für eine
Reparatur.
• Ohne vorherige schriftliche Zustimmung dürfen weder Unternehmen noch
Einzelperson Änderungen an der Struktur oder dem Sicherheitskonzept
des Geräts vornehmen. Yealink übernimmt unter keinen Umständen die
Haftung für Folgen oder Rechtsansprüche, die auf solche Änderungen
zurückzuführen sind.
• Beachten Sie bitte die entsprechenden Gesetze und Vorschriften bei der
Verwendung des Geräts. Die gesetzlichen Rechte Dritter müssen ebenfalls
beachtet werden.
Umweltvorschriften
• Stellen Sie das Gerät an einem gut belüfteten Ort auf. Setzen Sie das Gerät
nicht direkter Sonneneinstrahlung aus.
• Halten Sie das Gerät trocken und frei von Staub.
• Stellen Sie das Gerät auf einen stabilen, ebenen Untergrund.
• Bitte legen Sie keine schweren Gegenstände auf das Gerät, da
Beschädigung und Verformungen durch zu hohe Last möglich sind.
• Halten Sie mindestens 10 cm Abstand zwischen dem Gerät und dem
nächsten Objekt ein, um die Wärmeabfuhr zu gewährleisten.
• Stellen Sie das Gerät nicht auf oder in der Nähe von entammbaren oder
brandgefährdeten Objekt wie Gummimaterialien auf.
• Halten Sie das Gerät fern von Hitzequellen und offenem Feuer, wie Kerzen
oder einer elektrischen Heizung.
• Halten Sie das Gerät fern von jedem Haushaltsgerät mit starkem Magnetfeld
oder Elektromagnetfeld, z.B. einem Mikrowellenherd oder einem Kühlschrank.
Betriebsvorschriften
• Lassen Sie das Gerät nicht ohne Aufsicht durch ein Kind verwenden.
• Lassen Sie kein Kind mit dem Gerät oder einem Zubehörteil spielen, da
Kleinteile verschluckt werden können.
• Bitte verwenden Sie ausschließlich Zubehör, das vom Hersteller bereitgestellt oder
genehmigt wurde.
• Die Stromversorgung des Geräts muss den Anforderungen der Eingangsspannung
des Gerätes entsprechen. Bitte verwenden Sie ausschließlich den bereitgestellten
Überspannungsschutz an der Steckdose.
• Achten Sie vor dem Anschließen oder Abziehen des Kabels darauf, dass Ihre Hände
vollständig trocken sind.
• Verschütten Sie keine Flüssigkeiten auf das Gerät und verwenden Sie es
nicht in der Nähe von Wasser, beispielsweise in der Nähe einer Badewanne,
Waschschüssel, einem Spülbecken, in einem feuchten Keller oder in der
Nähe eines Schwimmbeckens.
• Treten Sie nicht auf das Kabel, ziehen und verbiegen Sie es nicht, da es
dadurch zu einer Fehlfunktion des Geräts kommen kann.
• Schalten Sie das Gerät bei Gewitter aus und trennen Sie es von der
Stromversorgung. Ziehen Sie das Netzkabel und das ADSL-Twisted-Pair-
Kabel (Festnetzkabel) zurVermeidung eines Blitzschlags.
• Wenn das Gerät längere Zeit ungenutzt bleibt, trennen Sie es von der
Stromversorgung und ziehen Sie den Netzstecker.
• Wenn Rauch oder ungewöhnliche Geräusche oder Gerüche aus dem Gerät
austreten, trennen Sie das Gerät sofort von der Stromversorgung und ziehen
Sie das Netzkabel. Wenden Sie sich an das angegebene Wartungscenter für
eine Reparatur.
• Führen Sie keine Gegenstände in Einschübe oder Anschlussöffnungen des
Geräts ein, die kein Bestandteil des Produktes oder ein Zubehörteil sind.
• Schließen Sie zuerst das Erdungskabel des Geräts an, bevor Sie ein Kabel
anschließen.Trennen Sie das Erdungskabel nicht, bis nicht alle anderen
Kabel entfernt wurden.
Reinigungsvorschriften
• Bevor Sie das Gerät reinigen, schalten Sie es aus und trennen Sie es von
der Stromversorgung.
• Verwenden Sie ein Stück trockenes, weiches und antistatisches Tuch zum
Reinigen des Geräts.
• Halten Sie das Netzkabel sauber und trocken. Über einen schmutzigen oder
nassen Netzstecker kann es zu einem elektrischen Schlag oder anderen
Gefahren kommen.
UMWELTFREUNDLICHE VERWERTUNG
Entsorgen Sie das Gerät nicht mit dem Hausmüll.
Erkundigen Sie sich bei Ihrer Stadtverwaltung, wie Sie das Gerät
umweltfreundlich entsorgen können Pappkarton, Kunststoffverpackung
und Bauteile des Gerätes können im Einklang mit den geltenden
Vorschriften in Ihrem Land verwertet werden.
Halten Sie stets die geltenden Vorschriften ein.
Deren Nichtbeachtung kann eine Buße oder Verfolgung gemäß dem
geltenden Recht nach sich ziehen Die durchgestrichene Mülltonne auf
dem Gerät bedeutet, dass das Gerät am Ende seiner Nutzungsdauer zu
einer speziellen Elektroschrottsammelstelle gebracht und vom Hausmüll
gesondert verarbeitet werden muss.
Fehlerbehebung
Die Einheit kann das Yealink Gerät nicht mit Strom versorgen.
Es gibt Probleme mit dem Steckeranschluss.
1. Reinigen Sie den Stecker mit einem trockenen Tuch.
2. Schließen Sie ihn an einer anderen Steckdose an.
Die Umgebungstemperatur liegt oberhalb des Betriebstemperaturbereichs.
1. Verwenden Sie die Einheit innerhalb des Betriebstemperaturbereichs.
Das Kabel zwischen der Einheit und dem Yealink Gerät ist nicht richtig
angeschlossen.
1. Schließen Sie das Kabel richtig an.
Das Kabel lässt sich nicht richtig anschließen.
1. Sie haben möglicherweise ein falsches Yealink Gerät angeschlossen.
2. Verwenden Sie die richtige Stromversorgung.
Es bendet sich möglicherweise Staub etc. im Port.
1. Reinigen Sie den Port.
Setzen Sie sich bei weiteren Fragen mit Ihrem Händler oder Ihrer anerkannten
Servicestelle in Verbindung.
Kontaktdaten des Ansprechpartners
YEALINK NETWORK TECHNOLOGY CO., LTD.
309, 3rd Floor, No. 16, Yun Ding North Road, Huli District, Xiamen City, Fujian, VR
China
YEALINK (EUROPE) NETWORK TECHNOLOGY B.V.
Strawinskylaan 3127, Atrium Building, 8th oor, 1077ZX Amsterdam, Niederlande
YEALINK (USA) NETWORK TECHNOLOGY CO., LTD.
999 Peachtree Street Suite 2300, Fulton, Atlanta, GA, 30309, USA
Hergestellt in China

13
Contenido de la caja
Assembling the Phone
En la caja se incluyen los siguientes artículos. Si detecta que falta algo, contacte con el administrador de su
sistema.
Guía de inicio rápido Adaptador eléctricoTeléfono IP Auricular
Cable del auricular Cable Ethernet Base
1. Puede jar el soporte en dos alturas distintas:
Utilice siempre accesorios proporcionados o aprobados por Yealink. El uso de accesorios no homologados puede
causar un mal funcionamiento del equipo.
También puede montar el teléfono en una pared.
E
S
P
A
Ñ
O
L
(opcional)
q
q

14
Utilice siempre el adaptador original de Yealink (5V/600mA) . El uso de alimentadores de terceros puede causar
daños irreparables en el equipo. Si quiere conectar un PC al terminal, le recomendamos usar el cable Ethernet
proporcionado por Yealink.
Si se proporciona alimentación en línea (PoE), no necesita conectar el alimentador. Asegúrese de que el hub/
switch es compatible con PoE.
2. Conecte el auricular y los cascos (opcional):
3. Conecte la red y la alimentación:
Tiene dos opciones para las conexiones de red y de alimentación. El administrador de su sistema le
recomendará cuál usar.
Puesta en funcionamiento
Welcome
Initializing... Please wait
El proceso de inicialización empezará automáticamente cuan-
do el teléfono IP esté conectado a la red y reciba alimentación.
El teléfono estará listo para usar tras la puesta en funciona-
miento. Puede congurar el teléfono a través de la interfaz de
usuario web o la interfaz de usuario del teléfono.
A
B
PC
PC
Opción Alimentador
Opción PoE (Power
over Ethernet)
Conexión a PC
(opcional)
Conexión a PC
(opcional) Adaptador eléctrico
(5 Vdc)
Hub/Switch PoE con-
forme a IEEE 802.3af

15
Conguración del teléfono
Conguración a través de la interfaz de usuario web
Acceso a la interfaz de usuario web:
1. Pulse la tecla (the OK key) cuando el teléfono esté en reposo para obtener su dirección IP.
2. Abra el navegador de Internet en su ordenador, introduzca la dirección IP en la barra de direcciones (es
decir, “http://192.168.0.10” o “192.168.0.10”) y a continuación pulse la tecla Entrar.
3. Marque el nombre de usuario (predeterminado: admin) y la contraseña (predeterminada: admin) en la
página de inicio de sesión y haga clic en Iniciar sesión.
Conguración de la red: Haga clic en Red->Básico->Cong IPv4
Puede congurar los ajustes de la red de las formas siguientes:
DHCP: El teléfono intentará contactar con un servidor DHCP de su red para obtener los ajustes de red válidos,
es decir, la dirección IP, máscara de subred, dirección de la puerta de enlace y dirección DNS.
IP estática: Si el teléfono no puede contactar con un servidor DHCP por alguna razón, deberá configurar
manualmente la dirección IP, máscara de subred, dirección de la puerta de enlace y los
DNS primario y secundario del teléfono.
El teléfono IP también es compatible con IPv6, pero está deshabilitado de forma predeterminada.
Los ajustes incorrectos de la red pueden dar como resultado la inaccesibilidad del teléfono y tener inuencia en el
comportamiento de la red. Contacte con el administrador de su sistema para obtener más información.
Ajustes de cuenta: Haga clic en Cuenta->Registro
Parámetros de la cuenta:
Estado de registro: Muestra el estado del registro de la cuenta actual.
Estado de línea: Puede seleccionar Habilitar/Deshabilitar para habilitar/deshabilitar la cuenta.
Etiqueta: Se muestra en la pantalla LCD para identicar la cuenta.
Mostrar nombre: Se muestra como ID de la llamada cuando se hace una llamada.
Nombre de usuario: Proporcionado por el ITSP para registrarse (requerido).
Nombre del registro: Es el nombre requerido para la autenticación con el servidor (requerido).
Contraseña: Proporcionado por el ITSP para registrarse (requerido).
Servidor Host: Proporcionado por el ITSP para registrarse (requerido).
Iconos del estado del registro en la pantalla LCD:
Para más información sobre los parámetros de cuenta, consulte Conguración a través de la interfaz de usuario a
web.
Compruebe con el administrador de su sistema si aparece algún error durante el proceso de registro o si se requiere
una conguración especíca para registrarse.
Conguración a través de la interfaz de usuario del teléfono
Conguración de la red:
Pulse la tecla de función Menú cuando el teléfono esté en reposo, seleccione Avanzado (contraseña por
defecto: admin)->Red-> Puerto WAN->IPv4 para congurar los ajustes de la red.
Ajustes de cuenta:
Pulse la tecla de función Menú cuando el teléfono esté en reposo, seleccione Avanzado (contraseña por
defecto: admin)->Cuentas para congurar los ajustes de cuenta.
(Verde) Registrada (Amarillo) Registrando (Gris) Error de registro
->Cuenta X (X=1, 2, 3, 4)

16
Hacer una llamada
Terminar una llamada
Rellamada
Silenciar
• Pulse para silenciar el micrófono durante una
llamada.
• Pulse de nuevo para activar el sonido.
Llamada en espera
Transferencia de llamadas
Desvío de llamadas
Para habilitar el desvío de llamadas:
1. Cuando el teléfono esté en reposo, pulse la tecla
de función Menú y a continuación seleccione
Caracteristicas->Desvío de llamada.
2. Seleccione el tipo de desvío deseado.
3. Marque el número al que quiera desviar la llamada.
Para desvio si no responde, seleccionar el tiempo
de tono en el campo Después de tono antes de
desviar la llamada.
4. Pulse la tecla de función Guardar para aceptar el
cambio.
Con el auricular:
1. Levante el auricular.
2. Marque el número y a continuación pulse la tecla
de función Enviar.
Con el altavoz:
1. Con el auricular colgado, pulse .
2. Marque el número y a continuación pulse la tecla
de función Enviar.
Con los cascos:
1. Con los cascos conectados, pulse para activar
el modo auricular.
2. Marque el número y a continuación pulse la tecla
de función Enviar.
Responder a una llamada
Con el auricular:
Levante el auricular.
Con el altavoz:
Pulse .
Con los cascos:
Pulse .
Puede ignorar una llamada entrante pulsando la tecla de
función Rechazar.
Con el auricular:
Cuelgue el auricular o pulse la tecla de función
EndCall .
Con el altavoz:
Pulse o la tecla de función Terminar .
Con los cascos:
Pulse la tecla de función Terminar .
• Pulse para entrar en la lista Llamadas realizadas,
seleccionar la llamada deseada y a continuación
pulse o la tecla de función Enviar.
• Pulse dos veces cuando el teléfono esté en
reposo para llamar al último número marcado.
Poner una llamada en espera:
Pulse la tecla de función Retener durante una llamada
activa.
Para reanudar la llamada, ejecute una de las
acciones siguientes:
• Si hay solamente una llamada en espera, pulse la
tecla de función Reanudar.
• Si hay más de una llamada en espera, seleccionar
la llamada deseada y a continuación pulse la tecla
de función Reanudar.
Puede transferir una llamada de las formas siguientes:
Transferencia ciega
1. Durante una llamada activa, pulse la tecla de
función Tranferir .
2. Marque el número al que quiere transferir la
llamada.
3. Pulse la tecla de función Tran. B..
Transferencia semi atendida
1. Durante una llamada activa, pulse la tecla de
función Tranferir .
2. Marque el número y a continuación pulse la tecla
de función Enviar.
3. Cuando escuche el tono de llamada, pulse la tecla
de función Tranferir .
Transferencia atendida
1. Durante una llamada activa, pulse la tecla de
función Tranferir .
2. Marque el número y a continuación pulse la tecla
de función Enviar.
3. Cuando la otra parte responda, pulse la tecla de
función Tranferir .

17
Conferencia
Marcación rápida
Mensaje de voz
Historial de llamadas
Directorio de contactos
Control de volumen
Pulse para ajustar el volumen del timbre.
1. Durante una llamada activa, pulse la tecla de
función Conf . La llamada se pone en espera.
2. Marque el número del siguiente participante y a
continuación pulse la tecla de función Enviar.
3. Cuando la otra parte responda, pulse de nuevo la
tecla de función Conf . Todas las partes están ahora
participando en la conferencia.
4. Pulse la tecla de función Terminar para
desconectar a todas las partes.
Puede dividir la conferencia en dos llamadas individuales
pulsando la tecla de función Dividir.
Congurar una tecla de marcación rápida:
1. Cuando el teléfono esté en reposo, pulse la tecla
de función Menú y a continuación seleccione
Caracteristicas->Teclas DSS.
2. Seleccione la tecla DSS deseada y a continuación
pulse la tecla de función Entrar.
3. Seleccione Maracación rápida en el campo Tipo,
seleccione la línea deseada en el campo Cuenta
ID, introduzca una etiqueta en el campo Etiqueta y
marque el número en el campo Valor.
4. Pulse la tecla de función Guardar para aceptar el
cambio.
Usar la tecla de marcación rápida:
Pulse la tecla de marcación rápida para marcar el
número preestablecido.
El indicador de mensaje en espera de la pantalla
en reposo indica que hay uno o más mensajes de
voz en el centro de mensajes. El LED indicador de
alimentación parpadea lentamente en rojo.
Para escuchar los mensajes de voz:
1. Pulse o la tecla de función Conectar.
2. Siga las indicaciones de voz para escuchar sus
mensajes de voz.
1. Pulse la tecla de función Historial cuando el
teléfono esté en reposo y, pulse o para
desplazarse por la lista.
2. Seleccione una entrada de la lista, puede hacer lo
siguiente:
• Para hacer una llamada, pulse la tecla de función
Enviar.
• Pulse la tecla de función Eliminar para eliminar la
entrada de la lista.
Si pulsa la tecla de función Opción, también puede
hacer lo siguiente:
• Seleccionar Detalles para ver la información
detallada relacionada con ese registro.
• Seleccionar Añadir a Contactos para añadir la
entrada al directorio local.
• Seleccionar Añadir a Lista negra para añadir la
entrada a la lista negra.
• Seleccionar Eliminar todo para eliminar todas las
entradas de la lista.
Añadir un contacto:
1. Pulse la tecla de función Directorio cuando
el teléfono esté en reposo y, a continuación,
seleccione Todos los contactos.
2. Pulse la tecla de función A ñ a d i r para añadir un
contacto.
3. Introduzca un nombre de contacto único en el
campo Nombre y los números de contacto en los
campos correspondiente.
4. Pulse la tecla de función Guardar para aceptar el
cambio.
Editar un contacto:
1. Pulse la tecla de función Directorio cuando
el teléfono esté en reposo y, a continuación,
seleccione Todos los contactos.
2. Pulse o para seleccionar el contacto
deseado, pulse la tecla de función Opción y
a continuación seleccione Detalle en la lista
mostrada.
3. Edite la información de contacto.
4. Pulse la tecla de función Guardar para aceptar el
cambio.
Eliminar un contacto:
1. Pulse la tecla de función Directorio cuando
el teléfono esté en reposo y, a continuación,
seleccione Todos los contactos.
2. Pulse or para seleccionar el contacto
deseado, pulse la tecla de función Opción y
a continuación seleccione Eliminar en la lista
mostrada.
3. Pulse la tecla de función OK cuando la pantalla
LCD indique “Eliminar contacto seleccionado?”.

Instrucciones de seguridad
Temperatura ambiente de funcionamiento
• Temperatura de funcionamiento: +14 to 122°F (-10 to 50°C)
• Humedad relativa: 5% to 90%,sin condensación
• Temperatura de almacenaje: -22 to +160°F (-30 to +70°C)
Garantía
La garantía del producto está limitada solo a la unidad, cuando se usa normalmente
de acuerdo con las instrucciones de operación y el entorno del sistema. No somos
responsables por daños o pérdidas resultantes del uso de este producto, o por
cualquier reclamo de un tercero. No nos hacemos responsables de los problemas
con el dispositivo Yealink que surjan del uso de este producto; No nos hacemos
responsables de los daños nancieros, pérdidas de benecios, reclamaciones de
terceros, etc., que surjan del uso de este producto.
Símbolo CC
Es el símbolo de voltaje de CC.
Directiva de Restricción de Sustancias Peligrosas (RoHS)
Este dispositivo cumple con los requisitos de la directiva RoHS de la UE. Las
declaraciones de cumplimiento se pueden obtener contactando a support@yealink.
com.
Instrucciones de seguridad
Conserve estas instrucciones. ¡Lea estas instrucciones de seguridad
antes de usar el dispositivo!
Las siguientes instrucciones básicas de seguridad deben respetarse siempre para
reducir el riesgo de incendio, descarga eléctrica y otras lesiones personales.
Requisitos generales
• Lea detenidamente estas instrucciones de seguridad antes de instalar y usar
el dispositivo y controle la situación durante el funcionamiento.
• Mantenga siempre el dispositivo seco y limpio durante el proceso de
almacenaje, transporte y funcionamiento.
• Evite golpes y sacudidas en el dispositivo durante el proceso de almacenaje,
transporte y funcionamiento.
• No desmonte el dispositivo por su cuenta. En caso de fallos, póngase en
contacto con el centro de mantenimiento designado para su reparación.
• No se permite hacer modificaciones en la estructura ni el diseño de
seguridad del dispositivo sin previo consentimiento por escrito. Yealink
no será responsable bajo ninguna circunstancia de las consecuencias o
problemas legales derivados de dichas modicaciones.
• Consulte las leyes y estatutos pertinentes cuando use el dispositivo. También
deben respetarse los derechos legales de terceros.
Requisitos ambientales
• Coloque el dispositivo en un lugar bien ventilado. No exponga el dispositivo a
la luz del sol directa.
• Mantenga el dispositivo seco y libre de polvo.
• Coloque el dispositivo sobre una plataforma estable y nivelada.
• No coloque objetos pesados sobre el dispositivo para evitar daños o
deformaciones causadas por el peso.
• Deje al menos 10 cm de distancia entre el dispositivo y los objetos más
cercanos para facilitar la disipación del calor.
• No coloque el dispositivo encima o cerca de objetos inflamables o
vulnerables al fuego, como materiales hechos de goma.
• Mantenga el dispositivo alejado de fuentes de calor o fuego vivo, como velas
o radiadores eléctricos.
• Mantenga el dispositivo alejado de aparatos domésticos con campos
magnéticos o electromagnéticos intensos, como hornos microondas o
neveras.
Requisitos de funcionamiento
• No permita que los niños utilicen el dispositivo sin supervisión.
• No permita que los niños jueguen con el dispositivo ni sus accesorios para
evitar asxia accidental.
• Utilice únicamente los accesorios suministrados o autorizados por el fabricante.
• La alimentación eléctrica debe cumplir los requisitos de voltaje de entrada del
dispositivo. Utilice únicamente una toma de corriente con protección contra
sobretensiones.
• Asegúrese de tener las manos completamente secas antes de enchufar o
desenchufar los cables.
• No derrame líquidos de ningún tipo sobre el producto ni use el equipo cerca
de agua, por ejemplo, cerca de una bañera, palangana, fregadero, sótanos
húmedos o piscinas.
• No pise, estire ni retuerza los cables para evitar fallos del dispositivo.
• En caso de tormenta, deje de usar el aparato y desenchúfelo de la
alimentación eléctrica. Desenchufe la clavija eléctrica y el cable de par
trenzado (el cable de radiofrecuencia) de la línea de abonado digital
simétrica (ADSL, por sus siglas en inglés) para evitar rayos.
• Si deja el dispositivo sin utilizar durante mucho tiempo, desconéctelo de la
alimentación eléctrica y desenchufe la clavija eléctrica.
• Si sale humo del dispositivo o ruidos u olores anormales, desconecte el
dispositivo de la alimentación eléctrica y desenchufe la clavija eléctrica
inmediatamente. Póngase en contacto con el centro de mantenimiento
designado para su reparación.
• o introduzca ningún objeto que no forme parte del producto o de los
accesorios en las ranuras del equipo.
• Antes de conectar un cable, conecte el cable de toma de tierra del
dispositivo. No desconecte el cable de toma de tierra hasta que haya
desconectado los demás cables.
Requisitos de limpieza
• Antes de limpiar el dispositivo, deje de utilizarlo y desconéctelo de la
alimentación eléctrica.
• Utilice un trapo suave, seco y antiestático para limpiar el dispositivo.
• Mantenga el enchufe eléctrico limpio y seco. Si usa un enchufe eléctrico
sucio o húmedo podría provocar una descarga eléctrica y otros peligros.
RECICLAJE AMBIENTAL
Nunca deseche el equipo con los residuos domésticos
Pregunte en su ayuntamiento cómo desecharlo de forma respetuosa con
el medio ambiente. Se debe reciclar la caja de cartón, el embalaje de
plástico y los componentes en conformidad con la normativa de reciclaje
vigente en su país.
Respete siempre la normativa vigente
En caso de incumplirla, podría ser multado o procesado en cumplimiento
de la ley. El cubo de basura tachado que aparece en el producto indica
que debe llevarse a un centro de eliminación de residuos especiales y
debe tratarse por separado de los residuos urbanos al nal de su vida útil.
Problemas y soluciones
La fuente de alimentación no alimentar al dispositivo de Yealink.
Hay una mala conexión con el enchufe.
1. Limpie el enchufe con un trapo seco.
2. Conecte a una toma de pared diferente.
La temperatura del entorno está fuera del rango de temperatura de funcionamiento.
1. Asegúrese de que la temperatura del entorno está dentro de los límites
permitidos.
El cable entre la unidad y el dispositivo de Yealink no está conectado correctamente.
1. Conecte el cable correctamente.
El cable no se puede conectar correctamente.
1. Es posible que haya conectado un dispositivo incorrecto.
2. Utilice la fuente de alimentación correcta.
El puerto está sucio.
1. Limpie el puerto
Póngase en contacto con su distribuidor o centro de atención autorizado para
cualquier consulta.
Información de Contacto
YEALINK NETWORK TECHNOLOGY CO.,LTD.
309, 3rd Floor, No.16, Yun Ding North Road, Huli District, Xiamen City, Fujian, P.R.C
YEALINK (EUROPE) NETWORK TECHNOLOGY B.V.
Strawinskylaan 3127, Atrium Building, 8th oor, 1077ZX Amsterdam, The Netherlands
YEALINK (USA) NETWORK TECHNOLOGY CO., LTD.
999 Peachtree Street Suite 2300, Fulton, Atlanta, GA, 30309, USA
Made in China
Seite wird geladen ...
Seite wird geladen ...
Seite wird geladen ...
Seite wird geladen ...
Seite wird geladen ...
Seite wird geladen ...
Seite wird geladen ...
Seite wird geladen ...
-
 1
1
-
 2
2
-
 3
3
-
 4
4
-
 5
5
-
 6
6
-
 7
7
-
 8
8
-
 9
9
-
 10
10
-
 11
11
-
 12
12
-
 13
13
-
 14
14
-
 15
15
-
 16
16
-
 17
17
-
 18
18
-
 19
19
-
 20
20
-
 21
21
-
 22
22
-
 23
23
-
 24
24
-
 25
25
-
 26
26
-
 27
27
-
 28
28


in anderen Sprachen
- English: Yealink SIP-T33P User guide
- français: Yealink SIP-T33P Mode d'emploi
- español: Yealink SIP-T33P Guía del usuario
Verwandte Artikel
-
Yealink SIP-T30 Benutzerhandbuch
-
-
-
Yealink SIP-T27G Benutzerhandbuch
-
-
-
Yealink SIP-T52S Schnellstartanleitung
-
-
-