
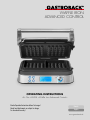
www.gastroback.de
WAFFLE IRON
ADVANCED CONTROL
Art.- No. 62424 » Waffle Iron Advanced Control «
OPERATING INSTRUCTIONS
English
Deutsch
Read all provided instructions before first usage!
Model and attachments are subject to change
For household use only!

EN EN
2 3
TABLE OF CONTENTS
Important Safeguards ................................................................................ 6
General Safety Instructions .................................................................... 6
Important Safeguards for Electrical Appliances ......................................... 9
High Temperatures – Risk of Burns ....................................................... 10
Non-Stick Coating ............................................................................ 12
Technical Specifications ........................................................................... 13
Knowing Your New Waffle Maker ............................................................ 14
Control Panel with Control Elements ..................................................... 15
Accessories ...................................................................................... 15
LCD-Display ..................................................................................... 15
Properties of Your New Waffle Maker ....................................................... 16
Locking the Lid to the Base ................................................................. 16
Variable Lid Hinge ............................................................................ 16
PFOA-Free Non-Stick Coating ............................................................. 17
Smart Control ................................................................................... 17
Pre-Defined Programs ......................................................................... 18
Manual Control........................................................................... 18
7 Browning Levels ............................................................................. 19
Texture Functions ............................................................................... 19
Restart Function ................................................................................. 19
Automatic Shut-Off ............................................................................ 20
Tips for Best Results ................................................................................. 20
We attach a certain importance to your safety. Thus, we ask you to read all provided
instructions and information in this booklet carefully and completely, before you start
running the appliance. This will help you to know all functions and properties of your
new appliance. We especially ask you to adhere strictly to the safety information
mentioned in these instructions.
Before First Use ...................................................................................... 22
Operation ............................................................................................. 24
Preparations ..................................................................................... 25
Entering Your Settings ........................................................................ 26
Baking the Waffle Batter .................................................................... 26
Adding Some More Baking Time ......................................................... 28
Baking Several Portions ...................................................................... 28
Controlling the Baking Cycle Manually ................................................. 29
Solving Problems .................................................................................... 31
Care and Cleaning ................................................................................ 33
Removing Stubborn Residues from the Waffle Plates ................................ 34
Storage ................................................................................................ 34
Notes for Disposal ................................................................................ 36
Information And Service ........................................................................... 36
Warranty .............................................................................................. 37
Recipes ................................................................................................ 38

EN EN
4 5
IMPORTANT NOTE - PLEASE READ CAREFULLY -
BEFORE YOU USE THE DEVICE!
All GASTROBACK® products are intended for food processing of food products and
groceries. For reasons of health protection and hygiene, products that are used
on a daily basis or used only once, are not allowed to be returned. Check the
goods just as you would do in a retail store.
You only have to pay for a possible loss in value of the goods, if this loss of value
is due to a non-necessary for the examination of the nature, characteristics and func-
tion of the goods handling.
An unnecessary way to check the nature, characteristics and function of the goods
is the processing of food products or groceries into food and drinks.
If you have any questions about GASTROBACK® products, if your unit is not wor-
king properly straight away or if you need any accessories or spare parts for your
GASTROBACK® product please contact our customer service before returning.
GASTROBACK® Customer Service Hotline:
Phone: +49 (0) 4165 – 22 25 0
Monday to friday (except on holidays) from 8am to 4pm
E-Mail: [email protected]
DEAR CUSTOMER!
Your new WAFFLE IRON ADVANCED CONTROL comes with some remarkable fea-
tures for preparing your waffles. Two delicious, fluffy and light Belgian waffles at
once made with the WAFFLE IRON ADVANCED CONTROL are a special treat for
the whole family. Integrated, powerful heating elements with 1600 watt, precise
temperature control and digitally adjustable crisp and browning level ensure to meat
even advanced demands.
4 different programs offer optimum settings for standard recipes and enable easy
baking fun. Individual adjustments for the browning and crispness are available for
each program. The acoustic signal reminding you in time of the end of the baking
time, avoiding that your waffles get burned. Via the manual control function you
make even special recipes to a delicious reality. The recipes in this booklet give
examples for making even your first attempts a delight.
These instructions for use will inform you about the various functions and features,
which make it easy to take pleasure in your new waffle maker.
We hope that you will enjoy your new WAFFLE IRON ADVANCED CONTROL.
Your GASTROBACK GmbH

EN EN
6 7
IMPORTANT SAFEGUARDS
Carefully read all instructions, before operating this appliance
and save for further reference. Do not attempt to use this appli-
ance in any other way and for any other purpose, than described in these
instructions (intended use). Any other use, especially misuse, can cause
severe injuries or damage by electric shock, heat, or fire.
The appliance meets the guidelines effective for CE certification. These
instructions are an essential part of the appliance. Do not pass on the
appliance to third parties without this booklet. Any operation, repair and
technical maintenance of the appliance or any part of it other than descri-
bed in these instructions may only be performed at an authorised service
centre (see: ‘Warranty’). Please contact your vendor.
GENERAL SAFETY INSTRUCTIONS
• This appliance is for household use only and NOT intended for use in
moving vehicles. Do not operate or store the appliance in humid or wet
areas or outdoors. Any use of accessories, attachments or spare parts that
are not recommended by the manufacturer or damaged in any way may
result in injuries to persons and/or damage. Exclusively use the appliance
for domestic use and for baking food that is fit for consumption.
• Do not leave the appliance unattended, while the appliance is con-
nected to the power supply. Check the entire appliance regularly for
proper operation (e.g. check for distortion, damaged waffle plates,
excessively frayed or melted parts, cracks, pollution, or corrosion at the
pins of the electrical connectors). Do not operate the appliance, when the
appliance or any part of it is likely to be damaged, to avoid risk of fire,
electric shock or any other injuries to persons and/or damage. The appli-
ance or its parts are likely to be damaged, if the appliance has been
subject to inadmissible strain (e.g. overheating, mechanical or electric
shock, liquids running into the housing) or if the appliance is not working
properly (e.g. overheating). If one of these cases occur during operation,
immediately unplug the appliance. Get in contact with an authorized
service centre for examination and/or repair. Do not attempt to repair
the appliance or power cord, but return the appliance to an authorized
service centre. Operate the appliance on a well accessible, stable, level,
dry, and suitable large table or counter that is resistant against water, fat,
and heat. Do not place the appliance over a power cord or on inclined,
wet or plastic surfaces or surfaces with plastic coatings (e.g. paint) or sur-
faces that could crack due to local heat (e.g. glass, stone). Even when
the appliance is cold, do not place the appliance on sensitive and valu-
able surfaces (e.g. coated furniture). Do not operate the appliance under
over-hanging boards or drop lights.
• During operation keep the appliance in an appropriate distance of at
least 30 cm on each side to the edge of the working space and to fur-
niture, walls, boards, curtains, and any sensitive objects to avoid risk
of fire and damage due to heat, steam, and splashes. Ensure good
ventilation during operation. Do not place any clothes or napkins on
or under the appliance during operation to avoid risk of overheating
and fire. RISK OF EXPLOSION AND FIRE! Do not heat any highly
alcoholic beverages or food (e.g. mulled wine, grog) via the appli-
ance. Do not operate the appliance near any inflammable, volatile
liquids (e.g. highly alcoholic beverages and food, spirit, benzine)
to avoid high risk of injuries and damage. Due to the heat, volatile
liquids will evaporate easily, generating an inflammable mixture that
could catch fire by any source of ignition (e.g. lit candles, cigarettes,
parts of the appliance), causing severe injuries to persons and serious
damage. The appliance is NOT suited for flambéing!
• Residues of food on the heating elements could be burnt to charcoal
during operation and could catch fire. Before operating the appliance,
always check whether the waffle plates are completely clean and dry.
• This appliance can be used by persons with reduced physical, senso-
ry or mental capabilities or lack of experience and knowledge (inclu-
ding children aged from 8 years), if they have been given supervision
or instruction concerning the use of the appliance in a safe way and
understand and consider the hazards involved. Even cleaning may
only be made by children without supervision. Children must always
be supervised to ensure that they do not play with the appliance
or any parts of the appliance or the packaging. Always keep the
appliance where it is dry, frost-free, and clean, and where young
children and animals cannot reach it. Do not leave the appliance
or any part of it unattended, when it is in reach of young children.

EN EN
8 9
• The appliance is heated electrically via integrated heating elements.
Do not heat the appliance via any other heating device. Do not place
the appliance or any part of it in a range, or on or near hot surfaces
(e.g. burner, heater, or oven).
• Do not handle the appliance or any part of it with violence. Always
turn the locking clip to the horizontal open position, before opening
the lid and operating the appliance.
• Do not tilt the appliance or place the appliance upright, while it is still
hot. Hot fat and batter could run out and cause injuries and dama-
ge. Always switch off (press the “POWER” button), unplug and lea-
ve the appliance cool down, before moving, cleaning, or storing the
appliance. Always ensure that the locking clip is closed firmly, before
moving the appliance via the handle and before storing the appliance.
• Do not use any hard or sharp-edged objects with the appliance (e.g.
knives, forks, metal scrapers). Do not use any cooking utensils that
could melt, burn, crack, get distorted, or give off harmful substances,
when exposed to heat.
• The batter may splash, when placed on the hot waffle plates, and hot
steam may escape. Always ensure that persons (including you) stay in
sufficient distance to the appliance during operation. Always expect
that splashes may escape.
• Do not place any hard and/or heavy objects on or in the appliance
or any part of it.
• Do not use any abrasive cleaners, cleaning pads (e.g. metal scouring
pads), or any corrosive chemicals (e.g. bleach, over cleaner) for cleaning.
Do not place the appliance or power cord in an automatic dishwasher.
• Do not leave any food dry on the appliance. Always clean the appli-
ance after each use to prevent an accumulation of baked-on food
(see: ‘Care and Cleaning’). Always keep the appliance and its parts,
where it is clean.
IMPORTANT SAFEGUARDS FOR ELECTRICAL APPLIANCES
The WAFFLE IRON ADVANCED CONTROL is heated electrically. Place
the appliance near a suitable wall power outlet to connect the appliance
directly to a protected mains power supply with protective conductor
(earth/ground) connected properly. Ensure that the voltage rating of your
power supply corresponds to the voltage requirements of the appliance
(220 - 240 V, 50 - 60 Hz, AC). The power outlet socket must be installed
separately from other power outlet sockets to avoid interference with other
appliances.
The installation of a residual current operated circuit breaker (r.c.c.b.)
with a maximum rated residual operating current of 30 mA in the supp-
lying electrical circuit is strongly recommended. If in doubt, contact your
electrician for further information. In various foreign countries, the specifi-
cations for power supplies are subject to incompatible norms. Therefore,
it is possible that power supplies in foreign countries do not meet the
requirements for safe operation of the appliance. Thus, before operating
the appliance abroad, ensure that safe operation is possible. Do not use
any desk top multi socket outlet, external timer, or remote control systems.
It is best to avoid using an extension cord, but if you wish to use one,
ensure that it is rated for a maximum continuous current of at least 16 A
with safety plug, safety coupler plug, and protective conductor (earth/
ground) connected properly. For disconnecting: Always unplug the exten-
sion cord from the power supply first.
• Always unplug the appliance, when it is not in use, and before
moving or cleaning the appliance.
• Always handle power cords with care. The pins of the power plug
must be smooth and clean. Always completely unwind the power
cord before use. Do not place the appliance on a power cord.
Power cords may never be knotted, twisted, pulled, strained or squee-
zed. Do not let the plug or power cord hang over the edge of the
table or counter. The power cord may never touch hot surfaces or
sharp edges. Ensure that no one will pull the appliance by the power
cord or get entangled in the power cord. Always grasp the plug to
disconnect the power cord.

EN EN
10 11
• Do not touch the appliance or power plug with wet hands when the
appliance is connected to the power supply. DO NOT pour or spill
any liquids on or in the housing of the appliance or on the power
cord. Do not place or immerse the appliance or power cord in water
or other liquids. Always keep the appliance and the table or coun-
ter clean and dry, and wipe off spilled liquids immediately. Do not
place the appliance on wet surfaces. When liquids overflowed or are
spilled into the housing or on the power cord, do not touch the appli-
ance but immediately unplug the appliance. Do not use the appliance
again, when liquids got into the housing.
• Do not clean the appliance or any part of it in an automatic dish-
washer.
• Do not overfill the waffle plates. Do not place any foil, paper, or
clothes or any other foreign objects onto the waffle plates, while the
appliance is connected to the power supply.
HIGH TEMPERATURES – RISK OF BURNS
The WAFFLE IRON ADVANCED CONTROL is designed for baking bat-
ter. For this purpose, the baking surfaces (waffle plates) are heated elec-
trically to high temperature. Thus, improper handling could cause severe
burns and damage.
• The waffle plates start heating immediately after switching on the
appliance and both waffle plates (base and lid) get hot! Even the
exterior of the appliance can be very hot during operation and some
time thereafter. While the appliance is hot: Do not touch the hot sur-
faces with any parts or your body or any objects sensitive to heat, fat,
or moisture. Only touch the appliance and its parts at the operating ele-
ments (buttons, browning control dial, lid handle) while the appliance is
hot. If required, protect your hands and arms with oven gloves.
• Additionally, during baking and especially when filling in the batter,
hot steam and splashes could escape. Ensure that all persons present
(including you) keep sufficient distance. During operation, do not hold
any parts of your body over or directly near, or at the appliance.
• Do not place any foreign objects (e.g. paper, foil, clothes, cooking
utensils) onto the waffle plates to avoid damage and risk of fire! Even
after switching off, do not leave any foreign objects (e.g. cooking
utensils) on the waffle plates.
• Always ensure that the lid is in the complete open position and will
not fall, when filling the waffle plates and removing the baked waf-
fles. With the lid falling down, severe injuries are possible. Avoid
knocking the appliance, when handling food at the waffle plates.
Ensure that the appliance is not tipped over, when opening the lid,
because hot batter and/or hot liquids could run out, causing severe
burns and damage.
• Always unplug the appliance, and leave the appliance cool down,
before moving or cleaning the appliance. Even after shut off, the
appliance will be hot for some time (at least 30 minutes). Always
ensure that the waffle plates are completely empty, before tilting the
appliance or moving the appliance to the upright position.

EN EN
12 13
NON-STICK COATING
The waffle plates, lid hinge, and moat of your »Design Waffle Maker«
are provided with high quality non-stick coatings, ensuring that food will
not stick to the surfaces.
• Do not use the appliance any more, if the non-stick coating is scrat-
ched, cracked or detached due to overheating. Some types of food
may cause discolouration. However, this will have no influence on
the baking performance.
• Before first use: wipe the non-stick coatings of the waffle plates with a little
cooking oil. Thereafter, there is no need to add any further oil for baking.
• Do not use any oven cleaner, spray-on non-stick coatings or similar
utilities with the appliance.
• Only use wooden or heat-resistant plastic cooking utensils with the
appliance. Do not use any hard or sharp-edged objects for scrat-
ching, stirring, or cutting on the coatings. We will not be liable for
damage to the non-stick coating, if metal utensils or similar objects
have been used.
• The non-stick coatings minimise the effort of cleaning. For cleaning,
do not use corrosive or abrasive cleaners or hard, abrasive scouring
utensils (e.g. metal scourers, wire brushes). Even stubborn residues
can be removed via a cloth, soft sponge, or nylon brush and warm
dishwater (see: ‘Care and Cleaning’).
TECHNICAL SPECIFICATIONS
Model:
Art.- No.: 62424 - Waffle Iron Advanced Control
Power supply:
220 - 240 V AC, 50 - 60 Hz
Power consumption:
1600 W
Length of power cord:
approx. 70 cm (28 inch)
Weight:
approx. 4 kg
Dimensions:
(width x depth x height)
approx. 330 x 290 x 134 mm (closed)
approx. 330 x 365 x 330 mm (open)
Size of waffle areas:
Base and lid: 2x 120 x 130 mm each
Capacity:
max. 220 ml batter for each baking cycle
Certificates:
These specifications may change without notice.

EN EN
14 15
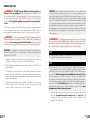
KNOWING YOUR NEW WAFFLE MAKER
1
2
3
3
5
6
7
4
1 THERMALLY INSULATED LID HANDLE - For opening and
closing the lid.
2 LID with floating lid hinge
3 DIE-CAST ALUMINIUM WAFFLE PLATE - In base and lid
with 2 waffle areas each: The PFOA-free non-stick coating
prevents the waffles from sticking.
4 STORAGE LOCKING CLIP - Keeps the lid locked to the base
for moving and storing the waffle maker.
5 INTEGRATED MOAT - Avoids overflow of the waffle batter.
6 LOCK JUT - Engage the locking clip here.
7 STAINLESS STEEL HOUSING
LCD-DISPLAY
14 BROWNING INDICATOR DASHES - Depending on the set
value, the assigned series of dashes illuminates.
15 TEXTURE FUNCTION
16 PROGRAM MENU - The arrow indicates the currently selected
program.
17 BAKING TIME - The smart control software calculates the
required time for each baking cycle separately.
ACCESSORIES
18 MEASURING CUP - Use the integrated gradation for measuring out the batter for 1 waffle (approx. 100 -110 ml) or 2 waffles (approx.
200 -220 ml).
CONTROL PANEL WITH CONTROL ELEMENTS
8
10
9
13
12
11
8 POWER BUTTON - For switching on or off.
9 MENU BUTTON - Press here to switch through the offered
programs.
10 TEXTURE BUTTON („CRISP EXTERIOR | MOIST
INTERIOR / UNIFORM TEXTURE“) - For selecting the
consistency of your waffles.
11 RESTART BUTTON - Starts operation with the current settings.
12 LCD-DISPLAY - Showing the current settings and the baking
time.
13 BROWNING CONTROL DIAL - 7 different settings allow to
customise the browning from light to dark.
LIGHT
CRISP EXTERIOR
MOIST INTERIOR
DARK
1 2 3 4 5 6 7
BELGIAN
CLASSIC
CHOCOLATE
BUTTERMILK
CUSTOM
14
15
17
16
18

EN EN
16 17
PROPERTIES OF YOUR NEW WAFFLE MAKER
Your new WAFFLE IRON ADVANCED CONTROL is perfectly suited for baking vari-
ous mixtures of light waffle batters easily and conveniently.
• Due to the variable lid hinge, the lid lowers onto the batter within the waffle are-
as evenly (see: ‘Variable Lid Hinge’).
• The non-stick coatings of the waffle plates enable healthy low-fat cooking, and
make it easy to remove the baked waffles.
• Via a smart control system, the baking time is determined automatically, whene-
ver making any settings (see: ‘Smart Control’). The appliance detects the cold
batter on the pre-heated waffle areas, and starts the baking time automatically,
when the lid is closed after filling.
• Even quite different waffle batters are baked perfectly by selecting the appro-
priate settings. If required, you can control the baking cycle manually via the
„CUSTOM“ program, using the displayed baking time just like an egg timer
(see: ‘Pre-Defined Programs’).
• For meeting your individual likings, use the texture functions and select the
desired browning (see: ‘Texture Functions’ and ‘7 Browning Levels’).
• For storage, lock the lid to the base for conveniently moving the appliance by
the handle of the lid and for storing in the space-saving upright position (see:
‘Locking the Lid to the Base’).
LOCKING THE LID TO THE BASE
You may carry the appliance conveniently by the lid handle via the locking clip at
the lid and the lock jut at the base (see: ‘Knowing Your New Waffle Maker’). For
this, simply close the lid and then turn the locking clip clockwise to the vertical clo-
sed position for engaging it at the lock jut. Thereafter, the lid will not open, when
moving the appliance by the handle and storing the appliance in a space-saving
upright position.
IMPORTANT - The vertical closed position of the locking clip may only be used
for moving and storing the appliance. For operation or cleaning, do not forget to
unlock the lid by turning the locking clip to the horizontal open position first. The-
reafter, the lid will open easily and without effort. Do not attempt to apply any
force for opening the lid to avoid damage.
VARIABLE LID HINGE
The lid of the WAFFLE IRON ADVANCED CONTROL is assembled with a floating
hinge. Therefore, during baking, the lid is lying evenly over the waffle plate at the
base, avoiding that the batter is squeezed out at the front of the waffle areas. The-
refore, your waffles get an even thickness.
IMPORTANT - Nevertheless, do not overfill the waffle areas. The batter may not swell
out over the waffle plates. Use the measuring cup for measuring out the correct
amount. Please keep in mind that the volume of the batter increases during baking.
PFOA-FREE NON-STICK COATING
The waffle plates, hinge and moat are equipped with a non-stick coating. Thus, low-
fat baking is enabled and the cleaning effort is significantly reduced. The waffles do
not stick to the surfaces and can be removed easily. Additionally, you can remove
any normal residues of batter via a cloth, soft sponge or nylon brush and a little
dishwater (see: ‘Care and Cleaning’).
IMPORTANT - Do not use the appliance furthermore, when the non-stick coating is
damaged via overheating or improper treatment (e.g. usage of hard and sharp-edged
objects or improper cleaning; see: ‘Important Safeguards / Non-Stick Coating’).
SMART CONTROL
The smart control of the heating elements determines the baking time automatical-
ly, according to the selected settings and various other parameters. Therefore, your
waffles get the desired browning and texture (consistency) for each portion, you are
baking. As a result, the calculated baking time may vary with each portion—even if
you made no changes to any settings at all.
NOTE
The baking time may differ between 2 and 10 minutes, according to the settings.
Additionally, there may be a little difference from one portion to the other. The
browning indicator dashes flash during pre-heating. As soon as the dashes illumi-
nate continuously and the acoustic signal is given, you may start the baking cycle
via filling in the cold batter and closing the lid or via the restart button.
The calculated baking time is counted down on the LCD display. You simply wait
until the acoustic signal sounds (6 beeps), indicating the end of the baking time.
Then, check your waffles and take them out, when the desired consistency is rea-
ched (see: ‘Operation / Baking the Waffle Batter’). The appliance keeps the waf-
fle plates hot automatically, thus being ready for starting the next baking cycle
immediately.

EN EN
18 19
IMPORTANT - Take your waffles out of the appliance, when the signal sounds.
Otherwise, your waffles may get burned. The waffle maker is not intended for
keeping you waffles warm.
IMPORTANT - The appliance heats the waffle plates, even after the baking cycle
is finished. Therefore, it is important to switch off the appliance via the power but-
ton, when it is useless to heat the waffle plates (e.g. whenever you wish to make
a break). Typically, the appliance is ready for use again within a few minutes
(max. 4 minutes).
PRE-DEFINED PROGRAMS
4 pre-defined programs are provided for various types of waffle batters, holding
appropriate settings for controlling the baking time and temperature: “BELGIAN“;
“CLASSIC“; “CHOCOLATE“; “BUTTERMILK“ (see: ‘Smart Control’). An additional
program for manual control (“CUSTOM”) enables the flexible usage of the appli-
ance (see below).
The programs calculate the required baking time for getting the desired results auto-
matically. When the correct baking time is reached and the count-down of the bak-
ing time reaches zero, an acoustic signal sounds (see: ‘Smart Control’).
Note: We recommend to select a program that is designed for your type of waffle
batter. When creating your own recipes, select a program that is as far as possible
similar to the type of batter, the pre-defined programs are created for. Examples are
given in the recipes in this booklet.
The baking program is selected via the menu button. On the LCD display, an arrow
at the left side of the menu indicates the currently selected program.
Using the appropriate program, in usual cases your waffles are baked with opti-
mum results. Via correctly adapted settings for browning and texture, your individu-
al likings can be realized (see below: ‘7 Browning Levels’ and ‘Texture Functions’).
Adjust the settings, when you are somewhat experienced.
When using a pre-defined program, a signal sounds after the baking time elapsed.
Open the lid and remove the waffles or close the lid again and leave the waffles
bake within the appliance for some more seconds (see: ‘Operation / Adding Some
More Baking Time’).
Manual Control
Additionally, you can control the baking time manually via the program “CUSTOM”.
Select this program for monitoring the baking time by yourself (see: ‘Operation /
Controlling the Baking Cycle Manually’). After removing the baked items, you may
start the baking time again via the restart button.
IMPORTANT - Please consider that the program “CUSTOM” may not give any
signal for the end of baking. You must monitor the baking cycle by yourself and
keep an eye on the baking time shown on the LCD display.
7 BROWNING LEVELS
The browning is displayed in the upper part of the LCD display via 7 dashes: from
“LIGHT” to “DARK”. You select the browning via the browning control dial at the
right side of the LCD display. Turn the browning control dial until the desired brow-
ning is displayed via the appropriate number of dashes.
NOTE
You control the temperature of the waffle plates via the browning. Therefore, when
baking a batter with high contents of sugar or other heat-sensitive ingredients, it
may be better to use a light browning level and a program with long baking time.
TEXTURE FUNCTIONS
You may select one of two texture functions for getting the desired consistency of your
waffles, generating a crisp exterior with moist (and soft) interior or getting uniform
texture. Press the texture button on the control panel for toggling between the texture
functions. The selected function is shown on the LCD display above the baking time.
The »Design Waffle Maker« offers 2 texture functions for selecting the consistency
of your waffles: „CRISP EXTERIOR MOIST INTERIOR“ and „UNIFORM TEXTURE“.
NOTE
The texture function has no influence, when using manual control (“CUSTOM”).
RESTART FUNCTION
You can start a baking cycle by pressing the restart button.
NOTE
The appliance detects the cold batter on the waffle plates. When baking your waf-
fles via a pre-defined program, the baking cycle is started automatically by closing
the lid. However, with the manual control („CUSTOM“) it may be required to start
the baking cycle manually via the restart button.

EN EN
20 21
When using the restart function, the appliance starts the baking time immediately,
even without detecting any changes of temperature on the waffle plates (see: ‘Smart
Control’ and ‘Operation / Baking Several Portions’).
IMPORTANT - Even when pressing the restart button, while a baking cycle is alrea-
dy running, a new baking cycle starts immediately.
AUTOMATIC SHUT-OFF
To ensure safe operation even in exceptional cases, after 2 hours of operation a
time-out counter will automatically shut off the appliance. This way, unnecessary ope-
ration and useless energy consumption is avoided, if you have forgotten to switch
off the appliance after usage.
IMPORTANT - Do not leave the appliance unattended, while it is connected to
the power supply. Always switch off and unplug the appliance, when it is not in
use and/or when leaving the appliance unattended.
After the automatic shut-off has been triggered, you may simply press the power but-
ton to switch on the appliance again.
TIPS FOR BEST RESULTS
• For your first tries using the appliance, you should start with the pre-defined set-
tings and adapt the settings in small steps one by one for reaching the desired
consistency and your individual likings.
• Sieve the flour before mixing the batter. When eggs are part of your recipe, you
should separate the yolk, beating the yolk creamy with sugar and some milk,
before adding flour. Whip the egg whites, before folding them in. This makes
the batter and the baked waffles light and airy.
• When using whole meal instead of plain flour for your waffle recipe, the required
baking time may differ significantly. Adapt your settings. You control the tempera-
ture of the waffle plates via the browning level. Therefore, when baking a batter
with high contents of sugar or other heat-sensitive ingredients, it may be better to
use a light browning level and a program with long baking time (see: ‘Properties
of Your New Waffle Maker / 7 Browning Levels’). It is essential to use the correct
amount for each baking cycle. Do not overfill the waffle areas any way. However,
avoid filling in too less batter also. Therefore, it is best to use the provided measu-
ring cup for measuring out the batter for a single waffle area or both waffle areas.
If required, bake the batter in appropriate portions. There is no use in overfilling the
waffle areas, because the batter needs sufficient space for rising during baking.
• For getting an even thickness, pour in the batter at the centre of the waffle area
first, then distribute the batter within the complete waffle area from the centre to
the rim. Fill the waffle areas one by one using the appropriate amount of batter
as given by the gradation of the measuring cup. It may be better to leave one
waffle area empty, when the amount of batter is not sufficient for filling both waf-
fle areas. Select the program, browning, and texture function according to your
likings and preferred mixture. When the results are not satisfying, you may use
the program “CUSTOM” for controlling the baking cycle manually (see: ‘Proper-
ties of Your New Waffle Maker / Pre-Defined Programs’).
• The waffles are best when served hot and freshly baked.
• You may keep waffles warm at 100°C (212°F) in an oven. Wrap the waffles in
tin foil or place the waffles in a closed baking form. This way, your waffles will
not get too dry. However, do not keep your waffles warm for a too long peri-
od of time. It may be better to leave the waffles cool down first and, just before
consumption, reheat them in an over or toaster.
NOTE
Crispy waffles may get soft, when keeping them warm. You may store the waffles
in the freezer. Leave the waffles cool down completely, before storage. Place the
waffles into a freezer bag with sheets of greaseproof paper between the single
pieces. This prevents the waffles from freezing to a compact block. Before serving,
leave the waffles thaw completely. Then reheat the waffles in an oven or toaster,
before serving.
• For serving, there are no limits to your fantasy. You will find various ideas in the
recipes at the end of this booklet.

EN EN
22 23
BEFORE FIRST USE
WARNING – DO NOT let young children play with the appliance, or
any part of it, or the packaging! Always unplug and leave the appliance cool
down, before cleaning or moving the appliance. Do not immerse the appliance
or power cord in water or other liquids or spill any liquids on or in the housing or
power cord. Do not place the appliance or any part of it in an automatic dish-
washer.
Even the exterior of the appliance (lid and base) may be hot during operation and
some time thereafter. During operation and while the appliance is still hot, only touch
the appliance at the operating elements (buttons, browning control dial, handle).
CAUTION – For moving and storing, the lid of the appliance should be
locked to the base (see: ‘Properties of Your New Waffle Maker / Locking the Lid
to the Base’). Do not attempt to open the lid with violence. Always ensure that
the locking clip is turned to the horizontal open position, before opening the lid.
IMPORTANT - The appliance is equipped with a floating lid hinge (flexible joint)
between lid and base. This is an essential feature of the special design of the
appliance an NO DEFECT.
1. Unpack the appliance and all accessories carefully. Check that no parts are
damaged or missing (see: ‘Knowing Your New Waffle Maker’).
2. Remove all shipping materials and promotional materials, but DO NOT remove
the model label.
3. Turn the locking clip at the right side of the lid to the horizontal open position.
Then, by the handle, fold the lid up until it rests in a stable open position. Espe-
cially ensure that there are no foreign objects (e.g. promotional material, packa-
ging) on the waffle plates.
4. Clean the appliance before first use and after an elongated period of storage.
For this, thoroughly wipe the waffle plates via a moist, not dripping cloth or soft
sponge. Thereafter, wipe dry (see: ‘Care and Cleaning’).
IMPORTANT - When using the appliance for the first time, you may notice a fine
smoke haze and some smoke may escape. This is caused by heating the com-
ponents of the appliance for the first time. There is no need for concern. To avo-
id any influence on the taste of your food, you should let the appliance operate
approx. 20 minutes without any food on it. If the smoke haze persists on further
use, unplug the appliance and leave it cool down to room temperature. Then cle-
an the appliance thoroughly, especially ensuring that no residues of food stick to
the waffle plates and in the moat at the rim of the lower waffle plate. If the smoke
haze still persists, return the appliance to an authorized service centre for exami-
nation and repair.
WARNING – The heating elements start operation as soon as the appli-
ance is switched on. Both waffle plates (base and lid) and even the exterior of the
appliance get hot! Only touch the appliance at the operating elements (buttons,
browning control dial, handle)! During heating, ensure good ventilation.
NOTE
The following step of preparation is only required for brand-new products. There
is no need to make any settings for this procedure.
NOTE
There is no need for concern, when heating up the appliance without any food.
The heating elements are temperature-controlled, preventing the appliance from
overheating, when operating the appliance according to the instructions given
in this booklet. Before placing food on the waffle plates for the very first time:
Place the appliance an a suitable work space and connect the appliance to an
appropriate power outlet (see: ‘Important Safeguards’). Press the power button for
switching on the appliance. Close the lid and leave the appliance operate for
approx. 20 minutes with the lid closed. Thereafter, switch off the appliance by
pressing the power button again. Unplug the appliance, open the lid and leave
the appliance cool down to room temperature.
5. Wipe the waffle plates with a clean, damp cloth or soft sponge. Then wipe dry
thoroughly. To prepare the non-stick coatings for use: Drip only a few drops
of cooking oil on a dry, clean kitchen towel and use this for wiping the non-stick
coatings of the waffle plates.

EN EN
24 25
OPERATION
WARNING – Always ensure that the appliance and all its parts and acces-
sories are out of reach of young children. Your new WAFFLE IRON ADVANCED
CONTROL is intended for cooking edible food and is heated electrically. Thus the
surfaces of the appliance (even the exterior) get very hot. During operation and
while the appliance is still hot, only touch the appliance at the operating elements
(lid handle, buttons, and browning control dial) to avoid burns. To avoid risk of
overheating and fire: Do not place any clothes or tissue or other foreign objects
on or under the appliance during operation. Do not place any inflammable objects
on the waffle plates. Do not pour any inflammable liquids (e.g. alcohol) on the
waffle plates. Do not leave any food carbonize on the waffle plates. Do not place
the appliance on heat-sensitive surfaces during operation.
Only place the appliance on a stable, dry, heat-resistant, and level surface (see:
‘General Safety Instructions’). During operation, the used power outlet and the ope-
rating elements must be accessible all the time (see: ‘Knowing Your New Waffle
Maker’). Do not block the ventilation slits at the bottom of the housing.
During operation, ensure to keep the appliance in an appropriate distance of at least
50 cm on each side to the edge of the working space and any delicate objects.
Additionally leave at least 1 m of free space above the appliance for free access.
Do not operate the appliance under drop lights or overhanging boards.
Before operating the appliance, always ensure that all parts are in proper working
order and completely dry. Do not use any damaged or unsuited parts or accesso-
ries to avoid risk of injuries and damage.
Please keep in mind that hot steam may escape, when filling in the batter and during
baking. Do not hold any part of your body or any delicate objects over or near the
appliance. Protect your hands and arms with oven gloves. During operation, ensure
that all persons (including you) stay in sufficient distance. Expect splashes of hot fat
and batter in the surroundings of the appliance.
CAUTION – Do not scratch or cut on the waffle plates. Do not use any
hard or sharp-edged objects (e.g. knives, metal scrapers) with the appliance to
avoid damage to the surfaces, especially the non-stick coating. Only use heat-
resistant wood or plastic cooking utensils.
IMPORTANT - For heating up the appliance, always close the lid. This way the
pre-heating process is done in a shorter time and with less energy consumption.
NOTE
During the very first heating, the appliance may give off some light smoke or bur-
ned smell. This is normal and will subside with further use. Before baking waffles
for the very first time, heat the appliance without batter for approx. 20 minutes for
preparing the heating elements for operation (see: ‘Before First Use’).
PREPARATIONS
CAUTION – Do not place the appliance on coated surfaces of delicate
furniture, even when the appliance is cold. Delicate surfaces could get damaged
by scratches or abrasion of the rubber feet of the appliance. For moving the appli-
ance, the lid may be locked to the base via the locking clip (vertical closed posi-
tion). Do not attempt to open the lid with violence (see: ‘Properties of Your New
Waffle Maker / Locking the Lid to the Base’).
WARNING – Always completely unwind the power cord, before connecting
the appliance to the power supply. Do not operate the appliance with the power cord
wrapped around the cord storage to avoid damage and injuries due to overheating
and short circuit. As soon as the appliance is switched on and the LCD display illu-
minates, the heating elements start heating the waffle plates at the base and lid.
After switching on, only touch the appliance at the operating elements.
1. Completely unwind the power cord of the appliance. Then place the appliance
on a suitable and heat-resistant surface (see: ‘General Safety Instructions’) near a
suitable wall power outlet (see: ‘Important Safeguards for Electrical Appliances’).
Turn the locking clip counter-clockwise to the horizontal open position for unlo-
cking the lid. Thereafter, you can open the lid without resistance. Ensure that the
waffle plates are clean and dry.
2. Close the lid. With the lid closed, the waffle plates reach the desired cooking
temperature quickly, and without useless energy loss.
3. Prepare your waffle batter. Some appropriate recipes are given in this booklet.
4. Connect the appliance to a sufficient power supply (see: ‘Technical Specifica-
tions’). Press the power button for switching on the appliance. The LCD display
illuminates, showing the defaults: program “BELGIAN”, medium browning (level
4), and texture function “CRISP EXTERIOR MOIST EXTERIOR”. The appliance
starts heating immediately.
5. Select the required settings (see below: ‘Entering Your Settings’).

EN EN
26 27
ENTERING YOUR SETTINGS
Whenever any changes to the settings are entered, the baking time is calculated
again. The new baking time is shown on the LCD display immediately.
6. Press the menu button repeatedly, for moving the arrow to the desired pre-
defined program or the manual control program “CUSTOM”. (see: ‘Properties
of Your New Waffle Maker / Pre-Defined Programs’).
7. Turn the browning control dial for selecting the browning (“1 LIGHT” to “7
DARK”), shown via the illuminated dashes on the upper part of the LCD display
(see: ‘Properties of Your New Waffle Maker / 7 Browning Levels’).
8. If required, press the texture button (“CRISP EXTERIOR MOIST EXTERIOR / UNI-
FORM TEXTURE”) for selecting the desired consistency (see: ‘Properties of Your
New Waffle Maker / Texture Functions’). This setting is shown on the left side
of the LCD display above the baking time.
NOTE
We recommend to select a program suited for the type of batter you are going to
bake. Examples for waffle recipes and the appropriate settings are given in this
booklet. For your first tries, you should use the default settings of the selected pro-
gram. Thereafter, step by step adapt the settings to your individual liking.
NOTE
With the lid closed, it may take max. 4-5 minutes to reach the required start tem-
perature. During heating, the browning indicator dashes flash on the LCD display.
BAKING THE WAFFLE BATTER
WARNING – When filling in the batter, droplets of batter and fat may
splash. Always ensure that all persons (including you) keep sufficient distance to
the appliance. Only touch the lid of the waffle maker by the handle and fold the
lid up carefully. Before filling in the batter, ensure that the lid is in the stable open
position. Ensure that you do not knock against the appliance during handling. The
lid may cause severe burns when falling down onto your hands! After filling,
always lower the lid onto the batter slowly and carefully.
WARNING – The waffle plates and the exterior of the waffle maker are very
hot. While handling the appliance, only touch the appliance at the operating ele-
ments. Fill the prepared batter into the measuring cup up to the required gradation
line for 1 or 2 waffle areas (approx. 100 -110 ml for 1 waffle; approx. 200 -220 ml
for 2 waffles).
9. Wait until the waffle maker reached the required temperature. A signal sounds
and the browning indicator dashes illuminate continuously. Open the lid by the
handle, folding the lid up to the stable open position. Thereafter, fill the waffle
batter into the waffle areas.
NOTE
During pre-heating, the browning indicator dashes flash on the LCD display. Fill in
the batter, if the browning indicator dashes illuminate continuously.
Distribute the batter as evenly as possible. You should start in the centre of a single
waffle area. Always fill the waffle areas one after the other with the appropriate
amount. Leave a waffle area empty, if the amount of batter is not sufficient for both
waffle areas.
10. Carefully close the lid and ensure that the count-down of the baking time started
automatically. Otherwise, press the restart button.
NOTE
The waffle maker calculates the required baking time automatically, depending on
the selected settings (program, browning, texture) and various other parameters.
Even when starting the recently used program with the same settings again, the
baking time may differ from the recent baking cycle (see: ‘Properties of Your New
Waffle Maker / Smart Control’).
CAUTION – Do not use any hard or sharp-edged objects with the appliance.
It is best to use a heat-resistant plastic or wooden spatula for removing the waffles.
Do not scratch or cut on the waffle plates to avoid damage to the non-stick coating.
11. When using a pre-defined program: Wait until the count-down of the baking
time reaches zero and 6 beeps sound.
When using the manual control: Wait until the desired baking time is reached.
12. Open the lid and check your waffles for the desired consistency and browning.
13. If you wish to bake your waffles somewhat longer, simply leave the waffles in
the appliance and close the lid again (see: ‘Adding Some More Baking Time’).

EN EN
28 29
14. If your waffles are done, take out the waffles via a heat-resistant plastic or
wooden spatula.
15. Thereafter, you may bake the next portion (see: ‘Baking Several Portions’).
16. If you do not wish to use the appliance for another portion, press the power
button and unplug the appliance. Leave the appliance cool down with the lid
open. Thereafter clean the appliance (see: ‘Care and Cleaning’).
ADDING SOME MORE BAKING TIME
When your waffles did not reach the desired browning or the batter is not done,
simply close the lid and leave the waffles within the appliance for some additional
seconds. Then check for the desired consistency again.
IMPORTANT - Please keep in mind that baking waffles is a matter of a few minutes
and seconds. Do not leave your waffles in the appliance for a too long time.
Otherwise, they may get burned.
BAKING SEVERAL PORTIONS
Larger amounts of batter, that does not fit in the measuring cup in total, must be
baked in portions. When overfilling the waffle areas, the batter cannot rise suffici-
ently and runs out at the rim of the waffle areas. Perhaps, your waffles may fail to
get the desired consistency.
CAUTION – Do not overfill the waffle areas! Do not fill in more batter than
indicated via the measuring cup (approx. 100 -110 ml for each waffle area). If you
prepared more batter, bake your waffles in portions. Otherwise the batter may
flow out during baking, causing risk of electric shock, overheating and fire.
IMPORTANT - Please observe the gradation at the measuring cup. Fill the waffle are-
as one by one. If there is not enough batter left for 2 waffles, it may be better to lea-
ve a waffle area empty. Otherwise, the waffle may get hard, dry, or even burned.
1. Ensure that the browning indicator dashes illuminate continuously, indicating that
the waffle plates reached the required temperature. Fill the appropriate amount
of batter into the waffle areas and close the lid. Ensure that the baking cycle
started again. Otherwise, press the restart button. The baking cycle is performed
using the previously selected settings (program, browning, and texture).
NOTE
The smart control calculates the baking time for each baking cycle separately.
Thus, the baking time may differ from the value given for the previous baking cycle
(see: ‘Properties of Your New Waffle Maker / Smart Control’).
2. Let the appliance operate until the signal sounds or until the desired baking time
is reached. Then take out your waffles (see: ‘Baking the Waffle Batter’).
3. If you wish to bake further portions, proceed with step 1.
4. After baking the batter, switch off (press the power button) and unplug the appli-
ance. Leave the appliance cool down sufficiently with the lid open. Clean the
appliance after each use (see: ‘Care and Cleaning’).
CONTROLLING THE BAKING CYCLE MANUALLY
IMPORTANT - Please consider that the program “CUSTOM” does not give a
signal for the end of baking. You must monitor the baking cycle by yourself. The
baking time already passed is counted up on the LCD display in minutes and
seconds.
IMPORTANT - If you wish to select another program or another browning level,
you need to switch off the appliance at least shortly by pressing the power but-
ton. When switching on the appliance thereafter, all former settings are selected.
However, you can change all settings now quite as usual.
NOTE
The texture function has no influence on the result, when using manual control.
However, the browning level may be adjusted and gives the similar results as with
any other program.
1. If you wish to control the baking cycle manually, press the menu button repea-
tedly, until the manual program “CUSTOM” is selected.
2. If required, adjust the browning (see: ‘Entering Your Settings’).
3. Via the measuring cup, fill the correct amount of batter into the waffle areas and
close the lid (see: ‘Baking the Waffle Batter’).
IMPORTANT - After starting the manual control (program “CUSTOM”), the menu
button and browning control dial are inactive.

EN EN
30 31
IMPORTANT - During baking you should check the doneness of your waffles in
time, for avoiding that the waffles get burned. If the baking time did not start auto-
matically, press the restart button. On the LCD display, the baking time is counted
up in minutes and seconds.
4. When the desired baking time is shown on the LCD display, open the lid and
check the result. If your waffles reached the desired doneness, remove the waffles.
5. If you wish to bake another portion of waffles, fill the appropriate amount of bat-
ter into the waffle areas and close the lid. Press the restart button. A new count-
up of the baking time starts.
6. If you do not wish to bake more waffles, press the power button to terminate
the baking process. Unplug the appliance and leave the appliance cool down
sufficiently. Then clean the appliance (see: ‘Care and Cleaning’).
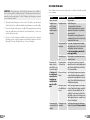
SOLVING PROBLEMS
Most problems during use can be solved easily. Use the tips in the following table
as an assistance.
Problem Possible Reason The Easy Solution
Emergency stop required? Unplug the appliance.
The appliance does not
heat. The LCD display
stays dark OR while in
operation, the appliance
stops working.
The appliance is not live. Check the following items:
- Is the power socket live? Connect a lamp.
- Ensure that the plugs between the power supply and
appliance have not been pulled out—especially when
using an extension cord.
Always ensure that no one may pull the power cord or
gets entangled in the power cord. Do not leave the plugs
hanging down the table or counter.
The automatic shut-off has
been triggered.
For your safety, the appliance switches off completely
after operating for approx. 2 hours. If you wish to re-acti-
vate the appliance, simply press the power button.
Do not leave the appliance connected to the
power supply uselessly.
A severe problem occur-
red.
Return the appliance to an authorised service centre for
examination and repair.
After switching on the
appliance, you notice a
burnt smell. May be, smo-
ke escapes from under the
lid. Food may catch
fire, when burned to
charcoal. Do not let
the appliance ope-
rate with food bur-
ning on the waffle
plates!
The appliance is heated
for the very first time.
In this case, there is no need to worry. To prepare the
appliance for the very first use, leave the appliance operate
approx. 20 minutes with the lid closed (see: ‘Before First
Use’). Ensure good ventilation.
Batter ran out of the waf-
fle plates.
Switch off and unplug the appliance. Leave the appliance
cool down. Thereafter clean the appliance, especially the
moat at the rim of the lower waffle plate (see: ‘Care and
Cleaning’). Do not overfill the waffle areas. Keep in mind,
that the batter rises during baking.
Batter burned to charcoal
on the waffle plates or in
the moat.
Switch off and unplug the appliance. Leave the appliance
cool down. Thereafter clean the appliance, especially the
moat at the rim of the lower waffle plate (see: ‘Care
and Cleaning’). Ensure to remove your waffles in time.
Baking waffles is a matter of a few minutes and seconds.
Clean the appliance after each use—especially the moat
at the rim of the waffle plates.
You cannot open the lid
or you cannot close the lid
completely.
The locking clip is in the
closed position.
Turn the locking clip at the right side of the lid counter-
clockwise to the open position. Do not use violence!

EN EN
32 33
Problem Possible Reason The Easy Solution
No respond to the buttons
or the browning control
dial.
Restart button: the
appliance is still pre-
heating.
The baking cycle cannot be started during pre-heating.
Wait until the required temperature is reached and the
browning indicator dashes illuminate continuously.
Menu button and
browning control
dial: a program is run-
ning or the manual control
“CUSTOM” is activated.
After starting a program or the manual control
(“CUSTOM”) no other program can be selected and the
browning control dial is deactivated. After starting a pre-
defined program: Wait until the program is finished. After
activating manual control (“CUSTOM”) via starting the
baking time: switch off the appliance shortly via the power
button. When switching on thereafter, all settings are
available again.
Your waffles are not done,
after the baking time
elapsed.
An unsuited program is
selected.
- Close the lid again and leave the waffles bake for some
more seconds, and/or
- Select another program and/or
- Select a darker browning level and/or
- Use the manual control “CUSTOM” and bake the batter
for an appropriate time.
Note: When using whole meal instead of plain flour for
your waffle recipe, the required baking time may differ
significantly.
The waffles are too dark,
hard, and/or dry.
You used an insufficient
program.
Select another program with a shorter baking time.
The browning level is set
too dark.
Select a lighter browning via the browning control dial.
The waffles stick to the
waffle plates.
The non-stick coating has
not been prepared for
operation.
Switch of and unplug the appliance. Leave the appliance
cool down sufficiently and clean the appliance. Thereafter
rub the waffle plates with some droplets of cooking oil ,
before using the appliance again.
The appliance did not
reach the required start
temperature, when you fil-
led in the waffle batter.
Before filling in the batter, always wait until the browning
indicator dashes do not flash any longer.
The waffles are not done.
The baking time is too
short.
Close the lid and leave the waffles bake for some more
seconds. However, consider that baking waffles is a mat-
ter of only a few minutes and seconds. Do not leave
the waffles within the appliance for a too
long time. Otherwise your waffles may burn.
Problem Possible Reason The Easy Solution
The non-stick coating is
damaged.
Do not use the appliance with the non-stick coating
damaged (e.g. excessively worn, scratched, or deta-
ched and/or deteriorated due to overheating). Do not
scratch or cut on the non-stick coating!
CARE AND CLEANING
WARNING - RISK OF BURNS – Always ensure that the appliance
is out of reach of young children. Before moving, disassembling, or cleaning the
appliance: Always switch OFF the appliance (press the power button, the LCD
display gets dark), then unplug the appliance, and wait until the appliance cooled
down completely (at least 30 minutes with the lid open). Do not move the appli-
ance with the waffle plates still hot to avoid injuries and damage.
WARNING – Do not immerse or place the appliance or power cord in
water or other liquids. Do not drip or pour any liquids on or into the housing of the
appliance. The appliance may not be used again, when water has run into the
interior of the housing (lid or base). Do not place the appliance or any part of
it in an automatic dishwasher! Do not use violence.
CAUTION – The waffle plates, moat and hinge of the appliance are equip-
ped with non-stick coatings. Do not use any abrasive cleaners or corrosive chemi-
cals (e.g. bleach, oven cleaner) for cleaning the appliance or any parts of it, to
avoid damage to the surfaces. Do not use any hard or sharp-edged objects for
cleaning any surface of the appliance.
CAUTION – Do not place the appliance or any part of it on surfaces that
are sensitive to heat, fat or moisture.
Before moving the appliance by the handle of the lid, always ensure that the locking
clip is in the vertical closed position and engaged firmly at the lock jut (see: ‘Proper-
ties of Your New Waffle Maker / Locking the Lid to the Base’).
Clean the appliance after each use to avoid that residues of food dry on the surfaces
and burn to charcoal, when using the appliance again. Cleaning may be easier,
when the appliance is still lukewarm.
1. Before cleaning, always ensure that the appliance is unplugged, and cooled
down sufficiently (at least 30 minutes with the lid open). Clean the waffle plates

EN EN
34 35
via a soft sponge or cloth that is moistened with some warm dishwater. Doing
so, ensure that the dishwater will not drip.
2. Use a clean cloth for wiping with clear water. Additionally, wipe the exterior
of the appliance and the power cord, if required. Then thoroughly wipe dry the
complete appliance.
3. Leave the appliance dry naturally for approx. 30 minutes, where it is out of
reach of young children and animals. Wash the measuring cup with warm
dishwater. Then, rinse with clear water and wipe dry thoroughly.
REMOVING STUBBORN RESIDUES FROM THE WAFFLE PLATES
NOTE
With some types of batter, it may happen that residues stick to the non-stick coa-
tings. Nevertheless, do not use any hard objects for scratching on the surfaces.
Instead, clean the waffle plates and moat according to the following instructions.
On later use, it may be helpful to wipe the non-stick coating with some cooking
oil, before starting operation.
1. Drip some cooking oil on a clean kitchen towel and wipe the surfaces of the
waffle plate, especially wipe the stains of food with oil.
2. Wait until the residues are softened (approx. 5 minutes). If required, loosen the
residues via a soft, dry nylon brush.
3. Clean the surfaces according to the instructions above.
STORAGE
WARNING – Young children must always be supervised that they do
not play with the appliance or any part of it. When the appliance is not in use,
always press the power button for switching off (LCD display gets dark). Then,
unplug the appliance and wait until the appliance cooled down, before cleaning
and moving the appliance for storage. Do not leave the appliance unattended,
when it is connected to the power supply to avoid hazards caused by electric
shock, heat or fire.
CAUTION – Do not hold the appliance by the power cord for moving the
appliance. Always handle power cords with special care. Power cords may never
be knotted, twisted, pulled, strained, or squeezed. Always ensure that no one will
pull the appliance by the power cord. Do not let the power cord hang down,
when moving or storing the appliance.
Store the appliance on a clean, dry, stable and level surface, where it is protected
against inadmissible strain (e.g. frost, mechanical or electric shock, fall down) and
out of reach of young children and animals. Do not place any hard or heavy objects
on or in the appliance or its parts. For moving: You may carry the appliance by the
handle of the lid. Before lifting the appliance by the handle, always ensure that the
lid is securely locked to the base of the appliance via the locking clip and will not
open unintentionally (see: ‘Properties of Your New Waffle Maker / Locking the Lid
to the Base’). Do not place any hard or heavy objects on or in the appliance or any
part of it to avoid damage. Do not place any foreign objects on the waffle plates
(e.g. clothes or towels).
When storing the appliance in an upright position, ensure that the appliance can-
not fall over.
1. Switch off the appliance (press the power button) and unplug the appliance.
Leave the waffle maker cool down sufficiently. Then, clean the appliance (see:
‘Care and Cleaning’).
2. For storage and before lifting and/or tilting the appliance, always ensure to lock
the lid of the appliance to the base. For this, close the lid completely and turn
the locking clip clockwise to the vertical closed position. Ensure that the locking
pin is engaged firmly at the lock jut of the base. Thereafter, you may carry the
appliance by the handle.
Place the appliance on a suitable surface where it is out of reach of young child-
ren and animals. You may wrap the power cord loosely around the cord storage
at the bottom of the base.
CAUTION – When storing the appliance in the upright position, ensure that
it has a stable stand and will not tilt or fall over.

EN EN
36 37
NOTES FOR DISPOSAL
Dispose of the appliance and packaging must be effected in accordance
with the corresponding local regulations and requirements for electrical
appliances and packaging. Please contact your local disposal company.
Do not dispose of electrical appliances as unsorted municipal waste, use
separate collection facilities. Contact your local government for information regar-
ding the collection systems available. If electrical appliances are disposed of in land-
fills, dumps, or refuse incineration, hazardous substances can leak into the ground-
water or can be emitted into air, thus getting into the food chain, and damaging
your health and well-being as well as poisoning flora and fauna. When replacing
old appliances with new once, the vendor is legally obligated to take back your old
appliance for disposal at least for free of charge.
INFORMATION AND SERVICE
Please check www.gastroback.de for further information.
For technical support, please contact Gastroback Customer Care Center by phone:
+49 (0)4165/22 25-0 or e-mail [email protected].
Please refer to our home page for a copy of these operating instructions in pdf format.
WARRANTY
We guarantee that all our products are free of defects at the time of purchase. Any
demonstrable manufacturing or material defects will be to the exclusion of any further
claim and within 2 years after purchasing the appliance free of charge repaired or
substituted. There is no Warranty claim of the purchaser if the damage or defect
of the appliance is caused by inappropriate treatment, over loading or installation
mistakes. The Warranty claim expires if there is any technical interference of a third
party without a written agreement. The purchaser has to present the sales slip in
assertion-of-claim and has to bear all charges of costs and risk of the transport. This
appliance is intended to be used in household and similar environments such as:
– Staff kitchen areas in shops and offices, in farm houses and other working places;
– By clients in bed and breakfast type environments, hotels, motels and similar envi-
ronments.
Hinweis
For repair and service, please send Gastroback products to the following address:
Gastroback GmbH, Gewerbestr. 20, 21279 Hollenstedt, Germany.
Please agree that we cannot bear the charge of receipt. Submission of appliances:
Please ensure packing the appliance ready for shipment without accessories and
attachments. Add the sales slip and a short fault description. The processing time
after receipt of the defective appliance will be approx. 2 weeks; we will inform you
automatically. After the warranty period, please send defective appliances to the
given address. You will get a free quotation and, thereafter, can decide, whether
we shall repair the appliance to the costs possibly accrued, send back the defec-
tive appliance for free of charge, or dispose of the appliance for free of charge.
The appliance is intended for household use only and not suited for commercial,
industrial or trade usage. Do not attempt to use this appliance in any other way
or for any other purpose than the intended use, described in these instructions.
Any other use is regarded as unintended use or misuse, and can cause severe
injuries or damage. There is no warranty claim of the purchaser if any injuries
or damages are caused by unintended use.

38 39
Ingredients
• 3 eggs, separated
• 420 ml milk
• 125 g unsalted butter, melted
• 1 teaspoon vanilla extract
• 200gself-raisingour
• 50 g caster sugar
Method
1. Select BELGIAN setting and dial up preferred setting on the browning control dial.
2.PreheatuntilorangelightashesupandthewordsHEATINGdisappear.
3. Place egg yolks, milk, butter and vanilla in a medium bowl and whisk until well combined.
4.Combineourandsugarintoalargemixingbowlandmakeawellinthecentre.
5. Carefully whisk in egg milk mixture to form a smooth batter.
6. Beat egg whites with electric beaters until stiff peaks form. Gently fold egg whites into batter.
7.Usingwafedosingcup,pour½cupofbatterintoeachwafesquare.Closelidandcook
untiltimerhasnishedandreadybeephassounded3times.
8. Repeat with remaining batter.
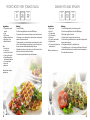
BELGIAN WAFFLE BATTER
CLASSIC WAFFLE BATTER
Ingredients
• 3 eggs
• 420 ml milk
• 125 g unsalted butter, melted
• 1 teaspoon vanilla extract
• 200gself-raisingour
• 50 g caster sugar
Method
1. Select CLASSIC setting and dial up preferred setting on the browning control dial.
2.PreheatuntilorangelightashesupandthewordsHEATINGdisappear.
3. Whisk together the eggs, milk, butter and vanilla in a medium sized bowl and set aside.
4.Combineourandsugarinalargebowlandmakeawellinthecentre.
5. Graduallywhiskmilkmixtureintoourtoformabatter.Don’tworryifthereareafewlumps.
6.Usingwafedosingcup,pour½cupofbatterintoeachwafesquare.Closelidandcook
untiltimerhasnishedandreadybeephassounded3times.
7. Repeat with remaining batter.
SERVES
8
WAFFLES
PREPARATION
10
MINUTES
COOK
10
MINUTES
SERVES
8
WAFFLES
PREPARATION
10
MINUTES
COOK
10
MINUTES
BUTTERMILK WAFFLE BATTER
Ingredients
• 3 eggs
• 600 ml buttermilk
• 84 ml vegetable oil
• 300gplainour
• 1 teaspoon baking powder
• ½teaspoonsalt
• 50 g caster sugar
Method
1. Select BUTTERMILK setting and dial up preferred setting on the browning control dial.
2.PreheatuntilorangelightashesupandthewordsHEATINGdisappear.
3. Place eggs, buttermilk and vegetable oil into a medium bowl and whisk until well combined.
4.Combineour,bakingpowder,saltandsugarintoalargemixingbowlandmakeawellinthecentre.
5. Carefullywhiskeggbuttermilkmixtureintoourtoformabatter.Don’tworryifthereafewlumps.
6. If batter is too thick, stir in 1–2 tablespoons of buttermilk to loosen mixture.
7.Usingwafedosingcup,pour½cupofbatterintoeachwafesquare.Closelidandcookuntiltimerhas
nishedandreadybeephassounded3times.
8. Repeat with remaining batter.
CHOCOLATE WAFFLE BATTER
Ingredients
• 150 g dark bittersweet
chocolate, chopped
• 30 g cocoa powder
• 2 eggs
• 90 g butter
• 170 g caster sugar
• 360 ml milk
• 1 teaspoon vanilla extract
• 250gplainour
• 1 teaspoon baking powder
• 1 teaspoon salt
Method
1. Select CHOCOLATE setting and dial up preferred setting on the browning control dial.
2.PreheatuntilorangelightashesupandthewordsHEATINGdisappear.
3. Place the chocolate and butter in a microwave safe bowl and heat on 100% power for 30 seconds. Stir
and continue until chocolate and butter have melted and mixture is smooth; set aside to cool slightly.
4. Whisk eggs, milk and vanilla together in a large jug and stir through cooled chocolate mixture until smooth.
5. Siftour,sugar,cocoapowder,bakingpowderandsalttogetherinalargemixingbowlandmakeawell
in the centre.
6. Pour in egg mixture and whisk until mostly smooth with just a few lumps.
7.Usingwafedosingcup,pour½cupofbatterintoeachwafesquare.Closelidandcookuntiltimerhas
nishedandreadybeephassounded3times.
8. Repeat with remaining batter.
SERVES
8
WAFFLES
PREPARATION
10
MINUTES
COOK
10
MINUTES
SERVES
8
WAFFLES
PREPARATION
10
MINUTES
COOK
10
MINUTES
RECIPES
Seite laden ...
Seite laden ...
Seite laden ...
Seite laden ...
Seite laden ...
Seite laden ...
Seite laden ...
Seite laden ...
Seite laden ...
Seite laden ...
Seite laden ...
Seite laden ...
Seite laden ...
Seite laden ...
Seite laden ...
Seite laden ...
Seite laden ...
Seite laden ...
Seite laden ...
Seite laden ...
Seite laden ...
Seite laden ...
Seite laden ...
Seite laden ...
Seite laden ...
Seite laden ...
Seite laden ...
Seite laden ...
Seite laden ...
Seite laden ...
Seite laden ...
Seite laden ...
Seite laden ...
Seite laden ...
Seite laden ...
Seite laden ...
Seite laden ...
Seite laden ...
Seite laden ...
Seite laden ...
Seite laden ...
-
 1
1
-
 2
2
-
 3
3
-
 4
4
-
 5
5
-
 6
6
-
 7
7
-
 8
8
-
 9
9
-
 10
10
-
 11
11
-
 12
12
-
 13
13
-
 14
14
-
 15
15
-
 16
16
-
 17
17
-
 18
18
-
 19
19
-
 20
20
-
 21
21
-
 22
22
-
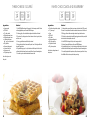 23
23
-
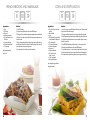 24
24
-
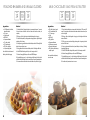 25
25
-
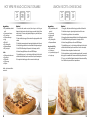 26
26
-
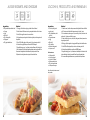 27
27
-
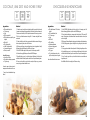 28
28
-
 29
29
-
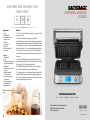 30
30
-
 31
31
-
 32
32
-
 33
33
-
 34
34
-
 35
35
-
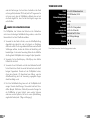 36
36
-
 37
37
-
 38
38
-
 39
39
-
 40
40
-
 41
41
-
 42
42
-
 43
43
-
 44
44
-
 45
45
-
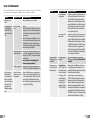 46
46
-
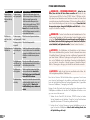 47
47
-
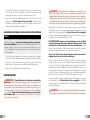 48
48
-
 49
49
-
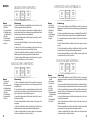 50
50
-
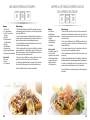 51
51
-
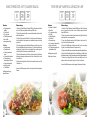 52
52
-
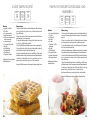 53
53
-
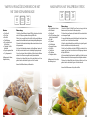 54
54
-
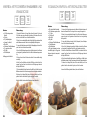 55
55
-
 56
56
-
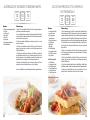 57
57
-
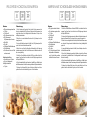 58
58
-
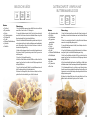 59
59
-
 60
60
-
 61
61


in anderen Sprachen
Verwandte Papiere
Sonstige Unterlagen
-
Silvercrest SWE 1200 C3 Operating Instructions Manual
-
Hendi 212172 Benutzerhandbuch
-
Brayer BR2303 Bedienungsanleitung
-
-
Brayer BR2302 Waffle Maker Benutzerhandbuch
-
Brayer BR2304 Bedienungsanleitung
-
 Brayer BR2301 Benutzerhandbuch
-
Korona 41001 Bedienungsanleitung
-
Korona 41002 Bedienungsanleitung
-
Silvercrest SDW 1200 B2 - IAN 304054 Bedienungsanleitung
