Iomega PROFESSIONAL HARD DRIVE ESATA Bedienungsanleitung
- Kategorie
- Externe Festplatten
- Typ
- Bedienungsanleitung
Dieses Handbuch eignet sich auch für

Professional Hard Drive
eSATA/USB
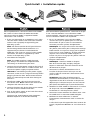
Quick Start Guide
Guide de démarrage rapide
Schnellstart-Handbuch
Guida di installazione rapida
Guía de instrucciones rápidas
Guia de uso rápido
Snel aan de slag
Snabbstartguide
Introduktion
Hurtigreferanse
Pikaopas
Gyors útmutató
Stručná příručka
Wprowadzenie
Οδηγός γρήγορης εκκίνησης
快速入門指南
Seite wird geladen ...
Seite wird geladen ...

4
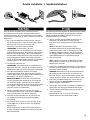
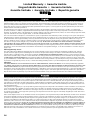
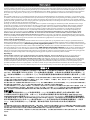
Para obtener el máximo rendimiento, conecte la
unidad a una tarjeta PCI eSATA o a una conexión
externa eSATA incorporada. Conecte la unidad
mediante USB si no dispone de una conexión eSATA
compatible.
1. Si la conecta a una tarjeta PCI eSATA, asegúrese
de que se han instalado los controladores de la
tarjeta y de que el sistema operativo reconoce
correctamente la tarjeta.
NOTA: No necesita instalar controladores
especiales para la unidad de disco duro Iomega
Professional. Se incluyen en los controladores de
la tarjeta PCI eSATA. Si su equipo dispone de una
conexión eSATA incorporada, los controladores
nativos del sistema operativo detectan la unidad.
2. Apague el equipo.
NOTA: La interfaz eSATA NO es un sistema Plug-
and-Play. Apague siempre el equipo antes de
conectar o desconectar la unidad.
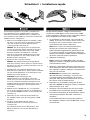
3. Conecte el cable de alimentación incluido a la
parte posterior de la unidad. Coloque la unidad
sobre una superficie estable y conecte el cable de
alimentación a una toma eléctrica.
PRECAUCIÓN: Para evitar daños en el conector
de alimentación, asegúrese de que esté
correctamente alineado antes de enchufarlo a
la unidad. No mueva la unidad mientras esté
encendida para evitar posibles daños en la
unidad o la pérdida de datos.
4. Busque el cable eSATA y conéctelo a la parte
posterior de la unidad. Nunca conecte la unidad al
equipo con más de un cable.
5. Conecte el otro extremo del cable a su tarjeta PCI
eSATA o conexión eSATA incorporada.
6. Pulse el interruptor de encendido de la parte
posterior de la unidad y reinicie el equipo.
El icono de la unidad aparecerá en Mi PC, el
Explorador de Windows o en el escritorio de Mac.
Para melhor desempenho conecte a unidade a uma
placa eSATA PCI ou a uma conexão externa eSATA
embutida. Conecte a unidade a USB se não houver
conexão eSATA suportada disponível.
1. Caso esteja conectando a uma placa eSATA
PCI, certifique-se de que os drivers para a
placa tenham sido instalados e de que a placa
seja reconhecida corretamente pelo sistema
operacional.
OBS: não é preciso instalar drivers especiais para
a unidade Iomega Professional Hard Drive. Ela é
suportada pelos drivers incluídos na placa eSATA
PCI. Se o seu computador possuir uma conexão
eSATA embutida, a unidade é suportada por
drivers nativos do sistema operacional.
2. Desligue o computador.
OBS: a interface eSATA NÃO é plug-and-play.
Sempre desligue o computador antes de conectar
ou desconectar a unidade.
3. Conecte a fonte de alimentação que acompanha
o produto à parte traseira da unidade. Coloque
a unidade em uma superfície estável e conecte a
fonte de alimentação a uma tomada elétrica.
CUIDADO! Para evitar danos ao conector da
fonte de alimentação, certifique-se de que ele
esteja alinhado corretamente antes de encaixá-
lo na unidade. Não mova a unidade enquanto
ela estiver ligada para evitar danos à mesma ou
perda de dados.
4. Identifique o cabo exata apropriado e conecte-o
à parte traseira da unidade. Nunca conecte a
unidade ao computador através de mais de um
cabo.
5. Conecte a outra extremidade do cabo à placa
eSATA PCI ou à conexão eSATA embutida.
6. Ligue o botão de alimentação na parte traseira da
unidade e reinicie o computador.
O ícone da unidade aparecerá em Meu
computador, no Windows Explorer ou na mesa do
Mac.
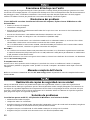
Instalación rápida • Instalação rápida
SA
T
A
S
AT
A
S
A
T
A
Seite wird geladen ...

6
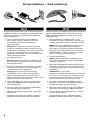
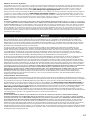
Du opnår den bedste ydelse ved at slutte drevet til et
eSATA PCI-kort eller et indbygget eksternt eSATA-stik.
Slut drevet til USB, hvis et understøttet eSATA-stik
ikke er tilgængeligt.
1. Hvis du opretter tilslutning til et eSATA PCI-
kort, skal du sørge for at driverne til kortet
er installeret, og at kortet genkendes af
operativsystemet.
Bemærk! Du behøver ikke installere specielle
drivere til harddisken Iomega Professional. Den
understøttes af de drivere, der leveres med eSATA
PCI-kortet. Hvis computeren har et indbygget
eSATA-stik, understøttes drevet af de drivere, der
findes i operativsystemet.
2. Luk computeren ned.
Bemærk! eSATA-grænsefladen er IKKE plug-and-
play. Luk altid computeren ned, før du tilslutter
eller frakobler drevet.
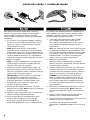
3. Slut det medfølgende strømkabel til bagsiden af
drevet. Placer drevet på en stabil overflade, og
slut strømkablet til en stikkontakt.
Forsigtig! Hvis du vil undgå at beskadige
strømstikket, skal du sørge for at vende det
rigtigt, før du sætter det i drevet. Hvis du vil
undgå at beskadige drevet eller miste data, må du
ikke flytte drevet, mens det startes.
4. Find sSATA-kablet, og sæt det i på bagsiden af
drevet. Slut aldrig drevet til computeren med
mere end ét kabel.
5. Slut den anden ende af kablet til eSATA-kortet
eller det indbyggede eSATA-stik.
6. Tænd for afbryderen bag på drevet, og genstart
computeren.
Drevikonet skulle blive vist i Denne computer i
Windows Stifinder eller på Mac-skrivebordet.
Koble stasjonen til et eSATA PCI-kort eller en innebygd
ekstern eSATA-tilkobling for å få best mulig ytelse.
Koble stasjonen til USB hvis du ikke har en støttet
eSATA-tilkobling.
1. Hvis du kobler til et eSATA PCI-kort, må du
kontrollere at driverne for kortet er installert, og
at kortet gjenkjennes riktig av operativsystemet.
MERK: Det er ikke nødvendig å installere egne
drivere for Iomega Professional Hard drive.
Den støttes av driverne som følger med eSATA
PCI-kortet. Hvis datamaskinen har en innebygd
eSATA-tilkobling, støttes stasjonen av driverne
som er innebygd i operativsystemet.
2. Avslutt datamaskinen.
MERK: eSATA-grensesnittet er IKKE plug-and-
play. Avslutt alltid datamaskinen før du kobler
stasjonen til eller fra.
3. Koble den medfølgende strømforsyningen til på
baksiden av stasjonen. Plasser stasjonen på et
stabilt underlag og koble strømforsyningen til en
stikkontakt.
FORSIKTIG! Pass på å holde
strømforsyningskontakten riktig før du setter den
i stasjonen, slik at du unngår å skade den. For å
unngå skade på stasjonen eller tap av data må
ikke stasjonen flyttes mens den er slått på.
4. Finn frem eSATA-kabelen og koble den til på
baksiden av stasjonen. Koble aldri stasjonen til
datamaskinen med mer enn én kabel.
5. Koble den andre enden av kabelen til eSATA PCI-
kortet eller den innebygde eSATA-tilkoblingen.
6. Slå på strømbryteren på baksiden av stasjonen,
og start datamaskinen.
Stasjonsikonet skal vises i Min datamaskin,
Windows Utforsker eller på Mac-skrivebordet.
Hurtig installation • Rask installering
SA
T
A
S
AT
A
S
A
T
A

7
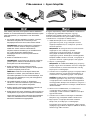
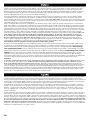
Laite toimii parhaiten, kun kytket aseman eSATA PCI -
korttiin tai sisäänrakennettuun eSATA-liitäntään. Kytke
laite USB-porttiin, jos käytettävissä ei ole eSATA-
liitäntää.
1. Jos kytket laitteen eSATA PCI -korttiin, varmista,
että kortin ohjaimet on asennettu ja että
käyttöjärjestelmä on tunnistanut kortin oikein.
HUOMAUTUS: Iomega Professional -kiintolevyä
varten ei tarvitse asentaa erityisiä ohjaimia.
eSATA PCI -kortin mukana toimitettavat
ohjaimet tukevat kiintolevyä. Jos tietokoneessa
on sisäänrakennettu eSATA-liitäntä,
käyttöjärjestelmän asema ohjaimet tukevat
kiintolevyä.
2. Katkaise tietokoneesta virta.
HUOMAUTUS: eSata-liitäntä ei ole plug-and-play-
yhteensopiva. Katkaise tietokoneen virta aina,
kun kytket tai irrotat kiintolevyn.
3. Kytke virtajohto aseman takana olevaan
liitäntään. Aseta kiintolevy vakaan alustan päälle
ja kytke virtajohto pistorasiaan.
VAROITUS: Kohdista virtakaapeli laitteeseen
kytkettäessä oikein, jotta virtalähteen liitin ei
vaurioidu kytkettäessä. Älä siirrä kiintolevyä, kun
siihen on virta kytkettynä. Levy voi vahingoittua,
tai tietoja voi hävitä.
4. Ota eSATA-kaapeli ja kytke se kiintolevyn
takaosassa olevaan liitäntään. Kytke kiintolevy
tietokoneeseen vain yhdellä kaapelilla.
5. Kytke kaapelin toinen pää eSATA PCI -korttiin tai
sisäänrakennettuun eSATA-liitäntään.
6. Kytke laitteeseen virta kiintolevyn takana olevasta
virtakytkimestä ja käynnistä tietokone uudelleen.
Levyaseman kuvake tulee näkyviin Oma tietokone
-ikkunaan, Windowsin Resurssienhallintaan tai
Macintosh-tietokoneen työpöydälle.
A legjobb teljesítmény elérése érdekében csatlakoztassa
a meghajtót egy eSATA PCI-kártyához vagy egy
beépített külső eSATA-csatlakozóhoz. Amennyiben
nem áll rendelkezésére támogatott eSATA-csatlakozó,
csatlakoztassa a meghajtót az USB-porthoz.
1. eSATA PCI-kártyához való csatlakoztatáskor
győződjön meg arról, hogy a kártyához tartozó
meghajtó telepítve lett, és a kártyát az operációs
rendszer felismeri.
MEGJEGYZÉS: Az Iomega Professional merevlemez-
meghajtóhoz nem szükséges speciális
meghajtóprogramokat telepíteni. A meghajtót
támogatják az eSATA PCI-kártyához mellékelt
meghajtóprogramok. Amennyiben számítógépéhez
beépített eSATA-csatlakozó tartozik, a meghajtót az
operációs rendszer saját meghajtói is támogatják.
2. Zárja le a számítógépet.
MEGJEGYZÉS: Az eSATA felület NEM „plug-and-play“
jellegű, vagyis nem használható azonnal. A meghajtó
csatlakoztatásakor, illetve leválasztásakor mindig
kapcsolja ki a számítógépet.
3. Csatlakoztassa a tápellátó egységet a meghajtó hátsó
részéhez. Helyezze a meghajtót stabil felületre, és
csatlakoztassa a tápellátó egységet a fali aljzatba.
VIGYÁZAT! A tápkonnektor sérülésének elkerülése
érdekében győződjön meg arról, hogy a konnektor
a meghajtóba való csatlakoztatás előtt megfelelően
van kiegyenlítve. Bekapcsolás közben ne mozgassa a
meghajtót, így elkerülheti az esetleges sérüléseket és
adatvesztéseket.
4. Válassza ki az eSATA-kábelt, és csatlakoztassa
a meghajtó hátsó részéhez. A meghajtó és a
számítógép csatlakoztatásához soha ne használjon
egynél több kábelt.
5. Csatlakoztassa a kábel másik végét az eSATA PCI-
kártyához vagy a beépített eSATA-csatlakozóhoz.
6. Kapcsolja be a meghajtó hátoldalán található
főkapcsolót, és indítja újra a számítógépet.
A meghajtó ikonja ezután megjelenik a My Computer
(Sajátgép) vagy a Windows Explorer (Windows Intéző)
részben vagy a Mac asztalon.
Pika-asennus • Gyors telepítés
SA
T
A
S
AT
A
S
A
T
A

8
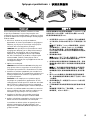
Rychlá instalace • Skrócona instrukcja insalacji
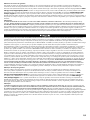
Nejlepšího výkonu dosáhnete, připojíte-li jednotku ke
kartě PCI eSATA PCI nebo k vestavěnému externímu
připojení eSATA. Není-li k dispozici podporované
připojení eSATA, připojte jednotku prostřednictvím
rozhraní USB.
1. Připojujete-li jednotku ke kartě PCI eSATA,
ujistěte se, že jsou pro kartu nainstalovány
všechny ovladače a karta je správně rozpoznána
operačním systémem.
POZNÁMKA: Pro pevný disk Iomega Professional
není nutné instalovat zvláštní ovladače. Disk je
podporován ovladači ke kartě PCI eSATA. Je-li v
počítači k dispozici vestavěné připojení eSATA,
je jednotka podporována nativními ovladači v
operačním systému.
2. Vypněte počítač.
POZNÁMKA: eSATA NENÍ rozhraní typu plug-and-
play. Před připojováním či odpojováním jednotky
počítač vždy vypněte.
3. Zapojte přiložený napájecí kabel do zadní
strany jednotky. Diskovou jednotku umístěte na
stabilní povrch a zapojte napájecí kabel do síťové
zásuvky.
UPOZORNĚNÍ! Chcete-li předejít poškození
síťového konektoru, přesvědčte se před jeho
připojením k diskové jednotce, že je správně
zapojen. Nepřemísťujte diskovou jednotku, když
je napájena. Hrozí poškození disků a ztráta dat.
4. Najděte příslušný kabel eSATA a připojte jej do
zadní části jednotky. Nikdy nepřipojujte jednotku
k počítači pomocí více než jednoho kabelu.
5. Připojte opačný konec kabelu ke kartě PCI eSATA
nebo vestavěnému připojení eSATA.
6. Zapněte síťový vypínač na zadní straně jednotky a
restartujte počítač.
Ikona jednotky by se měla zobrazit v okně Tento
počítač, Průzkumník Windows nebo na pracovní
ploše systému Mac.
Aby dysk działał niezawodnie, należy go podłączyć
do karty PCI eSATA lub wbudowanego złącza
zewnętrznego eSATA. Jeśli nie można użyć
obsługiwanego połączenia eSATA, dysk należy
podłączyć do portu USB.
1. W przypadku podłączania dysku do karty PCI
eSATA pamiętaj o zainstalowaniu sterowników
karty oraz sprawdź, czy karta jest poprawnie
rozpoznawana przez system operacyjny.
UWAGA: Dysk twardy Iomega Professional nie
wymaga instalowania specjalnych sterowników.
Jest on obsługiwany przez sterowniki karty PCI
eSATA. Jeśli w komputerze jest wbudowane złącze
eSATA, dysk jest obsługiwany przez sterowniki
systemu operacyjnego.
2. Wyłącz komputer.
UWAGA: Interfejs eSATA NIE jest interfejsem
plug-and-play. Przed podłączeniem i odłączeniem
dysku należy zawsze wyłączyć komputer.
3. Podłącz dostarczony zasilacz z tyłu dysku. Ustaw
dysk na stabilnej powierzchni i podłącz zasilacz
do gniazda zasilania.
UWAGA! Aby uniknąć uszkodzenia złącza
zasilania, przed podłączeniem dysku należy
sprawdzić polaryzację. Aby uniknąć uszkodzenia
dysku lub utraty danych, nie wolno przenosić
włączonego dysku.
4. Znajdź odpowiedni przewód eSATA i podłącz
go z tyłu dysku. Nie wolno podłączać dysku
do komputera za pomocą więcej niż jednego
przewodu.
5. Podłącz drugi koniec przewodu do karty PCI
eSATA lub wbudowanego złącza eSATA.
6. Włącz dysk za pomocą przełącznika z tyłu
obudowy i uruchom ponownie komputer.
Ikona dysku powinna zostać wyświetlona w oknie
Mój komputer, w programie Eksplorator Windows
lub na biurku w systemie Mac.
SA
T
A
S
AT
A
S
A
T
A

9
Για την καλύτερη δυνατή απόδοση, συνδέστε το δίσκο
σε µια κάρτα eSATA PCI ή σε µια ενσωµατωµένη στον
υπολογιστή εξωτερική υποδοχή USB 2.0. Συνδέστε το δίσκο
µε σύνδεση USB αν δεν υπάρχει διαθέσιµη υποστηριζόµενη
σύνδεση eSATA.
1. Εάν κάνετε σύνδεση σε µια κάρτα eSATA PCI,
βεβαιωθείτε ότι έχουν εγκατασταθεί τα προγράµµατα
οδήγησης της κάρτας και ότι η κάρτα αναγνωρίζεται
κανονικά από το λειτουργικό σας σύστηµα.
Σ
ΗΜΕΙΩΣΗ: ∆εν χρειάζεται να εγκαταστήσετε ειδικά
προγράµµατα οδήγησης για το σκληρό δίσκο Iomega
Professional. Υποστηρίζεται από τα προγράµµατα
οδήγησης που περιλαµβάνονται στην κάρτα eSATA
PCI. Εάν ο υπολογιστής σας διαθέτει ενσωµατωµένη
σύνδεση eSATA, ο δίσκος υποστηρίζεται από τα
προγράµµατα οδήγησης που περιλαµβάνονται ήδη στο
λειτουργικό σύστηµα.
2. Σβήστε τον υπολογιστή.
ΣΗΜΕΙΩΣΗ: Η διασύνδεση eSATA ∆ΕΝ είναι plug-and-
play. Πρέπει πάντα να τερµατίζετε τη λειτουργία του
υπολογιστή πριν συνδέσετε ή αποσυνδέσετε το δίσκο.
3. Συνδέστε το καλώδιο τροφοδοσίας που συνοδεύει το
δίσκο στο πίσω µέρος της. Τοποθετήστε το δίσκο σε µια
σταθερή επιφάνεια και συνδέστε το τροφοδοτικό σε
µια πρίζα ηλεκτρικού.
ΠΡΟΣΟΧΗ! Για να αποφύγετε την πρόκληση ζηµιάς
στο βύσµα του τροφοδοτικού, βεβαιωθείτε ότι έχει
ευθυγραµµιστεί σωστά προτού το συνδέσετε στο δίσκο.
Μην µετακινείτε το δίσκο όταν ξεκινά η τροφοδοσία
του, για να µην προκληθεί ζηµιά ή απώλεια δεδοµένων.
4. Εντοπίστε το καλώδιο eSATA και συνδέστε το στο πίσω
µέρος του δίσκου. Ποτέ µην συνδέετε το δίσκο µε τον
υπολογιστή µε περισσότερα του ενός καλώδια.
5. Συνδέστε το άλλο άκρο του καλωδίου στην κάρτα
eSATA PCI ή στην ενσωµατωµένη υποδοχή eSATA.
6. Ανάψτε το διακόπτη τροφοδοσίας στο πίσω µέρος του
δίσκου και κάντε επανεκκίνηση του υπολογιστή.
Το εικονίδιο του δίσκου πρέπει να εµφανίζεται στο
φάκελο Ο Υπολογιστής µου (My Computer), στην
Εξερεύνηση των Windows (Windows Explorer) ή στο
γραφείο του Mac.
為確保發揮最佳效能,請將磁碟機接上 eSATA PCI 卡或
內建外接式 eSATA 連線。如果沒有支援的 eSATA 連
線,請將磁碟機連接到 USB。
1.
如果您連接 eSATA PCI 卡,請確定介面卡的驅動程
式已經安裝,且您的作業系統可以正確識別該介面
卡。
注意:您不需要為「Iomega 專業版硬碟」安裝特
別的驅動程式。包含在 eSATA PCI 卡內的驅動
程式會支援該硬碟。如果您的電腦擁有內建的
eSATA 連線,則作業系統內原本的驅動程式就會支
援該磁碟機。
2.
關閉電腦的電源。
注意:eSATA 介面「不支援」隨插即用。在連接或
移除磁碟機之前,請務必關閉電腦的電源。
3. 將隨附的電源供應器連接至磁碟機的背面。將磁
碟機放置在穩定表面上並將電源供應器連接到電
源插座。
注意!為了避免電源供應器接頭損壞,在將其插到
磁碟機中之前,請確保已將其正確對齊。為避免
磁碟機資料遺失,當磁碟機電源開啟時,請勿移動
它。
4.
確定 eSATA 的纜線後,將該纜線連接到磁碟機背
面。將磁碟機連接到電腦時,絕對不可使用一條以
上的纜線。
5.
將資料纜線的另一端連接至 eSATA PCI 卡或內建
的 eSATA 連線。
6. 打開磁碟機背面的電源開關然後重新啟動您的電
腦。
磁碟機圖示應顯示在「我的電腦」、Windows 「
檔案總管」或 Mac 桌面上。
Γρήγορη εγκατάσταση • 快速安裝指南
SA
T
A
S
AT
A
S
A
T
A

10
Backing Up with Your Drive
Iomega recommends periodic system backups and more frequent data backups to ensure that your critical data
is always protected. The frequency of your backup should depend on the importance of your data. To protect
your data, you can simply drag and drop copies of your critical files onto the drive, or you can use backup
software to schedule regular backups.
Troubleshooting
Drive does not appear in My Computer or Windows Explorer or on the Mac Desktop
• Try rebooting your computer.
• Check all connections.
• Make sure the drive is receiving power (check if the status light is on). Make sure the power switch is on.
• Make sure you are using the eSATA or USB cable that came with your drive.
• Make sure the drive is connected to only one interface (eSATA or USB).
PC Users:
• If you are connecting to an eSATA PCI card or USB 2.0 host adapter, make sure the correct drivers for the
card are installed and recognized by your operating system.
• If you are connecting to USB, check your BIOS to ensure USB is enabled. Please refer to your computer’s
user’s guide or manual for instructions
.
Mac Users:
• If you are using a version of Mac OS X below 10.3, format the drive HFS+ or partition the drive into smaller
volumes (less than 127GB). Use Disk Utility to partition and format the drive.
If the drive is still not assigned a drive letter, please visit the Support & Downloads area on www.iomega.com
.
PC will not start up
If your PC will not start up when the drive is connected, there is probably a conflict with the computer. To work
around this problem, power off the drive when starting the computer. Power on the drive after the computer
finishes starting up.
Complete User's Manual
A complete user’s manual in HTML format is available on the Support & Downloads area on www.iomega.com.
Sauvegarde sur le disque
Iomega recommande d’effectuer des sauvegardes régulières du système et des sauvegardes fréquentes de
données pour assurer la protection permanente de vos données les plus importantes. La périodicité des
sauvegardes dépend directement de l’importance des données à sauvegarder. Pour protéger vos données,
copiez vos fichiers les plus importants sur le disque par simple glisser-déplacer ou utilisez le logiciel de
sauvegarde pour programmer des sauvegardes régulières.
Dépannage
Le lecteur n’apparaît pas dans le Poste de travail, l’Explorateur Windows ou sur le bureau du Mac.
• Redémarrez votre ordinateur.
• Vérifiez toutes les connexions.
• Assurez-vous que le disque est alimenté (vérifiez que le voyant d’état est allumé). Assurez-vous que
l’interrupteur d’alimentation est sous tension.
• Assurez-vous que vous utilisez le câble USB ou eSATA fourni avec le disque
.
• Assurez-vous que le disque est connecté à une seule interface (eSATA ou USB).
Utilisateurs de PC :
• En cas de connexion à une carte PCI eSATA ou à un adaptateur hôte USB 2.0, assurez-vous que les pilotes
corrects pour la carte sont installés et reconnus par votre système d’exploitation.
• En cas de connexion USB, vérifiez votre BIOS pour vous assurer que la connexion USB est activée. Reportez-
vous aux instructions de la documentation de votre ordinateur.
Seite wird geladen ...

12
Esecuzione di backup con l’unitö
Iomega consiglia di eseguire backup di sistema periodici e backup di dati più frequenti per garantire che i dati
essenziali siano sempre protetti. La frequenza dei backup varia in base all’importanza dei dati da memorizzare.
Per proteggere i dati, è sufficiente selezionare e trascinare copie dei dati più importanti sull’unità, oppure
utilizzare il software incluso per pianificare l’esecuzione di backup a intervalli regolari.
Risoluzione dei problemi
L’icona dell’unità non viene visualizzata in Risorse del computer, Esplora risorse di Windows o sulla
Scrivania Mac.
• Provare a riavviare il computer.
• Controllare i collegamenti.
• Assicurarsi che l’unità sia alimentata verificando che la spia sia accesa. Assicurarsi che l’interruttore di
alimentazione sia acceso.
• Assicurarsi di utilizzare il cavo eSATA o USB fornito in dotazione con l’unità
.
• Accertarsi che l’unità sia collegata a una sola interfaccia (eSATA o USB).
Utenti PC:
• Se si effettua la connessione a una scheda PCI eSATA o ad un adattatore USB 2.0, assicurarsi che i driver
relativi della scheda siano stati installati e riconosciuti dal sistema operativo.
• Se si sta effettuando la connessione all’USB, controllare il BIOS per verificare che la connessione USB sia
attivata. Per istruzioni, consultare la guida o il manuale del computer.
Utenti Mac:
• Se si utilizza una versione di Mac OS X precedente alla versione 10.3, formattare o partizionare l’unità HFS
in volumi di dimensioni più piccole (meno di 127 GB). Utilizzare l’utility Disco per effettuare la suddivisione
in più partizioni e formattare l’unità
.
Se all’unità continua a non essere assegnata alcuna lettera, visitare l’area dedicata all’assistenza e al download
nel sito Web www.iomega.com
.
Il computer non si avvia
Se il PC non si avvia quando l’unità è collegata, è possibile che esista un conflitto tra l’unità e il computer.
Per risolvere il problema, spegnere l’unità quando si accende il computer. Accendere l’unità dopo l’avvio del
computer.
Manuale completo dell’utente
Nell’area assistenza e download del sito Web www.iomega.com è disponibile il manuale completo dell’utente in
formato HTML.
Realización de copias de seguridad con su unidad
Iomega recomienda realizar con periodicidad copias de seguridad del sistema y copias de seguridad más
frecuentes de los datos para garantizar que los datos importantes estén siempre protegidos. La frecuencia de
las copias de seguridad dependerá de la importancia de los datos. Para proteger los datos, no tiene más que
arrastrar y soltar copias de los archivos importantes en la unidad o utilizar el software de copia de seguridad
para programar copias de seguridad regulares.
Solución de problemas
La unidad no aparece en Mi PC, el Explorador de Windows o en el escritorio de Mac.
• Inténtelo reiniciando el equipo.
• Compruebe todas las conexiones
.
• Asegúrese de que la unidad recibe alimentación (compruebe si la luz de estado está encendida). Asegúrese
de que el interruptor de encendido está en posición de encendido.
• Asegúrese de que está utilizando el cable eSATA o USB que se incluye con la unidad.
• Asegúrese de que la unidad está conectada a una sola interfaz (eSATA o USB).
Seite wird geladen ...
Seite wird geladen ...
Seite wird geladen ...

16
Limited Warranty • Garantie Limitée
Eingeschränkte Garantie • Garanzia limitata
Garantía limitada • Garantia limitada • Beperkte garantie
限期保固
Iomega warrants this hardware product to be free from defects in materials and workmanship for the warranty period. This non-transferable,
limited warranty is only to you, the first end-user purchaser. The warranty begins on the date of purchase and lasts for a period of one (1)
year for product purchased in the Americas, the Asia-Pacific region, or non-European Union nations in Europe, the Middle East, or Africa;
ninety (90) days for Iomega reconditioned products purchased in these regions; or, two (2) years for product purchased by an end-user in
member nations of the European Union.
This warranty does not apply to: (a) Iomega software products; (b) expendable components such as fuses or bulbs; or (c) third party
products, hardware or software, supplied with the warranted product. Iomega makes no warranty of any kind on such products which, if
included, are provided “AS IS.” This warranty also excludes damage caused by accident, misuse, abuse, use of non-Iomega approved media,
exposure of media to excessive magnetic fields, or external environmental causes.
Your sole and exclusive remedy for a covered defect is repair or replacement of the defective product, at Iomega’s sole option and expense
(shipping may be charged), and Iomega may use new or refurbished parts or products to do so. The replaced part/product will be warranted
for the remainder of the original warranty or three (3) months from the date of shipment of such parts/products, whichever is longer. If
Iomega is unable to repair or replace a defective product, your alternate exclusive remedy shall be a refund of the original purchase price.
The above is Iomega’s entire obligation to you under this warranty. IN NO EVENT SHALL IOMEGA BE LIABLE FOR INDIRECT, INCIDENTAL,
CONSEQUENTIAL OR SPECIAL DAMAGES OR LOSSES, INCLUDING LOSS OF DATA, USE, OR PROFITS EVEN IF IOMEGA HAS BEEN ADVISED OF THE
POSSIBILITY OF SUCH DAMAGES. In no event shall Iomega’s liability exceed the original purchase price of the drive or the media disk. Some
jurisdictions do not allow the exclusion or limitation of incidental or consequential damages, so the above limitation or exclusion may not
apply to you.
Obtaining Warranty Service
You must notify Iomega within the warranty period to receive warranty service. Just as technology and market conditions vary, Iomega’s
specific customer support policies (including fees for services) and procedures change over time. To obtain information about Iomega’s
current policies or warranty service, please visit our website at www.iomega.com/supportpolicy.html or write to: Iomega Customer Service,
4059 South 1900 West, Roy, UT 84067. Contact Information for Iomega Customer Service in Europe can be obtained on our Support website
at www.iomega.com/europe/support. If your product is eligible for warranty service, you will be required to return it to Iomega, along with
proper identification, a return authorization number obtained from the Iomega website or provided by the Iomega representative, and proof
of purchase. Iomega will not protect, recover, or return data during warranty service so you should duplicate your data before shipment.
Limitations
THE ABOVE WARRANTY IS EXCLUSIVE AND IN LIEU OF ALL OTHER WARRANTIES, EXPRESS OR IMPLIED. To the extent permitted by applicable
law, IOMEGA SPECIFICALLY DISCLAIMS ANY IMPLIED WARRANTIES, INCLUDING ANY IMPLIED WARRANTY OF MERCHANTABILITY OR FITNESS FOR
A PARTICULAR PURPOSE. Any implied warranty required by applicable law shall be limited in duration to the express warranty term. Some
jurisdictions do not allow disclaimers of implied warranties or limitations on how long an implied warranty lasts, so the above limitation may
not apply to you. This warranty gives you specific legal rights and you may also have other rights that vary from jurisdiction to jurisdiction.
Any suit for breach of any warranty on your Product must be filed within one (1) year of the first date the suit could have been brought.
Iomega garantit que ce produit est exempt de tout vice de fabrication ou de malfaçon pendant toute la période de garantie. Cette garantie
limitée n’est pas transférable et ne s’applique qu’à l’utilisateur final. La garantie est effective à partir de la date d’achat et reste ensuite
valable pendant une période de un (1) an à compter de cette même date sur le continent américain, dans la région Asie-Pacifique, dans les
pays d’Europe non membres de l’Union Européenne, au Moyen-Orient ou en Afrique, quatre-vingt dix (90) jours pour les produits remis en
état achetés dans les pays ou régions précédemment cités ou deux (2) ans dans le cadre d’un achat effectué par un utilisateur final au sein
de l’Union Européenne.
Cette garantie ne s’applique pas : (a) aux produits logiciels Iomega, (b) aux composants consommables comme les fusibles ou les ampoules
ou (c) aux produits tiers, matériel ou logiciel, fournis avec le produit sous garantie. Iomega ne garantit en aucun cas ces produits qui, si
inclus, sont fournis “EN L’ETAT”. Sont exclus les dommages causés par un accident, une mauvaise utilisation, un usage abusif, l’utilisation
de supports non fournis ou non approuvés par Iomega, une exposition excessive des supports à un champ magnétique ou tout autre cause
externe d’origine naturelle.
Votre seul et unique recours en cas de défaut reconnu est la réparation ou le remplacement du produit défectueux, aux frais et à la discrétion
de Iomega (l’expédition pourra vous être facturée). Iomega se réserve le droit d’utiliser des pièces ou produits neufs ou remis en état pour
procéder à la réparation. L’élément/produit remplacé sera garanti pendant le reste de la garantie d’origine ou, au maximum, trois (3) mois
à dater de l’expédition desdits éléments/produits. S’il s’avère que Iomega est dans l’impossibilité de réparer ou remplacer un produit
défectueux, votre seul recours sera le remboursement du prix d’achat initial. L’obligation de garantie de Iomega envers vous se limite aux
éléments cités précédemment. EN AUCUN CAS IOMEGA NE POURRA ETRE TENUE POUR RESPONSABLE DES DOMMAGES OU PERTES INDIRECTS,
ACCESSOIRES OU SPECIAUX, Y COMPRIS LA PERTE DE DONNEES, DE L’IMPOSSIBILITE D’UTILISATION OU DE PROFIT ET CE MEME SI IOMEGA A
ETE AVERTIE DE L’EVENTUALITE DE TELS DOMMAGES. En aucun cas la responsabilité de Iomega ne pourra s’étendre au-delà du prix d’achat
initial de l’appareil ou du support. Certaines juridictions ne reconnaissent pas l’exclusion ou la limitation des dommages accessoires ou
indirects. De ce fait, les limitations ou les exclusions énoncées ci-dessus peuvent ne pas être applicables dans votre cas.
Seite wird geladen ...

18
Iomega garantisce che questo prodotto hardware è privo di difetti di fabbricazione e dei materiali durante l’intero periodo di validità della
garanzia. La presente garanzia limitata, non trasferibile, è da considerarsi valida per il solo utente finale e non può quindi essere ceduta
a terze parti. La garanzia decorre a partire dalla data di acquisto del prodotto e ha validità di un (1) anno per i prodotti acquistati nelle
Americhe, nella regione Estremo Oriente e Oceania o nei paesi non membri dell’Unione Europea, in Medio Oriente o in Africa; la garanzia
ha una validità di novanta (90) giorni per i prodotti Iomega ricondizionati acquistati in tali regioni; oppure di due (2) anni per i prodotti
acquistati dall’utente finale in uno dei paesi membri dell’Unione Europea.
La presente garanzia non è da ritenersi valida per: (a) i prodotti software Iomega; (b) i materiali di consumo, come ad esempio i fusibili
o le lampadine; o (c) i prodotti di terze parti, hardware o software, forniti in dotazione con il prodotto coperto da garanzia. Iomega non
fornisce alcun tipo di garanzia su tali prodotti che, se inclusi, vengono forniti “COSÌ COME SONO”. Si considera escluso da garanzia il danno
causato da incidente, l’uso improprio, l’abuso, l’utilizzo di supporti non approvati da Iomega, l’esposizione dei supporti a campi magnetici
particolarmente intensi o a cause ambientali esterne.
L’unico ed esclusivo diritto risarcitorio esercitabile in caso di difetto di un prodotto coperto da garanzia è la riparazione o la sostituzione
del prodotto difettoso, a sola discrezione e interamente a carico di Iomega; Iomega ha inoltre la facoltà di utilizzare componenti o prodotti
nuovi o rimessi a nuovo. È prevista la copertura del componente/prodotto sostituito per tutto il periodo di validità della garanzia stipulata
originariamente o per i tre (3) mesi successivi alla data di spedizione di tale componente/prodotto, quale che sia la situazione temporale
che risulti più conveniente per garantire l’estendibilità della garanzia. Nell’eventualità in cui Iomega non sia in grado di riparare o sostituire
il prodotto difettoso, l’unico diritto risarcitorio alternativo esercitabile dall’acquirente consiste nella restituzione del prezzo di acquisto
del prodotto originale. Quanto sopra enunciato costituisce l’obbligo contrattuale cui attenersi ai sensi della presente garanzia. IN NESSUN
CASO IOMEGA DOVRÀ ESSERE RITENUTA RESPONSABILE DI EVENTUALI DANNI INDIRETTI, INCIDENTALI, CONSEGUENZIALI O SPECIALI O
DI ALTRI DANNI TRA CUI LE PERDITE DI DATI, UTILIZZO O DI PROFITTO, INDIPENDENTEMENTE DAL FATTO CHE IOMEGA FOSSE AL CORRENTE
DELLA POSSIBILITÀ CHE SI POTESSERO VERIFICARE TALI DANNI. In nessun caso la responsabilità di Iomega potrà superare il prezzo di
acquisto originale dell’unità o del supporto. Poiché alcune giurisdizioni non prevedono l’esclusione o la limitazione di danni incidentali o
conseguenziali, la limitazione o l’esclusione di cui sopra potrebbe non avere alcuna validità giuridica.
Come ottenere servizi di assistenza durante il periodo di validità della garanzia
Per ricevere assistenza durante il periodo di validità della garanzia, è necessario inviare opportuna notifica a Iomega entro detto periodo.
Le politiche di assistenza clienti Iomega (compresi i servizi a pagamento) e le relative procedure variano in base alle esigenze di mercato
e alle tecnologie emergenti. Per ottenere informazioni sulle procedure Iomega in vigore, visitare il sito Web all’indirizzo www.iomega.
com/supportpolicy.html o scrivere a Iomega Customer Service, 4059 South 1900 West, Roy, UT 84067. Le informazioni sui contatti
dell’Assistenza clienti di Iomega in Europe sono disponibili sul sito Web del Supporto tecnico all’indirizzo www.iomega.com/europe/
support. Nel caso in cui il prodotto sia idoneo a ricevere gli interventi manutentivi previsti dalla garanzia, sarà necessario restituire
il prodotto a Iomega unitamente al relativo codice, al numero di autorizzazione per la restituzione disponibile sul sito Web di Iomega o
fornito dal rivenditore Iomega e la prova di acquisto. Poiché Iomega non prevede la protezione, il ripristino o la restituzione dei dati durante
l’esecuzione degli interventi di manutenzione, si consiglia sempre di duplicarli prima di procedere alla spedizione del prodotto.
Limitazioni
LA PRESENTE GARANZIA HA NATURA ESCLUSIVA, PERTANTO SOSTITUISCE QUALUNQUE ALTRA GARANZIA ESPLICITA O IMPLICITA. Nella misura
in cui sia consentito dalle leggi in vigore, IOMEGA DISCONOSCE ESPRESSAMENTE EVENTUALI GARANZIE IMPLICITE, COMPRESE QUELLE
IMPLICITE DI COMMERCIABILITÀ O DI IDONEITÀ A FINI SPECIFICI. Eventuali garanzie implicite previste dalla legislazione vigente devono
essere limitate nel tempo in base a quanto sancito dai termini della garanzia esplicita. Poiché alcune giurisdizioni non prevedono il ricorso
a formule di diniego di garanzie implicite o limitazioni sulla durata di validità di tale garanzia, è possibile che la limitazione di cui sopra
non abbia alcuna validità nel caso specifico. La presente garanzia concede particolari diritti legali, nonché eventuali altri diritti suscettibili
di variazione in base alla giurisdizione specifica. Eventuali risarcimenti per violazione dei termini contenuti nella garanzia devono essere
richiesti entro 1 anno dalla data in cui è possibile intraprendere un’azione legale.
Iomega garantiza que este producto de hardware está libre de defectos de materiales y mano de obra durante el período de garantía. Esta
garantía limitada e intransferible es sólo para usted, el primer comprador usuario final. El período de garantía comienza en la fecha de
compra y tiene una duración de un (1) año para productos adquiridos en el continente americano, la región Asia-Pacífico, países europeos no
pertenecientes a la UE, Oriente Medio o África; noventa (90) días para productos reacondicionados de Iomega adquiridos en estas regiones;
o dos (2) años para productos adquiridos por un usuario final en a algún país miembro de la Unión Europea.
Esta garantía no se aplica a: (a) productos de software de Iomega, (b) consumibles como fusibles o lámparas, o (c) productos, hardware o
software, de terceros incluidos con el producto en garantía. Iomega no ofrece ningún tipo de garantía para dichos productos que, si están
incluidos, se proporcionan “TAL CUAL”. Se excluyen de esta garantía los daños provocados por accidente, uso incorrecto, abuso, uso de
discos no suministrados o no autorizados por Iomega, exposición excesiva de los discos a campos magnéticos o por causas ambientales
externas al producto.
Su única y exclusiva compensación por un defecto cubierto es la reparación o sustitución del producto defectuoso, a elección y cargo de Iomega (el
porte puede ser cobrado); Iomega puede utilizar piezas o productos nuevos o reparados para tal fin. La garantía de la pieza o producto repuesto
tendrá la validez del resto de la garantía original o tres (3) meses desde la fecha de envío de dichas piezas o productos, sea cual sea su duración. Si
Iomega no puede reparar o sustituir un producto defectuoso, su única compensación alternativa será un reembolso del precio de compra original. Lo
expuesto anteriormente es la única obligación de Iomega con respecto a usted según esta garantía. EN NINGÚN CASO IOMEGA SERÁ RESPONSABLE
DE CUALQUIER DAÑO INDIRECTO, INCIDENTAL O RESULTANTE NI DE PÉRDIDAS, INCLUIDA LA PÉRDIDA DE DATOS, USO O BENEFICIOS INCLUSO SI SE HA
ADVERTIDO A IOMEGA DE LA POSIBILIDAD DE TALES DAÑOS. En ningún caso la responsabilidad de Iomega superará el precio de compra original de
la unidad o el disco. Algunas jurisdicciones no permiten la exclusión o limitación de los daños incidentales o resultantes, por lo que es posible que
la limitación o exclusión anterior no se aplique a
usted.
Seite wird geladen ...
Seite wird geladen ...

21
If you have a problem, we can help. Please do NOT return this product to the store!
Your answer is on the web. Visit our award-winning web support site
www.iomega.com. Select your region, then
select Support & Downloads
.
Si vous avez un problème, nous pouvons vous aider. NE RENVOYEZ PAS ce produit au magasin !
Votre réponse est sur le Web. Site Web d’assistance primé www.iomega.com
. Sélectionnez votre région puis
Support et téléchargements
.
Wenn Sie ein Problem haben, können wir Ihnen helfen. Bringen Sie dieses Produkt NICHT zu Ihrem Händler zurück!
Ihre Antwort steht im Netz.
Preisgekrönte Support-Website www.iomega.com. Wählen Sie Ihr Gebiet aus und klicken Sie
auf Support und Downloads
.
In caso di problemi, noi possiamo fornire assistenza. NON restituire questo prodotto al rivenditore!
La risposta
è sul Web. Sito di supporto sul Web premiato www.iomega.com. Selezionare la propria regione, quindi
scegliere Assistenza e Download
.
Si tiene algún problema, podemos ayudar. ¡Por favor, NO devuelva este producto a la tienda!
Su respuesta está en la web. Destacado sitio Web de atención al cliente
www.iomega.com. Elija su región y
luego seleccione Suporte y Descargas
.
Se você tiver um problema, nós podemos ajudar. NÃO devolva esse produto à loja!
A resposta para você está na web. Site da web vencedor de prêmios www.iomega.com
. Selecione a sua região e
Suporte e Downloads.w.iomega.com.
如需 Iomega 產品的服務與支援,請造訪我們的網站 www.iomega.com。
Customer Support • Assistance clientèle • Kundenunterstützung
Assistenza clienti • Asistencia al cliente • Suporte ao cliente
客戶支援
Seite wird geladen ...
Seite wird geladen ...

31690600 4/10/07 b
Copyright © 2007 Iomega Corporation. All rights reserved. Iomega, the stylized “i” logo, and all Iomega brand blocks are either registered
trademarks or trademarks of Iomega Corporation in the United States and/or other countries. Microsoft and Windows are either registered
trademarks or trademarks of Microsoft Corporation in the United States and/or other countries. Apple, Macintosh, and Mac are either
registered trademarks or trademarks of Apple, Inc. in the United States and/or other countries. Certain other product names, brand names,
and company names may be trademarks or designations of their respective owners.
-
 1
1
-
 2
2
-
 3
3
-
 4
4
-
 5
5
-
 6
6
-
 7
7
-
 8
8
-
 9
9
-
 10
10
-
 11
11
-
 12
12
-
 13
13
-
 14
14
-
 15
15
-
 16
16
-
 17
17
-
 18
18
-
 19
19
-
 20
20
-
 21
21
-
 22
22
-
 23
23
-
 24
24


Iomega PROFESSIONAL HARD DRIVE ESATA Bedienungsanleitung
- Kategorie
- Externe Festplatten
- Typ
- Bedienungsanleitung
- Dieses Handbuch eignet sich auch für
in anderen Sprachen
- English: Iomega PROFESSIONAL HARD DRIVE ESATA Owner's manual
- français: Iomega PROFESSIONAL HARD DRIVE ESATA Le manuel du propriétaire
- español: Iomega PROFESSIONAL HARD DRIVE ESATA El manual del propietario
- italiano: Iomega PROFESSIONAL HARD DRIVE ESATA Manuale del proprietario
- Nederlands: Iomega PROFESSIONAL HARD DRIVE ESATA de handleiding
- português: Iomega PROFESSIONAL HARD DRIVE ESATA Manual do proprietário
Verwandte Artikel
-
Iomega UltraMax Plus 4TB Schnellstartanleitung
-
Iomega ULTRAMAX PRO Bedienungsanleitung
-
-
Iomega eGo 34375 Schnellstartanleitung
-
-
-
-
-
-