Lavor LAV54 Benutzerhandbuch
- Kategorie
- Hochdruckreiniger
- Typ
- Benutzerhandbuch

IDROPULITRICE AD ALTA PRESSIONE A CALDO pag. 10 IT
HOT HIGH-PRESSURE WASHER MACHINE pag. 16 EN
NETTOYEUR HAUTE PRESSION A CHAUD page 22 FR
HEIßWASSER-HOCHDRUCKREINIGER Seite 28 DE
HIDROLIPIADORA DE ALTA PRESIÓN EN CALIENTE pág. 34 ES
HIDROLIMPADORA DE ALTA PRESSÃO A QUENTE pág. 40 PT
HYDRAULINEN KORKEAPAINEPESURI sivu 46 FI
HEET WATER HOGEDRUCK REINIGER blz. 51 NL
VYSOKOTLAKÝ VODNÍ ČISTIČ PRO ČIŠTĚNÍ ZA TEPLA srt. 57 CS
VARMTVANDS HØJTRYKSRENSER sd. 62 DA
VISOKOTLAČNI VODNI ČISTILEC NA VROČO VODO str. 67 SL
VATTENKURANSTALT RENGÖRA HÖG - TRYCK PÅ VÄRMA sid. 72 SV
TOPLI VODENI PERAČ VISOKOG PRITISKA str. 77 HR
YÜKSEK BASINÇLI SICAK SULU YIKAMA MAKINESI sf. 82 TR
KÕRGSURVEPESUR
lk.
88 ET
HØYTRYKKSVASKER RU - ГИДРООЧИСТИТЕЛЬ ВЫСОКОГО ДАВЛЕНИЯ
side
94 NO
MYJKA WYSOKOCIŚNIENIOWA str.
100 PL
ГИДРООЧИСТИТЕЛЬ ВЫСОКОГО ДАВЛЕНИЯ
стр.
106 RU
1-123 AR
ATTENZIONE: leggere le istruzioni prima dell’ utilizzo.
WARNING: read the instructions carefully before use.
ATTENTION: lire attentivement les istructions avant l’usage.
ACHTUNG: die anweisungen bitte vor gebrauch sorgfältig lesen.
ADVERTENCIA: leer atentamente las advertencias antes el uso de aparado.
ATENÇÃO: ler atentamente as instruções antes da utilização.
HUOMIO: lue ohjeet ennen käyttöä.
LET OP: vóór gebruik de gebruiksaanwijzing aandachtig lezen.
POZOR: před použitím si přečtěte návod k obsluze. PAS PÅ! læs instruktionsbogen før
maskinen tages i brug. POZOR: pred uporabo preberite navodila.
VIKTIGT! läs
anvisningarna före användning.
PAŽNJA: prije upotrebe pročitajte upute.
DİKKAT: MAKİNAYI KULLANMADAN ÖNCE KULLANIM TALİMATLARINI OKUYUNUZ. ADVARSEL:
les bruksanvisningen før bruk. TÄHELEPANU: lugege juhised enne seadme kasutamist läbi
UWAGA: przed użyciem przeczytać instrukcje. ВНИМАНИЕ: перед использованием
прочитайте инструкцию по эксплуатации
FKX, Kappa,
RIO, Kappa A,
XTR, Fuego,

model:
Fuego
model:
XTR
FKX
Kappa
model:
Rio
Kappa A
4 X
8 X
4 X
2
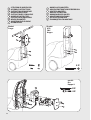
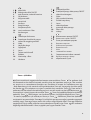
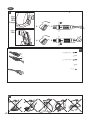
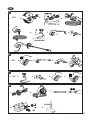
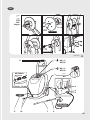
• ISTRUZIONI DI MONTAGGIO
• ASSEMBLY INSTRUCTIONS
• INSTRUCTION DE MONTAGE
• MONTAGEANLEITUNG
• INSTRUCCIONES DE MONTAJE
• MONTAGE-INSTRUCTIES
• INSTRUÇÃO DE MONTAGEM
• NÁVOD K MONTÁŽI
• MONTERINGSVEJELDNING
• ASENNUSOHJE
• NAVODILA ZA MONTAŽO
• MONTAGEINSTRUKTIONPÅ FÖRFRÅGAN
• UPUTE ZA MONTAŽU
• MONTAJ TALIMATLARI
• KOKKUPANEMISE JUHISED
• MONTERINGSVEILEDNING
• INSTRUKCJE MONTAŻU
• РУКОВОДСТВО ПО МОНТАЖУ

1 X
4 X
OPTIONAL
model:
XTR
FKX
Kappa
1.
4.
2.
5.
3.
6.
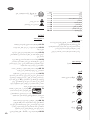
In base al modello si possono verificare delle differenze nella fornitura. Depending on the model,
there are differences in the scopes of delivery. Suivant le modèle, la fourniture peut varier. Je nach
Modell gibt es Unterschiede im Lieferumfang. Según el modelos, hay diferencias en el contenido
suministrado. Consoante o modelo, existem diferenças no volume de fornecimento. Mallien
varustetaso vaihtelee, katso kuvaus laatikon kyljestä. Afhankelijk van het model zijn er verschillen in
de leveringspakketten. Alt etter modell kan det være ulike leveringsomfang. Leveransomfånget
varierar allt efter modell. Afhængigt af modellen er der forskelle i leveringen. Στο παραδοτέο υλικό
υπάρχουν διαφορέ ανάλογα ε το οντέλο. Ovisno o modelu postoje razlike u sadržaju isporuke.
Glede na model prihaja do razlik v obsegu dobave. V závislosti na modelu se liší obsah dodávky.
Modele bağlı olarak teslimat kapsamında farklar olabilir. W zależności od modelu istnieją różnice w
zakresie dostawy. В данном руководстве по эксплуатации дано описание прибора с максимальной
комплектацией. Комплектация отличается в зависимости от модели. A szállítási terjedelem
modellenként eltérő (lásd a csomagoláson). Piegādātā komplektācija atšķiras atkarībā no putekļu sūcēja
modeļa. W zależności od modelu istnieją różnice w zakresie dostawy (patrz opakowanie). În funcţie
de model pachetele de livrare pot diferi (vezi ambalajul). Podľa modelu existujú rozdiely v rozsahu
dodávky (pozri obal). В обема на доставка има разлики в зависимост от модела (вижте опаковката).
3
• NAVODILA ZA MONTAŽO
• MONTAGEINSTRUKTIONPÅ FÖRFRÅGAN
• UPUTE ZA MONTAŽU
• MONTAJ TALIMATLARI
• KOKKUPANEMISE JUHISED
• MONTERINGSVEILEDNING
• INSTRUKCJE MONTAŻU
• РУКОВОДСТВО ПО МОНТАЖУ

OPTIONAL
1/2 inch • 13 mm
ON ( I )
OFF (0)
ON ( I )
OFF (0)
10
4
7
1
2
5
6
11
3
9
8
model:
Rio
4
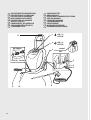
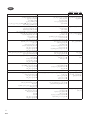
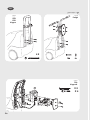
• DESCRIZIONE DELL’APPARECCHIO
• DESCRIPTION OF THE MACHINE
• DESCRIPTION DU L’APPAREIL
• BESCHREIBUNG DES GERÄTS
• DESCRIPCIÓN DEL APARATO
• TOESTEL UITZICHT
• COMPONENTES DO APARELHO
• STANDARDNÍ PŘÍSLUŠENSTVÍ
• STANDARDUDSTYR
• VAKIOVARUSTEET
• OBSEG DOBAVE
• UTRUSTNING STANDARDUTRUSTNING
• SERIJSKA OPREMA
• STANDART DONANIM
• STANDARDVARUSTUS
• SERIETILBEHØR
• WYPOSAŻENIE SERYJNE
• БАЗОВАЯ КОМПЛЕКТАЦИЯ

OPTIONAL
SE PRESENTE
IF PRESENT
SI INCLUSE
WENN VORHANDEN
SI ESTUVIERA PRESENTE
INDIEN AANWEZIG
SE PRESENTE
JE-LI PŘÍTOMNÁ
SÅFREMT MASKINEN ER
FORSYNET DERMED
MIKÄLI VARUSTEENA
ČE JE V KOMPLETU
I FÖREKOMMANDE FALL
NEKI MODELI
MEVCUT İSE
KUI OLEMAS
DERSOM SLIK FINNES
JEŻELI WYSTĘPUJE
ЕСЛИ ЕСТЬ
5
1
Interruttore bruciatore
2
Interruttore
elettropompa
ON/OFF
3
Serbatoio detergente
4
Uscita
5
Tubo ad alta pressione
6
Pistola
7
Lancia
8
Serbatoio gasolio
9
Cavo elettrico con spina
10
Entrata + filtro
11
Manico
1
Burner switch
2
ON/OFF
Electropump switch
3
Detergent tank
4
Water outlet
5
High pressure hose
6
Gun
7
Lance
8Diesel tank
9
Electric cable
10
Water inlet + filter
11 Handle
1
Interrupteur brûleur
2
Interrupteur
électropompe
ON/OFF
3
Réservoir de détergent
4
Sortie H.P.
5
Flexible haute pression
6
Pistolet
7
Lance
8
réservoir du DIESEL
9
Cable electrique avec prise
10
Entrée d’eau + filtre
11 Manche
1
Schalter Brenner
2
Schalter Elektropumpe
ON
3
Reinigungsmittelbehälter
4
Auslauf
5
Hochdruckschlauch
6
Pistole
7
Lanze
8Diesel
behälter
9
Anschlusskabel mit Stecker
10
Einlauf + Filter
11 Griff
1
Interruptor quemador
2
Interruptor eléctropompa
ON/OFF
3
Depósito detergente
4
Salida
5
Manguera de alta presión
6
Pistola
7
Lanza
8
Depósito Diesel
9
Cable eléctrico con enchufe
10
Entrada + filtro
11
Mango
1
Schakelaar van de verwarmer
2
UIT/ AAN
Schakelaar elektro pomp
ON/OFF
3
Reinigingsmiddeltank
4
Wateruitgang
5
Hogedrukslang
6
Pistool
7
Lans
8
Diesel tank
9
Eelectrische kabel
10
Wateringang + filter
11 Handvat

6
1
Interruptor queimador
2
Interruptor de
bomba eléctrica
ON/OFF
3
Reservatório detergente
4
Saida
5
Tubo flexível de alta pressão
6
Pistola
7
Lança
8
Reservatório Diesel
9
Cabo elétrico com ficha
10
Entrada + filtro
11 Alça
1
Přepínač hořáku
2
Přepínač elektrického čerpadla
ON/OFF
3
Nádrž se saponátem
4
Výstup
5
Vysokotlaká hadice
6
Pistole
7
Tryska
8
Diesel
9
Elektrická přívodní šňůra se zástrčkou
10
Vstup + filtr
11 Rukojeť
1
Afbryder til brænder
2
ON/OFF
Afbryder til elektrisk pumpe
3
Tank for rengøringsmiddel
4
Vandafgang
5
Højtryksslange
6
Pistol
7
Dyserør
8
Tank for Diesel
9
El-kabel med stik
10
Vandtilgang + filter
11 håndtag
1
Polttimen katkaisin
2
Sähköpumpun katkaisin
ON/OFF
3
Pesuainesäiliö
4
Veden ulostulo
5
Korkeapaineinen letku
6
Pesukahva
7
Suutin
8
Diesel
9
Sähköjohto ja pistotulppa
10
Veden sisäänmeno + suodatin
11 kahva
1
Stikalo gorilnika
2
ON/OFF
Stikalo elektročrpalke
3
Posoda za čistilo
4
Izstop
5
Visokotlačna cev
6
Pištola
7
Brizgalka
8
Diesel
9
Električna vrvica z vtičem
10
Vstop + filter
11 Ročaj
1
Strömbrytare brännare
2
ON/OFF
Strömbrytare elpump
3
Behållare till rengöringsmedel
4
Uttag (vatten)
5
Tryckslang
6
Pistol
7
Lans
8
Behållare till Diesel
9
Elkabel med stickpropp
10
Intag + filter (vatten)
11 handtag
1
Prekidač gorionika
2
ON/OFF
Prekidač električne pumpe
3
Spremnik deterdženta
4
Izlaz
5
Visokotlačno crijevo
6
Pištolj
7
Cijev s mlaznicom
8
Diesel
9
Električni kabel s utikačem
10
Ulaz + filtar
11 Drška
1
Brülör açma kapama düğmesi
2
Elektrikli pompa açma kapama düğmesi ON/OFF
3
Deterjan deposu
4
Çıkış
5
Yüksek basınçlı boru
6
Tabanca
7
Lans
8
Diesel deposu
9
Fişli elektrik kablosu
10
Giriş + filtre
11 Kulp

7
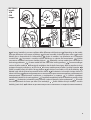
•Questa macchina è soggetta ad allacciamento sotto condizione: Zmax • The appliance shall
be connected to the electrical network providing that the impedence zmax • Cette machine
est soumise a un raccordement électrique sous condition du respect de l’impédence zmax
• Nach Berechnung ist die maximal zulässige Netzipedanz Zmax am Versorgungs-Anschlusspunkt
des Kunden • Esta máquina esta sujeta a conexi ón bajo condición: Zmax • Deze toestel is
onderworp aan een electrische verbinding op basis van een respekt van het impedantie zmax •
Esta maquina é sujeita à ligaçao sob condiçao: Zmax • Tento stroj podléhá připojení za následující
podmínky: Zmax • Elforsyningen, som maskinen tilsluttes, skal opfylde følgende krav: Zmax
• Η συσκευή προορίζεται για σύνδεση σε δίκτυο ε: Zmax • Sähkövirran, johon laite kytketään,
on täytettävä seuraavat ehdot: Zmax • Pri priključitvi aparata na omrežje je potrebno zagotoviti
naslednji pogoj: Zmax • Denna maskin ska anslutas enligt följande villkor: Zmax • Električno
napajanje na koje je uređaj priključen mora zadovoljavati sljedeći uvjet: Zmax • Bu makinenin
bağlandığı elektrik beslemesi sistemi, aşağıdaki şarta uygun olmalıdır: Zmax
Zmax = 0,256 Ohm
1
põleti lüliti
2
elektripumba lüliti ON/OFF
3
paak Pesuaine, uvahendi imemine
4
väljalaskeava
5
kõrgsurvevoolik
6
pesupüstol
7
pesutoru
8
paagi kütusega
9
toitejuhtme pistik
10
vee sissevõtuava + filter
11
kandesangast
1
Strømbryter for brenner
2
Strømbryter for elektrisk pumpe
3
tanken for rengjøringsmiddel
4
Utløp
5
Høytrykksslange
6
Spylepistol
7
Lanse
8
Tanken med drivstoff
9
Kabelen
10
Vanninnløp + filter
11
Håndtere
1
Przełącznik palnika
2
Przełącznik pompy elektryczney ON/OFF
3
zbiornik na detergent
4
Wylot
5
Wąż wysokociśnieniowy
6
Pistolet natryskowy
7
Lanca
8
zbiornik paliwem
9
przewodu elektrycznego.
10 Wlot + filtr
11
uchwyt
1
Выключатель горелки ON/OFF
2
Выключатель горелки
ON/OFF
3Бачок для моющего средства
4
Выпускное отверстие
5
Шланг высокого давления
6
Водяной пистолет
7
Копье
8
топливный бак топливом
9Соединительный кабель с вилкой
10
Впускное отверстие + фильтр
11
обрабатывать
Pучка

8
1/2 inch • 13 mm
5÷40°C
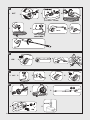
1.
2. 3. 4.
2.
OFF
ON
3. 4.
5. 6. 7.
9.
1.
8.
min 15 l/min
max 1 MPa
1 min
OFF
1. 2. 3.
5. 1. 2. 3. 4.
4. 5.
A
B
C
D
DIESEL

9
E
I
H
·
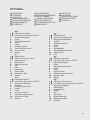
getto spillo/ventaglio
·
spread pattern/pencil jet
·
jet
variable
·
vario Duese
·
chorro regulable
·
jato variavel
·
pistemäinen/viuhkamainen suihku
·
dunne straal/
waaiervormige straal
·
vějířová/přímá tryska
·
nålesprøjt/
viftesprøjt
·
iglasti/pahljačasti curek vode
·
nål-/
sol ädersformad stråle
·
mlaznica-fi ni mlaz/raspršivač
·
jet püskürtme/jet fan waaiervormige straal vifteformet
stråle strumień wachlarzowy веерообразная струя
·
lancia turbo
·
turbo lance
·
lance turbo
·
turbo
lanze
·
lanza turbo
·
turbo lança
·
turbo suihkuputki
·
turbo Lans
·
tryska turbo
·
turbolanse
·
turbo
pištola
·
turbolans
·
turbo mlaznica
·
turbo lans
turbootsik turbo-lanse lanca turbo насадка турбо
OPTIONAL
1
2
1
2
1.
1.
2.
4.
3.
5.
OPTIONAL
SE PRESENTE
IF PRESENT
SI INCLUSE
WENN VORHANDEN
SI ESTUVIERA PRESENTE
INDIEN AANWEZIG
SE PRESENTE
JE-LI PŘÍTOMNÁ
SÅFREMT MASKINEN ER
FORSYNET DERMED
MIKÄLI VARUSTEENA
ČE JE V KOMPLETU
I FÖREKOMMANDE FALL
NEKI MODELI
model:
FKX
XTR
Fuego
model:
Rio
MEVCUT İSE
KUI OLEMAS
DERSOM SLIK FINNES
JEŻELI WYSTĘPUJE
ЕСЛИ ЕСТЬ
Seite wird geladen ...
Seite wird geladen ...
Seite wird geladen ...
Seite wird geladen ...
Seite wird geladen ...
Seite wird geladen ...

Translation of the original instructions
EN
16
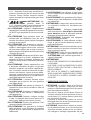
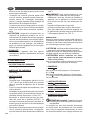
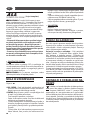
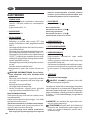
SAFETY PRECAUTIONS
> WARNINGS
• 01WARNING: This appliance is for outdoor
use only.
• 02WARNING: Always disconnect the elec-
tricity and water supplies on completion of
every job.
• 03WARNING: Do not use the machine if a
supply cord or important parts of the ma-
chine are damaged, e.g. safety devices, high
pressure hoses, trigger gun.
• 04WARNING: This appliance has been de-
signed for use with the detergent provided
or the detergent specified by the manufac-
turer, such as a neutral shampoo based on
biodegradable anionic surface active deter-
gents. The use of other detergents or chemi-
cals may put the appliance’s safety at risk.
• 05WARNING: o not use the machine within
range of persons unless they wear protective
clothing.
• 06WARNING: Do not direct the nozzle to-
ward mechanical parts containing lubricant
grease, as the grease will dissolve and spread
over the surrounding ground. Vehicle tyres/
tyre valves may only be cleaned from a mini-
mum distance of 30 cm, otherwise the vehi-
cle tyre/tyre valve could be damaged by the
high-pressure jet. The first indication of this
is a discoloration of the tyre. Damaged vehi-
cle tyres/tyre valves can be deadly danger-
ous.
• 07WARNING: High pressure jets
can be dangerous if subject to
misuse. The jet must not be di-
rected at persons,animal, live electrical
equipment or the machine itself.
• 08WARNING: High pressure hoses, fittings
and couplings are important for the safety
of the machine. Use only hoses, fittings and
couplings recommended by the manufac-
turer. (it is extremely important to protect
these components against damage by avoid-
ing their improper use and protecting them
against bending, knocks and scratches).
• 09WARNING: Appliances not equipped
with A.S.S. – Automatic Stop System: must
not be left in operation for more than 2 min-
utes with the gun released. The recycled wa-
ter heats up considerably, seriously damag-
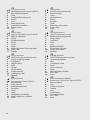
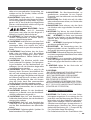
INDEX pag.
General information 1
Symbols 1
Safety precautions 1
Usage 3
Care and maintenance 5
Warranty conditions 5
Disposal 5
Troubleshooting 6
Pictures 8-9
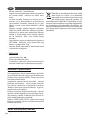
GENERAL INFORMATION
> INTENDED USE
· The appliance can be used for washing surfaces out-
doors, whenever pressurised water is required to re-
move dirt.
· With special optional accessories, it can be used for
foaming and sandingblasting, and for washing with
a rotary brush for application to the gun.
· This appliance’s performance and userfriendliness
make it suitable for NON PROFESSIONAL use.
> THECNICAL DATA
(see thecnical data plate)
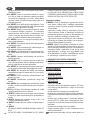
SYMBOLS
CAUTION! It is important to be
careful of the following items.
IMPORTANT
LOCKED
OPEN
IF PRESENT
Double insulated (IF PRESENT): supple-
mentary insulation is applied to the basic
insulation to protect against electric shock
in the event of failure of the basic insulation.
warning do not touch
warning symbol : do not inhale
..
- 1

EN
17
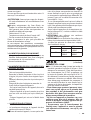
ing the pump.
• 10WARNING: Appli-
ances equipped with
A.S.S – Automatic Stop System: these appli-
ances should not be left in standby for more
than 5 minutes.
• 11WARNING: Switch the appliance off com-
pletely (master switch on (0)OFF) whenever
it is left unattended.
• 12WARNING: Every machine is tested in its
operating conditions, so it is normal for a few
drops of water to be left inside it.
• 13WARNING: Take care not damage the
electric cable. If the supply cord is damaged,
it must be replaced by the manufacturer, its
service agent or similarly qualified persons in
order to avoid a hazard
• 14WARNING: Appliance with fluid under
pressure. Keep a firm hold on the gun and be
prepared to take the kickback pressure. Only
use the high pressure nozzle provided with
the appliance.
• 16WARNING: This appliance is not intended
for use by persons (including children) with
reduced physical, sensory or mental capa-
bilities, or lack of experience and knowledge,
unless they have been given supervision or
instruction concerning use of the appliance
by a person responsible for their safety.
• 17WARNING: Children should be super-
vised to ensure that they do not play with
the appliance.
• 18WARNING: Never start the high-pressure
cleaner without first completely unwinding
the high-pressure hose.
• 19WARNING: When winding and unwind-
ing the pipe take care not to cause the high-
pressure cleaner to overturn.
• 20WARNING: Before unwinding or winding
the hose, switch the machine off and release
the pressure in the hose itself (switching off).
• 21WARNING: Risk of explosion — Do not
spray flammable liquids.
• 22WARNING: To ensure machine safety, use
only original spare parts from the manufac-
turer or approved by the manufacturer.
• 23WARNING: Do not direct the jet against
yourself or others in order to clean clothes or
foot-wear.
• 24WARNING: High pressure cleaners shall
not be used by children or untrained person-
nel.
• WARNING: Water that has flown through
backflow preventers is considered to be
non-potable.
• XX WARNING: the machine shall be discon-
nected from its power source, by removing
the plug from the socket-outlet, during
cleaning or maintenance and when replac-
ing spare parts
• XJ WARNING: If an extension cord is used,
the plug and socket must be of watertight
construction.
• XY WARNING: Inadequate extension cords
can be dangerous.
•
WARNING: When the unit is working do not use it in
a closed place where ventilation may be insufficient
and never cover the unit.
•
WARNING: By no means use the machine during
thunderstorms or when it is raining.
•
WARNING: Do not use the unit on inflammables
surfaces.
•
WARNING:
- NEVER EVER TOUCH THE MACHINE WITH WET
HANDS OR BARE FEET.
- NEVER PULL THE POWER SUPPLY CABLE OR MA-
CHINE IN ORDER TO DISCONNECT THE PLUG FROM
THE SOCKET.
- IF DURING FUNCTIONING THE POWER SUPPLY
RUNS OUT, FOR SAFETY REASONS, TURN THE MA-
CHINE OFF.
> SAFETY DEVICE
• WARNING: the gun is fitted with a safety
catch. Whenever use of the machine is inter-
rupted it is important to operate the safety
catch to prevent accidental activation of the
jet.
- Safety features: gun equipped with safety
locking device, appliance equipped with
(Class I) overload cutout, pump equipped
with by-pass valve or shutdown device.
- The safety button on the gun is not there to
lock the lever during operation, but to pre-
vent its accidental operation.
• WARNING: The appliance is equipped with
a motor protection device: in case of device
intervention, wait some minutes or, in alter-
native, disconnect and re-connect the prod-
uct to the electric system. In case this prob-
lem repeats again or if the product does not
start again, take the product to the nearest
After Sales Service Point
> STABILITY
2 -

EN
18
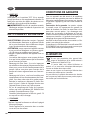
• WARNING: The machine must be always kept
on horizontal bases, in a safe and stable way.
USAGE
> DESCRIPTION OF THE MACHINE
See pag.3-4-5.
> ASSEMBLY INSTRUCTIONS
See pag.2.
> PUT INTO SERVICE
See fig.
* Check that the master switch is turned to
“OFF” and that the water filter is fitted into
the pump’s inlet pipe.
* Screw the snap connection into place by
hand, without the aid of tools.
* Connect the water supply hose to the snap
connection. The hose must have an inside
diameter of at least 13 mm (1/2”).
* Connect the high pressure hose to the
pump’s outlet pipe. Press the high pressure
hose coupling fully down and then screw
into place by hand without the aid of tools.
* Connect the high pressure hose to the gun.
* Turn the water tap fully on. The water tem-
perature absolutely must be below 40°C.
IMPORTANT: The washer machine has to
operate with clean water in order to avoid
any damages to the washer machine itself.
* Release the gun safety catch and keep the
trigger pressed, allowing the water to flow
until all the air has been expelled.
* Fit the lance into the gun.
* Connect the plug to the power socket.
* To start the machine, press the gun trigger
and at the same time tur
n the master switch to
“ON”.
FILLING UP
Fill up the tank with the fuel
indicated on the
technical data plate.
Avoid that the tank is empty when the ma-
chine is running in order not to damage the
fu
el pump.
•
WARNING:
Incorrect fuel shall not used as
they as provide hazard.
Fill up the detergent tank with the suggested prod-
ucts, suitable for the kind of washing to be carried
out .
•WARNING:
make use only of liquid deter-
gent, do not absolutely use acid or too much
alkaline products.
We suggest you to make use of our products, which
have been studied for the use with washer ma-
chines.
> STARTING UP
See fig.
Start the machine:
turn the switch pos. 2 ( I ) ON .
To wash with hot water:
turn the switch pos. 1 ( I ) ON .
The burner operates when the machine is in pres-
sion.
> HIGH PRESSURE LANCE
See fig.
> DETERGENT SUCTION
See fig.
> HIGH PRESSURE HOSE
See fig.
> WATER SUPPLY
Water supply collection
Water supply from the water main
· Connect a supply hose (not included) to the water
inlet of the unit and to the water supply.
· Open the water supply.
WARNING: (symbol) machine not suitable for
connection to the potable water mains.
The cleaner can only be connected to the wa-
ter mains if the water mains is separated by a
backflow preventer. Make sure that the hose
is at least Ø 13mm-1/2 inch and that it is rein-
forced.
• WARNING: Water that has flown through
backflow preventers is considered to be
nonpotable.
IMPORTANT: Only clean or filtered water
should be used for intake. The delivery of the
water intake tap should be equal to the dou-
ble of the maximum pump range.
-
Minimum delivery rate: 15 l/ min.
-
Maximum intake water temperature: 40°C
-
Max inlet water pressure: 1Mpa
Place the cleaner as close to the water supply
system as possible.
- 3

EN
19
Water supply from an open container
· Unscrew the coupling part for the water inlet.
· Screw the suction hose with filter (not included) onto
the water connection of the unit.
· Hang the filter in the container.
· Vent the unit before operation.
· Unscrew the high-pressure line at the high-pressure
outlet of the unit.
· Switch on the unit and let it run until water free of
bubbles emerges at the high-pressure outlet.
· Switch off the unit and screw on the high-pressure
hose again.
Failure to comply with the above conditions
causes serious mechanical damage to the
pump and the loss of warranty cover.
> ELECTRICITY SUPPLY
- The appliance’s electrical connection must
comply with the IEC 60364-1 standard.
IMPORTANT: Before connecting the ap-
pliance, make sure that the nameplate data
are the same as those of the electrical mains
and that the socket is protected by a differ-
ential security breaker with tripping sensitiv-
ity below 0.03 A - 30 ms.
- If the appliance’s plug is not compatible
with the socket, have the socket replaced
with another of suitable type by profession-
ally qualified staff.
- Never use the appliance in ambient temper-
atures below 0° C if it is equipped with a PVC
(H VV-F) cable.
• XY WARNING: Inadequate extension cords
can be dangerous.
• XJ WARNING: If an extension cord is used,
the plug and socket must be of watertight
construction.
Information for supply may also be obtained
from the plug manufacturer.
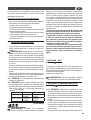
<16 A <25 A
<20 m ø 1,5 mm2
14 AWG
ø 2,5 mm2
12 AWG
20 m - 50 m ø 2,5 mm2
12 AWG
ø 4,0 mm2
10 AWG
> PLUG
HOW TO CONNECT THE CORD TO A U.K. PLUG:
IMPORTANT The wires in the mains lead are col-
oured in accordance with the following code:
Blue Neutral
Brown Live
Yellow/Green Earth
Please read the in-
structions given be-
low before connect-
ing the cord to a plug.
If in doubt please
consult a qualified
electrician. As the
colours of the wires in
the mains lead of this
appliance may not
correspond with the
coloured markings
identifying the termi-
nals in your plug, proceed as follows: The wires that
is coloured Brown must be connected to the termi-
nal which is marked with the letter L or coloured
Red. The wire that is coloured Blue must be con-
nected to the terminal wich is marked with the letter
N or coloured Black. Safety points for rewireable or
moulded plug: The mains lead of this appliance may
be already fitted with a BS1363 13A plug.
- If your socket outlet is not suitable for the plug, then
the plug must be removed (cut off if it is a mould-
ed on plug), the flexible cord insulation should be
stripped back as appropriate and a suitable 3 pin
plug fitted.
•
WARNING: Dispose of a plug that has been cut from
the power supply cord, as such a plug is hazardous
if inserted in a live 13A socket outlet elsewhere in
the house. - Should the fuse need to be replaced
an ASTA marked fuse, approved to BS1362, of the
same rating must be used. - Always replace the fuse
cover after fitting a fuse. The plug must NOT be used
if the cover is omitted or lost until a replacement is
obtained. - Make certain that only the correct fuse
cover is used and fitted. - For plugs with detachable
fuse cover the replacement must be the same as the
colour insert in the base of the plug, or as directed by
the embossed wording on the base of the plug. - If
the detachable fuse cover is lost a replacement may
be purchased from a Service Centre.
( if fitted)
NOTE:
(Automatic Stop System), which
stops the machine during the bypass phase. To start
the water cleaner, it is therefore necessary to set the
switch on position (I)“ON”; after that press the pistol
4 -

EN
20
trigger: the Automatic Stop System will start the ma-
chine and will stop it automatically when the trigger
is released. It is advisable to put on the safety of the
pistol trigger whenever the machine is stopped, in
order to avoid unintentional starting.
· Any automatic start of the machine without press-
ing the gun trigger is attributable to air bubbles in
the water or other similar phenomena which do not
imply the existence of any defects in the machine.
· Do not leave the appliance unattended during the
standby for more than 5 minutes. Contrarily, for the
safety of the appliance it is necessary to re-turn the
switch into the (0) OFF position.
· Please check that the coupling of the high pressure
hose with the appliance and the gun supplied as
standard equipments made correctly, that is to say
without any water leak.
> SWITCHING OFF
See fig.
turn the switch pos. 2 (0) OFF position and wait that
the water get completly cold.
In this way you avoid any calcareous deposit and
overheatings of the coil and the boiler, which are al-
ways dangerous.
IMPORTANT:
When the machine is switched off,
always discharge the pressure hose, opening the
gun.
CARE AND MAINTENANCE
See fig.
• XX WARNING: the machine shall be discon-
nected from its power source, by removing
the plug from the socket-outlet, during
cleaning or maintenance
• WARNING: Do not spray the appliance with
water and do not use detergents or aggres-
sive solvents. Machine could be damaged.
· Clean the exterior part of the machine with a dry
cloth.
- Always keep the machine clean so that the cooling
air can pass through the slits without obstructions..
- Cleaning the water filter: To ensure the pump gives
good service it is extremely important to check and
clean the water filter frequently. Use pliers to extract
it from the pump and rinse it carefully in running wa-
ter.
- Cleaning the nozzle: A blockage in the nozzle may
prevent the machine from operating correctly, so it
must be kept clean. Switch off the machine and re-
move the lance. Clean the nozzle with the pin pro-
vided. Rinse the lance in running water.
- When topping up the oil in the pump, use a SAE
20W40 mineral oil. Quantity supplied: 70 gr.
- The replacement of the fuel metal pipe is requested
after disassembling to avoid fuel leakages.
> STORAGE
See fig.
· Move the machine only by grasping the car-
rying handle
· Store the appliance and the accessories in a
frost-safe room.
WARRANTY CONDITIONS
All our machines are subjected to strict tests
and are covered against manufacturing de-
fects in accordance with applicable regula-
tions. The warranty is effective from the date of
purchase. The following are not included in
the warranty: - Parts subject to normal wear.
- Rubber parts, charcoal, filters and the acces-
sories and optional accessories. - Accidental
damage, caused by transport, neglect or inad-
equate treatment, incorrect or improper use
and installation failing - The warranty shall not
cover any cleaning operations to which the op-
erative components may be subjected, such
as clogged nozzles and filter blocked due to
limestones. This pressure cleaner is intended
to be used for domestic and hobby work: the
warranty does not cover any other different
kind of use.
DISPOSAL WEEE
As the owner of electrical or electronic
equipment, the law (in accordance
with the EU Directive 2002/96/EC of 27 Janu-
ary 2003) prohibits you from disposing of this
product or its electrical / electronic accessories
as municipal solid waste and obliges you to
make use of the appropriate waste collection
facilities.
The product can be disposed of by returning it
to the distributor when a new product is pur-
chased. The new product must be equivalent
to that being disposed of.
- 5

EN
21
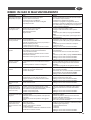
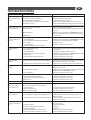
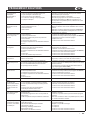
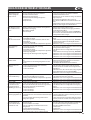
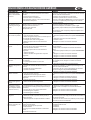
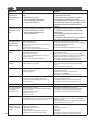
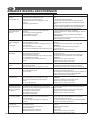
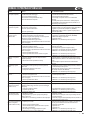
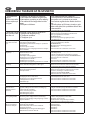
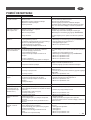
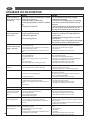
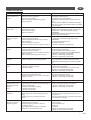
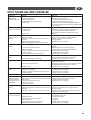
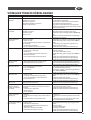
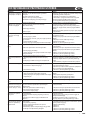
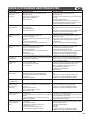
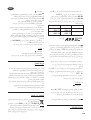
TROUBLESHOOTING
FAULT PROBABLE CAUSE REPAIR
1. The pump does not
start when the switch is
pressed.
1. The plug is not properly connected to the socket.
2. The electrical socket is not working.
3. The mains voltage is insufficient.
4. The gauge of the electrical power lead is too small.
5. The pump has cut out.
1. Connect the plug to the power socket correctly.
2. Have the electrical socket checked.
3. Check that the system is suitable.
4. Refer to the section detailing the electrical connection.
5. Turn the switch to ON while keeping the gun lever pressed;
if the problem persists contact an authorised service centre.
2. The machine starts, but
no water comes out.
6. Pump, hoses or accessories frozen.
7. No water supply.
8. Water filter fouled.
9. Nozzle fouled.
6. Allow the pump and hoses to thaw.
7. Connect the machine to the water supply system and turn
on the tap.
8. Remove and clean the filter (see “MAINTENANCE” section).
9. Remove the lance from the gun and clean the nozzle with
the pin provided.
3. The pump runs but
pressurisation does not
take place.
10. Insufficient water.
11. Suction filter fouled.
12. Pressure regulator valve (if fitted) on minimum
pressure setting.
13. Lance nozzle worn.
14. Suction or delivery valves fouled or worn.
10. Check that the delivery rate is at least 12 l/min.
11. Remove and clean the filter (see “MAINTENANCE” section).
12. Increase the pressure by turning the handgrip.
13. Replace the lance.
14. Contact an authorised service centre.
4. Uneven working
pressure.
15. Lance nozzle fouled or dirty.
16. Air in intake water.
17. Suction filter fouled.
18. Suction or delivery valves fouled or worn.
19. Gaskets worn.
20. Pressure regulator valve gaskets worn.
15. Remove the lance from the gun and clean the nozzle with
the pin provided.
16. Supply the machine with water correctly.
17. Remove and clean the filter (see “MAINTENANCE” section).
18. Contact an authorised service centre.
19. Contact an authorised service centre.
20. Contact an authorised service centre.
5. The motor stops
suddenly.
21. Machine’s safety overload cutout has been tripped.
22. The gauge of the electrical power lead is too small.
21. Allow the motor to cool for a few minutes. If the problem
persists contact an authorised service centre.
22. Refer to the section detailing the electrical connection.
6. Water leaks from the
machine.
23. Leaks from hose reel (if used).
24. Leaks from intake coupling.
25. Leaks from pump.
23. Tighten the couplings; if the problem persists contact an
authorised service centre.
24. Make sure that the coupling has been fitted correctly (See
illustrations in the “INSTALLATION” section).
25. Contact an authorised service centre.
7. Abnormal noise. 26. Suction filter fouled.
27. Intake water temperature too high.
28. Suction or delivery valves fouled or worn.
29. Bearings worn.
26. Remove and clean the filter (see “MAINTENANCE” section).
27. Reduce the temperature below 40°C.
28. Contact an authorised service centre.
29. Contact an authorised service centre.
8. Water in the oil. 30. O-ring seals worn. 30. Contact an authorised service centre.
9. The machine restarts
with the gun released
(versions with A.S.S.).
31.Water leak from hose - gun connection (except models
with hose and gun supplied readyconnected).
32. Air in intake water.
33.Water leak from the gun.
34.Water leak from the pump.
31. Tighten the connection with 2 spanners.
32. Supply the machine with water correctly.
33. Contact an authorised service centre.
34. Contact an authorised service centre.
10.The machine does not
suck in detergent.
35. Tank empty.
36. Lance handgrip on high pressure setting (if present).
37. Transparent suction pipe damaged or disconnected.
35. Fill the tank.
36. Move it to the low pressure setting by pulling the lever
towards the nozzle.
37. Reconnect the pipe. If the problem persists contact an
authorised service centre.
11.Turning on the burner
switch the boiler doesn’t
start.
38.No fuel
39.Fuel filter is clogged
40.Fuel pump is either blocked or burnt out
41.Damaged thermostat
42.Ignition spark insufficient or totally lacking
43.The space among the electrodes is not correct
38.Check the level in the tank and check whether the rigid
suction pipe is clean
39.Replace the line filter
40.Replace it.
41.Replace it.
42.Contact an authorised service centre.
43.Contact an authorised service centre.
6 -

Traduction des instruction originales
FR
22
SOMMAIRE pag.
Indications générales 1
Symboles 1
Avertissements 1
Utilisation 3
Nettoyage et entretien 5
Conditions de garantie 5
Élimination 5
Problèmes et solutions 6
Illustrations 8-9
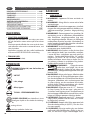
INDICATIONS GÉNÉRALES
> UTILISATION PRÉVUES
· L’appareil peut être utilisé pour le nettoyage de sur-
faces dans des milieux extérieurs tout les fois qu'on
élimina la saleté par l’eau sous pression.
· En utilisan les accessoires on peut effectuer des
travaux d’écumage, de sablage et des lavages avec
brosse rotative à appliquer sur la pistolet.
· Les performances et la simplicité d’utilisation de
l’appareil en permettent un usage NON PROFES-
SIONNEL.
> DONNÉES TECHNIQUES
(voir plaque données techniques)
SYMBOLES
ATTENTION! Redoublez d’attention
pour des motifs de sécurité.
IMPORTANT
FERMÉ
OUVERT
SI INCLUE
Double isolation (si inclue): il s ' agit
d'une protection supplementaire pour
l'isolation éléctrique
AVERTISSEMENT Ne pas touch
er
AVERTISSEMENT: ne pas inhaler
SECURITÉ
> AVERTISSEMENTS
• 01ATTENTION: Appareil ne devant être uti-
lisé qu’en plein air.
• 02ATTENTION: débrancher toujours l’ali-
mentation électrique ainsi que le raccorde-
ment au réseau de distribution d’eau à la fin
de chaque utilisation.
• 03ATTENTION: Ne pas utiliser l’appareil si le
câble électrique ou des parties importantes
de l’appareil même sont détériorés (ex.: dis-
positifs de sécurité, tube haute pression, pis-
tolet, etc.).
• 04ATTENTION: Cet appareil a été conçu
pour être utilisé avec le détergent fourni ou
préconisé par le fabricant, type shampooing
neutre à base de tensioactifs biodégradables
non ioniques. Le recours à d’autres déter-
gents ou d’autres substances chimiques
peut compromettre la sécurité de l’appareil.
• 05ATTENTION: Avant d’utiliser l’appareil
s’assurer que toute personne se trouvant
près de celui-ci portent des vêtements de
protéction, dans le cas contraire ne pas l’uti-
liser.
• 06ATTENTION:Le jet de la lance ne doit
pas être dirigé vers les parties mécaniques
contenant de la graisse lubrifiante: dans
le cas contraire la graisse sera dissoute et
répandue sur le terrain. Les pneus et valves
de gonflage ne doivent être nettoyés qu’en
maintenant le jet à une distance de 30 cm
minimum, sinon le pneu/la valve risque
d’être endommagé(e) par le jet haute pres-
sion. Le premier symptôme est la décolora-
tion des pneus. Tout pneu/toute valve de
gonflage détérioré(e) représente un danger
de mort.
• 07ATTENTION: Les jets haute
pression peuvent être dange-
reux s’ils ne sont pas correcte-
ment utilisés. Ne pas les diriger sur des per-
sonnes, des animaux, des appareils
électriques branchés ou sur l’appareil lui-
même
• 08ATTENTION: Les tubes flexibles, les
accessoires et les raccords haute pression
sont importants pour la sécurité de l’appa-
- 1
Seite wird geladen ...
Seite wird geladen ...
Seite wird geladen ...
Seite wird geladen ...
Seite wird geladen ...

Übersetzung des Originalanleitung
DE
28
INHALTSVERZEICHNIS Seite
Enleitung 1
Symbole 1
Sicherheit 1
Bedienung 3
Pflege und Wartung 5
Garantiebedingungen 5
Entsorgung 5
Abhilfen bei Betriebsstörungen 6
Abbildung 8-9
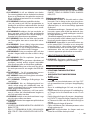
ENLEITUNG
> BESTIMMUNGSGEMÄSSER GEBRAUCH
· Das Gerät kann für das Waschen von Ober-
flächen in Außenräumen verwendet wer-
den, wenn unter Druck stehendes Wasser zur
Schmutzbeseitigung benötigt wird.
· Mit den entsprechenden Zubehörteilen kann
Schaum aufgetragen, sandgestrahlt oder mit
einer rotierenden Bürste, die auf die Pistole
aufgesetzt wird, gewaschen werden.
· Die Leistungen und die Einfachheit der Benut-
zung des Gerätes entsprechen einer NICHT
PROFESSIONELLEN Verwendung.
> TECHNISCHE DATEN
(siehe das Typenschild)
SYMBOL
ACHTUNG! Wichtiger Hinweis, der aus
Sicherheitsgründen zu beachten ist.
WICHTIG
VERRIEGELT
OFFEN
WENN VORHANDEN
(siehe Verpackung)
Doppelisolierung (WENN VORHAN-
DEN): sie ist einen zusätzlichen Schutz der
elektrischen Isolierung dieses Produkt
verlangt keine Erdung.
Warnung: nicht berühren
Warnung: nicht einatm
SICHERHEIT
> WARNHINWEISE
• 01 ACHTUNG: Gerät darf nur im Freien be-
nutzt werden.
• 02 ACHTUNG: Nach Beendigung jeder Arbeit
Strom- und Wasserversorgung immer absper-
ren.
• 03 ACHTUNG: Das Gerät nicht benutzen,
wenn das Stromkabel oder wichtige Gerätetei-
le beschädigt sind, z.B. Sicherheitsvorrichtun-
gen, Hochdruckschlauch der Pistole usw.
• 04 ACHTUNG: Dieses Gerät wurde für den
Einsatz mit dem vom Hersteller beigestellten
oder vorgeschriebenen Reinigungsmittel (Typ
neutrales Reinigungs-Shampoo auf der Basis
biologisch abbaubarer anionischer Tenside) ent-
wickelt. Die Verwendung anderer Reinigungs-
mitteln oder chemischer Substanzen kann die
Sicherheit des Gerätes beeinträchtigen.
• 05 ACHTUNG: Das Gerät nicht in der Nähe von
Personen benutzen, es sei denn, sie tragen
Schutzkleidung.
• 06 ACHTUNG: Bei der Reinigung von Fahrzeu-
gen darf der Strahl nicht direkt auf Achslager
gerichtet werden, da sonst das Fett ausgewa-
schen wird. Fahrzeugreifen/ Reifenventile dür-
fen nur mit einem Mindestabstand von 30 cm
gereinigt werden, sonst kann der Fahrzeugrei-
fen/ Reifenventil durch den Hochdruckstrahl
beschädigt werden. Erstes Anzeichen hierfür
ist eine Verfärbung des Reifens. Beschädigte
Fahrzeugreifen/Reifenventile sind lebensge-
fährlich.
• 07ACHTUNG:
Hochdruckwasserstrahlen kön-
nen gefährlich sein, wenn sie auf
unangebrachte Weise benutzt werden. Der
Strahl darf nicht auf Personen, Tiere, einge-
schaltete Elektrogeräte oder das Gerät selbst
gerichtet werden.
• 08 ACHTUNG: Die Hochdruckschläuche, Zu-
behörteile und Anschlüsse sind wichtig für die
Sicherheit des Gerätes. Benutzen Sie nur die
vom Hersteller vorgeschriebenen Schläuche,
Zubehörteile und Anschlüsse (es ist äußerst
wichtig, dass diese Teile unversehrt bleiben,
- 1

DE
29
daher eine unangebrachte Verwendung ver-
meiden und sie vor Knicken, Stößen und Ab-
schürfungen schützen).
• 09 ACHTUNG: Geräte ohne A.S.S. – Automatic
Stop System: sie dürfen nicht länger als 2 Minu-
ten mit freigegebener Pistole laufen. Die Tem-
peratur des in den Kreislauf zurückgeführten
Wassers wird beträchtlich erhöht und fügt der
Pumpe ernsthafte Schäden zu.
• 10ACHTUNG: Geräte
mit A.S.S – Automatic
Stop System: man sollte sie nicht länger als 5
Minuten in Stand-By-Modus belassen.
• 11 ACHTUNG: Das Gerät jedes Mal völlig aus-
schalten (Hauptschalter in Position (0)OFF),
wenn es unbeaufsichtigt bleibt.
• 12 ACHTUNG: Jede Maschine wird einer End-
kontrolle unter Benutzungsbedingungen
unterzogen, daher ist es normal, dass sich in
ihrem Innern noch ein paar Wassertropfen be-
finden.
• 13 ACHTUNG: Darauf achten, dass das Strom-
kabel nicht beschädigt wird. Be-schädigte
Anschlussleitung unverzüglich durch autori-
sierten Kundendienst/ Elektro-Fachkraft aus-
tauschen lassen.
• 14 ACHTUNG: Die Maschine enthält unter
Druck stehende Flüssigkeiten. Die Spritzpisto-
le gut festhalten, um der Reaktionskraft vor-
zubeugen. Nur die der Maschine beigestellte
Hochdruckdüse verwenden.
• 16 ACHTUNG: Dieses Gerät ist nicht für die
Nutzung durch Personen (einschließlich Kin-
der) mit stark reduzierten physischen, sensori-
schen oder geistigen Fähigkeiten oder Mangel
an Erfahrung und Wissen, es sei denn, sie Über-
wachung oder Belehrung über die Verwen-
dung des Geräts durch eine verantwortliche
Person für Ihre Sicherheit gegeben wurden.
• 17 ACHTUNG: Die Kinder sollten beaufsichtigt
werden, um sicherzustellen, dass sie nicht mit
dem Gerät spielen.
• 18 ACHTUNG: Nehmen Sie den Hochdruck-
reiniger erst in Betrieb, wenn der Hochdruck-
schlauch vollkommen ausgerollt ist.
• 19 ACHTUNG: Beim Auf- und Abwickeln des
Schlauches darauf achten, dass der Hochdruck-
reiniger nicht umkippt.
• 20 ACHTUNG: Beim Auf- und Abwickeln des
Schlauches muss die Maschine ausgeschaltet
und das Rohr druckentlastet sein (betrieb Be-
enden).
• 21 ACHTUNG: Explosionsgefahr. Sprühen Sie
keine brennbaren Flüssigkeiten..
• 22 ACHTUNG: Die Maschinensicherheit zu
gewährleisten, verwenden Sie nur Original-
Ersatzteile vom Hersteller oder vom Hersteller
zugelassen.
• 23 ACHTUNG: Den Strahl nicht auf sich selbst
oder andere Personen richten, um Schuhe oder
Kleider zu reinigen.
• 24 ACHTUNG: Nicht zulassen, dass das Gerät
von Kindern oder ungeschultem Personal be-
nutzt wird.
• ACHTUNG: Das Wasser, das durch Rückfuss-
verhinderer geflogen wird als nicht trinkbar ist.
• XX ACHTUNG! Das Gerät vom Stromnetz
bei Loesen des Steckers von der Steckdose ab-
trennen, bevor Reinigungsarbeiten durchge-
führt werden.
• XY ACHTUNG: Ungeeignete Verlängerun-
gen können gefährlich sein.
• XJ ACHTUNG: Bei Verwendung eines Ver-
längerungskabels müssen Steckdose und Ste-
cker gegen Spritzwasser geschützt sein.
• ACHTUNG: Während des Betriebs die Maschi-
ne in keine ungenügend belüftete Zone stellen
und sie nicht decken.
• ACHTUNG: Es ist zu vermeiden, die Maschine
unter dem Regen zu benutzen und den Hoch-
druckstrahl gegen die Maschine selbst zu rich-
ten.
• ACHTUNG: Haben Sie das Gerät nicht auf
brennbaren Flächen.
• ACHTUNG:
- DAS GERÄT NIEMALS MIT FEUCHTEN ODER NAS-
SEN HÄNDEN UND BARFUSS ANFASSEN.
- NICHT AM GERÄTEKABEL ODER AM GERÄT
SELBST ZIEHEN, UM DEN GERÄTESTECKER AUS
DER STECKDOSE ZU ZIEHEN.
- SOLLTE WÄHREND DES BETRIEBES DER STROM
AUSFALLEN, MUß DIE MASCHINE AU S S I C H E R
H E I T S G R ü N D E N AUSGESCHALTET WERDEN
(SCHALTER AUF OFF POSITION).
> SICHERHEITSEINRICHTUNGEN
• ACHTUNG: Die Pistole ist mit einer Sicher-
heitssperre ausgerüstet. Es ist wichtig, dass Sie
jedes Mal, wenn die Benutzung des Gerätes un-
terbrochen wird, diese Sicherheitssperre betä-
tigen, um ein zufälliges Öffnen zu verhindern.
- Sicherheitsvorrichtungen: Spritzpistole mit Si-
cherheitssperre, Maschine mit Schutz gegen
elektrische Überlastung (KL. 1), Pumpe mit By-
Pass-Ventil oder Stopp-Vorrichtung.
- Die Sicherheitstaste an der Pistole dient nicht
2 -

DE
30
zur Sperrung des Hebels während der Arbeit,
sondern damit sie sich nicht zufällig öffnet.
• ACHTUNG: Das Gerät ist mit einem Motor-
schutz ausgestattet: Im Falle eines Gerät Inter-
vention, warten Sie einige Minuten oder alter-
nativ, trennen SieUnd wieder anschließen Sie,
das Produkt an das Elektrische Netz. Wenn das
Problem weiterhin besteht, schicken Sie das
Geraete an unsere Kundendienst.
> STABILITÄT
• ACHTUNG: Das Gerät darf nicht auf Halterungen,
Sockeln oder ähnlichen Unterlagen aber auf Hori-
zontalfläche, stetig und sicher gestellt werden.
BEDIENUNG
> BESCHREIBUNG DES GERÄTS
· Siehe Seite 3-4-5.
> MONTAGE
Siehe Seite 2.
> INSTALLATION
Siehe Abb.
- Kontrollieren Sie, dass der Hauptschalter in Po-
sition “OFF”(0) steht und dass das Wasserfilter
im Ansaugstutzen der Pumpe (INLET) sitzt.
- Den Schnellanschluss mit der Hand, ohne Zu-
hilfenahme von Werkzeugen, anschrauben.
- Den Wasserzuflussschlauch mit dem Schnell-
anschluss verbinden. Der Schlauch muss einen
Innendurchmesser von mind. 13 mm (1/2”) auf-
weisen.
- Den Hochdruckschlauch mit dem Ausfluss-
stutzen der Pumpe (OUTLET) verbinden. Das
Anschlussstück des Hochdruckschlauchs ganz
nach unten drücken und dann mit der Hand,
ohne Zuhilfenahme von Werkzeugen, ein-
schrauben.
- Den Hochdruckschlauch mit der Pistole verbin-
den
- Den Wasserhahn völlig öffnen. Die Wasser-
temperatur muss unbedingt niedriger sein als
40°C.
WICHTIG Der Hochdruckreiniger darf nur mit
sauberem Wasser betrieben werden, da sonst
Schäden am Reiniger selbst verursacht werden
können.
- Die Sicherheitssperre der Pistole lösen und
den Abzug gedrückt halten, bis soviel Wasser
durchgelaufen ist, dass die ganze Luft ausge-
trieben ist.
Die Lanze in die Pistole einstecken.
Stecker in die Steckdose einführen.
Zum Anlassen der Maschine den Pistolenabzug
drücken und den Hauptschalter gleichzeitig
auf “ON” ( I ) stellen”.
TREIBSTOFFAUFFÜLLUNG
Den Tank mit dem auf dem Fabrikschild angege-
benen Treibstoff auffüllen. Vermeiden, daß der
Tank während des Betriebes leer läuft, weil die
Kraftstoffpumpe dadurch Schaden nehmen kann.
•Der gebrauch ungeeigneten brennstoffs kann
gefärlich sein.
Den Reinigertank mit Produkten befüllen, die für
die beabsichtige Wäsche geeignet sind.
•ACHTUNG: Es dürfen nur flüssige Reinigungsmit-
tel verwendet werden, die stark säure- oder lau-
genhaltig sind.
Es empfiehlt sich die Verwendung unserer Reini-
ger (oder des Wachses), die spezifisch für die
Verwendung auf Hochdruckreinigern konzi-
piert wurden.
> IMBETRIEBNAHME
Siehe Abb.
Zür Reinigung mit kaltes Wasser den
Hauptchalter 2 ( I ) ON .
Zür Reinigung mit heißem Wasser den
Hauptchalter 1 ( I ) ON .
Der Brenner läuft beim Gerät unter Druck.
> HOCHDRUCKLANZEN
Siehe Abb.
> ANSAUGEN DES REINIGUNGSMITTELS
Siehe Abb.
> HOCHDRUCKSCHLAUCH
Siehe Abb.
> WASSERVERSORGUNG
Wasseranschluß
ACHTUNG! (Symbol) Durch einen Rück-
flussverhinderer geflossenes Wasser ist nicht
trinkbar.
Der direkte Anschluss des Hochdruckreinigers
an die Trinkwasserleitung ist nur dann zulässig,
wenn in der Zuleitung eine vorschriftsmäßige
Schutzvorrichtung gegen Rückfluss mit Ablauf
installiert ist. Der Schlauchdurchmesser muss
mindestens Ø 13mm - 1/2 inch betragen; der
Schlauch selbst muss verstärkt sein.
- 3

DE
31
• ACHTUNG: Das Wasser, das durch Rückfuss-
verhinderer geflogen wird als nicht trinkbar ist.
WICHTIG Nur gefiltertes oder sauberes Was-
ser ansaugen. Der Wasserhahn muss mindes-
tens eine der Förderleistung der Pumpe zwei-
fach Wassermenge liefern.
-Mindestdurchfluss: 15 l/ min.
-Max. Wassertemperatur am Einfluss: 40°C
-Max. Eingangsdruck: 1Mpa
Den Hochdruckreiniger so nahe wie möglich am
Wassernetzanschluss aufstellen.
Das Nichtbeachten dieser Bedingungen verur-
sacht ernsthafte mechanische Schäden an der
Pumpe sowie den Verfall der Garantieansprüche.
Wasserversorgung aus der Wasserleitung
· Einen Zulaufschlauch (nicht im Lieferumfang)
am Wasseranschluß des Gerätes und am Was-
serzulauf anschließen.
· Wasserzulauf öffnen.
Wasserversorgung aus offenem Behälter
· Kupplungsteil für Wasser.
· Saugschlauch mit Filter (nicht im Lieferumfang)
am Wasseranschluß des Gerätes anschrauben.
· Filter in den Behälter hängen.
· Gerät vor dem Betrieb entlüften.
- Hochdruckleitung am Hochdruckanschluß
des Gerätes abschrauben.
- Gerät einschalten und solange laufen lassen,
bis das Wasser blasenfrei am Hochdruckan-
schluß.
- Gerät ausschalten und Hochdruckschlauch
wieder anschrauben.
> STROMVERSORGUNG
- Der elektrische Anschluss des Gerätes muss der
Norm IEC 60364-1 entsprechen.
WICHTIG Bevor Sie das Gerät anschließen,
vergewissern Sie sich, dass die Angaben auf
dem Typenschild denen des Stromnetzes ent-
sprechen und dass die Steckdose durch einen
Fehlerstromschutzschalter mit einer Anspre-
chempfindlichkeit unter 0,03 A - 30ms abgesi-
chert ist.
- Passen Steckdose und Gerätestecker nicht zu-
sammen, lassen Sie die Steckdose von geschul-
tem Fachpersonal durch eine andere, passende
ersetzen.
- Das Gerät nicht bei Temperaturen unter 0°C be-
nutzen, wenn es mit einem Schlauch aus PVC
(H VV-F) ausgerüstet ist.
• XY ACHTUNG: Ungeeignete Verlängerungen
können gefährlich sein.
• XJ ACHTUNG: Bei Verwendung eines Ver-
längerungskabels müssen Steckdose und Ste-
cker gegen Spritzwasser geschützt sein.
Das Kabel muss die in der untenstehenden Tabel-
le aufgeführten Abmessungen haben
<16 A <25 A
<20 m ø 1,5 mm2
14 AWG
ø 2,5 mm2
12 AWG
20 m - 50 m ø 2,5 mm2
12 AWG
ø 4,0 mm2
10 AWG
(falls vorhanden)
WICHTIG A.S.S. (Automatic Stop System) das
die Maschine während der Bypass-Phase ab-
stellt. Um die Maschine zu starten, positionie-
ren Sie den Schalter auf (I)“ON”; dann drücken
Sie den Pistolenabzug: das A.S.S. setzt die Ma-
schine in Betrieb und stellt sie automatisch ab,
wenn der Abzug losgelassen wird. Es ist des-
halb ratsam, die Pistole durch die am Abzug
angebrachte Vorrichtung zu sichern, jedesmal
wenn die Maschine abgestellt wird, um unab-
sichtliche Anläufe zu vermeiden.
· Selbststarts der Maschine, ohne die Pistole zu
betätigen sind durch z.B. Luftblasen im Wasser
begründet.
· Beim Stillstand für mehr als 5 Minuten soll-
te das Gerät nicht unbeaufsichtigt abgestellt
werden. Andernfalls, ist es notwendig für den
Schutz des Gerätes, den Schalter auf (0)OFF Po-
sition zu stellen.
· Prüfen Sie, dass die Verbindung des Hoch-
druckschlauches mit dem Gerät und der als
Ausrüstung vorgesehenen Pistole korrekt an-
geschlossen ist.
> BETRIEB BEENDEN
Siehe Abb.
Auf dem Schalter im Position “OFF” (0) und warten
Sie, daß das Wasser kalt wird. Auf diese Weise, ver-
meidt man Kalkablagerung und Überheizung von
der Schlange und vom Kessel.
WICHTIG Bei stillstehender Maschine die Pis-
4 -
Seite wird geladen ...
Seite wird geladen ...
Seite wird geladen ...
Seite wird geladen ...
Seite wird geladen ...
Seite wird geladen ...
Seite wird geladen ...
Seite wird geladen ...
Seite wird geladen ...
Seite wird geladen ...
Seite wird geladen ...
Seite wird geladen ...
Seite wird geladen ...
Seite wird geladen ...
Seite wird geladen ...
Seite wird geladen ...
Seite wird geladen ...
Seite wird geladen ...
Seite wird geladen ...
Seite wird geladen ...
Seite wird geladen ...
Seite wird geladen ...
Seite wird geladen ...
Seite wird geladen ...
Seite wird geladen ...
Seite wird geladen ...
Seite wird geladen ...
Seite wird geladen ...
Seite wird geladen ...
Seite wird geladen ...
Seite wird geladen ...
Seite wird geladen ...
Seite wird geladen ...
Seite wird geladen ...
Seite wird geladen ...
Seite wird geladen ...
Seite wird geladen ...
Seite wird geladen ...
Seite wird geladen ...
Seite wird geladen ...
Seite wird geladen ...
Seite wird geladen ...
Seite wird geladen ...
Seite wird geladen ...
Seite wird geladen ...
Seite wird geladen ...
Seite wird geladen ...
Seite wird geladen ...
Seite wird geladen ...
Seite wird geladen ...
Seite wird geladen ...
Seite wird geladen ...
Seite wird geladen ...
Seite wird geladen ...
Seite wird geladen ...
Seite wird geladen ...
Seite wird geladen ...
Seite wird geladen ...
Seite wird geladen ...
Seite wird geladen ...
Seite wird geladen ...
Seite wird geladen ...
Seite wird geladen ...
Seite wird geladen ...
Seite wird geladen ...
Seite wird geladen ...
Seite wird geladen ...
Seite wird geladen ...
Seite wird geladen ...
Seite wird geladen ...
Seite wird geladen ...
Seite wird geladen ...
Seite wird geladen ...
Seite wird geladen ...
Seite wird geladen ...
Seite wird geladen ...
Seite wird geladen ...
Seite wird geladen ...
Seite wird geladen ...
Seite wird geladen ...
Seite wird geladen ...
Seite wird geladen ...
Seite wird geladen ...
Seite wird geladen ...
Seite wird geladen ...
Seite wird geladen ...
Seite wird geladen ...
Seite wird geladen ...
Seite wird geladen ...
Seite wird geladen ...
Seite wird geladen ...
Seite wird geladen ...
Seite wird geladen ...
Seite wird geladen ...
Seite wird geladen ...
Seite wird geladen ...
Seite wird geladen ...
-
 1
1
-
 2
2
-
 3
3
-
 4
4
-
 5
5
-
 6
6
-
 7
7
-
 8
8
-
 9
9
-
 10
10
-
 11
11
-
 12
12
-
 13
13
-
 14
14
-
 15
15
-
 16
16
-
 17
17
-
 18
18
-
 19
19
-
 20
20
-
 21
21
-
 22
22
-
 23
23
-
 24
24
-
 25
25
-
 26
26
-
 27
27
-
 28
28
-
 29
29
-
 30
30
-
 31
31
-
 32
32
-
 33
33
-
 34
34
-
 35
35
-
 36
36
-
 37
37
-
 38
38
-
 39
39
-
 40
40
-
 41
41
-
 42
42
-
 43
43
-
 44
44
-
 45
45
-
 46
46
-
 47
47
-
 48
48
-
 49
49
-
 50
50
-
 51
51
-
 52
52
-
 53
53
-
 54
54
-
 55
55
-
 56
56
-
 57
57
-
 58
58
-
 59
59
-
 60
60
-
 61
61
-
 62
62
-
 63
63
-
 64
64
-
 65
65
-
 66
66
-
 67
67
-
 68
68
-
 69
69
-
 70
70
-
 71
71
-
 72
72
-
 73
73
-
 74
74
-
 75
75
-
 76
76
-
 77
77
-
 78
78
-
 79
79
-
 80
80
-
 81
81
-
 82
82
-
 83
83
-
 84
84
-
 85
85
-
 86
86
-
 87
87
-
 88
88
-
 89
89
-
 90
90
-
 91
91
-
 92
92
-
 93
93
-
 94
94
-
 95
95
-
 96
96
-
 97
97
-
 98
98
-
 99
99
-
 100
100
-
 101
101
-
 102
102
-
 103
103
-
 104
104
-
 105
105
-
 106
106
-
 107
107
-
 108
108
-
 109
109
-
 110
110
-
 111
111
-
 112
112
-
 113
113
-
 114
114
-
 115
115
-
 116
116
-
 117
117
-
 118
118
-
 119
119
-
 120
120
-
 121
121
-
 122
122
-
 123
123
-
 124
124
-
 125
125
-
 126
126
-
 127
127
-
 128
128


Lavor LAV54 Benutzerhandbuch
- Kategorie
- Hochdruckreiniger
- Typ
- Benutzerhandbuch
in anderen Sprachen
- français: Lavor LAV54 Manuel utilisateur
- español: Lavor LAV54 Manual de usuario
- italiano: Lavor LAV54 Manuale utente
- русский: Lavor LAV54 Руководство пользователя
- Nederlands: Lavor LAV54 Handleiding
- português: Lavor LAV54 Manual do usuário
- dansk: Lavor LAV54 Brugermanual
- polski: Lavor LAV54 Instrukcja obsługi
- čeština: Lavor LAV54 Uživatelský manuál
- eesti: Lavor LAV54 Kasutusjuhend
- svenska: Lavor LAV54 Användarmanual
- Türkçe: Lavor LAV54 Kullanım kılavuzu
- suomi: Lavor LAV54 Ohjekirja
