
1 / 201 / 20 BODY+SOUL_Sitz_Dampfbox_MA_ 11692_04_23
1
DEM ENDKUNDEN ZU ÜBERGEBEN!
TO BE HANDED TO CUSTOMER!
A REMETTRE AU CLIENT!
TE OVERHANDIGEN AAN DE
EINDVERBRUIKER!
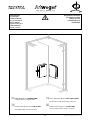
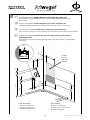
MONTAGEANLEITUNG
Sitz und Dampfbox
ASSEMBLY INSTRUCTIONS
Tip-up seat and steam box
NOTICE DE MONTAGE
Strapontin et coffret vapeur
MONTAGEVOORSCHRIFT
Klapstoel en stoombox
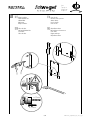
Montageanleitung für Sitz und Dampfbox LINKS -
bei Dampfbox RECHTS - spiegelgleicher Aufbau.
Assembly instruction for tip-up seat and steam box LEFT -
for steaming box RIGHT - assemble in mirror image.
Notice de montage pour strapontin et coffret vapeur à gauche -
pour coffret vapeur à droite, principe identique, mais inversé.
Montagevoorschrift voor klapstoel en stoombox LINKS -
bij uitv. met stoombox RECHTS - montage in spiegelbeeld.

2 / 202 / 20 BODY+SOUL_Sitz_Dampfbox_MA_ 11692_04_23
When drilling holes do not damage hidden pipes
and wiring !
Attention:
Faites attention en persant les trous de ne pas
endommager les tuyauteries (câbles, électriques,
canalisations de gaz, d'eau, etc.) !
Attention:
Let er bij het boren van gaten op, dat u geen
leidingen (elektriciteit, gas of water) beschadigt !
Let op:
Beachten Sie beim Bohren der Löcher, dass Sie
keine Leitungen (Elektro, Gas, Wasser)
beschädigen !
Achtung:
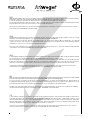
Benötigtes Werkzeug
Tools needed
Outillage necessaire
Benodigd gereedschap
SW12
SW5
ø10mm
ø 6mm
SW3
3
2
General notes:
The electrical installation may only be carried out by a certified specialist observing the statutory
guidelines as well as the national installation regulations (e.g. EN 1-4 §49 in Austria and
DIN VDE 0100-701 in Germany) as most recently issued.
BODY+SOUL is a quality certified product and complies with CE guidelines.
Follow the operating instructions to ensure correct use of this product.
Remarques générales :
L'installation électrique doit être effectuée par une entreprise spécialisée dans le respect des directives
légales, ainsi que des dispositions nationales liées.(par ex : Autriche EN 1-4 §49; Allemagne
DIN VDE 0100-701 respectivement dans leurs versions actuelles)
Le BODY+SOUL est un produit éprouvé de qualité répondant aux directives CE.
Afin d’utiliser correctement ce produit, veuillez suivre la notice d’utilisation.
Algemene instructies:
De elektronische installatie mag slechts door een gespecialiseerd bedrijf, met inachtneming van de
wettelijke richtlijnen en de nationale voorschriften betreffend de inbouw, worden uitgevoerd
(bijv. Oostenrijk EN 1-4 §49, Duitsland DIN VDE 0100-701 in de betreffend geldige uitgave).
De BODY+SOUL is een gekeurd kwaliteitsproduct en voldoet aan de CE-richtlijnen.
Voor het juiste gebruik van dit product moet de gebruiksaanwijzing worden nageleefd.
Allgemeine Hinweise:
Die Elektroinstallation darf nur von einem berechtigten Fachbetrieb unter Berücksichtigung der gesetzlichen
Richtlinien sowie der nationalen Errichtungsbestimmungen erfolgen (z.B.: Österreich EN 1-4 §49; Deutschland
DIN VDE 0100-701 in der jeweils gültigen Ausgabe).
Die BODY+SOUL ist ein geprüftes Qualitätsprodukt und entspricht den CE-Richtlinien.
Für den korrekten Gebrauch dieses Produktes ist die Bedienungsanleitung zu befolgen.
DEDie Elektroinstallation darf nur von einem berechtigten Fachbetrieb unter Berücksichtigung der gesetzlichen Richtlinien sowie der nationalen Errichtungs-
bestimmungen erfolgen (z.B.: Österreich EN OVE E 8101; Deutschland DIN VDE 0100-701 in der jeweils gültigen Ausgabe).
Leerrohr von oben bzw unten (mind. Ø 20 mm, Mindestverlegetiefe 5 cm). Separate Netzzuleitung H05-VV-F (fl exible Leitung)
über FI-Schutzschalter RCD ∆IN ≤ 30 mA. Zum Anschluss sollten ca. 3m Kabel vorgesehen werden. Gültige Vorschriften für Potentialausgleich beachten!
Potentialausgleichsleitung, 4 mm2 (Cu) für den Anschluss an die serienmäßige Erdungsklemme.
Die Leitung muß 2polig abschaltbar sein, mit min.3mm Kontaktöffnung (außerhalb von Schutzbereich 2) (z.b. Schütz geschalten über Lichtschalter mit
Kontrollanzeige) (Gemäß VDE 0100-701 bzw. EN OVE E 8101).
ITL‘installazione elettrica può essere effettuata solamente da una ditta specializzata autorizzata osservando le disposizioni di legge e i regolamenti nazi-
onali relativi all‘installazione (ad es. Austria: EN OVE E 8101; Germania DIN VDE 0100-701 nelle edizioni in vigore). Canalina dall‘alto e dal basso ( min. Ø
20 mm, profondità minima di posa 5 cm). Cavo di allacciamento alla rete separato H05-VV-F (Cavo fl essibile), su interruttore di protezione FI RCD ∆IN ≤
30 mA. Per l‘allacciamento si deve prevedere un cavo di ca. 3 mt. Prestare attenzione alle normative in vigore per il collegamento equipotenziale! Cavo di
collegamento equipotenziale, 4 mm2 (Cu) per il collegamento ai morsetti di messa a terra di serie.
Il cavo deve essere interrompibile a 2 poli, con un‘apertura di contatto di almeno 3 mm (ad eccezione dello spazio di protezione 2) (ad es. protezione
inserita su interruttore di luce con indicatore di controllo) (ai sensi del VDE 0100-701 e dell‘ EN OVE E 8101).
EN Electrical installation may only be carried out by a qualifi ed, registered company in compliance with legislation guidelines as well as the currently
valid edition of national installation regulations (e.g.; Austria EN OVE E 8101; Germany DIN VDE 0100-701).
Cable duct from above or below (min. 20 mm Ø, min. installation depth 5 cm). Separate mains supply line H05-VV-F (fl exible line), over a RCD ∆IN
≤ 30 mA. For connection a cable of approx. 3 m should be provided. Take care to comply with current regulations about potential equalization! Potential
equalization line, 4 mm2 (Cu) for connection to the standard ground terminal.
The line has to have a double-pole cut-off, with a min. 3 mm contact opening (outside of protected zone 2) (e.g. protection switched over light switch with
control indicator) (in accordance with VDE 0100-701 respectively EN OVE E 8101).
FR L‘installation électrique ne peut être qu‘effectuée par une entreprise spécialisée sous la stricte observance des directives légales, ainsi que des dispositions nationales
liées à la construction (par ex.: Autriche EN OVE E 8101; Allemagne DIN VDE 0100-701 respectivement dans sa dernière version).
Gaine à partir du haut ou bien du bas (diamètre minimum 20 mm, profondeur d‘encastrement minimum 5 cm). Alimentation réseau séparée H05-VV-F (câble
fl exible), par un interrupteur de sécurité FI RCD ∆IN ≤ 30 mA. Pour le raccordement il convient de prévoir environ 3 m de câble. Respecter les directives en
vigueur pour la compensation de potentiel ! Câble de compensation de potentiel, 4 mm2 (Cu) pour le raccordement à la borne de terre standard.
Le câble doit être muni d‘un dispositif d‘interruption bipolaire, avec une ouverture de contact de minimum 3 mm (en dehors de la zone de sécurité 2) (par ex.
contacteur branché sur interrupteur lumineux avec indication de contrôle) (Selon VDE 0100-701 ou bien EN OVE E 8101).
NL De elektronische installatie mag slechts door een gespecialiseerd bedrijf, met inachtneming van de wettelijke richtlijnen en de nationale voorschriften betreffend
de inbouw, worden uitgevoerd (bijv. Oostenrijk EN OVE E 8101, Duitsland DIN VDE 0100-701 in de betreffend geldige uitgave).
Losse buis van boven naar beneden (min. Ø 20 mm, minimale plaatsingsdiepte 5 cm). Aparte nettoevoerleiding H05-VV-F (fl exibele leiding), via
FI-veiligheidsschakelaar RCD ∆IN ≤ 30 mA Voor de aanleg moet tenminste rekening worden gehouden met ca. 3m kabel. Let op de geldende eisen voor de
potentiaalcompensatie! Leiding voor de potentiaalcompensatie 4 mm2 (Cu), voor de aansluitingen aan de standaard aardklem.
De leiding moet 2-polig uitgeschakeld kunnen worden, met minimaal 3mm contactopening (buiten de beschermde sector 2). (Bijvoorbeeld veiligheids-
schakelaar geschakeld via lichtschakelaar met controllampje.) (Volgens VDE 0100-701 resp. EN OVE E 8101).

3 / 203 / 20 BODY+SOUL_Sitz_Dampfbox_MA_ 11692_04_23
When drilling holes do not damage hidden pipes
and wiring !
Attention:
Faites attention en persant les trous de ne pas
endommager les tuyauteries (câbles, électriques,
canalisations de gaz, d'eau, etc.) !
Attention:
Let er bij het boren van gaten op, dat u geen
leidingen (elektriciteit, gas of water) beschadigt !
Let op:
Beachten Sie beim Bohren der Löcher, dass Sie
keine Leitungen (Elektro, Gas, Wasser)
beschädigen !
Achtung:
Benötigtes Werkzeug
Tools needed
Outillage necessaire
Benodigd gereedschap
SW12
SW5
ø10mm
ø 6mm
SW3
3
2
General notes:
The electrical installation may only be carried out by a certified specialist observing the statutory
guidelines as well as the national installation regulations (e.g. EN 1-4 §49 in Austria and
DIN VDE 0100-701 in Germany) as most recently issued.
BODY+SOUL is a quality certified product and complies with CE guidelines.
Follow the operating instructions to ensure correct use of this product.
Remarques générales :
L'installation électrique doit être effectuée par une entreprise spécialisée dans le respect des directives
légales, ainsi que des dispositions nationales liées.(par ex : Autriche EN 1-4 §49; Allemagne
DIN VDE 0100-701 respectivement dans leurs versions actuelles)
Le BODY+SOUL est un produit éprouvé de qualité répondant aux directives CE.
Afin d’utiliser correctement ce produit, veuillez suivre la notice d’utilisation.
Algemene instructies:
De elektronische installatie mag slechts door een gespecialiseerd bedrijf, met inachtneming van de
wettelijke richtlijnen en de nationale voorschriften betreffend de inbouw, worden uitgevoerd
(bijv. Oostenrijk EN 1-4 §49, Duitsland DIN VDE 0100-701 in de betreffend geldige uitgave).
De BODY+SOUL is een gekeurd kwaliteitsproduct en voldoet aan de CE-richtlijnen.
Voor het juiste gebruik van dit product moet de gebruiksaanwijzing worden nageleefd.
Allgemeine Hinweise:
Die Elektroinstallation darf nur von einem berechtigten Fachbetrieb unter Berücksichtigung der gesetzlichen
Richtlinien sowie der nationalen Errichtungsbestimmungen erfolgen (z.B.: Österreich EN 1-4 §49; Deutschland
DIN VDE 0100-701 in der jeweils gültigen Ausgabe).
Die BODY+SOUL ist ein geprüftes Qualitätsprodukt und entspricht den CE-Richtlinien.
Für den korrekten Gebrauch dieses Produktes ist die Bedienungsanleitung zu befolgen.

4 / 204 / 20 BODY+SOUL_Sitz_Dampfbox_MA_ 11692_04_23
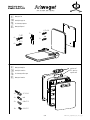
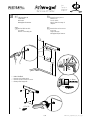
Kontrolle der Montagepositionen. Tragfähige Wand für die Sitzbefestigung muss gegeben sein!
Bei speziellen Wänden (wie zB. Porenbeton) muss geeignetes, von den Herstellern empfohlenes, Befestigungsmaterial
verwendet werden!
Checking the assembly positions. A load-bearing wall must be present for attaching the seat!
Suitable fastening materials recommended by the manufacturers must be used for special walls (e.g. aerated concrete).
Contrôle des positions de montage. La solidité du mur est important pour la fixation du siège !
Dans le cas de cloisons spéciales (par ex. de type béton alvéolé) il est impératif d'utiliser le matériel de fixation conseillé par le fabricant.
Controle van de montageposities. De muur die dient voor de bevestiging van het zitje moet voldoende
draagvermogen hebben!
Bij speciale wanden (zoals bijvoorbeeld gasbeton) moet daarvoor geschikt, door de producent aanbevolen, bevestigingsmateriaal
worden gebruikt.
46* 8
78*
135*
41* 20
5
1
* ... Maße ab Standfläche
* ....Dimensions as of standing position
* ....Dimensions à partir de la surface du receveur
* ....Afmetingen vanaf staoppervlak
# ... Maße ab fertiger Wand
# ....Dimensions as of finished wall
# ....Dimensions à partir du mur fini
# ....Afmetingen vanaf afgewerkte wand
Freie Fläche
Free surface
Surface dégagée
Vrij oppervlak
10
15,5#
20
38,5
21,5
#
33
#
12
12#41
max 7,5
3/8“
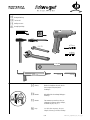
Montageset Sitz
Assembly kit tip-up seat
Set de montage strapontin
Montageset klapstoel
Montageset Dampfbox
Set de montage coffret vapeur
Montageset Stoombox
Assembly kit steam box
4
ø10
4,2x38
3x
3x ø6
7x90
4x
4x
2x
optional
en option
optioneel
4,2x38
ø6
M6x25
M4x20
4x
4x
4x
8x

5 / 205 / 20 BODY+SOUL_Sitz_Dampfbox_MA_ 11692_04_23
Kontrolle der Montagepositionen. Tragfähige Wand für die Sitzbefestigung muss gegeben sein!
Bei speziellen Wänden (wie zB. Porenbeton) muss geeignetes, von den Herstellern empfohlenes, Befestigungsmaterial
verwendet werden!
Checking the assembly positions. A load-bearing wall must be present for attaching the seat!
Suitable fastening materials recommended by the manufacturers must be used for special walls (e.g. aerated concrete).
Contrôle des positions de montage. La solidité du mur est important pour la fixation du siège !
Dans le cas de cloisons spéciales (par ex. de type béton alvéolé) il est impératif d'utiliser le matériel de fixation conseillé par le fabricant.
Controle van de montageposities. De muur die dient voor de bevestiging van het zitje moet voldoende
draagvermogen hebben!
Bij speciale wanden (zoals bijvoorbeeld gasbeton) moet daarvoor geschikt, door de producent aanbevolen, bevestigingsmateriaal
worden gebruikt.
46* 8
78*
135*
41* 20
5
1
* ... Maße ab Standfläche
* ....Dimensions as of standing position
* ....Dimensions à partir de la surface du receveur
* ....Afmetingen vanaf staoppervlak
# ... Maße ab fertiger Wand
# ....Dimensions as of finished wall
# ....Dimensions à partir du mur fini
# ....Afmetingen vanaf afgewerkte wand
Freie Fläche
Free surface
Surface dégagée
Vrij oppervlak
10
15,5#
20
38,5
21,5
#
33
#
12
12#41
max 7,5
3/8“
Montageset Sitz
Assembly kit tip-up seat
Set de montage strapontin
Montageset klapstoel
Montageset Dampfbox
Set de montage coffret vapeur
Montageset Stoombox
Assembly kit steam box
4
ø10
4,2x38
3x
3x ø6
7x90
4x
4x
2x
optional
en option
optioneel
4,2x38
ø6
M6x25
M4x20
4x
4x
4x
8x

6 / 206 / 20 BODY+SOUL_Sitz_Dampfbox_MA_ 11692_04_23
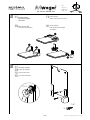
7
Dessiner les trous et percer au
diamètre 6 mm.
Poser les chevilles.
Monter le châssis support du
coffret vapeur.
Gaten aftekenen en boren met een
ø van 6 mm.
Pluggen aanbrengen.
Montageframe stoombox monteren.
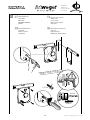
Löcher anzeichnen und
ø 6mm bohren.
Dübel setzen.
Montagerahmen Dampfbox
montieren.
Mark and drill ø6mm holes.
Insert dowels.
Mount the steam box
assembly plate.
3
1,2
4,2x38
4x
13
Dampfbox
Steam box
Coffret vapeur
Stoombox
4x
ø 6mm
ø 6mm
* ..... Maße ab Standfläche
* ..... Dimensions as of standing position
* ..... Dimensions à partir de la surface du receveur
* ..... Afmetingen vanaf staoppervlak
6
2
4,2x38
3x
48,5*
18
89,5*
Dessiner les trous et percer au
diamètre 6 mm.
Poser les chevilles.
Monter la platine de montage du
strapontin.
Gaten aftekenen en boren met een
ø van 6 mm.
Pluggen aanbrengen.
Montageplaat klapstoel monteren.
Löcher anzeichnen und
ø 6mm bohren.
Dübel setzen.
Montageplatte Sitz montieren.
Mark and drill ø 6mm holes.
Insert dowels.
Mount the seat assembly plate.
3x
ø 6mm
ø 6mm
Sitz
Tip-up sit
Strapontin
Klapstoel

7 / 207 / 20 BODY+SOUL_Sitz_Dampfbox_MA_ 11692_04_23
7
Dessiner les trous et percer au
diamètre 6 mm.
Poser les chevilles.
Monter le châssis support du
coffret vapeur.
Gaten aftekenen en boren met een
ø van 6 mm.
Pluggen aanbrengen.
Montageframe stoombox monteren.
Löcher anzeichnen und
ø 6mm bohren.
Dübel setzen.
Montagerahmen Dampfbox
montieren.
Mark and drill ø6mm holes.
Insert dowels.
Mount the steam box
assembly plate.
3
1,2
4,2x38
4x
13
Dampfbox
Steam box
Coffret vapeur
Stoombox
4x
ø 6mm
ø 6mm
* ..... Maße ab Standfläche
* ..... Dimensions as of standing position
* ..... Dimensions à partir de la surface du receveur
* ..... Afmetingen vanaf staoppervlak
6
2
4,2x38
3x
48,5*
18
89,5*
Dessiner les trous et percer au
diamètre 6 mm.
Poser les chevilles.
Monter la platine de montage du
strapontin.
Gaten aftekenen en boren met een
ø van 6 mm.
Pluggen aanbrengen.
Montageplaat klapstoel monteren.
Löcher anzeichnen und
ø 6mm bohren.
Dübel setzen.
Montageplatte Sitz montieren.
Mark and drill ø 6mm holes.
Insert dowels.
Mount the seat assembly plate.
3x
ø 6mm
ø 6mm
Sitz
Tip-up sit
Strapontin
Klapstoel

8 / 208 / 20 BODY+SOUL_Sitz_Dampfbox_MA_ 11692_04_23
Sitz
Tip-up sit
Strapontin
Klapstoel
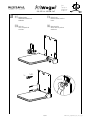
9
Insérer les cales.
Dessiner les trous et percer au
diamètre 10 mm.
Poser les chevilles.
Insérer les cales.
Hulpstukken inschuiven.
Gaten aftekenen en boren met een
ø van 10 mm.
Pluggen aanbrengen.
Hulpstukken inschuiven.
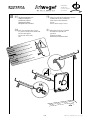
Beilage einschieben.
Löcher anzeichnen und
ø10mm bohren.
Dübel setzen.
Beilage einschieben.
Slide in the shims.
Mark and drill ø10mm holes.
Insert dowels.
Slide in the shims.
5
4x
ø 10mm
ø 10mm
8
Etancher le raccord d’angle de régulation avec sortie 3/8".
L’installation doit être rincée selon DIN 1988.
Etancher l’arrivée du câble d’alimentation
électrique.
Etancher le châssis de montage à l’extérieur.
Haakse afsluiter met afvoer 3/8" afdichten.
De installatie moet volgens DIN 1988
gespoeld zijn.
Elektriciteitssnoer afkitten.
Buitenkant van het montageframe afkitten.
Eckregulierventil mit Abgang 3/8”
eindichten. Die Anlage muss
nach DIN 1988 gespült sein.
Elektrozuleitung eindichten.
Montagerahmen aussen eindichten.
Seal in corner control valve with 3/8" outlet.
The system must be flushed in line with DIN 1988.
Seal the electrical supply line.
Seal the outside of the assembly
frame.
4
Dampfbox
Steam box
Coffret vapeur
Stoombox
3/8”
ACHTUNG:
Nur neutralvernetzendes Silikon verwenden!!
ATTENTION:
Only neutral cross-linking silicone to be used!
Merci de n’utiliser que du mastic silicone neutre !
LET OP:
Gebruik enkel neutraalverbindend silicone!
ATTENZIONE:
Utilizzare solo silicone a reticolazione neutra!

9 / 209 / 20 BODY+SOUL_Sitz_Dampfbox_MA_ 11692_04_23
Sitz
Tip-up sit
Strapontin
Klapstoel
9
Insérer les cales.
Dessiner les trous et percer au
diamètre 10 mm.
Poser les chevilles.
Insérer les cales.
Hulpstukken inschuiven.
Gaten aftekenen en boren met een
ø van 10 mm.
Pluggen aanbrengen.
Hulpstukken inschuiven.
Beilage einschieben.
Löcher anzeichnen und
ø10mm bohren.
Dübel setzen.
Beilage einschieben.
Slide in the shims.
Mark and drill ø10mm holes.
Insert dowels.
Slide in the shims.
5
4x
ø 10mm
ø 10mm
8
Etancher le raccord d’angle de régulation avec sortie 3/8".
L’installation doit être rincée selon DIN 1988.
Etancher l’arrivée du câble d’alimentation
électrique.
Etancher le châssis de montage à l’extérieur.
Haakse afsluiter met afvoer 3/8" afdichten.
De installatie moet volgens DIN 1988
gespoeld zijn.
Elektriciteitssnoer afkitten.
Buitenkant van het montageframe afkitten.
Eckregulierventil mit Abgang 3/8”
eindichten. Die Anlage muss
nach DIN 1988 gespült sein.
Elektrozuleitung eindichten.
Montagerahmen aussen eindichten.
Seal in corner control valve with 3/8" outlet.
The system must be flushed in line with DIN 1988.
Seal the electrical supply line.
Seal the outside of the assembly
frame.
4
Dampfbox
Steam box
Coffret vapeur
Stoombox
3/8”
ACHTUNG:
Nur neutralvernetzendes Silikon verwenden!!
ATTENTION:
Only neutral cross-linking silicone to be used!
Merci de n’utiliser que du mastic silicone neutre !
LET OP:
Gebruik enkel neutraalverbindend silicone!
ATTENZIONE:
Utilizzare solo silicone a reticolazione neutra!

10 / 2010 / 20 BODY+SOUL_Sitz_Dampfbox_MA_ 11692_04_23
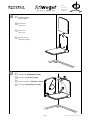
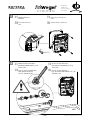
11
8
SW12
Zitting erop steken.
Tweede console erop steken en
vastschroeven
Enficher le siège.
Enficher la deuxième console et
la visser.
Sitzblatt aufstecken.
Zweite Konsole aufstecken und
anschrauben.
Fit the seat.
Fit the second panel and
screw down.
7x90
2x
1
2
Sitz
Tip-up sit
Strapontin
Klapstoel
Sitz
Tip-up sit
Strapontin
Klapstoel
SW12
7x90
2x
10
Erste Konsole anschrauben.
Screw the first panel down.
Visser la première console.
Eerste console vastschroeven.
7
6
Elastiek verwijderen.
Beide consoles naar boven klappen
en verwijderen.
Enlever l’élastique.
Déplier les deux consoles et les enlever.
Gummiband entfernen.
Beide Konsolen aufklappen
und abnehmen.
Remove the rubber band.
Fold up and remove both panels.
1
2
3
2
3

11 / 2011 / 20 BODY+SOUL_Sitz_Dampfbox_MA_ 11692_04_23
11
8
SW12
Zitting erop steken.
Tweede console erop steken en
vastschroeven
Enficher le siège.
Enficher la deuxième console et
la visser.
Sitzblatt aufstecken.
Zweite Konsole aufstecken und
anschrauben.
Fit the seat.
Fit the second panel and
screw down.
7x90
2x
1
2
Sitz
Tip-up sit
Strapontin
Klapstoel
Sitz
Tip-up sit
Strapontin
Klapstoel
SW12
7x90
2x
10
Erste Konsole anschrauben.
Screw the first panel down.
Visser la première console.
Eerste console vastschroeven.
7
6
Elastiek verwijderen.
Beide consoles naar boven klappen
en verwijderen.
Enlever l’élastique.
Déplier les deux consoles et les enlever.
Gummiband entfernen.
Beide Konsolen aufklappen
und abnehmen.
Remove the rubber band.
Fold up and remove both panels.
1
2
3
2
3

12 / 2012 / 20 BODY+SOUL_Sitz_Dampfbox_MA_ 11692_04_23
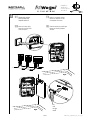
13
SW5
Koud water aansluiten. Klep openen.
Let op, dat de minstens loflies waterdruk is EU 1,5 bar,
(Zwitserland 2,5bar).
Kaltwasser anschliessen. Ventil öffnen.
Kontrolle Mindestfließwasserdruck EU 1,5 bar,
(Schweiz 2,5bar).
Connect to cold water supply. Open valve.
Control, minimum water pressure
EU 1,5 bar, (Switzerland 2,5bar).
Raccorder l’eau froide. Ouvir le ventil.
Veiler moindre bression hydrostatique EU 1,5 bar,
(Suisse 2,5bar).
12
11
Stoombox plaatsen en vastschroeven.
Mettre en place le coffret vapeur et
le visser.
Dampfbox aufsetzen und
anschrauben.
Fit the steam box and screw
down.
M6x25
4x
Dampfbox
Steam box
Coffret vapeur
Stoombox
12
9
Rugleuning opschuiven.
Zitting naar boven klappen.
Enfiler le dossier.
Déplier le siège.
Rückenlehne aufschieben.
Sitzfläche aufklappen.
Push on the back.
Fold the seat up.
1
2
10 Funktionskontrolle, Belastbarkeit bis 130 kg.
Functional check, Load capacity 130 kg.
Contrôle du fonctionnement, Poids limite à 130 kg
Functiecontrole, Draagvermogen tot 130 kg
Sitz
Tip-up sit
Strapontin
Klapstoel

13 / 2013 / 20 BODY+SOUL_Sitz_Dampfbox_MA_ 11692_04_23
13
SW5
Koud water aansluiten. Klep openen.
Let op, dat de minstens loflies waterdruk is EU 1,5 bar,
(Zwitserland 2,5bar).
Kaltwasser anschliessen. Ventil öffnen.
Kontrolle Mindestfließwasserdruck EU 1,5 bar,
(Schweiz 2,5bar).
Connect to cold water supply. Open valve.
Control, minimum water pressure
EU 1,5 bar, (Switzerland 2,5bar).
Raccorder l’eau froide. Ouvir le ventil.
Veiler moindre bression hydrostatique EU 1,5 bar,
(Suisse 2,5bar).
12
11
Stoombox plaatsen en vastschroeven.
Mettre en place le coffret vapeur et
le visser.
Dampfbox aufsetzen und
anschrauben.
Fit the steam box and screw
down.
M6x25
4x
Dampfbox
Steam box
Coffret vapeur
Stoombox
12
9
Rugleuning opschuiven.
Zitting naar boven klappen.
Enfiler le dossier.
Déplier le siège.
Rückenlehne aufschieben.
Sitzfläche aufklappen.
Push on the back.
Fold the seat up.
1
2
10 Funktionskontrolle, Belastbarkeit bis 130 kg.
Functional check, Load capacity 130 kg.
Contrôle du fonctionnement, Poids limite à 130 kg
Functiecontrole, Draagvermogen tot 130 kg
Sitz
Tip-up sit
Strapontin
Klapstoel

14 / 2014 / 20 BODY+SOUL_Sitz_Dampfbox_MA_ 11692_04_23
Dampfbox
Steam box
Coffret vapeur
Stoombox
15
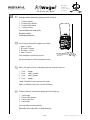
14 Spannung einschalten. Automatisches Spülprogramm läuft wie folgt ab:
1. 1,5 minuten entleeren
2. 2,5 minuten füllen/überfüllen
3. 1,5 minuten füllen/entleeren
4. 1,5 minuten entleeren
System auf Dichtheit und Funktion prüfen.
Wasserhärte einstellen
(siehe Bedienungsanleitung).
Turn on steam box. Automatic Rinse program runs as follows:
1. empties 1.5 minutes
2. fills/overfills 2.5 minutes
3. fills/empties 1.5 minutes
4. empties 1.5 minutes
Check watertightness and functioning of system.
Also set water hardness if needed(see operating instructions).
Mettre le coffret vapeur sous tension. Le automatique programme de rincage déroule comme suit:
1. 1,5 min. - dégorger
2. 2,5 min. - remplir / encombrer
3. 1,5 min. - remplir / dégorger
4. 1,5 min. - dégorger
Controler l'étanchéité et le bon fonctionnement du système.
Régler le cas échéant la dureté de l’eau (voir notice d’utilisation).
Stoombox inschakelen. De automatische spoelingscyclus vloeit als volgt weg:
1. 1,5 minuut legen
2. 2,5 minuut vullen/overlopen
3. 2,5 minuut vullen/legen
4. 1,5 minuut legen
Systeem op lekkage en werking controleren.
Waterhardheid indien nodig instellen (zie gebruiksaanwijzing).
14
Elektrische aansluiting tot stand brengen.
Besturing op bediening (frontplaat)
aansluiten.
Elektro-Anschluss herstellen.
Steuerung an Bedienung
Frontplatte anschliessen.
Connect to electricity supply.
Connect the control unit to the
controls (front plate).
Réaliser le raccordement électrique.
Raccorder la commande sur l’unité
de manipulation (face avant).
13
LNPE
rot
red
rouge
rood
Dampfbox
Steam box
Coffret vapeur
Stoombox

15 / 2015 / 20 BODY+SOUL_Sitz_Dampfbox_MA_ 11692_04_23
Dampfbox
Steam box
Coffret vapeur
Stoombox
15
14 Spannung einschalten. Automatisches Spülprogramm läuft wie folgt ab:
1. 1,5 minuten entleeren
2. 2,5 minuten füllen/überfüllen
3. 1,5 minuten füllen/entleeren
4. 1,5 minuten entleeren
System auf Dichtheit und Funktion prüfen.
Wasserhärte einstellen
(siehe Bedienungsanleitung).
Turn on steam box. Automatic Rinse program runs as follows:
1. empties 1.5 minutes
2. fills/overfills 2.5 minutes
3. fills/empties 1.5 minutes
4. empties 1.5 minutes
Check watertightness and functioning of system.
Also set water hardness if needed(see operating instructions).
Mettre le coffret vapeur sous tension. Le automatique programme de rincage déroule comme suit:
1. 1,5 min. - dégorger
2. 2,5 min. - remplir / encombrer
3. 1,5 min. - remplir / dégorger
4. 1,5 min. - dégorger
Controler l'étanchéité et le bon fonctionnement du système.
Régler le cas échéant la dureté de l’eau (voir notice d’utilisation).
Stoombox inschakelen. De automatische spoelingscyclus vloeit als volgt weg:
1. 1,5 minuut legen
2. 2,5 minuut vullen/overlopen
3. 2,5 minuut vullen/legen
4. 1,5 minuut legen
Systeem op lekkage en werking controleren.
Waterhardheid indien nodig instellen (zie gebruiksaanwijzing).
14
Elektrische aansluiting tot stand brengen.
Besturing op bediening (frontplaat)
aansluiten.
Elektro-Anschluss herstellen.
Steuerung an Bedienung
Frontplatte anschliessen.
Connect to electricity supply.
Connect the control unit to the
controls (front plate).
Réaliser le raccordement électrique.
Raccorder la commande sur l’unité
de manipulation (face avant).
13
LNPE
rot
red
rouge
rood
Dampfbox
Steam box
Coffret vapeur
Stoombox

16 / 2016 / 20 BODY+SOUL_Sitz_Dampfbox_MA_ 11692_04_23
Dampfbox
Steam box
Coffret vapeur
Stoombox
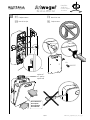
16
Frontplaat monteren.
Frontplatte montieren.
Mount the front plate.
Monter la face avant.
15
M4x20
8x
optional
en option
optioneel
Dampfbox
Steam box
Coffret vapeur
Stoombox
16
Frontplaat monteren.
Frontplatte montieren.
Mount the front plate.
Monter la face avant.
15
M4x20
8x
optional
en option
optioneel
Version Kunststoff
Version plastic
Version plastique
Versie kunststof

17 / 2017 / 20 BODY+SOUL_Sitz_Dampfbox_MA_ 11692_04_23
Dampfbox
Steam box
Coffret vapeur
Stoombox
16
Frontplaat monteren.
Frontplatte montieren.
Mount the front plate.
Monter la face avant.
15
M4x20
8x
optional
en option
optioneel
Dampfbox
Steam box
Coffret vapeur
Stoombox
16
Frontplaat monteren.
Frontplatte montieren.
Mount the front plate.
Monter la face avant.
15
M4x20
8x
optional
en option
optioneel
Version Glas
Glass version
Version en verre
Glazen versie

18 / 2018 / 20 BODY+SOUL_Sitz_Dampfbox_MA_ 11692_04_23
Dampfbox
Steam box
Coffret vapeur
Stoombox
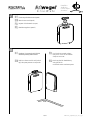
18
Fernsteuerung auf Ladestation setzen (optional)
Mount the remote control (optional)
Intégration de la télécommande (en option)
Afstandsbesturing plaatsen (optioneel)
Einsatzbereit. Fernsteuerung für Audio/Farblicht
mit Bedienungsanleitung in Betrieb nehmen.
Ready for use. Remote control for audio/coloured
light, with operating instructions in enterprise take.
Prêt à l’emploi. Une commande à distance
Audio/feux de couleur avec des instructions
d'emploi en service mettre.
Gereed voor gebruik. De afstandsbediening
audio/gekleurd licht
met werkende instructies in onderneming neemt.
18
17
BODY+SOUL_Sitz_Dampfbox_MA_TB/STÖ 11692_09_15
17
16
Fernbedienung
Remote Control
Commande à distance
Afstandsbediening
DE Fernbedienung (OPTIONAL)
Diese ist werkseitig bereits auf Ihre Body+Soul abgestimmt.
Falls unter Umständen ein erneutes Anlernen notwendig ist, gehen sie bitte wie folgt vor:
• Unterbrechen der Spannungsversorgung der BODY+SOUL.
• auf der AUDIO-Seite der Fernbedienung zuerst (-) Taste und (+) Taste drücken und halten, zusätzlich EIN/AUS Taste kurzdrücken.
Der farbige EIN-Ring beginnt schnell zu blinken.
• Wiederherstellen der Stromversorgung der BODY+SOUL (innerhalb von 5 Minuten)
• Die LEDs leuchten nach dem erfolgreichen Anlernen für ca. 1 Sekunde auf.
• Der farbige Ring erlischt.
• Ihre Fernbedienung zur Steuernung von Audio/Farblicht ist angelernt.
Die EIN/AUS-Taste bricht den Anlernvorgang ab.
EN
Remote control (OPTIONAL)
This has been preset at our plant for your Body+Soul
In case it requires resetting please follow these steps:
•Interrupt the power supply to the BODY+SOUL.
•On the AUDIO side of the remote control, first press and hold down the (-)button and then the (+) button, then quickly press the
ON/OFF button. The coloured ON ring starts to flash quickly.
•Restore the power supply to the BODY+SOUL (within 5 minutes)
• The LEDs 1-7 light up for 1 second when the setting was successful
• The colored ring goes out
• The remote control for audio and colored lighting is set.
Pressing the EIN/AUS key breaks off the setting process.
FR
Télécommande (EN OPTION)
Celle-ci est accordée en usine sur votre Body+Soul.
Si toutefois selon les circonstances une nouvelle mise en phase est nécessaire, merci de procéder comme suit:
• Couper l’alimentation électrique de la BODY+SOUL.
• Sur la partie AUDIO de la télécommande, appuyez d’abord sur la touche (-) etsur la touche (+), les maintenir enfoncées et appuyez
brièvement sur la touche MARCHE/ARRÊT. L’anneau MARCHE de couleur commence à clignoter rapidement.
• Rétablir l’alimentation électrique de la BODY+SOUL (dans les 5 minutes)
• Après le paramétrage réussi, les LEDs 1 à 7 s‘allument durant env. 1 seconde
• L‘anneau de couleur s‘éteint
• la télécommande pour le pilotage de l‘audio et de la lumière est paramétrée.
L‘actionnement de la touche MARCHE/ARRET interrompt le paramétrage.
NL
Afstandsbediening (OPTIONEEL)
Deze is al vanuit de fabriek op uw Body+Soul ingesteld.
Voor het geval u onder bepaalde omstandigheden een nieuwe instructie nodig heeft, volgt u a.u.b. de volgende stappen:
• Onderbreek de stroomvoorziening naar de BODY+SOUL.
• Druk aan de AUDIO-zijde van de afstandsbediening eerst de (-)-toets en (+)-toets in en houd deze ingedrukt,
druk tegelijkertijd de AAN/UIT-toets kort in. De gekleurde AAN-ring begint snel te knipperen.
• Sluit de stroomvoorziening weer op de BODY+SOUL aan (binnen 5 minuten)
• De led‘s 1-7 gaan na succesvol aanleren ongeveer 1 seconde aan
• De gekleurde ring gaat uit.
• De afstandsbediening voor het regelen van audio/gekleurd licht is ingeleerd.“
Als de toets AAN/UIT wordt ingedrukt, wordt het inleerproces afgebroken.

19 / 2019 / 20 BODY+SOUL_Sitz_Dampfbox_MA_ 11692_04_23
Dampfbox
Steam box
Coffret vapeur
Stoombox
18
Fernsteuerung auf Ladestation setzen (optional)
Mount the remote control (optional)
Intégration de la télécommande (en option)
Afstandsbesturing plaatsen (optioneel)
Einsatzbereit. Fernsteuerung für Audio/Farblicht
mit Bedienungsanleitung in Betrieb nehmen.
Ready for use. Remote control for audio/coloured
light, with operating instructions in enterprise take.
Prêt à l’emploi. Une commande à distance
Audio/feux de couleur avec des instructions
d'emploi en service mettre.
Gereed voor gebruik. De afstandsbediening
audio/gekleurd licht
met werkende instructies in onderneming neemt.
18
17
BODY+SOUL_Sitz_Dampfbox_MA_TB/STÖ 11692_09_15
17
16
Fernbedienung
Remote Control
Commande à distance
Afstandsbediening
DE Fernbedienung (OPTIONAL)
Diese ist werkseitig bereits auf Ihre Body+Soul abgestimmt.
Falls unter Umständen ein erneutes Anlernen notwendig ist, gehen sie bitte wie folgt vor:
• Unterbrechen der Spannungsversorgung der BODY+SOUL.
• auf der AUDIO-Seite der Fernbedienung zuerst (-) Taste und (+) Taste drücken und halten, zusätzlich EIN/AUS Taste kurzdrücken.
Der farbige EIN-Ring beginnt schnell zu blinken.
• Wiederherstellen der Stromversorgung der BODY+SOUL (innerhalb von 5 Minuten)
• Die LEDs leuchten nach dem erfolgreichen Anlernen für ca. 1 Sekunde auf.
• Der farbige Ring erlischt.
• Ihre Fernbedienung zur Steuernung von Audio/Farblicht ist angelernt.
Die EIN/AUS-Taste bricht den Anlernvorgang ab.
EN
Remote control (OPTIONAL)
This has been preset at our plant for your Body+Soul
In case it requires resetting please follow these steps:
•Interrupt the power supply to the BODY+SOUL.
•On the AUDIO side of the remote control, first press and hold down the (-)button and then the (+) button, then quickly press the
ON/OFF button. The coloured ON ring starts to flash quickly.
•Restore the power supply to the BODY+SOUL (within 5 minutes)
• The LEDs 1-7 light up for 1 second when the setting was successful
• The colored ring goes out
• The remote control for audio and colored lighting is set.
Pressing the EIN/AUS key breaks off the setting process.
FR
Télécommande (EN OPTION)
Celle-ci est accordée en usine sur votre Body+Soul.
Si toutefois selon les circonstances une nouvelle mise en phase est nécessaire, merci de procéder comme suit:
• Couper l’alimentation électrique de la BODY+SOUL.
• Sur la partie AUDIO de la télécommande, appuyez d’abord sur la touche (-) etsur la touche (+), les maintenir enfoncées et appuyez
brièvement sur la touche MARCHE/ARRÊT. L’anneau MARCHE de couleur commence à clignoter rapidement.
• Rétablir l’alimentation électrique de la BODY+SOUL (dans les 5 minutes)
• Après le paramétrage réussi, les LEDs 1 à 7 s‘allument durant env. 1 seconde
• L‘anneau de couleur s‘éteint
• la télécommande pour le pilotage de l‘audio et de la lumière est paramétrée.
L‘actionnement de la touche MARCHE/ARRET interrompt le paramétrage.
NL
Afstandsbediening (OPTIONEEL)
Deze is al vanuit de fabriek op uw Body+Soul ingesteld.
Voor het geval u onder bepaalde omstandigheden een nieuwe instructie nodig heeft, volgt u a.u.b. de volgende stappen:
• Onderbreek de stroomvoorziening naar de BODY+SOUL.
• Druk aan de AUDIO-zijde van de afstandsbediening eerst de (-)-toets en (+)-toets in en houd deze ingedrukt,
druk tegelijkertijd de AAN/UIT-toets kort in. De gekleurde AAN-ring begint snel te knipperen.
• Sluit de stroomvoorziening weer op de BODY+SOUL aan (binnen 5 minuten)
• De led‘s 1-7 gaan na succesvol aanleren ongeveer 1 seconde aan
• De gekleurde ring gaat uit.
• De afstandsbediening voor het regelen van audio/gekleurd licht is ingeleerd.“
Als de toets AAN/UIT wordt ingedrukt, wordt het inleerproces afgebroken.

20 / 2020 / 20 BODY+SOUL_Sitz_Dampfbox_MA_ 11692_04_23
Druck- und Satzfehler sowie technische Änderungen vorbehalten.
Typographical errors and technical changes reserved.
Sous réserve d‘erreurs d‘impression ou de syntaxe ainsi que de modifications techniques.
Drukfouten, maatwijzingen en technische veranderungen voorbehouden.
Ci riserviamo errori di stampa e variazioni tecniche.
Artweger GmbH. & Co. KG
Sulzbacherstraße 60 | 4820 Bad Ischl | Austria
Tel. +43 6132 205-0 | Fax +43 6132 205-5001
info@artweger.at | www.artweger.at
Verkauf Deutschland
Artweger GmbH. & Co. KG
Postfach 1169 | 83402 Ainring
| Deutschland
Tel. 0800 1114442-0
|
Fax 0800 1114442-5002
info@artweger.de | www.artweger.de
Verkauf Schweiz
Artweger GmbH. & Co. KG
Postfach 16 | CH-4202 Duggingen
Tel. + 41 61 751 90 91 |
Fax + 41 61 751 63 54
info@artweger.com | www.artweger.com
-
 1
1
-
 2
2
-
 3
3
-
 4
4
-
 5
5
-
 6
6
-
 7
7
-
 8
8
-
 9
9
-
 10
10
-
 11
11
-
 12
12
-
 13
13
-
 14
14
-
 15
15
-
 16
16
-
 17
17
-
 18
18
-
 19
19
-
 20
20


Artweger Tip-up seat and steam box Assembly Instructions Manual
- Typ
- Assembly Instructions Manual
- Dieses Handbuch eignet sich auch für
in anderen Sprachen
- English: Artweger Tip-up seat and steam box
- français: Artweger Tip-up seat and steam box
- Nederlands: Artweger Tip-up seat and steam box

