Parkside KH 3020 BELT SANDER Bedienungsanleitung
- Kategorie
- Power Sanders
- Typ
- Bedienungsanleitung
Dieses Handbuch ist auch geeignet für

BANDSCHLEIFER
Bedienungs- und Sicherheitshinweise
BÅNDSLIBER
Brugs- og sikkerhedsanvisninger
ΤΑΙΝΙΟΛΕΙΑΝΤΗΡΑΣ
Υποδείξεις χειρισμού και ασφαλείας
BELT SANDER
Operation and Safety Notes
PEBS 900 SE

GB / IE / CY Operation and Safety Notes Page 5
DK Brugs- og sikkerhedsanvisninger Side 15
GR / CY Υποδείξεις χειρισμού και ασφαλείας Σελίδα 25
DE / AT / CH Bedienungs- und Sicherheitshinweise Seite 37
Before reading, unfold the page containing the illustrations and familiarise yourself with all functions of the
device.
Før du læser, vend siden med billeder frem og bliv bekendt med alle apparatets funktioner.
Πριν ξεκινήσετε την ανάγνωση, ανοίξτε τη σελίδα με τις εικόνες και εξοικειωθείτε με όλες τις λειτουργίες της
συσκευής.
Klappen Sie vor dem Lesen die Seite mit den Abbildungen aus und machen Sie sich anschließend mit allen
Funktionen des Gerätes vertraut.

A B C
D E F
12
13
14
14
16
15
9
6
10 11
6
1
4
7 8
5
2
3

5 GB/IE/CY
Table of contents
Introduction
Proper use ......................................................................................................................Page 6
Features and equipment ...............................................................................................Page 6
Included items ...............................................................................................................Page 7
Technical information ....................................................................................................Page 7
General safety advice for electrical power tools
1. Workplace safety .....................................................................................................Page 7
2.
Electrical safety .........................................................................................................Page 8
3. Personal safety ..........................................................................................................Page 8
4.
Careful handling and use of electrical power tools ................................................Page 8
Safety advice for belt sanders ......................................................................................Page 9
Preparing for usea
Tensioning / changing the sanding belt .......................................................................Page 10
Advice on use ................................................................................................................Page 10
Vacuum dust extraction .................................................................................................Page 10
Operation
Switching on and off .....................................................................................................Page 11
Selecting the correct rotational speed and sanding belt ............................................Page 11
Using the sander in a fixed mounting ..........................................................................Page 12
Tips and tricks ................................................................................................................Page 12
Maintenance and cleaning .........................................................................Page 13
Service centre ........................................................................................................Page 13
Warranty ...................................................................................................................Page 13
Disposal ......................................................................................................................Page 13
Declaration of conformity / Producer ................................................Page 14

6 GB/IE/CY
Introduction
Belt sander PEBS 900 SE
Q
Introduction
Please make sure you familiarise your-
self fully with the way the device works
before you use it for the first time and
that you understand how to handle electrical pow-
er tools correctly. To help you do this please read
the accompanying operating instructions.
Keep these instructions in a safe place. If you pass
the device on to anyone else, please ensure that
you also pass on all the documentation.
Q
Proper use
The belt sander is designed for dry sanding of
large surfaces of wood, plastic, metal, plaster and
painted surfaces. The device may only be used for
dry sanding. Always use a sanding belt and grade
of grit suitable for the particular surface you are
sanding. The speed selected should also be appro-
priate for the material. The device is not intended
for commercial use. Any other use or modification
to the device shall be considered as improper use
and could give rise to considerable dangers. The
manufacturer will not accept liability for loss or
damage arising from improper use.
Q
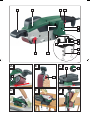
Features and equipment
1
Belt speed adjuster wheel
2
Locking knob
3
ON / OFF switch
4
Toothed belt cover
5
Dust extraction spout
6
Belt adjuster screw
7
Auxiliary handle
8
Ventilation slots
9
Tensioning lever
10
Dust collection box
11
Extraction adapter
Fixed mounting kit:
12
Mounting frame
13
Clamp plates 2 x
14
Screw clamps 2 x
15
Spacer plates 2 x
16
Screw
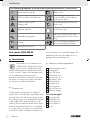
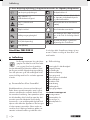
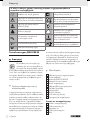
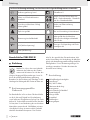
The following pictograms are used in these operating instructions / on the device:
Read instruction manual! Safety class II
Observe caution and safety notes!
Wear hearing protection, dust
protection mask, protective glasses
and protective gloves.
Caution – electric shock!
Danger to life!
Keep children away from electrical
power tools!
Explosive material! For indoor use only!
n
0
Rated idle running speed
Risk of loss of life by electric shock
from damaged mains lead or mains
plug!
V
~
Voltage
Dispose packaging and appliance in
an environmentally-friendly way!
W
Watts (Effective power)

7 GB/IE/CY
Introduction / General safety advice for electrical power tools
Q
Included items
Check that all the items and accessories
are present immediately after unpacking
the device:
1 Belt sander PEBS 900 SE
1 Sanding belt
1 Dust collection box
1 Extraction adapter
(for external vacuum dust extraction)
1 Fixed mounting kit
1 Operating instructions
Q
Technical information
Belt sander: Parkside PEBS 900 SE
Nominal voltage: 230 V
~
50 Hz
Nom. power input: 900 W
No-load belt speed: 180 - 340 m / min
No-load speed: n
0
345 - 645 min
-1
Sanding belt 75 x 533 mm
Protection class: II /
Noise and vibration data:
Values determined in accordance with EN 60745.
The sound pressure level (A-weighted) of the
device is typically 86 dB (A). Uncertainty K = 3 dB.
The sound level while working can exceed
100 dB (A).
Wear ear protection!
Total vibration, EN 60745:
Vibration emission value a
h,D
= 2,928 m / s
2
Uncertainty K < 1.5 m / s
2
WARNING!
The vibration level given in these
instructions has been measured in accordance with
a standardised measurement procedure specified
in EN 60745 and can be used to compare devices.
Different uses of the device give rise to different vibra-
tion levels and in many cases they may exceed the
values given in these instructions. It is easy to underes-
timate the vibration load if the electrical power tool is
used regularly in particular circumstances.
Note: If you wish to make an accurate assessment
of the vibration loads experienced during a particu-
lar period of working, you should also take into
account the intervening periods of time when the
device is switched off or is running but is not actual-
ly in use. This can result in a much lower vibration
load over the whole of the period of working.
The PEBS 900 SE belt sander has full-wave elec-
tronics with additional control electronics, soft start
with inrush current limiting.
General safety advice for
electrical power tools
WARNING!
Read all the safety advice
and instructions! Failure to observe the safety
advice and instructions may result in electric shock,
fire and / or serious injury.
KEEP ALL THE SAFETY ADVICE AND INSTRUC-
TIONS IN A SAFE PLACE FOR FUTURE REFER-
ENCE! THE TERM “ELECTRICAL TOOL” USED
IN THE SAFETY ADVICE REFERS TO ELECTRICAL
TOOLS POWERED BY MAINS ELECTRICITY (BY
MEANS OF A MAINS LEAD) AND ELECTRICAL
TOOLS POWERED BY RECHARGEABLE BATTER-
IES (WITHOUT A MAINS LEAD).
1.
Workplace safety
a) Keep your working area clean and
well lit. Untidy or poorly lit working areas
can lead to accidents.
b)
Do not work with the device
in potentially explosive envi-
ronments in which there
are inflammable liquids, gases or
dusts. Electrical power tools create sparks,
which can ignite dusts or fumes.
c)
Keep children and other peo-
ple away while you are op-
erating the electrical tool.
Distractions can cause you to lose control of
the device.

8 GB/IE/CY
General safety advice for electrical power tools
2.
Electrical safety
To avoid danger to life from
electric shock:
a)
The mains plug on the device must match
the mains socket. The plug must not
be modified in any way. Do not use
an adapter plug with devices fitted
with a protective earth. Unmodified
plugs and matching sockets reduce the risk of
electric shock.
b) Avoid touching earthed surfaces such
as pipes, radiators, ovens and refrig-
erators with any part of your body.
There is an increased risk of electric shock if
your body is earthed
.
c) Keep the device away from rain or
moisture. Water entering an electrical device
increases the risk of electric shock.
d)
Do not use the mains lead for
any purpose for which it was
not intended, e.g. to carry the
device, to hang up the device or to pull
the mains plug out of the mains socket.
Keep the mains lead away from heat,
oil, sharp edges or moving parts of the
device. Damaged or tangled mains leads
increase the risk of electric shock.
e) When working outdoors with an
electrical power tool always use ex-
tension cables that are also approved
for use outdoors. The use of an extension
cable suitable for outdoor use reduces the risk
of electric shock.
f) Use a residual current device (RCD)
for protection if operating the electri-
cal power tool in a moist environment
is unavoidable. The use of an RCD reduces
the risk of electric shock.
3. Personal safety
a) Remain alert at all times, watch what
you are doing and always proceed
with caution. Do not use the device if
you are tired or under the influence of
drugs, alcohol or medication. One mo-
ment of carelessness when using the device
can lead to serious injury.
b)
Wear personal protective
equipment and always wear
safety glasses. The wearing of
personal protective equipment such as dust
masks, non-slip safety shoes, safety helmets or
ear protectors, appropriate to the type of elec-
trical power tool used and work undertaken,
reduces the risk of injury.
c) Avoid unintentional operation of the
device. Check that the electrical power
tool is switched off before you connect
it to the mains, pick it up or carry it.
Accidents can happen if you carry the device
with your finger on the ON / OFF switch or with
the device switched on.
d) Remove any setting tools or spanners
before you switch the device on. A tool
or spanner left attached to a rotating part of a
device can lead to injury.
e) Avoid placing your body in an unnat-
ural position. Keep proper footing
and balance at all times. By doing this
you will be in a better position to control the
device in unforeseen circumstances.
f) Wear suitable clothing. Do not wear
loose clothing or jewellery. Keep your
hair, clothing and gloves clear of mov-
ing parts. Loose clothing, jewellery or long
hair can become trapped in moving parts.
g) If vacuum dust extraction and collection
devices are fitted do not forget to
check
that they are properly connected
and
correctly used. The use of these devices re-
duces the hazard presented by dust.
4.
Careful handling and use of
electrical power tools
a) Do not overload the device. Always
use an electrical power tool that is
intended for the task you are under-
taking. By using the right electrical power
tool for the job you will work more safely and
achieve a better result.

9 GB/IE/CY
General safety advice for electrical power tools
b) Do not use an electrical power tool if
its switch is defective. An electrical power
tool that can no longer be switched on and off
is dangerous and must be repaired.
c) Pull the mains plug from the socket
before you make any adjustments to
the device, change accessories or
when the device is put away. This pre-
caution is intended to prevent you from uninten-
tionally starting the device.
d) When not in use always ensure that
electrical power tools are kept out of
reach of children. Do not let anyone
use the device if he or she is not famil-
iar with it or has not read the
instructions and advice. Electrical power
tools are dangerous when they are used by
inexperienced people.
e) Look after the device carefully. Check
that moving parts are working prop-
erly and move freely. Check for any
parts that are broken or damaged
enough to detrimentally affect the
functioning of the device. Have dam-
aged parts repaired before you use
the device. Many accidents have their ori-
gins in poorly maintained electrical power
tools.
f) Keep cutting tools clean and sharp.
Carefully maintained cutting tools with sharp
cutting edges are less likely to jam and are
easier to control.
g) Use the electrical power tool, accesso-
ries, inserted tools etc. in accordance
with these instructions and advice,
and the stipulations drawn up for this
particular type of device. In doing this,
take into account the working condi-
tions and the task in hand. The use of
electrical power tools for purposes other than
those intended can lead to dangerous situations.
Safety advice for
belt sanders
J DANGER OF FIRE FROM FLYING
SPARKS! Sanding metal creates flying sparks.
For this reason, always make sure that nobody
is placed in any danger and that there are no
inflammable materials near the working area.
J When undertaking prolonged sanding of
wood, and in particular when working on ma-
terials that give rise to dusts that are hazardous
to health, the sander must be connected to a
suitable external dust extraction device.
J Ensure that there is adequate ventilation when
working on plastic, paint, varnish etc.
J The belt sander is designed for the dry sanding
of large surfaces of wood, plastic, metal and
plaster and painted surfaces. The device is to
be used for dry sanding only.
J Do not sand materials containing asbestos.
Asbestos is a known carcinogen.
WARNING!
POISONOUS DUSTS!
Sanding paints containing lead, some types of
wood and metal for example may give rise to
hazardous or poisonous dusts and represents a
risk to the health of the person operating the
device and to anyone near the work area.
Wear safety glasses and a dust
protection mask!
J Securely support the workpiece. Use clamps or
a vice to grip the workpiece firmly. This is much
safer than holding it with your hand.
J Never support yourself by placing your hands
near or in front of the device or the workpiece
surface. A slip can result in injury.
J If a dangerous situation arises, pull the mains
plug immediately out of the mains socket.
J Always work with the mains lead leading
away from the rear of the device.
J Avoid contact with the moving sanding belt.
J Do not work on moistened materials or damp
surfaces.
J Always switch on the device before placing it
against the workpiece. After sanding, lift the de-
vice from the workpiece before switching it off.
J When working always hold the device securely
with both hands (see Fig. D). Always keep
proper footing and balance.

10 GB/IE/CY
General safety advice for electrical power tools / Preparing for use
J Switch the device off and allow it to come to
a complete standstill before you put it down.
J When taking a break from your work, before
carrying out any tasks on the device itself (e.g.
changing the sanding belt) and when you are
not using the device, always pull the mains
plug out of the mains socket.
Q
Preparing for use
Q
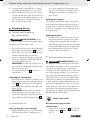
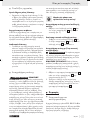
Tensioning / changing
the sanding belt
WARNING!
RISK OF INJURY! Before
you carry out any work on the belt sander always
pull the plug out of the mains socket.
1. Then release the tensioner for the sanding belt
by moving the tensioning lever
9
fully out-
wards (see fig. A). The tensioner is now open
and the sanding belt can be removed.
2. Next insert a new sanding belt or change the
belt for one suitable for a different material or
one with a different grit size.
IMPORTANT: The direction of the arrows on
the inside of the sanding belt must agree with
that on sander housing.
3. Press the tensioning lever
9
back into its
initial position.
Adjusting the sanding belt:
j Pick up the device, switch it on and turn it over.
Adjust the belt tracking by turning the adjuster
screw
6
until the edge of the sanding belt is
flush with and runs parallel to the edge of the
device (Fig. B.).
IMPORTANT: Always make sure that the
sanding belt does not cut into the housing.
Check the sanding belt regularly and if neces-
sary re-adjust it using the adjuster screw
6
.
Q
Advice on use
Light sanding pressure is enough:
j Apply light sanding pressure only. The weight
of the belt sander alone is adequate to pro-
duce good sanding results. By adopting this
approach you will also prolong the life of your
sanding belts and obtain a smoother work-
piece surface.
Sanding and surfaces:
The sanding output and the quality of the surface
finish obtained are determined by the belt speed
and the grade of grit on the sanding belt (see the
section on “Selecting the correct rotational speed
and sanding belt”).
Sanding procedure:
j With the sander switched on, bring it into con-
tact with the workpiece and move it forward
carefully. Work in parallel and overlapping
widths. Always work in the direction of the grain
to avoid undesirable transverse sanding marks.
After sanding always lift the device from the
workpiece before switching it off.
Q
Vacuum dust extraction
WARNING!
DANGER OF FIRE! There is
the danger of fire when working with electrical de-
vices that have a dustbox or can be connected to a
vacuum cleaner. Under certain conditions the
wood dust in the dust collection box (or in the vacu-
um‘s dust bag) may self-ignite, e.g. as a result of
flying sparks generated when abrading metals or
metal objects left in wood. This can happen partic-
ularly if the wood dust is mixed with paint residue
or other chemicals and the abraded particles are
hot from prolonged abrasion. Therefore you must
empty the device’s dust collection box and the vac-
uum cleaner’s dust bag before taking a break or
stopping work and always avoid overheating of the
abraded particles and the device.
Wear a dust mask!
Dust extraction using the dust
collection box:
j Slide the dust collection box
10
on to the dust
extraction spout
5
on the side of the device
(Fig. C).

11 GB/IE/CY
Preparing for use / Operation
Emptying the dust collection box:
j Pull the dust collection box
10
off the dust
extraction spout
5
. Open the dust collection
box
10
and empty it.
Dust extraction using external vacuum
extraction:
WARNING!
If there is an explosive mixture
of dust and air you must use a vacuum device espe-
cially intended for that purpose.
DANGER OF FIRE! Do not use vacuum dust
extraction (dust collection box or vacuum cleaner)
when sanding metals (flying sparks).
1. Push the extraction adapter
11
on to the dust
extraction spout
5
on the side of the device
(see Fig. C).
2. Slide the hose of a suitable dust extraction de-
vice approved for that purpose (e.g. a workshop
vacuum cleaner) on to the extraction adapter
11
.
Q
Operation
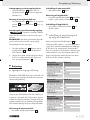
Q
Switching on and off
The PEBS 900 SE belt sander has full-wave electro-
nics with additional control electronics, soft start
with inrush current limiting.
When operating the belt sander you can select
between intermittent or continuous operation mode.
For short sanding tasks use the intermittent operation
mode. For longer sanding tasks we recommend the
continuous operation mode. Whilst working in your
selected mode the device functions as follows:
To switch on intermittent operation mode:
j Press the ON / OFF switch
3
.
To switch off intermittent operation mode:
j Release the ON / OFF switch
3
.
To switch on continuous operation mode:
j Press the ON / OFF switch
3
, and keep it
pressed, then press the locking knob
2
.
To switch off continuous operation mode:
j Press and then release the ON / OFF switch
3
.
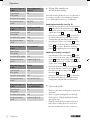
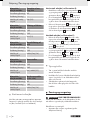
Q
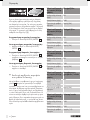
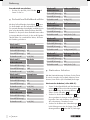
Selecting the correct rotational
speed and sanding belt
You can select the belt speed using the belt speed
adjuster wheel
1
even whilst the sander is running.
The optimum belt speed depends on the workpiece
and the workpiece material. Always confirm the
best speed by carrying out a small test. The follow-
ing table lists some recommended values to help
you determine the optimum speed.
Material / type of
work
Softwood
Coarse finish
(Grit grade)
60
Fine finish (Grit grade) 240
Preselected rotation
speed
high (5-6)
Material / type of
work
Hardwood
Coarse finish
(Grit grade)
60
Fine finish (Grit grade) 180
Preselected rotation
speed
high (5-6)
Material / type of
work
Chipboard
Coarse finish
(Grit grade)
60
Fine finish (Grit grade) 150
Preselected rotation
speed
high (5-6)

12 GB/IE/CY
Operation
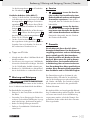
Material / type of
work
Removing paint /
varnish
Coarse finish
(Grit grade)
60
Fine finish (Grit grade) ––
Preselected rotation
speed
high (5-6)
Material / type of
work
Sanding varnish
Coarse finish
(Grit grade)
150
Fine finish (Grit grade) 320
Preselected rotation
speed
low (1-2)
Material / type of
work
Rust removal
Coarse finish
(Grit grade)
40
Fine finish (Grit grade) 120
Preselected rotation
speed
medium / high (3-4)
Material / type of
work
Plastic
Coarse finish
(Grit grade)
120
Fine finish (Grit grade) 240
Preselected rotation
speed
low / medium (2-3)
Material / type of
work
Non-ferrous metals
(e.g. aluminium)
Coarse finish
(Grit grade)
80
Fine finish (Grit grade) 150
Preselected rotation
speed
medium / high (3-4)
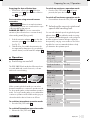
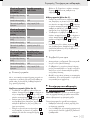
Q
Using the sander in
a fixed mounting
The fixed mounting kit allows you to use the device
for sanding vertically or horizontally by fastening
it on to a flat stable surface (e.g. workbench).
Sanding horizontally (see Fig. E):
j Place the belt sander on to the mounting frame
12
and guide the dust extraction spout
5
through the opening of the mounting frame
12
.
Tighten the screws
16
.
j Place the two clamp plates
13
on to the holes
provided on the opposite side and screw the
clamp plates tight with the provided screws.
j Insert the pins of the screw clamps
14
into the
holes on one of the long sides of the mounting
frame
12
(see Fig. E). Attach the mounting
frame
12
by tightening the screw clamps
14
.
Sanding vertically (see Fig. F):
j Insert the pins of the screw clamps
14
into the
holes on one of the short sides of the mounting
frame
12
. Attach the mounting frame
12
to a
flat, stable surface (e.g. workbench) by tighten-
ing the screw clamps
14
.
j Place the belt sander on to the mounting frame
12
and guide the dust extraction spout
5
through
the opening of the mounting frame
12
. Tighten
the screws
16
.
j Place the two clamp plates
13
on to the holes
provided on the opposite side and screw the
clamp plates tight with the provided screws.
Q
Tips and tricks
j Never use the same sanding belt to sand wood
and metal.
j Worn or ripped sanding belts can damage
the workpiece. Change sanding belts at the
appropriate time.
j Keep the sanding belt properly tensioned so
that it does not hang down too much and
become unusable due to nicks, creases etc.

13 GB/IE/CY
Maintenance and cleaning / Service centre / Warranty / Disposal
Q
Maintenance and cleaning
WARNING!
RISK OF INJURY! Before
you carry out any work on the belt sander always
pull the mains plug out of the mains socket.
The belt sander is designed to be maintenance-free.
j Clean the device frequently. This should be done
immediately after you have finished using it.
j Use a dry cloth to clean the device - never use
petrol, solvents or cleaners that attack plastic.
j Always keep the ventilation slots clear.
j Remove any adhering dust with a narrow
paint brush.
Q
Service centre
J
WARNING!
Have your device re-
paired only by qualified specialist
personnel using original manufactur-
er parts only. This will ensure that your de-
vice remains safe to use.
J
WARNING!
If the plug or mains
lead needs to be replaced, always
have the replacement carried out by
the manufacturer or its service centre.
This will ensure that your device remains safe
to use.
Q
Warranty
This appliance is guaranteed for 3 years
from the date of purchase. It has been
carefully produced and meti-culously
checked before delivery. Please keep
your receipt as proof of purchase. Contact
your service centre by telephone in case
of questions pertaining to the warranty.
Your goods can be transmitted free of
cost only in this manner. This warranty
applies only to the initial purchaser and
is non-transferable.
The warranty covers only material or manufacturing
faults, not normal wear or damage to fragile parts
such as switches or rechargeable batteries.
The appliance is intended solely for private, not
commercial, use.
If this product has been subjected to improper or
inappropriate handling, abuse, or interventions not
carried out by one of our authorised sales and
service outlets, the warranty will be considered void.
This warranty does not affect your statutory rights.
GB
DES UK LTD
Tel.: 0871 5000 700 (£ 0,10 / minute)
e-mail: support.uk@kompernass.com
IE
Kompernaß Service Ireland
Tel.: 1850 930 412 (0,082 €/Min.)
* Standard call rates apply.
Mobile operators may vary.
e-mail: [email protected]
Q
Disposal
The packaging is wholly composed of
environmentally-friendly materials that can
be disposed of at a local recycling centre.
Do not dispose of electrical
power tools with the household
rubbish!
In accordance with European Directive
2002 / 96 / EC (covering waste electrical and elec-
tronic equipment) and its transposition into national
legislation, worn out electrical power tools must be
collected separately and taken for environmentally
compatible recycling.
Contact your local refuse disposal authority for
more details of how to dispose of your worn out
electrical devices.

14 GB/IE/CY
Declaration of conformity / Producer
Q
Declaration of conformity /
Producer
We, Kompernaß GmbH, Burgstr. 21,
D-44867 Bochum, Germany, hereby declare that
this product complies with the following EU directives:
Machinery Directive
(98 / 37 / EC)
EU Low Voltage Directive
(2006 / 95 / EC):
EN 60745-1, EN 60745-2-4
Electromagnetic Compatibility
(2004 / 108 / EC):
EN 50366, EN 55014-1, EN 61000-3-2,
EN 61000-3-3, EN 55014-2
Type / Description of product:
Parkside belt sander PEBS 900 SE
Bochum, 31.10.2009
Hans Kompernaß
- Managing Director -
We reserve the right to make technical modifications
in the course of further development.

15 DK
Indholdsfortegnelse
Indledning
Anvendelse efter formålet .............................................................................................Side 16
Udrustning .....................................................................................................................Side 16
Leverancens indhold .....................................................................................................Side 17
Tekniske data .................................................................................................................Side 17
Generelle sikkerhedsinstrukser for elektrisk værktøj
1. Sikkerhed på arbejdsstedet ......................................................................................Side 17
2.
Elektrisk sikkerhed .....................................................................................................Side 18
3. Personlig sikkerhed ...................................................................................................Side 18
4.
Omhu i omgangen med og anvendelsen af elektriske redskaber .........................Side 19
Sikkerhedsbestemmelser for båndslibemaskine ..........................................................Side 19
Ibrugtagning
Indspændig / udskiftning af slibebånd ........................................................................Side 20
Råd om arbejdet ...........................................................................................................Side 20
Støvopsugning ...............................................................................................................Side 20
Betjening
Igangsætning og slukning ............................................................................................Side 21
Indstilling af omdrejningstal og valg af slibebånd ......................................................Side 21
Stationært arbejde ........................................................................................................Side 22
Tips og tricks ..................................................................................................................Side 22
Pasning og rengøring .....................................................................................Side 22
Service .........................................................................................................................Side 23
Garanti ........................................................................................................................Side 23
Bortskaffelse ..........................................................................................................Side 23
Konformitetserklæring / Fremstiller ...................................................Side 24

16 DK
Båndsliber PEBS 900 SE
Q
Indledning
Før De tager apparatet i brug den første
gang bør De sætte Dem ind i dets funkti-
oner og gøre Dem fortrolig med den
korrekte behandling af elektriske redskaber. Dette
kan De gøre med den følgende betjeningsvejldning.
Den skal opbevares godt. Alle medfølgende doku-
menter skal følge med hvis De overlader apparatet
til andre.
Q
Anvendelse efter formålet
Båndslibemaskinen er kontrueret til tørslibning af
flader af træ, syntetiske materialer, metal og spar-
telmasse samt lakerede overflader. Maskinen må
kun anvendes til tørslibning. Vær opmærksom på at
der til behandling af de forskellige materialer skal
anvendes passende slibeplader med forskellig
kornstørrelse, og at omdrejningstallet ligeledes skal
tilpasses efter materialet. Apparatet er ikke beregnet
til erhvervsmæssig anvendelse. Enhver anden an-
vendelse eller forandring af maskinen gælder som
værende i strid med formålet og indeholder risiko
for alvorlige uheld. Fremstilleren påtager sig intet
ansvar for skader som følge af anvendelse i strid
med formålet.
Q
Udrustning
1
Justeringshjul for båndhastighed
2
Fastgørelsesknap
3
Hovedafbryder
4
Tandremsafdækning
5
Opsugningsstuds
6
Justeringsskrue for båndløb
7
Ekstra-håndgreb
8
Ventilationsslids
9
Spændestang
10
Støvfangsboks
11
Opsugningsadapter
Stationært montagesæt:
12
Montageramme
13
Klemmeplader 2 x
14
Skruetvinger 2 x
15
Afstandsplader 2 x
16
Skrue
Indledning
I denne betjeningsvejledning / på apparatet anvendes der følgende piktogrammer:
Læs betjeningsvejledningen! Beskyttelsesklasse II
Følg advarsels- og
sikkerhedsanvisningerne!
Dae anbefales at bære sikkerhedsbril-
ler, høreværn, åndedrætsbeskyttelse
og sikkerhedshandsker.
Fare for elektrisk stød!
Livsfare!
Børn skal holdes borte fra elektrisk
værktøj!
Eksplosionsfare! Kun til indendørs anvendelse!
n
0
Måling-tomgangshastighed
Hvis ledningen eller stikket er beskadi-
get, er der risiko for livsfarligt elektrisk
stød!
V
~
Volt (Vekselspænding)
Bortskaf emballagen og maskinen
miljøvenligt efter forskrifterne!
W
Watt (Effektivt)

17 DK
Q
Leverancens indhold
Umiddelbart efter udpakning af appara-
tet kontrolleres leverancens indhold:
1 Båndslibemaskine PEBS 900 SE
1 Slibebånd
1 Støvopfangningsboks
1 Opsugeradapter (til ekstern støvopsugning)
1 Stationært montagesæt
1 Betjeningsvejledning
Q
Tekniske data
Båndsliber: Parkside PEBS 900 SE
Nominel spænding: 230 V
~
50 Hz
Nominelt indtag: 900 W
Tomgangs-
båndhastighed: 180 - 340 m / min
Tomgangsomdrej-
ningstal: n
0
345 - 645 min
-1
Slibebånd: 75 x 533 mm
Sikkerhedsklasse: II /
Støj- og vibrationsinformationer:
Værdierne er målt i henhold til EN 60745.
Det A-målte lydtryksniveau i apparatet andrager
typisk 86 dB (A). Usikkerhed K = 3 dB. Støjniveauet
kan under arbejdet overskride 100 dB (A).
Anvend høreværn!
Samlede svingningsværdier, EN 60745:
Svingningsemissionsværdi a
h,D
= 2,928 m / s
2
Usikkerhed K < 1,5 m / s
2
ADVARSEL!
Det i disse anvisninger angivne
svingningsniveau er blevet målt svarende til en i
EN 60745 normeret målemetode og kan anven-
des til sammenligning af apparater.
Svingningsniveauet skal ændre sig svarende til
anvendelse af det elektriske redskab og kan i nogle
tilfælde ligge over den værdi der er angivet i disse
anvisninger. Svingningsbelastningen kan undervur-
deres hvis det elektriske redskab jævnligt bliver
anvendt på en sådan måde.
Obs: For at opnå en nøjagtig vurdering af sving-
ningsbelastningen i et bestemt arbejdstidsrum er
man også nødt til at medregne de tidspunkter, hvor
apparatet er slukket, eller ganske vist er tændt, men
egentlig ikke anvendes. Dette kan reducere sving-
ningsbelastningen over hele tidsrummet betydeligt.
Båndsliberen PEBS 900 SE råder over fuldakseltek-
nik med ekstra styringselektronik, softstart med
startstrømsbegrænsning.
Generelle sikkerheds-
instrukser for elektrisk
værktøj
ADVARSEL!
Alle sikkerhedsinstrukser
og anvisninger skal læses! Forsømmelighed
over for sikkerhedsinstrukserne og anvisninger kan
resultere i elektriske stød, brand og / eller alvorlige
kvæstelser.
ALLE SIKKERHEDSINSTRUKSER OG ANVISNIN-
GER SKAL OPBEVARES TIL SENERE BRUG!
BEGREBET „ELEKTROVÆRKTØJ“ DER ANVENDES
I SIKKERHEDSANVISNINGERNE, RELATERER
SIG TIL ELEKTRISKE REDSKABER DER ANVENDES
MED LEDNING TIL LYSNETTET OG TIL AKKU-
MULATORDREVNE ELEKTRISKE REDSKABER
(UDEN LEDNING TIL LYSNETTET).
1.
Sikkerhed på arbejdsstedet
a) Arbejdsområdet skal være ryddeligt
og have god belysning. Uorden og
ubelyste arbejdsområder kan være årsag til
ulykker.
b)
Apparatet må ikke anvendes
i eksplosionstruede omgivel-
ser hvor der befinder
sig brændbare væsker, luftarter eller
støvpartikler. Elektriske redskaber danner
gnister der kan antænde dampe eller støv.
c)
Børn og andre personer skal
holdes på afstand når red-
skabet bliver benyttet. Hvis
Indledning / Generelle sikkerhedsinstrukser for elektrisk værktøj

18 DK
man bliver afledt, kan man miste kontrollen
over apparatet.
2.
Elektrisk sikkerhed
Forebyg livsfarlige
elektriske stød:
a)
Apparatets stik skal passe til stikdåsen.
Stikket må ikke ændres på nogen
måde. Der må ikke anvendes adapeter-
stik sammen med apparatet der har
sikkerhedsjording. Uændrede stik og passen-
de stikdåser nedsætter risikoen for elektrisk stød.
b) Undgå kropskontakt med jordede
overflader som f.eks. rør, varmeap-
parater, komfurer og køleskabe. Der
er øget risiko ved et elektrisk stød hvis legemet
har jordforbindelse.
c) Apparatet skal beskyttes mod regn
og væde. Hvis der trænger vand ind i et elek-
trisk apparater der forøget risiko for elektrisk stød.
d)
Ledningen må ikke benyttes
til at bære maskinen i, hænge
den op i eller til at trække
stikket ud med. Ledningen skal holdes
på afstand varme, olie, skarpe kanter
eller dele af apparatet der er i bevæ-
gelse. Beskadigede eller forsnoede ledninger
forhøjer risikoen for elektrisk stød.
e) Til arbejde med elektriske redskaber
under åben himmel, skal der anven-
des forlængerledninger der også er
godkendt til udendørs anvendelse.
Anvendelsen af en sådan ledning nedsætter
risikoen for elektrisk stød.
f) Hvis det ikke er til at undgå at elektrisk
værktøj skal bruges i fugtige omgivel-
ser, skal der anvendes en fejlstrømskon-
takt. En sådan forringer risikoen for elektrisk stød.
3. Personlig sikkerhed
a) Bevar hele tiden opmærksomheden,
pas på hvad De foretage Dem og gå
til værks med det elektriske værktøj
med fornuften i behold. Undlad at
bruge apparatet hvis De er træt eller
under indflydelse af euforiserende
stoffer, alkohol eller medikamenter. Et
øjebliks uopmærksomhed under benyttelse af
apparatet kan føre til alvorlige kvæstelser.
b)
Ifør Dem personligt sikker-
hedsudstyr, og bær altid
sikkerhedsbriller. Personligt
sikkerhedsudstyr, som f.eks. støvmaske, skridsik-
kert fodtøj, sikkerhedshjelm eller høreværn, alt
efter det elektriske redskabs art og anvendelse,
nedsætter risikoen for tilskadekomst.
c) Undgå utilsigtet igangsætning. Der skal
drages omsorg for at det elektriske
redskab er slået fra før det bliver for-
bundet med elektricitetsforsyningen,
når det tages op eller bliver båret.
Hvis man har en finger på afbryderen eller ap-
paratet er slået til medens det bliver båret, kan
dette have ulykker til følge.
d) Indstillingsredskaber eller skruenøg-
ler skal fjernes før apparatet bliver
startet. Et stykke værktøj eller en nøgle der
sidder i en bevægelig del af apparatet, kan
afstedkomme kvæstelser.
e) Undgå at indtage anormal kropshold-
ning. De skal sørge for at De står
sikkert og hele tiden er i balance. På
den måde kan apparatet bedre kontrolleres i
uventede situationer.
f) Ifør Dem egnet beklædning. Den må
ikke være vid, og smykker skal lægges
væk. Hår, beklædningsdele og hand-
sker skal holdes borte fra bevægelige
dele. Hvis De har langt hår, bør De bruge et
hårnet. Løst siddende beklædning, smykker eller
hår kan blive grebet af dele der bevæger sig.
g) Hvis der monteres opsugnings- og op-
fangsanordninger, skal disse være
sluttet til og anvendes korrekt. Anven-
delse af den slags anordninger nedsætter
faremomenterne som følge af støv.
Generelle sikkerhedsinstrukser for elektrisk værktøj

19 DK
4.
Omhu i omgangen med og
anvendelsen af elektriske
redskaber
a) Undgå at overbelaste apparatet.
Anvend det elektriske redskab der er
bestemt til Deres arbejde. Med det pas-
sende elektriske værktøj er det bedre og mere
sikkert at arbejde i det angivne effektområde.
b) Tag ikke elektriske redskaber i brug
hvor kontakten er defekt. Et elektrisk ap-
parat der ikke kan tændes eller slukkes, er far-
ligt og skal repareres.
c) Stikket skal strækkes ud af stikkon-
takten før der må foretages indstillin-
ger af maskinen, tilbehørsdele bliver
udskiftet, eller maskinen lægges væk.
Disse sikkerhedstiltag forhindrer utilsigtet igang-
sætning af apparatet.
d) Elektriske redskaber der ikke er i brug,
skal opbevares uden for børns ræk-
kevidde. Lad ikke personer benyttet
apparatet hvis de ikke er fortrolig med
det eller ikke har læst disse anvisnin
ger.
Elektrisk værktøj er farligt hvis det benyttes af
uerfarne personer.
e) Apparatet skal behandles med omhu.
Det skal kontrolleres om bevægelige
dele af apparatet fungerer fejlfrit og
ikke er fastklemt, om noget dele er
knækket eller beskadiget så appara-
tets funktion er forstyrret. Beskadige-
de dele skal repareres før apparatet
tages i brug. Mange uheld skyldes dårligt
vedligeholdte elektriske apparater.
f) Skærende værktøjer skal holdes skar-
pe og rene. Ordentligt vedligeholdte skære-
redskaber med skarpe ægge klemmer sig ikke
så ofte fast og er lettere at føre.
g) Redskabet, tilbehør, udskiftelige dele
osv. skal anvendes i overensstemmelse
med disse anvisninger og sådan som
det er foreskrevet for denne særlige
type apparat. Her skal der også tages
hensyn til arbejdsbetingelserne og den
opgave der skal udføres. Anvendelse af
elektriske redskaber til andre formål end de an-
givne kan føre til farlige situationer.
Sikkerhedsbestemmelser
for båndslibemaskine
J BRANDFARE FRA FLYVENDE GNISTER!
Ved slibning af metal opstår der gnister. Sørg
derfor altid for at ingen personer kan komme
til skade, og at der ikke befinder sig nogen
brændbare materialer i nærheden af arbejds-
området.
J Under behandling af træ og i særdeleshed af
materialer hvor der kan opstå sundhedsskadeligt
støv, skal apparatet forbindes med en egnet
ekstern opsugningsanordning.
J Ved behandling af syntetiske stoffer, maling, lak
osv. skal der sørges for tilstrækkelig udluftning.
J Båndsliberen er konstrueret til tør slibning af
træ, syntestisk materiale, matel og spatelmasse
samt lakerede flader. Apparatet må kun anven-
des til tørslibning.
J Asbestholdigt materiale må ikke behandles.
Asbest gælder som kræftfremkaldende.
ADVARSEL!
GIFTIGT STØV! Støvdannelser
der opstår ved slibning f.eks. af blyholdige
farver, visse træsorter og metaller er skadelige /
giftige og udgør en trussel mod den betjenende
persons helbred eller for personer der befinder
sig i nærheden.
Der skal bruges øjenbeskyttelse og
åndedrætsværn!
J Emnet skal sikres. Der bør benyttes spændean-
ordninger / skruetvinge til at holde emnet fast.
Dette er mere sikkert end med hænderne.
J Støt under ingen omstændigheder med hæn-
derne ved siden af eller foran maskine og det
stykke der skal behandles. Hvis De mister fæ-
stet, er der risiko for at komme til skade.
J I tilfælde af fare skal stikket omgående trækkes
ud af stikdåsen.
J Ledningen skal altid føres bagud og bort fra
maskinen.
J Undgå berøring med det løbende slibebånd.
J Undlad at behandle fugtige materialer eller
fugtige flader.
J Apparatet føres hen mod emnet i løbende
tilstand. Efter behandlingen skal apparatet løf-
tes bort fra emnet medens det er i gang; først
derefter kan der slukkes.
Generelle sikkerhedsinstrukser for elektrisk værktøj

20 DK
Generelle sikkerhedsinstrukser for elektrisk værktøj / Ibrugtagning
J Under arbejdet skal apparatet altid holdes fast
med begge hænder (se også illustration D).
Sørg for at De står sikkert.
J Apparatet skal komme i fuldstændig stilstand
og slukkes før det kan lægges bort.
J I arbejdspauser, før alle arbejder på apparatet
(f.eks. udskiftning af slibepapir) og når det ikke
er i brug skal stikket altid trækkes ud.
Q
Ibrugtagning
Q
Indspændig / udskiftning
af slibebånd
ADVARSEL!
FARE FOR PERSONSKADER!
Stikket skal altid trækkes ud før der gennemføres
arbejder på båndsliberen.
1. Først skal spændeanordningen for slibebåndet
løsnes ved at spænde-stangen
9
drejes helt
ud (se illustration A). Spændeanordningen er
nu åbnet, og slibebåndet kan tages ud.
2. Det nye slibebånd sættes i henholdsvis skiftes
hvis der skal behandles andet materiale, eller
der skal anvendes en anden kornstørrelse.
VIGTIGT: Pileretningerne på indersiden af
slibebåndet og på apparatets indfatning skal
passe med hinanden.
3. Spændestangen
9
trykkes tilbage i sin
udgangsposition.
Justering af slibebåndet:
j Apparatet tages op, sættes i gang og vendes
om. Nu kan båndløbet justeres ved at juste-
ringsskruen
6
drejes så kanten af slibebåndet
ligger tæt og parallelt med apparatets kant
(illustration B).
VIGTIGT: Sørg hele tiden for at slibebåndet
ikke gnaver sig ind i indfatningen. Båndløbet
skal jævnligt kontrolleres og om nødvendigt
indstilles med justeringsskruen
6
.
Q
Råd om arbejdet
Et ringe slibetryk er tilstrækkeligt:
j Der arbejdes med et ringe tryk. Båndsliberens
egenvægt er tilstrækkelig til at opnå et godt
sliberesultat. Derudover bliver slidtagen på
slibebåndet nedsat på denne måde; emnets
overflade bliver glattere.
Abslibning og overflade:
Afslibningseffekten og overfladekvaliteten bestemmes
af båndets hastighed og kornstørrelsen på slibebå
ndet
(se også afsnittet ”Indstilling af af omdrejningstal og
slibebånd”).
Slibningen:
j Apparatet anbringes på emnet i løbende til-
stand, og der arbejdes med mådelig fremskyd-
ning. Slibningen udføres parallelt og overlap-
pende i forhold til slibebanerne. Til undgåelse
af forstyrrende tværløbende slibespor skal der
kun slibes i fibrenes retning. Når behandlingen
er færdig, skal maskinen løftes bort fra emnet
og først derefter slukkes.
Q
Støvopsugning
ADVARSEL!
BRANDFARE! Arbejde med
elektriske apparater der råder over en støvopfangs-
boks eller er forbundet med støvsugeren over en
støvopsugningsanordning, frembyder brandfare! Un-
der ugunstige forhold, som f.eks. flyvende gnister,
slibning af metal eller metalrester i træ, kan træstø-
vet i støvopfangsboksen (eller i støvsugerposen) gå
i selvantændelse. Dette kan især ske når træstøvet
er blandet op med lakrester eller andre kemiske
stoffer og slibegodset er varmt efter længere tids
arbejde. Undgå altså for enhver pris en overophed-
ning af slibegodset og af apparatet, og tøm altid
støvopfangsboksen resp. støvsugerposen før pau-
ser i arbejdet.
Ifør Dem en
støvbeskyttende maske!

21 DK
Støvopsugning med støvopfangsboks:
j Støvopfangsboksen
10
skubbes ind over
opsugningsstudsen
5
på siden af apparatet
(illustration C).
Tømning af støvopfangsboksen:
j Srøvopfangsboksen
10
trækkes af opsugnings-
studsen
5
. Støvopfangsboksen
10
åbnes og
tømmes.
Støvopsugning med fremmedopsugning:
ADVARSEL!
Til eksplosive støvarter / luftblan-
dinger skal der anvendes en dertil specielt egnet
opsuger.
BRANDFARE! Ved slibning af metaller (flyvende
gnister) må der ikke anvendes støvopsugning
(støvopfangsboks eller støvsuger).
1. Opsugningsadapteren
11
anbringes på op-
sugningsstudsen
5
på siden af apparatet
(se illustration C).
2. Slangen til en tilladt støvopsugningsanordning
(f.eks. til en værkstedsstøvsuger) skydes ind
over opsugningsadapteren
11
.
Q
Betjening
Q
Igangsætning og slukning
Båndsliberen PEBS 900 SE har massiv akselektronik
med ekstra styringselektronik, blød motorstart med
startstrømsbegrænsning.
I betjeningen af båndsliberen kan der indstilles på
momentan- og langtids drift. Til kortvarige opgaver
indstilles den på momentandrift. Til længerevarende
opgaver anbefales det at indstilles på langtidsdrift.
Den ønskede indstilling fungerer på følgende måde:
Aktivering af momentandrift:
j Der trykkes på afbryderkontakten
3
.
Frakobling af momentandrift:
j Afbryderkontakten
3
slippes.
Aktivering af langtidsdrift:
j Der trykkes på afbryderkontakten
3
, den holdes
trykket, og der trykkes på låseknappen
2
.
Frakobling af langtidsdrift:
j Der trykkes på afbryderkontakten
3
som
derefter slippes.
Q
Indstilling af omdrejningstal
og valg af slibebånd
Med justeringshjulet til båndhastighed
1
kan
omdrejningstallet indstilles – også når apparatet er
i gang. Den optimale båndhastighed er afhængig
af det emne resp. materialet der skal behandles.
Prøv selv at finde frem til det bedste omdrejningstal
vefd et praktisk forsøg. I den følgende tabel er der
angivet uforpligtende værdier der kan lette det at
finde frem til den optimale indstilling.
Materiale /
abejdsområde
Blødt træ
Grovslibning (korning) 60
Finslibning (korning) 240
Indstilling af
omdrejningstaæ
højt (5-6)
Materiale /
arbejdsområde
Hårdt træ
Grovslibning (korning) 60
Finslibning (korning) 180
Indstilling af
omdrejningstal
højt (5-6)
Materiale /
abejdsområde
Spånplader
Grovslibning (korning) 60
Finslibning (korning) 150
Indstilling af
omdrejningstal
Højt (5-6)
Ibrugtagning / Betjening
Seite laden ...
Seite laden ...
Seite laden ...
Seite laden ...
Seite laden ...
Seite laden ...
Seite laden ...
Seite laden ...
Seite laden ...
Seite laden ...
Seite laden ...
Seite laden ...
Seite laden ...
Seite laden ...
Seite laden ...
Seite laden ...
Seite laden ...
Seite laden ...
Seite laden ...
Seite laden ...
Seite laden ...
Seite laden ...
Seite laden ...
Seite laden ...
Seite laden ...
Seite laden ...
-
 1
1
-
 2
2
-
 3
3
-
 4
4
-
 5
5
-
 6
6
-
 7
7
-
 8
8
-
 9
9
-
 10
10
-
 11
11
-
 12
12
-
 13
13
-
 14
14
-
 15
15
-
 16
16
-
 17
17
-
 18
18
-
 19
19
-
 20
20
-
 21
21
-
 22
22
-
 23
23
-
 24
24
-
 25
25
-
 26
26
-
 27
27
-
 28
28
-
 29
29
-
 30
30
-
 31
31
-
 32
32
-
 33
33
-
 34
34
-
 35
35
-
 36
36
-
 37
37
-
 38
38
-
 39
39
-
 40
40
-
 41
41
-
 42
42
-
 43
43
-
 44
44
-
 45
45
-
 46
46


Parkside KH 3020 BELT SANDER Bedienungsanleitung
- Kategorie
- Power Sanders
- Typ
- Bedienungsanleitung
- Dieses Handbuch ist auch geeignet für
in anderen Sprachen
Verwandte Papiere
-
Kompernass PEBS 900 SE - 2 Benutzerhandbuch
-
Parkside PEBS 600 - 2 Operation and Safety Notes
-
-
Parkside PBS 900 A1 Operation and Safety Notes
-
-
-