
www.modellmarkt24.ch
90º Main Retracts with Controller
Instruction Manual | Bedienungsanleitung | Manuel d’utilisation | Manuale di Istruzioni (EFLG700, EFLG709, EFLG710, EFLG715, EFLG720, EFLG725, EFLG730, EFLG735, EFLG740, EFLG745)
NOTICE
All instructions, warranties and other collateral documents are subject to change at the sole discretion of Horizon Hobby, LLC. For up-to-
date product literature, visit horizonhobby.com and click on the support tab for this product.
MEANING OF SPECIAL LANGUAGE
The following terms are used throughout the product literature to indicate various levels of potential harm when operating this product:
NOTICE: Procedures, which if not properly followed, create a possibility of physical property damage AND a little or no possibility of injury.
CAUTION: Procedures, which if not properly followed, create the probability of physical property damage AND a possibility of serious injury.
WARNING: Procedures, which if not properly followed, create the probability of property damage, collateral damage, and serious injury OR
create a high probability of superficial injury.
WARNING: Read the ENTIRE instruction manual to become familiar with the features of the product before operating. Failure to
operate the product correctly can result in damage to the product, personal property and cause serious injury.
This is a sophisticated hobby product. It must be operated with caution and common sense and requires some basic mechanical ability.
Failure to operate this Product in a safe and responsible manner could result in injury or damage to the product or other property. This
product is not intended for use by children without direct adult supervision. Do not attempt disassembly, use with incompatible compo-
nents or augment product in any way without the approval of Horizon Hobby, LLC. This manual contains instructions for safety, operation
and maintenance. It is essential to read and follow all the instructions and warnings in the manual, prior to assembly, setup or use, in
order to operate correctly and avoid damage or serious injury.
Age Recommendation: Not for children under 14 years. This is not a toy.
RADIO CONNECTIONS AND OPERATION
Use caution when connecting all extension leads so you maintain proper battery polarity. The white wire is the signal (s), the black wire is ground
(–) and the red wire is the power (+).
1. Insert one end of the male/male extension into the controller port labeled RX input, then insert the other end into the gear channel of the
receiver.
2. Connect the right gear unit connector to one of the included extensions. Connect the other end of the extension to the controller port labeled
Gear 3. Do the same for the left gear unit, connecting the extension to Gear 2. If you have a tail retract, connect the tail gear unit connector
to Gear 1.
An additional extension lead, up to 12 inches (300mm), can be used if a longer lead is needed to reach the retract gear extension lead. If you
want to reverse the direction your retract operates, disconnect it from the controller and reconnect it in the opposite direction so the polarity
is reversed.
3. Connect the gear door servo connectors to the appropriate controller ports, noting proper polarity. Refer to the Programming Modes below to
determine which controller ports are correct for your application.
4. Power ON your transmitter and receiver.
5. Operate the channel control on your transmitter to which you have connected the gear.
6. The gear channel may need to be reversed in your transmitter for correct operation. If using a 2.4GHz system, always rebind after servo
reversing to reset the receiver failsafe.
REQUIRED TOOLS
o File o Threadlock o Screwdriver o Rotary tool with cutoff wheel
SPECIFICATIONS
Current draw Idle: 10mA | Operating: 500–700mA | Full Stall: 0.8–1.0A
Operating voltage range 6.0–8.4V
Aircraft weight 20.0–35.0 lb (9.0 –15.9 kg)
Unit weight (each) Retract: 7.8 oz (220 g) | Strut: 6.0 oz (170 g)
Pulse width trigger points Down: 1.205ms | Up: 1.786ms
Sequence time @6.0V: 3.5s | @6.6V: 3.0s | @7.4V: 2.5s
INSTALLATION
NOTICE: Always ensure the retracts and wheels are installed so that there are no obstructions when extending and retracting the struts and that
the wheels roll straight when the rudder is at neutral. Failure to do so could result in damage to the aircraft or gear.
If the retract stops moving before reaching the fully retracted or extended position, use the transmitter gear switch to reverse the direction of
movement and then check for obstructions. The retract will not draw power from the battery if it is blocked.
1. Install the left and right retracts in your aircraft (right retract (A) shown) using the included M4x20 (I) screws or M4 countersunk wood
screws.
2. Assemble the axle (G), wheel and setscrew (F) onto each strut.
3. Tighten the setscrew (F) in the strut to mark the axle, then mark the axle to length.
4. Loosen the setscrew, remove the axle and use a flat file to make a flat spot at your mark. Cut the axle to length at your other mark.
5. Install the wheel/axle assembly on the strut (B) and tighten the setscrew (F) using thread lock.
6. Insert the strut (B) through the steel shaft (K) and adjust the length of the strut/wheel to allow the wheel to be centered in the wheel well
when retracted.
7. Tighten the shaft screws (C) to hold the strut while still allowing rotation to aid in aligning the wheel.
8. Check the alignment of the wheel when extended to ensure it aligns with the centerline of the model, then tighten the shaft setscrew (E) and
screws (C) using thread lock.
9. Install the door ball link (H) onto the strut, then install the remaining ball links and 3mm nuts (J) onto the gear doors using thread lock.
10. Install the ball link pushrods (D) and adjust the length as needed to align the gear doors.
If installing a retract on a wood mounting rail, drill holes smaller than your mounting screws first. Install the mounting screws in the drilled
holes, then carefully remove them. Harden the threads in the wood using thin CA (cyanoacrylate adhesive).
OPTIONAL AUXILIARY BATTERY
The controller is designed to be powered by the receiver battery through the retract channel port or a separate battery. To use an auxiliary battery,
connect a switch (SPM9530) and the battery to the auxiliary lead of the controller. The controller will automatically pull from this battery. The input
voltage will affect the speed of the retract. Increase the speed using a higher voltage battery such as a Li-Fe (6.6V) or Li-Po (7.4V) battery.
PROGRAMMING
1. Connect a battery to the Programmer Power Port.
Please connect
Gear Ctl Board
2. Connect a lead from the RX Input Port on the controller to the
Programmer Controller Port.
Gear Ctl Board
Connect OK!
3. Press the Mode Button to scroll through the Programming Modes
(see the table below).
4. Press the Value Button to scroll through the options in each mode.
Refer to the Programming Modes information below.
5. When the arrow is lined up with the option you want, press the
Sel/OK Button to select that option. Press the Sel/OK Button
again to confirm your choice when programming Model options.
6. An asterisk will appear next to the option you chose.
Model-> No Door*
P-47
7. Press the Save/Test Button to save the programming to the controller.
Saving Data to
Ctl Gear Board
Saving Data OK!
8. Go to the Test mode to ensure the currently selected options
function properly for your model.
9. Disconnect the controller lead from the programmer and connect it
to the receiver.
10. Disconnect the battery from the programmer.
Programmer Controller Port Programmer Power Port
Mode
Value Sel/OK
Save/Test
Gear 1
Gear 2
Gear 3
Rx Input
Door 1
Door 2
Door 3
Door 4
Aux. Power
H
E
K
B
C
C E H
I
I J
x2
D
x2
B
x4
C
x2
x2
G
x8
H
x8
I
x4
J
x2
Warranty and Service contact information
Country of Purchase Horizon Hobby Contact Information Address
United States of America
Horizon Service Center
(Repairs and Repair Requests)
servicecenter.horizonhobby.com/
RequestForm/
4105 Fieldstone Rd
Champaign, Illinois, 61822 USA
Horizon Product Support
(Product Technical Assistance)
www.quickbase.com/db/
bghj7ey8c?a=GenNewRecord
888-959-2305
Sales
888-959-2305
United Kingdom
Service/Parts/Sales:
Horizon Hobby Limited
Units 1–4, Ployters Rd, Staple Tye
Harlow, Essex, CM18 7NS, United Kingdom
+44 (0) 1279 641 097
Germany
Horizon Technischer Service [email protected]
Christian-Junge-Straße 1
25337 Elmshorn, Germany
Sales: Horizon Hobby GmbH +49 (0) 4121 2655 100
France
Service/Parts/Sales:
Horizon Hobby SAS
11 Rue Georges Charpak
77127 Lieusaint, France
+33 (0) 1 60 18 34 90
China
Service/Parts/Sales:
Horizon Hobby – China
Room 506, No. 97 Changshou Rd.
Shanghai, China 200060
+86 (021) 5180 9868
1-year Limited Warranty
What this Warranty Covers - Horizon Hobby, LLC (Horizon) warrants
to the original purchaser that the product purchased (the “Product”) will
be free from defects in materials and workmanship for a period of 1 year
from the date of purchase.
What is Not Covered - This warranty is not transferable and does not
cover (i) cosmetic damage, (ii) damage due to acts of God, accident,
misuse, abuse, negligence, commercial use, or due to improper use, in-
stallation, operation or maintenance, (iii) modification of or to any part of
the Product, (iv) attempted service by anyone other than a Horizon Hobby
authorized service center, (v) Product not purchased from an authorized
Horizon dealer, or (vi) Product not compliant with applicable technical
regulations.
OTHER THAN THE EXPRESS WARRANTY ABOVE, HORIZON MAKES NO
OTHER WARRANTY OR REPRESENTATION, AND HEREBY DISCLAIMS
ANY AND ALL IMPLIED WARRANTIES, INCLUDING, WITHOUT LIMITA-
TION, THE IMPLIED WARRANTIES OF NON-INFRINGEMENT, MERCHANT-
ABILITY AND FITNESS FOR A PARTICULAR PURPOSE. THE PURCHASER
ACKNOWLEDGES THAT THEY ALONE HAVE DETERMINED THAT THE
PRODUCT WILL SUITABLY MEET THE REQUIREMENTS OF THE PUR-
CHASER’S INTENDED USE.
Purchaser’s Remedy - Horizon’s sole obligation and purchaser’s sole
and exclusive remedy shall be that Horizon will, at its option, either (i)
service, or (ii) replace, any Product determined by Horizon to be defec-
tive. Horizon reserves the right to inspect any and all Product(s) involved
in a warranty claim. Service or replacement decisions are at the sole dis-
cretion of Horizon. Proof of purchase is required for all warranty claims.
SERVICE OR REPLACEMENT AS PROVIDED UNDER THIS WARRANTY IS
THE PURCHASER’S SOLE AND EXCLUSIVE REMEDY.
Limitation of Liability - HORIZON SHALL NOT BE LIABLE FOR SPE-
CIAL, INDIRECT, INCIDENTAL OR CONSEQUENTIAL DAMAGES, LOSS OF
PROFITS OR PRODUCTION OR COMMERCIAL LOSS IN ANY WAY, RE-
GARDLESS OF WHETHER SUCH CLAIM IS BASED IN CONTRACT, WAR-
RANTY, TORT, NEGLIGENCE, STRICT LIABILITY OR ANY OTHER THEORY
OF LIABILITY, EVEN IF HORIZON HAS BEEN ADVISED OF THE POSSIBIL-
ITY OF SUCH DAMAGES. Further, in no event shall the liability of Horizon
exceed the individual price of the Product on which liability is asserted.
As Horizon has no control over use, setup, final assembly, modification
or misuse, no liability shall be assumed nor accepted for any resulting
damage or injury. By the act of use, setup or assembly, the user accepts
all resulting liability. If you as the purchaser or user are not prepared to
accept the liability associated with the use of the Product, purchaser is
advised to return the Product immediately in new and unused condition
to the place of purchase.
Law - These terms are governed by Illinois law (without regard to con-
flict of law principals). This warranty gives you specific legal rights, and
you may also have other rights which vary from state to state. Horizon
reserves the right to change or modify this warranty at any time without
notice.
Warranty ServiceS
Questions, Assistance, and Services - our local hobby store and/
or place of purchase cannot provide warranty support or service. Once
assembly, setup or use of the Product has been started, you must con-
tact your local distributor or Horizon directly. This will enable Horizon
to better answer your questions and service you in the event that you
may need any assistance. For questions or assistance, please visit our
website at www.horizonhobby.com, submit a Product Support Inquiry at
https://horizonhobby.quickbase.com/db/bghj7ey8c?a=GenNewRecord,
or call the toll free telephone number referenced in the Warranty and
Service Contact Information section to speak with a Product Support
representative.
Inspection or Services - If this Product needs to be inspected or
serviced and is compliant in the country you live and use the Product
in, please use the Horizon Online Service Request submission process
found on our website or call Horizon to obtain a Return Merchandise
Authorization (RMA) number. Pack the Product securely using a shipping
carton. Please note that original boxes may be included, but are not
designed to withstand the rigors of shipping without additional protec-
tion. Ship via a carrier that provides tracking and insurance for lost or
damaged parcels, as Horizon is not responsible for merchandise until it
arrives and is accepted at our facility. An Online Service Request is avail-
able at http://www.horizonhobby.com/content/_service-center_render-
service-center. If you do not have internet access, please contact Ho-
rizon Product Support to obtain a RMA number along with instructions
for submitting your product for service. When calling Horizon, you will
be asked to provide your complete name, street address, email address
and phone number where you can be reached during business hours.
When sending product into Horizon, please include your RMA number, a
list of the included items, and a brief summary of the problem. A copy of
your original sales receipt must be included for warranty consideration.
Be sure your name, address, and RMA number are clearly written on the
outside of the shipping carton.
NOTICE: Do not ship LiPo batteries to Horizon. If you have any
issue with a LiPo battery, please contact the appropriate Horizon
Product Support office.
Warranty Requirements- For Warranty consideration, you must
include your original sales receipt verifying the proof-of-pur-
chase date. Provided warranty conditions have been met, your Product
will be serviced or replaced free of charge. Service or replacement deci-
sions are at the sole discretion of Horizon.
Non-Warranty Service - Should your service not be covered by
warranty, service will be completed and payment will be re-
quired without notification or estimate of the expense unless the
expense exceeds 50% of the retail purchase cost. By submitting
the item for service you are agreeing to payment of the service without
notification. Service estimates are available upon request. You must in-
clude this request with your item submitted for service. Non-warranty
service estimates will be billed a minimum of ½ hour of labor. In addi-
tion you will be billed for return freight. Horizon accepts money orders
and cashier’s checks, as well as Visa, MasterCard, American Express,
and Discover cards. By submitting any item to Horizon for service, you
are agreeing to Horizon’s Terms and Conditions found on our website
http://www.horizonhobby.com/content/_service-center_render-service-
center.
ATTENTION: Horizon service is limited to Product compliant in
the country of use and ownership. If received, a non-compliant
Product will not be serviced. Further, the sender will be respon-
sible for arranging return shipment of the un-serviced Product,
through a carrier of the sender’s choice and at the sender’s ex-
pense. Horizon will hold non-compliant Product for a period of
60 days from notification, after which it will be discarded.
compLiance information for the european union
Declaration of Conformity (in accordance with ISO/IEC 17050-1)
No. HH2014061901
Product(s): 90° Main Retract with Deluxe Controller
Item Number(s): EFLG700, EFLG709, EFLG710, EFLG715, EFLG720, EFLG725, EFLG730, EFLG735, EFLG740, EFLG745
The object of declaration described above is in conformity with the requirements of the specifications listed below, following the provisions of the
EMC Directive 2004/108/EC:
EN55022:2010 + AC:2011
EN55024:2010
Signed for and on behalf of:
Horizon Hobby, LLC
Champaign, IL USA
June 19, 2014
Robert Peak
Chief Financial Officer, Horizon Hobby, LLC
Instructions for disposal of WEEE by users in the European Union
This product must not be disposed of with other waste. Instead, it is the user’s responsibility to dispose of their waste equipment by
handing it over to a designated collections point for the recycling of waste electrical and electronic equipment. The separate collection
and recycling of your waste equipment at the time of disposal will help to conserve natural resources and ensure that it is recycled in a manner
that protects human health and the environment. For more information about where you can drop off your waste equipment for recycling, please
contact your local city office, your household waste disposal service or where you purchased the product.
© 2014 Horizon Hobby, LLC. E-flite and the Horizon Hobby Logo are registered trademarks of Horizon Hobby, LLC. Created 03/2014 | 44541
CONTROLLER
G
F
G F
PROGRAMMING MODES
1. Model This mode affects the actions of the gear and doors.
No Door Gear 1–3 function normally and Doors 1–4 are disabled.
P-47
Gear
Doors 1–4 open and Gear 1–3 extend.
Gear
Gear 1–3 retract and Doors 1–4 close.
P-51
Gear
Doors 1–4 open, Gear 1–3 extend, then Doors 1–2 close and Doors 3–4 stay open.
Gear
Doors 1–2 open, Gear 1–3 retract, then Doors 1–4 close.
B-25
Gear
Doors 1–3 open followed by Door 4, Gear 1–3 extend, then Doors 1–3 close and Door 4 stays open.
Gear
Doors 1–3 open, Gear 1–3 retract, then Door 4 closes followed by Doors 1–3.
2. Gear This mode affects whether you have a tail wheel/nose wheel (Gear 1) connected.
3. Delay This mode affects the delay of the gear. Each gear can be independently programmed to be delayed from 0–3 seconds.
4. Travel
This mode affects the travel of the gear door servos. Each gear door servo can be independently programmed to travel from
20–60 in both directions from the center. If you change the travel, the door will react in real time, if connected and in the
current position that you are adjusting.
5. D. Speed
This mode affects the speed of the gear door servos. The gear door servos can be programmed to travel from 25–100%
normal speed.
6. Direction:
Doors
This mode affects the travel direction of the gear door servos (Doors 1–4). Each gear door servo can be independently
programmed for normal or reverse operation.
7. Current For all 700-series retracts, select I.
8. Test Press the Save/Test Button to test the currently selected options.
www.modellmarkt24.ch

www.modellmarkt24.ch
HINWEIS
Alle Anweisungen, Garantien und anderen zugehörigen Dokumente können im eigenen Ermessen von Horizon Hobby, LLC jederzeit geän-
dert werden. Die aktuelle Produktliteratur finden Sie auf horizonhobby.com unter der Registerkarte „Support“ für das betreffende Produkt.
SPEZIELLE BEDEUTUNGEN
Die folgenden Begriffe werden in der gesamten Produktliteratur verwendet, um auf unterschiedlich hohe Gefahrenrisiken beim Betrieb
dieses Produkts hinzuweisen:
HINWEIS: Wenn diese Verfahren nicht korrekt befolgt werden, können sich möglicherweise Sachschäden UND geringe oder keine Gefahr
von Verletzungen ergeben.
ACHTUNG: Wenn diese Verfahren nicht korrekt befolgt werden, ergeben sich wahrscheinlich Sachschäden UND die Gefahr von schweren
Verletzungen.
WARNUNG: Wenn diese Verfahren nicht korrekt befolgt werden, ergeben sich wahrscheinlich Sachschäden, Kollateralschäden und
schwere Verletzungen ODER mit hoher Wahrscheinlichkeit oberflächliche Verletzungen.
WARNUNG: Lesen Sie die GESAMTE Bedienungsanleitung, um sich vor dem Betrieb mit den Produktfunktionen vertraut zu
machen. Wird das Produkt nicht korrekt betrieben, kann dies zu Schäden am Produkt oder persönlichem Eigentum führen oder
schwere Verletzungen verursachen.
Dies ist ein hochentwickeltes Hobby-Produkt. Es muss mit Vorsicht und gesundem Menschenverstand betrieben werden und benötigt
gewisse mechanische Grundfähigkeiten. Wird dieses Produkt nicht auf eine sichere und verantwortungsvolle Weise betrieben, kann
dies zu Verletzungen oder Schäden am Produkt oder anderen Sachwerten führen. Dieses Produkt eignet sich nicht für die Verwendung
durch Kinder ohne direkte Überwachung eines Erwachsenen. Versuchen Sie nicht ohne Genehmigung durch Horizon Hobby, LLC, das
Produkt zu zerlegen, es mit inkompatiblen Komponenten zu verwenden oder auf jegliche Weise zu erweitern. Diese Bedienungsanleitung
enthält Anweisungen für Sicherheit, Betrieb und Wartung. Es ist unbedingt notwendig, vor Zusammenbau, Einrichtung oder Verwendung
alle Anweisungen und Warnhinweise im Handbuch zu lesen und zu befolgen, damit es bestimmungsgemäß betrieben werden kann und
Schäden oder schwere Verletzungen vermieden werden.
Nicht geeignet für Kinder unter 14 Jahren. Dies ist kein Spielzeug.
RC VERBINDUNG UND BETRIEB
Bitte sein Sie bei dem Anschluss aufmerksam, so dass Sie die die korrekte Polarität beibehalten. Das weisse Kabel ist das Signal (s), das
schwarze Kabel Masse (–) und rote Kabel Plus (+).
1. Stecken Sie eine Buchse/Buchse Verlängerung in den Controller RX Eingang und das andere Ende in den Fahrwerkskanal des Empfängers.
2. Schließen Sie den Anschluss des rechten Fahrwerks an eine der Verlängerungen an. Schließen Sie das andere Ende der Verlängerung an den
Controller Anschluss Gear 3. Führen Sie das gleiche mit dem linken Fahrwerk an Anschlus Gear 2 durch. Ein einziehbares Spornrad schließen
Sie an Gear 1 an.
Sie können zusätzliche Verlängerungen bis zu 300mm verwenden. Sollten Sie die Arbeitsrichtung des Fahrwerks ändern wollen, trennen Sie
die Verbindung vom Controller und drehen diese um, so dass die Polarität reversiert ist.
3. Schließen Sie die Anschlüsse der Fahrwerkstüren an die entsprechenden Controlleranschlüsse und achten dabei auf die richtige Polarität.
Bitte lesen Sie unten im im Abschnitt Programmodes wie Sie Controllerports für ihre Anwendung nutzen können.
4. Schalten Sie den Sender und Empfänger ein.
5. Schalten Sie den gewählten Fahrwerkskanal.
6. Es ist möglich, dass der Fahrwerkskanal für einen korrekten Betrieb reversiert werden muß. Sollten Sie ein 2,4GHz System verwenden,
binden Sie immer neu nach dem reversieren um den Empfänger Failsafe neu zu programmieren.
ERFORDERLICHES WERKZEUG
o Feile o Schraubensicherungslack o Schraubendreher o Handbohrer mit Trennscheibe
SPEZIFIKATIONEN
Stromaufnahme Leerlauf: 10mA | Betrieb: 500–700mA | Blockierstroml: 0,8–1,0A
Betriebsspannung 6,0–8,4V
Luftfahrzeug Gewicht 9,0 –15,9 kg
Gewicht (je) Fahrwerk: 220 g | Strebe: 170 g
Pulsbreite Triggerpunkte Runter: 1,205ms | Rauf: 1,786ms
Sequenzzeit bei 6,0V: 3,5 sec | bei 6,6V: 3,0 sec | bei 7,4V: 2,5 sec
EINBAU
HINWEIS: Stellen Sie immer sicher, dass die Fahrwerksbeine und Räder so montiert sind dass Ein- und Ausfahren ohne Behinderung möglich
ist und das Flugzeug bei neutralem Ruder gerade rollt. Nichtbeachtung könnte Schaden am Fluggerät oder Fahrwerk verursachen.
Sollte das Fahrwerk in der Bewegung stoppen bevor es die vollständig ein- oder ausgefahren Position erreicht hat, schalten Sie mit dem
Senderschalter das Fahrwerk in die entgegengesetzte Richtung und prüfen den Grund der Blockade. Das Fahrwerk zieht wenn es blockiert ist
keinen Strom.
1. Setzen Sie das rechte und linke Fahrwerk (A) und schrauben es mit dem im Lieferumfang enthaltenen M4 x 20 Schrauben (I) oder M4
Holzschrauben fest.
2. Montieren Sie die Achse (G), das Rad und die Madenschraube (F) auf jede Strebe.
3. Ziehen Sie die Madenschraube (F) in der Strebe um die Achse zu markieren und markieren dann die Länge.
4. Lösen Sie die Madenschraube, nehmen die Achse heraus und feilen an der Markierung eine flache Stelle. Schneiden Sie die Achse auf die
Länger der Markierung.
5. Montieren Sie das Rad mit der Achse auf der Strebe (B) und sichern die Madenschraube (F) mit Schraubensicherungslack.
6. Setzen Sie das FW-Bein (B) in den Halter (K) und justieren die Länge so, dass das Rad beim Einfahren in das Radhaus fährt.
7. Ziehen Sie die Halterschraube (C) an. Eine Drehung des Rades zur Anpassung im Radhaus ist noch möglich.
8. Prüfen Sie die Ausrichtung des Rades im ausgefahrenen Zustand. Ist die Einstellung korrekt auf der Mittellinie ziehen Sie die Madenschraube
(E) und Schrauben (C) mit Schraubensicherungslack an.
9. Montieren Sie den Kugelkopf (H) auf der Strebe und die verbleibenden Kugelköpfe und 3mm Muttern (J) auf den Fahrwerkstüren und
sichern diese ebenfalls mit Schraubensicherungslack.
10. Montieren Sie die Verbinder (D) und justieren die Länge wie benötigt um die Fahrwerkstüren auszurichten.
Wenn Sie ein Einziehfahrwerk auf einer Holzstrebe befestigen bohren Sie als erstes Löcher die etwas kleiner als die Schrauben sind. Drehen
Sie die Schrauben dann ein und vorsichtig wieder aus. Härten Sie dann das Holzgewinde mit dünnflüssigen.
OPTIONALER EXTERNER AKKU
Der Controller kann durch den Fahrwerkskanal des Empfängers oder durch einen separaten Akku mit Strom versorgt werden. Um ein externes
Akku zu verwenden, schließen Sie einen Schalter (SPM9530) und den Akku an das Auxkabel des Schalters an. Der Controller zieht dann
automatisch Strom von diesem Akku. Die Eingangspannung beeinflusst die Geschwindigkeit des Fahrwerks. Erhöhen Sie die Geschwindigkeit des
Fahrwerks mit einem Akku mit höherer Spannung wie zum Beispiel einem Li-Fe (6,6V) oder Li-Po (7,4V) Akku.
PROGRAMMIERUNG
1. Schließen Sie einen Akku an den Programmer Power Port an.
Please connect
Gear Ctl Board
2. Schließen Sie ein Kabel vom Empfänger an den Programmer
Controller Port.
Gear Ctl Board
Connect OK!
3. Drücken Sie den Mode Button um durch die Programmiermodes
zu scrollen (siehe Liste unten).
4. Drücken Sie den Value Button um durch die verfügbaren Optionen
in jedem Mode zu scrollen. Bitte lesen Sie dazu die unten stehenden
Informationen zu den Programmier-Modes.
5. Steht der Pfeil auf der gewünschten Option drücken Sie den Sel/
OK Button um die Option auszuwählen. Drücken Sie den Sel/OK
Button erneut um die Auswahl zu bestätigen.
6. Neben der Auswahl erscheint ein Stern.
Model-> No Door*
P-47
7. Drücken Sie den Save/Test Button um die Programmierung zu sichern.
Saving Data to
Ctl Gear Board
Saving Data OK!
8. Wechseln Sie in den Testmode um die einwandfreie Funktion ihrer
Auswahl zu testen.
9. Trennen Sie das Controllerkabel und schließen es an den Empfänger an.
10. Trennen Sie den Akku von dem Programmiergerät.
Programmer Controller Port Programmer Power Port
Mode
Value Sel/OK
Save/Test
H
E
K
B
C
C E H
I
I J
x2
D
x2
B
x4
C
x2
x2
G
x8
H
x8
I
x4
J
x2
REGLER
G
F
G F
PROGRAMMIERMODES
1. Modell Dieser Mode beeinflußt die Funktionen von Fahrwerk und Türen.
Keine Tür Türen deaktiviert und FW 1–3 arbeitet normal.
P-47
Fahrwerk
Türen 1–4 öffnen und FW 1–3 fahren aus.
Fahrwerk
FW 1–3 fahren ein, Türen 1–4 schließen.
P-51
Fahrwerk
Türen 1–4 öffnen und FW 1–3 fahren aus, dann schließen Türen 1–2 und Türen 3–4 bleiben offen.
Fahrwerk
Türen 1–2 öffnen, FW 1–3 fährt ein , dann schließen Türen 1–4.
B-25
Fahrwerk
Türen 1–3 öffnen gefolgt von Tür 4, FW 1–3 fährt aus, dann schließen Türen 1–3 und Tür 4 bleibt offen.
Fahrwerk
Türen 1–3 öffnen, FW 1–3 fahren aus, dann schließt Tür 4 gefolgt von 1–3.
2. Gear Dieser Mode beeinflusst ob Sie ein Modell mit Spornrad oder Bugfahrwerk (Gear 1) angeschlossen haben.
3. Delay
Dieser Mode beeinflusst die Verzögerung des Fahrwerks. Jedes Fahrwerk kann unabhängig mit einer Verzögerung von 0–3
Sekunden programmiert werden.
4. Travel
Dieser Mode regelt den Weg der Servos der Fahrwerkstüren. Jedes Servo kann dabei individuell in den Werten von 20–60 in
die Mitte programmiert werden. Sollten Sie den Weg ändern, reagiert die FW-Tür wenn sie angeschlossen ist in Echtzeit.
5. D. Speed Dieser Mode regelt die Geschwindigkeit der Fahrwerkstüren von 25% bis 100% (normale Geschwindigkeit)
6. Direction:
Doors
Dieser Mode regelt die die Arbeitsrichtung der Fahrwerkstürservos (Tür 1–4). Jedes Türservo kann dabei individuell für
normalen und reversierten Betrieb programmiert werden.
7. Current Wählen Sie für die 700 EZFW Serie I.
8. Test Drücken Sie den Save/Test Button um die aktuell gewählten Optionen zu testen.
Garantie und Service KontaKtinformationen
Land des Kauf Horizon Hobby Kontaktinformationen Adresse
Deutschland
Horizon Technischer Service
+49 (0) 4121 2655 100
Christian-Junge-Straße 1
25337 Elmshorn
Horizon Hobby GmbH
Garantie und Service informationen
Garantiezeitraum - Exklusive Garantie Horizon Hobby, LLC (Horizon)
garantiert, dass das gekaufte Produkt frei von Material- und Montage-
fehlern ist. Der Garantiezeitraum entspricht den gesetzlichen Bestim-
mung des Landes, in dem das Produkt erworben wurde. In Deutschland
beträgt der Garantiezeitraum 6 Monate und der Gewährleistungszeitraum
18 Monate nach dem Garantiezeitraum.
Einschränkungen der Garantie - (a) Die Garantie wird nur dem
Erstkäufer (Käufer) gewährt und kann nicht übertragen werden. Der
Anspruch des Käufers besteht in der Reparatur oder dem Tausch im
Rahmen dieser Garantie. Die Garantie erstreckt sich ausschließlich auf
Produkte, die bei einem autorisierten Horizon Händler erworben wurden.
Verkäufe an dritte werden von dieser Garantie nicht gedeckt. Garan-
tieansprüche werden nur angenommen, wenn ein gültiger Kaufnachweis
erbracht wird. Horizon behält sich das Recht vor, diese Garantiebestim-
mungen ohne Ankündigung zu ändern oder modifizieren und widerruft
dann bestehende Garantiebestimmungen.
(b) Horizon übernimmt keine Garantie für die Verkaufbarkeit des
Produktes, die Fähigkeiten und die Fitness des Verbrauchers für einen
bestimmten Einsatzzweck des Produktes. Der Käufer allein ist dafür
verantwortlich, zu prüfen, ob das Produkt seinen Fähigkeiten und dem
vorgesehenen Einsatzzweck entspricht.
(c) Ansprüche des Käufers Es liegt ausschließlich im Ermessen von Ho-
rizon, ob das Produkt, bei dem ein Garantiefall festgestellt wurde, repa-
riert oder ausgetauscht wird. Dies sind die exklusiven Ansprüche des
Käufers, wenn ein Defekt festgestellt wird. Horizon behält sich vor, alle
eingesetzten Komponenten zu prüfen, die in den Garantiefall einbezogen
werden können. Die Entscheidung zur Reparatur oder zum Austausch
liegt nur bei Horizon. Die Garantie schließt kosmetische Defekte oder
Defekte, hervorgerufen durch höhere Gewalt, falsche Behandlung des
Produktes, falscher Einsatz des Produktes, kommerziellen Einsatz oder
Modifikationen irgendwelcher Art aus. Die Garantie schließt Schäden,
die durch falschen Einbau, falsche Handhabung, Unfälle, Betrieb, Ser-
vice oder Reparaturversuche, die nicht von Horizon ausgeführt wurden
aus. Rücksendungen durch den Käufer direkt an Horizon oder eine
seiner Landesvertretung bedürfen der Schriftform.
Schadensbeschränkung - Horizon ist nicht für direkte oder indirekte
Folgeschäden, Einkommensausfälle oder kommerzielle Verluste, die in
irgendeinem Zusammenhang mit dem Produkt stehen verantwortlich,
unabhängig ab ein Anspruch im Zusammenhang mit einem Vertrag,
der Garantie oder der Gewährleistung erhoben werden. Horizon wird
darüber hinaus keine Ansprüche aus einem Garantiefall akzeptieren,
die über den individuellen Wert des Produktes hinaus gehen. Horizon
hat keinen Einfluss auf den Einbau, die Verwendung oder die Wartung
des Produktes oder etwaiger Produktkombinationen, die vom Käufer
gewählt werden. Horizon übernimmt keine Garantie und akzeptiert keine
Ansprüche für in der folge auftretende Verletzungen oder Beschädigun-
gen. Mit der Verwendung und dem Einbau des Produktes akzeptiert der
Käufer alle aufgeführten Garantiebestimmungen ohne Einschränkungen
und Vorbehalte. Wenn Sie als Käufer nicht bereit sind, diese Bestim-
mungen im Zusammenhang mit der Benutzung des Produktes zu akz-
eptieren, werden Sie gebeten, dass Produkt in unbenutztem Zustand in
der Originalverpackung vollständig bei dem Verkäufer zurückzugeben.
Sicherheitshinweise - Dieses ist ein hochwertiges Hobby Produkt und
kein Spielzeug. Es muss mit Vorsicht und Umsicht eingesetzt werden
und erfordert einige mechanische wie auch mentale Fähigkeiten. Ein
Versagen, das Produkt sicher und umsichtig zu betreiben kann zu Ver-
letzungen von Lebewesen und Sachbeschädigungen erheblichen Aus-
maßes führen. Dieses Produkt ist nicht für den Gebrauch durch Kinder
ohne die Aufsicht eines Erziehungsberechtigten vorgesehen. Die Anlei-
tung enthält Sicherheitshinweise und Vorschriften sowie Hinweise für
die Wartung und den Betrieb des Produktes. Es ist unabdingbar, diese
Hinweise vor der ersten Inbetriebnahme zu lesen und zu verstehen. Nur
so kann der falsche Umgang verhindert und Unfälle mit Verletzungen
und Beschädigungen vermieden werden.
Fragen, Hilfe und Reparaturen - Ihr lokaler Fachhändler und die
Verkaufstelle können eine Garantiebeurteilung ohne Rücksprache mit
Horizon nicht durchführen. Dies gilt auch für Garantiereparaturen. De-
shalb kontaktieren Sie in einem solchen Fall den Händler, der sich mit
Horizon kurz schließen wird, um eine sachgerechte Entscheidung zu fäl-
len, die Ihnen schnellst möglich hilft.
Wartung und Reparatur - Muss Ihr Produkt gewartet oder repariert
werden, wenden Sie sich entweder an Ihren Fachhändler oder direkt an
Horizon. Rücksendungen/Reparaturen werden nur mit einer von Horizon
vergebenen RMA Nummer bearbeitet. Diese Nummer erhalten Sie oder
ihr Fachhändler vom technischen Service. Mehr Informationen dazu er-
halten Sie im Serviceportal unter www.Horizonhobby.de oder telefonisch
bei dem technischen Service von Horizon. Packen Sie das Produkt
sorgfältig ein. Beachten Sie, dass der Originalkarton in der Regel nicht
ausreicht, um beim Versand nicht beschädigt zu werden. Verwenden Sie
einen Paketdienstleister mit einer Tracking Funktion und Versicherung,
da Horizon bis zur Annahme keine Verantwortung für den Versand des
Produktes übernimmt. Bitte legen Sie dem Produkt einen Kaufbeleg bei,
sowie eine ausführliche Fehlerbeschreibung und eine Liste aller eing-
esendeten Einzelkomponenten. Weiterhin benötigen wir die vollständige
Adresse, eine Telefonnummer für Rückfragen, sowie eine Email Adresse.
Garantie und Reparaturen - Garantieanfragen werden nur bearbe-
itet, wenn ein Originalkaufbeleg von einem autorisierten Fachhändler
beiliegt, aus dem der Käufer und das Kaufdatum hervorgeht. Sollte sich
ein Garantiefall bestätigen wird das Produkt repariert oder ersetzt. Diese
Entscheidung obliegt einzig Horizon Hobby.
Kostenpflichtige Reparaturen - Liegt eine kostenpflichtige Reparatur
vor, erstellen wir einen Kostenvoranschlag, den wir Ihrem Händler über-
mitteln. Die Reparatur wird erst vorgenommen, wenn wir die Freigabe
des Händlers erhalten. Der Preis für die Reparatur ist bei Ihrem Händler
zu entrichten. Bei kostenpflichtigen Reparaturen werden mindestens 30
Minuten Werkstattzeit und die Rückversandkosten in Rechnung gestellt.
Sollten wir nach 90 Tagen keine Einverständniserklärung zur Reparatur
vorliegen haben, behalten wir uns vor, das Produkt zu vernichten oder
anderweitig zu verwerten.
ACHTUNG: Kostenpflichtige Reparaturen nehmen wir nur für Ele-
ktronik und Motoren vor. Mechanische Reparaturen, besonders
bei Hubschraubern und RC-Cars sind extrem aufwendig und
müssen deshalb vom Käufer selbst vorgenommen werden.
rechtLiche informationen für die europäiSche union
Konformitätserklärung laut Allgemeine Anforderungen (ISO/IEC 17050-1:2004, korrigierte Fassung 2007-06-15); Deutsche und
Englische Fassung EN ISO/IEC 17050-1:2010 Declaration of conformity (in accordance with ISO/IEC 17050-1)
No. HH2014061901
Horizon Hobby GmbH,
Christian-Junge-Straße 1
D-25337 Elmshorn
erklärt das Produkt: 90° Main Retract with Deluxe Controller, EFLG700, EFLG709, EFLG710, EFLG715, EFLG720, EFLG725, EFLG730,
EFLG735, EFLG740, EFLG745
declares the product: 90° Main Retract with Deluxe Controller, EFLG700, EFLG709, EFLG710, EFLG715, EFLG720, EFLG725, EFLG730,
EFLG735, EFLG740, EFLG745
den übrigen einschlägigen Bestimmungen des EMV-Richtlinie 2004/108/EC.
complies with the essential requirements of the EMC Directive 2004/108/EC.
Angewendete harmonisierte Normen:
Harmonized standards applied:
EN55022:2010 + AC:2011
EN55024:2010
Elmshorn
19.06.2014
Klaus Breer
Geschäftsführer, Managing Director
Robert Peak
Geschäftsführer, Managing Director
Horizon Hobby GmbH; Christian-Junge-Straße 1; D-25337 Elmshorn
HR Pi: HRB 1909; UStlDNr,:DE812678792; STR.NR.L 1829812324
Geschäftsführer: Klause Breer, Robert Peak – Tel.: +49 (0) 4121 2655 100 • Fax: +49 (0) 4121 2655 111
eMail: [email protected]; Internet: www.horizonhobby.de
Es gelten unsere allgemeinen Geschäftsbedingungen, die in unseren Geschäftsräumen eingesehen weden können.
Eare bleibt bis zur vollstandigen Bezahlung Eigentum der Horizon Hobby GmbH
Anweisungen zur Entsorgung von Elektro—und Elektronik-Altgeräten für Benutzer in der Europäischen Union
Dieses Produkt darf nicht zusammen mit anderem Abfall entsorgt werden. Stattdessen ist der Benutzer dafür verantwortlich, unbrauchbare
Geräte durch Abgabe bei einer speziellen Sammelstelle für das Recycling von unbrauchbaren elektrischen und elektronischen Geräten zu
entsorgen. Die separate Sammlung und das Recycling von unbrauchbaren Geräten zum Zeitpunkt der Entsorgung hilft, natürliche Ressourcen zu
bewahren und sicherzustellen, dass Geräte auf eine Weise wiederverwertet werden, bei der die menschliche Gesundheit und die Umwelt geschützt
werden. Weitere Informationen dazu, wo Sie unbrauchbare Geräte zum Recycling abgeben können, erhalten Sie bei lokalen Ämtern, bei der Müllabfuhr
für Haushaltsmüll sowie dort, wo Siedas Produkt gekauft haben.
FW1
FW2
FW3
Empfänger Eingang
Tür 1
Tür 2
Tür 3
Tür 4
AUX Stromeingang
www.modellmarkt24.ch

www.modellmarkt24.ch
REMARQUE
La totalité des instructions, garanties et autres documents est sujette à modification à la seule discrétion d’Horizon Hobby, LLC. Pour
obtenir la documentation àjour, rendez-vous sur le site horizonhobby.com et cliquez sur l’onglet de support de ce produit.
SIGNIFICATION DE CERTAINS TERMES SPÉCIFIQUES
Les termes suivants sont utilisés dans l’ensemble du manuel pour indiquer différents niveaux de danger lors de l’utilisation de ce produit:
REMARQUE: Procédures qui, si elles ne sont pas suivies correctement, peuvent entraîner des dégâts matériels ET éventuellement un
faible risque de blessures.
ATTENTION: Procédures qui, si elles ne sont pas suivies correctement, peuvent entraîner des dégâts matériels ET des blessures graves.
AVERTISSEMENT: Procédures qui, si elles ne sont pas suivies correctement, peuvent entraîner des dégâts matériels et des blessures
graves OU engendrer une probabilité élevée de blessure superficielle.
AVERTISSEMENT: Lisez la TOTALITÉ du manuel d’utilisation afin de vous familiariser avec les caractéristiques du produit avant
de le faire fonctionner. Une utilisation incorrecte du produit peut entraîner sa détérioration, ainsi que des risques de dégâts
matériels, voire de blessures graves.
Ceci est un produit de loisirs sophistiqué. Il doit être manipulé avec prudence et bon sens et requiert des aptitudes de base en méca-
nique. Toute utilisation irresponsable de ce produit ne respectant pas les principes de sécurité peut provoquer des blessures, entraîner
des dégâts matériels et endommager le produit. Ce produit n’est pas destiné à être utilisé par des enfants sans la surveillance directe
d’un adulte. N’essayez pas de démonter le produit, de l’utiliser avec des composants incompatibles ou d’en améliorer les performances
sans l’accord d’Horizon Hobby, LLC. Ce manuel comporte des instructions relatives à la sécurité, au fonctionnement et à l’entretien. Il est
capital de lire et de respecter la totalité des instructions et avertissements du manuel avant l’assemblage, le réglage et l’utilisation, ceci
afin de manipuler correctement l’appareil et d’éviter tout dégât matériel ou toute blessure grave.
14 ans et plus. Ceci n’est pas un jouet.
90º Main Retracts with Controller
Instruction Manual | Bedienungsanleitung | Manuel d’utilisation | Manuale di Istruzioni (EFLG700, EFLG709, EFLG710, EFLG715, EFLG720, EFLG725, EFLG730, EFLG735, EFLG740, EFLG745)
BRANCHEMENT À LA RADIO ET FONCTIONNEMENT
Prenez soin de bien respecter les polarités quand vous connectez toutes les rallonges. Le câble blanc est le signal (s), le câble noir est le négatif
(–) et le câble rouge est le positif (+).
1. Insérez une des prises de la rallonge mâle/mâle dans le port RX imput du boîtier de commande, puis insérez l’autre prise dans le port GEAR
du récepteur.
2. Connectez la prise du mécanisme droit à une des rallonges fournies. Connectez l’autre côté de la rallonge au port GEAR3 du boitier de
commande. effectuez la même opération pour le mécanisme gauche en connectant la rallonge au port GEAR2. Si vous utilisez une roulette
rétractable, connectez sa rallonge au port GEAR1 du boitier de commande.
Vous pouvez ajouter une rallonge supplémentaire allant jusqu’à 300mm, si votre mécanisme est très éloigné du boîtier de commande. Si
vous voulez inverser la direction de fonctionnement du mécanisme, déconnectez la rallonge du boitier de commande et reconnectez-la en
direction opposée pour inverser la polarité.
3. Connectez les servos des trappes aux ports appropriés du boitier de commande en respectant les polarités. Consultez les Modes de
programmation ci-dessous pour déterminer quels sont les ports correspondants à votre application.
4. Mettez votre émetteur et votre récepteur sous tension.
5. Activez la voie à l’émetteur correspondante à la voie de l’émetteur où le train est relié.
6. La voie GEAR (Train) de votre émetteur devra peut-être être inversée pour un fonctionnement correct. Si vous utilisez une radio en 2,4GHz,
n’oubliez pas de refaire l’affectation après avoir effectué l’inversion afin de reprogrammer le failsafe.
OUTILS REQUIS
o Lime o Tournevis o Frein filet o Disque à découper
CARACTÉRISTIQUES TECHNIQUES
Consommation de courant En attente: 10mA | En fonctionnement: 500–700mA | Blocage: 0,8–1,0A
Tension d’alimentation 6,0–8,4V
Masse de l’avion 9,0 –15,9 kg
Masse d’une unité (chaque unité) Train principal: 220 g | Jambe: 170 g
Largeur d’impulsion des points de déclenchement Bas: 1,205ms | Haut: 1,786ms
Durée de la séquence @6,0V: 3,5s | @6,6V: 3,0s | @7,4V: 2,5s
INSTALLATION
REMARQUE: Toujours contrôler que les trains et les roues sont installés de façon à manoeuvrer sans blocage et que les roues roulent
parfaitement droit quand la dérive est au neutre. Un non-respect de cette consigne peut entraîner des dommages au train et à l’avion.
Si le mouvement du train s’arrête avant l’extension ou la rétraction complète, actionnez l’interrupteur GEAR (Train) de votre émetteur pour
inverser le mouvement, puis recherchez la cause du blocage dans le mouvement. Le train rentrant ne devra pas consommer de l’énergie de
la batterie s’il est bloqué.
1. Installez les mécanismes gauche et droit sur votre avion (A) en utilisant les vis M4x20 (I) incluses ou des vis M4 à bois à tête fraisée.
2. Placez l’axe (G), la roue et la vis sans tête (F) sur chaque jambe.
3. Serrez la vis sans tête (F) dans la jambe pour marquer l’axe, puis marquez la longueur de l’axe.
4. Desserrez la vis sans tête, retirez l’axe et utilisez une lime plate pour effectuer un méplat au niveau de la première marque. Coupez l’axe à
longueur en vous basant sur la deuxième marque.
5. Installez l’axe et la roue sur la jambe (B) et serrez la vis sans tête (F) en utilisant du frein-filet.
6. Insérez la jambe (B) dans le support en acier (K) réglez la longueur de la jambe pour que la roue soit parfaitement centrée dans son
logement quand le train est en position rentrée.
7. Serrez les vis (C) pour maintenir la jambe en position mais en gardant la possibilité de pivoter la jambe afin d’aligner la roue.
8. Contrôlez l’alignement de la roue par rapport à la ligne centrale du fuselage quand la jambe de train est en position sortie, puis serrez la vis
sans tête (E) et les vis (C) en utilisant du frein filet.
9. Installez les rotules (H) des biellettes de trappe sur les jambes, puis installez les rotules restantes et les écrous M3 (J) sur les trappes de
train en utilisant du frein filet.
10. Installez les biellettes (D) et réglez leur longueur pour assurer l’alignement des trappes par rapport à la surface de l’aile en position fermée.
Si vous installez le train sur des longerons en bois, pré-percez en premier des trous de diamètre inférieur au diamètre des vis. Vissez les vis
puis retirez-les délicatement. Renforcez les filets dans le bois en utilisant de la colle Ca fine.
BATTERIE AUXILIAIRE OPTIONNELLE
Le boîtier de commande est conçu pour être alimenté par le port GEAR du récepteur ou par une batterie auxiliaire. Pour utiliser une batterie
auxiliaire, connectez un interrupteur (SPM9530) et la batterie au port d’alimentation auxiliaire du boîtier de commande. Le boîtier de commande
basculera automatiquement sur l’alimentation par la batterie. La tension d’alimentation influera directement sur la vitesse du mouvement.
Augmentez la vitesse en utilisant une tension supérieure en utilisant une batterie Li-Fe (6,6V) ou Li-Po (7,4V).
PROGRAMMATION
1. Connectez une batterie au port d’alimentation du boitier de
programmation.
Please connect
Gear Ctl Board
2. Connectez la rallonge sortant du port RX Imput du boitier de
commande au Port de commande du boitier de programmation.
Gear Ctl Board
Connect OK!
3. Appuyez sur le Bouton Mode pour faire défiler les Modes (Voir le
tableau suivant).
4. Appuyez sur le Bouton Valeur pour faire défiler les options de
chaque Mode. Référez-vous aux informations relatives aux Modes
de Programmation ci-dessous.
5. Quand une flèche pointe le haut à côté de l’option souhaitée,
appuyez sur le Bouton Sel/OK pour sélectionner cette option.
Appuyez de nouveau sur le Bouton Sel/OK pour confirmer votre
choix quand vous programmez les option du modèle.
6. Un astérisque apparaîtra derrière l’option choisie.
Model-> No Door*
P-47
7. Appuyez sur le Bouton Save/Test pour enregistrer le programme dans
le boitier de commande.
Saving Data to
Ctl Gear Board
Saving Data OK!
8. Allez en Mode Test pour vous assurer que les options choisies
correspondent à votre modèle.
9. Déconnectez câble du port de commande du boitier de
programmation et connectez-le au port GEAR du récepteur.
10. Déconnectez la batterie du boitier de programmation.
Port de commande Port d'alimentation
Mode
Value Sel/OK
Save/Test
H
E
K
B
C
C E H
I
I J
x2
D
x2
B
x4
C
x2
x2
G
x8
H
x8
I
x4
J
x2
BOITIER DE COMMANDE
G
F
G F
MODES DE PROGRAMMATION
1. Modèle Ce mode intervient sur le fonctionnement des mécanisme de train et des trappes.
Sans trappe Fonctionnement normal des 3 jambes de train et désactivation des trappes.
P-47
Gear
Trappes 1–4 ouvertes et jambes 1–3 sorties.
Gear
Jambes 1–3 rentrées et trappes 1–4 fermées.
P-51
Gear
Trappes 1–4 ouvertes, jambes 1–3 sorties, puis fermeture des trappes 1–2 et les trappes 3–4 restent ouvertes.
Gear
Trappes 1–2 ouvertes, jambes 1–3 rentrées, puis fermeture des trappes 1–4.
B-25
Gear
Trappes 1–3 ouvertes, puis trappe 4, jambes 1–3 sorties, puis fermeture des trappes 1–3, le trappe 4 reste ouverte.
Gear
Trappes 1–3 ouvertes, jambes 1–3 rentrées, fermeture de la trappe 4 suivie de la fermeture des trappes 1–3.
2. Gear Ce mode sert uniquement si vous avez connecté une roulette de queue ou de nez rétractable (Gear 1).
3. Delay
Ce mode permet d’affecter des temporisations aux mouvements des jambes. Chaque jambe peut être indépendamment
temporisée d’un délais de 0 à 3 secondes.
4. Travel
Ce mode permet de régler les couses des servos des trappes. Chaque course de chaque servo de trappe peut être réglée
indépendamment de 20 à 60° dans les 2 directions autour du neutre. Si vous modifiez la course, si la trappe est connectée,
elle réagira en temps réel aux modifications pour visualiser la position courante.
5. D. Speed
Ce mode permet de régler la vitesse des servo des trappes. La vitesse peut être réglée de 25 à 100% de la vitesse normale
de fonctionnement.
6. Direction:
Doors
Ce mode permet de régler la direction du mouvement des trappes 1–4. Chaque servo se règle indépendamment en direction
normale ou inversée.
7. Current Pour tous les trains rentrants série 700, sélectionnez I.
8. Test Appuyez sur le bouton Save/Test pour tester les options sélectionnées.
Mécanisme 1
Mécanisme 2
Mécanisme 3
Entrée récepteur
Trappe 1
Trappe 2
Trappe 3
Trappe 4
Alimentation auxiliaire
coordonnéeS de Garantie et réparationS
Pays d’achat Horizon Hobby Coordonnées Adresse
France Horizon Hobby SAS
+33 (0) 1 60 18 34 90
11 Rue Georges Charpak
77127 Lieusaint
Garantie et réparationS
Durée de la garantie - Garantie exclusive - Horizon Hobby, LLC
(Horizon) garantit que le Produit acheté (le « Produit ») sera exempt de
défauts matériels et de fabrication à sa date d’achat par l’Acheteur. La
durée de garantie correspond aux dispositions légales du pays dans
lequel le produit a été acquis. La durée de garantie est de 6 mois et la
durée d’obligation de garantie de 18 mois à l’expiration de la période
de garantie.
Limitations de la garantie - (a) La garantie est donnée à l’acheteur
initial (« Acheteur ») et n’est pas transférable. Le recours de l’acheteur
consiste en la réparation ou en l‘échange dans le cadre de cette garan-
tie. La garantie s’applique uniquement aux produits achetés chez un
revendeur Horizon agréé. Les ventes faites à des tiers ne sont pas cou-
vertes par cette garantie. Les revendications en garantie seront accep-
tées sur fourniture d’une preuve d’achat valide uniquement. Horizon se
réserve le droit de modifier les dispositions de la présente garantie sans
avis préalable et révoque alors les dispositions de garantie existantes.
(b) Horizon n’endosse aucune garantie quant à la vendabilité du produit
ou aux capacités et à la forme physique de l’utilisateur pour une utilisa-
tion donnée du produit. Il est de la seule responsabilité de l’acheteur de
vérifier si le produit correspond à ses capacités et à l’utilisation prévue.
(c) Recours de l’acheteur – Il est de la seule discrétion d‘Horizon de déter-
miner si un produit présentant un cas de garantie sera réparé ou échangé.
Ce sont là les recours exclusifs de l’acheteur lorsqu’un défaut est constaté.
Horizon se réserve la possibilité de vérifier tous les éléments utilisés et
susceptibles d’être intégrés dans le cas de garantie. La décision de ré-
parer ou de remplacer le produit est du seul ressort d’Horizon. La garan-
tie exclut les défauts esthétiques ou les défauts provoqués par des cas
de force majeure, une manipulation incorrecte du produit, une utilisation
incorrecte ou commerciale de ce dernier ou encore des modifications
de quelque nature qu’elles soient. La garantie ne couvre pas les dégâts
résultant d’un montage ou d’une manipulation erronés, d’accidents ou
encore du fonctionnement ainsi que des tentatives d’entretien ou de
réparation non effectuées par Horizon. Les retours effectués par le fait
de l’acheteur directement à Horizon ou à l’une de ses représentations
nationales requièrent une confirmation écrite.
Limitation des dégâts - Horizon ne saurait être tenu pour responsable
de dommages conséquents directs ou indirects, de pertes de revenus ou
de pertes commerciales, liés de quelque manière que ce soit au produit
et ce, indépendamment du fait qu’un recours puisse être formulé en re-
lation avec un contrat, la garantie ou l’obligation de garantie. Par ailleurs,
Horizon n’acceptera pas de recours issus d’un cas de garantie lorsque
ces recours dépassent la valeur unitaire du produit. Horizon n’exerce au-
cune influence sur le montage, l’utilisation ou la maintenance du produit
ou sur d’éventuelles combinaisons de produits choisies par l’acheteur.
Horizon ne prend en compte aucune garantie et n‘accepte aucun recours
pour les blessures ou les dommages pouvant en résulter. En utilisant et en
montant le produit, l’acheteur accepte sans restriction ni réserve toutes
les dispositions relatives à la garantie figurant dans le présent document.
Si vous n’êtes pas prêt, en tant qu’acheteur, à accepter ces dispositions
en relation avec l’utilisation du produit, nous vous demandons de res-
tituer au vendeur le produit complet, non utilisé et dans son emballage
d’origine.
Indications relatives à la sécurité - Ceci est un produit de loisirs
perfectionné et non un jouet. Il doit être utilisé avec précaution et bon
sens et nécessite quelques aptitudes mécaniques ainsi que mentales.
L’incapacité à utiliser le produit de manière sûre et raisonnable peut pro-
voquer des blessures et des dégâts matériels conséquents. Ce produit
n’est pas destiné à être utilisé par des enfants sans la surveillance
par un tuteur. La notice d’utilisation contient des indications relatives
à la sécurité ainsi que des indications concernant la maintenance et le
fonctionnement du produit. Il est absolument indispensable de lire et de
comprendre ces indications avant la première mise en service. C’est
uniquement ainsi qu’il sera possible d’éviter une manipulation erronée
et des accidents entraînant des blessures et des dégâts.
Questions, assistance et réparations - Votre revendeur spécialisé
local et le point de vente ne peuvent effectuer une estimation d’éligibilité
à l’application de la garantie sans avoir consulté Horizon. Cela vaut
également pour les réparations sous garantie. Vous voudrez bien, dans
un tel cas, contacter le revendeur qui conviendra avec Horizon d’une
décision appropriée, destinée à vous aider le plus rapidement possible.
Maintenance et réparation - Si votre produit doit faire l’objet d’une
maintenance ou d‘une réparation, adressez-vous soit à votre revendeur
spécialisé, soit directement à Horizon. Emballez le produit soigneuse-
ment. Veuillez noter que le carton d‘emballage d’origine ne suffit pas,
en règle générale, à protéger le produit des dégâts pouvant survenir
pendant le transport. Faites appel à un service de messagerie proposant
une fonction de suivi et une assurance, puisque Horizon ne prend au-
cune responsabilité pour l’expédition du produit jusqu’à sa réception
acceptée. Veuillez joindre une preuve d’achat, une description détaillée
des défauts ainsi qu’une liste de tous les éléments distincts envoyés.
Nous avons de plus besoin d’une adresse complète, d’un numéro de
téléphone (pour demander des renseignements) et d’une adresse de
courriel.
Garantie et réparations - Les demandes en garantie seront unique-
ment traitées en présence d’une preuve d’achat originale émanant d’un
revendeur spécialisé agréé, sur laquelle figurent le nom de l’acheteur
ainsi que la date d’achat. Si le cas de garantie est confirmé, le produit
sera réparé. Cette décision relève uniquement de Horizon Hobby.
Réparations payantes - En cas de réparation payante, nous établis-
sons un devis que nous transmettons à votre revendeur. La réparation
sera seulement effectuée après que nous ayons reçu la confirmation
du revendeur. Le prix de la réparation devra être acquitté au revendeur.
Pour les réparations payantes, nous facturons au minimum 30 minutes
de travail en atelier ainsi que les frais de réexpédition. En l’absence
d’un accord pour la réparation dans un délai de 90 jours, nous nous
réservons la possibilité de détruire le produit ou de l’utiliser autrement.
ATTENTION: Nous n’effectuons de réparations payantes que
pour les composants électroniques et les moteurs. Les répara-
tions touchant à la mécanique, en particulier celles des hélicop-
tères et des voitures radiocommandées, sont extrêmement coû-
teuses et doivent par conséquent être effectuées par l’acheteur
lui-même.
informationS de conformité pour L’union européenne
Déclaration de conformité (conformément à la norme ISO/IEC 17050-1)
No. HH2014061901
Produit(s): 90° Main Retract with Deluxe Controller
Numéro(s) d’article: EFLG700, EFLG709, EFLG710, EFLG715, EFLG720, EFLG725, EFLG730, EFLG735, EFLG740, EFLG745
L’objet de la déclaration décrit ci-dessus est en conformité avec les exigences des spécifications énumérées ci-après, suivant les conditions de
la directive CEM 2004/108/EC:
EN55022:2010 + AC:2011
EN55024:2010
Signé en nom et pour le compte de:
Horizon Hobby, LLC
Champaign, IL USA
19.06.14
Robert Peak
Chief Financial Officer, Horizon Hobby, LLC
Elimination dans l’Union Européenne
Ce produit ne doit pas être éliminé avec les ordures ménagères. Il est de la responsabilité de l‘utilisateur de remettre le produit à un point
de collecte officiel des déchets d’équipements électriques. Cette procédure permet de garantir le respect de l’environnement et l’absence
de sollicitation excessive des ressources naturelles. Elle protège de plus le bien-être de la communauté humaine. Pour plus d’informations quant
aux lieux d’éliminations des déchets d‘équipements électriques, vous pouvez contacter votre mairie ou le service local de traitement des ordures
ménagères.
www.modellmarkt24.ch

www.modellmarkt24.ch
AVVISO
Tutte le istruzioni, le garanzie e gli altri documenti pertinenti sono soggetti a cambiamenti a totale discrezione di Horizon Hobby, LLC. Per
una documentazione aggiornata sul prodotto, visitare il sito horizonhobby.com e fare clic sulla sezione Support del prodotto.
TERMINOLOGIA
Nella documentazione relativa al prodotto vengono utilizzati i seguenti termini per indicare i vari livelli di pericolo potenziale durante l’uso
del prodotto:
AVVISO: indica procedure che, se non debitamente seguite, possono determinare il rischio di danni alle cose E il rischio minimo o nullo
di lesioni alle persone.
ATTENZIONE: indica procedure che, se non debitamente seguite, determinano il rischio di danni alle cose E di gravi lesioni alle persone.
AVVERTENZA: indica procedure che, se non debitamente seguite, determinano il rischio di danni alle cose, danni collaterali e gravi lesioni
alle persone O il rischio elevato di lesioni superficiali alle persone.
AVVERTENZA: leggere TUTTO il manuale di istruzioni e familiarizzare con le caratteristiche del prodotto prima di farlo funzionare.
Un uso improprio del prodotto può causare danni al prodotto stesso e alle altre cose e gravi lesioni alle persone.
Questo è un prodotto sofisticato per appassionati. Deve essere azionato in maniera attenta e responsabile e richiede alcune conoscenze
basilari di meccanica. L’uso improprio o irresponsabile di questo prodotto può causare lesioni alle persone e danni al prodotto stesso o
alle altre cose. Questo prodotto non deve essere utilizzato dai bambini senza la diretta supervisione di un adulto. Non usare compo-
nenti non compatibili o alterare il prodotto in nessuna maniera al di fuori delle istruzioni fornite da Horizon Hobby LLC. Questo manuale
contiene le istruzioni per la sicurezza, l’uso e la manutenzione del prodotto. È fondamentale leggere e seguire tutte le istruzioni e le av-
vertenze del manuale prima di montare, impostare o utilizzare il prodotto, alfine di utilizzarlo correttamente e di evitare di causare danni
alle cose o gravi lesioni alle persone.
Almeno 14 anni. Non è un giocattolo.
COLLEGAMENTI RADIO E FUNZIONAMENTO
Bisogna fare attenzione, quando si collegano le prolunghe, di rispettare le polarità della batteria. Il filo bianco è quello del segnale (s), il filo nero
è la massa (–) e il filo rosso è l’alimentazione (+).
1. Inserire un capo della prolunga maschio/maschio nella presa del controller segnata come RX, poi inserire l’altro capo nel canale del carrello
(GEAR) sul ricevitore.
2. Collegare il connettore del carrello destro ad una delle prolunghe fornite. Collegare l’altro capo della prolunga alla presa del controller
segnata come Gear 3. Fare la stessa cosa con il carrello sinistro collegando la prolunga al Gear 2. Se c’è anche un carrello retrattile di coda,
bisogna collegarlo al Gear 1.
Se necessario, per raggiungere il cavo del carrello, si può usare una prolunga aggiuntiva, fino a 30cm. Se si vuole invertire la direzione in cui
opera il carrello, bisogna scollegarlo dal controller e ricollegarlo nel verso opposto per invertire la polarità.
3. Collegare i connettori dei servi dei portelli alle appropriate prese sul controller, osservando la polarità corretta. Si faccia riferimento alle
modalità di programmazione seguenti per determinare quale presa del controller è adatta all’applicazione in uso.
4. Accendere ricevitore e trasmettitore.
5. Muovere il controllo del trasmettitore sul canale a cui si è collegato il carrello retrattile.
6. Per correggere il funzionamento, potrebbe servire un intervento sulla funzione Reverse del trasmettitore. Se si usa una radio a 2,4GHz dopo il
Reverse bisogna rifare la connessione (binding) per aggiornare le posizioni per il fail-safe sul ricevitore.
ATTREZZI NECESSARI
o Lima o Frenafiletti o Cacciavite o Trapano con disco da taglio
CARATTERISTICHE
Assorbimento di corrente Fermo: 10mA | Operativo: 500–700mA | Bloccato: 0,8–1,0A
Tensione operativa 6,0–8,4V
Peso dell’aereo 9,0 –15,9 kg
Peso dell’unità (ciascuno) Carrello principale: 220 g | Gamba: 170 g
Larghezza dell’impulso Basso: 1,205ms | Alto: 1,786ms
Durata della sequenza @6,0V: 3,5s | @6,6V: 3,0s | @7,4V: 2,5s
INSTALLAZIONE
AVVISO: Verificare sempre che nell’installazione dei carrelli e delle ruote non vi siano impedimenti all’estensione e alla retrazione delle gambe, e
che il modello vada diritto quando il comando timone è al centro. In caso contrario si potrebbe danneggiare l’aereo o il carrello.
Se il retrattile si ferma prima di aver raggiunto la posizione massima di retratto o esteso, usare il comando a interruttore sul trasmettitore
per invertire il senso del movimento e individuare l’ostruzione. Il retrattile, quando si ferma a fine corsa, non deve assorbire corrente dalla
batteria.
1. Montare sull’aereo il carrello destro e quello sinistro (A) usando le viti incluse M4x20 (I) o le viti da legno M4 a testa svasata.
2. Montare su ogni gamba l’asse (G), la ruota e il grano (F).
3. Stringere il grano (F) sulla gamba per segnare l’asse, poi segnarlo in lunghezza.
4. Allentare il grano, togliere l’asse e usare una lima piatta per spianare la parte in corrispondenza del grano. Tagliare l’asse in corrispondenza
dell’altro segno fatto prima.
5. Installare l’insieme asse/ruota sulla gamba (B) e stringere il grano (F) usando del frenafiletti per bloccarlo.
6. Inserire la gamba (B) nel supporto (K) regolandone la lunghezza per avere la ruota centrata nella sua sede quando il carrello viene retratto.
7. Stringere le viti (C) del supporto per fissare la gamba nella posizione che permetta il giusto allineamento della ruota.
8. Quando le ruote sono estratte, verificare l’allineamento con la linea centrale del modello, poi stringere il grano (E) e le viti (C) applicando del
frenafiletti.
9. Montare sulla gamba le sfere (H) per i rinvii del portello, poi montare sui portelli del carrello le sfere rimanenti con i loro dadi da 3mm (J)
applicando del frenafiletti.
10. Montare i rinvii con gli attacchi a sfera (D) regolandone la lunghezza in modo da avere i portelli allineati.
Se si monta un carrello su di un supporto in legno, praticare dei fori più piccoli del diametro delle viti. Avvitare le viti di montaggio nei fori e
poi toglierle con attenzione. Indurire la filettatura nel legno con colla CA (cianoacrilica).
BATTERIA AUSILIARIA OPZIONALE
La centralina si può alimentare sia attraverso il canale del retrattile sia con una batteria separata. Per usare una batteria ausiliaria, collegare un
interruttore (SPM9530) e una batteria al cavo apposito della centralina, la quale preleverà automaticamente l’alimentazione da questa batteria.
La tensione disponibile influirà sulla velocità del retrattile. Per aumentare la velocità si può usare una batteria con una tensione maggiore come
una Li-Fe (6,6V) o una Li-Po (7,4V).
PROGRAMMAZIONE
1. Collegare una batteria alla presa di alimentazione del
Programmatore.
Please connect
Gear Ctl Board
2. Collegare un cavo dalla presa ingresso RX sul controller, alla presa
sul Programmatore.
Gear Ctl Board
Connect OK!
3. Premere il tasto Mode per scorrere attraverso le modalità di
programmazione (si veda la tabella seguente).
4. Premere il tasto Value per scorrere attraverso le opzioni di
ciascun modo. Si faccia riferimento alle informazioni seguenti sulla
programmazione.
5. Quando la freccia è allineata all’opzione desiderata, premere il
tasto Sel/OK per sceglierla. Premere di nuovo lo stesso tasto per
confermare la scelta quando si programmano le opzioni Model.
6. Appare un asterisco vicino all’opzione scelta.
Model-> No Door*
P-47
7. Premere il tasto Save/Test per salvare la programmazione sul
controller.
Saving Data to
Ctl Gear Board
Saving Data OK!
8. Andare nel modo Test per verificare che le opzioni scelte funzionino
correttamente sul proprio modello.
9. Scollegare il cavo del controller dal programmatore e collegarlo al
ricevitore.
10. Scollegare la batteria dal programmatore.
Presa per il Programmatore Presa aliment. Programmatore
Mode
Value Sel/OK
Save/Test
H
E
K
B
C
C E H
I
I J
x2
D
x2
B
x4
C
x2
x2
G
x8
H
x8
I
x4
J
x2
CONTROLLER
G
F
G F
MODALITA’ DI PROGRAMMAZIONE
1. Model Questo modo influisce sulle azioni del carrello e dei portelli.
Le funzioni Gear 1–3 funzionano normalmente, mentre quelle Doors 1–4 sono disabilitate.
P-47
Gear
Doors 1–4 aperti e Gear 1–3 estesi
Gear
Gear 1–3 retratti e Doors 1–4 chiusi.
P-51
Gear
Doors 1–4 aperti e Gear 1–3 estesi, poi Doors 1–2 chiusi e Doors 3–4 restano aperti.
Gear
Doors 1–2 aperti, Gear 1–3 retratti, poi Doors 1–4 chiusi.
B-25
Gear
Doors 1–3 aperti seguiti da Door 4, Gear 1–3 estesi, poi Doors 1–3 chiusi e Door 4 resta aperto.
Gear
Doors 1–3 aperti, Gear 1–3 retratti, poi Door 4 chiude seguito da Doors 1–3.
2. Gear Questo modo ha effetto se si ha un carrello di coda o anteriore (Gear 1) collegato.
3. Delay
Questo modo agisce sul ritardo del carrello. Su ogni carrello si può programmare in modo indipendente un ritardo da 0 a 3
secondi.
4. Travel
Questo modo agisce sulla corsa dei servi che muovono i portelli. Ogni servo si può programmare in modo indipendente per
un movimento da 20–60 rispetto al centro in entrambe le direzioni. Se si cambia la corsa, il portello (door) reagisce in tempo
reale, se collegato e nella posizione attuale che si sta regolando.
5. D. Speed
Questo modo agisce sulla velocità dei servi che muovono i portelli. I servi si possono programmare per avere un movimento
dal 25 al 100% rispetto alla velocità normale.
6. Direction:
Doors
Questo modo agisce sulla direzione della corsa dei servi che muovono i portelli del carrello (Doors 1–4). Ogni servo si può
programmare in modo indipendente con movimento normale o invertito.
7. Current Per tutti i carrelli della serie 700, selezionare I.
8. Test Premere il tasto Save/Test per verificare le opzioni selezionate.
Carrello 1
Carrello 2
Carrello 3
Ingresso ricevitore
Portello 1
Portello 2
Portello 3
Portello 4
Alimentazione AUX
Garanzia e aSSiStenza - informazioni per i contatti
Stato di acquisto Horizon Hobby Informazioni per i contatti Indirizzo
Germania
Horizon Technischer Service
+49 (0) 4121 2655 100
Christian-Junge-Straße 1
25337 Elmshorn, Germania
Horizon Hobby GmbH
Garanzia
Periodo di garanzia - La garanzia esclusiva - Horizon Hobby, LLC
(Horizon) garantisce che i prodotti acquistati (il “Prodotto”) sono privi di
difetti relativi ai materiali e di eventuali errori di montaggio. Il periodo
di garanzia è conforme alle disposizioni legali del paese nel quale il
prodotto è stato acquistato. Tale periodo di garanzia ammonta a 6 mesi
e si estende ad altri 18 mesi dopo tale termine.
Limiti della garanzia - (a) La garanzia è limitata all’acquirente origi-
nale (Acquirente) e non è cedibile a terzi. L’acquirente ha il diritto a far
riparare o a far sostituire la merce durante il periodo di questa garanzia.
La garanzia copre solo quei prodotti acquistati presso un rivenditore au-
torizzato Horizon. Altre transazioni di terze parti non sono coperte da
questa garanzia. La prova di acquisto è necessaria per far valere il diritto
di garanzia. Inoltre, Horizon si riserva il diritto di cambiare o modificare i
termini di questa garanzia senza alcun preavviso e di escludere tutte le
altre garanzie già esistenti.
(b) Horizon non si assume alcuna garanzia per la disponibilità del
prodotto, per l’adeguatezza o l’idoneità del prodotto a particolari previsti
dall’utente. È sola responsabilità dell’acquirente il fatto di verificare se il
prodotto è adatto agli scopi da lui previsti.
(c) Richiesta dell’acquirente – spetta soltanto a Horizon, a propria dis-
crezione riparare o sostituire qualsiasi prodotto considerato difettoso
e che rientra nei termini di garanzia. Queste sono le uniche rivalse a
cui l’acquirente si può appellare, se un prodotto è difettoso. Horizon si
riserva il diritto di controllare qualsiasi componente utilizzato che viene
coinvolto nella rivalsa di garanzia. Le decisioni relative alla sostituzione
o alla riparazione avvengono solo in base alla discrezione di Horizon.
Questa garanzia non copre dei danni superficiali o danni per cause di
forza maggiore, uso errato del prodotto, negligenza, uso ai fini com-
merciali, o una qualsiasi modifica a qualsiasi parte del prodotto. Questa
garanzia non copre danni dovuti ad una installazione errata, ad un funzi-
onamento errato, ad una manutenzione o un tentativo di riparazione non
idonei a cura di soggetti diversi da Horizon. La restituzione del prodotto a
cura dell’acquirente, o da un suo rappresentante, deve essere approvata
per iscritto dalla Horizon.
Limiti di danno - Horizon non si riterrà responsabile per danni spe-
ciali, diretti, indiretti o consequenziali; perdita di profitto o di produzione;
perdita commerciale connessa al prodotto, indipendentemente dal fatto
che la richiesta si basa su un contratto o sulla garanzia. Inoltre la respon-
sabilità di Horizon non supera mai in nessun caso il prezzo di acquisto
del prodotto per il quale si chiede la responsabilità. Horizon non ha alcun
controllo sul montaggio, sull’utilizzo o sulla manutenzione del prodotto o
di combinazioni di vari prodotti. Quindi Horizon non accetta nessuna re-
sponsabilità per danni o lesioni derivanti da tali circostanze. Con l’utilizzo
e il montaggio del prodotto l’utente acconsente a tutte le condizioni,
limitazioni e riserve di garanzia citate in questa sede. Qualora l’utente
non fosse pronto ad assumersi tale responsabilità associata all’uso del
prodotto, si suggerisce di restituire il prodotto intatto, mai usato e im-
mediatamente presso il venditore.
Indicazioni di sicurezza - Questo è un prodotto sofisticato di hob-
bistica e non è un giocattolo. Esso deve essere manipolato con cautela,
con giudizio e richiede delle conoscenze basilari di meccanica e delle
facoltà mentali di base. Se il prodotto non verrà manipolato in maniera
sicura e responsabile potrebbero risultare delle lesioni, dei gravi danni a
persone, al prodotto o all’ambiente circostante. Questo prodotto non è
concepito per essere usato dai bambini senza una diretta supervisione
di un adulto. Il manuale del prodotto contiene le istruzioni di sicurezza, di
funzionamento e di manutenzione del prodotto stesso. È fondamentale
leggere e seguire tutte le istruzioni e le avvertenze nel manuale prima di
mettere in funzione il prodotto. Solo così si eviterà un utilizzo errato e di
preverranno incidenti, lesioni o danni.
Domande, assistenza e riparazioni - Il vostro negozio locale e/o luo-
go di acquisto non possono fornire garanzie di assistenza o riparazione
senza previo colloquio con Horizon. Questo vale anche per le riparazioni
in garanzia. Quindi in tale casi bisogna interpellare un rivenditore, che si
metterà in contatto subito con Horizon per prendere una decisione che
vi possa aiutare nel più breve tempo possibile.
Manutenzione e riparazione - Se il prodotto deve essere ispezionato
o riparato, si prega di rivolgersi ad un rivenditore specializzato o diret-
tamente ad Horizon. Il prodotto deve essere Imballato con cura. Bisogna
far notare che i box originali solitamente non sono adatti per effettuare
una spedizione senza subire alcun danno. Bisogna effettuare una sped-
izione via corriere che fornisce una tracciabilità e un’assicurazione, in
quanto Horizon non si assume alcuna responsabilità in relazione alla
spedizione del prodotto. Inserire il prodotto in una busta assieme ad una
descrizione dettagliata dei problemi e ad una lista di tutti i singoli compo-
nenti spediti. Inoltre abbiamo bisogno di un indirizzo completo, di un nu-
mero di telefono per rivolgere ulteriori domande e di un indirizzo e-mail.
Garanzia a riparazione - Le richieste in garanzia verranno elaborate
solo se è presente una prova d’acquisto in originale proveniente da un
rivenditore specializzato autorizzato, nella quale è ben visibile la data di
acquisto. Se la garanzia viene confermata, allora il prodotto verrà ripara-
to o sostituito. Questa decisione spetta esclusivamente a Horizon Hobby.
Riparazioni a pagamento - Se bisogna effettuare una riparazione
a pagamento, effettueremo un preventivo che verrà inoltrato al vostro
rivenditore. La riparazione verrà effettuata dopo l’autorizzazione da parte
del vostro rivenditore. La somma per la riparazione dovrà essere pa-
gata al vostro rivenditore. Le riparazioni a pagamento avranno un costo
minimo di 30 minuti di lavoro e in fattura includeranno le spese di resti-
tuzione. Qualsiasi riparazione non pagata e non richiesta entro 90 giorni
verrà considerata abbandonata e verrà gestita di conseguenza.
ATTENZIONE: Le riparazioni a pagamento sono disponibili solo
sull’elettronica e sui motori. Le riparazioni a livello meccanico,
soprattutto per gli elicotteri e le vetture RC sono molto costose e
devono essere effettuate autonomamente dall’acquirente.
informazioni SuLLa conformità per L’unione europea
Dichiarazione di conformità (in conformità con ISO/IEC 17050-1)
No. HH2014061901
Prodotto(i): 90° Main Retract with Deluxe Controller
Numero(i) articolo: EFLG700, EFLG709, EFLG710, EFLG715, EFLG720, EFLG725, EFLG730, EFLG735, EFLG740, EFLG745
Gli oggetti presentati nella dichiarazione sopra citata sono conformi ai requisiti delle specifiche elencate qui di seguito, seguendo le disposizioni
della direttiva EMC 2004/108/EC:
EN55022:2010 + AC:2011
EN55024:2010
Firmato per conto di:
Horizon Hobby, LLC
Champaign, IL USA
19.06.14
Robert Peak
Chief Financial Officer, Horizon Hobby, LLC
Istruzioni del RAEE per lo smaltimento da parte di utenti dell’Unione Europea
Questo prodotto non deve essere smaltito assieme ai rifiuti domestici. Al contrario, l’utente è responsabile dello smaltimento di tali rifiuti
che devono essere portati in un centro di raccolta designato per il riciclaggio di rifiuti elettrici e apparecchiature elettroniche. La raccolta
differenziata e il riciclaggio di tali rifiuti provenienti da apparecchiature nel momento dello smaltimento aiuteranno a preservare le risorse naturali
e garantiranno un riciclaggio adatto a proteggere il benessere dell’uomo e dell’ambiente. Per maggiori informazioni sui centri di raccolta,
contattare il proprio ufficio locale, il servizio di smaltimento rifiuti o il negozio presso il quale è stato acquistato il prodotto.
www.modellmarkt24.ch
-
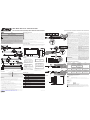 1
1
-
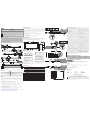 2
2
-
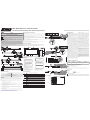 3
3
-
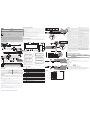 4
4


E-flite EFLG700 Bedienungsanleitung
- Kategorie
- Ferngesteuertes Spielzeug
- Typ
- Bedienungsanleitung
in anderen Sprachen
- English: E-flite EFLG700 Operating instructions
- français: E-flite EFLG700 Mode d'emploi
- italiano: E-flite EFLG700 Istruzioni per l'uso
Verwandte Artikel
Andere Dokumente
-
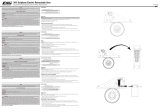 Hangar 9 EFLG630S Bedienungsanleitung
-
Spektrum SPMSA6390 Bedienungsanleitung
-
-
-
 Hangar 9 HAN4770 Bedienungsanleitung
-
 Hangar 9 HAN2765 Bedienungsanleitung
-
 Hangar 9 HAN2990 Bedienungsanleitung
-
Spektrum SPMSS6510 Benutzerhandbuch
-


