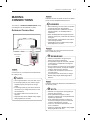
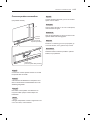
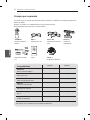
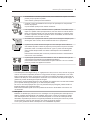
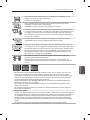
LG 55EA9809 OLED Bedienungsanleitung
- Kategorie
- Fernseher
- Typ
- Bedienungsanleitung
Dieses Handbuch eignet sich auch für

Drawn Approved
Signature
Mi-Ra Woo Jong-Ok Kim
MMM/DD/YYYY
JUN/28/2013 JUN/28/2013
55EA9800-ZA LG MFL67785705
EU/VS EA9800 (1309-REV02)
:LGEAK :LGEKR :LGERS
:LGEAZ :LGEMA :LGESY
:LGEEG :LGEMX :LGETH
:LGEIL :LGEND :LGEVN
:LGEIN :LGERA :LGEWR
:LGEAS
JUN/28/2013
Su-In Kim
:Part number
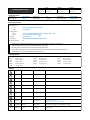
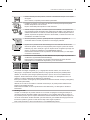
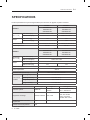
1. Model Description
Printing specification
Printed in Mexico
Printed in Poland
Printed in Kazakhstan
Printed in Brazil
:5. Language
:6. Number of pages
:Model name
:2nd, 3rd Suffix
:Brand name
:Product name
:1. Trim size (Format)
2. Printing colors
: • Cover
: • Inside
Printed in Korea
: • Inside
:4. Bindery
(Revision number)
2. Printing Specification
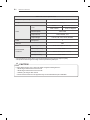
Checked
Rev. Number
MMM/DD/YYYY
316
182 mm x 257 mm (B5)
4 Color (Cyan, Magenta, Yellow, Black)
1 Color (Black)
Coated, Snow white paper 150 g/㎡ (Laminating coating - Matt)
Uncoated, wood-free paper 60 g/㎡
Perfect binding
ENG/GER/FRE/ITA/SPA/POR/DUT/GRE/SLN (9)
3. Origin Notification
4. Changes
Printed in Mexico
Printed in Egypt
Printed in India
Printed in Algeria
3. Stock (Paper)
: • Cover
Manual drawing update ( Add 55EA880V-ZF model)
EKLD701804
mira.woo
JUL/26/2013
SEP/23/2013
mira.woo
EKLD900607
Manual drawing update
- Add 55EA880V-ZC model
- Delete OSD "Sound Out -> Canvas Speaker"
Printed in Indonesia
Printed in Russia
Printed in Poland
Signature
Change Contents
ECO Number
N
O
T
E
“This part contains Eco-hazardous substances (Pb, Cd, Hg, Cr6+, PBB, PBDE, etc.) within LG standard level,
Details should be followed Eco-SCM management standard[LG(56)-A-2524].
Especially, Part should be followed and controlled the following specification.
(1) Eco-hazardous substances test report should be submitted when Part certification test and First Mass Production.
(2) Especially, Don’t use or contain lead(Pb) and cadmium(Cd) in ink.
Printed in China
Printed in China
Printed in Thailand
Printed in Vietnam
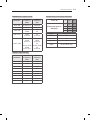
1
10
9
8
7
6
5
4
3
2

316 pages
Front
Cover
(ENG)
P/No. A-2 … … … … A-35 A-36
ENG
Cover
2 … … … … 29 30
GER
Cover
2 … … … … 29 30
FRE
Cover
2 … … … … 29 30
ITA
Cover
2 … … … … 33 34
SPA
Cover
2 … … … … 29 30
POR
Cover
2 … … … … 29 30
DUT
Cover
2 … … … … 29 30
GRE
Cover
2 … … … … 29 30
SLV
Cover
2 … … … … 29 30
:Total pages
:Part number
MFL67785705
Pagination sheet

316 pages
Back
SPECIFICATIONS Cover
(ENG)
B-1 B-2 B-3 B-4 B-5
:Part number
MFL67785705
:Total pages

www.lg.com
P/NO : MFL67785705 (1309-REV02)
Printed in Korea
EA98**
EA88**
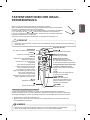
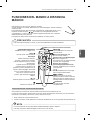
Please read this manual carefully before operating your set and retain it
for future reference.
OWNER’S MANUAL

A-2
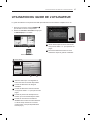
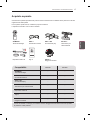
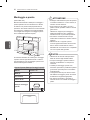
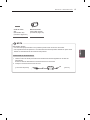
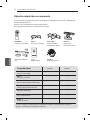
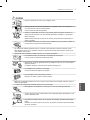
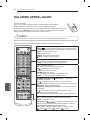
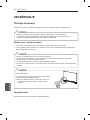
TABLE OF CONTENTS
TABLE OF CONTENTS
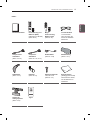
A-3 SETTING UP THE TV
A-3 Attaching the stand
A-4 Assembling the AV Cover
A-4 Attaching the Video Call Camera
A-5 Tidying cables
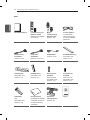
A-7 MAKING CONNECTIONS
A-7 Antenna Connection
A-9 Satellite dish Connection
A-10 HDMI Connection
A-12 - ARC (Audio Return Channel)
A-13 DVI to HDMI Connection
A-15 MHL Connection
A-18 Component Connection
A-19 Composite Connection
A-20 Headphone Connection
A-22 Audio Connection
A-22 - Digital optical audio connection
A-25 - Canvas speaker connection
A-26 USB Connection
A-28 CI module Connection
A-30 Euro Scart Connection
LANGUAGE LIST
English
Deutsch
Français
Italiano
Español
Português
Nederlands
Ελληνικά
Slovenščina
B-1 SPECIFICATIONS
COMMON
COMMON
LANGUAGE

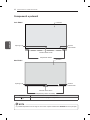
A-3
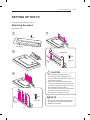
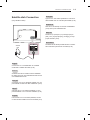
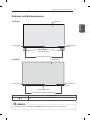
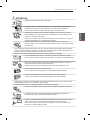
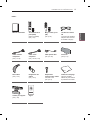
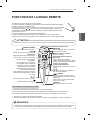
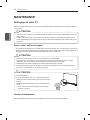
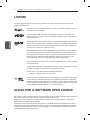
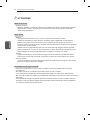
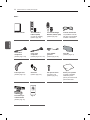
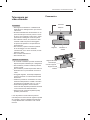
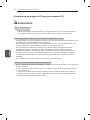
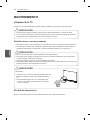
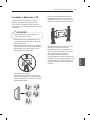
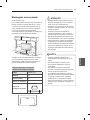
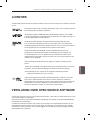
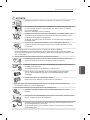
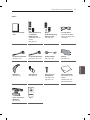
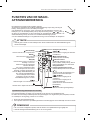
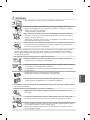
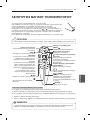
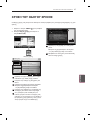
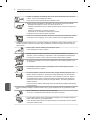
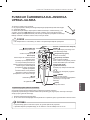
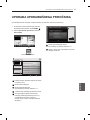
SETTING UP THE TV
SETTING UP THE TV
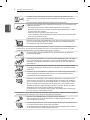
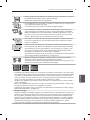
Image shown may differ from your TV.
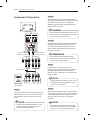
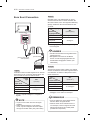
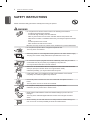
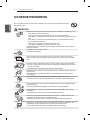
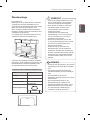
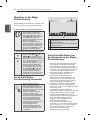
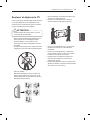
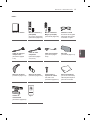
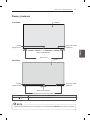
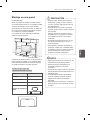
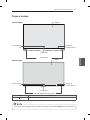
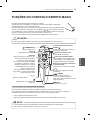
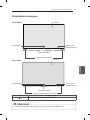
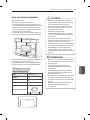
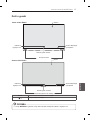
Attaching the stand
(Only EA88**-ZA)
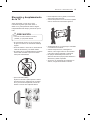
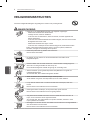
CAUTION
When attaching the stand to the TV
set, place the screen facing down on a
cushioned table or flat surface to protect the
screen from scratches.
Make sure that the screws are inserted
correctly and fastened securely. (If they are
not fastened securely enough, the TV may
tilt forward after being installed.)
Do not use too much force and over tighten
the screws; otherwise screw may be
damaged and not tighten correctly.
NOTE
Remove the stand before installing the TV
on a wall mount by performing the stand
attachment in reverse.
1
2
Stand Base
Front
3
9EA
M4 x L20
4
4EA
M4 x L10
Stand Cover

A-4
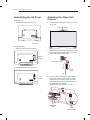
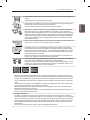
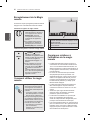
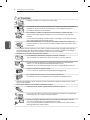
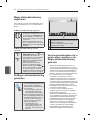
SETTING UP THE TV
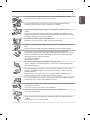
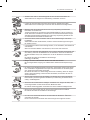
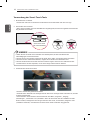
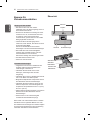
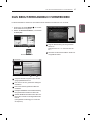
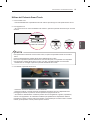
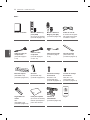
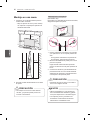
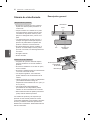
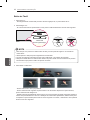
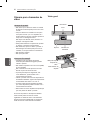
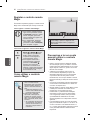
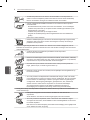
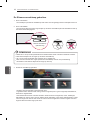
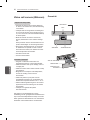
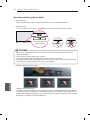
Attaching the Video Call
Camera
1 Unfold the stand and put it on the top center of
the TV set.
Video call camera
2 Bend the stand of the Video call camera. Attach
the stand of the Video call camera to the back
of the display with a Velcro Tape.
Video call camera
TV
Velcro
Tape
3 Insert the Video call camera’s cable into the
Stand-cable holder. Please open the USB
Camera Cover for Video call camera’s cable
connection.The camera shall be connected to
the CAM terminal as shown.
(Image shown may differ from your TV.)
Stand-cable
holder
USB
Camera Cover
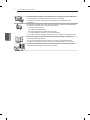
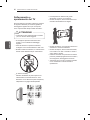
Assembling the AV Cover
(Only EA98**)
1 Assemble the AV Cover as shown.
AV Cover
(Only EA88**-ZA)
1 Attach the Velcro Tapes as shown.
Velcro
Tape
2 Assemble the AV Cover as shown.
AV
Cover

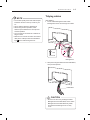
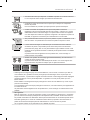
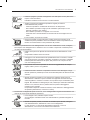
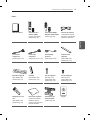
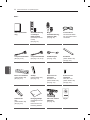
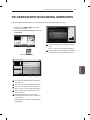
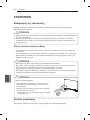
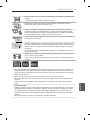
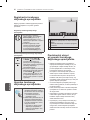
A-5
SETTING UP THE TV
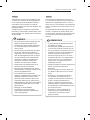
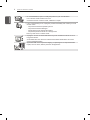
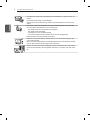
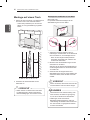
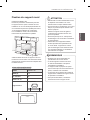
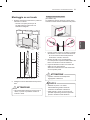
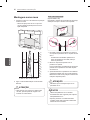
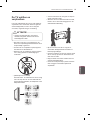
Tidying cables
(Only EA98**)
1 Fix the Cable Management with Cable
Management Screw and arrange the cables.
M4 x L20
1 EA
Cable
Management
2 Wrap the arranged cables with the Cable Band,
then pull the zip down.
Cable Band
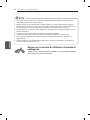
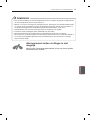
CAUTION
Do not move the TV by holding the Cable
Management and Cable Band, as the Cable
Management and Cable Band may break,
and injuries and damage to the TV may
occur.
NOTE
For the best quality video and audio outputs,
install the camera on the top-center of your
TV.
Set up with the television switched off.
When using external speakers, allow
sufficient space between the microphones
and the speakers.
The TV must be connected to a network for
Skype to work.
Make sure to connect the Video call camera
cable to the CAM port with the USB trident
logo on the cable facing the front.

A-6
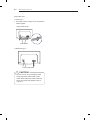
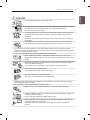
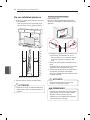
SETTING UP THE TV
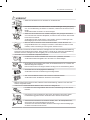
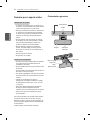
(Only EA88**-ZA)
** Stand Type **
1 Use Cable Holder to neatly secure and position
cables together.
Cable Holder
Power Cable Hoder
** Wall Mount Type **
Power Cable Hoder
CAUTION
Do not move the TV by holding the Cable
Holder and Power Cable Holder, as the
Cable Holder and Power Cable Holder may
break, and injuries and damage to the TV
may occur.

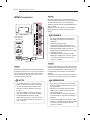
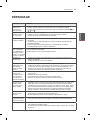
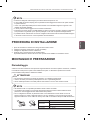
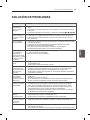
A-7
MAKING CONNECTIONS
MAKING
CONNECTIONS
This section on MAKING CONNECTIONS mainly
uses diagrams for the 55EA98** models.
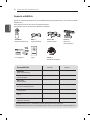
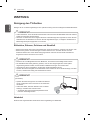
Antenna Connection
Wall Antenna
Socket
IN
ANTENNA/
CABLE
English
Connect the TV to a wall antenna socket with an
RF cable (75 Ω).
NOTE
Use a signal splitter to use more than 2 TVs.
If the image quality is poor, install a signal
amplifier properly to improve the image
quality.
If the image quality is poor with an antenna
connected, try to realign the antenna in the
correct direction.
An antenna cable and converter are not
supplied.
Supported DTV Audio: MPEG, Dolby Digital,
Dolby Digital Plus, HE-AAC
Deutsch
Schließen Sie das TV-Gerät mit einem HF-Kabel
(75 Ω) an eine Wandantennenbuchse an.
HINWEIS
Bei Verwendung von mehr als 2 TV-Geräten
verwenden Sie einen Signalsplitter.
Ist das Bild schlecht, installieren Sie einen
Signalverstärker, um die Bildqualität zu
verbessern.
Wenn die Bildqualität bei angeschlossener
Antenne schlecht ist, richten Sie die Antenne
richtig aus.
Antennenkabel und Verstärker sind nicht im
Lieferumfang enthalten.
Unterstützter DTV-Ton: MPEG, Dolby Digital,
Dolby Digital Plus, HE-AAC
Français
Connectez la TV à une prise d’antenne murale
avec un câble RF (75 Ω).
REMARQUE
Utilisez un séparateur de signaux pour
utiliser plus de deux téléviseurs.
Si la qualité d’image est mauvaise, installez
correctement un amplificateur de signaux
pour l’améliorer.
Si vous utilisez une antenne et que la qualité
d’image est mauvaise, essayez de réaligner
l’antenne dans la bonne direction.
Le câble et le convertisseur d’antenne ne
sont pas fournis.
Technologies audio TNT prises en charge :
MPEG, Dolby Digital, Dolby Digital Plus,
HE-AAC
Italiano
Collegare il televisore all’antenna centralizzata con
un cavo RF (75 Ω).
NOTA
Utilizzare uno sdoppiatore del segnale per
usare più di 2 televisori.
Se la qualità dell’immagine è scarsa,
installare correttamente un amplificatore del
segnale per migliorarla.
Se la qualità dell’immagine è scarsa con
un’antenna collegata, provare a riallineare
l’antenna nella direzione corretta.
Il cavo e il convertitore dell’antenna non
sono in dotazione.
Audio DTV supportato: MPEG, Dolby Digital,
Dolby Digital Plus, HE-AAC

A-8
MAKING CONNECTIONS
Español
Conecte la TV a una toma de pared de antena con
un cable RF (75 Ω).
NOTA
Emplee un divisor de señal cuando desee
utilizar más de dos TV.
Si la imagen es de poca calidad, instale un
amplificador de señal correctamente para
mejorar la calidad de imagen.
Si la imagen es de poca calidad con una
antena conectada, intente volver a orientar
la antena en la dirección adecuada.
No se suministran el cable de antena ni el
conversor.
Audio DTV admitido: MPEG, Dolby Digital,
Dolby Digital Plus, HE-AAC
Português
Ligue a TV a uma tomada de antena de parede
com um cabo RF (75 Ω).
NOTA
Utilize um separador de sinal se quiser
utilizar mais de 2 TVs.
Se a qualidade de imagem for fraca, instale
um amplificador de sinal para melhorar a
qualidade de imagem.
Se a qualidade de imagem for fraca mesmo
que tenha uma antena ligada, tente orientar
a antena para a direcção correcta.
O cabo da antena e o conversor não são
fornecidos.
Áudio DTV suportado: MPEG, Dolby Digital,
Dolby Digital Plus, HE-AAC
Nederlands
Sluit de TV met behulp van een RF-kabel (75 Ω)
aan op een antenneaansluiting op de muur.
OPMERKING
Gebruik een signaalsplitter om meer dan
twee TV’s te gebruiken.
Als de beeldkwaliteit slecht is, installeert u
een signaalversterker om de beeldkwaliteit
te verbeteren.
Als de beeldkwaliteit slecht is terwijl een
antenne is aangesloten, probeert u de
antenne in de juiste richting te draaien.
Antennekabel en converter worden niet
meegeleverd.
Ondersteunde DTV-audio: MPEG, Dolby
Digital, Dolby Digital Plus, HE-AAC
Ελληνικά
Συνδέστε την τηλεόραση σε μια υποδοχή κεραίας
στον τοίχο με ένα καλώδιο RF (75 Ω).
ΣΗΜΕΙΩΣΗ
Χρησιμοποιήστε ένα διαχωριστή σήματος
για τη χρήση περισσότερων από 2
τηλεοράσεων.
Αν η ποιότητα της εικόνας δεν είναι καλή,
εγκαταστήστε έναν ενισχυτή σήματος για τη
βελτίωση της ποιότητας εικόνας.
Αν η ποιότητα της εικόνας δεν είναι καλή
μετά τη σύνδεση της κεραίας, δοκιμάστε να
αλλάξετε τον προσανατολισμό της κεραίας
στη σωστή κατεύθυνση.
Δεν παρέχεται καλώδιο κεραίας και
μετατροπέας.
Υποστηριζόμενος ήχος DTV: MPEG, Dolby
Digital, Dolby Digital Plus, HE-AAC
Slovenščina
Televizor priključite v stensko antensko vtičnico s
kablom RF (75 Ω).
OPOMBA
Če želite uporabljati več kot 2 televizorja,
uporabite razcepnik za signal.
Če je kakovost slike slaba, jo izboljšajte
tako, da ustrezno namestite ojačevalnik
signala.
Če je kakovost slike slaba in uporabljate
anteno, usmerite anteno v ustrezno smer.
Kabel antene in pretvornik nista priložena.
Podprte oblike zvoka za DTV: MPEG, Dolby
Digital, Dolby Digital Plus, HE-AAC

A-9
MAKING CONNECTIONS
Satellite dish Connection
(Only satellite models)
IN
13 / 18 V
700mA Max
LNB IN
Satellite
Satellite
Dish
English
Connect the TV to a satellite dish to a satellite
socket with a satellite RF cable (75 Ω).
Deutsch
Schließen Sie das TV-Gerät mit einem Satelliten-
HF-Kabel (75 Ω) an eine Satellitenschüssel und an
eine Satellitenbuchse an.
Français
Connectez la TV à une parabole satellite ou à une
prise satellite à l’aide d’un câble satellite RF (75 Ω).
Italiano
Collegare la TV a un’antenna satellitare e a una
presa satellitare con un cavo RF satellitare (75 Ω).
Español
Para conectar la TV a una antena parabólica, enchufe
un cable de RF de satélite a una toma de satélite (75 Ω).
Português
Ligue a TV a uma antena parabólica a uma toma-
da de satélite com um cabo RF para satélite (75 Ω).
Nederlands
Sluit de TV met behulp van een RF-satellietkabel
(75 Ω) aan op een satellietschotel.
Ελληνικά
Συνδέστε την τηλεόραση σε μια δορυφορική κε-
ραία, μέσω μιας δορυφορικής υποδοχής με δορυ-
φορικό καλώδιο (75 Ω).
Slovenščina
S kablom RF za satelit povežite televizor s satelit-
skim krožnikom prek vtičnice za satelit (75 Ω).

A-10
MAKING CONNECTIONS
HDMI Connection
HDMI
DVD / Blu-Ray /
HD Cable Box /
HD STB / PC
(*Not Provided)
English
Transmits the digital video and audio signals from
an external device to the TV. Connect the external
device and the TV with the HDMI cable as shown.
Choose any HDMI input port to connect. It does
not matter which port you use.
NOTE
It is recommended to use the TV with the
HDMI connection for the best image quality.
Use the latest High Speed HDMI™ Cable
with CEC (Customer Electronics Control)
function.
High Speed HDMI™ Cables are tested to
carry an HD signal up to 1080p and higher.
Supported HDMI Audio format : Dolby
Digital, DTS, PCM (Up to 192 KHz, 32 KHz
/ 44.1 KHz / 48 KHz / 88 KHz / 96 KHz / 176
KHz / 192 KHz)
Deutsch
Überträgt digitale Video- und Audiosignale von
einem externen Gerät an das TV-Gerät. Verbinden
Sie das externe Gerät, wie in der folgenden
Abbildung gezeigt, mithilfe des HDMI-Kabels mit
dem TV-Gerät.
Wählen Sie zum Anschließen einen beliebigen
HDMI-Eingang. Es ist egal, welchen Port Sie
wählen.
HINWEIS
Für optimale Bildqualität wird empfohlen,
den HDMI-Anschluss des TV-Gerätes zu
verwenden.
Verwenden Sie das neueste
Hochgeschwindigkeits-HDMI™-Kabel mit
CEC-Funktion (Customer Electronics Control).
High-Speed-HDMI™-Kabel sind für die
Übertragung von HD-Signalen bis zu 1080p
und höher getestet.
Unterstütztes HDMI-Audioformat: Dolby
Digital, DTS, PCM (bis zu 192 KHz, 32 KHz
/ 44,1 KHz / 48 KHz / 88 KHz / 96 KHz /
176 KHz / 192 KHz)
Français
Permet de transmettre les signaux vidéo et audio
numériques d’un périphérique externe vers la TV.
Connectez le périphérique externe et la TV avec
le câble HDMI comme indiqué sur l’illustration
suivante.
Choisissez un port d’entrée HDMI pour établir la
connexion. Peu importe le port que vous utilisez.
REMARQUE
Pour obtenir une meilleure qualité d’image,
il est recommandé d’utiliser la TV avec une
connexion HDMI.
Utilisez le tout nouveau câble haut débit
HDMI™ avec la fonction CEC (contrôles
électroniques client).
Les câbles HDMI™ haut débit sont testés
pour transporter un signal HD de 1080p ou
supérieur.
Formats audio HDMI pris en charge : Dolby
Digital, DTS, PCM (jusqu'à 192 KHz, 32 KHz
/ 44,1 KHz / 48 KHz / 88 KHz / 96 KHz /
176 KHz / 192 KHz)

A-11
MAKING CONNECTIONS
Italiano
Il segnale digitale audio e video viene trasmesso
da un dispositivo esterno al televisore. Collegare il
dispositivo esterno e il televisore mediante il cavo
HDMI come mostrato nell’illustrazione di seguito.
Scegliere una porta di ingresso HDMI per il
collegamento. La scelta della porta è libera.
NOTA
Si consiglia di utilizzare il televisore con il
collegamento HDMI per ottenere la migliore
qualità delle immagini.
Utilizzare un cavo HDMI™ ad alta velocità
dotato dei requisiti più recenti con funzione
CEC (Customer Electronics Control).
I cavi HDMI™ ad alta velocità sono testati
per trasmettere un segnale HD fino a 1080p
e superiore.
Formato audio HDMI supportato: Dolby
Digital, DTS, PCM (fino a 192 KHz, 32 KHz
/ 44,1 KHz / 48 KHz / 88 KHz / 96 KHz / 176
KHz / 192 KHz)
Español
Transmite las señales de audio y vídeo digital de
un dispositivo externo a la TV. Use el cable HDMI
para conectar el dispositivo externo a la TV, tal y
como se muestra en la siguiente ilustración.
Seleccione un puerto de entrada HDMI. El puerto
utilizado es irrelevante.
NOTA
Se recomienda usar la conexión HDMI de la
TV para obtener la mejor calidad de imagen.
Utilice el cable HDMI™ de alta velocidad
más reciente con la función CEC (control de
electrónica de consumo).
Los cables HDMI™ de alta velocidad están
preparados para transportar una señal HD
de 1080p o superior.
Formato de audio HDMI admitido: Dolby
Digital, DTS, PCM (hasta 192 KHz, 32 KHz
/ 44,1 KHz / 48 KHz / 88 KHz / 96 KHz / 176
KHz / 192 KHz)
Português
Transmite os sinais digitais de vídeo e áudio
de um dispositivo externo para a TV. Ligue o
dispositivo externo à TV com o cabo HDMI,
conforme demonstrado na ilustração.
Escolha qualquer porta de entrada HDMI para
ligar. Pode utilizar qualquer porta.
NOTA
Recomenda-se a utilização da TV com a
ligação HDMI para uma melhor qualidade
de imagem.
Utilize o mais recente cabo HDMI™ de alta
velocidade com função CEC (Customer
Electronics Control).
Os cabos HDMI™ de alta velocidade foram
testados para executar um sinal HD até
1080p e superior.
Formato áudio HDMI suportado: Dolby Digital,
DTS, PCM (até 192 KHz, 32 KHz / 44,1 KHz
/ 48 KHz / 88 KHz / 96 KHz / 176 KHz / 192
KHz)
Nederlands
U kunt de digitale video- en audiosignalen vanaf
een extern apparaat naar de TV zenden. Sluit
het externe apparaat en de TV op elkaar aan met
behulp van de HDMI-kabel, zoals aangegeven in
de volgende afbeelding.
Kies op welke HDMI-ingangspoort u wilt
aansluiten. Het maakt niet uit welke poort u
gebruikt.
OPMERKING
Wij raden u aan de TV aan te sluiten door
middel van een HDMI-verbinding voor de
hoogste beeldkwaliteit.
Gebruik de nieuwste High Speed HDMI™-
kabel met CEC-functie (Customer
Electronics Control).
HDMI™-kabels van het type High Speed zijn
getest op het verzenden van HD-signalen
tot 1080p en hoger.
Ondersteunde HDMI-audio-indeling: Dolby
Digital, DTS, PCM (maximaal 192 KHz, 32
KHz / 44,1 KHz / 48 KHz / 88 KHz / 96 KHz
/ 176 KHz / 192 KHz)

A-12
MAKING CONNECTIONS
Ελληνικά
Μεταδίδει τα ψηφιακά σήματα εικόνας και ήχου
από μια εξωτερική συσκευή στην τηλεόραση.
Συνδέστε την εξωτερική συσκευή και την
τηλεόραση με το καλώδιο HDMI, όπως φαίνεται
στην παρακάτω εικόνα.
Επιλέξτε οποιαδήποτε θύρα εισόδου HDMI για
τη σύνδεση. Δεν έχει σημασία ποια θύρα θα
χρησιμοποιήσετε.
ΣΗΜΕΙΩΣΗ
Για τη βέλτιστη ποιότητα εικόνας,
χρησιμοποιήστε την τηλεόραση με σύνδεση
HDMI.
Χρησιμοποιήστε το καλώδιο HDMI™ υψηλής
ταχύτητας με λειτουργία CEC (Customer
Electronics Control).
Τα καλώδια HDMI™ υψηλής ταχύτητας
έχουν ελεγχθεί για τη μετάδοση σήματος HD
ανάλυσης έως 1080p ή υψηλότερης.
Υποστηριζόμενες μορφές ήχου HDMI: Dolby
Digital, DTS, PCM (έως 192 KHz, 32 KHz /
44,1 KHz / 48 KHz / 88 KHz / 96 KHz / 176
KHz / 192 KHz)
Slovenščina
Prenaša digitalne video in zvočne signale iz
zunanje naprave na televizor. Povežite zunanjo
napravo in televizor s HDMI-kablom, kot je
prikazano na naslednji sliki.
Izberite vhodna vrata HDMI za povezavo. Ni
pomembno, katera vrata uporabite.
OPOMBA
Za najboljšo kakovost slike priporočamo
uporabo televizorja s HDMI-povezavo.
Uporabite najnovejši kabel HDMI™ za
hitri prenos s funkcijo CEC (Customer
Electronics Control).
Kabli HDMI™ za hitri prenos so preizkušeni,
tako da lahko prenašajo signal visoke
ločljivosti do 1080p in več.
Podprte oblike zvoka HDMI: Dolby Digital,
DTS, PCM (do 192 kHz, 32 kHz / 44,1 kHz
/ 48 kHz / 88 kHz / 96 kHz / 176 kHz / 192
kHz)
ARC (Audio Return Channel)
English
An external audio device that supports
SIMPLINK and ARC must be connected
using HDMI/DVI IN 1 (ARC) port.
When connected with a high-speed HDMI
cable, the external audio device that
supports ARC outputs optical SPDIF without
additional optical audio cable and supports
the SIMPLINK function.
Deutsch
Ein externes Audiogerät, das SIMPLINK und
ARC unterstützt, muss über den HDMI/DVI
IN 1 (ARC) angeschlossen werden.
Wenn der Anschluss mit einem High-Speed-
HDMI-Kabel erfolgt, gibt das externe Audi-
ogerät, das ARC unterstützt, SPDIF ohne
zusätzliches optisches Audiokabel aus und
unterstützt die SIMPLINK-Funktion.
Français
Un périphérique audio externe qui prend en
charge les technologies SIMPLINK et ARC
doit être connecté au port HDMI/DVI IN 1
(ARC).
Si vous reliez un câble HDMI haut débit,
le périphérique audio externe qui prend en
charge les sorties ARC, prend également en
charge la sortie optique SPDIF sans câble
audio optique supplémentaire, ainsi que la
fonction SIMPLINK.
Italiano
Per il collegamento di un dispositivo
audio esterno che supporta le funzionalità
SIMPLINK e ARC, usare la porta HDMI/DVI
IN 1 (ARC).
Se si effettua il collegamento con un cavo
HDMI ad alta velocità, il dispositivo audio
esterno che supporta ARC trasmette
il segnale SPDIF senza il cavo ottico
aggiuntivo e supporta la funzione SIMPLINK.

A-13
MAKING CONNECTIONS
Español
Hay que conectar un dispositivo de audio
externo que admita SIMPLINK y ARC
utilizando el puerto HDMI/DVI IN 1 (ARC).
Cuando esté conectado mediante un cable
HDMI de alta velocidad, el dispositivo de
audio externo que admite ARC emite el SPDIF
óptico sin necesidad de un cable óptico de
audio adicional y admite la función SIMPLINK.
Português
É necessário ligar um dispositivo de áudio
externo que suporte SIMPLINK e ARC
utilizando a porta HDMI/DVI IN 1 (ARC).
Quando ligado a um cabo HDMI de alta
velocidade, o aparelho de áudio externo que
suporta ARC transmite SPDIF óptica sem
um cabo de áudio óptico adicional e suporta
a função SIMPLINK.
Nederlands
Een extern audioapparaat dat ondersteuning
biedt voor SIMPLINK en ARC, moet op de
HDMI/DVI IN 1 (ARC) worden aangesloten.
Bij aansluiting met een High Speed HDMI-
kabel zorgt het externe audioapparaat met
ARC-ondersteuning ervoor dat optische
SPDIF wordt uitgevoerd zonder extra
optische audiokabel, en ondersteunt dit
apparaat de SIMPLINK-functie.
Ελληνικά
Μια εξωτερική συσκευή ήχου η οποία
υποστηρίζει SIMPLINK και ARC πρέπει να
συνδεθεί με τη χρήση της θύρας εισόδου
HDMI/DVI IN 1 (ARC).
Κατά τη σύνδεση με καλώδιο HDMI υψηλής
ταχύτητας, η εξωτερική συσκευή ήχου που
υποστηρίζει το ARC παρέχει οπτικό σήμα
SPDIF χωρίς πρόσθετο οπτικό καλώδιο ήχου
και υποστηρίζει τη λειτουργία SIMPLINK.
Slovenščina
Zunanja zvočna naprava, ki podpira funkciji
SIMPLINK in ARC, mora biti povezana z
vhodnimi vrati HDMI/DVI IN 1 (ARC).
Če jo povežete s kablom HDMI za hitri
prenos, zunanja zvočna naprava, ki podpira
funkcijo ARC, oddaja optični zapis SPDIF
brez dodatnega optičnega zvočnega kabla in
podpira funkcijo SIMPLINK.
DVI to HDMI Connection
IN
AV2
( Audio in)
DVI OUT
AUDIO OUT
DVD / Blu-Ray / HD Cable Box / PC
(*Not Provided)
English
Transmits the digital video signal from an external
device to the TV. Connect the external device and
the TV with the DVI-HDMI cable as shown. To
transmit an audio signal, connect an audio cable.
Choose any HDMI input port to connect. It does
not matter which port you use.
NOTE
Depending on the graphics card, DOS mode
may not work if a HDMI to DVI Cable is in use.
When using the DVI/HDMI cable, single link
is supported.

A-14
MAKING CONNECTIONS
Deutsch
Überträgt digitale Videosignale von einem
externen Gerät an das TV-Gerät. Verbinden Sie
das externe Gerät, wie in der folgenden Abbildung
gezeigt, mithilfe des DVI-HDMI-Kabels mit dem
TV-Gerät. Schließen Sie ein Audiokabel an, um ein
Audiosignal zu übertragen.
Wählen Sie zum Anschließen einen beliebigen HDMI-
Eingang. Es ist egal, welchen Port Sie wählen.
HINWEIS
Abhängig von der Grafikkarte funktioniert
der DOS-Modus bei Einsatz eines HDMI-zu-
DVI-Kabels möglicherweise nicht.
Bei Verwendung des HDMI/DVI-Kabels wird
nur eine einfache Verbindung unterstützt..
Français
Permet de transmettre les signaux vidéo d’un
périphérique externe vers la TV. Connectez le
périphérique externe et la TV avec le câble DVI-
HDMI comme indiqué sur l’illustration suivante. Pour
émettre un signal audio, raccordez un câble audio.
Choisissez un port d’entrée HDMI pour établir la
connexion. Peu importe le port que vous utilisez.
REMARQUE
Selon la carte graphique, le mode DOS peut
ne pas fonctionner si vous utilisez un câble
pour établir la connexion HDMI-DVI.
Lors de l’utilisation du câble HDMI/DVI, seule
une liaison unique peut être prise en charge.
Italiano
Il segnale digitale video viene trasmesso da
un dispositivo esterno al televisore. Collegare
il dispositivo esterno e il televisore mediante il
cavo DVI-HDMI come mostrato nell’illustrazione
di seguito. Per trasmettere un segnale audio,
collegare un cavo audio.
Scegliere una porta di ingresso HDMI per il
collegamento. La scelta della porta è libera.
NOTA
A seconda della scheda grafica in uso, la
modalità DOS potrebbe non funzionare se si
utilizza un cavo da HDMI a DVI.
Quando si utilizza il cavo HDMI/DVI, è
supportata solo l’interfaccia Single link.
Español
Transmite la señal de vídeo digital de un dispositivo
externo a la TV. Use el cable DVI-HDMI para
conectar el dispositivo externo a la TV, tal y como se
muestra en la siguiente ilustración. Para transmitir
una señal de audio, conecte un cable de audio.
Seleccione un puerto de entrada HDMI. El puerto
utilizado es irrelevante.
NOTA
En función de la tarjeta gráfica, puede
que no funcione el modo DOS si se está
utilizando un cable de HDMI a DVI.
Si se utiliza un cable HDMI/DVI, solo se
admite un enlace.
Português
Transmite o sinal digital de vídeo de um dispositivo
externo para a TV. Ligue o dispositivo externo à
TV com o cabo DVI-HDMI, conforme demonstrado
na seguinte ilustração. Para transmitir um sinal de
áudio, ligue um cabo de áudio.
Escolha qualquer porta de entrada HDMI para
ligar. Pode utilizar qualquer porta.
NOTA
Dependendo da placa gráfica, o modo DOS
poderá não funcionar se utilizar um cabo
HDMI para DVI.
Ao utilizar o cabo HDMI/DVI, apenas a
Ligação única é suportada.
Nederlands
U kunt het digitale videosignaal vanaf een extern
apparaat naar de TV zenden. Sluit het externe
apparaat en de TV op elkaar aan met behulp
van de DVI-HDMI-kabel, zoals aangegeven in de
volgende afbeelding. Om het audiosignaal van het
externe apparaat naar de TV te zenden, moet u
een audiokabel aansluiten.
Kies op welke HDMI-ingangspoort u wilt aansluiten.
Het maakt niet uit welke poort u gebruikt.
OPMERKING
Afhankelijk van de grafische kaart werkt de
DOS-modus mogelijk niet bij het gebruik van
een HDMI/DVI-kabel.
Bij gebruik van de HDMI/DVI-kabel wordt
alleen single link ondersteund.

A-15
MAKING CONNECTIONS
Ελληνικά
Μεταδίδει το ψηφιακό σήμα εικόνας από μια
εξωτερική συσκευή στην τηλεόραση. Συνδέστε
την εξωτερική συσκευή και την τηλεόραση με
το καλώδιο DVI-HDMI, όπως φαίνεται στην
παρακάτω εικόνα. Για τη μετάδοση σήματος ήχου,
συνδέστε ένα καλώδιο ήχου.
Επιλέξτε οποιαδήποτε θύρα εισόδου HDMI για
τη σύνδεση. Δεν έχει σημασία ποια θύρα θα
χρησιμοποιήσετε.
ΣΗΜΕΙΩΣΗ
Ανάλογα με την κάρτα γραφικών, η
λειτουργία DOS ενδέχεται να μην λειτουργεί,
εάν χρησιμοποιείται καλώδιο HDMI σε DVI.
Όταν χρησιμοποιείτε το καλώδιο HDMI/
DVI, υποστηρίζεται αποκλειστικά η Μονή
σύνδεση.
Slovenščina
Prenaša digitalni video signal iz zunanje naprave
na televizor. Povežite zunanjo napravo in televizor
s kablom DVI-HDMI, kot je prikazano na naslednji
sliki. Za prenos avdio signala priključite avdio
kabel.
Izberite vhodna vrata HDMI za povezavo. Ni
pomembno, katera vrata uporabite.
OPOMBA
Odvisno od grafične kartice način DOS
morda ne bo deloval, če uporabljate kabel
HDMI-DVI.
Ko uporabljate kabel HDMI/DVI, je podprta
le ena povezava.
MHL Connection
Mobile phone
(*Not Provided)
MHL passive cable
English
Mobile High-denition Link (MHL) is an interface
for transmitting digital audiovisual signals from
mobile phones to television sets.
NOTE
Connect the mobile phone to the HDMI/DVI
IN 4 (MHL) port to view the phone screen on
the TV.
The MHL passive cable is needed to
connect the TV and a mobile phone.
This only works for the MHL-enabled phone.
Some applications can be operated by the
remote control.
For some mobile phones supporting MHL,
you can control with the magic remote control.
Remove the MHL passive cable from the TV
when:
- The MHL function is disabled
- Your mobile device is fully charged in
standby mode

A-16
MAKING CONNECTIONS
Deutsch
Mobile High-Denition Link (MHL) ist eine digitale
Schnittstelle, welche audiovisuelle Signale vom
Mobiltelefon an ein TV-Gerät überträgt.
HINWEIS
Verbinden Sie das Mobiltelefon mit dem
HDMI/DVI IN 4 (MHL)-Anschluss, um
den Bildschirm des Telefons auf dem
Fernsehgerät anzuzeigen.
Das passive MHL-Kabel dient dazu, das TV-
Gerät mit einem Mobiltelefon zu verbinden.
Dies ist nur bei MHL-fähigen Telefonen
möglich.
Einige Anwendungen können über die
Fernbedienung gesteuert werden.
Einige MHL-fähige Mobiltelefone können mit
der Magic-Fernbedienung bedient werden.
Entfernen Sie das passive MHL-Kabel vom
TV-Gerät, wenn:
- die MHL-Funktion deaktiviert ist
- Ihr Mobilfunkgerät im Standby-Modus
vollständig geladen ist
Français
Mobile High-denition Link (MHL) est une
interface qui permet de transmettre des signaux
audiovisuels numériques depuis des téléphones
portables vers des téléviseurs.
REMARQUE
Connectez le téléphone portable au port
d’entrée HDMI/DVI IN 4 (MHL) pour afficher
l’écran du téléphone sur le téléviseur.
Le câble passif MHL sert à connecter la TV
à un téléphone portable.
Cette fonctionnalité est uniquement
disponibles sur les téléphones prenant en
charge la connexion MHL.
Certaines applications peuvent être utilisées
depuis la télécommande.
Vous pouvez utiliser la télécommande Magic
sur certains téléphones portables prenant
en charge la connexion MHL.
Retirez le câble passif MHL du téléviseur
uniquement si :
- la fonction MHL est désactivée
- votre périphérique mobile est
complètement chargé et en mode veille ou
Italiano
Mobile High-denition Link (MHL) è un’interfaccia
per la trasmissione di segnali audiovisivi digitali dai
cellulari ai TV.
NOTA
Collegare il cellulare alla porta HDMI/DVI
IN 4 (MHL) per visualizzare lo schermo del
telefono sul TV.
È necessario un cavo passivo MHL per
collegare il TV a un cellulare.
Questa funzione è disponibile soltanto sui
telefoni che supportano l’interfaccia MHL.
È possibile utilizzare alcune applicazioni
tramite il telecomando.
Per alcuni cellulari che supportano la
tecnologia MHL, è possibile utilizzare il
telecomando magico.
Rimuovere il cavo passivo MHL dal TV
quando:
- The MHL function is disabled
- Il dispositivo mobile è completamente
carico in modalità standby
Español
Mobile High-denition Link (MHL) is an interface
for transmitting digital audiovisual signals from
mobile phones to television sets.
NOTA
Conecte el teléfono móvil al puerto HDMI/
DVI IN 4 (MHL) para ver la pantalla del
teléfono en la TV.
Se necesita un cable pasivo MHL para
conectar el televisor y el teléfono móvil.
Esta función solo está disponible en
teléfonos compatibles con MHL.
Algunas aplicaciones se pueden utilizar a
través del mando a distancia.
Desde algunos teléfonos móviles
compatibles con MHL, se puede controlar el
dispositivo por medio del mando a distancia
Mágico.
Extraiga el cable pasivo MHL de la TV
cuando:
- la función MHL esté deshabilitada
- su dispositivo móvil esté completamente
cargado y en modo de espera

A-17
MAKING CONNECTIONS
Português
A Ligação de Alta Denição Móvel (MHL) é uma
interface para transmissão de sinais audiovisuais
digitais do telemóvel para a televisão.
NOTA
Ligue o telemóvel à porta HDMI/DVI IN 4
(MHL) para visualizar o ecrã do telemóvel
na TV.
O cabo passivo MHL é necessário para ligar
a TV a um telemóvel.
Funciona apenas no telemóvel compatível
com MHL.
É possível utilizar algumas aplicações
através do controlo remoto.
Em alguns telemóveis que suportam MHL, é
possível controlar com o Comando Magic.
Remova o cabo passivo MHL da TV quando:
- a função MHL está desactivada
- o seu dispositivo móvel está totalmente
carregado no modo de espera
Nederlands
MHL (Mobile High-denition Link) is een interface
voor het verzenden van digitale audiovisuele
signalen van mobiele telefoons naar televisies.
OPMERKING
Sluit de mobiele telefoon aan op de HDMI/
DVI IN 4 (MHL)-poort om het scherm van de
telefoon op de TV weer te geven.
De MHL passieve kabel is nodig om de
TV en een mobiele telefoon met elkaar te
verbinden.
Dit kan alleen met een MHL-telefoon.
Sommige toepassingen kunnen met de
afstandsbediening worden bediend.
Bij sommige mobiele telefoons met MHL
kunt u de Magic-afstandsbediening
gebruiken.
Koppel de MHL-passieve kabel los van de
TV wanneer:
- de MHL-functie is uitgeschakeld
- uw mobiele apparaat volledig is opgeladen
in standby-modus
Ελληνικά
Το MHL (Mobile High-denition Link) είναι
μια διασύνδεση για τη μετάδοση ψηφιακών
οπτικοακουστικών σημάτων από κινητά τηλέφωνα
προς τηλεοράσεις.
ΣΗΜΕΙΩΣΗ
Συνδέστε το κινητό τηλέφωνο στη θύρα
HDMI/DVI IN 4 (MHL) για προβολή της
οθόνης του τηλεφώνου στην τηλεόραση.
Το παθητικό καλώδιο MHL είναι απαραίτητο
για τη σύνδεση της τηλεόρασης με κινητό
τηλέφωνο.
Η λειτουργία αυτή υποστηρίζεται μόνο για
τηλέφωνα με δυνατότητα MHL.
Ορισμένες εφαρμογές μπορούν να
χρησιμοποιηθούν μέσω του τηλεχειριστηρίου.
Για ορισμένα κινητά τηλέφωνα που
υποστηρίζουν MHL, ο χειρισμός είναι
δυνατός μέσω του Magic Remote Control
(μαγικού τηλεχειριστηρίου).
Πρέπει να αφαιρείτε το παθητικό καλώδιο
MHL από την τηλεόραση όταν:
- η λειτουργία MHL είναι απενεργοποιημένη
- η κινητή συσκευή είναι πλήρως φορτισμένη
και βρίσκεται σε κατάσταση αναμονής
Slovenščina
Povezava MHL (Mobile High-denition Link)
je vmesnik za oddajanje digitalnih zvočnih
in vizualnih signalov iz mobilnih telefonov v
televizorje.
OPOMBA
Če želite zaslon telefona gledati na
televizorju, priklopite mobilni telefon v vrata
HDMI/DVI IN 4 (MHL).
Pasivni kabel MHL potrebujete za povezavo
televizorja in mobilnega telefona.
To deluje samo pri telefonih s podporo za
MHL.
Nekatere aplikacije lahko upravljate z
daljinskim upravljalnikom.
Pri nekaterih telefonih, ki podpirajo MHL,
lahko predvajanje upravljate z daljinskim
upravljalnikom Magic.
Pasivni kabel MHL odstranite s televizorja, ko:
- je funkcija MHL onemogočena
- je mobilna naprava popolnoma napolnjena
v načinu pripravljenosti
Seite wird geladen ...
Seite wird geladen ...
Seite wird geladen ...
Seite wird geladen ...
Seite wird geladen ...
Seite wird geladen ...
Seite wird geladen ...
Seite wird geladen ...
Seite wird geladen ...
Seite wird geladen ...
Seite wird geladen ...
Seite wird geladen ...
Seite wird geladen ...
Seite wird geladen ...
Seite wird geladen ...
Seite wird geladen ...
Seite wird geladen ...
Seite wird geladen ...
Seite wird geladen ...
Seite wird geladen ...
Seite wird geladen ...
Seite wird geladen ...
Seite wird geladen ...
Seite wird geladen ...
Seite wird geladen ...
Seite wird geladen ...
Seite wird geladen ...
Seite wird geladen ...
Seite wird geladen ...
Seite wird geladen ...
Seite wird geladen ...
Seite wird geladen ...
Seite wird geladen ...
Seite wird geladen ...
Seite wird geladen ...
Seite wird geladen ...
Seite wird geladen ...
Seite wird geladen ...
Seite wird geladen ...
Seite wird geladen ...
Seite wird geladen ...
Seite wird geladen ...
Seite wird geladen ...
Seite wird geladen ...
Seite wird geladen ...
Seite wird geladen ...
Seite wird geladen ...
Seite wird geladen ...
Seite wird geladen ...
Seite wird geladen ...
Seite wird geladen ...
Seite wird geladen ...
Seite wird geladen ...
Seite wird geladen ...
Seite wird geladen ...
Seite wird geladen ...
Seite wird geladen ...
Seite wird geladen ...
Seite wird geladen ...
Seite wird geladen ...
Seite wird geladen ...
Seite wird geladen ...
Seite wird geladen ...
Seite wird geladen ...
Seite wird geladen ...
Seite wird geladen ...
Seite wird geladen ...
Seite wird geladen ...
Seite wird geladen ...
Seite wird geladen ...
Seite wird geladen ...
Seite wird geladen ...
Seite wird geladen ...
Seite wird geladen ...
Seite wird geladen ...
Seite wird geladen ...
Seite wird geladen ...
Seite wird geladen ...
Seite wird geladen ...
Seite wird geladen ...
Seite wird geladen ...
Seite wird geladen ...
Seite wird geladen ...
Seite wird geladen ...
Seite wird geladen ...
Seite wird geladen ...
Seite wird geladen ...
Seite wird geladen ...
Seite wird geladen ...
Seite wird geladen ...
Seite wird geladen ...
Seite wird geladen ...
Seite wird geladen ...
Seite wird geladen ...
Seite wird geladen ...
Seite wird geladen ...
Seite wird geladen ...
Seite wird geladen ...
Seite wird geladen ...
Seite wird geladen ...
Seite wird geladen ...
Seite wird geladen ...
Seite wird geladen ...
Seite wird geladen ...
Seite wird geladen ...
Seite wird geladen ...
Seite wird geladen ...
Seite wird geladen ...
Seite wird geladen ...
Seite wird geladen ...
Seite wird geladen ...
Seite wird geladen ...
Seite wird geladen ...
Seite wird geladen ...
Seite wird geladen ...
Seite wird geladen ...
Seite wird geladen ...
Seite wird geladen ...
Seite wird geladen ...
Seite wird geladen ...
Seite wird geladen ...
Seite wird geladen ...
Seite wird geladen ...
Seite wird geladen ...
Seite wird geladen ...
Seite wird geladen ...
Seite wird geladen ...
Seite wird geladen ...
Seite wird geladen ...
Seite wird geladen ...
Seite wird geladen ...
Seite wird geladen ...
Seite wird geladen ...
Seite wird geladen ...
Seite wird geladen ...
Seite wird geladen ...
Seite wird geladen ...
Seite wird geladen ...
Seite wird geladen ...
Seite wird geladen ...
Seite wird geladen ...
Seite wird geladen ...
Seite wird geladen ...
Seite wird geladen ...
Seite wird geladen ...
Seite wird geladen ...
Seite wird geladen ...
Seite wird geladen ...
Seite wird geladen ...
Seite wird geladen ...
Seite wird geladen ...
Seite wird geladen ...
Seite wird geladen ...
Seite wird geladen ...
Seite wird geladen ...
Seite wird geladen ...
Seite wird geladen ...
Seite wird geladen ...
Seite wird geladen ...
Seite wird geladen ...
Seite wird geladen ...
Seite wird geladen ...
Seite wird geladen ...
Seite wird geladen ...
Seite wird geladen ...
Seite wird geladen ...
Seite wird geladen ...
Seite wird geladen ...
Seite wird geladen ...
Seite wird geladen ...
Seite wird geladen ...
Seite wird geladen ...
Seite wird geladen ...
Seite wird geladen ...
Seite wird geladen ...
Seite wird geladen ...
Seite wird geladen ...
Seite wird geladen ...
Seite wird geladen ...
Seite wird geladen ...
Seite wird geladen ...
Seite wird geladen ...
Seite wird geladen ...
Seite wird geladen ...
Seite wird geladen ...
Seite wird geladen ...
Seite wird geladen ...
Seite wird geladen ...
Seite wird geladen ...
Seite wird geladen ...
Seite wird geladen ...
Seite wird geladen ...
Seite wird geladen ...
Seite wird geladen ...
Seite wird geladen ...
Seite wird geladen ...
Seite wird geladen ...
Seite wird geladen ...
Seite wird geladen ...
Seite wird geladen ...
Seite wird geladen ...
Seite wird geladen ...
Seite wird geladen ...
Seite wird geladen ...
Seite wird geladen ...
Seite wird geladen ...
Seite wird geladen ...
Seite wird geladen ...
Seite wird geladen ...
Seite wird geladen ...
Seite wird geladen ...
Seite wird geladen ...
Seite wird geladen ...
Seite wird geladen ...
Seite wird geladen ...
Seite wird geladen ...
Seite wird geladen ...
Seite wird geladen ...
Seite wird geladen ...
Seite wird geladen ...
Seite wird geladen ...
Seite wird geladen ...
Seite wird geladen ...
Seite wird geladen ...
Seite wird geladen ...
Seite wird geladen ...
Seite wird geladen ...
Seite wird geladen ...
Seite wird geladen ...
Seite wird geladen ...
Seite wird geladen ...
Seite wird geladen ...
Seite wird geladen ...
Seite wird geladen ...
Seite wird geladen ...
Seite wird geladen ...
Seite wird geladen ...
Seite wird geladen ...
Seite wird geladen ...
Seite wird geladen ...
Seite wird geladen ...
Seite wird geladen ...
Seite wird geladen ...
Seite wird geladen ...
Seite wird geladen ...
Seite wird geladen ...
Seite wird geladen ...
Seite wird geladen ...
Seite wird geladen ...
Seite wird geladen ...
Seite wird geladen ...
Seite wird geladen ...
Seite wird geladen ...
Seite wird geladen ...
Seite wird geladen ...
Seite wird geladen ...
Seite wird geladen ...
Seite wird geladen ...
Seite wird geladen ...
Seite wird geladen ...
Seite wird geladen ...
Seite wird geladen ...
Seite wird geladen ...
Seite wird geladen ...
Seite wird geladen ...
Seite wird geladen ...
Seite wird geladen ...
Seite wird geladen ...
Seite wird geladen ...
Seite wird geladen ...
Seite wird geladen ...
Seite wird geladen ...
Seite wird geladen ...
Seite wird geladen ...
Seite wird geladen ...
Seite wird geladen ...
Seite wird geladen ...
Seite wird geladen ...
Seite wird geladen ...
Seite wird geladen ...
Seite wird geladen ...
Seite wird geladen ...
Seite wird geladen ...
Seite wird geladen ...
Seite wird geladen ...
Seite wird geladen ...
Seite wird geladen ...
Seite wird geladen ...
Seite wird geladen ...
Seite wird geladen ...
Seite wird geladen ...
Seite wird geladen ...
Seite wird geladen ...
Seite wird geladen ...
Seite wird geladen ...
Seite wird geladen ...
Seite wird geladen ...
Seite wird geladen ...
Seite wird geladen ...
-
 1
1
-
 2
2
-
 3
3
-
 4
4
-
 5
5
-
 6
6
-
 7
7
-
 8
8
-
 9
9
-
 10
10
-
 11
11
-
 12
12
-
 13
13
-
 14
14
-
 15
15
-
 16
16
-
 17
17
-
 18
18
-
 19
19
-
 20
20
-
 21
21
-
 22
22
-
 23
23
-
 24
24
-
 25
25
-
 26
26
-
 27
27
-
 28
28
-
 29
29
-
 30
30
-
 31
31
-
 32
32
-
 33
33
-
 34
34
-
 35
35
-
 36
36
-
 37
37
-
 38
38
-
 39
39
-
 40
40
-
 41
41
-
 42
42
-
 43
43
-
 44
44
-
 45
45
-
 46
46
-
 47
47
-
 48
48
-
 49
49
-
 50
50
-
 51
51
-
 52
52
-
 53
53
-
 54
54
-
 55
55
-
 56
56
-
 57
57
-
 58
58
-
 59
59
-
 60
60
-
 61
61
-
 62
62
-
 63
63
-
 64
64
-
 65
65
-
 66
66
-
 67
67
-
 68
68
-
 69
69
-
 70
70
-
 71
71
-
 72
72
-
 73
73
-
 74
74
-
 75
75
-
 76
76
-
 77
77
-
 78
78
-
 79
79
-
 80
80
-
 81
81
-
 82
82
-
 83
83
-
 84
84
-
 85
85
-
 86
86
-
 87
87
-
 88
88
-
 89
89
-
 90
90
-
 91
91
-
 92
92
-
 93
93
-
 94
94
-
 95
95
-
 96
96
-
 97
97
-
 98
98
-
 99
99
-
 100
100
-
 101
101
-
 102
102
-
 103
103
-
 104
104
-
 105
105
-
 106
106
-
 107
107
-
 108
108
-
 109
109
-
 110
110
-
 111
111
-
 112
112
-
 113
113
-
 114
114
-
 115
115
-
 116
116
-
 117
117
-
 118
118
-
 119
119
-
 120
120
-
 121
121
-
 122
122
-
 123
123
-
 124
124
-
 125
125
-
 126
126
-
 127
127
-
 128
128
-
 129
129
-
 130
130
-
 131
131
-
 132
132
-
 133
133
-
 134
134
-
 135
135
-
 136
136
-
 137
137
-
 138
138
-
 139
139
-
 140
140
-
 141
141
-
 142
142
-
 143
143
-
 144
144
-
 145
145
-
 146
146
-
 147
147
-
 148
148
-
 149
149
-
 150
150
-
 151
151
-
 152
152
-
 153
153
-
 154
154
-
 155
155
-
 156
156
-
 157
157
-
 158
158
-
 159
159
-
 160
160
-
 161
161
-
 162
162
-
 163
163
-
 164
164
-
 165
165
-
 166
166
-
 167
167
-
 168
168
-
 169
169
-
 170
170
-
 171
171
-
 172
172
-
 173
173
-
 174
174
-
 175
175
-
 176
176
-
 177
177
-
 178
178
-
 179
179
-
 180
180
-
 181
181
-
 182
182
-
 183
183
-
 184
184
-
 185
185
-
 186
186
-
 187
187
-
 188
188
-
 189
189
-
 190
190
-
 191
191
-
 192
192
-
 193
193
-
 194
194
-
 195
195
-
 196
196
-
 197
197
-
 198
198
-
 199
199
-
 200
200
-
 201
201
-
 202
202
-
 203
203
-
 204
204
-
 205
205
-
 206
206
-
 207
207
-
 208
208
-
 209
209
-
 210
210
-
 211
211
-
 212
212
-
 213
213
-
 214
214
-
 215
215
-
 216
216
-
 217
217
-
 218
218
-
 219
219
-
 220
220
-
 221
221
-
 222
222
-
 223
223
-
 224
224
-
 225
225
-
 226
226
-
 227
227
-
 228
228
-
 229
229
-
 230
230
-
 231
231
-
 232
232
-
 233
233
-
 234
234
-
 235
235
-
 236
236
-
 237
237
-
 238
238
-
 239
239
-
 240
240
-
 241
241
-
 242
242
-
 243
243
-
 244
244
-
 245
245
-
 246
246
-
 247
247
-
 248
248
-
 249
249
-
 250
250
-
 251
251
-
 252
252
-
 253
253
-
 254
254
-
 255
255
-
 256
256
-
 257
257
-
 258
258
-
 259
259
-
 260
260
-
 261
261
-
 262
262
-
 263
263
-
 264
264
-
 265
265
-
 266
266
-
 267
267
-
 268
268
-
 269
269
-
 270
270
-
 271
271
-
 272
272
-
 273
273
-
 274
274
-
 275
275
-
 276
276
-
 277
277
-
 278
278
-
 279
279
-
 280
280
-
 281
281
-
 282
282
-
 283
283
-
 284
284
-
 285
285
-
 286
286
-
 287
287
-
 288
288
-
 289
289
-
 290
290
-
 291
291
-
 292
292
-
 293
293
-
 294
294
-
 295
295
-
 296
296
-
 297
297
-
 298
298
-
 299
299
-
 300
300
-
 301
301
-
 302
302
-
 303
303
-
 304
304
-
 305
305
-
 306
306
-
 307
307
-
 308
308
-
 309
309
-
 310
310
-
 311
311
-
 312
312
-
 313
313
-
 314
314
-
 315
315
-
 316
316
-
 317
317
-
 318
318
-
 319
319


LG 55EA9809 OLED Bedienungsanleitung
- Kategorie
- Fernseher
- Typ
- Bedienungsanleitung
- Dieses Handbuch eignet sich auch für
in anderen Sprachen
- English: LG 55EA9809 OLED Owner's manual
- français: LG 55EA9809 OLED Le manuel du propriétaire
- español: LG 55EA9809 OLED El manual del propietario
- italiano: LG 55EA9809 OLED Manuale del proprietario
- Nederlands: LG 55EA9809 OLED de handleiding
- português: LG 55EA9809 OLED Manual do proprietário