
1
User Manual
Bedienungsanleitung
Manuel de l’utilisateur
Manual del Usuario
Manuale d’istruzione
Brugerhåndbog
用户手册
CD34
Capacitive sensor
Kapazitiver Sensor / Détecteur capacitif / Sensor capacitivo / Sensore capacitivo /
Kapasitiv sensor / 电容式传感器
ENGLISH page ........................ 2
DEUTCH seite ......................... 4
FRANÇAIS page ..................... 6
ESPAÑOL pagina .................... 8
ITALIANO pagina .................. 10
DANSK side ......................... 12
中文 第页 ............................ 14

2
Warnings
This manual contains important information regarding installation. We
highly recommend that you read the manual carefully before installing the
sensor. Save the manual for future use. The Installation manual is intended
for qualified technical personnel.
This Manual applies to the CD34… capacitive sensor family
Settings and connections
The CD34… sensor is designed to be used for water-based liquid (con-
ductive) level detection. The sensor functions are guaranteed only when
the sensor is installed according to the guidelines in this manual and by
means of the installation accessories specified for the CD34… sensor
family. Carlo Gavazzi disclaims any liability for damages due to modifica-
tion or non-approved use of the sensors.
The applied mounting bracket can be used for tube and container mount-
ing, and the sensor lock ensures a firm position of the sensor thus allow-
ing the sensor to be replaced without moving the bracket.
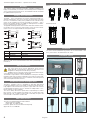
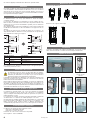
When not used, we recommend that the teach wire is permanently con-
nected to V-
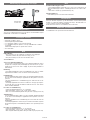
Pin Colour Description
1 BN (Brown) Supply (V+)
2 WH (White) Teach input
3 BU (Blue) Supply (V-)
4 BK (Black) Output
Teach-in
I <100mA
LOAD
-
+
1BN
3BU
2WH
4BK
1
2
3
4
T
each-in
I <100mA
LOAD
-
+
1BN
3BU
4BK
2WH
Teach-in
I <100mA
LOAD
-
+
1BN
3BU
2WH
4BK
T
each-in
I <100mA
LOAD
-
+
1BN
3BU
4BK
2WH
PNP NO NPN NO
PNP NC NPN NC
Safety precautions
This sensor must not be used in applications where personal
safety depends on proper function of the sensor (The sensor is not
designed according to the EU Machinery Directive)
Installation and use must be carried out by trained technical per-
sonnel with basic electrical installation knowledge.
The installer is responsible for correct installation according to local safety
regulations and must ensure that a defective sensor will not result in haz-
ards to people or equipment. If the sensor is defective, it must be replaced
and secured against unauthorised use.
Product description and applications
The CD34.. capacitive sensor is designed for detecting water-based
(conductive) liquids through a non-metallic container wall, and it automat-
ically adapts to various thicknesses of plastic or glass walls. The universal
mounting brackets allow the sensor to be fixed on multiple tubes or con-
tainers of plastic or glass materials.
The sensor reliably detects the liquids while compensating for residue
film, moisture or foam build-up from liquids such as water, milk, body
fluids (blood), acid- or alkaline solutions with conductivity as high as 50
ms/cm inside or outside the container wall.
Main characteristics
The sensor is equipped with two LED indicators:
• Green LED: for power ON
• Yellow LED: for output function
Protection against short circuit and reversed polarity
Approvals: CE, UL, ECOLAB
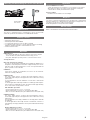
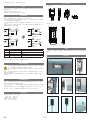
Dimensions (mm)
Sensor
Mounting bracket
16 8
34
1.1
16. 3
3
10
3
3.6
6.6
3.2
16 8
34
1.1
16. 3
3
10
3
3.6
6.6
3.2
10 . 5
1
0. 5
52 . 8 5
73 . 8 5
7. 626
Installation
The sensor can be installed in any position. As for environmental condi-
tions, please refer to the datasheet for the sensor.
Installation options
Embedded flush mounted
Adhesive mounted
Mounting bracket on
small pipe
Mounting with cable
ties on tube
Mounting with velcro on tank
English

3
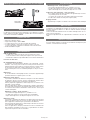
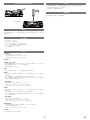
Mounting and dismounting the sensor in the bracket
Mounting the sensor
Dismounting
the sensor
Maintenance
The sensor is maintenance-free; contaminations can be removed with
chemicals specified in the datasheet. See ECOLAB information.
Delivery contents
• Capacitive switch: CD34 …
• Mounting bracket: ACD34-MB01
• 2 x foam pads, thickness 3 mm (for pipe mounting)
• 2 x adhesive pads, thickness 1 mm (for adhesive surface mounting)
Maximum bonding strength is achieved after 24 hours.
• Short Instruction sheet
Operation
LED Indicators:
• The yellow LED lights up when the output is active. If the output is
short-circuited, the yellow LED flashes with 4 imp. per sec.
• The green LED lights up when power is connected to the sensor
Sensing functions:
Out of the box (Factory settings):
The sensor can typically be used without any additional calibration; it is
designed to work with plastic tank walls of approximately 0,5 to 6 mm
and glass walls of approximately 0,5 to 4 mm. It is important that the
glass or plastic is nonconductive.
Calibration:
If the factory settings are insufficient, the sensor can be “teached”
either Full or Empty calibration.
Calibration Full:
The sensor switch point is set below the actual detection value to
ensure that slight changes in the application will not affect the sensing
performance.
In most applications, the full calibration on a full tank or tube will be
sufficient.
In critical applications with large variations in media type and tempera-
ture, it may be an advantage to teach the Full level with approximately
50 % of the active sensing surface covered.
Full calibration procedure:
• Connect teach wire to V+ for 2 – 7 seconds
• Green LED flashes 1 imp. per sec. and yellow LED is OFF
• After successful calibration, the yellow LED flashes 3 times (with 1 Hz)
Calibration Empty:
The sensor switch point is set above the actual detection value to
ensure that slight changes in the application will not affect the sensing
performance.
In most applications, the empty calibration on an empty tank or tube will
be sufficient.
In critical applications with a high amount of residue film, moisture or
foam build-up, an Empty calibration can be performed with the build-up
present.
Empty calibration procedure:
• Connect teach wire to V+ for 7 – 12 seconds
• Green LED flashes 1 imp. per sec. and yellow LED is ON
• After successful calibration, the yellow LED flashes 3 times (with 1 Hz)
Disposal
The sensor cannot be repaired and must be disposed of following the
European Directive for “Waste Electrical and Electronic Equipment”. Do
not dispose of the sensors with household waste!
National regulations for disposal must be fulfilled.
Electrical data
Refer to the datasheet for the latest technical information.
Operation
Cancel Calibration Procedure:
• Keep the teach wire connected to V+ for more than 14 seconds to
abort teach procedure. The switch points will remain unchanged.
• Green LED is off and yellow LED flashes (4 Hz)
Factory settings:
Full teach at 2 mm distance to metal target
English

4
Warnungen
Dieses Handbuch enthält wichtige Informationen zur Installation. Es wird
dringend empfohlen, das Handbuch vor der Installation des Sensors
aufmerksam zu lesen. Bewahren Sie das Handbuch für zukünftiges
Nachschlagen auf. Das Installationshandbuch richtet sich an technisches
Fachpersonal.
Dieses Handbuch beschreibt die CD34...-Produktreihe kapazitiver
Sensoren.
Einstellungen und Anschlüsse
Der CD34…-Sensor ist für den Einsatz zur Pegelerkennung wasserba-
sierter (leitfähiger) Flüssigkeiten konzipiert. Die ordnungsgemäße Funktion
des Sensors ist nur dann gewährleistet, wenn die Installation gemäß
den Anweisungen in diesem Handbuch und mithilfe des für die CD34...-
Sensorproduktreihe geeigneten Installationszubehörs erfolgt.
Carlo Gavazzi lehnt jegliche Haftung für Schäden ab, die aus Veränderungen
oder unsachgemäßem Gebrauch des Sensors resultieren.
Die im Lieferumfang enthaltene Halterung ist zur Montage an Rohren
und Behältern geeignet. Die Sensorverriegelung gewährleistet festen Sitz
des Sensors, sodass der Sensor ausgetauscht werden kann, ohne die
Halterung von ihrer Montageposition zu entfernen.
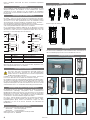
Wenn die Leitung zum Anlernen nicht verwendet wird, empfiehlt es sich,
diese Leitung dauerhaft mit V– zu verbinden.
Anschluss Farbe Beschreibung
1 BN (Braun) Stromversorgung (V+)
2 WH (Weiß) Anlerneingang
3 BU (Blau) Stromversorgung (V-)
4 BK (Schwarz) Ausgang
Teach-in
I <100mA
LOAD
-
+
1BN
3BU
2WH
4BK
1
2
3
4
T
each-in
I <100mA
LOAD
-
+
1BN
3BU
4BK
2WH
Teach-in
I <100mA
LOAD
-
+
1BN
3BU
2WH
4BK
T
each-in
I <100mA
LOAD
-
+
1BN
3BU
4BK
2WH
PNP NO (Schließer) NPN NO (Schließer)
PNP NC (Öffner) NPN NC (Öffner)
Sicherheitsvorkehrungen
Der Sensor darf nicht in Anwendungen eingesetzt werden, bei
denen die persönliche Sicherheit von der ordnungsgemäßen
Funktion des Sensors abhängt (der Sensor wurde nicht gemäß der
EU-Maschinenrichtlinie entworfen).
Installation sowie Verwendung müssen durch geschultes technisches
Personal mit Grundwissen zur elektrischen Installation erfolgen.
Der Installateur ist für die ordnungsgemäße Installation gemäß den gelten-
den örtlichen Sicherheitsvorschriften verantwortlich und muss sicherstel-
len, dass ein beschädigter Sensor nicht zu Gefahren für Personen oder
Anlagenausstattung führt. Im Falle eines Defekts muss der Sensor ersetzt
und der defekte Sensor vor unerlaubter Verwendung geschützt werden.
Produktbeschreibung und Anwendungen
Die kapazitiven Sensoren der CD34..-Produktreihe wurden zur Detektion
wasserbasierter (leitfähiger) Flüssigkeiten durch nichtmetallische
Behälterwände entwickelt und passen sich automatisch an verschiedene
Wandstärken von Kunststoff- und Glaswänden an. Dank der universellen
Halterung kann der Sensor an einer Vielzahl von Rohren und Behältern
aus Kunststoff- oder Glasmaterialien angebracht werden.
Der Sensor erkennt Medien zuverlässig und kompensiert Kahmhaut,
Feuchtigkeit und Schaumrückstände auf Medien wie Wasser, Milch,
Körperflüssigkeiten (Blut), Säuren und alkalischen Laugen mit einer
Leitfähigkeit von bis zu 50 mS/cm innerhalb oder außerhalb der
Behälterwand.
Haupteigenschaften
Der Sensor ist mit zwei LED-Anzeigen ausgestattet:
• Grüne LED: Stromversorgung EIN
• Gelbe LED: Ausgangsfunktion
Gegen Kurzschluss und umgekehrte Polarität geschützt
Zulassungen: CE, UL, ECOLAB
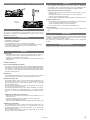
Abmessungen (mm)
Abmessungen des Sensors
Abmessungen der Halterung
16 8
34
1.1
16. 3
3
10
3
3.6
6.6
3.2
16 8
34
1.1
16. 3
3
10
3
3.6
6.6
3.2
10 . 5
1
0. 5
52 . 8 5
73 . 8 5
7. 626
Installation
Der Sensor kann in beliebiger Position installiert werden. Informationen zu
den Umweltbedingungen finden Sie im Datenblatt des Sensors.
Installationsoptionen
Eingebettet unterputzmontage
Klebmontage
Halterung an
schmalem Rohr
Montage mittels
Kabelhaltern an einem
Rohr
Klettbandmontage an einem Tank
Deutch
Anlernen Anlernen
Anlernen Anlernen

5
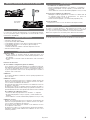
Montage und Demontage des Sensors in der Halterung
Sensor einbauen
Sensor
ausbauen
Wartung
Der Sensor ist wartungsfrei. Verschmutzungen können mit den im
Datenblatt angegebenen Reinigungsmitteln entfernt werden (siehe
ECOLAB-Informationen).
Lieferumfang
• Kapazitiver Schalter: CD34…
• Halterung: ACD34-MB01
• 2 Schaumstoffpolster, Dicke 3 mm (für Rohrmontage)
• 2 Klebepads, Dicke 1 mm (für schraubenlose Oberflächenmontage)
Die maximale Haftfestigkeit wird nach 24 Stunden erreicht.
• Installationskurzanleitung
Betrieb
LED-Anzeigen:
• Die gelbe LED leuchtet, wenn der Ausgang aktiv ist. Wenn am
Ausgang ein Kurzschluss vorliegt, blinkt die gelbe LED mit einer
Frequenz von vier Impulsen pro Sekunde.
• Die grüne LED leuchtet auf, wenn der Sensor mit der Stromversorgung
verbunden ist.
Detektionsfunktionen:
Im Lieferzustand (Werkseinstellung):
Der Sensor kann typischerweise ohne zusätzliche Kalibrierung einge-
setzt werden. Er wurde für den Einsatz an Kunststofftank-Wänden mit
einer Stärke von circa 0,5 bis 6 mm und an Glaswänden mit einer Stärke
von circa 0,5 bis 4 mm entwickelt. Das Glas bzw. der Kunststoff müssen
zwingend nichtleitend sein.
Kalibrierung:
Falls die Werkseinstellung nicht ausreicht, kann der Sensor entweder
für den Vollzustand oder für den Leerzustand angelernt werden.
Kalibrierung Vollzustand:
Der Schaltpunkt des Sensors wird auf einen Wert unterhalb des tat-
sächlichen Detektionswerts gesetzt, um sicherzustellen, dass die
Erkennungsleistung durch leichte Abweichungen in der Anwendung
nicht beeinträchtigt wird.
Bei den meisten Anwendungen reicht die Kalibrierung des Zustands
„voll“ bei vollem Tank oder Rohr aus.
Bei wichtigen Anwendungen mit einer großen Bandbreite verschiede-
ner Arten von Medien und Temperaturen kann es von Vorteil sein, den
Zustand „voll“ mit einer zur Hälfte abgedeckten Sensorfläche anzuler-
nen.
Kalibrierungsverfahren für Vollzustand:
• Verbinden Sie die Leitung zum Anlernen für einen Zeitraum von 2–7
Sekunden mit V+.
• Die grüne LED blinkt mit einer Frequenz von einem Impuls pro
Sekunde, und die gelbe LED ist AUS.
• Nach erfolgreicher Kalibrierung blinkt die gelbe LED dreimal (mit 1 Hz).
Kalibrierung Leerzustand:
Der Schaltpunkt des Sensors wird auf einen Wert oberhalb des tat-
sächlichen Detektionswerts gesetzt, um sicherzustellen, dass die
Erkennungsleistung durch leichte Abweichungen in der Anwendung
nicht beeinträchtigt wird.
Bei den meisten Anwendungen reicht die Kalibrierung des Zustands
„leer“ bei leerem Tank oder Rohr aus.
Entsorgung
Der Sensor kann nicht repariert werden und muss gemäß der EU-Richtlinie
für Elektro- und Elektronikaltgeräte entsorgt werden. Die Sensoren dürfen
nicht mit dem Hausmüll entsorgt werden!
Die nationalen Vorschriften zur Abfallentsorgung müssen eingehalten
werden.
Elektrische Daten
Angaben zu den neuesten technischen Daten finden Sie im Datenblatt.
Betrieb
Bei wichtigen Anwendungen mit hohem Anteil an Kahmhaut,
Feuchtigkeit oder Schaumrückständen kann die Kalibrierung des
Leerzustands mit vorhandenen Rückständen ausgeführt werden.
Kalibrierungsverfahren für Leerzustand:
• Verbinden Sie die Leitung zum Anlernen für einen Zeitraum von 7–12
Sekunden mit V+.
• Die grüne LED blinkt mit einer Frequenz von einem Impuls pro
Sekunde, und die gelbe LED ist AN.
• Nach erfolgreicher Kalibrierung blinkt die gelbe LED dreimal (mit 1 Hz).
Kalibrierung abbrechen:
• Verbinden Sie die Leitung zum Anlernen für mehr als 14 Sekunden mit
V+, um das Anlernen abzubrechen. Die eingestellten.
Schaltschwellwerte bleiben unverändert erhalten.
• Die grüne LED ist AUS, und die gelbe LED blinkt (4 Hz).
Werkseinstellung:
Vollzustand angelernt in einer Entfernung von 2 mm zu metallischem
Ziel.
Deutch

6
Attention
Ce manuel contient des instructions importantes relatives à la sécurité en
cours d’installation. Avant d’installer un détecteur, nous vous conseillons
vivement de lire le manuel avec la plus grande attention. Conserver le
manuel à portée pour utilisation future. Le manuel d’installation est desti-
né au personnel technique qualifié.
Ce manuel s’applique à la famille des détecteurs capacitifs CD34
Paramètres et connexions
Le détecteur CD34… est conçu pour détecter le niveau de liquides
conductifs aqueux.
Les fonctions du détecteur sont garanties à la seule condition de l’ins-
taller en stricte conformité avec les instructions du présent manuel et de
l’utiliser avec les accessoires d’installation spécifiés pour les détecteurs
de la famille CD34.
Carlo Gavazzi décline toute responsabilité pour toute avarie résultant de
modifications de détecteurs ou de toute utilisation non approuvée de ces
derniers.
Un support est prévu pour le montage de tubes sur le conteneur ; un
dispositif immobilise le détecteur tout en permettant de le repositionner
sans obligation d’en déposer le support.
Hors utilisation, Carlo Gavazzi recommande que le fil apprentissage soit
connecté en permanence en V-
Broche Couleur Description
1 BN (Marron) Alimentation (V+)
2 WH (Blanc) Entrée apprentissage
3 BU (Bleu) Alimentation (V-)
4 BK (Noir) Sortie
Teach-in
I <100mA
LOAD
-
+
1BN
3BU
2WH
4BK
1
2
3
4
T
each-in
I <100mA
LOAD
-
+
1BN
3BU
4BK
2WH
Teach-in
I <100mA
LOAD
-
+
1BN
3BU
2WH
4BK
T
each-in
I <100mA
LOAD
-
+
1BN
3BU
4BK
2WH
PNP NO NPN NO
PNP NF NPN NF
Instructions de sécurité
Ce détecteur ne doit en aucun cas être utilisé dans les applica-
tions où la sécurité du personnel dépend du fonctionnement d’un
détecteur (les détecteurs ne sont pas conçus selon la Directive
Européenne relative aux équipements mécaniques)
L’installation et l’utilisation des détecteurs sont réservées seulement à un
personnel technique formé et possédant les connaissances de base en
matière d’électricité et d’installation.
Responsable du bien-fondé d’une installation conforme aux réglementa-
tions locales en matière de sécurité, l’installateur doit s’assurer qu’en cas
de défaut, un détecteur ne peut en aucun cas générer un préjudice cor-
porel ou matériel. Remplacer impérativement tout détecteur défectueux et
en interdire formellement l’accès pour utilisation.
Description du produit et applications
Les détecteurs capacitifs CD34 sont conçus pour détecter les liquides
aqueux (conductifs) à travers la paroi de conteneurs non métalliques
et pour s’adapter automatiquement à diverses épaisseurs de parois en
matière plastique ou verre.
Les supports de montage universels permettent d’installer le détecteur
sur divers tubes ou conteneurs en matière plastique ou en verre.
Cet instrument est capable de détecter des milieux fiables en compensant
les résidus de films, l’humidité ou la mousse qui s’y accumulent : eau,
fluides corporels (sang), solutions acides ou alkalines présentant une
conductivité de jusqu’à 50 ms/cm sur ou hors de la paroi du conteneur.
Caractéristiques principales
Le détecteur est équipé de deux indicateurs à LED
• LED verte : Alimentation ACTIVE
• LED jaune : Fonction de sortie
Protection au court-circuit et à l’inversion de polarité
Homologations : CE, UL, ECOLAB
Dimensions (mm)
Dimensions du détecteur
Dimensions du support de montage
16 8
34
1.1
16. 3
3
10
3
3.6
6.6
3.2
16 8
34
1.1
16. 3
3
10
3
3.6
6.6
3.2
10 . 5
1
0. 5
52 . 8 5
73 . 8 5
7. 626
Installation
La position d’installation du capteur est indifférente ; pour toute considé-
ration environnementale, consulter la fiche technique du détecteur.
Option de montage
Montage noyable intégré
Montage à la colle
Support de montage
sur tube de petit
diamètre
Montage avec collier
sur le tube
Montage Velcros sur réservoir
Français
Apprentissage Apprentissage
Apprentissage Apprentissage

7
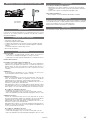
Montage et démontage du détecteur sur son support
Montage du détecteur
Démontage
du détecteur
Maintenance
Le détecteur ne nécessite aucune maintenance. Pour éliminer la contami-
nation, utiliser les produits chimiques spécifiés dans la fiche technique et
consulter les informations ECOLAB.
Contenu du colis
• Détecteur capacitif : CD34 …
• Support de montage : ACD34-MB01
• 2 x patins de mousse 3 mm pour montage de tuyauterie
• 2 x patins adhésifs 1 mm (pour montage en surface, sans vis)
Le joint collé atteint sa résistance maximale au bout de 24 heures.
• Guide d’installation rapide
Fonctionnement
LED de signalisation :
• La LED jaune s’allume lorsque la sortie est activée. En cas de
court-circuit de la sortie, la LED jaune clignote 4 fois par seconde.
• La LED verte s’allume lorsque l’alimentation est connectée au détecteur.
Fonctions de détection :
En standard (Réglages d’usine) :
Le détecteur est généralement utilisable sans étalonnage complé-
mentaire ; il est conçu pour fonctionner sur des parois de réservoir en
matière plastique d’une épaisseur comprise entre 0,5 et 6 mm environ
et de verre d’une épaisseur comprise entre 0,5 et 4 mm environ.
Il est essentiel que le verre ou la matière plastique ne soit pas conduc-
teurs.
Étalonnage :
En cas d’insuffisance des réglages d’usine, une fonction apprentissage
permet d’étalonner le capteur à plein ou à vide.
Étalonnage à plein niveau :
Le point de commutation du détecteur est réglé sous la valeur effective
de détection afin de s’assurer que des changements minimes dans
l’application n’affectent pas la performance de détection.
Dans la plupart des applications, l’étalonnage avec un réservoir ou un
tube plein, s’avère suffisant.
Dans les applications critiques présentant des variations importantes
du média et de la température, un apprentissage à plein niveau avec un
recouvrement de la surface de détection active de 50 % environ peut
s’avérer avantageux.
Étalonnage complet - mode opératoire :
• Connecter le fil apprentissage en V+ pendant 2 à 7 sec
• La LED verte clignote à 1 Hz et la LED jaune est ÉTEINTE
• Après étalonnage réussi, la LED jaune clignote 3 fois à 1 Hz
Étalonnage à vide :
Le point de commutation du détecteur est réglé au-dessus de la valeur
effective de détection afin de s’assurer que des changements minimes
dans l’application n’affectent pas la performance de détection.
Dans la plupart des applications, l’étalonnage à vide dans un réservoir
ou un tube vide s’avère suffisant.
Dans les applications critiques présentant une forte accumulation de
films résiduels, d’humidité ou de mousse, on peut effectuer un étalon-
nage à vide en présence de l’accumulation.
Mise au rebut
Le détecteur est irréparable et doit être mis au rebut en accord avec la
directive européenne relative à la « Mise au rebut de matériel électrique
et électronique »
La mise au rebut des détecteurs avec les rebuts ménagers de la vie cou-
rante n’est pas autorisée !
Respecter impérativement les réglementations nationales de mise au
rebut.
Données électriques
Pour plus amples détails concernant les informations techniques les plus
récentes, consulter la fiche technique.
Fonctionnement
Étalonnage à vide - mode opératoire :
• Connecter le fil apprentissage en V+ pendant 7 à 12 sec
• La LED verte clignote à 1 Hz et la LED jaune est ALLUMÉE
• Après étalonnage réussi, la LED jaune clignote 3 fois à 1 Hz
Suppression d’un étalonnage - mode opératoire :
• Pour arrêter l’apprentissage, maintenir le fil apprentissage connecté
V+ pendant plus de 14 secondes.
Les points de consigne de commutation demeurent inchangés.
• La LED verte s’éteint et la LED jaune clignote (4Hz)
Réglages d’usine :
Apprentissage complet à une distance de 2 mm d’une cible métallique
Français

8
Advertencias
Este manual contiene información importante relativa a la instalación.
Recomendamos encarecidamente que lea el manual con atención antes
de instalar el sensor. Guarde el manual para consultarlo más adelante. El
manual de instalación está dirigido al personal técnico cualificado.
Este manual es válido para la familia de sensores capacitivos CD34...
Ajustes y conexiones
El sensor CD34… está diseñado para utilizarse en la detección del nivel
de líquidos con base acuosa (conductores). Únicamente puede garanti-
zarse el funcionamiento del sensor si está instalado conforme a la guía
del presente manual y si se utilizan los accesorios de instalación especi-
ficados para la familia de sensores CD34…
Carlo Gavazzi declina cualquier responsabilidad por daños debidos a la
modificación o al uso no homologado de los sensores.
El soporte de montaje empleado puede utilizarse para el montaje en
tubos y contenedores, y el bloqueo del sensor garantiza una posición
firme del sensor a la vez que permite reposicionar el sensor sin necesidad
de mover el soporte.
Cuando no se esté utilizando, se recomienda que el cable de programa-
ción se mantenga conectado a V-
Conector Color Descripción
1 BN (marrón) Alimentación (V+)
2 WH (blanco) Entrada de programación
3 BU (azul) Alimentación (V-)
4 BK (negro) Salida
Teach-in
I <100mA
LOAD
-
+
1BN
3BU
2WH
4BK
1
2
3
4
T
each-in
I <100mA
LOAD
-
+
1BN
3BU
4BK
2WH
Teach-in
I <100mA
LOAD
-
+
1BN
3BU
2WH
4BK
T
each-in
I <100mA
LOAD
-
+
1BN
3BU
4BK
2WH
PNP NO NPN NO
PNP NC NPN NC
Precauciones de seguridad
Este sensor no puede utilizarse en aplicaciones en las que la
seguridad personal dependa del funcionamiento adecuado del
sensor (el sensor no está diseñado conforme a la Directiva comu-
nitaria de máquinas)
La instalación y el uso deben llevarse a cabo por personal técnico forma-
do con conocimientos básicos sobre instalaciones eléctricas.
El instalador es responsable de la instalación correcta conforme a las nor-
mativas de seguridad locales y debe asegurar que un sensor defectuoso
no suponga un peligro para personas ni equipos. Si el sensor estuviera
defectuoso, deberá sustituirse y asegurarse para impedir un uso no
autorizado.
Descripción del producto y aplicaciones
Los sensores capacitivos CD34.. están diseñados para la detección de
líquidos de base acuosa (conductores) a través de la pared de un conte-
nedor no metálico y se adaptan automáticamente a diferentes grosores
de pared de plástico o vidrio. Los soportes de montaje universal permiten
fijar el sensor en diferentes tubos o contenedores de plástico o vidrio.
Los sensores pueden detectar con fiabilidad los líquidos y, así, compen-
sar una posible formación de películas residuales, humedad o espuma
de medios como el agua, leche, fluidos corporales (sangre), soluciones
alcalinas o ácidas con una conductividad de hasta 50 mS/cm en el interior
o el exterior de la pared del contenedor.
Características principales
El sensor está equipado con dos indicadores LED:
• LED verde: para conexión
• LED amarillo: para función de salida
Protección contra cortocircuitos y polaridad inversa
Homologaciones: CE, UL, ECOLAB
Dimensiones (mm)
Dimensión del sensor
Dimensión del soporte de montaje
16 8
34
1.1
16. 3
3
10
3
3.6
6.6
3.2
16 8
34
1.1
16. 3
3
10
3
3.6
6.6
3.2
10 . 5
1
0. 5
52 . 8 5
73 . 8 5
7. 626
Instalación
El sensor puede instalarse en cualquier posición. Consulte las condicio-
nes del entorno en la ficha de datos del sensor.
Opciones de instalación
Embedded montaje enrasado
Montaje adhesivo
Soporte de montaje en
tubo pequeño
Montaje con bridas
en tubo
Montaje con velcro en depósito
Español
Programación Programación
Programación Programación

9
Montaje y desmontaje del sensor en el soportev
Montaje del sensor
Desmontaje
del sensor
Mantenimiento
Los sensores no precisan de mantenimiento. La suciedad puede eliminar-
se con los productos químicos especificados en la ficha de datos, véase
la información de ECOLAB.
Volumen de suministro
• Interruptor capacitivo: CD34 …
• Soporte de montaje: ACD34-MB01
• 2 almohadillas de espuma, 3 mm de grosor (para montaje en tubo)
• 2 almohadillas adhesivas, 1 mm de grosor (para montaje en
superficies adhesivas)
La fuerza de adhesión máxima se alcanza después de 24 horas.
• Guía de instalación rápida
Funcionamiento
Indicadores LED:
• El LED amarillo se enciende cuando la salida está activa. Si la
salida presentara un cortocircuito, el LED amarillo parpadea 4 veces
por segundo.
• El LED verde se enciende cuando la alimentación está conectada al
sensor
Funciones de detección:
Sin necesidad de configuración (ajustes de fábrica):
Por lo general, el sensor puede utilizarse sin una calibración adicional.
Está diseñado para funcionar con paredes de depósitos de plástico
con un grosor aproximado de 0,5 a 6 mm y con paredes de vidrio con
un grosor aproximado de 0,5 a 4 mm. Es importante que ni el vidrio ni
el plástico sean conductores.
Calibración:
Si los ajustes de fábrica no bastaran, el sensor puede programarse en
lleno o en vacío.
Calibración en lleno:
El punto de conmutación del sensor se ajusta por debajo del valor de
detección real para garantizar que los cambios menores en la aplica-
ción no afecten al rendimiento de detección.
En la mayoría de las aplicaciones, bastará con la calibración en lleno en
un depósito o tubo llenos.
En aplicaciones críticas con grandes variaciones del tipo de medios y
de la temperatura, puede resultar ventajoso programar el nivel lleno con
aproximadamente el 50 % de la superficie de detección activa cubierta.
Procedimiento de calibración en lleno:
• Conecte el cable de programación a V+ durante 2 – 7 segundos
• El LED verde parpadea 1 vez por segundo, y el LED amarillo está
apagado
• Tras la calibración correcta, el LED amarillo parpadea 3 veces (con 1 Hz)
Calibración en vacío:
El punto de conmutación del sensor se ajusta por encima del valor de
detección real para garantizar que los cambios menores en la aplica-
ción no afecten al rendimiento de detección.
En la mayoría de las aplicaciones, bastará con la calibración en vacío
en un depósito o tubo vacíos.
En aplicaciones críticas con una alta formación de películas residuales,
humedad o espuma, puede realizarse una calibración en vacío con la
formación presente.
Eliminación
El sensor no puede repararse y debe eliminarse de acuerdo con la
Directiva comunitaria para “residuos de aparatos eléctricos y electrónic-
os”. ¡Los sensores no pueden eliminarse con la basura doméstica!
Observe las regulaciones nacionales para la eliminación de residuos.
Datos eléctricos
Consulte la información técnica más actualizada en la ficha de datos.
Funcionamiento
Procedimiento de calibración en vacío:
• Conecte el cable de programación a V+ durante 7 – 12 segundos
• El LED verde parpadea 1 vez por segundo, y el LED amarillo está
encendido
• Tras la calibración correcta, el LED amarillo parpadea 3 veces (con 1 Hz)
Cancelar el procedimiento de calibración:
• Mantenga el cable de programación conectado a V+ durante más de
14 segundos para cancelar la programación. Los puntos de
conmutación ajustados se conservan.
• El LED verde está apagado, y el LED amarillo parpadea (4 Hz)
Ajustes de fábrica:
Programación en lleno a 2 mm de distancia del objetivo metálico
Español

10
Avvertenze
Questo manuale contiene importanti informazioni riguardanti l’installazio-
ne e si consiglia vivamente di leggerlo con attenzione prima di installare
il sensore. Conservare il manuale per consultarlo in futuro. Il manuale di
installazione è destinato a personale tecnico qualificato.
Questo manuale si applica alla famiglia di sensori capacitivi CD34…
Impostazioni e connessioni
Il sensore CD34… è progettato per il rilevamento del livello di liquido
(conduttivo) a base acquosa. Le funzioni del sensore sono garantite solo
se installato secondo le linee guida del presente manuale e utilizzando
gli accessori di installazione specificati per la famiglia di sensori CD34…
Carlo Gavazzi declina qualsiasi responsabilità in relazione a eventuali
danni derivanti da modifiche dei sensori o dall’uso non autorizzato.
La staffa di montaggio applicata può essere utilizzata per il montaggio di
tubi e di contenitori e il blocco del sensore assicura una posizione stabile
del sensore consentendo così la sostituzione del sensore senza spostare
la staffa.
Quando non in uso, si raccomanda che il cavo Teach sia collegato in
modo permanente a V-
Pin Colore Descrizione
1 BN (marrone) Alimentazione (V+)
2 WH (bianco) Ingresso Teach
3 BU (Blu) Alimentazione (V-)
4 BK (nero) Uscita
Teach-in
I <100mA
LOAD
-
+
1BN
3BU
2WH
4BK
1
2
3
4
T
each-in
I <100mA
LOAD
-
+
1BN
3BU
4BK
2WH
Teach-in
I <100mA
LOAD
-
+
1BN
3BU
2WH
4BK
T
each-in
I <100mA
LOAD
-
+
1BN
3BU
4BK
2WH
PNP NO NPN NO
PNP NC NPN NC
Precauzioni di sicurezza
Non utilizzare questo sensore in applicazioni in cui la sicurezza
personale dipende dal corretto funzionamento del sensore (il sen-
sore non è progettato secondo la Direttiva Macchine UE)
L’installazione e l’uso devono essere eseguiti da personale tecni-
co qualificato con conoscenze di base sulle installazioni elettriche.
L’installatore è responsabile della corretta installazione secondo le nor-
mative locali sulla sicurezza e deve assicurarsi che un sensore difettoso
non comporti rischi per persone o apparecchiature. Sostituire il sensore
se difettoso e assicurarsi contro l’uso non autorizzato.
Descrizione del prodotto e sue applicazioni
I sensori capacitivi CD34... sono progettati per rilevare liquidi (conduttivi)
a base acquosa attraverso una parete non metallica del contenitore e per
adattarsi automaticamente a vari spessori di parete in plastica o vetro. Le
staffe di montaggio universali consentono il fissaggio del sensore su vari
tubi o contenitori in plastica o vetro.
È in grado di rilevare i fluidi sicuri e di compensare quindi la formazione di
residui quali pellicole, umidità o schiuma da fluidi come acqua, latte, fluidi
corporei (sangue), soluzioni acide o alcaline con conducibilità fino a 50
mS/cm all’interno o all’esterno della parete del contenitore.
Caratteristiche principali
Il sensore è dotato di due indicatori a LED:
• LED verde: per alimentazione attiva
• LED giallo: per funzione di uscita
Protezione da corto circuiti e inversione di polarità
Omologazioni: CE, UL, ECOLAB
Dimensioni (mm)
Dimensioni del sensore
Dimensioni della staffa di montaggio
16 8
34
1.1
16. 3
3
10
3
3.6
6.6
3.2
16 8
34
1.1
16. 3
3
10
3
3.6
6.6
3.2
10 . 5
1
0. 5
52 . 8 5
73 . 8 5
7. 626
Installazione
Il sensore può essere installato in qualsiasi posizione: consultare la sche-
da tecnica del sensore, così anche per le condizioni ambientali.
Opzioni d’installazione
Incasso montato a filo
Montaggio con adesivo
Staffa di montaggio su
tubo piccolo
Montaggio con fascette
sul tubo
Montaggio con velcro su serbatoio
Italiano

11
Montaggio e smontaggio del sensore sulla staffa
Montaggio del sensore
Smontaggio
del sensore
Manutenzione
Il sensore non richiede manutenzione, le contaminazioni possono essere
rimosse con le sostanze chimiche specificate nel foglio dati, vedere le
informazioni ECOLAB.
Contenuto della confezione
• Interruttore capacitivo: CD34…
• Staffa di montaggio: ACD34-MB01
• 2 tamponi di schiuma di 3 mm di spessore (per montaggio del tubo)
• 2 tamponi adesivi di 1 mm di spessore (per montaggio su superficie
adesiva)
La massima aderenza si ottiene dopo 24 ore.
• Breve foglio di istruzioni
Funzionamento
Indicatori a LED:
• Il LED giallo si accende quando l’uscita è attiva. Se l’uscita è in
cortocircuito, il LED giallo lampeggia con 4 imp. al secondo.
• Il LED verde si accende quando l’alimentazione è collegata al sensore
Funzioni di rilevamento:
Fuori dalla scatola (impostazione di fabbrica):
Il sensore può essere utilizzato in genere senza alcuna calibrazione
aggiuntiva ed è progettato per funzionare con pareti del serbatoio in
plastica da 0,5 a 6 mm circa di spessore e pareti di vetro da 0,5 a 4
mm circa di spessore. È importante che il vetro o la plastica non siano
conduttivi.
Calibrazione:
Se le impostazioni di fabbrica non sono sufficienti, sul sensore può
essere eseguita la funzione Teach di pieno o di vuoto.
Calibrazione di pieno:
Il punto di commutazione del sensore viene impostato al di sotto del
valore di rilevamento effettivo per garantire che piccole modifiche
nell’applicazione non influiscano sulle prestazioni di rilevamento.
Nella maggior parte delle applicazioni la calibrazione di pieno su un
serbatoio o un tubo pieno sarà sufficiente.
Nelle applicazioni critiche con grandi variazioni del tipo di fluido e della
sua temperatura può essere un vantaggio usare la funzione Teach per il
livello di pieno con circa il 50% della superficie sensibile attiva coperta.
Procedura per calibrazione di pieno:
• Collegare il cavo Teach a V+ per 2-7 secondi
• Il LED verde lampeggia 1 imp. al secondo e il LED giallo è spento
• Dopo una calibrazione riuscita il LED giallo lampeggia 3 volte (con 1 Hz)
Calibrazione di vuoto:
Il punto di commutazione del sensore viene impostato al di sopra
del valore di rilevamento effettivo per garantire che piccole modifiche
nell’applicazione non influiscano sulle prestazioni di rilevamento.
Nella maggior parte delle applicazioni la calibrazione di vuoto su un
serbatoio o un tubo vuoto sarà sufficiente.
Nelle applicazioni critiche con un’elevata quantità residua di pellicola,
umidità o accumulo di schiuma può essere eseguita una calibrazione di
vuoto in presenza di tale accumulo.
Procedura per calibrazione di vuoto:
• Collegare il cavo Teach a V+ per 7-12 secondi
• Il LED verde lampeggia 1 imp. al secondo e il LED giallo è acceso
• Dopo una calibrazione riuscita il LED giallo lampeggia 3 volte (con 1 Hz)
Smaltimento
Il sensore non può essere riparato e deve essere smaltito in conformità
con la Direttiva Europea “sui rifiuti di apparecchiature elettriche ed elettro-
niche”. Non smaltire i sensori con i rifiuti domestici!
Attenersi alle normative nazionali per lo smaltimento.
Dati elettrici
Fare riferimento al foglio dati per le più recenti informazioni tecniche.
Funzionamento
Procedura per annullare la calibrazione:
• Mantenere il cavo Teach collegato a V+ per più di 14 secondi per
interrompere la funzione Teach. I punti di commutazione rimarranno
invariati.
• Il LED verde è spento e il LED giallo lampeggia (4 Hz)
Impostazioni di fabbrica:
Teach completo a 2 mm di distanza dall’obiettivo in metallo
Italiano

12
Vigtigt
Denne vejledning indeholder vigtige oplysninger om installationen. Vi
anbefaler stærkt at man læser brugsanvisningen nøje inden man instal-
lerer sensoren. Gem manualen til senere brug. Installationsmanualen er
beregnet for kvalificeret teknisk personale.
Denne manual omhandler den kapacitive CD34…-sensorfamilie
Indstillinger og tilslutninger
CD34 ...-sensoren er designet til detektering af niveauet på vandbaseret
væske (ledende). Korrekt sensorfunktion er kun garanteret, hvis sensoren
er installeret i overensstemmelse med instruktionerne i denne vejledning
og ved hjælp af det installationstilbehør der specificeres for CD34 ... sen-
soren produktlinjen.
Carlo Gavazzi frasiger sig ethvert ansvar for skader på grund af ændring
eller ikke-godkendt brug af sensorerne.
Det medfølgende beslag kan anvendes til rør- og beholdermontering, og
sensorlåsen sikrer at sensoren sidder fast således at den kan udskiftes
uden at flytte beslaget.
Når indlæringskablet ikke er i brug, anbefales det at være permanent
tilsluttet V-
Ben Farve Beskrivelse
1 BN (Brun) Forsyning (V+)
2 WH (Hvid) Indlæringsindgang
3 BU (Blå) Forsyning (V-)
4 BK (Sort) Udgang
Teach-in
I <100mA
LOAD
-
+
1BN
3BU
2WH
4BK
1
2
3
4
T
each-in
I <100mA
LOAD
-
+
1BN
3BU
4BK
2WH
Teach-in
I <100mA
LOAD
-
+
1BN
3BU
2WH
4BK
T
each-in
I <100mA
LOAD
-
+
1BN
3BU
4BK
2WH
PNP NO NPN NO
PNP NC NPN NC
Sikkerhedsforskrifter
Denne sensor må ikke anvendes i applikationer, hvor personlig
sikkerhed afhænger af sensorens funktion (Sensoren er ikke kon-
strueret i henhold til EU’s maskindirektiv)
Installation og brug skal udføres af uddannet teknisk personale
med grundlæggende elinstallationskendskab.
Installatøren er ansvarlig for korrekt installation i henhold til lokale sikker-
hedsforskrifter og skal sikre, at en defekt sensor ikke medfører fare for
mennesker eller udstyr. Hvis sensoren er defekt, skal den udskiftes og
sikres mod uautoriseret brug.
Produktbeskrivelse og applikationer
Den kapacitive CD34...-sensor er designet til at detektere vandbaserede
(ledende) væsker gennem en ikke-metallisk væg, og den tilpasser sig
automatisk plastik- eller glasvægge i forskellige tykkelser. Det universelle
monteringsbeslag gør det muligt at montere sensoren på forskellige rør
eller beholdere af plast eller glas.
Sensoren detekterer væsker driftsikkert og stabilt og kompenserer samti-
dig for restkoncentrationer af film, fugt- eller skumophobning fra væsker
som vand, mælk, kropsvæsker (blod), syre- eller baser (med en ledning-
sevne på op til 50 ms/cm) inde i eller uden på beholderens væg.
Vigtigste egenskaber
Sensoren er udstyret med to LED-indikatorer:
• Grøn LED: power ON
• Gul LED: udgangsfunktion
Beskyttelse mod kortslutning og omvendt polaritet
Godkendelser CE, UL, ECOLAB
Dimensions (mm)
Sensor
Monteringsbeslag
16 8
34
1.1
16. 3
3
10
3
3.6
6.6
3.2
16 8
34
1.1
16. 3
3
10
3
3.6
6.6
3.2
10 . 5
1
0. 5
52 . 8 5
73 . 8 5
7. 626
Installation
Sensoren kan installeres i enhver position. Hvad angår miljømæssige
forhold henvises der til databladet for sensoren.
Installationsmuligheder
Indlejret planmontering
Klæbemonteret
Monteringsbeslag på
lille rør
Montering med kabel-
strips på rør
Montering med velcro på tank
Dansk

13
Montering og afmontering i beslaget
Montering af sensoren
Afmontering
af sensoren
Vedligeholdelse
Sensoren er vedligeholdelsesfri; snavs kan fjernes med kemikalier angivet
i databladet. Se information om ECOLAB.
Leveringen omfatter
• Kapacitiv omskifter: CD34 …
• Monteringsbeslag ACD34-MB01
• 2 x skumpuder, tykkelse 3 mm (til rørmontering)
• 2 x selvklæbende puder, tykkelse 1 mm (til selvklæbende overflade-
montering)
Maksimal bindingsstyrke er opnået efter 24 timer.
• Kort instruktion
Drift
LED-indikation
• Den gule LED lyser, når udgangen er aktiveret. Hvis udgangen
kortsluttes, blinker den gule LED med 4 imp. pr. sek.
• Den grønne LED lyser når sensoren tilsluttes strøm
Sensorfunktioner
Som leveret (Fabriksindstillinger)
Sensoren kan normalt bruges uden nogen yderligere kalibrering; den er
designet til at arbejde med plastikvægge på cirka 0,5-6 mm og glas-
vægge på ca 0,5 til 4 mm. Det er vigtigt, at glasset eller plastikken er
ikke-ledende.
Kalibrering
Hvis fabriksindstillingerne ikke er tilstrækkelige, kan man via indlæ-
ringsfunktionen kalibrere sensoren til fuld- eller tomkalibrering.
Fuldkalibrering
Sensorindstillingspunktet sættes under den egentlige detekteringsvær-
di for at sikre at små ændringer i applikationen ikke påvirker sensorens
ydeevne.
I de fleste applikationer er fuldkalibrering på en fuld tank eller rør til-
strækkelig.
I vanskelige applikationer med store variationer i stoftype og tempera-
tur, kan det være en fordel at indlære Fuldniveau med ca. 50% af den
aktive følerflade tildækket.
Procedure for fuldkalibrering
• Forbind indlæringskablet til V+ i 2-7 sekunder
• Grøn LED blinker 1 imp. pr. sek. og gul LED er slukket
• Efter succesfuld kalibrering blinker den gule LED 3 gange (med 1 Hz)
Tomkalibrering:
Sensorindstillingspunktet sættes over den egentlige detekteringsværdi
for at sikre at små ændringer i applikationen ikke påvirker sensorens
ydeevne.
I de fleste applikationer er tomkalibrering på en fom tank eller tomt rør
tilstrækkelig.
I vanskelige applikationer med en høj koncentration af restfilm, fugt eller
skumophobning kan en tomkalibrering udføres mens ophobningen er til
stede.
Procedure for tomkalibrering
• Forbind indlæringskablet til V+ i 7-12 sekunder
• Grøn LED blinker 1 imp. pr. sek. og gul LED er tændt
• Efter vellykket kalibrering blinker den gule LED tre gange (med 1 Hz)
Bortskaffelse
Sensoren kan ikke repareres og skal bortskaffes i henhold til Europæisk
Direktiv om “affald af elektrisk og elektronisk udstyr”. Bortskaf ikke sen-
sorerne sammen med husholdningsaffald!
Nationale bestemmelser for bortskaffelse skal overholdes.
Elektriske specifikationer
Se databladet for de nyeste tekniske informationer.
Drift
Annuller kalibreringsprocedure
• Hold indlæringskablet forbundet til V+ i mere end 14 sekunder for at
afbryde indlæringsproceduren. Indstillingspunkterne vil forblive uæn-
drede.
• Grøn LED er slukket og gul LED blinker (4 Hz)
Fabriksindstillinger
Fuld indlæring ved 2 mm afstand til metalemnet
Dansk

14
警告
本手册包含有关安装的重要信息。我们强烈建议您在安装传感器之前认真
阅读本手册。
请妥善保管本手册以便今后使用。
本安装手册仅供具备资质的技术人员使用。
本手册适用于 CD34… 电容式传感器系列
设置和连接
CD34… 传感器设计用于水基液体(导电)液位检测。
只有按照本手册中的指导安装并使用 CD34 ...传感器系列指定的安装配
件,传感器的功能才能得到保证。
对于因传感器的改装或未经批准的使用而导致的损坏,Carlo Gavazzi 概
不负责。
安装支架可用于管道和容器安装,而传感器锁可确保传感器位置固定,在
更换传感器时不会移动支架。
不用时,建议将调校导线永久连接到电源负极
针脚 颜色 说明
1
BN(棕色) 电源 (V+)
2
WH(白色) 调校输入
3
BU(蓝色) 电源 (V-)
4
BK(黑色) 输出
Teach-in
I <100mA
LOAD
-
+
1BN
3BU
2WH
4BK
1
2
3
4
T
each-in
I <100mA
LOAD
-
+
1BN
3BU
4BK
2WH
Teach-in
I <100mA
LOAD
-
+
1BN
3BU
2WH
4BK
T
each-in
I <100mA
LOAD
-
+
1BN
3BU
4BK
2WH
PNP NO NPN NO
PNP NC NPN NC
安全预防措施
该传感器不能用于需要传感器正常工作才能保证人身安全的应用场
合(该传感器并非按照欧盟机械指令设计而成)
必须由具有基本电气安装知识且经过培训的技术人员进行安装和使
用。
安装人员有责任根据当地安全法规正确安装,确保传感器损坏时不会对人
员或设备造成危害。
如果传感器损坏,则必须更换传感器,并且必须确保无人擅自使用损坏的
传感器。
产品描述和应用
CD34.. 电容式传感器设计用于通过非金属容器壁检测水基(导电)液体,
可以自动适应塑料或玻璃的各种壁厚。
借助通用安装支架,可将传感器固定在塑料或玻璃材料的各种管道或容器
上。
它能够可靠地检测介质,可补偿容器壁内外导电率最高 50 mS/cm 的水、奶
类、体液(血液)、酸碱溶液形成的残余液膜、湿气或泡沫积聚。
主要特性
该传感器配备两个 LED 指示灯:
• 绿色 LED: 电源开启
• 黄色 LED: 输出功能
短路和反极性防护措施
认证: CE、UL、ECOLAB
尺寸 (mm)
传感器尺寸
安装支架尺寸
16 8
34
1.1
16. 3
3
10
3
3.6
6.6
3.2
16 8
34
1.1
16. 3
3
10
3
3.6
6.6
3.2
10 . 5
1
0. 5
52 . 8 5
73 . 8 5
7. 626
安装
该传感器可以安装在任何位置,有关环境条件的信息,请参阅传感器的数
据表。
安装选项
嵌入式齐平安装
粘接安装
通过安装支架安装在小
型管道上
用电缆扎带安装在管
道上
使用尼龙搭扣安装在箱体上
中文
调校 调校
调校 调校

15
在支架上安装和拆除传感器
安装传感器
拆除传感器
维护
该传感器无需维护,可以用数据表中指定的化学物质去除污染,请参阅
ECOLAB 信息。
交货清单
• 电容式开关: CD34 …
• 安装支架: ACD34-MB01
• 2 块 3 mm 厚泡沫垫(用于管道安装)
• 2 块 1 mm 厚粘性垫(用于粘接表面安装)
24 小时候达到最大粘结强度。
• 快速安装指南
操作
LED 指示灯:
• 输出激活时,黄色 LED 亮起。
输出短路时,黄色 LED 闪烁,每秒 4 次。
• 电源连接到传感器时,绿色 LED 亮起
感应功能:
开箱即用(出厂设置):
该传感器通常无需另外校准即可使用,设计用于厚度约 0.5 至 6 mm 的
塑料箱壁和厚度约 0.5 至 4 mm 的玻璃壁。
玻璃或塑料必须不能导电。
校准:
如果出厂设置不适用,可以对传感器进行满或空调校。
满校准:
传感器开关点设置在实际检测值以下,以保证应用的微小变化不会影响
传感性能。
在大多数应用中,在装满的箱或管上进行满校准就够了。
对于介质类型和温度变化较大的重要应用中,盖住大约 50% 的有效传感
表面进行满液位调校可能较好。
满校准程序:
• 将调校导线与电源正极连接 2 - 7 秒
• 绿色 LED 闪烁,每秒 1 次,黄色 LED 熄灭
• 校准成功后,黄色 LED 闪烁 3 次(频率 1 Hz)
空校准:
传感器开关点设置在实际检测值以上,以保证应用的微小变化不会影响
传感性能。
在大多数应用中,在空箱或空管上进行空校准就够了。
在有大量残留液膜、湿气或泡沫积聚的重要应用中,可以在有积聚物的
情况下进行空校准。
空校准程序:
• 将调校导线与电源正极连接 7 - 12 秒
• 绿色 LED 闪烁,每秒 1 次,黄色 LED 亮起
• 校准成功后,黄色 LED 闪烁 3 次(频率 1 Hz)
取消校准程序:
• 保持调校导线与电源正极连接超过 14 秒即可中止调校。
开关设定值将保持不变。
• 绿色 LED 熄灭,黄色 LED 闪烁 (4 Hz)
出厂设置:
距离金属目标 2 mm 处满调校
处置
该传感器无法修理,必须按照欧洲报废电子电气设备指令进行处理。
不得将传感器与生活垃圾一同丢弃!
必须履行关于处置的国家法规。
电器数据
有关最新技术信息,请参阅数据表。
中文

16
CARLO GAVAZZI
www.gavazziautomation.com
Certified in accordance with ISO 9001
Gerätehersteller mit dem ISO 9001/EN 29 001 Zertifikat
Une société qualifiée selon ISO 9001
Empresa que cumple con ISO 9001
Certificato in conformità con l’IS0 9001
Kvalificeret i overensstemmelse med ISO 9001
按照认证 ISO 9001
CD34 manual MUL rev.00 - 01.2018 - 15-029-xxx
-
 1
1
-
 2
2
-
 3
3
-
 4
4
-
 5
5
-
 6
6
-
 7
7
-
 8
8
-
 9
9
-
 10
10
-
 11
11
-
 12
12
-
 13
13
-
 14
14
-
 15
15
-
 16
16


CARLO GAVAZZI CD34CNFLFPCT5 Benutzerhandbuch
- Typ
- Benutzerhandbuch
- Dieses Handbuch ist auch geeignet für
in anderen Sprachen
Verwandte Papiere
-
CARLO GAVAZZI CD34CNFLFPCT5 Bedienungsanleitung
-
CARLO GAVAZZI MC36CH2ORT1L Bedienungsanleitung
-
-
-
-
CARLO GAVAZZI CA30CLL30BP Benutzerhandbuch
-
-
-
CARLO GAVAZZI UA18CSD08AGM1TI Benutzerhandbuch
-
CARLO GAVAZZI CA18FAF08BPA2IO Benutzerhandbuch
