Lightning Audio LA-152-S Bedienungsanleitung
- Kategorie
- Soundbar-Lautsprecher
- Typ
- Bedienungsanleitung

• LA-152-S
• LA-1652-S
• LA-1T
components
Seite wird geladen ...

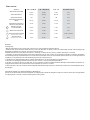
HOCHTON/TWEETER
TIEETON EINGANG
IN
-6dB -3dB -0dB
WOOFER
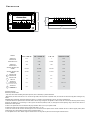
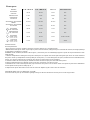
Model
LA-152-S LA-1652-S LA-1T Crossover
Nominal
Diameter
5.25” 6.5” 1” N/A
Description
2-way 2-way Tweeter N/A
Nominal
Impedance
4 Ω 4 Ω 4 Ω N/A
Power Handling
(MAX)
100 watts 125 watts 100 watts N/A
Power Handling
(RMS)
35 watts 45 watts 35 watts N/A
Mounting
Diameter
4.7” 5.7” 2.0” N/A
Mounting
Depth
1.9” 2.4” 0.8” N/A
Overall
Diameter
(including grille)
6.2” 7.2” 2.5” 3.3” x 5.1”
Overall
Height
(including grille)
2.8” 3.5” 1.1” 1.3”
Crossover
Installation
Preliminary Considerations:
• If you feel unsure about installing this system yourself, have it installed by a qualified technician.
• Think before you drill! Be careful not to cut or drill into gas tanks, fuel lines, brake or hydraulic lines, vacuum lines or electrical wiring when working on any
vehicle.
CAUTION: Before installation, disconnect the battery negative (-) terminal to prevent damage to the unit, fire and/or possible injury.
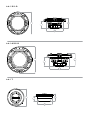
1. Determine where the speakers will be mounted. Ensure an area large enough for the speaker to mount evenly. Be sure that the mounting location is deep
enough for the speaker to fit; if mounting in a door, operate all functions (windows, locks, etc.) through their entire operating range to ensure there will be no
interference from the speaker.
2. Refer to the specification chart to determine the proper diameter hole to cut for your speaker model.
3. Mark the locations for the mounting screws. Drill the holes with a 1/8” bit.
4. Route the wires from the crossover and through the cutout and connect to the speaker and/or tweeter terminals. Be sure to observe proper polarity when
connecting the wires. The speaker’s positive terminal is indicated with a “+”.
5. Fit the speaker to the cutout. Mount using the enclosed screws. Fit the grille into place and mount using the enclosed screws.

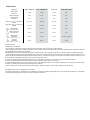
Modell
LA-152-S LA-1652-S LA-1T Crossover
Nenndurchmesser
133 mm 165 mm 25 mm N/A
Beschreibung
Zweiweg Zweiweg Hochtöner N/A
Nennimpendanz
4 Ω 4 Ω 4 Ω N/A
Nennbelastbarkeit
(MAX)
100 watt 125 watt 100 watt N/A
Nennbelastbarkeit
(Effektivspannung)
35 watt 45 watt 35 watt N/A
Befestigungs-
durchmesser
120 mm 144 mm 51 mm N/A
Befestigungstiefe
49 mm 61 mm 20 mm N/A
Gesamtdurchmesser
(einschließlich Gitter)
158 mm 184 mm 64 mm 84 mm x 130 mm
Gesamthöhe
(einschließlich Gitter)
72 mm 90 mm 28 mm 33 mm
Deutsch
Einbau
Vorüberlegungen:
• Wenn Sie beim Einbau des Geräts unsicher sind, lassen Sie es von einem qualifizierten Techniker einbauen.
• Denken Sie nach, bevor Sie bohren! Achten Sie darauf, nicht in den Benzintank, die Benzin-, Brems- oder hydraulischen Leitungen, Vakuumleitungen oder
Elektrokabel zu schneiden oder zu bohren, wenn Sie am Fahrzeug arbeiten.
VORSICHT: Entfernen Sie vor dem Einbau den negativen (-) Batteriepol, um Schäden am Gerät, Feuer bzw. mögliche Verletzungen zu vermeiden.
1. Entscheiden, wo die Lautsprecher befestigt werden sollen. Gewährleisten, dass der Platz ausreicht, um den Lautsprecher gleichmäßig zu befestigen. Gewährleisten,
dass die Befestigungsstelle ausreichende Tiefe für den Lautsprecher hat; beim Einbau in einer Türe alle Funktionen (Fenster, Schloss usw.) in ihrem ganzen Bereich
ausprobieren um zu gewährleisten, dass keine Beeinträchtigung durch den Lautsprecher eintritt.
2. Die Tabelle in den Technischen Daten gibt den richtigen Lochdurchmesser für Ihr Lautsprechermodell zum Ausschneiden an.
3. Die Stellen für die Befestigungsschrauben markieren. Die Löcher mit einer 1/8-Zoll (3,2 mm) Bohrerspitze bohren.
4. Die Drähte vom Crossover und durch das Loch führen und am Lautsprecher und/oder den Hochtöneranschlüssen befestigen. Beim Anschließen der Kabel die ord-
nungsgemäße Polarität beachten. Der positive Anschluss des Lautsprechers ist mit einem „+“ markiert.
5. Den Lautsprecher in dem Loch ausrichten. Mit den beiliegenden Schrauben befestigen. Das Gitter an seinem Platz ausrichten und mit den beiliegenden Schrau-
ben befestigen.
Informationen zur beschränkten Garantie
Produkte, die von Konsumenten bei einem Vertragshändler von Lightning Audio außerhalb der USA gekauft wurden, sind unter der Garantie des Vertragsgroßhändlers
von Lightning Audio für das Land, in dem die Produkte gekauft wurden, gedeckt.

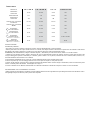
Modèle
LA-152-S LA-1652-S LA-1T Crossover
Diamètre
nominal
133 mm 165 mm 25 mm N/A
Description
2 voies 2 voies Tweeter N/A
Impédance
nominale
4 Ω 4 Ω 4 Ω N/A
Puissance admissible
(MAX.)
100 watts 125 watts 100 watts N/A
Puissance admissible
(efcace)
35 watts 45 watts 35 watts N/A
Diamètre
de montage
120 mm 144 mm 51 mm N/A
Profondeur
de montage
49 mm 61 mm 20 mm N/A
Diamètre
hors tout
(grille incluse)
158 mm 184 mm 64 mm 84 mm x 130 mm
Hauteur
hors tout
(grille incluse)
72 mm 90 mm 28 mm 33 mm
Installation
Précautions préliminaires
• Si vous n’êtes pas sûr(e) d’arriver à installer le système par vous-même, confiez la tâche à un technicien qualifié.
• Réfléchissez bien avant de percer. Veillez à ne pas couper ou percer le réservoir d’essence, le câblage électrique ou les conduites de carburant, de freinage hydraulique
ou de dépression en travaillant sur un véhicule.
ATTENTION : Avant l’installation, débranchez la borne négative (-) de la batterie pour éviter d’endommager l’appareil et prévenir les risques d’incendie et de dom-
mages corporels.
1. Déterminez l’emplacement de montage des haut-parleurs. Veillez pour cela à disposer d’une surface plane assez grande pour assurer un contact uniforme du
haut-parleur. Vérifiez que l’emplacement est assez profond pour le haut-parleur ; en cas de montage dans une portière, actionnez toutes les commandes (fenêtres,
serrures, etc.) jusqu’aux extrémités de leurs courses pour vous assurer que le haut-parleur n’y fait pas obstacle.
2. Consultez le tableau des caractéristiques pour déterminer le diamètre de l’orifice à découper pour votre modèle de haut-parleur.
3. Marquez l’emplacement des vis de montage. Percez les trous avec une mèche de 1/8 de pouce (3,2 mm).
4. Acheminez les fils à travers l’orifice depuis le filtre jusqu’aux bornes du haut-parleur et/ou du tweeter. Veillez à bien respecter la polarité lors du branchement.
La borne positive du haut-parleur est indiquée par un « + ».
5. Disposez le haut-parleur dans l’orifice. Fixez-le avec les vis fournies. Disposez la grille et fixez-la avec les vis fournies.
Français
Informations sur la garantie limitée
Les articles vendus au public par un distributeur Lightning Audio agréé situé hors des États-Unis sont couverts par celui-ci dans le pays d’achat.
Seite wird geladen ...
Seite wird geladen ...

L
imited
W
arranty
I
nformation
Lightning Audio offers a limited warranty on products subject to the following terms:
• Length of warranty:
Speakers - One year replacement warranty from date of original purchase - requires proof of purchase.
Amplifiers - One year replacement warranty from date of original purchase - requires proof of purchase.
• What is covered:
This warranty applies only to Lightning Audio products sold to consumers by an authorized Lightning Audio Dealer in the United States
of America. Products purchased by consumers from an authorized Lightning Audio Dealer located outside of the USA are covered by
the authorized Lightning Audio Distributor for the country in which the products were purchased.
• Who is covered:
This warranty covers only the original purchaser of Lightning Audio product purchased from an authorized Lightning Audio Dealer
in the United States. In order to receive service, the purchaser must provide Lightning Audio with a dated copy of the sales receipt
stating the customer name, dealer name and product(s) purchased. Products found to be defective during the warranty period will be
replaced (with a product deemed to be equivalent at Lightning Audio’s sole discretion) by Lightning Audio.
• What is not covered:
1. Damage caused by accident, misuse, abuse, improper installation or operation, water or moisture, excessive heat, theft, or ship-
ping
2. Any cost or expense related to the removal or reinstallation of product
3. Items previously repaired, serviced or modified by an unauthorized service center
4. Any product which has had the serial number defaced, altered, or removed
5. Subsequent damage to other components
6. Any product purchased outside the U.S.
7. Any product not purchased from an authorized Lightning Audio Dealer
• Limit on implied warranties
Any implied warranties of fitness for use and merchantability are limited in duration to the period of the express warranty set forth
above. Some states do not allow limitations on the length of an implied warranty, so this limitation may not apply. No person is autho-
rized to assume for Lightning Audio any other liability in connection with the sale of the product.
• How to obtain service
Defective products should be returned to your local authorized Lightning Audio Dealer for warranty service or, you may call 1-888-
881-8186 for Lightning Audio customer service. You must obtain an RA# (Return Authorization number) prior to returning any
product to Lightning Audio. Return Authorizations are valid for 30 days. You are responsible for the shipment of defective product to
Lightning Audio and you MUST include valid proof of purchase. Mark your RA# clearly on outside of your shipping carton. Products
received without a valid RA# will be refused and returned to sender at sender’s expense.
955 N. Fiesta Blvd, Suite 4
•
Gilbert, Arizona 85233 U.S.A.
•
(800)726-8178
-
 1
1
-
 2
2
-
 3
3
-
 4
4
-
 5
5
-
 6
6
-
 7
7
-
 8
8


Lightning Audio LA-152-S Bedienungsanleitung
- Kategorie
- Soundbar-Lautsprecher
- Typ
- Bedienungsanleitung

