Samsung LE32A556P1F Benutzerhandbuch
- Kategorie
- LCD-Fernseher
- Typ
- Benutzerhandbuch

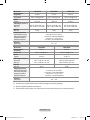
Country
Customer Care Centre
Web Site
AUSTRIA 0800-SAMSUNG (726-7864) www.samsung.com/at
BELGIUM 0032 (0)2 201 24 18 www.samsung.com/be
CZECH REPUBLIC
844 000 844 www.samsung.com/cz
Distributor pro Českou republiku:
Samsung Zrt., česka organizační složka Vyskočilova 4, 14000 Praha 4
DENMARK 70 70 19 70 www.samsung.com/dk
EIRE 0818 717 100 www.samsung.com/ie
FINLAND 030-6227 515 www.samsung.com/
FRANCE
3260 SAMSUNG (€ 0,15/Min)
08 25 08 65 65 (€ 0,15/Min)
www.samsung.com
GERMANY 01805 - SAMSUNG (726-7864) (€ 0,14/Min) www.samsung.com
HUNGARY 06-80-SAMSUNG (726-7864) www.samsung.com
ITALIA 800-SAMSUNG (726-7864) www.samsung.com
LUXEMBURG 0035 (0)2 261 03 710 www.samsung.com/be
NETHERLANDS 0900-SAMSUNG (726-7864) (€ 0,10/Min) www.samsung.com/nl
NORWAY 815-56 480 www.samsung.com/no
POLAND
0 801 801 881
022-607-93-33
www.samsung.com/pl
PORTUGAL 80820-SAMSUNG (726-7864) www.samsung.com/pt
SLOVAKIA 0800-SAMSUNG (726-7864) www.samsung.com/sk
SPAIN 902 10 11 30 www.samsung.com
SWEDEN 0771-400 200 www.samsung.com/se
SWITZERLAND 0800-SAMSUNG (726-7864) www.samsung.com/ch
U.K 0845 SAMSUNG (7267864) www.samsung.com
TURKEY 444 77 11 www.samsung.com
ESTONIA 800-7267 www.samsung.ee
LATVIA 800-7267 www.samsung.com/lv
LITHUANIA 8-800-77777 www.samsung.lt
KAZAHSTAN 8-10-800-500-55-500 www.samsung.kz
KYRGYZSTAN 00-800-500-55-500 -
RUSSIA 8-800-555-55-55 www.samsung.com
TADJIKISTAN 8-10-800-500-55-500 -
UKRAINE 8-800-502-0000 www.samsung.com
UZBEKISTAN 8-10-800-500-55-500 www.samsung.uz
LCD TV
user manual
imagine the possibilities
Thank you for purchasing this Samsung product.
To receive more complete service, please register
your product at
www.samsung.com/global/register
Model Serial No.
BN68-01409A-00
Contact SAMSUNG WORLDWIDE
If you have any questions or comments relating to Samsung products,
please contact the SAMSUNG customer care centre.
BN68-01409A-00-Cover-��.indd 1 2008-02-21 �� 5:54:43
Seite wird geladen ...
Seite wird geladen ...
Seite wird geladen ...
Seite wird geladen ...
Seite wird geladen ...

English - 5
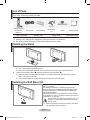
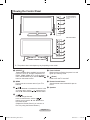
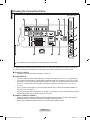
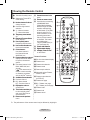
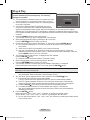
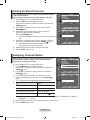
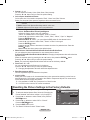
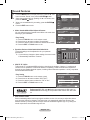
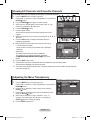
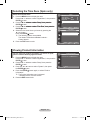
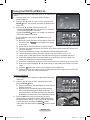
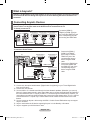
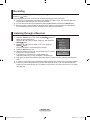
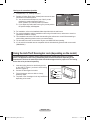
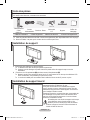
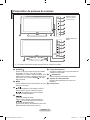
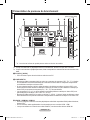
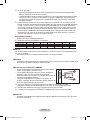
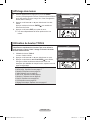
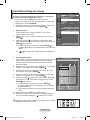
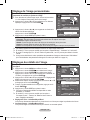
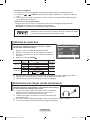
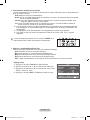
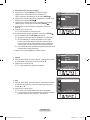
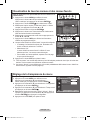
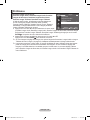
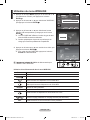
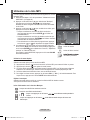
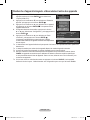
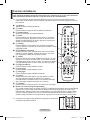
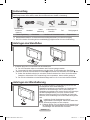
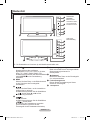
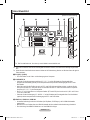
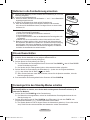
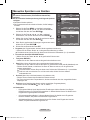
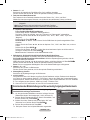
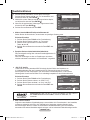
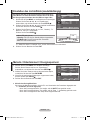
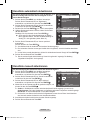
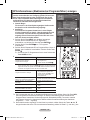
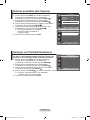
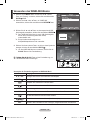
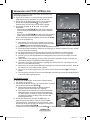
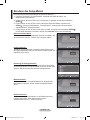
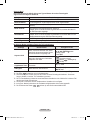
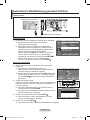
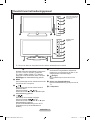
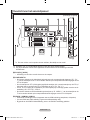
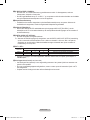
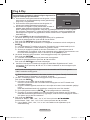
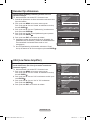
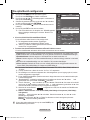
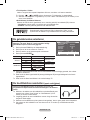
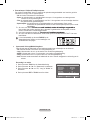
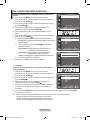
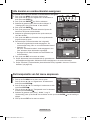
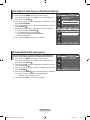
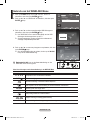
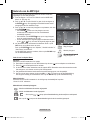
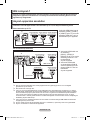
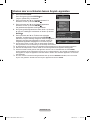
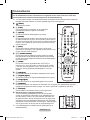
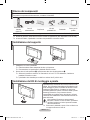
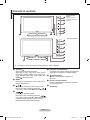
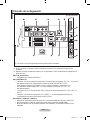
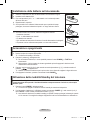
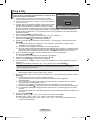
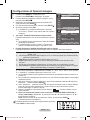
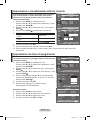
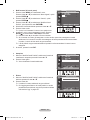
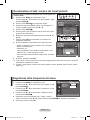
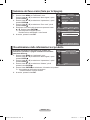
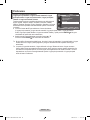
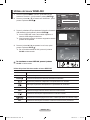
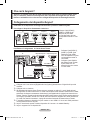
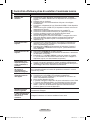
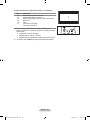
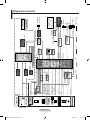
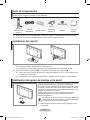
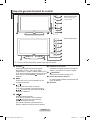
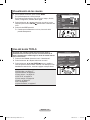
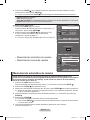
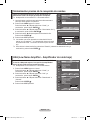
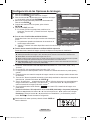
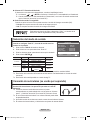
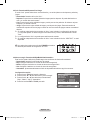
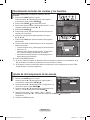
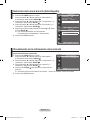
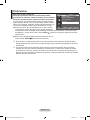
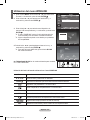
Viewing the Connection Panel
Whenever you connect an external device to your TV, make sure that power on the unit is turned off
When connecting an external device, match the colour of the connection terminal to the cable.
1 PC IN [PC] / [AUDIO]
Connect to the video and audio output jack on your PC.
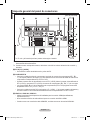
2 COMPONENT IN
Connect component video cables (optional) to component connector ("PR", "PB", "Y") on the rear of
your set and the other ends to corresponding component video out connectors on the DTV or DVD.
If you wish to connect both the Set-Top Box and DTV (or DVD), you should connect the Set-Top Box
to the DTV (or DVD) and connect the DTV (or DVD) to component connector ("PR", "PB", "Y") on
your set.
The PR, PB and Y connectors on your component devices (DTV or DVD) are sometimes labeled Y,
B-Y and R-Y or Y, Cb and Cr.
Connect RCA audio cables (optional) to "R - AUDIO - L" on the rear of your set and the other ends to
corresponding audio out connectors on the DTV or DVD.
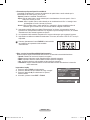
3 HDMI IN 1, HDMI IN 2, HDMI IN 3
Supports connections between HDMI-connection-enabled AV devices (Set-Top Boxes, DVD players)
No additional Audio connection is needed for an HDMI to HDMI connection.
When using an HDMI/DVI cable connection, you must use the HDMI IN 2 jack.
➣
➣
-
-
-
-
-
-
-
-
6
0
The product colour and shape may vary depending on the model.
Power Input
[Side Panel Jacks]
1 2 3 4 5
3
7
8
9
!@#
BN68-01409A-00Eng-0220.indd 5 2008-02-21 �� 4:26:25
Seite wird geladen ...
Seite wird geladen ...
Seite wird geladen ...
Seite wird geladen ...

English - 10
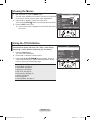
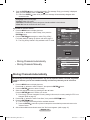
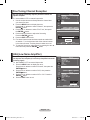
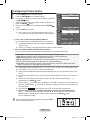
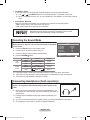
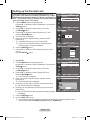
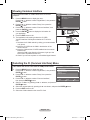
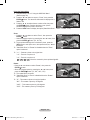
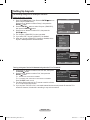
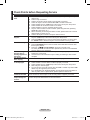
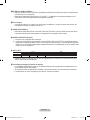
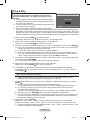
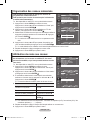
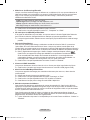
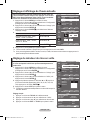
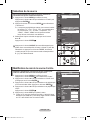
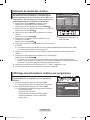
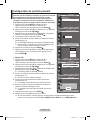
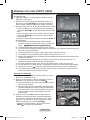
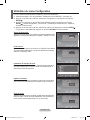
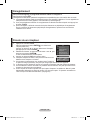
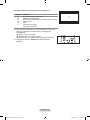
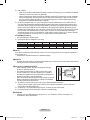
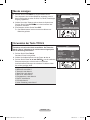
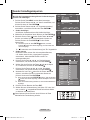
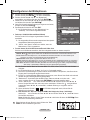
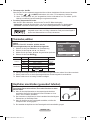
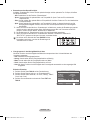
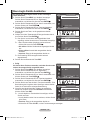
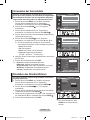
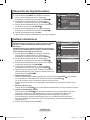
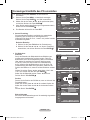
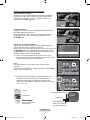
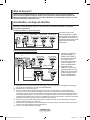
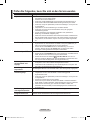
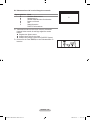
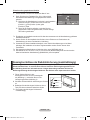
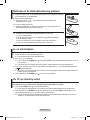
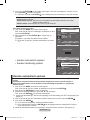
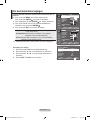
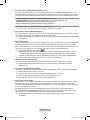
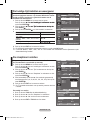
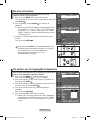
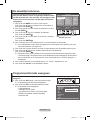
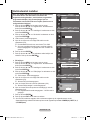
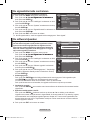
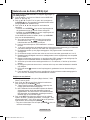
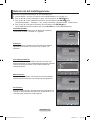
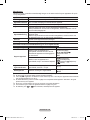
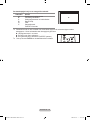
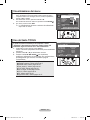
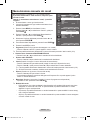
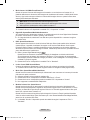
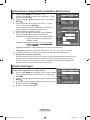
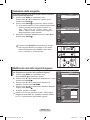
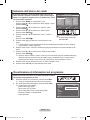
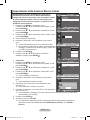
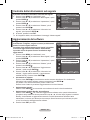
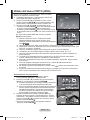
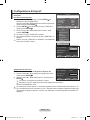
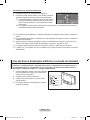
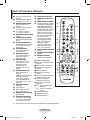
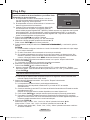
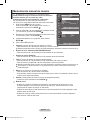
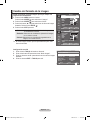
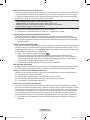
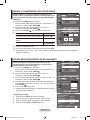
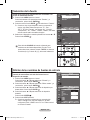
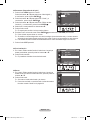
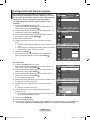
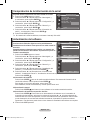
Viewing the Menus
1. With the power on, press the MENU button.
The main menu appears on the screen. The menu’ s left side has
icons: Picture, Sound, Channel, Setup, Input, Digital Menu.
2. Press the ▲ or ▼ button to select one of the icons.
Then press the
ENTER
button to access the icon’s sub-menu.
3. Press the EXIT button to exit.
The on-screen menus disappear from the screen after about
one minute.
➣
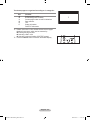
Using the TOOLS Button
You can use the TOOLS button to select your frequently
used functions quickly and easily. The “Tools” menu change
depending on which external input mode you are viewing.
1. Press the TOOLS button.
The “Tools” menu will appear.
2. Press the ▲ or ▼ button to select a menu.
3. Press the ▲/▼/◄/►/
ENTER
buttons to display, change, or
use the selected items. For a more detailed description of each
function, refer to the corresponding page.
Anynet+ (HDMI-CEC), see page 56
Picture Mode, see page 17
Sound Mode, see page 23
Sleep Timer, see page 25
SRS TS XT, see page 23
Energy Saving, see page 28
Dual l-ll, see page 24
PIP, see page 22
Auto Adjustment, see page 47
♦
♦
♦
♦
♦
♦
♦
♦
♦
Tools
Anynet+ (HDMI-CEC)
Picture Mode : Standard
Sound Mode : Custom
Sleep Timer : Off
SRS TS XT : Off
Energy Saving : Off
Dual l-ll : Mono
Move Enter Exit
Picture
Mode : Standard
Backlight 7
Contrast 95
Brightness 45
Sharpness 50
Colour 50
Tint G50 R50
Detailed Settings
sMore
TV
Move Enter Return
BN68-01409A-00Eng-0220.indd 10 2008-02-21 �� 4:26:28
Seite wird geladen ...
Seite wird geladen ...
Seite wird geladen ...
Seite wird geladen ...

English - 15
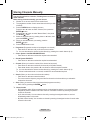
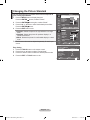
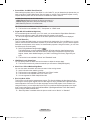
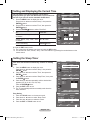
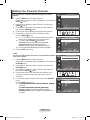
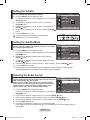
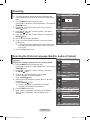
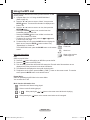
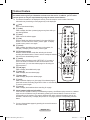
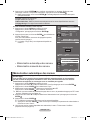
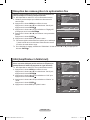
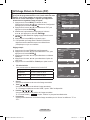
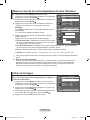
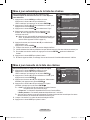
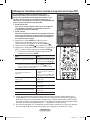
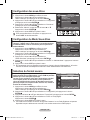
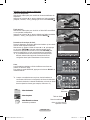
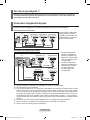
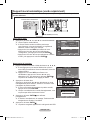
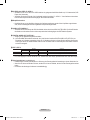
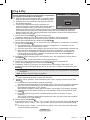
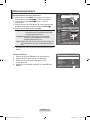
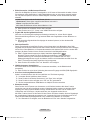
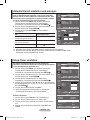
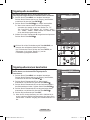
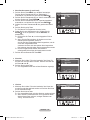
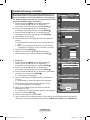
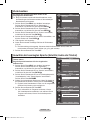
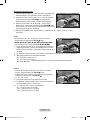
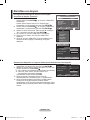
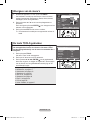
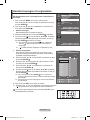
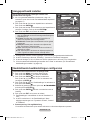
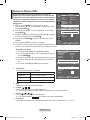
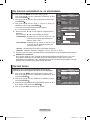
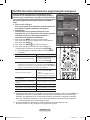
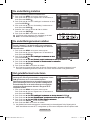
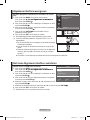
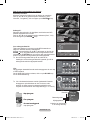
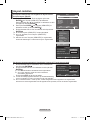
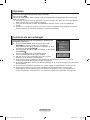
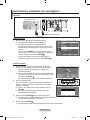
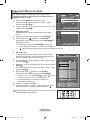
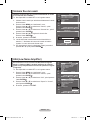
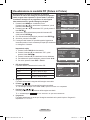
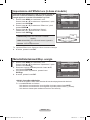
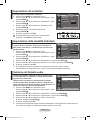
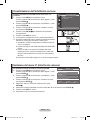
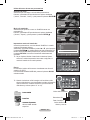
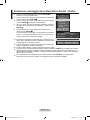
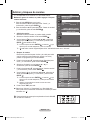
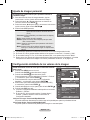
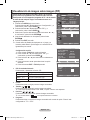
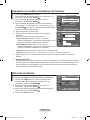
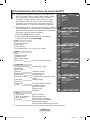
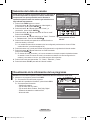
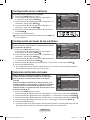
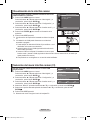
Sorting the Stored Channels
This operation allows you to change the programme numbers
of the stored channels.
This operation may be necessary after using the auto store.
Not available in DTV or external input mode.
1. Press the MENU button to display the menu.
Press the ▲ or ▼ button to select "Channel", then press the
ENTER
button.
2. Press the ▲ or ▼ button to select "Sort", then press the
ENTER
button.
3. Select the channel number that you wish to change by
pressing the ▲ or ▼ button repeatedly.
Press the
ENTER
button.
The selected channel number and name are moved to right
side.
4. Press the ▲ or ▼ button to move to the position in which you
would like to change and then press the
ENTER
button.
The selected channel is exchanged with the one
previously stored to the chosen number.
5. Repeat steps 3 to 4 for another channel to be sorted.
6. Press the EXIT button to exit.
➣
➣
➣
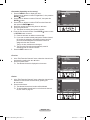
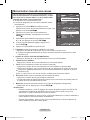
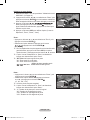
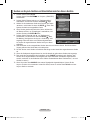
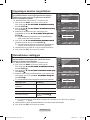
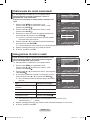
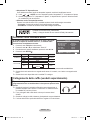
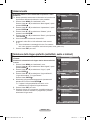
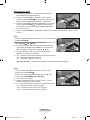
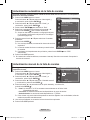
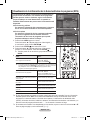
Assigning Channels Names
Channel names will be assigned automatically when channel
information is broadcast. These names can be changed,
allowing you to assign new names.
Not available in DTV or external input mode.
1. Press the MENU button to display the menu.
Press the ▲ or ▼ button to select "Channel", then press the
ENTER
button.
2. Press the ▲ or ▼ button to select "Name", then press the
ENTER
button.
3. If necessary, select the channel to be assigned to a new
name by pressing the ▲ or ▼ button. Press the
ENTER
button
The selection bar is displayed around the name box.
4.
To... Then...
Select a letter, number or symbol Press the ▲ or ▼ button
Move on the next letter Press the ► button
Move back the previous letter Press the ◄ button
Conrm the name
Press the
ENTER
button
The following characters are available: Letters of the alphabet (A~Z) / Numbers (0~9) / Special
characters (+, -, *, /, space)
5. Repeat steps 3 to 4 for each channel to be assigned to a new name.
6. Press the EXIT button to exit.
➣
➣
➣
Sort
Prog. Ch. Name
0 C--
1 C23
2 C16
3 C3
4 S1
s
TV
Move Enter Return
Channel
Country :
United Kingdom
Auto Store
Manual Store
Channel Manager
Sort
Name
Fine Tune
LNA : Off
TV
Move Enter Return
Name
Move Enter Return
Prog. Ch. Name
0 C-- -----
1 C23 -----
2 C16 -----
3 C3 -----
4 S1 -----
s
TV
Channel
Country :
United Kingdom
Auto Store
Manual Store
Channel Manager
Sort
Name
Fine Tune
LNA : Off
Move Enter Return
TV
BN68-01409A-00Eng-0220.indd 15 2008-02-21 �� 4:26:32
Seite wird geladen ...
Seite wird geladen ...
Seite wird geladen ...
Seite wird geladen ...
Seite wird geladen ...
Seite wird geladen ...
Seite wird geladen ...
Seite wird geladen ...
Seite wird geladen ...

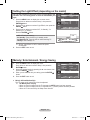
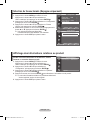
English - 25
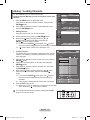
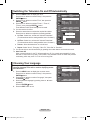
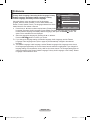
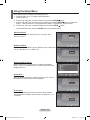
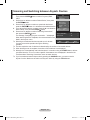
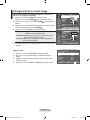
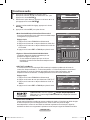
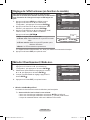
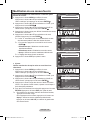
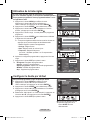
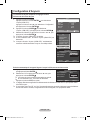
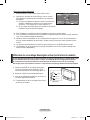
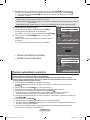
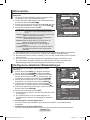
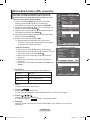
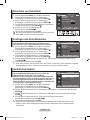
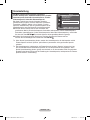
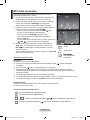
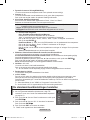
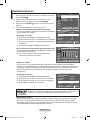
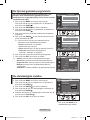
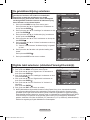
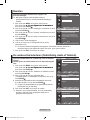
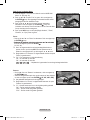
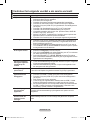
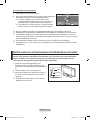
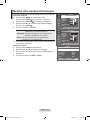
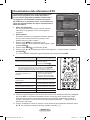
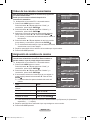
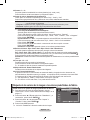
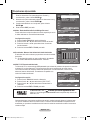
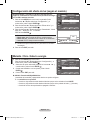
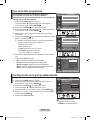
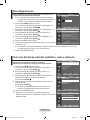
Setting and Displaying the Current Time
You can set the TV’s clock so that the current time is
displayed when you press the INFO button. You must also set
the time if you wish to use the automatic On/Off timers.
1. Press the MENU button to display the menu.
Press the ▲ or ▼ button to select "Setup", then press the
ENTER
button.
2. Press the ▲ or ▼ button to select "Time", then press the
ENTER
button.
3. Press the
ENTER
button to select "Clock Set".
4.
5. Press the EXIT button to exit.
The current time will appear every time you press the INFO button.
You can also set "Year", "Month", "Day", "Hour" and "Minute" by pressing the number buttons on the
remote control.
➣
➣
To... Press the....
Move to "Month", "Day", "Year", "Hour"
or "Minute"
◄ or ► button.
Set the "Month", "Day", "Year", "Hour"
or "Minute"
▲ or ▼ button.
Conrm the setting
ENTER
button
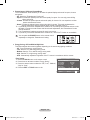
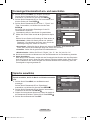
Setting the Sleep Timer
You can select a time period of between 30 and 180 minutes
after which the television automatically switches to standby
mode.
1. Press the MENU button to display the menu.
Press the ▲ or ▼ button to select "Setup", then press the
ENTER
button.
2. Press the ▲ or ▼ button to select "Time", then press the
ENTER
button.
3. Press the ▲ or ▼ button to select "Sleep Timer", then press
the
ENTER
button.
4. Press the ▲ or ▼ button repeatedly until the desired time
appears (Off, 30, 60, 90, 120, 150, 180).
Press the
ENTER
button.
5. Press the EXIT button to exit.
The TV automatically switches to standby mode when the
timer reaches 0.
Easy Setting
1. Press the TOOLS button on the remote control.
2. Press the ▲ or ▼ button to select “Sleep Timer”.
3. Press the ◄ or ► button to select the minute.
4. Press the EXIT or TOOLS button to exit.
➣
Tools
Anynet+ (HDMI-CEC)
Picture Mode : Standard
Sound Mode : Custom
Sleep Timer ◄ Off ►
SRS TS XT : Off
Energy Saving : Off
Dual l-ll : Mono
Move Adjust Exit
Mode : Custom
Equalizer
SRS TS XT : Off
Auto Volume : Off
Internal Mute : Off
Reset
Move Enter Return
TV
Setup
Plug & Play
Language : English
Time
Light Effect :
In Watching TV
Auto Wall-Mount
Melody : Off
Entertainment : Off
Energy Saving : Off
PIP
Move Enter Return
TV
Clock Set
Month
01
Day
p
q
01
2008
Year
00
Hour
00
Minute
Move Adjust Return
Mode : Custom
Equalizer
SRS TS XT : Off
Auto Volume : Off
Internal Mute : Off
Reset
Move Enter Return
TV
Setup
Plug & Play
Language : English
Time
Light Effect :
In Watching TV
Auto Wall-Mount
Melody : Off
Entertainment : Off
Energy Saving : Off
PIP
Move Enter Return
Time
Clock Set : 00:00
Sleep Timer :
Timer 1 :
Timer 2 :
Timer 3 :
Move Enter Return
TV
Off
30
60
90
120
150
180
BN68-01409A-00Eng-0220.indd 25 2008-02-21 �� 4:26:42
Seite wird geladen ...
Seite wird geladen ...
Seite wird geladen ...

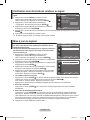
English - 29
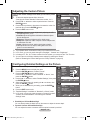
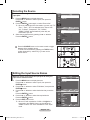
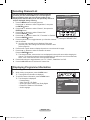
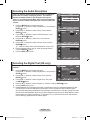
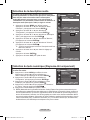
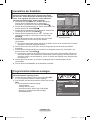
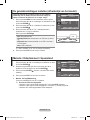
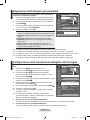
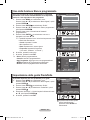
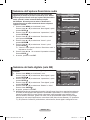
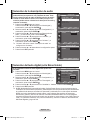
Editing the Input Source Names
Name the device connected to the input jacks to make your
input source selection easier.
1. Press the MENU button to display the menu.
Press the ▲ or ▼ button to select "Input", then press the
ENTER button.
2. Press the ▲ or ▼ button to select "Edit Name", then press the
ENTER button.
3. Press the ▲ or ▼ button to select the device that you wish to
edit.
Press the ENTER button.
4. Press the ▲ or ▼ button to select the required device.
Press the ENTER button.
5. Press the EXIT button to exit.
When a PC with a resolution of 1920 x 1080@60Hz is
connected to the HDMI IN 2 port, you should set the
"HDMI2" mode to "PC" in the "Edit Name" of the "Input"
mode.
➣
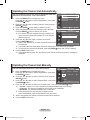
Selecting the Source
You can select among external sources connected to your TV’s
input jacks.
1. Press the MENU button to display the menu.
Press the ▲ or ▼ button to select "Input", then press the
ENTER button.
2. Press the ENTER button again, to select "Source List".
When no external device is connected to your set, only "TV",
"Ext.1", "Ext.2", "DTV" are activated in the "Source List".
"AV", "S-Video", "Component", "PC", "HDMI1",
"HDMI2","HDMI3" are activated only when they are
connected to your set.
3. Select the required device by pressing the ▲ or ▼ button.
Press the ENTER button.
Press the SOURCE button on the remote control to toggle
between all the available source.
TV mode can be selected by pressing the TV/DTV button,
number buttons(0~9), and the P</> button on the
remote control.
➣
Mode : Custom
Equalizer
SRS TS XT : Off
Auto Volume : Off
Internal Mute : Off
Reset
Move Enter Return
TV
Input
Source List : TV
Edit Name
Anynet+(HDMI-CEC)
WISELINK
Move Enter Return
Mode : Custom
Equalizer
SRS TS XT : Off
Auto Volume : Off
Internal Mute : Off
Reset
Move Enter Return
TV
Edit Name
Ext.1 : ----
Ext.2 : ----
AV : ----
S-Video : ----
Component : ----
PC : ----
HDMI1 : ----
HDMI2 : ----
HDMI3 : ----
Move Enter Return
----
VCR
DVD
Cable STB
Satellite STB
PVR STB
AV Receiver
s
Mode : Custom
Equalizer
SRS TS XT : Off
Auto Volume : Off
Internal Mute : Off
Reset
Move Enter Return
TV
Input
Source List : TV
Edit Name
Anynet+(HDMI-CEC)
WISELINK
Move Enter Return
Mode : Custom
Equalizer
SRS TS XT : Off
Auto Volume : Off
Internal Mute : Off
Reset
Move Enter Return
TV
Source List
TV
Ext.1 : ----
Ext.2 : ----
AV : ----
S-Video : ----
Component : ----
PC : ----
sMore
Move Enter Return
BN68-01409A-00Eng-0220.indd 29 2008-02-21 �� 4:26:46

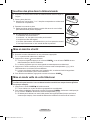
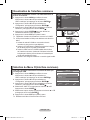
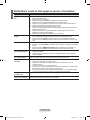
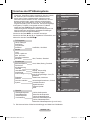
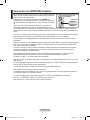
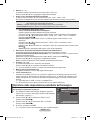
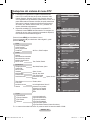
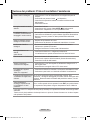
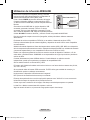
English - 30
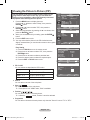
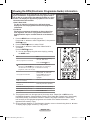
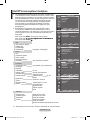
♦ The company does not guarantee the normal operation of the
DTV menu for countries other than the supported countries
(France, Germany, Italy, Netherlands, Spain, Switzerland,
United Kingdom, Austria) because only these country standards
are supported.
In addition, when the country of the broadcast stream differs
from the country selected by the current user, the string
appearing in the channel banner, Info, Guide, Channel
Manager, etc. may not be displayed properly.
♦ Available in DTV mode. Preset to the DTV mode by using the
TV/DTV button on your remote control. To help you navigate
around the on-screen menu system and adjust the various
settings available, refer to the following illustration.
Press the MENU button to display the menu.
Press the ▲ or ▼ button to select "Digital Menu", then press the
ENTER button.
The sub-items of the CI Menu may vary depending on the CAM model.
➣
Language
Audio Language
Subtitle Language
Teletext Language
Preference
Now/Next, Full Guide
Guide
Now & Next Guide
Full Guide
Scheduled List
Default Guide
Channel
Country
Auto Store
Manual Store
Edit Favourite Channels
Channel List
Setup
Menu Transparency
Change PIN
Parental Lock
Subtitle
Subtitle Mode
Audio Format
Audio Description
Digital Text
Time Zone
Common Interface
System
Product Information
Signal Information
Software Upgrade
Reset
High, Medium, Low, Opaque
Off, On
Normal, Hard of hearing
Primary Audio Language
Secondary Audio Language
Primary Subtitle Language
Secondary Subtitle Language
Primary Teletext Language
Secondary Teletext Language (Depending On the Country)
Disable, Enable
PCM, Dolby Digital
All, Favourites, Default
Previewing the DTV Menu System
Audio Description Off, On
Volume
Application Info, CI Menu
Mode : Custom
Equalizer
SRS TS XT : Off
Auto Volume : Off
Internal Mute : Off
Reset
Move Enter Return
TV
Digital Menu
Guide
Digital Channel
Setup
Language
Move Enter Return
Mode : Custom
Equalizer
SRS TS XT : Off
Auto Volume : Off
Internal Mute : Off
Reset
Move Enter Return
Guide
Now & Next Guide
Full Guide
Scheduled List
Default Guide : Full Guide
Move Enter Return
DTV
Move Enter Return
Channel
Country :
United Kingdom
Auto Store
Manual Store
Edit Favourite Channels
Channel List
Move Enter Return
DTV
Move Enter Return
Setup
Menu Transparency
: Medium
Change PIN
Parental Lock
Subtitle : Off
Subtitle Mode
q
Move Enter Return
DTV
Move Enter Return
Language
Audio Language
Subtitle Language
Teletext Language
Preference
Move Enter Return
DTV
BN68-01409A-00Eng-0220.indd 30 2008-02-21 �� 4:26:48
Seite wird geladen ...

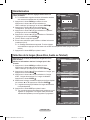
English - 32
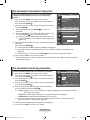
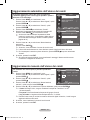
Editing Your Favourite Channels
You can edit your favourite channels using the four colour
buttons.
1. Press the MENU button to display the menu.
Press the ▲ or ▼ button to select "Digital Menu", then press the
ENTER button.
2. Press the ▲ or ▼ button to select "Channel", then press the
ENTER button.
3. Press the ▲ or ▼ button to select "Edit Favourite Channels",
then press the ENTER button.
4. Press the red button to display all currently stored channels.
5. Press the ▲ or ▼ button to select a channel you want.
Press the ENTER button.
A "
" icon is shown next to the selected channel and the
channel will be added to the favourite channel list.
•
To undo, press the ENTER button again.
•
Select All: Select all channels currently displayed.
•
Select None: Deselect all selected channels.
•
Preview: Displays (a) currently selected channel(s).
The Favourite Channels settings have been completed.
6. Press the EXIT button to exit.
♦ Add
You can use this function when one or more favourite channels
have been selected.
1. Press the MENU button to display the menu.
Press the ▲ or ▼ button to select "Digital Menu", then press the
ENTER button.
2. Press the ▲ or ▼ button to select "Channel", then press the
ENTER button.
3. Press the ▲ or ▼ button to select "Edit Favourite Channels",
then press the ENTER button.
4. Press the red button in the "Edit Favourite Channels" menu.
To add more channels, refer to the step 5 on the previous
description.
5.
If you want to check the channel to be stored, press RETURN
button.
Press the EXIT button to exit.
• To add all channels to the favourite channel list, press theTo add all channels to the favourite channel list, press the
red button.
• To remove all channels, press the green button.To remove all channels, press the green button.
• Preview : Displays (a) currently selected channel(s).
• Press thePress the CH LIST button to display the favourite channel
manager.
➣
➣
➣
➣
Move Enter Return
Edit Favourite Channels
(no channels)
Return
Add Channels
DTV
Move Enter Return
Edit Favourite Channels
5
2 BBC TWO
5 Five
7 BBC THREE
15 abc1
16 QVC
6
Select All Select None Preview
Move Select Return
DTV
Move Enter Return
Edit Favourite Channels
2 BBC TWO ★
7 BBC THREE ★
15 abc1 ★
Add
Renumber
Preview Delete
Move Return
DTV
Move Enter Return
Edit Favourite Channels
5
2 BBC TWO ★
5 Five
7 BBC THREE ★
15 abc1 ★
16 QVC
6
Select All Select None Preview
Move Select Return
DTV
BN68-01409A-00Eng-0220.indd 32 2008-02-21 �� 4:26:51
Seite wird geladen ...
Seite wird geladen ...
Seite wird geladen ...

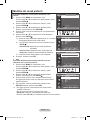
English - 36
Setting the Default Guide
You can preset the default guide style.
1. Press the MENU button to display the menu.
Press the ▲ or ▼ button to select "Digital Menu", then press the
ENTER button.
2. Press the ENTER button, to select "Guide".
3. Press the ▲ or ▼ button to select "Default Guide", then press
the ENTER button.
4. Select "Now/Next" or "Full Guide" using the ▲ or ▼ button,
and press the ENTER button.
5. Press the EXIT button to exit.
Using the Scheduled List
If you make a scheduled viewing list of programs you may like to
see, the channel will be automatically switched to the scheduled
programme at the scheduled time even if you are watching another
programme.
1. Press the MENU button to display the menu.
Press the ▲ or ▼ button to select "Digital Menu", then press the
ENTER button.
2. Press the ENTER button, to select "Guide".
3. Press the ▲ or ▼ button to select "Scheduled List", then press
the ENTER button.
4. Press the red button.
The channel will be switched to the scheduled programme.
5. Press the ENTER button to select an item and adjust with the
▲ or ▼ button .
You can also set hour and minute by pressing the number
buttons on the remote control.
•
Channel: Set the channel.
•
Time: Set the time.
•
Date: Set Year, Month and Day.
•
Frequency: Set the frequency.
("Once", "Daily", or "Weekly")
6. After setting the schedule, Press the red button.
7. Press the EXIT button to exit.
•
Save: Save the adjusted schedule.
•
Cancel: Cancel the adjusted schedule.
•
Add Programme: Add a new schedule.
•
Edit: Readjust the selected schedule.
•
Delete: Delete the selected schedule.
➣
➣
You can select these options
by simply pressing the GUIDE
button on the remote control.
Scheduled List
(No programmes)
Return
Add Programme
DTV
Scheduled List
Tuesday 22 Apr 15:30 ~ 16:00 Once
801 RaiTre
Move Return
Add Programme Edit Delete
DTV
Scheduled List
Channel
Adjust Move Return
Save Cancel
Time
Date
Frequency
802 RaiUno
15 : 20 to -- : --
Tue 22 Apr 2008
Once
DTV
Move Enter Return
Guide
Now & Next Guide
Full Guide
Scheduled List
Default Guide : Full Guide
Now/Next
Full Guide
Move Enter Return
DTV
BN68-01409A-00Eng-0220.indd 36 2008-02-21 �� 4:26:54
Seite wird geladen ...
Seite wird geladen ...
Seite wird geladen ...
Seite wird geladen ...
Seite wird geladen ...
Seite wird geladen ...
Seite wird geladen ...
Seite wird geladen ...
Seite wird geladen ...

English - 46
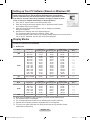
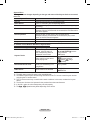
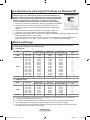
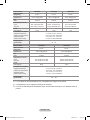
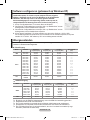
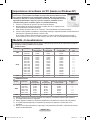
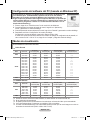
Display Modes
Both screen position and size will vary depending on the type of PC monitor and its resolution. The
resolutions in the table are recommended.
D-Sub Input
Mode Resolution
Horizontal
Frequency (kHz)
Vertical
Frequency (Hz)
Pixel Clock
Frequency (MHz)
Sync Polarity
(H/V)
IBM
640 x 350
720 x 400
31.469
31.469
70.086
70.087
25.175
28.322
+ / -
- / +
VESA
640 x 480
640 x 480
640 x 480
800 x 600
800 x 600
800 x 600
1024 x 768
1024 x 768
1024 x 768
1280 x 1024
1280 x 1024
1360 x 768
1600 x 1200
31.469
37.861
37.500
37.879
48.077
46.875
48.363
56.476
60.023
63.981
79.976
47.712
75.000
59.940
72.809
75.000
60.317
72.188
75.000
60.004
70.069
75.029
60.020
75.025
60.015
60.000
25.175
31.500
31.500
40.000
50.000
49.500
65.000
75.000
78.750
108.000
135.000
85.500
162.000
- / -
- / -
- / -
+ / +
+ / +
+ / +
- / -
- / -
+ / +
+ / +
+ / +
+ / +
+ / +
CVT 1920 x 1080RB 66.587 59.934 138.500 + / -
HDMI/DVI Input
Mode Resolution
Horizontal
Frequency (kHz)
Vertical
Frequency (Hz)
Pixel Clock
Frequency (MHz)
Sync Polarity
(H/V)
VESA
640 x 480
800 x 600
1024 x 768
1280 x 1024
1360 x 768
1600 x 1200
31.469
37.879
48.363
63.981
47.712
75.000
59.940
60.317
60.004
60.020
60.015
60.000
25.175
40.000
65.000
108.000
85.500
162.000
- / -
+ / +
- / -
+ / +
+ / +
+ / +
CEA 1920 x 1080p 67.500 60.000 148.500 + / +
When using an HDMI/DVI cable connection, you must use the HDMI IN 2 jack.
The interlace mode is not supported.
The set might operate abnormally if a non-standard video format is selected.
Separate and Composite modes are supported. SOG is not supported.
Too long or low quality VGA cable can cause picture noise at high resolution modes
(1920x1080 or 1600x1200).
➣
➣
➣
➣
➣
➣
➣
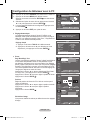
Setting up Your PC Software (Based on Windows XP)
The Windows display-settings for a typical computer are shown below. The
actual screens on your PC may be different depending upon your particular
version of Windows and your particular video card. Even if your actual screens
look different, the same, basic set-up information will apply in almost all cases.
(If not, contact your computer manufacturer or Samsung Dealer.)
1. First, click on "Control Panel" on the Windows start menu.
2. When the control panel window appears, click on "Appearance and Themes"
and a display dialog-box will appear.
3. When the control panel window appears, click on "Display" and a display
dialog-box will appear.
4. Navigate to the "Settings" tab on the display dialog-box.
The correct size setting (resolution): Optimum- 1920 X 1080
If a vertical-frequency option exists on your display settings dialog box, the correct value is
"60" or "60 Hz". Otherwise, just click "OK" and exit the dialog box.
BN68-01409A-00Eng-0220.indd 46 2008-02-21 �� 4:27:00

English - 47
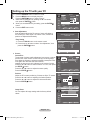
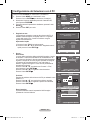
Setting up the TV with your PC
Press the SOURCE button to select PC mode.
1. Press the MENU button to display the menu.
Press the ENTER button, to select "Picture".
2. Select the required option by pressing the ▲ or ▼ button,
then press the ENTER button.
3. When you are satised with your setting, press the ENTER
button.
4. Press the EXIT button to exit.
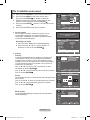
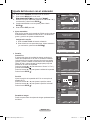
Auto Adjustment
Auto adjustment allows the PC screen of set to self-adjust to
the incoming PC video signal. The values of fine, coarse and
position are adjusted automatically.
Easy Setting
1. Press the TOOLS button on the remote control.
2. Press the ▲ or ▼ button to select “Auto Adjustment”, then
press the ENTER button.
Screen:
Coarse/Fine
The purpose of picture quality adjustment is to remove or reduce
picture noise. If the noise is not removed by Fine-tuning alone,
then adjust the frequency as best as possible (coarse) and Fine-
tune again. After the noise has been reduced,
readjust the picture so that it is aligned on the center of screen.
Press the ▲ or ▼ button to select "Coarse" or "Fine", then press
the ENTER button.
Press the ◄ or ► button to adjust the screen quality.
Press the ENTER button.
Position
Adjust the PC’s screen positioning if it does not fit the TV screen.
Press the ▲ or ▼ button to adjusting the Vertical-Position.
Press the ◄ or ► button to adjust the Horizontal-Position.
Press the ENTER button.
Image Reset
You can replace all image settings with the factory default
values.
➣
♦
♦
Auto Adjustment in progress
Please wait.
TV
Screen
Coarse 50
Fine 93
Position
Image Reset
Move Enter Return
Picture
Mode : Standard
Backlight 7
Contrast 95
Brightness 45
Sharpness 50
Auto Adjustment
Screen
Detailed Settings
sMore
TV
Move Enter Return
TV
Position
Move Enter Return
TV
Screen
Coarse 50
Fine 93
Position
Image Reset
Move Enter Return
Tools
Anynet+ (HDMI-CEC)
Picture Mode : Standard
Sound Mode : Custom
Sleep Timer : Off
SRS TS XT : Off
Energy Saving : Off
PIP
Auto Adjustment
Move Enter Exit
BN68-01409A-00Eng-0220.indd 47 2008-02-21 �� 4:27:02
Seite wird geladen ...

English - 49
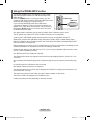
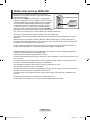
Using the WISELINK Menu
1. Press the MENU button. Press the ▲ or ▼ button to select
“Input”, then press the ENTER button.
2. Press the ▲ or ▼ button to select “WISELINK”, then press the
ENTER button.
3. Press the ▲ or ▼ button to select the corresponding USB
Memory Device, then press the ENTER button.
The "WISELINK" menu differs depending on the USB
Memory Device connected to TV.
Some devices may not be supported due to compatibility
problems.
4. Press the ◄ or ► button to move to an icon, then press the
ENTER button.
To exit WISELINK mode, press the W.LINK button on the
remote control.
Press the W.LINK button on the remote control to display a
WISELINK menu.
Using the Remote Control Button in WISELINK Menu
Button Operations
▲/ ▼/ ◄/ ► Move the cursor and select an item.
ENTER
Select the currently selected item.
Play the Slide Show or MP3 file.
Pause the Slide Show or MP3 file.
RETURN Return to the previous menu.
INFO Run various functions from the Photo and Music menus.
Stop the current slide show or MP3 file.
Page Up or Down (file list item)
EXIT Stop the current function and return to the previous high-level menu.
➣
➣
➣
Input
Source List : TV ►
Edit Name ►
Anynet+ (HDMI-CEC)
WISELINK
TV
Move Enter Return
Move Enter Exit
SUM
STORAGE DEVICE
STORAGE DEVICE
STORAGE DEVICE
STORAGE DEVICE
Move Enter Return
SUM
861MB/994MBFree
Photo
Photo Music Setup
BN68-01409A-00Eng-0220.indd 49 2008-02-21 �� 4:27:19

English - 50
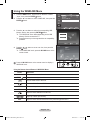
Using the PHOTO (JPEG) List
This menu shows JPEG les and folders saved on an USB memory
device.
1. Complete Steps 1 to 3 of “Using the WISELINK Menu”.
(Refer to page 49)
2. Press the ◄ or ► button to move to “Photo”, then press the
ENTER button. The saved le information is displayed as a
folder or le.
3. Press the ▲, ▼, ◄ and ► buttons to select a le.
• Pressing the ENTER button over a photo icon shows the
currently selected photo in full screen.
• Pressing the ENTER button over a folder icon shows the
JPEG les included in the folder.
To exit WISELINK mode, press the W.LINK button on the
remote control.
Moving to a photo may take a few seconds to load the le.
At this point, the icon will appear at the top left
of the screen.
It takes time to show JPEG les as Thumbnail images.
This menu only shows les whose le extension is jpg. Files of other formats such as bmp or tiff
will not be displayed.
The les are displayed on a page. 15 thumbnail photos are displayed per page.
The thumbnails are numbered from left to right and from top to bottom, from 1 to 15.
Certain types of USB Digital camera and audio devices may not be compatible with this TV.
Folders are displayed rst and they are followed by all JPEG les in the current folder. The
folders and JPEG les are sorted in alphabetical order.
If the photo is displayed in full screen, you can zoom in and out or rotate the photo on the screen.
While a full screen is displayed, ◄ or ► button will let you see another photo image in the same
folder.
Press the button when a Photo icon is selected to start a Slide Show.
Photos without EXIF information may not be displayed as thumbnail images in the PHOTO LIST
depending on the picture quality and resolution.
Viewing a Slide Show
4. Press the INFO button to display the option("Start Slide Show",
"Select All").
5. Press the ▲ or ▼ button to select “Start Slide Show” then
press the ENTER button.
During the slide show, les are displayed in order from the
currently shown le.
MP3 les can be automatically played during the Slide
Show if the Default Background Music is set to On. To
enable this function, MP3 les and other photo les must
be located in the same folder on the USB Memory Device.
6. Press the INFO button during the slide show to set the
following options ("Slide Show Speed", "Background Music",
"Background Music Setting", "List"). Press the ▲ or ▼ button
to select the option, then press the ENTER button.
• After setting the option press the ENTER button to make a
change.
➣
➣
➣
➣
➣
➣
➣
➣
➣
➣
➣
➣
➣
Upper Folder
Forder1
Photo 0001 Photo 0001 None
File 4 File 5 File 6 File 7 File 8
File 9 File 10 File 11 File 12 File 13
Select Move Enter
INFO
Option Return
Photo
1/10 Page
580*440
47KB
Jun 1,2008
3/23
895MB/993MB
SUM
Upper Folder
Forder1
Photo 0001 Photo 0001 None
File 4 File 5 File 6 File 7 File 8
File 9 File 10 File 11 File 12 File 13
Select Move Enter
INFO
Option Return
Photo
1/10 Page
580*440
47KB
Jun 1,2008
3/23
895MB/993MB
Start Slide Show
Select All
INFO
Exit
Slide Show Speed Nomal►
Background Music
On ►
Background Music Setting
List
INFO
Exit
Move Enter Return
SUM
861MB/994MBFree
Photo
Photo Music Setup
BN68-01409A-00Eng-0220.indd 50 2008-02-21 �� 4:27:32

English - 51
Using the Menu during a Slide Show
Slide Show Speed:
Select to control the slide show speed.
Press the ▲ or ▼ button to select the required option
("Fast", "Normal", "Slow"), then press the ENTER button.
Background Music:
Select to choose whether you want to play an MP3 le during a
slide show.
Press the ▲ or ▼ button to select the required option("On", "Off"),
then press the ENTER button.
Background Music Setting:
While the slide show is in progress, MP3 les and folders under
the same directory are displayed.
Select a folder using the ▲ or ▼ button and press the ENTER
button. The selected folder will be highlighted. Press the RETURN
button again to return to the slide show screen. The selected
background music is played.
If you turn Off the Background Music, even if the Background
Music Settings have been set up, the background music will
not be played.
List:
The le information is displayed as a folder or JPEG le.
To exit WISELINK mode, press the W.LINK button on the remote
control.
When selecting a photo le, the photo le information is
displayed on the left side of the TV screen, such as the
resolution, the date modied and the order of the le in the
current directory (e.g. 10th out of 15).
➣
➣
: Folder icon
: Photo icon
: Move to the previous
folder stage icon
Photo
580*440
47KB
Jun 1,2008
3/23
Such as the resolution
Order of the file in the
current directory
Date modified
Upper Folder
01-001
02-002
03-003
04-004
05-005
Select
Move Enter Return
◄◄ 1/1 Page ►►
Background Music Setting
Choose file for background music
Upper Folder
Forder1
Photo 0001 Photo 0001 None
File 4 File 5 File 6 File 7 File 8
File 9 File 10 File 11 File 12 File 13
Select Move Enter
INFO
Option Return
Photo
1/10 Page
580*440
47KB
Jun 1,2008
3/23
895MB/993MB
SUM
Upper Folder
Forder1
Photo 0001 Photo 0001 None
File 4 File 5 File 6 File 7 File 8
File 9 File 10 File 11 File 12 File 13
Select Move Enter
INFO
Option Return
Photo
1/10 Page
580*440
47KB
Jun 1,2008
3/23
895MB/993MB
SUM
File Size
Slide Show Speed Nomal
Background Music
On ►
Background Music Setting
List
INFO
Exit
Fast
Nomal
Slow
Slide Show Speed Nomal►
Background Music
On
Background Music Setting
List
INFO
Exit
Off
On
BN68-01409A-00Eng-0220.indd 51 2008-02-21 �� 4:27:34
Seite wird geladen ...

English - 53
Using the MP3 List
This menu shows MP3 les from among the les saved on a USB
memory device.
1. Complete Steps 1 to 3 of “Using the WISELINK Menu”.
(Refer to page 49)
2. Press the ◄ or ► button to move to “Music”, then press the
ENTER button. The saved le information is displayed as a
folder or le.
3. Press the ▲ or ▼ button to move to an icon, then press the
ENTER button.
Pressing the ENTER button over a musical note icon
immediately plays the music le.
Pressing the ENTER button over a folder icon shows the
music les included in the folder.
To select a le on the next page, press the or button
to move to the next page.
4. To select all les or a le, press the INFO button to display the
Music menus. Press the ENTER button to select “Play”,
“Repeat Music” or “Select All”.
To exit WISELINK mode, press the W.LINK button on the remote
control.
Using the Option Menu
Play:
Select to play MP3 files.
Press the button while playing an MP3 le to pause the le.
Press the button to exit Play mode.
This menu only shows les with the MP3 le extension. Files with other le extensions are not
displayed,even if they are saved on the same USB device.
The selected le is displayed on the top with its playing time.
To adjust the music volume, press the VOL +, VOL - button on the remote control. To mute the
sound, press the MUTE button on the remote control.
Repeat Music:
Select to repeatedly play MP3 les in the current folder.
You can select On or Off.
Music function information icon
: When all music les are being played.
: When a music le is being played.
/
:
When pressing the
/
button on the remote control while music is playing.
: When pressing the button on the remote control when music is stopped.
•
•
•
➣
➣
➣
➣
➣
: Folder icon
: Music icon
: Move to the previous
folder stage icon
Move Enter Return
SUM
861MB/994MBFree
Music
Photo Music Setup
Upper Folder
00:04:01
00:04:28
00:04:12
00:05:39
00:04:30
00:04:30
00:03:54
00:05:25
Folder 1
001-001
002-002
003-003
004-004
005-005
007-007
008-008
006-006
006-006
00:04:00
Select Move Enter
INFO
Option Return
Music
1/10 Page
5MB
Jun 1,2008
3/23
Play
Repeat Music Off
►
Select All
INFO
Exit
BN68-01409A-00Eng-0220.indd 53 2008-02-21 �� 4:28:00

English - 54
Using the Setup Menu
Setup displays the user settings of the WISELINK menu.
1. Complete Steps 1 to 3 of “Using the WISELINK Menu”.
(Refer to page 49)
2. Press the ◄ or ► button to move to “Setup”, then press the ENTER button.
3. Press the ▲ or ▼ button to select an item you want, then press the ENTER button. (“Slide Show
Speed”, “Background Music”, “Background Music Setting”, “Repeat Music”, “Screen Saver”)
4. Press the ▲ or ▼ button to select the option, then press the ENTER button.
To exit WISELINK mode, press the W.LINK button on the remote control.
Slide Show Speed:
Select to control the slide show speed. You can select “Fast”,
“Normal” or “Slow”.
Background Music :
Select to determine whether to play an MP3 file during a slide show.
You can select Music “On” or Music “Off”.
Background Music Setting:
While a slide show is in progress, use the "Background Music
Setup" to select a music file to listen to. Select an MP3 file as the
background music.
Repeat Music :
Select to determine whether to repeat playing the music when all
MP3 files in the current folder have been played.
Screen Saver:
Select to set the waiting time before the screen saver appears.
The screensaver will appear when no button is pressed for 1, 5 or
10 minutes.
Slide Show Speed Normal
Background Music On ►
Background Music Setting
Repeat Music Off ►
Screen Saver 1min. ►
Move Enter Return
Setup
Fast
Normal
Slow
Upper Folder
01-001
02-002
03-003
04-004
05-005
Select
Move Enter Return
◄◄ 1/1 Page ►►
Background Music Setting
Choose file for background music
Slide Show Speed Normal ►
Background Music On ►
Background Music Setting
Repeat Music Off
Screen Saver 1min. ►
Move Enter Return
Setup
Off
On
Slide Show Speed Normal ►
Background Music On ►
Background Music Setting
Repeat Music Off ►
Screen Saver 1min.
Move Enter Return
Setup
1min.
5min.
10min.
Slide Show Speed Normal ►
Background Music On
Background Music Setting
Repeat Music Off ►
Screen Saver 1min. ►
Move Enter Return
Setup
Off
On
BN68-01409A-00Eng-0220.indd 54 2008-02-21 �� 4:28:14
Seite wird geladen ...
Seite wird geladen ...
Seite wird geladen ...
Seite wird geladen ...
Seite wird geladen ...
Seite wird geladen ...
Seite wird geladen ...

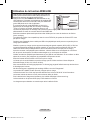
English - 62
The teletext pages are organized according to six categories:
Part Contents
A
B
C
D
E
F
Selected page number.
Broadcasting channel identity.
Current page number or search indications.
Date and time.
Text.
Status information.
FASTEXT information.
Teletext information is often divided between several pages
displayed in sequence, which can be accessed by:
Entering the page number
Selecting a title in a list
Selecting a coloured heading (FASTEXT system)
Press the TV/DTV button to exit from the teletext display.
➣
➣
BN68-01409A-00Eng-0220.indd 62 2008-02-21 �� 4:28:18
Seite wird geladen ...
Seite wird geladen ...
Seite wird geladen ...

English - 66
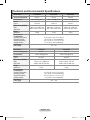
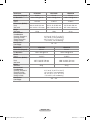
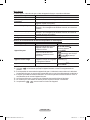
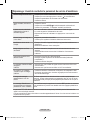
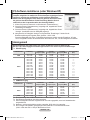
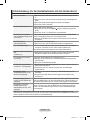
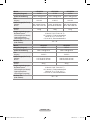
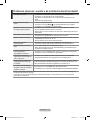
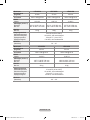
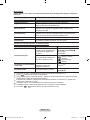
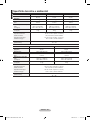
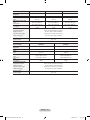
Technical and Environmental Specications
Model Name
LE32A556 LE37A556 LE40A556
Screen Size (Diagonal)
32 inch 37 inch 40 inch
PC Resolution
1920 x 1080 @ 60 Hz 1920 x 1080 @ 60 Hz 1920 x 1080 @ 60 Hz
Sound
Output
10 W X 2 10 W X 2 10 W X 2
Dimensions (WxDxH)
Body
With stand
865 x 79 x 500 mm
865 x 220 x 561 mm
984 x 87 x 572 mm
984 x 240 x 637 mm
1058 x 91 x 608 mm
1058 X 240 X 672 mm
Weight
With stand
14 kg
18 kg
19 kg
Environmental
Considerations
Operating Temperature
Operating Humidity
Storage Temperature
Storage Humidity
10 °C to 40 °C (50 °F to 104 °F)
10 % to 80 %, non-condensing
-20 °C to 45 °C (-4 °F to 113 °F)
5 % to 95 %, non-condensing
Stand Swivel
(Left / Right)
-20˚ ~ 20˚
Model Name
LE46A556 LE52A556
Screen Size (Diagonal)
46 inch 52 inch
PC Resolution
1920 x 1080 @ 60 Hz 1920 x 1080 @ 60 Hz
Sound
Output
10 W X 2 10 W X 2
Dimensions (WxDxH)
Body
With stand
1186 x 111 x 686 mm
1186 X 260 X 749 mm
1330 x 120 x 779 mm
1330 X 291 X 842 mm
Weight
With stand
27 kg
33 kg
Environmental
Considerations
Operating Temperature
Operating Humidity
Storage Temperature
Storage Humidity
10 °C to 40 °C (50 °F to 104 °F)
10 % to 80 %, non-condensing
-20 °C to 45 °C (-4 °F to 113 °F)
5 % to 95 %, non-condensing
Stand Swivel
(Left / Right)
-20˚ ~ 20˚
BN68-01409A-00Eng-0220.indd 66 2008-02-21 �� 4:28:20

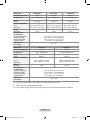
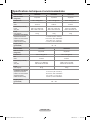
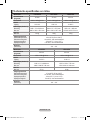
English - 67
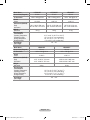
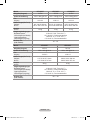
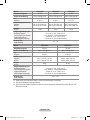
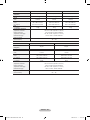
Model Name
LE32A557 LE37A557 LE40A557
Screen Size (Diagonal)
32 inch 37 inch 40 inch
PC Resolution
1920 x 1080 @ 60 Hz 1920 x 1080 @ 60 Hz 1920 x 1080 @ 60 Hz
Sound
Output
10 W X 2 10 W X 2 10 W X 2
Dimensions (WxDxH)
Body
With stand
801 X 88 X 526 mm
801 X 252 X 574 mm
918 X 92 X 608 mm
918 X 300 X 650 mm
997 X 92 X 641 mm
997 X 300 X 686 mm
Weight
With stand
13 kg
18 kg
21 kg
Environmental
Considerations
Operating Temperature
Operating Humidity
Storage Temperature
Storage Humidity
10 °C to 40 °C (50 °F to 104 °F)
10 % to 80 %, non-condensing
-20 °C to 45 °C (-4 °F to 113 °F)
5 % to 95 %, non-condensing
Stand Swivel
(Left / Right)
-20˚ ~ 20˚
Model Name
LE46A557 LE52A557
Screen Size (Diagonal)
46 inch 52 inch
PC Resolution
1920 x 1080 @ 60 Hz 1920 x 1080 @ 60 Hz
Sound
Output
10 W X 2 10 W X 2
Dimensions (WxDxH)
Body
With stand
1127 X 100 X 716 mm
1127 X 280 X 767 mm
1269 X 109 X 806 mm
1269 X 326 X 857 mm
Weight
With stand
28 kg
32 kg
Environmental
Considerations
Operating Temperature
Operating Humidity
Storage Temperature
Storage Humidity
10 °C to 40 °C (50 °F to 104 °F)
10 % to 80 %, non-condensing
-20 °C to 45 °C (-4 °F to 113 °F)
5 % to 95 %, non-condensing
Stand Swivel
(Left / Right)
-20˚ ~ 20˚
BN68-01409A-00Eng-0220.indd 67 2008-02-21 �� 4:28:20

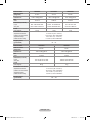
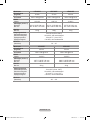
English - 68
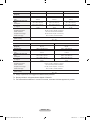
Model Name
LE32A558 LE37A558 LE40A558
Screen Size (Diagonal)
32 inch 37 inch 40 inch
PC Resolution
1920 x 1080 @ 60 Hz 1920 x 1080 @ 60 Hz 1920 x 1080 @ 60 Hz
Sound
Output
10 W X 2 10 W X 2 10 W X 2
Dimensions (WxDxH)
Body
With stand
801 X 88 X 514 mm
801 X 252 X 574 mm
918 X 92 X 592 mm
918 X 300 X 650 mm
997 X 92 X 628 mm
997 X 300 X 686 mm
Weight
With stand
13 kg
18 kg
21 kg
Environmental
Considerations
Operating Temperature
Operating Humidity
Storage Temperature
Storage Humidity
10 °C to 40 °C (50 °F to 104 °F)
10 % to 80 %, non-condensing
-20 °C to 45 °C (-4 °F to 113 °F)
5 % to 95 %, non-condensing
Stand Swivel
(Left / Right)
-20˚ ~ 20˚
Model Name
LE46A558 LE52A558
Screen Size (Diagonal)
46 inch 52 inch
PC Resolution
1920 x 1080 @ 60 Hz 1920 x 1080 @ 60 Hz
Sound
Output
10 W X 2 10 W X 2
Dimensions (WxDxH)
Body
With stand
1127 X 100 X 700 mm
1127 X 280 X 767 mm
1269 X 109 X 791 mm
1269 X 326 X 857 mm
Weight
With stand
28 kg
32 kg
Environmental
Considerations
Operating Temperature
Operating Humidity
Storage Temperature
Storage Humidity
10 °C to 40 °C (50 °F to 104 °F)
10 % to 80 %, non-condensing
-20 °C to 45 °C (-4 °F to 113 °F)
5 % to 95 %, non-condensing
Stand Swivel
(Left / Right)
-20˚ ~ 20˚
BN68-01409A-00Eng-0220.indd 68 2008-02-21 �� 4:28:20
Seite wird geladen ...
Seite wird geladen ...
Seite wird geladen ...
Seite wird geladen ...
Seite wird geladen ...
Seite wird geladen ...
Seite wird geladen ...
Seite wird geladen ...
Seite wird geladen ...
Seite wird geladen ...
Seite wird geladen ...
Seite wird geladen ...
Seite wird geladen ...
Seite wird geladen ...
Seite wird geladen ...
Seite wird geladen ...
Seite wird geladen ...
Seite wird geladen ...
Seite wird geladen ...
Seite wird geladen ...
Seite wird geladen ...
Seite wird geladen ...
Seite wird geladen ...
Seite wird geladen ...
Seite wird geladen ...
Seite wird geladen ...
Seite wird geladen ...
Seite wird geladen ...
Seite wird geladen ...
Seite wird geladen ...
Seite wird geladen ...
Seite wird geladen ...
Seite wird geladen ...
Seite wird geladen ...
Seite wird geladen ...
Seite wird geladen ...
Seite wird geladen ...
Seite wird geladen ...
Seite wird geladen ...
Seite wird geladen ...
Seite wird geladen ...
Seite wird geladen ...
Seite wird geladen ...
Seite wird geladen ...
Seite wird geladen ...
Seite wird geladen ...
Seite wird geladen ...
Seite wird geladen ...
Seite wird geladen ...
Seite wird geladen ...
Seite wird geladen ...
Seite wird geladen ...
Seite wird geladen ...
Seite wird geladen ...
Seite wird geladen ...
Seite wird geladen ...
Seite wird geladen ...
Seite wird geladen ...
Seite wird geladen ...
Seite wird geladen ...
Seite wird geladen ...
Seite wird geladen ...
Seite wird geladen ...
Seite wird geladen ...
Seite wird geladen ...
Seite wird geladen ...
Seite wird geladen ...
Seite wird geladen ...
Seite wird geladen ...
Seite wird geladen ...
Seite wird geladen ...
Seite wird geladen ...
Seite wird geladen ...
Seite wird geladen ...
Seite wird geladen ...
Seite wird geladen ...
Seite wird geladen ...
Seite wird geladen ...
Seite wird geladen ...
Seite wird geladen ...
Seite wird geladen ...
Seite wird geladen ...
Seite wird geladen ...
Seite wird geladen ...
Seite wird geladen ...
Seite wird geladen ...
Seite wird geladen ...
Seite wird geladen ...
Seite wird geladen ...
Seite wird geladen ...
Seite wird geladen ...
Seite wird geladen ...
Seite wird geladen ...
Seite wird geladen ...
Seite wird geladen ...
Seite wird geladen ...
Seite wird geladen ...
Seite wird geladen ...
Seite wird geladen ...
Seite wird geladen ...
Seite wird geladen ...
Seite wird geladen ...
Seite wird geladen ...
Seite wird geladen ...
Seite wird geladen ...
Seite wird geladen ...
Seite wird geladen ...
Seite wird geladen ...
Seite wird geladen ...
Seite wird geladen ...
Seite wird geladen ...
Seite wird geladen ...
Seite wird geladen ...
Seite wird geladen ...
Seite wird geladen ...
Seite wird geladen ...
Seite wird geladen ...
Seite wird geladen ...
Seite wird geladen ...
Seite wird geladen ...
Seite wird geladen ...
Seite wird geladen ...
Seite wird geladen ...
Seite wird geladen ...
Seite wird geladen ...
Seite wird geladen ...
Seite wird geladen ...
Seite wird geladen ...
Seite wird geladen ...
Seite wird geladen ...
Seite wird geladen ...
Seite wird geladen ...
Seite wird geladen ...
Seite wird geladen ...
Seite wird geladen ...
Seite wird geladen ...
Seite wird geladen ...
Seite wird geladen ...
Seite wird geladen ...
Seite wird geladen ...
Seite wird geladen ...
Seite wird geladen ...
Seite wird geladen ...
Seite wird geladen ...
Seite wird geladen ...
Seite wird geladen ...
Seite wird geladen ...
Seite wird geladen ...
Seite wird geladen ...
Seite wird geladen ...
Seite wird geladen ...
Seite wird geladen ...
Seite wird geladen ...
Seite wird geladen ...
Seite wird geladen ...
Seite wird geladen ...
Seite wird geladen ...
Seite wird geladen ...
Seite wird geladen ...
Seite wird geladen ...
Seite wird geladen ...
Seite wird geladen ...
Seite wird geladen ...
Seite wird geladen ...
Seite wird geladen ...
Seite wird geladen ...
Seite wird geladen ...
Seite wird geladen ...
Seite wird geladen ...
Seite wird geladen ...
Seite wird geladen ...
Seite wird geladen ...
Seite wird geladen ...
Seite wird geladen ...
Seite wird geladen ...
Seite wird geladen ...
Seite wird geladen ...
Seite wird geladen ...
Seite wird geladen ...
Seite wird geladen ...
Seite wird geladen ...
Seite wird geladen ...
Seite wird geladen ...
Seite wird geladen ...
Seite wird geladen ...
Seite wird geladen ...
Seite wird geladen ...
Seite wird geladen ...
Seite wird geladen ...
Seite wird geladen ...
Seite wird geladen ...
Seite wird geladen ...
Seite wird geladen ...
Seite wird geladen ...
Seite wird geladen ...
Seite wird geladen ...
Seite wird geladen ...
Seite wird geladen ...
Seite wird geladen ...
Seite wird geladen ...
Seite wird geladen ...
Seite wird geladen ...
Seite wird geladen ...
Seite wird geladen ...
Seite wird geladen ...
Seite wird geladen ...
Seite wird geladen ...
Seite wird geladen ...
Seite wird geladen ...
Seite wird geladen ...
Seite wird geladen ...
Seite wird geladen ...
Seite wird geladen ...
Seite wird geladen ...
Seite wird geladen ...
Seite wird geladen ...
Seite wird geladen ...
Seite wird geladen ...
Seite wird geladen ...
Seite wird geladen ...
Seite wird geladen ...
Seite wird geladen ...
Seite wird geladen ...
Seite wird geladen ...
Seite wird geladen ...
Seite wird geladen ...
Seite wird geladen ...
Seite wird geladen ...
Seite wird geladen ...
Seite wird geladen ...
Seite wird geladen ...
Seite wird geladen ...
Seite wird geladen ...
Seite wird geladen ...
Seite wird geladen ...
Seite wird geladen ...
Seite wird geladen ...
Seite wird geladen ...
Seite wird geladen ...
Seite wird geladen ...
Seite wird geladen ...
Seite wird geladen ...
Seite wird geladen ...
Seite wird geladen ...
Seite wird geladen ...
Seite wird geladen ...
Seite wird geladen ...
Seite wird geladen ...
Seite wird geladen ...
Seite wird geladen ...
Seite wird geladen ...
Seite wird geladen ...
Seite wird geladen ...
Seite wird geladen ...
Seite wird geladen ...
Seite wird geladen ...
Seite wird geladen ...
Seite wird geladen ...
Seite wird geladen ...
Seite wird geladen ...
Seite wird geladen ...
Seite wird geladen ...
Seite wird geladen ...
Seite wird geladen ...
Seite wird geladen ...
Seite wird geladen ...
Seite wird geladen ...
Seite wird geladen ...
Seite wird geladen ...
Seite wird geladen ...
Seite wird geladen ...
Seite wird geladen ...
Seite wird geladen ...
Seite wird geladen ...
Seite wird geladen ...
Seite wird geladen ...
Seite wird geladen ...
Seite wird geladen ...
Seite wird geladen ...
Seite wird geladen ...
Seite wird geladen ...
Seite wird geladen ...
Seite wird geladen ...
Seite wird geladen ...
Seite wird geladen ...
Seite wird geladen ...
Seite wird geladen ...
Seite wird geladen ...
Seite wird geladen ...
Seite wird geladen ...
Seite wird geladen ...
Seite wird geladen ...
Seite wird geladen ...
Seite wird geladen ...
Seite wird geladen ...
Seite wird geladen ...
Seite wird geladen ...
Seite wird geladen ...
Seite wird geladen ...
Seite wird geladen ...
Seite wird geladen ...
Seite wird geladen ...
Seite wird geladen ...
Seite wird geladen ...
Seite wird geladen ...
Seite wird geladen ...
Seite wird geladen ...
Seite wird geladen ...
Seite wird geladen ...
Seite wird geladen ...
Seite wird geladen ...
Seite wird geladen ...
Seite wird geladen ...
Seite wird geladen ...
Seite wird geladen ...
Seite wird geladen ...
Seite wird geladen ...
Seite wird geladen ...
Seite wird geladen ...
Seite wird geladen ...
Seite wird geladen ...
Seite wird geladen ...
Seite wird geladen ...
Seite wird geladen ...
Seite wird geladen ...
Seite wird geladen ...
Seite wird geladen ...
Seite wird geladen ...
Seite wird geladen ...
Seite wird geladen ...
Seite wird geladen ...
Seite wird geladen ...
Seite wird geladen ...
Seite wird geladen ...
Seite wird geladen ...
Seite wird geladen ...
Seite wird geladen ...
Seite wird geladen ...
Seite wird geladen ...
Seite wird geladen ...
Seite wird geladen ...
Seite wird geladen ...
Seite wird geladen ...
Seite wird geladen ...
Seite wird geladen ...
Seite wird geladen ...
Seite wird geladen ...
Seite wird geladen ...
Seite wird geladen ...
Seite wird geladen ...
Seite wird geladen ...
Seite wird geladen ...
Seite wird geladen ...
Seite wird geladen ...
Seite wird geladen ...
Seite wird geladen ...
Seite wird geladen ...
Seite wird geladen ...
Seite wird geladen ...
Seite wird geladen ...
Seite wird geladen ...
Seite wird geladen ...
Seite wird geladen ...
Seite wird geladen ...
Seite wird geladen ...
Seite wird geladen ...
Seite wird geladen ...
Seite wird geladen ...
Seite wird geladen ...
Seite wird geladen ...
Seite wird geladen ...
Seite wird geladen ...
Seite wird geladen ...
Seite wird geladen ...
Seite wird geladen ...
Seite wird geladen ...
Seite wird geladen ...
Seite wird geladen ...
Seite wird geladen ...
Seite wird geladen ...
Seite wird geladen ...
Seite wird geladen ...
Seite wird geladen ...
Seite wird geladen ...
Seite wird geladen ...
Seite wird geladen ...
Seite wird geladen ...
Seite wird geladen ...
Seite wird geladen ...
Seite wird geladen ...
Seite wird geladen ...
Seite wird geladen ...
Seite wird geladen ...
Seite wird geladen ...
Seite wird geladen ...
Seite wird geladen ...
Seite wird geladen ...
Seite wird geladen ...
Seite wird geladen ...
Seite wird geladen ...
Seite wird geladen ...
Seite wird geladen ...
Seite wird geladen ...
Seite wird geladen ...
Seite wird geladen ...
Seite wird geladen ...
Seite wird geladen ...
Seite wird geladen ...
Seite wird geladen ...
Seite wird geladen ...
Seite wird geladen ...
Seite wird geladen ...
Seite wird geladen ...
Seite wird geladen ...
Seite wird geladen ...
Seite wird geladen ...
Seite wird geladen ...
Seite wird geladen ...
Seite wird geladen ...
Seite wird geladen ...
Seite wird geladen ...
Seite wird geladen ...
Seite wird geladen ...
Seite wird geladen ...
Seite wird geladen ...
Seite wird geladen ...
Seite wird geladen ...
Seite wird geladen ...
Seite wird geladen ...
Seite wird geladen ...
Seite wird geladen ...
Seite wird geladen ...
Seite wird geladen ...
Seite wird geladen ...
Seite wird geladen ...
Seite wird geladen ...
Seite wird geladen ...
Seite wird geladen ...
Seite wird geladen ...
Seite wird geladen ...
Seite wird geladen ...
Seite wird geladen ...
Seite wird geladen ...
Seite wird geladen ...
Seite wird geladen ...
Seite wird geladen ...
Seite wird geladen ...
Seite wird geladen ...
Seite wird geladen ...
Seite wird geladen ...
Seite wird geladen ...
Seite wird geladen ...
Seite wird geladen ...
Seite wird geladen ...
Seite wird geladen ...
Seite wird geladen ...
Seite wird geladen ...
Seite wird geladen ...
Seite wird geladen ...
Seite wird geladen ...
Seite wird geladen ...
Seite wird geladen ...
Seite wird geladen ...
Seite wird geladen ...
Seite wird geladen ...
Seite wird geladen ...
Seite wird geladen ...
Seite wird geladen ...
Seite wird geladen ...
Seite wird geladen ...
Seite wird geladen ...
Seite wird geladen ...
Seite wird geladen ...
Seite wird geladen ...
Seite wird geladen ...
Seite wird geladen ...
Seite wird geladen ...
Seite wird geladen ...
Seite wird geladen ...
Seite wird geladen ...
Seite wird geladen ...
Seite wird geladen ...
Seite wird geladen ...
Seite wird geladen ...
Seite wird geladen ...
Seite wird geladen ...
Seite wird geladen ...
Seite wird geladen ...
Seite wird geladen ...
Seite wird geladen ...
Seite wird geladen ...
Seite wird geladen ...
Seite wird geladen ...
Seite wird geladen ...
-
 1
1
-
 2
2
-
 3
3
-
 4
4
-
 5
5
-
 6
6
-
 7
7
-
 8
8
-
 9
9
-
 10
10
-
 11
11
-
 12
12
-
 13
13
-
 14
14
-
 15
15
-
 16
16
-
 17
17
-
 18
18
-
 19
19
-
 20
20
-
 21
21
-
 22
22
-
 23
23
-
 24
24
-
 25
25
-
 26
26
-
 27
27
-
 28
28
-
 29
29
-
 30
30
-
 31
31
-
 32
32
-
 33
33
-
 34
34
-
 35
35
-
 36
36
-
 37
37
-
 38
38
-
 39
39
-
 40
40
-
 41
41
-
 42
42
-
 43
43
-
 44
44
-
 45
45
-
 46
46
-
 47
47
-
 48
48
-
 49
49
-
 50
50
-
 51
51
-
 52
52
-
 53
53
-
 54
54
-
 55
55
-
 56
56
-
 57
57
-
 58
58
-
 59
59
-
 60
60
-
 61
61
-
 62
62
-
 63
63
-
 64
64
-
 65
65
-
 66
66
-
 67
67
-
 68
68
-
 69
69
-
 70
70
-
 71
71
-
 72
72
-
 73
73
-
 74
74
-
 75
75
-
 76
76
-
 77
77
-
 78
78
-
 79
79
-
 80
80
-
 81
81
-
 82
82
-
 83
83
-
 84
84
-
 85
85
-
 86
86
-
 87
87
-
 88
88
-
 89
89
-
 90
90
-
 91
91
-
 92
92
-
 93
93
-
 94
94
-
 95
95
-
 96
96
-
 97
97
-
 98
98
-
 99
99
-
 100
100
-
 101
101
-
 102
102
-
 103
103
-
 104
104
-
 105
105
-
 106
106
-
 107
107
-
 108
108
-
 109
109
-
 110
110
-
 111
111
-
 112
112
-
 113
113
-
 114
114
-
 115
115
-
 116
116
-
 117
117
-
 118
118
-
 119
119
-
 120
120
-
 121
121
-
 122
122
-
 123
123
-
 124
124
-
 125
125
-
 126
126
-
 127
127
-
 128
128
-
 129
129
-
 130
130
-
 131
131
-
 132
132
-
 133
133
-
 134
134
-
 135
135
-
 136
136
-
 137
137
-
 138
138
-
 139
139
-
 140
140
-
 141
141
-
 142
142
-
 143
143
-
 144
144
-
 145
145
-
 146
146
-
 147
147
-
 148
148
-
 149
149
-
 150
150
-
 151
151
-
 152
152
-
 153
153
-
 154
154
-
 155
155
-
 156
156
-
 157
157
-
 158
158
-
 159
159
-
 160
160
-
 161
161
-
 162
162
-
 163
163
-
 164
164
-
 165
165
-
 166
166
-
 167
167
-
 168
168
-
 169
169
-
 170
170
-
 171
171
-
 172
172
-
 173
173
-
 174
174
-
 175
175
-
 176
176
-
 177
177
-
 178
178
-
 179
179
-
 180
180
-
 181
181
-
 182
182
-
 183
183
-
 184
184
-
 185
185
-
 186
186
-
 187
187
-
 188
188
-
 189
189
-
 190
190
-
 191
191
-
 192
192
-
 193
193
-
 194
194
-
 195
195
-
 196
196
-
 197
197
-
 198
198
-
 199
199
-
 200
200
-
 201
201
-
 202
202
-
 203
203
-
 204
204
-
 205
205
-
 206
206
-
 207
207
-
 208
208
-
 209
209
-
 210
210
-
 211
211
-
 212
212
-
 213
213
-
 214
214
-
 215
215
-
 216
216
-
 217
217
-
 218
218
-
 219
219
-
 220
220
-
 221
221
-
 222
222
-
 223
223
-
 224
224
-
 225
225
-
 226
226
-
 227
227
-
 228
228
-
 229
229
-
 230
230
-
 231
231
-
 232
232
-
 233
233
-
 234
234
-
 235
235
-
 236
236
-
 237
237
-
 238
238
-
 239
239
-
 240
240
-
 241
241
-
 242
242
-
 243
243
-
 244
244
-
 245
245
-
 246
246
-
 247
247
-
 248
248
-
 249
249
-
 250
250
-
 251
251
-
 252
252
-
 253
253
-
 254
254
-
 255
255
-
 256
256
-
 257
257
-
 258
258
-
 259
259
-
 260
260
-
 261
261
-
 262
262
-
 263
263
-
 264
264
-
 265
265
-
 266
266
-
 267
267
-
 268
268
-
 269
269
-
 270
270
-
 271
271
-
 272
272
-
 273
273
-
 274
274
-
 275
275
-
 276
276
-
 277
277
-
 278
278
-
 279
279
-
 280
280
-
 281
281
-
 282
282
-
 283
283
-
 284
284
-
 285
285
-
 286
286
-
 287
287
-
 288
288
-
 289
289
-
 290
290
-
 291
291
-
 292
292
-
 293
293
-
 294
294
-
 295
295
-
 296
296
-
 297
297
-
 298
298
-
 299
299
-
 300
300
-
 301
301
-
 302
302
-
 303
303
-
 304
304
-
 305
305
-
 306
306
-
 307
307
-
 308
308
-
 309
309
-
 310
310
-
 311
311
-
 312
312
-
 313
313
-
 314
314
-
 315
315
-
 316
316
-
 317
317
-
 318
318
-
 319
319
-
 320
320
-
 321
321
-
 322
322
-
 323
323
-
 324
324
-
 325
325
-
 326
326
-
 327
327
-
 328
328
-
 329
329
-
 330
330
-
 331
331
-
 332
332
-
 333
333
-
 334
334
-
 335
335
-
 336
336
-
 337
337
-
 338
338
-
 339
339
-
 340
340
-
 341
341
-
 342
342
-
 343
343
-
 344
344
-
 345
345
-
 346
346
-
 347
347
-
 348
348
-
 349
349
-
 350
350
-
 351
351
-
 352
352
-
 353
353
-
 354
354
-
 355
355
-
 356
356
-
 357
357
-
 358
358
-
 359
359
-
 360
360
-
 361
361
-
 362
362
-
 363
363
-
 364
364
-
 365
365
-
 366
366
-
 367
367
-
 368
368
-
 369
369
-
 370
370
-
 371
371
-
 372
372
-
 373
373
-
 374
374
-
 375
375
-
 376
376
-
 377
377
-
 378
378
-
 379
379
-
 380
380
-
 381
381
-
 382
382
-
 383
383
-
 384
384
-
 385
385
-
 386
386
-
 387
387
-
 388
388
-
 389
389
-
 390
390
-
 391
391
-
 392
392
-
 393
393
-
 394
394
-
 395
395
-
 396
396
-
 397
397
-
 398
398
-
 399
399
-
 400
400
-
 401
401
-
 402
402
-
 403
403
-
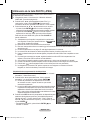 404
404
-
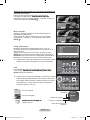 405
405
-
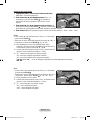 406
406
-
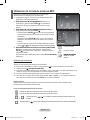 407
407
-
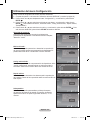 408
408
-
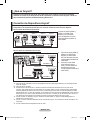 409
409
-
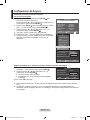 410
410
-
 411
411
-
 412
412
-
 413
413
-
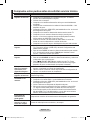 414
414
-
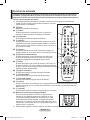 415
415
-
 416
416
-
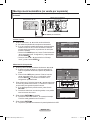 417
417
-
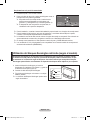 418
418
-
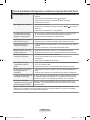 419
419
-
 420
420
-
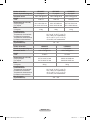 421
421
-
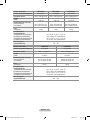 422
422
-
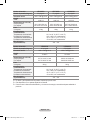 423
423
-
 424
424
-
 425
425
-
 426
426
-
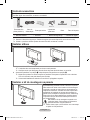 427
427
-
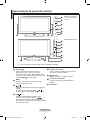 428
428
-
 429
429
-
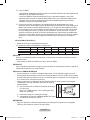 430
430
-
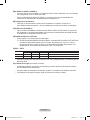 431
431
-
 432
432
-
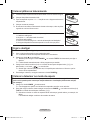 433
433
-
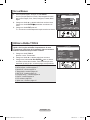 434
434
-
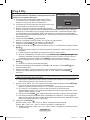 435
435
-
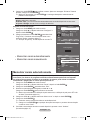 436
436
-
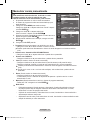 437
437
-
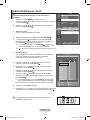 438
438
-
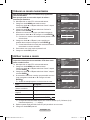 439
439
-
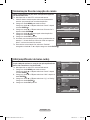 440
440
-
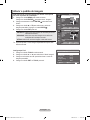 441
441
-
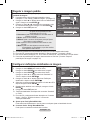 442
442
-
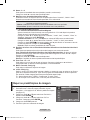 443
443
-
 444
444
-
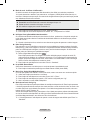 445
445
-
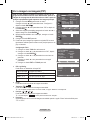 446
446
-
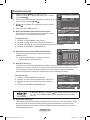 447
447
-
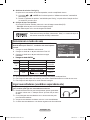 448
448
-
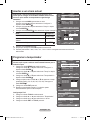 449
449
-
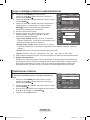 450
450
-
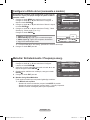 451
451
-
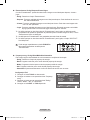 452
452
-
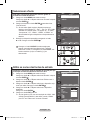 453
453
-
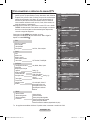 454
454
-
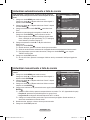 455
455
-
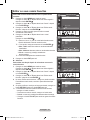 456
456
-
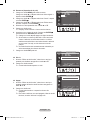 457
457
-
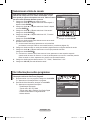 458
458
-
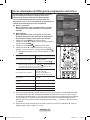 459
459
-
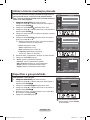 460
460
-
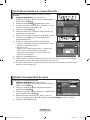 461
461
-
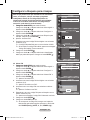 462
462
-
 463
463
-
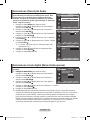 464
464
-
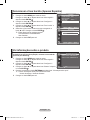 465
465
-
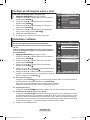 466
466
-
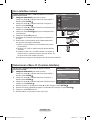 467
467
-
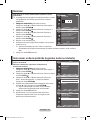 468
468
-
 469
469
-
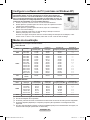 470
470
-
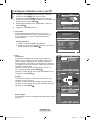 471
471
-
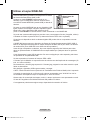 472
472
-
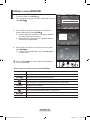 473
473
-
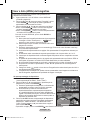 474
474
-
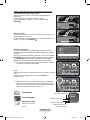 475
475
-
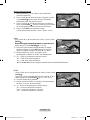 476
476
-
 477
477
-
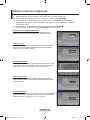 478
478
-
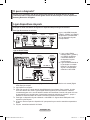 479
479
-
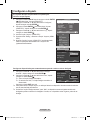 480
480
-
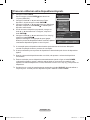 481
481
-
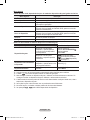 482
482
-
 483
483
-
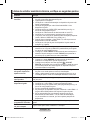 484
484
-
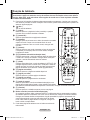 485
485
-
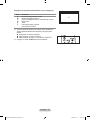 486
486
-
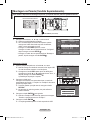 487
487
-
 488
488
-
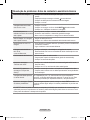 489
489
-
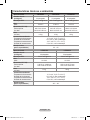 490
490
-
 491
491
-
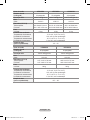 492
492
-
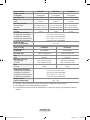 493
493
-
 494
494
-
 495
495
-
 496
496
-
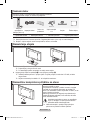 497
497
-
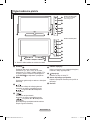 498
498
-
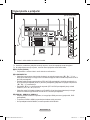 499
499
-
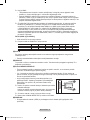 500
500
-
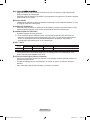 501
501
-
 502
502
-
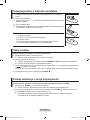 503
503
-
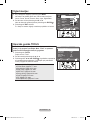 504
504
-
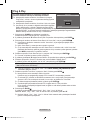 505
505
-
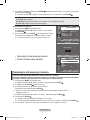 506
506
-
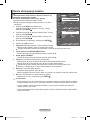 507
507
-
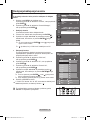 508
508
-
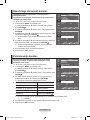 509
509
-
 510
510
-
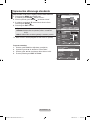 511
511
-
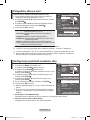 512
512
-
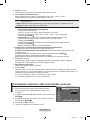 513
513
-
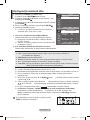 514
514
-
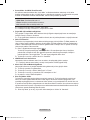 515
515
-
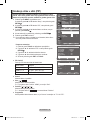 516
516
-
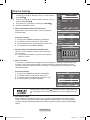 517
517
-
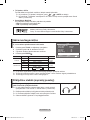 518
518
-
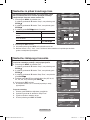 519
519
-
 520
520
-
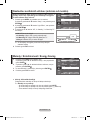 521
521
-
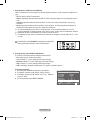 522
522
-
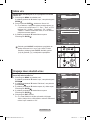 523
523
-
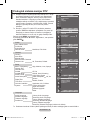 524
524
-
 525
525
-
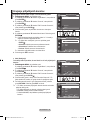 526
526
-
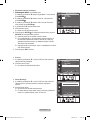 527
527
-
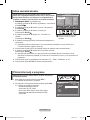 528
528
-
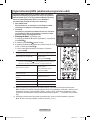 529
529
-
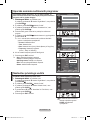 530
530
-
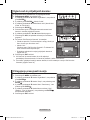 531
531
-
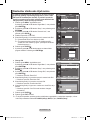 532
532
-
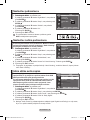 533
533
-
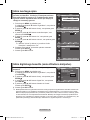 534
534
-
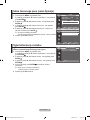 535
535
-
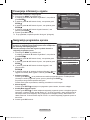 536
536
-
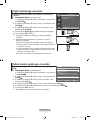 537
537
-
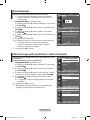 538
538
-
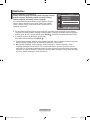 539
539
-
 540
540
-
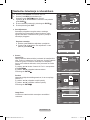 541
541
-
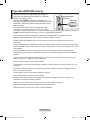 542
542
-
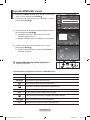 543
543
-
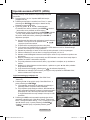 544
544
-
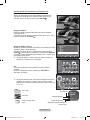 545
545
-
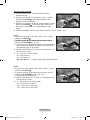 546
546
-
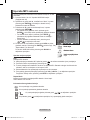 547
547
-
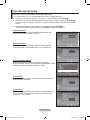 548
548
-
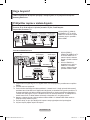 549
549
-
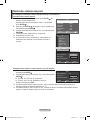 550
550
-
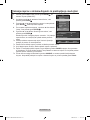 551
551
-
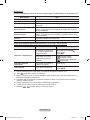 552
552
-
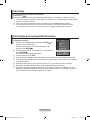 553
553
-
 554
554
-
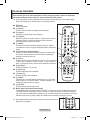 555
555
-
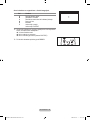 556
556
-
 557
557
-
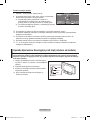 558
558
-
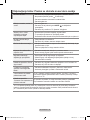 559
559
-
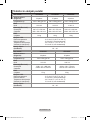 560
560
-
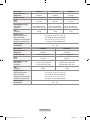 561
561
-
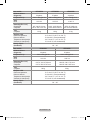 562
562
-
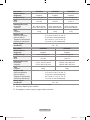 563
563
-
 564
564


Samsung LE32A556P1F Benutzerhandbuch
- Kategorie
- LCD-Fernseher
- Typ
- Benutzerhandbuch
in anderen Sprachen
- English: Samsung LE32A556P1F User manual
- français: Samsung LE32A556P1F Manuel utilisateur
- español: Samsung LE32A556P1F Manual de usuario
- italiano: Samsung LE32A556P1F Manuale utente
- Nederlands: Samsung LE32A556P1F Handleiding
- português: Samsung LE32A556P1F Manual do usuário
Verwandte Artikel
-
Samsung LE40R81B Benutzerhandbuch
-
Samsung LE32A550P1R Benutzerhandbuch
-
-
Samsung LE32A769 Benutzerhandbuch
-
-
-
Samsung LE46A756R1M Schnellstartanleitung
-
-
Samsung PS50A557S3F Benutzerhandbuch
-
Samsung LE32A659A1F Bedienungsanleitung