
RK5018ek & RK5019ek Instructions P35729ec
RK5018ek and RK5019ek INSTRUCTIONS
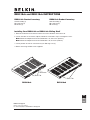
RK5018ek Product Inventory RK5019ek Product Inventory
Shelf Assembly (1) Shelf Assembly (1)
M6 Cage Nut (8) M6 Cage Nut (8)
M6 Screw (8) M6 Screw (8)
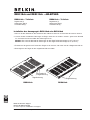
Installing Your RK5018ek or RK5019ek Sliding Shelf
1. Measure the distance from the front of the front rail to the back of the back rail.
2. Loosen the tabs on the shelves, adjust to distance measured in step 1 and tighten screws.
Note: Maximum tab placement for the RK5018ek is 32,125 inches (816mm).
Note: Maximum tab placement for the RK5019ek is 36,18 inches (919mm).
3. Locate position of shelf on rail and insert your M6 cage nuts (8).
4. Mount shelf using the M6 screws supplied.
RK5018ek RK5019ek
Shelf Tab
Tab Screw
Shelf Tab
EN
DE
FR
Belkin Tech Support
Europe: 00 800 223 55 460
For other languages: www.belkin.com/support

RK5018ek + RK5019ek – Anleitung P35729ec
RK5018ek und RK5019ek – ANLEITUNG
RK5018ek – Teileliste RK5019ek – Teileliste
Regaleinheit (1) Regaleinheit (1)
Käfigmuttern M6 (8) Käfigmuttern M6 (8)
Schrauben M6 (8) Schrauben M6 (8)
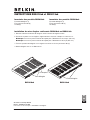
Installation des Auszugregals RK5018ek oder RK5019ek
1. Messen Sie den Abstand von der Vorderseite der vorderen Schiene bis zur Rückseite der hinteren Schiene.
2. Lockern Sie die verstellbaren Halterungen am Regal, stellen Sie sie auf den in Schritt 1 gemessenen Abstand
ein, und ziehen Sie die Schrauben der Halterungen fest an.
Hinweis: Der maximale Abstand der Halterungen für das Regal RK5018ek beträgt 32,125” (816 mm).
Hinweis: Der maximale Abstand der Halterungen für das Regal RK5019ek beträgt 36,18” (919 mm).
3. Ermitteln Sie die gewünschte Position des Regals an der Schiene, und setzen Sie die 8 Käfigmuttern M6 ein.
4. Befestigen Sie das Regal mit den mitgelieferten M6-Schrauben.
RK5018ek RK5019ek
Regalhalterung
Schraube für
Regalhalterung
Regalhalterung
EN
DE
FR
Belkin Technischer Support
Europa: 00 800 223 55 460
Für andere Sprachen: www.belkin.com/support

Instructions RK5018 et RK5019ek P35729ec
INSTRUCTIONS RK5018ek et RK5019ek
Inventaire des produits RK5018ek Inventaire des produits RK5019ek
Ensemble détagères (1) Ensemble détagères (1)
Écrous prisonniers M6 (8) Écrous prisonniers M6 (8)
Vis M6 (8). Vis M6 (8).
Installation de votre étagère coulissante RK5018ek ou RK5019ek
1. Mesurez la distance le devant du longeron avant à larrière du longeron arrière.
2. Desserrez les pattes sur les étagères, réglez la distance mesurée à létape 1 et serrez les vis.
Remarque :La mise en place maximale de la patte pour RK5018ek est 32,125 po (816 mm).
Remarque :La mise en place maximale de la patte pour RK5019ek est 36,18 po (919 mm).
3. Trouvez la position de létagère sur le longeron et insérez les écrous prisonniers M6 (8).
4. Montez létagère avec les vis M6 fournies.
RK5018ek RK5019ek
Patte détagère
Vis de patte
Patte détagère
EN
DE
FR
Assistance technique Belkin
Europe : 00 800 223 55 460
Pour toutes les autres langues : www.belkin.com/support

RK5018ek & RK5019ek Instructions P35729ec
Belkin Ltd.
Express Business Park
Shipton Way, Rushden
NN10 6GL, United Kingdom
+44 (0) 1933 35 2000
+44 (0) 1933 31 2000 fax
Belkin B.V.
Boeing Avenue 333
1119 PH Schiphol-Rijk,
The Netherlands
+31 (0) 20 654 7300
+31 (0) 20 654 7349 fax
Belkin GmbH
Hanebergstrasse 2
80637 Munich,
Germany
+49 (0) 89 143405 0
+49 (0) 89 143405 100 fax
Belkin SAS
130 rue de Silly
92100 Boulogne Billancourt,
France
+33 (0) 1 41 03 14 40
+33 (0) 1 41 31 01 72 fax
© 2005 Belkin Corporation. All rights reserved.
All trade names are registered trademarks of respective manufacturers listed.
-
 1
1
-
 2
2
-
 3
3
-
 4
4


in anderen Sprachen
- English: Belkin RK5018ek Operating instructions
- français: Belkin RK5018ek Mode d'emploi
Verwandte Artikel
-
Belkin 42U Benutzerhandbuch
-
-
-
-
-
Belkin RK5001ek Benutzerhandbuch
-
-
-