
10034936
Follower
Fahrradanhänger
Bicycle Trailer
Remorque de vélo
Remolque de bicicletas
Rimorchio da bici


3
DE
English 9
Español 15
Français 21
Italiano 27
Sehr geehrter Kunde,
wir gratulieren Ihnen zum Erwerb Ihres Gerätes. Lesen
Sie die folgenden Hinweise sorgfältig durch und befolgen
Sie diese, um möglichen Schäden vorzubeugen. Für
Schäden, die durch Missachtung der Hinweise und
unsachgemäßen Gebrauch entstehen, übernehmen wir
keine Haftung. Scannen Sie den folgenden QR-Code,
um Zugriff auf die aktuellste Bedienungsanleitung und
weitere Informationen rund um das Produkt zu erhalten.
INHALTSVERZEICHNIS
Sicherheitshinweise 4
Geräteübersicht 4
Zusammenbau 5
Wichtige Hinweise zur Befestigung und Benutzung 8
TECHNISCHE DATEN
Artikelnummer 10034936
Abmessungen Anhänger 67 x 40 x 32 cm
Gewicht Anhänger 10 kg
Maximales Beladungsgewicht 35 kg
Ladevolumen 149 L
Reifengröße 16 Zoll
HERSTELLER & IMPORTEUR (UK)
Hersteller:
Chal-Tec GmbH, Wallstraße 16, 10179 Berlin, Deutschland.
Importeur für Großbritannien:
Berlin Brands Group UK Limited
PO Box 42
272 Kensington High Street
London, W8 6ND
United Kingdom

4
DE
SICHERHEITSHINWEISE
• Der Anhänger sollte nicht mit mehr als 35 kg beladen werden.
• Der Anhänger darf nicht benutzt werden, um Personen damit zu
befördern.
• Führen Sie keine technischen Modikationen am Gerät durch. Dies kann
zu Gefahren im Straßenverkehr führen und die Herstellergarantie erlischt.
• Nutzen Sie den Anhänger nicht auf steinigem, unebenem Gelände und in
gefährlichen Verkehrssituationen.
• Das ziehende Fahrrad muss in einwandfreiem Zustand sein. Die Bremsen
sollten perfekt funktionieren. Mit Anhänger (und Beladung) verlängert
sich Ihr Bremsweg.
• Fahren Sie mit dem Anhänger nicht schneller als 40 km/h.
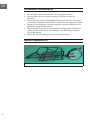
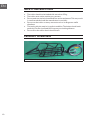
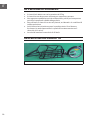
GERÄTEÜBERSICHT
Zusammengebauter Anhänger

5
DE
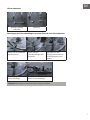
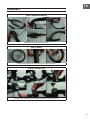
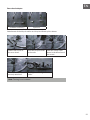
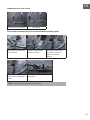
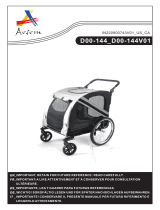
ZUSAMMENBAU
Schritt 1: Schutzblech und Gabel
Bauen Sie Schutzblech und Gabel zusammen.
Schritt 2: Laufrad
Befestigen Sie das Laufrad mit dem Schnellspanner an der Gabel.
Schritt 3: Laderahmen
Verbinden Sie den Laderahmen und die Gabel mit der Verbindungsmutter.

6
DE
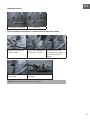
Schritt 4: Dämpfer
Installieren Sie den Dämpfer am Laderahmen.
Schritt 5: Fahrradhalterung
Entfernen Sie die Schraube an der
Fahrradhalterung und entnehmen Sie die Spindel.
Setzen Sie die
Fahrradhalterung an
den Laderahmen an,
setzen Sie die Spindel
wieder ein und ziehen
Sie sie fest.
Befestigen Sie
zum Schluss die
Sicherheitsfahne am
Laderahmen.

7
DE
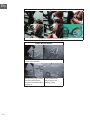
Hinterradadapter
Im Lieferumfang
enthalten
Optional
Befestigung des Fahrradanhängers an einem Fahrrad ohne Schnellspanner
Lösen Sie die Schraube
am Hinterrad.
Setzen Sie den
Fahrradanhänger auf
die Achse.
Schieben Sie den
Sicherheitsverschluss
in Pfeilrichtung nach
unten.
Der Anhänger ist nun
sicher befestigt.
Setzen Sie zum Schluss die
Tasche in den Anhänger.
Hinweis: Die Tasche ist nicht im Lieferumfang enthalten.

8
DE
WICHTIGE HINWEISE ZUR BEFESTIGUNG UND
BENUTZUNG
Hinweis: Die Verbindung zwischen Fahrrad und Anhänger ist der
wichtigste Schritt im Montageprozess. Vergewissern Sie sich, dass
der Anhänger sicher mit dem Fahrrad verbunden ist. Wenn sich die
Anhängerkupplung nicht sicher an Ihrem Fahrrad befestigen oder anziehen
lässt, verwenden Sie sie nicht. Wenden Sie sich an Ihren Fahrradhändler,
um Hilfe bei der korrekten Installation zu erhalten.
• Überprüfen Sie den Zustand von Fahrrad und Anhänger vor jedem
Gebrauch.
• Fahren Sie immer defensiv. Während der Nutzung müssen Sie die örtlichen
Verkehrsvorschriften beachten.
• Mit Anhänger benötigen Sie einen zusätzlichen Bremsweg.
• Üben Sie mit Ihrem Anhänger vor dem Gebrauch, bis Sie mit ihm vertraut
sind.
• Stellen Sie sicher, dass Ihre Ladung vor der Fahrt gesichert ist.
Überschreiten Sie nicht das maximale Beladungsgewicht.
• Achten Sie darauf, dass Sie ein geeignetes Fahrrad verwenden. Fragen Sie
im Zweifelsfall Ihren lokalen Fahrradhändler oder Ihren Hersteller.
• Überprüfen Sie nach dem Zusammenbau und vor der Fahrt, ob die
Anhängevorrichtung vollständig eingerastet ist.
• Überprüfen Sie regelmäßig den Reifendruck. .
• Verwenden Sie den Anhänger nach Möglichkeit nur auf glatten Straßen.
Vermeiden Sie Bordsteine, Schlaglöcher oder unebenen Untergrund.
• Wenn Sie bergab oder um eine Kurve fahren, müssen Sie langsamer
fahren.

9
EN
Dear Customer,
Congratulations on purchasing this device. Please read
the following instructions carefully and follow them to
prevent possible damages. We assume no liability for
damage caused by disregard of the instructions and
improper use. Scan the QR code to get access to the
latest user manual and more product information.
CONTENT
Safety Instructions 10
Product Overview 10
Assembly 11
Important Notes on Fastening and Use 14
TECHNICAL DATA
Item number 10034936
Dimensions trailer 67 x 40 x 32 cm
Weight trailer 10 kg
Maximum loading weight 35 kg
Loading volume 149 L
Tire size 16 inch
MANUFACTURER & IMPORTER (UK)
Manufacturer:
Chal-Tec GmbH, Wallstrasse 16, 10179 Berlin, Germany.
Importer for Great Britain:
Berlin Brands Group UK Limited
PO Box 42
272 Kensington High Street
London, W8 6ND
United Kingdom

10
EN
SAFETY INSTRUCTIONS
• The trailer should not be loaded with more than 35 kg.
• The trailer must not be used to carry persons.
• Do not make any technical modications to the equipment. This may result
in road hazards and void the manufacturer‘s warranty.
• Do not use the trailer on stony, uneven terrain or in dangerous trafc
situations.
• The towing bicycle must be in perfect condition. The brakes should work
perfectly. A trailer (and load) will increase your braking distance.
• Do not drive the trailer faster than 40 km/h.
PRODUCT OVERVIEW
Assembled trailer

11
EN
ASSEMBLY
Step 1: Mudguard and fork
Assemble the mudguard and fork.
Step 2: Wheel
Attach the wheel to the fork using the quick release.
Step 3: Loading frame
Connect the loading frame and fork with the connecting nut.

12
EN
Step 4: Damper
Install the damper on the loading frame.
Step 5: Bicycle holder
Remove the screw from the bicycle holder and
remove the spindle.
Place the bicycle holder
on the loading frame,
reinsert the spindle and
tighten it.
Finally, attach the
safety ag to the
loading frame.

13
EN
Rear wheel adapter
Included in delivery Optional
Attachment of the bicycle trailer to a bicycle without quick-release
Loosen the screw on
the rear wheel.
Place the bicycle trailer
on the axle.
Slide the safety catch
down in the direction of
the arrow.
The trailer is now
securely attached.
Finally, place the bag in the
trailer.
Note: The bag is not included.

14
EN
IMPORTANT NOTES ON FASTENING AND USE
Note: The connection between bicycle and trailer is the most important
step in the assembly process. Make sure that the trailer is securely
attached to the bicycle. If the trailer hitch cannot be securely attached or
tightened to your bicycle, do not use it. Contact your bicycle dealer for help
with correct installation.
• Check the condition of the bicycle and trailer before each use.
• Always ride defensively. During use, observe local trafc regulations.
• If you have a trailer, you will need additional stopping distance.
• Practice your trailer before use until you are familiar with it.
• Make sure that your load is secured before driving. Do not exceed the
maximum load weight.
• Make sure that you use a suitable bicycle. If in doubt, consult your local
bicycle dealer or manufacturer.
• After assembly and before riding, check that the hitch is fully engaged.
• Check the tyre pressure regularly.
• If possible, use the trailer only on slippery roads. Avoid kerbs, potholes or
uneven surfaces.
• If you drive downhill or around a bend, you must drive slower.

15
ES
Estimado cliente:
Le felicitamos por la adquisición de este producto. Lea
atentamente el siguiente manual y siga cuidadosamente
las instrucciones de uso con el n de evitar posibles
daños. La empresa no se responsabiliza de los daños
ocasionados por un uso indebido del producto o por haber
desatendido las indicaciones de seguridad. Escanee el
código QR para obtener acceso al manual de usuario más
reciente y otra información sobre el producto.
ÍNDICE DE CONTENIDOS
Instrucciones de seguridad 16
Descripción del producto 16
Montaje 17
Instrucciones importantes para el montaje y el uso 20
DATOS TÉCNICOS
Número de pedido 10034936
Dimensiones del remolque 67 x 40 x 32 cm
El peso del remolque 10 kg
Peso máximo de carga 35 kg
Volumen de carga 149 L
El tamaño de los neumáticos 16 inch
FABRICANTE E IMPORTADOR (REINO UNIDO)
Fabricante:
Chal-Tec GmbH, Wallstraße 16, 10179 Berlín, Alemania.
Importador para Gran Bretaña:
Berlin Brands Group UK Limited
PO Box 42
272 Kensington High Street
London, W8 6ND
United Kingdom

16
ES
INSTRUCCIONES DE SEGURIDAD
• El remolque no debe ser cargado con más de 35 kg.
• El remolque no debe utilizarse para transportar personas.
• No haga ninguna modicación técnica en el dispositivo. Esto puede
provocar peligros en el tráco rodado y anula la garantía del fabricante.
• No utilice el remolque en terrenos pedregosos, desnivelados y en
situaciones de tráco peligrosas.
• La bicicleta de remolque debe estar en perfecto estado. Los frenos deben
funcionar perfectamente. Con el remolque (y la carga) la distancia de
parada aumenta.
• No conduzca el remolque a más de 40 km/h.
DESCRIPCIÓN DEL PRODUCTO
Trailer ensamblado

17
ES
MONTAJE
Paso 1: Guardabarros y horquilla
Monta el guardabarros y la horquilla
Paso 2: Impulsor
Ata la rueda a la horquilla con el cierre rápido.
Paso 3: Marco de carga
Conecte el marco de carga y la horquilla con la tuerca de conexión.

18
ES
Paso 4: Amortiguador
Instale el amortiguador en el marco de carga.
Paso 5: Portabicicletas
Retira el tornillo del soporte de la bicicleta y quita
el eje.
Coloque el soporte de
la bicicleta en el marco
de carga, reinserte el
eje y apriételo.
Por último, coloque la
bandera de seguridad
en el marco de carga.

19
ES
Adaptador trasero
Incluido en la entrega Opcional
Fijar el remolque de la bicicleta a una bicicleta sin liberación rápida
Aoja el tornillo de la
rueda trasera.
Coloca el remolque de
la bicicleta en el eje.
Deslice el cierre de
seguridad hacia abajo
en la dirección de la
echa.
El remolque está ahora
bien sujeto.
Finalmente, coloca la bolsa en el
remolque.
Nota: La bolsa no está incluida en la entrega.

20
ES
INSTRUCCIONES IMPORTANTES PARA EL
MONTAJE Y EL USO
Nota: La conexión entre la bicicleta y el remolque es el paso más
importante en el proceso de montaje. Asegúrese de que el remolque
está conectado de forma segura a la bicicleta. Si el gancho de remolque
no puede ser jado o apretado con seguridad a su bicicleta, no lo utilice.
Contacte con su distribuidor de bicicletas para que le ayude con la
instalación correcta.
• Compruebe el estado de la bicicleta y el remolque antes de cada uso.
• Circule con precaución. Durante el uso, debe observar las normas de
tráco locales.
• Con un remolque, se necesita una distancia de frenado adicional.
• Practique con su remolque antes de usarlo hasta que se familiarice con él.
• Asegúrese de que su carga esté asegurada antes del viaje. No exceda el
peso máximo de la carga.
• Asegúrese de usar una bicicleta adecuada. En caso de duda, póngase en
contacto con su distribuidor local de bicicletas o con el fabricante.
• Después del montaje y antes de montar, compruebe que enganche está
totalmente cerrado.
• Revise la presión de los neumáticos regularmente.
• Si es posible, use el remolque solo en carreteras resbaladizas. Evite los
bordillos, los baches o el terreno irregular.
• Si está conduciendo cuesta abajo o en una curva, debe conducir más
despacio.
Seite wird geladen ...
Seite wird geladen ...
Seite wird geladen ...
Seite wird geladen ...
Seite wird geladen ...
Seite wird geladen ...
Seite wird geladen ...
Seite wird geladen ...
Seite wird geladen ...
Seite wird geladen ...
Seite wird geladen ...
Seite wird geladen ...
Seite wird geladen ...
Seite wird geladen ...
Seite wird geladen ...
Seite wird geladen ...
-
 1
1
-
 2
2
-
 3
3
-
 4
4
-
 5
5
-
 6
6
-
 7
7
-
 8
8
-
 9
9
-
 10
10
-
 11
11
-
 12
12
-
 13
13
-
 14
14
-
 15
15
-
 16
16
-
 17
17
-
 18
18
-
 19
19
-
 20
20
-
 21
21
-
 22
22
-
 23
23
-
 24
24
-
 25
25
-
 26
26
-
 27
27
-
 28
28
-
 29
29
-
 30
30
-
 31
31
-
 32
32
-
 33
33
-
 34
34
-
 35
35
-
 36
36


in anderen Sprachen
Verwandte Artikel
Andere Dokumente
-
 Aosom D00-144V01RD Benutzerhandbuch
-
XLC BIKCARRY Bike Shopping Trolley Benutzerhandbuch
-
Thule Chariot Cross 2 Benutzerhandbuch
-
Thule Chariot Lite Benutzerhandbuch
-
Burley Coho XC Benutzerhandbuch
-
Burley Encore X Benutzerhandbuch
-
Burley Honey Bee Benutzerhandbuch
-
-
Burley D’Lite Single Benutzerhandbuch
