
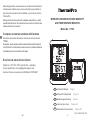
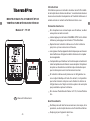
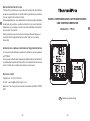
-1- V20171013 EN FR DE IT ES
WIRELESS INDOOR/OUTDOOR HUMIDITY
AND TEMPERATURE MONITOR
EN Instruction Manual Page 2
FR Manuel D'utilisational Page 12
Model No.: TP-65
DE Bedienungsanleitung Seite 23
IT Istruzioni per l’uso Pagina 35
ES Manual de instrucciones Página 46
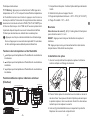
Comprar sensores remotos adicionales
El número de modelo del sensor remoto de esta unidad es
TPR65.
Se pueden pedir sensores adicionales directamente de Amazon
o de ThermoPro contactando nuestro servicio al cliente utilizando
los detalles que se encuentran más abajo.
Servicio de atención al cliente
Teléfono: 1-877-515-7797 (solo EE.UU. y Canadá)
Correo electrónico: service@buythermopro.com
Horario: De lunes a viernes de 8:00 AM a 6:00 PM EST
bajo esta garantía, comuníquese con el Servicio de atención
al cliente por teléfono o por correo electrónico para obtener
las instrucciones sobre cómo embalar y enviar el producto a
ThermoPro.
Esta garantía le otorga derechos legales específicos y usted
puede también tener otros derechos que varían en función del
estado donde se encuentra.
ES
-56-

Introduction
Congratulations on your purchase of the wireless indoor/outdoor
humidity and temperature monitor. You will now be able to know
the outdoor/indoor temperature and humidity while sitting inside.
Hints and tips
If the receiver does not connect to the transmitter, try the
following:
Press and hold the CHANNEL/SYNC button on the base
station and then press TX button on the transmitter.
Relocate the base station and/or the remote unit until
connection is found.
Signals from other electronic devices may cause interference.
Place the base station and receiver away from these devices.
The transmitter may not function properly in extreme
temperatures due to battery power. Replace the batteries
or the unit will resume proper function in more moderate
weather.
If the base station is attached to a refrigerator or a metal
object by magnet, the transmission may be shorter. Remove
the base station from the refrigerator or the metal object or
place the base station and remote sensor as close as possible.
If the Humidity is lower than 10%, it will display LLL.
Warnings
Do not subject the unit to excessive force, shock, dust,
temperature or humidity.
Do not immerse the unit in water.
Do not remove any screws.
Do not dispose this unit in a fire. IT MAY EXPLODE.
-2- -3-
Keep unit away from small children. The unit or parts of the
unit might be a choking hazard.
Never attempt to recharge the batteries using any other
methods.
Dispose of the unit legally and recycle when possible.
Specifications
1. 433 Mhz transmission frequency
2. Transmission range up to 200 feet in open area. (range maybe
shorter based on interference present)
3. Indoor Temperature range: -4 °F ~ 158°F (-20 °C ~ 70 °C)
4. Outdoor Temperature range: -58°F ~ 158°F (-50 °C ~ 70 °C)
5. Humidity range: 10% ~ 99%
6. Temperature tolerance: +/- 2.0 °F (+/- 1.1 °C)
7. Humidity tolerance: ±2% from 30% to 80%; ±3% below 30%
and above 80%
8. Power: 2 X AAA 1.5V for base unit and 2 X AAA 1.5V for
remote sensor
Components
1. One base station unit (Receiver)
2. One remote sensor (Transmitter)
*Although the remote sensor is designed to be rain-proof, the
remote sensor must be always placed upwards so that rain
won't get inside the sensor through the vent holes on the bottom
of the senor which functions to let the remote sensor detect the
environmental temperature and humidity more precisely and
quickly.
EN EN

-4- -5-
EN EN
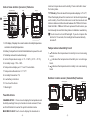
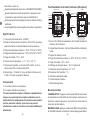
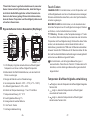
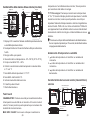
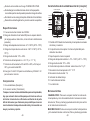
Indoor base station (receiver) features
1. LCD display: Displays the current outdoor humidity/temperature
and indoor humidity/temperature
2. Battery Compartment: Holds 2 AAA batteries to power the unit
3. Tabletop and wall-mounted design
4. Indoor Temperature range: -4 °F ~ 158°F (-20 °C ~ 70 °C).
5. Humidity range: 10% ~ 99%.
6. Temperature display unit: °C and °F selectable
7. Temperature Resolution: 0.1 °C/°F
8. Humidity Resolution:1%
9. Low battery indication
10. Four touch buttons
11. Backlight
Touch buttons
CHANNEL/SYNC: Press once to display the temperature and
humidity readings from up to 3 outdoor remote sensors; Press
and hold this button to enter the synchronization mode.
MAX/MIN/CLEAR: Touch once to display the maximum or
minimum temperature and humidity; Press and hold to clear
the history data.
Large LCD display
Outdoor
temperature
Outdoor
humidity
Indoor
temperature
Battery compartment
Four Touch Buttons :
Wall hanging hole
Indoor
humidity
SIDE
Stand
Magnet
°or ºF; F/°C/History: Press to select the temperature display in ºC
When the display shows the maximum or minimum temperature
and humidity. Touch this button once to set the maximum and
minimum data record time interval between ALL TIME or 24 hours.
Note: Both ALL TIME and 24 hours represent the time since you
last manually cleared the history data or installed a new battery.
: Touch once to turn on/off backlight. If you do not press the
button for 15 seconds, the backlight will be automatically
turned off.
Temperature & humidity trend
1. indicates the temperature & humidity is in an increasing
trend.
2. indicates the temperature & humidity is in a no change
trend.
3. indicates the temperature & humidity is in a decreasing
trend.
Outdoor remote sensor (transmitter) features
Channel 1, 2, 3
TX
Wall hanging hole
TX LED RESET
2 AAA battery
Vent holes

-6- -7-
EN EN
Buttons
CHANNEL Selector (1,2,3): Slide to set Channel 1,2 or 3.
RESET: Press once to reset the remote sensor.
TX: Press to send temperature/humidity data to the receiver
manually.
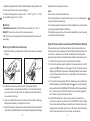
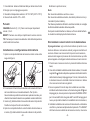
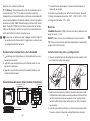
Battery installation and setup
1. Open the battery compartment of the remote sensor as below
Figure;
2. Slide the channel selector switch inside the battery
compartment to your desired channel. For the first remote
you may select any channel, for additional remotes select
any unused channel;
3. Insert (2) AAA batteries according to the polarity markings.
Replace the battery compartment cover;
4. Open the battery compartment at the back of the base station
and insert (2) AAA batteries according to the polarity markings.
Replace the compartment door;
Note:
Do not mix old and new batteries.
Do not mix alkaline, standard (carbon zinc), or rechargeable
(nickel cadmium) batteries.
For maximum performance in normal conditions we recommend
using good quality alkaline batteries.
If the battery power is low, there will be low battery icon showing
on the base station display.
Synchronize remote sensors with the base Station
1. Position the remote sensor near the base station;
2. Once the batteries are installed in the base station, the RF
signal icon (located on the upper left of the base station
display) will flash for 3 minutes, indicating that the base station
is in synchronization mode: it is waiting for remote sensors
to be registered.
3. If 3 minutes have passed after the batteries were installed in
the base station and the RF signal Icon is no longer flashing,
press and hold the CHANNEL/SYNC button of the base station
for 3-4 seconds until the RF signal icon is flashing again to
set it back in synchronization mode;
4. Install the batteries in the remote sensor and wait for a
moment or just press either the TX or RESET button inside
the remote sensor battery compartment, the remote sensor
temperature/humidity will show on the base station display
which indicates the synchronization is complete.
Please note: each time the batteries (either base station or
remote sensor) are replaced or base station/remote sensor lost
connection, make sure to follow the below synchronization
process to pair and re-connect the base station and remote senor:
4. Humidity range: 10% ~ 99%
1. Battery Compartment: Holds 2 X AAA batteries to power the unit.
2. Rain-proof and designwall-mounted
3. Outdoor Temperature range: -58°F ~ 158°F (-50 °C ~ 70 °C)

-8- -9-
ENEN
station. Press CHANNEL/SYNC button until you observe a
circular arrow on the base station LCD display under the
channel number. The unit will then auto-scroll, changing from
channel to channel every 5 seconds.
NOTE: If you have additional remote sensors, when you are
synchronizing remote sensors with the base station, the unit
will keep changing from channel to channel in the first three
minutes, after that you can select any channel you like or auto
-scroll mode.
Place the base station and remote sensor
1. The indoor base station (receiver) should always be placed
in a well ventilated indoor area and located away from vents,
heating or cooling elements, direct sunlight, windows, doors,
or any other openings.
2. The remote sensor (transmitter) can be placed on a flat
surface indoor or outdoor. Make sure the sensor is within
the transmission distance from the base station and with
minimal obstructions.
NOTE: Although the remote sensor is designed to be rain-proof,
the remote sensor must be always placed upwards so that rain
won't get inside the sensor through the vent holes on the bottom
of the senor which functions to let the remote sensor detect the
quickly.
3. The base station and remote sensor can both be wall mounted.
Maximum & minimum recorded temperature &
humidity
1. Press MAX/MIN/Clear button once to display the highest
indoor and outdoor temperatures/humidity recorded since
last reset. MAX is shown on the display.
2. Press MAX/MIN/Clear button again to display the lowest
indoor and outdoor temperatures/humidity recorded since
last reset. MIN is shown on the display.
3. To clear and reset the max/min records, when either the MAX
or MIN record is shown on the LCD display, press and hold
MAX/MIN/Clear for 3 seconds.
4. When either the MAX or MIN record is shown on the LCD
display, press ALL-TIME/24 button once to set the data record
time interval between ALL TIME or 24 hours. Note: Both ALL
TIME and 24 hours represent the time since you last time
manually cleared the history data or battery installation.
FCC statement of compliance
This device complies with Part 15 of the FCC rules. Operation
is subject to the following two conditions:
1) This device may not cause harmful interference.
2) This device must accept any interference received, including
interference that may cause undesired operation.
Warning: Changes or modifications to this unit not expressly
approved by the party responsible for compliance could void
the user's authority to operate the equipment.
NOTE: This equipment has been tested and found to comply with
the limits for a Class B digital device, pursuant to Part 15 of the FCC
CHANNEL/SYNC button on the base station to select the
remote channel you want displayed permanently on the base
5. If you have additional remote sensors, repeat the above
steps to register the remote sensors (up to 3 remote sensors
can be registered with one base station);
6. If you have registered more than one sensor, press the
environmental temperature and humidity more precisely and rules. These limits are designed to provide reasonable protection
against harmful interference in a residential installation. This
equipment generates, uses and can radiate radio frequency energy

-10- -11-
EN EN
radio or television reception, which can be determined by turning
the equipment off and on, the user is encouraged to try to correct
the interference by one of more of the following measures:
- Reorient or relocate the receiving antenna.
-
receiver.
Increase the separation between the equipment and the
-
from that to which the receiver is connected. Consult the
dealer or an experienced radio/TV technician for help.
Connect the equipment into an outlet on a circuit different
Limited one-year warranty
ThermoPro warrants this product to be free of defects in parts,
materials and workmanship for a period of one year, from date
of purchase.
Should any repairs or servicing under this warranty be required,
contact Customer Service by phone or email for instructions on
how to pack and ship the product to ThermoPro.
This warranty gives you specific legal rights and you may also
have other rights which vary from state to state.
Purchasing additional remote sensors
The model number of the remote sensor for this unit is TPR65.
Additional sensors may be ordered directly from Amazon or
ThermoPro by contacting our customer service listed below.
Customer service
Telephone: 44-203-769-1321
Email: service@buythermopro.com
Hours: Weekdays 8:00 AM- 6:00 PM EST
and, if not installed and used in accordance with the instructions,
may cause harmful interference to radio communications. However,
there is no guarantee that interference will not occur in a particular
installation. If this equipment does cause harmful interference to

-12- -13-
MONITEUR SANS FIL D'HUMIDITÉ ET DE
TEMPÉRATURE INTÉRIEUR/EXTÉRIEUR
FR Manuel D'utilisational
Modèle N°.: TP-65
FR
Introduction
Félicitations pour avoir acheté le moniteur sans fil d'humidité
et de température intérieur/extérieur. Vous êtes désormais en
mesure de connaitre la température et l'humidité intérieure et
extérieure tout en restant confortablement chez vous.
Conseils et astuces
Si le récepteur ne se connecte pas avec l'émetteur, veuillez
essayer les conseils suivants :
Laissez appuyé sur le bouton CHANNEL/SYNC sut la station
intérieure, puis appuyez sur le bouton TX de l'émetteur.
Repositionnez la station intérieure ou l'unité à distance
jusqu'à ce qu'une connexion soit trouvée.
Les signaux d'autres appareils électroniques peuvent causer
des interférences. Éloignez la station intérieure et le capteur
de ces appareils.
Il est possible que l'émetteur ne fonctionne pas correctement
à des températures extrêmes à cause des piles. Remplacez
les piles ou attendez des conditions plus clémentes pour
que l'unité reprenne son fonctionnement normal.
Si la station intérieure est placée sur un réfrigérateur ou
sur un objet métallique à l'aide d'un aimant, il est possible
que la transmission soit plus courte. Retirez la station du
réfrigérateur ou de l'objet en métal ou placez-la aussi près
que possible du capteur à distance.
Si le niveau d'humidité est inférieur à 10 %, l'écran affichera
LLL.
Avertissements
Ne faites pas subir des forces excessives, des coups, de la
poussière, ou des températures ou de l'humidité extrêmes.
Ne plongez pas l'appareil dans l'eau.
FR

-14- -15-
FR FR
Ne retirez aucune vis.
Ne jetez pas l'appareil dans le feu, IL POURRAIT EXPLOSER.
Gardez l'appareil éloigné des enfants. L'appareil ou ses
composants comportent des risques d'étouffement.
N'essayez jamais de recharger les piles en utilisant d'autres
méthodes.
Jetez l'appareil de manière légale et recyclez-le si possible.
Spécifications
1. Fréquence de transmission : 433 Mhz
2. Distance de transmission maximale : 200 ft./ 60 m (la portée
peut être inférieure si des interférences sont présentes)
3. Plage de température intérieure : -20°C~70°C(-4°F~158°F).
4. Plage de température extérieure : -50°C~70°C(-58°F~158°F).
5. Plage d'humidité : 10 % ~ 99 %.
6. Tolérance de température : +/- 1,1 °C (+/- 2,0 °F)
7. Tolérance d'humidité : ±2 % entre 30 % et 80 %, ±3 % en-
dessous de 30 % et au-dessus de 80 %
8. Alimentation : 2 X AAA 1,5 V pour la station intérieure et 2
X AAA 1,5 V pour le capteur à distance
Composants
1. Une station intérieure (récepteur)
2. Un capteur à distance (émetteur)
*Si vous possédez des capteurs à distance supplémentaires,
lorsque vous synchronisez les capteurs à distance avec la
station intérieure, l'unité passera d'un canal à un autre pendant
les trois premières minutes, après quoi vous pourrez
sélectionner le canal de votre choix ou le mode de défilement
automatique.
Fonctionnalités de la station intérieure (Récepteur)
Grand écran LCD VUE LATÉRALE
Température
extérieure
Support
Humidité
extérieure
Aimant
Température
intérieure
Trou de fixation
murale
Humidité
intérieure
Compartiment des piles
Quatre boutons tactiles
1. Écran LCD : Affiche la température et l'humidité actuelles à
l'intérieur et à l'extérieur
2. Compartiment des piles : Contient 2 piles AAA pour alimenter
l'unité
3. Support de table ou mural
4. Plage de température intérieure : -20°C~70°C(-4°F~158°F).
5. Plage d'humidité : 10 % ~ 99 %.
6. Affichage de la température : °C et °F optionnels
7. Résolution de la température : 0,1 °C/°F
8. Résolution de l'humidité : 1 %
9. Indicateur de batterie faible
10. Quatre boutons tactiles
11. Rétroéclairage bleu
Boutons tactiles
CHANNEL/SYNC : Appuyez une fois pour afficher les lectures
de température et d'humidité de trois capteurs extérieurs au
maximum. Laissez appuyé sur ce bouton pour entrer dans le
mode de synchronisation.
MAX/MIN/CLEAR : Appuyez une fois pour afficher la température
et l'humidité maximum ou minimum. Laissez appuyé pour effacer

-16- -17-
FR
l'historique des données.
°F/°C/History: Appuyez pour sélectionner l'affichage de la
température en ºC ou ºF. Lorsque l'écran affiche la température
et l'humidité maximum ou minimum, appuyez une fois sur ce
bouton pour définir l'intervalle d'enregistrement des données
maximum et minimum entre ALL TIME (TOUT LE TEMPS) ou
24 heures. Remarque : ALL TIME et 24 heures représentent
la période depuis laquelle vous avez manuellement effacé
l'historique des données ou installé de nouvelles piles.
Tendance de la température et de l'humidité
1. indique que la température et l'humidité ont une tendance
à la hausse.
2. indique que la température et l'humidité ont une tendance
constante.
3. indique que la température et l'humidité ont une tendance
à la baisse.
: Appuyez une fois pour allumer/éteindre le rétroéclairage.
Si vous n'appuyez sur aucun bouton pendant 15 secondes,
le rétro-éclairage sera automatiquement désactivé.
Fonctionnalités du capteur à distance extérieur
(Émetteur)
DEL TX
Trous d'évent
RESET
Trou de suspension murale
TX
2 piles AAA
Channel 1, 2, 3
1. Compartiment des piles : Contient 2 piles AAA pour alimenter
l'unité
2. Résistant à la pluie et support mural
3. Plage de température intérieure : -50°C~70°C(-58°F~158°F)
4. Plage d'humidité : 10 % ~ 99 %
Boutons
Sélectionneur de canal (1, 2, 3) : Faites glisser l'interrupteur
pour choisir le canal 1, 2 ou 3.
RESET : Appuyez une fois pour réinitialiser le capteur à
distance.
TX : Appuyez pour envoyer manuellement les données de
température et d'humidité au récepteur.
Installation des piles
1. Ouvrez le compartiment des piles du capteur à distance
comme indiqué sur l'image ci-dessous.
2. Placez l'interrupteur du sélectionneur de canal sur le canal
de votre choix. Vous pouvez choisir n'importe quel canal pour
le premier capteur, mais vous devrez choisir l'un des canaux
restants pour les capteurs suivants.
3. Insérez (2) piles AAA batteries en respectant la polarité.
Replacez le couvercle du compartiment.
FR

-18- -19-
FRFR
4. Ouvrez le compartiment des piles à l'arrière de la station
intérieure et insérez (2) piles AAA batteries en respectant la
polarité. Replacez le couvercle du compartiment.
Remarque:
Ne mélangez pas d'anciennes piles avec des nouvelles.
Ne mélangez pas les piles alcalines, standards (carbone-zinc)
ou rechargeables (nickel cadmium).
Pour obtenir les meilleures performances possibles dans des
conditions normales, nous vous recommandons d'utiliser des
piles alcalines de bonne qualité.
Si les piles sont presque vides, un icône sera affiché sur l'écran
de la station intérieure.
Synchroniser les capteurs à distance avec la station
intérieure
Veuillez noter: Chaque fois que les piles (soit la station
1. Positionnez le capteur à proximité de la station intérieure.
2. Une fois les piles installées dans la station intérieure, l'icône
de signal RF (situé dans le coin supérieur gauche de l'écran
de la station) clignotera pendant 3 minutes, ce qui indique
que la station est en mode de synchronisation – elle attend
donc que les capteurs soient reconnus.
3. Si les 3 minutes se sont écoulées après que les piles aient
été installées dans la station intérieure et que l'icône ne
clignote pas, laissez appuyé sur le bouton CHANNEL/SYNC
pendant 3-4 secondes jusqu'à ce que l'icône RF se remette à
clignoter et que le mode de
activé.
synchronisation soit de nouveau
4. Installez les piles dans le capteur à distance et attendez un
instant ou appuyez soit sur le bouton TX ou RESET à l'intérieur
du compartiment des piles du capteur, ce qui affichera la
température et l'humidité sur l'écran et la synchronisation
era alors terminée. s
5. Si vous avez des capteurs à distance supplémentaires,
répétez les étapes précédentes pour les enregistrer (jusqu'à
3 capteurs à distance peuvent être enregistrés sur une station
intérieure).
6. Si vous avez enregistré plus d'un capteur, appuyez sur le
bouton CHANNEL/SYNC à la base de la station pour
sélectionner le canal que vous souhaitez afficher sur l'écran.
Appuyez sur le bouton CHANNEL/SYNC jusqu'à ce que vous
voyiez une flèche circulaire à la base de l'écran de la station
sous le numéro du canal. L'appareil affichera alors chaque
canal pendant 5 secondes l'un après l'autre.
le récepteur/émetteur perdent la connexion, assurez-vous de
suivre le processus de synchronisation ci-dessous pour appairer
et reconnecter la station intérieure et le capteur à distance:
intérieure ou du capteur à distance) sont remplacées, soit que REMARQUE : Si vous possédez des capteurs à distance
supplémentaires, lorsque vous synchronisez les capteurs à
distance avec la station intérieure, l'unité passera d'un canal
à un autre pendant les trois premières minutes, après quoi vous
pourrez sélectionner le canal de votre choix ou le mode de
défilement automatique.
Positionner la station intérieure et le capteur à
distance
1. La station intérieure (récepteur) doit toujours être positionnée
dans un espace bien ventilé et éloigné des aérations, chauffages,
climatiseurs, fenêtres, portes et autres ouvertures, et de la
lumière directe du soleil.
2. Le capteur à distance (émetteur) doit toujours être positionné

-20- -21-
FR FR
sur une surface plane à l'intérieur ou à l'extérieur. Le capteur
doit être éloigné de la lumière directe du soleil et de l'humidité.
Assurez-vous que le capteur soit à portée de la station
intérieure et que les interférences de transmission soient
au minimum.
REMARQUE :Bien que le capteur à distance soit conçu pour
résister à la pluie, il doit toujours être placé vers le haut pour
éviter que la pluie pénètre dans le capteur par les trous d'évent
situés en bas qui permettent au capteur de détecter la température
et l'humidité environnantes plus rapidement et avec plus de
précision.
3. La station intérieure et le capteur à distance peuvent être
fixés au mur.
Température et humidité maximum et minimum
enregistrées
1. Appuyez une fois sur le bouton MAX/MIN/Clear pour afficher
les températures et l'humidité maximum enregistrées à
l'extérieur et à l'intérieur depuis la dernière réinitialisation.
MAX est affiché sur l'écran.
2. Appuyez de nouveau sur le bouton MAX/MIN/Clear pour
afficher les températures et l'humidité minimum enregistrées
à l'extérieur et à l'intérieur depuis la dernière réinitialisation.
MIN est affiché sur l'écran.
3. Pour effacer et réinitialiser les records max/min, laissez
appuyé sur MAX/MIN/Clear pendant 3 secondes lorsque MAX
ou MIN sont affichés à l'écran.
4. Appuyez une fois sur le bouton ALL-TIME/24 pour configurer
l'intervalle d'enregistrement des données entre TOUT LE
TEMPS et 24 heures lorsque MAX ou MIN sont affichés à
l'écran. Remarque : ALL TIME et 24 heures représentent la
période depuis laquelle vous avez manuellement effacé
l'historique des données ou installé de nouvelles piles.
Déclaration de conformité fcc
Cet appareil se conforme avec la partie 15 de la règlementation
FCC. Son opération est sujette aux conditions suivantes :
l) Cet appareil ne doit pas entrainer d'interférences dangereuses.
2) Cet appareil doit accepter toute interférence reçue, y compris
des interférences pouvant entrainer une mauvaise opération.
Avertissement: Les changements ou modifications qui ne
sont pas expressément approuvés par la partie responsable
de la conformité pourraient annuler l'autorité des utilisateurs
opérant sur l'équipement.
REMARQUE : Cet équipement a été testé et se conforme au
cadre de la Classe B des appareils numériques, en accord avec
la partie 15 de la règlementation FCC. Ces limites sont conçues
pour apporter une protection raisonnable contre les interférences
dangereuses dans une installation résidentielle. Cet équipement
génère, utilise et peut créer des ondes radio et, s'il n'est pas
installé et utilisé conformément aux instructions, peut causer
des interférences dangereuses aux communications radios.
Il n'existe cependant aucune garantie que ces interférences
ne se produiront pas dans une installation donnée. Si cet
équipement cause des interférences dangereuses aux radios
ou à la réception de la télévision, ce qui peut être déterminé
en allumant et en éteignant l'installation, nous encourageons
l'utilisateur à essayer de corriger l'interférence en prenant une
ou plusieurs des mesures suivantes :
- Réorientez ou déplacer l'antenne de réception.
- Augmentez l'espace entre l'équipement et le receveur.
-
récepteur. Contactez le revendeur ou un technicien radio/TV
expérimenté pour obtenir de l'aide.
Branchez l'équipement sur une prise différente de celle du

-22- -23-
FR
Garantie limitée d'un an
ThermoPro garantie que ce produit est exempt de tout défaut
de pièce, de matériaux et de fabrication pendant une période
d'un an à partir de la date d'achat.
Si des réparations ou une maintenance sont nécessaires pendant
la période de garantie, veuillez contacter le service client par
téléphone ou e-mail pour savoir comment emballer et retourner
le produit à ThermoPro.
Cette garantie vous donne des droits spécifiques légaux et
certains droits supplémentaires selon l'état où vous êtes
domicilié.
Acheter des capteurs à distance Supplémentaires
Le numéro de modèle des capteurs à distance de cet appareil
est TPR65.
Vous pouvez acheter des capteurs supplémentaires sur Amazon
ou directement auprès de ThermoPro en contactant notre service
client à l'aide des coordonnées listées ci-dessous.
Service client
Téléphone: 33-975-129-576
E-mail : service@buythermopro.com
Horaires : Tous les jours ouvrés de la semaine de 8h00 à 18h00
EST
KABELLOSER INNEN/AUßEN LUFTFEUCHTIGKEITS-
UND TEMPERATURMONITOR
DE Bedienungsanleitung
Modell-Nr.: TP-65 DE

Einleitung
Herzlichen Glückwunsch zum Kauf des kabellosen Innen/Außen
Feuchtigkeits- und Temperaturmonitors. Sie werden nun die
Außen-/Innentemperatur und Luftfeuchtigkeit ablesen können,
während Sie drinnen sitzen.
Hinweise und Tipps
Wenn der Empfänger sich nicht mit dem Sender verbindet,
versuchen Sie folgendes:
Drücken und halten Sie die CHANNEL/SYNC-Taste an der
Basisstation und drücken Sie dann die TX-Taste auf dem
Sender.
Verändern Sie den Standort der Basisstation und/oder der
Sendestation, bis eine Verbindung hergestellt wird.
Signale anderer elektronischer Geräte können Störungen
verursachen. Platzieren Sie Basisstation und Empfänger
fern dieser Geräte.
Der Sender funktioniert möglicherweise aufgrund der
Batterieleistung bei extremen Temperaturen nicht richtig.
Wechseln Sie die Batterien oder das Gerät wird bei
moderaterem Wetter wieder einwandfrei funktionieren.
Wenn die Basisstation per Magnet an einem Kühlschrank
oder einem Metallgegenstand befestigt ist, kann die
Übertragung kürzer sein. Entfernen Sie die Basisstation
vom Kühlschrank oder dem Metallobjekt, oder stellen Sie die
Basisstation und den Sensor so nah wie möglich zueinander.
Wenn die Luftfeuchtigkeit niedriger als 10% ist, wird LLL
angezeigt.
Warnhinweise
Behandeln Sie das Gerät sorgsam, setzen Sie es keinen
Stößen, extremen Temperaturen, Feuchtigkeit oder Staub
aus.
Bitte tauchen Sie das Gerät nicht in Wasser.
Entfernen Sie keine Schrauben.
Entsorgen Sie dieses Gerät nicht in offenem Feuer. ES
BESTEHT EXPLOSIONSGEFAHR.
Gerät von kleinen Kindern fernhalten. Beim Gerät oder Teilen
des Gerätes besteht Erstickungsgefahr.
Versuchen Sie niemals, die Batterien auf andere Weise
aufzuladen.
Entsorgen Sie das Gerät ordnungsgemäß und recyclen es,
wenn möglich.
Technische Daten
1. 433 MHz Übertragungsfrequenz
2. Übertragungsreichweite bis zu 60m in offenem Gelände.
(Reichweite kann möglicherweise aufgrund vorhandener
Interferenzen kürzer sein)
3. Innentemperaturbereich: -20°C ~ 70°C (-4°F ~ 158°F)
4. Außentemperaturbereich: -50°C ~ 70°C (-58°F ~ 158°F)
5. Luftfeuchtigkeitsbereich: 10% ~ 99%
6. Temperaturtoleranz: +/- 1,1°C (+/- 2,0°F)
7. Luftfeuchtigkeitstoleranz: ±2% bei 30% bis 80%; ±3% unter
30% und über 80%
8. Stromversorgung: 2 x AAA 1,5 V für die Basiseinheit und 2
x AAA 1,5 V für Fernfühler
Komponenten
1. Eine Basisstation (Empfänger)
2. Ein Fernfühler (Sender)
DE
DE
-24- -25-

*Obwohl der Sensor regenfest entworfen wurde, muss der
Sensor immer aufrecht platziert werden, damit der Regen
nicht durch die Entlüftungslöcher auf der Unterseite des
Senors in den Sensor gelangt. Diese Löcher dienen dazu,
dass der Sensor Temperatur und Feuchtigkeit präziser und
schneller erfassen kann.
Eigenschaften der Indoor-Basisstation (Empfänger)
LCD-Display
Außen-
temperatur
Außenluft-
feuchtigkeit
Raum-
temperatur
2 AAA-Batterien
vier
Aufhängeloch
Raumluft-
feuchtigkeit
SEITE
Ständer
Magnet
1. LCD-Display: Zeigt die aktuelle Außen-Luftfeuchtigkeit/
Temperatur und Innen-Luftfeuchtigkeit/Temperatur
2. Batteriefach: Enthält 2 AAA-Batterien, um das Gerät mit
Strom zu versorgen
3. Design als Ständer und zur Wandmontage
4. Innentemperatur-Bereich: -20°C ~ 70°C (-4 °F ~ 158°F).
5. Luftfeuchtigkeitsbereich: 10% ~ 99%.
6. Einheit der Temperaturanzeige: °C und °F wählbar
7. Temperaturauflösung: 0,1 °C/°F
8. Feuchtigkeitsauflösung: 1%
9. Anzeige bei schwacher Batterie
10. Vier Touch-Tasten
11. Hintergrundbeleuchtung
Touch-Tasten
CHANNEL/SYNC: Einmal drücken, um die Temperatur- und
Luftfeuchtigkeitswerte von bis zu 3 Außensensoren anzuzeigen;
Drücken und halten Sie diese Taste, um in den Synchronisation-
smodus zu gelangen.
MAX/MIN/CLEAR: Einmal drücken, um die maximale oder
minimale Temperatur und Feuchtigkeit anzuzeigen; Drücken
und halten, um die Verlaufsdaten zu löschen.
°F/°C/History: Drücken, um die Temperaturanzeige in ºC oder
ºF zu wählen; Wenn das Display die maximale oder minimale
Temperatur und Feuchtigkeit anzeigt. Drücken Sie diese Taste
einmal, um das maximale und minimale Zeitintervall zur
Aufzeichnung zwischen ALL TIME oder 24 Stunden einzustellen.
Hinweis: Sowohl ALL TIME als auch 24 Stunden stehen für die
Zeit, seit Sie das letzte Mal die Aufzeichnungen manuell gelöscht
oder eine neue Batterie eingesetzt haben.
:Einmal drücken, um Hintergrundbeleuchtung ein-/
auszuschalten. Wenn Sie die Taste für 15 Sekunden nicht
berühren, wird die Hintergrundbeleuchtung automatisch
abgeschaltet.
Temperatur & luftfeuchtigkeits-entwicklung
1. zeigt an, dass die Temperatur & Luftfeuchtigkeit steigende
Tendenz hat.
2. zeigt an, dass die Temperatur & Luftfeuchtigkeit
unveränderte Tendenz hat.
3. zeigt an, dass die Temperatur & Luftfeuchtigkeit
abnehmende Tendenz hat.
DE DE
-26- -27-

Eigenschaften des Außen-Fernfühlers (Sender)
Kanal 1, 2, 3
TX
Aufhängeloch
TX LED RESET
2 AAA-Batterien
Sensorerkennung Port
1. Batteriefach: Enthält 2 AAA-Batterien, um das Gerät mit
Strom zu versorgen
2. Regenfest und entworfenfür die Wandmontage
3. Außen-Temperaturbereich: -50°C ~ 70°F (-58°F ~ 158°F)
4. Luftfeuchtigkeitsbereich: 10% ~ 99%
Tasten
Kanalauswahl (1,2,3): Schieben, um Kanal 1,2 oder 3
einzustellen.
RESET: Einmal drücken, um den Fernfühler zurückzusetzen.
TX: Drücken, um manuell Temperatur-/Luftfeuchtigkeitsdaten
an den Empfänger zu senden.
Einsetzen der Batterie und Einrichten
1. Öffnen Sie das Batteriefach des Senders so, wie auf der
Abbildung weiter unten.
2. Schieben Sie den Kanalwahlschalter im Batteriefach auf
Ihren gewünschten Kanal. Für den ersten Fernfühler können
Sie einen beliebigen Kanal auswählen, für zusätzliche
Fernfühler einen nicht verwendeten Kanal auswählen;
3. Setzen Sie (2) AAA Batterien entsprechend den Polaritätsmar-
kierungen ein. Nun den Batteriefachdeckel wieder aufsetzen;
4. Öffnen Sie das Batteriefach auf der Rückseite der Basisstation
und setzen (2) AAA Batterien entsprechend den Polaritätsmar-
kierungen ein. Die Abdeckung wieder einsetzen.
Hinweis:
Niemals alte und neue Batterien miteinander mischen.
Mischen Sie keine Alkali, standardmäßigen (Carbonzink), oder
wiederaufladbare (Nickel-Cadmium) Batterien.
Für maximale Leistung unter normalen Bedingungen empfehlen
wir die Verwendung von Alkaline-Batterien von guter Qualität.
Wenn die Batterie schwach ist, wird das Batteriesymbol auf
dem Display der Basisstation angezeigt.
Synchronisieren des Fernfühlers mit der Basisstation
Hinweis: Jedes Mal, wenn die Batterien (in der Basisstation oder
dem Fernsender eingelegt) ersetzt werden oder die Basisstation/
Fernsender die Verbindung verloren hat, vergewissern Sie sich,
dass Sie den folgenden Synchronisierungsprozess befolgen,
DE
DE
-28- -29-

um die Basisstation mit dem Fernsender zu synchronisieren
und erneut zu verbinden:
1. Platzieren Sie den Fernfühler in der Nähe der Basisstation;
2. Sobald die Batterien in die Basisstation eingesetzt wurden,
wird das HF-Signal-Symbol (Befindet sich in der linken
oberen Ecke des Displays der Basisstation) 3 Minuten lang
blinken. Das weist darauf hin, dass sich die Basisstation im
Synchronisations-Modus befindet: Sie wartet darauf, das
Fernfühler registriert werden.
3. Nachdem 3 Minuten vergangen sind, seit die Batterien in die
Basisstation eingesetzt wurden und das HF-Signal-Symbol
nicht mehr blinkt, drücken und halten Sie die CHANNEL/
SYNC-Taste für 3-4 Sekunden. So lange, bis das HF-Signal
-Symbol wieder blinkt, um sie wieder in den Synchronisations
-Modus zu bringen;
4. Setzen Sie die Batterien in den Fernfühler ein und warten
einen Moment, oder drücken Sie einfach die TX oder RESET-
Taste im Batteriefach des Fernfühlers. Die Temperatur/
Luftfeuchtigkeit des Fernfühlers wird auf dem Display der
Basisstation anzeigt. Das bedeutet, dass die Synchronisierung
abgeschlossen ist.
5. Wenn Sie zusätzliche Fernfühler haben, wiederholen Sie die
obigen Schritte, um die Fernfühler zu registrieren (bis zu 3
Fernfühler können an einer Basisstation angemeldet werden);
6. Wenn Sie mehr als einen Fühler registriert haben, drücken
Sie die CHANNEL/SYNC-Taste an der Basisstation, um
Kanal auszuwählen, welchen Sie dauerhaft an der den
anzeigen möchten. Drücken Sie die CHANNEL/Basisstation
bis Sie auf dem LCD-Display der Basisstation SYNC-Taste,
kreisförmigen Pfeil unter der Kanalnummer sehen einen
Das Gerät wird dann automatisch alle 5 Sekunden können.
zu Kanal wechseln.von Kanal
HINWEIS: Wenn Sie zusätzliche Sensoren haben, wechselt das
Gerät in den ersten drei Minuten von Kanal zu Kanal, während
Sie die Sensoren mit der Basisstation synchronisieren. Danach
können Sie einen beliebigen Kanal, oder einen automatischen
Scrollmodus auswählen.
Die Basisstation und den Fernfühler platzieren
1. Die Innen-Basisstation (Empfänger) sollte immer in einem
gut belüfteten Innenbereich und fern von Belüftungsöffnungen,
Heiz- oder Kühlelementen, direkter Sonneneinstrahlung,
Fenstern, Türen oder andere Öffnungen aufgestellt werden.
2. Der Fernfühler (Sender) kann auf einer ebenen Fläche im
Innen- und Außenbereich platziert werden. Stellen Sie sicher,
dass sich der Fühler innerhalb der Übertragungsreichweite
der Basisstation mit minimalen Hindernissen befindet.
HINWEIS: Obwohl der Sensor regenfest entworfen wurde, muss
der Sensor immer aufrecht platziert werden, damit der Regen
nicht durch die Entlüftungslöcher auf der Unterseite des Senors
in den Sensor gelangt. Diese Löcher dienen dazu, dass der
Sensor Temperatur und Feuchtigkeit präziser und schneller
erfassen kann.
3. Basisstation und Fernfühler können an der Wand montiert
werden.
Maximale & Minimale aufgezeichnete Temperatur &
Luftfeuchtigkeit
1. Drücken Sie die MAX/MIN/Clear Taste einmal, um die höchste
Innen- und Außentemperatur/Luftfeuchtigkeit anzuzeigen,
die seit dem letzten Reset aufgezeichnet wurde. MAX wird
auf dem Display angezeigt.
DE DE
-30- -31-

2. Drücken Sie die MAX/MIN/Clear-Taste erneut, um die
niedrigste Innen- und Außentemperatur/Luftfeuchtigkeit
anzuzeigen, die seit dem letzten Reset aufgezeichnet wurde.
MIN wird auf dem Display angezeigt.
3. Um die max/min Aufzeichnungen zu löschen und zurü-
ckzusetzen, wenn entweder die MAX oder MIN Aufzeichnung
auf dem LCD-Display angezeigt wird, drücken und halten Sie
MAX/MIN/Clear für 3 Sekunden.
4. Wenn entweder die MAX oder MIN Aufzeichnung auf dem
LCD-Display angezeigt wird, drücken Sie die ALL-TIME/24-
Taste einmal, um den Zeitintervall der Aufzeichnung auf ALL
TIME oder 24 Stunden einzustellen. Hinweis: Sowohl ALL
TIME als auch 24 Stunden stehen für die Zeit, seit Sie das
letzte Mal die Aufzeichnungen gelöscht oder eine Batterie
eingesetzt haben.
FCC- Konformitätserklärung
Dieses Gerät entspricht Abschnitt 15 der FCC-Bestimmungen.
Der Betrieb unterliegt den folgenden zwei Bedingungen:
I) Dieses Gerät darf keine schädlichen Interferenzen verursachen.
2) dieses Gerät muss den Empfang von Interferenzen zulassen,
einschließlich Interferenzen, die einen ungewünschten Betrieb
verursachen können.
Warnung: Änderungen am Gerät, die nicht ausdrücklich von der
für die Konformität verantwortlichen Stelle genehmigt wurden,
können zur Nichtigkeit der Betriebserlaubnis des Anwenders
für dieses Gerät führen.
HINWEIS: Dieses Gerät wurde getestet und erfüllt die Grenzwerte
für ein digitales Gerät der Klasse B, gemäß Abschnitt 15 der
FCC-Bestimmungen. Diese Grenzwerte sind dazu bestimmt,
einen angemessenen Schutz vor schädlichen Interferenzen
bei häuslicher Installation zu bieten. Dieses Gerät produziert
und nutzt Hochfrequenzenergie, kann Hochfrequenzenergie
ausstrahlen und kann, wenn es nicht in Übereinstimmung mit
den Anweisungen installiert und benutzt wird, zu Störungen des
Funkverkehrs führen. Es besteht jedoch keine Garantie, dass
bei einer bestimmten Installation keine Interferenzen auftreten.
Falls dieses Gerät Störungen des Radio- oder Fernsehempfangs
zur Folge hat, die durch Ein- und Ausschalten des Gerätes
überprüft werden können, sollte der Benutzer versuchen, die
Störungen durch eine oder mehrere der folgenden Maßnahmen
zu beheben:
- Erneutes Ausrichten oder Platzieren der Empfangsantenne.
-
Empfänger.
Vergrößern Sie den Abstand zwischen dem Gerät und dem
- Schließen Sie das Gerät an eine Steckdose in einem Stromkreis
an, an den der Empfänger nicht angeschlossen ist. Ziehen
Sie den Händler oder einen erfahrenen Radio-/TV-Techniker
zu Rate.
Ein Jahr beschränkte Garantie
ThermoPro garantiert für einen Zeitraum von einem Jahr ab dem
Kaufdatum, dass dieses Produkt frei von Mängeln in Teilen,
Material und Verarbeitung ist.
Sollten Reparaturen oder Wartungen im Rahmen dieser Garantie
erforderlich sein, kontaktieren Sie für Anleitungen zum Verpacken
und Versenden des Produkts an ThermoPro den Kundenservice
per Telefon oder E-Mail.
Diese Garantie gibt Ihnen bestimmte Rechte und eventuell
haben Sie zudem andere Rechte, die von Staat zu Staat
variieren.
DE
DE
-32- -33-

Kauf von zusätzlichen Fernfühlern
Die Modellnummer des Fernfühlers für dieses Gerät ist TPR65.
Zusätzliche Fühler können Sie direkt bei Amazon oder
ThermoPro bestellen, indem Sie unseren unten aufgeführten
Kundendienst kontaktieren.
Kundenservice
Telefon: 49-211-546-9003
E-Mail: service@buythermopro.com
Zeiten: Wochentags 08:00 - 18:00 Uhr EST
MONITOR WIRELESS DI MISURAZIONE DI UMIDITÀ
E TEMPERATURA INTERNA ED ESTERNA
IT Istruzioni per l’uso
Modello N.: TP-65
DE
IT
-34- -35-

Introduzione
Congratulazioni per l'acquisto del monitor wireless per la
misurazione di umidità e temperatura interna ed esterna. Ora
potrai conoscere la temperatura e l'umidità interna ed esterna
comodamente seduto in casa.
Suggerimenti e consigli
Se il ricevitore non si collega al trasmettitore, provare quanto
segue:
Tenere premuto il pulsante CHANNEL / SYNC sulla stazione
base e quindi premere il pulsante TX sul trasmettitore.
Trasferire la stazione base e / o l'unità remota fino a quando
non si trova la connessione.
I segnali provenienti da altri dispositivi elettronici possono
causare interferenze. Posizionare la stazione base e il
ricevitore da questi dispositivi.
Il trasmettitore potrebbe non funzionare correttamente in
temperature estreme a causa della potenza della batteria.
Sostituire le batterie o l'unità farà riprendere la funzione
correttamente in un tempo meteorologico più moderato.
Se la stazione di base è collegata a un frigorifero o a un
oggetto metallico mediante magnete, la trasmissione può
essere più breve. Rimuovere la stazione di base dal frigorifero
o dall'oggetto metallico o collocare la stazione base e il
sensore remoto il più vicino possibile.
Se l'umidità è inferiore al 10%, si visualizzerà LLL.
Avvertenze
Non sottoporre l'unità a forti eccessive forze, shock, polvere,
temperatura o umidità.
Non immergere l'unità nell'acqua.
Non rimuovere le viti.
Non smaltire l'unità in un incendio. Può esplodere.
Tenere l'unità lontano dai bambini piccoli. L'unità o parti
dell'apparecchio potrebbe essere un pericolo di soffocamento.
Non tentare mai di ricaricare le batterie con altri metodi.
Smaltire l'unità legalmente e riciclare quando possibile.
Specifiche
1. Frequenza di trasmissione di 433 Mhz
2. Gamma di trasmissione fino a 200 piedi in area aperta. (Range
probabilmente più corto sulla base dell'interferenza presente)
3. Intervallo di temperatura interna: -4°F~158°F(-20°C~70°C)
4. Intervallo di temperatura esterna: -58°F~158°F(-50°C~70°C)
5. Gamma di umidità: 10% ~ 99%
6. Tolleranza alla temperatura: +/- 2,0°F (+/- 1,1°C)
7. Tolleranza all'umidità: ± 2% dal 30% all'80%; ± 3% inferiore
al 30% e superiore all'80%
8. Alimentazione: 2 X AAA 1.5V per l'unità base e 2 X AAA 1.5V
per il sensore remoto
Componenti
1. Una stazione base (ricevitore)
2. Un sensore remoto (trasmettitore)
*Sebbene il sensore remoto sia progettato per essere
resistente alla pioggia, il sensore remoto deve essere
sempre posizionato verso l'alto in modo che la pioggia non
penetri all'interno del sensore attraverso i fori di sfiato sul
fondo del sensore le cui funzioni permettono al sensore
remoto di rilavare la temperatura ambientale e l'umidità più
precisamente e rapidamente.
IT IT
-36- -37-

Caratteristiche della stazione di base interna (ricevitore)
Display LCD
Temperatura
esterna
Umidità
esterna
Temperatura
interna
2* batteria AAA
Pulsanti a quattro tasti
Parete del foro
appeso
Umidità
interna
LATO
Stare
Magnete
1. Display LCD: visualizza l'attuale umidità/temperatura esterne
e umidità/temperatura interne
2. Scomparto batteria: Presenta 2 batterie AAA per alimentare
l'unità
3. Design sottile e per parete
4. Intervallo interno di temperatura: -4°F~158°F(-20°C~70°C).
5. Campo di umidità: 10% ~ 99%.
6. Unità di visualizzazione della temperatura: selezionabile
in °C e in °F
7. Sensibilità della temperatura: 0.1°C/°F
8. Sensibilità dell'umidità: 1%
9. Indicazione della batteria scarica
10. Quattro pulsanti touch
11. Retroilluminazione
Tasti touch
CHANNEL/SYNC: Premere una volta per visualizzare le letture
di temperatura e umidità da un massimo di 3 sensori remoti
esterni; Tenere premuto questo pulsante per accedere alla
modalità di sincronizzazione.
MAX / MIN / CLEAR: Toccare una volta per visualizzare la
temperatura o l'umidità massima o minima; Tenere premuto
per cancellare i dati della cronologia.
°F/°C/Cronologia: Premere per selezionare la temperatura
in ºC o ºF; Quando il display mostra la temperatura o l'umidità
massima o minima, toccare questo pulsante una volta per
impostare l'intervallo di tempo massimo e minimo di registrazione
dei dati tra ALL TIME o 24 ore. Nota: entrambi ALL TIME e 24
ore rappresentano l'ora dell'ultima volta in cui sono stati eliminati
manualmente i dati di cronologia o è stata installata una nuova
batteria.
:Toccare una volta per attivare/disattivare la retroilluminazione.
Se non si preme il pulsante per 15 secondi, la retroilluminazione
si spegne automaticamente.
Andamento di temperatura e umidità
1. indica la temperatura e l'umidità in un andamento
crescente.
2. indica la temperatura e l'umidità in un andamento in
mutazione.
3. indica la temperatura e l'umidità in un andamento
decrescente.
Channel 1, 2, 3
TX
Parete del foro appeso
TX LED RESET
2* batteria AAA
Porta di rivelazione
del sensore
Caratteristiche del sensore remoto (trasmettitore)
esterno
IT IT
-38- -39-
Seite wird geladen ...
Seite wird geladen ...
Seite wird geladen ...
Seite wird geladen ...
Seite wird geladen ...
Seite wird geladen ...
Seite wird geladen ...
Seite wird geladen ...
-
 1
1
-
 2
2
-
 3
3
-
 4
4
-
 5
5
-
 6
6
-
 7
7
-
 8
8
-
 9
9
-
 10
10
-
 11
11
-
 12
12
-
 13
13
-
 14
14
-
 15
15
-
 16
16
-
 17
17
-
 18
18
-
 19
19
-
 20
20
-
 21
21
-
 22
22
-
 23
23
-
 24
24
-
 25
25
-
 26
26
-
 27
27
-
 28
28


in anderen Sprachen
- français: ThermoPro TP-65 Mode d'emploi
- español: ThermoPro TP-65 Instrucciones de operación
- italiano: ThermoPro TP-65 Istruzioni per l'uso
Verwandte Artikel
Andere Dokumente
-
National Geographic 9070700 Bedienungsanleitung
-
Bresser VA colour LCD Weather Station incl. 3 Sensors Bedienungsanleitung
-
Bresser VA colour RC Weather Station Bedienungsanleitung
-
-
-
National Geographic 9070710 Bedienungsanleitung
-
-
-
Bresser 7001040 Bedienungsanleitung
-
Celestron HomeCast 47021 Benutzerhandbuch