horntools HPSAL2RREX01 Bedienungsanleitung
- Typ
- Bedienungsanleitung

www.horntools.com
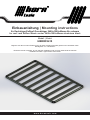
Einbauanleitung | Mounting instructions
für Dachträger ExRoof Grundträger 2400x1500x49mm Alu schwarz
for roof rack ExRoof Basic carrier 2400x1500x49mm aluminium black
Modell | Model
HBRRF2415
Beginne erst dann mit dem Einbau wenn du diese Anleitung komplett gelesen und verstanden hast!
Montagezeit: ca. 120 Minuten
Read this manual complete, do not start the installation until you fully understood the manual!
Installation duration: approximate 120 minutes

Datum / date: 2 | 1017.02.2022 Seite / page:
Technische Änderungen vorbehalten / technical changes reserved
Allgemeine Hinweise | universal notes
► Fragen / questions
Solltest du noch Fragen zur Montage oder zum Gebrauch deines Produktes haben, kontaktiere uns gerne.
If you have further questions regarding the mounting or the useage of your horntools product feel free to contact
us.
► Ersatzteile / spare parts
erhaltest du von deinem horntools Fachhändler /
contact your local horntools dealer
► Haftung / liability
Bei Nichtbeachtung der in dieser Anleitung angegebenen Hinweise und Informationen, bei nicht
bestimmungsgemäßem Gebrauch oder bei Einsatz außerhalb des vorgesehenen Verwendungszwecks, lehnt der
Hersteller die Gewährleistung für Schäden am Produkt ab.
Die Haftung für Folgeschäden an Elementen aller Art oder Personen ist ausgeschlossen. In case of non-
observance of this manual and its information or non-specied usage of the product, the manufacturer does not
give any kind of warranty of damage on the product.
The liability is excluded for consequential damages in any
kind for material or persons.
► Rechtliche hinweise / legal notice
Grak- und Textteile dieser Anleitung wurden mit Sorgfalt hergestellt. Für eventuell vorhandene Fehler und deren
Auswirkung kann keine Haftung übernommen werden! Technische Änderungen am Produkt sowie in dieser
Anleitung sind vorbehalten!
horntools excludes the liability for mistakes in the images or text phrases in this manual. Technical changes
reserved!
► Kennzeichnung von Gefahren / symbols for dangerous operation
Achtung! Dieses Symbol weist auf wichtige Arbeitsschritte hin, bei Nichtbeachtung kann es zu
Beschädigung am Produkt oder Verletzungen kommen!
Whenever this symbol is placed at an installation step special care must be taken. If you don’t
follow the instructions you could either damage the product or injure yourself!
► Nach dem Einbau / after the installation
Mach dich auf eine Testfahrt und prüfe ob durch den Einbau der horntools Komponente keine ungewollten
Geräusche entstanden sind oder sich das Fahrverhalten anderweitig geändert hat.
Make a test drive with the car and check that no unwanted noise or other unwanted changes in the cars
driveability or behaviour have occurred since you’ve installed the horntools components.
► Wichtig / important
Scanne diesen QR Code, um die Einbauanleitung auf deinem Smartphone zu önen.
Prüfe, ob die Versionsnummer (unten) dieselbe ist! Es kann sein, dass online bereits
eine aktualisierte Version (höherer Code) zur Verfügung steht – dann muss diese
verwendet werden.
Scan this QR Code to open this instruction on your mobile phone! Make sure that
the online and the printed instruction are the same version (code below)! It could be
possible that there is already an updated online version available.
If the version code of the online manual is higher than this one use the online manual!
Wenn du den QR Code nicht önen kannst hier der Link:
If you can’t read the QR Code we stated the link here:
https://www.horntools.com/pub/more_downloads/hbrrf2415_ins_man_de_en.pdf
VERSION: V1

3 | 10
Seite / page:
Datum / date: 17.02.2022
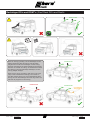
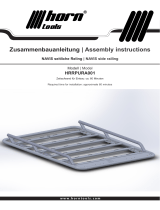
Dachträger DO‘s and DONT‘s | Roof Rack DO‘s and Dont‘s
Wenn ein Canopy („Hardtop“) und ein Dachträger auf der
Kabine verbaut sind darf die Ladung nicht auf beiden
festgebunden werden! Der Dachträger und das Canopy
bewegen sich während der Fahrt unabhängig voneinander,
das kann zu Schäden an Ladung und Gurten führen! Daher
die Ladung nur auf dem Dachträger befestigen, auf dem
Canopy lediglich auegen.
When using a canopy („hardtop”) make sure not to x the
cargo to the roofrack and the Canopy! The roofrack on
the cabin and the Canopy can move independently while
driving, this can cause damage! So x the cargo to the roof
rack and only support it on the Canopy.
km/h
!
!
festzurren/x
festzurren/x
nur auegen/
only support
festzurren/x
festzurren/x

Datum / date: 4 | 1017.02.2022 Seite / page:
Technische Änderungen vorbehalten / technical changes reserved
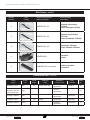
Stückliste | partlist
Anzahl
quantity
Bild
image
Zeichnungsnummer
drawing number
Beschreibung
description
4
HBRRF2415_01
Rahmen links/rechts
1107mm
Frame left/right 1107mm
2
HBRRF2415_02
Rahmen vorne/hinten
1315mm
Frame front/back 1315mm
8
HBRRF2415_03 Querträger 1453mm
Cross member 1453mm
4
HEXEDGE01 Eckstück
corner
4
HHBRRF2415_connector Verbinungsstück
Connector
Schraubenliste | boltlist
Artikel
article
Größe
size
Länge
length
Koporm
head
Oberäche
surface nish
Norm
standard
Anzahl
qty.
Schraube / bolt M8 35 Inbus / allen key verzinkt /
galvanzied DIN912 24
Nutenstein nicht
drehbar / slot nut
NON swivel type
M8 verzinkt /
galvanized 24
Scheibe / washer M8 verzinkt /
galvanized DIN125-A 24
Schraube / bolt M12 16 Linsenkopf / Lens
head
verzinkt /
galvanized ISO7390 8
Scheibe / washer M12 verzinkt /
galvanized DIN125-A 8

5 | 10
Seite / page:
Datum / date: 17.02.2022
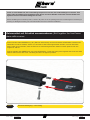
Rahmenstück mit Eckstück zusammenbauen | Bolt together the front frame
piece with a corner
1.
Eckstück Befestigung / corner ttingAbb.01
Zuerst wird der Artikel HBRRF2415_001 (Rahmen links/rechts) mit einem Eckstück HEXEDGE01 mithilfe eines
Nutenstein und einer Scheibe, welche von der Seite in das Prol eingeschoben werden, mit einer Schraube
xiert. Dabei ist zu beachten, dass die Teile schön zusammengeschoben werden und der Spalt so klein wie
möglich ist. Abb.01
First put together part HBRRF2415_001 with HEXEDGE01. To bolt the frame piece together take a slot nut and a
washer and secure it with a bolt. The tting should be as tight as possible.
Prüfe vor dem Einbau ob, der Lieferumfang komplett ist und alle Teile unbeschädigt sind. Sollten Teile
fehlen oder beschädigt sein kontaktiere bitte deinen horntools Händler und warte mit dem Einbau des
Systems bis alle Teile unbeschädigt bei dir sind.
Before installing the horntools product, check if all parts are in the package and are not damaged! If something is
missing or damaged contact your horntools dealer and don’t start the installation.

Datum / date: 6 | 1017.02.2022 Seite / page:
Technische Änderungen vorbehalten / technical changes reserved
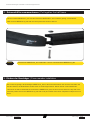
Rahmenhälfte zusammenbauen | Put together the half frame2.
Eckstück mit HBRRF2415_004 verbunden / corners connected with HBRRF2415_004
Abb.02
Nun den Artikel HBRRF2415_001 mit dem Eckstück HEXEDGE01, wie in Abb.02 gezeigt, verschrauben.
Now connect HBRRF2415_004 with the corner piece like shown in Abb.02.
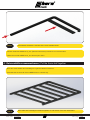
Einbau der Querträger | Cross member installation 3.
Wie in Abb.03 gezeigt, die Querträger HBRRF2415_003 in das Prol einschieben und mit einer Schraube und
Scheibe xieren, die Nutensteine werden oben ins Prol eingeschoben. Diesen Schritt 3-mal wiederholen.
Like shown in Abb.03 assemble the rack with the HBRRF2415_003, the slot nuts are sled in the top side of the
extrusion prole! Secure the HBRRF2415_003 with a bolt plus washer from below. Repeat this step three more
times.

7 | 10
Seite / page:
Datum / date: 17.02.2022
Querstreben einsetzten / insertion of the cross member struts
Abb.03
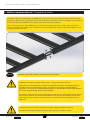
Rahmenhälfte zusammenbauen | Put the frame half together4.
Baue die zweite Hälfte des Grundträgers in gleicher Weise zusammen.
Assemble the second half of the HBRRF2415 in a similar way.
Zweites Seitenteil HBRRF2415_001 (Rahmen links/rechts) montieren und verschrauben.
Attach the second HBRRF2415_001 and torque it down.
Eine Hälfte des Dachträgers zusammengebaut / a half section of the rack assembled
Abb.04

Datum / date: 8 | 1017.02.2022 Seite / page:
Technische Änderungen vorbehalten / technical changes reserved
Verbindung der beiden Hälften / joining oft he two half sections
Abb.05
Hälften zusammenbauen | Complete the frame 5.
Die beiden Hälften des Dachträgers mit HBRRF2415_connector und je zwei M12 Schrauben verbinden. Achte
darauf, dass die Ecken im rechten Winkel sind und die Spalte an den Ecken so klein als möglich sind. Schrauben
anhand der Drehmomenttabelle auf der letzten Seite dieser Anleitung festziehen.
Join the two half sections using HBRRF2415_connector and two M12 bolts each. Finally, make sure that all
corners are aligned at an angle of 90° and that the screws are tightened according to the torque diagram on the
last page of these instruction.
Prüfe periodisch den korrekten Halt aller Schrauben, gegebenenfalls nachziehen.
Periodically check that the bolts are torqued down properly, if needed re torque.
Tragkraft/ load capacity: 300 kg statisch/ static – 100 kg dynamisch/ dynamic*
*Die dynamische Belastbarkeit ist nicht die Freigabe des Herstellers. Die Belastbarkeit des
Herstellers darf nicht überschritten werden. Die statische Last gibt die Ladekapazität im
Stillstand an. Die dynamische Belastbarkeit bezieht sich ausschließlich auf befestigte Straßen.
Die Last muss gleichmäßig, ächig verteilt auiegen.
The dynamic load capacity is not the manufacturer‘s release. The manufacturer‘s load capacity
must not be exceeded. The static load indicates the load capacity at standstill. The dynamic
load capacity refers exclusively to paved roads. The load must be evenly distributed over a
wide area.

9 | 10
Seite / page:
Datum / date: 17.02.2022
Regelgewinde
Abmessung Vorspannkraft (kN) Anziehmoment (Nm)
Festigkeits-
klasse 4.6 5.6 8.8 10.9 12.9 4.6 5.6 8.8 10.9 12.9
M 4x0,70 1,29 1,71 3,9 5,7 6,7 1,02 1,37 3,0 4,4 5,1
M 5x0,80 2,1 2,79 6,4 9,3 10,9 2,0 2,7 5,9 8,7 10
M 6x1,00 2,96 3,94 9,0 13,2 15,4 3,5 4,6 10,0 15,0 18,0
M 8x1,25 5,42 7,23 16,5 24,2 28,5 8,4 11,0 25,0 36,0 43,0
M 10x1,50 8,64 11,5 26,0 38,5 45,0 17,0 22,0 49,0 72,0 84,0
M 12x1,75 12,6 16,8 38,5 56,0 66,0 29,0 39,0 85,0 125,0 145,0
M 14x2,00 17,3 23,1 53,0 77,0 90,0 46,0 62,0 135,0 200,0 235,0
M 16x2,00 23,8 31,7 72,0 106,0 124,0 71,0 95,0 210,0 310,0 365,0
M 18x2,50 28,9 38,6 91,0 129,0 151,0 97,0 130,0 300,0 430,0 500,0
M 20x2,50 37,2 49,6 117,0 166,0 194,0 138,0 184,0 425,0 610,0 710,0
M 22x2,50 46,5 62,0 146,0 208,0 243,0 186,0 250,0 580,0 830,0 970,0
M 24x3,00 53,6 71,4 168,0 239,0 280,0 235,0 315,0 730,0 1050,0 1220,0
M 27x3,00 70,6 94,1 221,0 315,0 370,0 350,0 470,0 1100,0 1550,0 1800,0
M 30x3,50 85,7 114,5 270,0 385,0 450,0 475,0 635,0 1450,0 2100,0 2450,0
M 33x3,50 107,0 142,5 335,0 480,0 560,0 645,0 865,0 2000,0 2800,0 3400,0
M 36x4,00 125,5 167,5 395,0 560,0 680,0 1080,0 1440,0 2600,0 3700,0 4300,0
M 39x4,00 151,0 201,0 475,0 670,0 790,0 1330,0 1780,0 3400,0 4800,0 5600,0
Drehmomenttabelle | torque diagram [torque in Nm]

www.horntools.com
horntools GmbH
Wallenmahd 23 . 6850 Dornbirn . AUSTRIA
email: o[email protected]
UID: ATU65090439
-
 1
1
-
 2
2
-
 3
3
-
 4
4
-
 5
5
-
 6
6
-
 7
7
-
 8
8
-
 9
9
-
 10
10


horntools HPSAL2RREX01 Bedienungsanleitung
- Typ
- Bedienungsanleitung
in anderen Sprachen
Verwandte Artikel
-
 horntools PHRRF009 Bedienungsanleitung
-
 horntools HISDMSPEL01 Bedienungsanleitung
-
 horntools HNINARSA01 Bedienungsanleitung
-
 horntools HFORARSA01 Bedienungsanleitung
-
 horntools PHRRF004 Bedienungsanleitung
-
 horntools HRANRR01NG_X Bedienungsanleitung
-
 horntools HFORASPTA01 Bedienungsanleitung
-
 horntools HRRPURA001 Bedienungsanleitung
-
 horntools HRANRR01NG_X Bedienungsanleitung
-
 horntools HISDMSPTA01 Bedienungsanleitung


