
Montageanleitung
Montage der Nabe und Bremse für Aquatec®Ocean 24“-Räder
Assembly instruction
Assembly of the hub and brake for self-propelling wheels Aquatec®Ocean
Monteringsanvisning
Montering av nav och bromsar for drivhjul Aquatec®Ocean
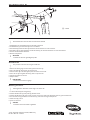
Tools / Werkzeuge / Verktyg:
17, 24
E
B
C
D
B
A
DE
Nabe montieren
i
Die Verfahrensweise ist für die linke und rechte Seite identisch!
1. Abdeckkappen aus den Aufnahmen Ⓓ im Seitenteil Ⓒ entfernen.
2. Scheibe Ⓑ auf die Nabe Ⓐ aufschieben.
3. Nabe mit Scheibe von außen in die Aufnahme Ⓓ am Seitenteil stecken.
4. Scheibe Ⓑ von innen auf die Nabe aufschieben und die Mutter Ⓔ aufschrauben.
5. Die Schraube mit geeignetem Werkzeug gegenhalten und die Mutter Ⓔ mit einem Drehmoment von 20 - 30 Nm fest anziehen.
EN
Assemble the hub
i
The procedure is the same for the right and left side.
1. Remove the dummy plugs from the holes Ⓓ of the side frame Ⓒ.
2. Put a washer Ⓑ on the hub Ⓐ.
3. Push the hub with the washer into the hole Ⓓ of the side frame.
4. From the inside, put a washer Ⓑ on the hub and screw on the nut Ⓔ.
5. Hold the bolt with a suitable tool and tighten the nut Ⓔ with a torque of 20 - 30 Nm.
SV
Montering av nav
i
Förfaringssättet är identiskt för stolens högra och vänstra sida.
1. Montera av täcklocken Ⓓ från sidogavlarna Ⓒ.
2. För på en hålbricka Ⓑ på navdelen Ⓐ.
3. För navdelen med brickan genom hålet Ⓓ i sidogaveln från stolens yttersida.
4. Sätt på en hålbricka Ⓑ på navdelen från stolens insida och skruva på muttern Ⓔ.
5. Håll skruven med ett lämpligt verktyg och dra åt muttern Ⓔ med minst ett dragmoment på 20 - 30 Nm.
Ⓔ → 20 - 30 Nm

Tools / Werkzeuge / Verktyg:
Ã
6
C
D
G
F
E
B
A
DE
Bremse montieren
i
Die Verfahrensweise ist für die linke und rechte Seite identisch!
1. Abdeckkappen aus den Aufnahmen Ⓔ im Seitenteil Ⓒ entfernen.
2. Feststellbremse Ⓓ mit dem Hebel Ⓕ nach vorn aufsetzen.
3. Die Scheiben Ⓑ auf die Schrauben Ⓐ aufstecken und die Schraube von innen einstecken.
4. Die Muttern Ⓖ von außen aufstecken und die Schrauben Ⓐ mit einem Drehmoment von 5 Nm fest anziehen.
5. Das 24“ Rad auf die Nabe aufstecken.
6. Bremsen nachjustieren.
!
WICHTIG
▸ Funktion der Bremsen regelmäßig überprüfen.
EN
Assemble brake
i
The procedure is the same for the right and left side.
1. Remove the dummy plugs from the holes Ⓔ of the side frame Ⓒ.
2. Put on the brake Ⓓ with the lever Ⓕ facing forward.
3. Put the washers Ⓑ on the bolts Ⓐ and put in the bolts from the inside.
4. Put in the nuts Ⓖ and tighten the bolts Ⓐ with a torque of 5 Nm.
5. Place the 24“ Wheel on the hub.
6. Readjust brakes.
!
IMPORTANT
▸ Check function of brakes regularly.
SV
Montering av bromsar
i
Förfaringssättet är identiskt för stolens högra och vänstra sida.
1. Ta bort täcklocken Ⓔ från sidogaveln Ⓒ.
2. Montera handbromsen Ⓓ med spaken Ⓕ pekandes framåt.
3. Montera på hålbrickorna Ⓑ på skruvarna Ⓐ och för in skruvarna i hålen från sidogavelns insida och genom handbromsen.
4. Lås med muttrarna Ⓖ på utsidan. Dra åt skruvarna Ⓐ med minst ett dragmoment på 5 Nm.
5. Placera 24“ hjul på navet.
6. Justera om bromsen.
!
VIKTIGT
▸ Kontrollera bromsens funktion regelbundet.
Ⓐ → 5 Nm
©2012, AQUATEC Operations
GmbH, D-88316 Isny
Part No. 16410-01 / 2012-07
-
 1
1
-
 2
2


in anderen Sprachen
- English: Aquatec Ocean
- svenska: Aquatec Ocean
Verwandte Artikel
Andere Dokumente
-
Etac Crissy Active Bedienungsanleitung
-
-
Invacare Aquatec Ocean Dual VIP Ergo Benutzerhandbuch
-
Etac Cross 5 XL Assembly Instruction
-
BERG 24.15.00.00 Bedienungsanleitung
-
-
BERG Choppy Neo Benutzerhandbuch
-