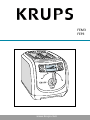
Krups Convection Oven FEM3 Benutzerhandbuch
- Kategorie
- Toaster
- Typ
- Benutzerhandbuch
Dieses Handbuch eignet sich auch für

www.krups.com
FEM3
FEP3

F*
L
C
E
H*
K
D
I
G*
A
B
J
(F*)
reheat
2
* Depending on model, selon modèle, afhankelijk van het model, je nach Modell, según modelo, a seconda del
modello, consoante o modelo, afhængig af model, på enkelte modeller, beroende på modell,
zale˝nie od
modelu,
в зависимости от модели,
mallista riippuen, modele göre.

1 2
4
3
5 6
7 8 9
10
X1
11
X2
12
13
17
14 15
18
***
* Depending on model, selon modèle, afhankelijk van het model, je nach Modell, según modelo, a seconda del
modello, consoante o modelo, afhængig af model, på enkelte modeller, beroende på modell,
zale˝nie od
modelu,
в зависимости от модели,
mallista riippuen, modele göre.
3
16

4
ENG
SAFETY INSTRUCTIONS
• For your safety, this toaster complies with applicable technical rules and norms.
• Check that the main voltage corresponds to the voltage indicated on the toaster (alternating voltage
only).
• Because of the diversity of applicable norms, if this toaster is used in a country other than the country
it was bought in, have it checked by an authorised Service Dealer. (see list attached).
• Use a flat, stable, heat resistant work surface, away from any contact with water and never in a built-in
kitchen alcove.
• Do not move the toaster whilst in operation.
• Do not disconnect the toaster by pulling on the cord.
• Do not dismantle the toaster yourself. Use the services of an approved service centre.
SHORT CORD
(a) • A short power cord is provided, to reduce risks resulting from becoming entangled in or tripping
over a longer cord.
(b) • Extension cords may be used if care is exercised in their use.
(c) • If an extension cord is absolutely necessary :
- The marked electrical rating of the extension cord should be at least as great as the electrical
rating of the appliance.
- The cord should be arranged so that it will not drape over the work top or tabletop where it can
be pulled on by children or tripped over unintentionally.
(d)• Do not unplug the toaster by pulling on the cord. Instead grasp the plug and pull to disconnect.
(e)• Never wrap the cord around the toaster. Use the cord storage on the underside of the toaster.
IMPORTANT SAFEGUARDS
When using electrical appliances, basic safety precautions should always be followed :
DO
• Place on a flat, stable, heat-resistant surface away from water splashes or other sources of heat.
• Read all instructions.
• The toaster must always be used in the upright position (not on its side or tilted forward or back).
• Before each use, make sure that the crumb tray is in its proper location.
• Regularly remove crumbs from the crumb tray.
• The control lever must be in the “Up” position before attaching or disconnecting the plug from the mains
socket.
• Unplug from the mains when not in use and before cleaning. Allow to cool down before cleaning and
before putting on or taking off parts.
Do not attempt to modify the plug in any way.
• If bread jams in the slots after toasting the unit will automatically shut off. Disconnect the plug imme-
diately from the mains socket and wait for the toaster to cool before attempting to remove the bread.
• Disconnect the toaster if it shows any working abnormalities.

5
ENG
DO NOT
• Do not leave the toaster within the reach of children.
• The toaster is not intended for use by young children or infirm persons without close supervision.
• Young children should be supervised to ensure they do not play with the appliance.
• Never leave the toaster unattended during operation, particularly when toasting for the first time or
when changing settings.
• Do not use the toaster for anyting else other than its intended use.
• Do not touch the metal parts or hot surfaces of the appliance when it is working. Use handles or
knobs.
• Oversized foods, metal foil packages, or utensils must not be inserted in a toaster as they may cause
an electric shock or fire..
• The use of accessory attachments are not recommended by the appliance manufacturer as it may
cause injuries.
• To protect against electrical shock do not immerse the cord, plugs, or toaster in water or other liquids.
• Do not try to toast sugar coated bread that may melt or drip in the toaster and do not toast crusts as
this may damage the appliance or cause a fire.
• Do not try to toast very thick slices of bread that could block the toasting mechanism.
• Do not operate any appliance with :
- a damaged cord or plug ;
- after the appliance malfunctions, or has been damaged in any manner. Return the appliance to an
Authorised Krups Service Centre for examination, repair, or adjustment, in order to avoid any risk of
danger.
• Do not let the cord hang over the edge of work top or come in contact with hot surfaces.
• Do not use outdoors. Avoid humid environments.
• Do not place on or near a gas or electric burner or near a heated oven.
• Bread can burn, do not cover this appliance while in use and do not use this appliance near any flammable
materials such as curtains, under shelving or wall cupboards, etc… it should be attended when in use.
• Do not put paper towels, cardboard or plastic in, on or under the toaster.
• If flames were to arise from parts of the toaster, never attempt to extinguish them with water. Unplug
the appliance and smother the flames with a damp cloth.
• Do not attempt to dislodge food when the toaster is plugged in.
• Do not use this appliance as source of heating or drying.
• Do not cover the toaster during use.
• Do not use the toaster for cooking, grilling or defrosting frozen food other than bread products.
This product has been designed for domestic use only. Any professional use, inappropriate
use or failure to comply with the instructions will void the warranty.
SAVE THESE INSTRUCTIONS.

6
ENG
Thank you for choosing a toaster from the KRUPS range which is designed exclusively
for toasting bread and warming bakery products.
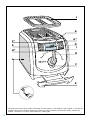
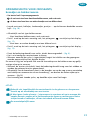
DESCRIPTION :
A Digital display: indicates selected functions and toasting time
B Control lever with 3-position HI-LIFT function
C STOP button
D + button (increases degree of toasting)
E - button (decreases degree of toasting)
F button « Warming » *
G button « Defrost » *
H button « Bagel » *
I 2-programme button (croissants or buns)*
J REMOVABLE integrated warming plate
K Crumb tray
L Cord storage
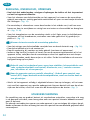
BEFORE USING FOR THE FIRST TIME:
• Unpack the toaster and remove all self-adhesive stickers.
• Wipe the outside of the toaster with a damp cloth and dry.
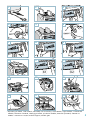
• Before use, unwind the supply cord completely and plug into the supply – (fig. 1).
Never operate the toaster with the supply cord partially unwound.
• Start the toaster once or twice on its maximum setting to eliminate the “new” smell.
This should be done with the toaster empty and the room ventilated.
•
Useful advice
- The water content of bread can vary; this affects the required toasting or browning
time. Here are a few general recommendations:
- slightly dry bread should be toasted with a lower toasting or browning setting,
- very fresh or wholemeal bread will require slightly more toasting. For breads and
buns with an uneven surface more browning is recommended.
- If you toast fruit loaf or buns, remove any loose fruit that might fall off, otherwise it
may damage the toaster by becoming lodged on an element.
- When toasting bagels or french bread, cut them into two equal halves before placing
them in the toaster.
- When toasting a single slice of bread, you should reduce the toasting setting slightly.
- Take great care when warming or toasting sugar coated products or products with
fillings (for example, pastries/cakes to be toasted) and always ensure that the toaster
is on its minimum setting.
* depending on model

7
ENG
TOASTING BREAD:
• Insert the slices of bread in the toaster slots - (fig. 2).
• Select the desired browning level, from 1 to 9, by pressing the + and – buttons, accor-
ding to the type freshness and thickness of the bread - (fig. 3). The browning level
selected will appear on the digital display.
- 1 . very slightly browned - 6.7. well toasted
- 2.3. slightly browned - 8.9 very well toasted
- 4.5. lightly browned
• Turn the control lever clockwise until it locks into position - (fig. 4).
• The bread slices will be automatically centred and toasting will begin.
Once the cycle has begun, the remaining toasting time is shown on the digital display.
The control lever can only be locked in the lower position when the toaster is
plugged in.
Any bread protruding out of the slots will not be toasted.
Never leave the toaster unattended during use. We do not recommend toasting
sugar coated bread, use caution when toasting sugar coated or filled items
(such as toaster pastries). Always set browning control to lowest setting.
Before toasting, be sure that the toaster is not under cabinets or other flam-
mable materials such as curtains.
Reduce the browning level if you are toasting only one slice.
For best results, always toast two slices of bread.
The toaster stops automatically when toasting is finished, the control lever returns to the
upright position and the slices of toast pop up - (fig. 5).
Do not use the control lever to stop the toaster during toasting.
STOP AND CHILD SAFETY FUNCTION:
• You can stop toasting at any time by pressing the STOP button.
Do not use the control lever to stop the toasting cycle.
After about ten minutes, the digital display goes automatically into stand-
by mode and comes on again if the control lever is moved or one of the
control buttons is pressed.
• The child safety function is switched on by pressing the STOP button for 3 seconds; the sym-
bol appears on the digital display, the functions are de-activated and the toaster cannot
be used once locked.
• The child safety function is switched off by pressing the STOP button once again for
3 seconds; the symbol disappears from the display and is replaced by the default
setting of 5.

8
ENG
* depending on model ** tongs and oven gloves not supplied
HI-LIFT FUNCTION
• To remove smaller slices of bread more easily from the toaster,
3 lifting positions are available:
- For medium slices, turn the control lever anti-clockwise to the first “pictogram”
- For small slices, turn the control lever anti-clockwise to the second “pictogram”
- For very small slices, turn the control lever anti-clockwise to the third “pictogram”
- (fig. 6).
If a function has been selected by pressing a button, this can be cancelled
by pressing the button again.
TOASTING FUNCTION FOR FROZEN BREAD *
• Select the desired browning level with the + and - buttons.
• Press the DEFROST button ; the pictogram will appear on the display - ( fig. 7)
•
For frozen bagels (or similar), press the BAGEL button ; the pictogram will
appear on the display.
• Push down the control lever. A longer toasting time will be automatically selected in
order to defrost your bread before toasting.
Once the cycle is started, the remaining toasting time is shown on the digital display.
• The selected function is cancelled when the toaster stops.
BAGEL FUNCTION *
• Insert the two halves of your cut bagel or french bread in the slots of your toaster,
with the cut side facing the middle and the crust outwards.
• Select the desired degree of toasting with the + and - buttons.
• Press the BAGEL button ; the pictogram will appear on the display - ( fig. 8).
• Push down the control lever.
• The toasting time is automatically adjusted to the required degree of browning*.
Once the cycle is started, the remaining toasting time is shown on the digital display.
• When ready, the bagel pops up and the toaster stops automatically.
• The selected function is cancelled when the toaster stops.
WARMING FUNCTION *
• Press the WARMING button ; the pictogram will appear on the display - (fig. 9).
• Push down the control lever (there is no need to select a toasting setting).
• The toaster will run for a short, preset time, just to warm your ready toasted bread.
Once the cycle is started, the remaining toasting time is shown on the digital display.
• The selected function is cancelled when the toaster stops.

9
ENG
* depending on model ** bread tongs and oven gloves are not provided with the toaster.
CROISSANT WARMING FUNCTION*
rolls and pastries
• Your toaster has two warming programmes:
croissant setting for delicate pastries such as croissants.
bun setting for buns and other rolls with a thicker crust.
• Place the croissants, bread rolls, brioches, milk rolls, etc. directly on the warming plate
provided for this purpose - (fig. 10).
• Depending on the type of pastry:
- For delicate pastries such as croissants:
• Press the WARMING PLATE button once; the pictogram will appear on the display
- (fig. 11).
- For buns and other rolls with a thicker crust:
• Press the WARMING PLATE button twice; the pictogram will appear on the display
- (fig. 12).
• Turn the control lever clockwise until it locks in position - (fig. 4).
• There is no need to select a toasting setting.
• Once the cycle is started, the remaining warming time is shown on the digital display.
The hot air rising from the toaster will be diffused by the warming plate to heat the
buns / pastries evenly.
• The control lever returns to the upright position and the selected function is cancelled
when the toaster stops.
• Depending on the type of bread: to warm the other side of the bread, turn it over
while the warming plate is still hot, using oven gloves or bread tongs** - (fig. 13).
• If necessary, start the WARMING cycle afresh, as described above.
WARNING:
Never attempt to use the toaster for toasting bread (in the slots) and war-
ming (on the warming plate) at the same time.
Never toast or warm food items (fatty or sugared) that might melt or run into
the toaster. Do not toast small pieces of bread or croutons, which may damage
the toaster or even catch fire.
The warming plate remains hot.

LOOKING AFTER, CLEANING AND STORING YOUR TOASTER
• Before cleaning, care or storage, unplug the toaster and allow it to cool.
• To wipe the outside of the toaster, the supply cord and the warming plate: use a soft
cloth or slightly damp sponge with washing-up liquid. Dry - (fig. 14).
• The warming plate is removable: take hold of the middle and pull upwards to remove
it. Clean with water and washing-up liquid then leave to dry -(fig. 15, 16).
• To replace it, insert the 4 tongues of the warming plate into the corresponding slots of
the toaster and ensure that it is correctly positioned before each use - (fig. 17).
Never use the toaster without the warming plate.
• To clean the crumb tray: pull out the tray and empty out the crumbs - (fig. 18).
• Do not wash the crumb tray in the dishwasher.
• Do this regularly, ideally after each use (toasting or warming).
• If crusts, crumbs or other debris remain trapped in the toaster or between the heating
elements, remove the warming rack, then turn the toaster upside down to allow the
residues to fall out of the top. Ensure that the crumb tray and warming plate are
replaced correctly.
Care of your toaster: never use abrasive cleaning agents (soda-based oven clea-
ner, metal cleaner, bleach etc.) or metal utensils, scourers or abrasive pads.
For models with metallic finishes*: Do not use cleaning products intended for
metals (stainless steel, copper, etc.), just a soft cloth with window cleaning
liquid.
• Wait for the toaster to cool down completely before putting it away. Do not wind the
supply cord around the toaster; a cord tidy is provided for this purpose at the back of
the toaster. Simply slide the cord into the toaster - (fig. 1).
ENVIRONMENTAL PROTECTION
The packaging of your product is made of recyclable materials. Do not throw it in your
usual dustbin; take it to a nearby separate waste collection centre.
If you have any product problems or queries, please contact our Customer Relations Team
first for expert help and advice:
HELPLINE:
0845 602 1454 - UK
(01) 4751947 - Ireland
or consult our website - www.krups.co.uk
ENG
10

FRA
CONSIGNES DE SÉCURITÉ
• La sécurité de cet appareil est conforme aux règles techniques et aux normes en vigueur.
• Vérifiez que la tension du réseau correspond bien à celle indiquée sur l’appareil (tension alternative seu-
lement).
• Compte tenu de la diversité des normes en vigueur, si l’appareil est utilisé dans un pays différent de
celui où il a été acheté, faites-le vérifier par un centre de service agréé (voir la liste ci-jointe).
• Utilisez un plan de travail stable à l’abri des projections d’eau et n’installez en aucun cas l’appareil dans
une niche de cuisine intégrée.
• Ne portez ou ne déplacez pas l’appareil pendant l’utilisation.
• Ne déconnectez pas l’appareil en tirant sur le cordon.
CORDON D’ALIMENTATION
(a) • Le fil électrique est court de façon à réduire les risques de s’emmêler dans un fil trop long.
(b) • Une rallonge peut être utilisée à condition de s’en servir avec précaution.
(c) • Si vous utilisez une rallonge, certaines précautions s’imposent :
- La puissance électrique de votre fil d’extension doit être au moins aussi grande que celle de votre
grille-pain.
- La rallonge doit être placée hors de portée des enfants et de façon telle que personne ne tré-
buche ou ne se blesse.
(d)• Ne débranchez pas l’appareil en tirant sur le cordon. Saisissez la prise et retirez-la du mur.
(e)• N’enroulez pas le cordon autour du grille-pain. Utilisez le range cordon prévu à cet effet derrière l’appareil.
PRÉCAUTIONS IMPORTANTES
Lors de l’utilisation d’appareils électriques, un certain nombre de règles élémentaires doivent
être respectées, en particulier les suivantes :
À FAIRE
• Lisez entièrement le mode d’emploi et suivez attentivement les instructions d’utilisation.
• L’appareil doit être exclusivement en position debout, jamais couché, incliné ou à l’envers.
• Avant chaque utilisation, vérifiez que le tiroir ramasse-miettes est bien dans son logement.
• Enlevez régulièrement les miettes du tiroir ramasse-miettes.
• Le levier de commande du chariot doit être en position verticale quand vous branchez ou débranchez
votre appareil.
• Débranchez l’appareil quand il ne sert pas et avant de le nettoyer. Attendez qu’il refroidisse avant de le
nettoyer ou de le ranger.
• En fin de cycle, si les tranches de pain restaient coincées entre les grilles, débranchez, et attendez que
l’appareil refroidisse avant de retirer le pain.
• Débranchez l’appareil si une anomalie de fonctionnement se produisait.
11

12
FRA
À NE PAS FAIRE
• L’appareil ne doit pas être utilisé par de jeunes enfants ou par des personnes inaptes sans supervision.
• Les jeunes enfants doivent être surveillés afin de s'assurer qu'ils ne jouent pas avec l'appareil.
• Ne laissez jamais l’appareil fonctionner sans surveillance et particulièrement à chaque premier grillage
ou changement de réglage.
• N’utilisez pas l’appareil pour tout autre usage que celui pour lequel il a été conçu.
• Ne touchez pas les parties métalliques ou chaudes de l’appareil en cours d’utilisation, utilisez les poi-
gnées.
• N’introduisez pas dans le grille-pain des ustensiles en métal (cuillère, couteau …), des aliments trop
gros ou des emballages en aluminium qui pourraient provoquer des courts-circuits.
• N’ajoutez pas au grille-pain des accessoires qui ne sont pas recommandés par le fabricant car cela
peut-être dangereux.
• Afin d’éviter les chocs électriques, ne plongez pas dans l’eau ou tout autre liquide le fil électrique, la
prise de courant ou l’appareil en entier.
• Ne grillez pas de pain avec glaçage susceptible de fondre et de couler dans le grille-pain et ne grillez pas
de petits morceaux de pain ou croutons, car cela pourrait causer des dommages ou un risque de feu.
• N’introduisez pas dans l’appareil de trop grosses tranches de pain susceptibles de coincer le mécanis-
me du grille-pain.
• N’utilisez pas l’appareil si :
- celui-ci a un cordon défectueux ;
- l’appareil est tombé et présente des détériorations visibles ou des anomalies de fonctionnement.
Dans chacun de ces cas, l’appareil doit être envoyé au centre de service après-vente agréé le plus
proche, afin d’éviter tout danger.
• Ne laissez pas le cordon pendre dans le vide ou toucher à toutes surfaces brûlantes.
• N’utilisez l’appareil que dans la maison. Évitez les lieux humides.
• Ne posez votre grille-pain sur aucune surface chaude, ni trop près d’un four chaud.
• Le pain peut brûler, aussi ne couvrez pas l’appareil pendant son fonctionnement et ne le mettez pas en
contact ou à proximité de matériaux inflammables comme des rideaux, des tentures ou du bois (éta-
gères, meubles …). L’appareil doit être utilisé sous surveillance.
• Ne placez jamais de papier, carton ou plastique dans, sur ou sous l’appareil.
• S’il arrivait que certaines parties du produit s’enflamment, ne tentez jamais d’éteindre les flammes avec
de l’eau. Débranchez l’appareil et étouffez les flammes avec un linge humide.
• N’essayez jamais d’ enlever le pain lorsque le cycle de grillage est enclenché.
• N’utilisez pas le grille-pain comme source de chaleur ou de séchage.
• N’utilisez pas le grille-pain pour cuire, griller, réchauffer ou décongeler des plats surgelés.
Cet appareil a été conçu uniquement pour un usage domestique.
Toute utilisation professionnelle, non appropriée ou non conforme au mode d’emploi n’en-
gage ni la responsabilité, ni la garantie du fabricant.
GARDEZ PRÉCIEUSEMENT
CES CONSIGNES.

13
FRA
Nous vous remercions d’avoir choisi un appareil de la gamme KRUPS qui est exclusive-
ment prévu pour le grillage des pains et le réchauffage des viennoiseries.
DESCRIPTION :
A Ecran digital : indique les fonctions sélectionnées et le temps de grillage
B Levier de commande avec fonction HI-LIFT à 3 positions
C Touche STOP
D Touche + (augmentation niveau de grillage)
E Touche - (diminution niveau de grillage)
F Touche « réchauffage » *
G Touche « décongelation » *
H Touche « bagel » *
I Touche ,2 programmes (croissants ou buns)*
J Toit réchauffeur AMOVIBLE
K Tiroir ramasse-miettes
L Range-cordon
AVANT LA PREMIERE UTILISATION :
• Sortez l’appareil de son emballage et enlevez tous les autocollants.
• Essuyez l’extérieur de l’appareil avec un linge humide, séchez.
• Déroulez complètement le cordon d’alimentation avant l’utilisation et branchez la prise
- (fig. 1).
Ne faites jamais fonctionner l’appareil avec le cordon partiellement déroulé.
• Mettez une ou 2 fois le toaster en marche sur le niveau maximum afin d’éliminer
l’odeur de neuf. Cette opération doit être réalisée le toaster vide. (Aérez la pièce).
•
Conseils pratiques
- Les pains pouvant présenter des teneurs en humidité différentes, les temps de grilla-
ge et de brunissage sont susceptibles de varier d’un pain à l’autre. Voici quelques
recommandations d’ordre général :
- Un pain légèrement sec devra être grillé de préférence à un niveau de puissance
inférieur.
- Un pain très frais ou un pain complet devra quant à lui bénéficier d’un grillage légè-
rement plus intense. Dans le cas de pains présentant des surfaces irrégulières, tels
que les muffins anglais, un brunissage plus prononcé est recommandé.
- Si vous grillez du pain aux raisins, enlevez les raisins qui risquent de se détacher car
ceux-ci peuvent endommager l’appareil en provoquant un court-circuit.
- Lorsque vous grillez des bagels, découpez-les en deux moitiés égales avant de les pla-
cer dans les fentes.
- Si vous grillez une seule tranche de pain, vous pouvez diminuer le niveau de grillage.
- Réchauffez ou grillez les produits glacés ou fourrés (des pâtisseries à griller par
exemple) avec grande précaution. Veillez à ce que le bouton de réglage soit toujours
positionné sur son niveau minimum.
* selon modèle

14
FRA
GRILLAGE DU PAIN :
• Placez les toasts ou les tranches de pain dans les fentes du toaster - (fig. 2).
• Appuyer sur les touches + ou - pour sélectionner le niveau de grillage souhaité entre 1
et 9 suivant la nature et l’épaisseur du pain - (fig. 3). Le degré de grillage sélectionné
apparaîtra sur l’écran digital.
- 1 . peu grillé - 6.7. bien grillé
- 2.3. légèrement grillé - 8.9 très grillé
- 4.5. moyennement grillé
• Tournez le levier de commande à droite jusqu’à le verrouiller - (fig. 4).
• Les tranches de pain sont centrées automatiquement et le grillage commence.
Une fois le cycle enclenché le décompte du temps de grillage apparaît sur l’écran digital.
Le levier de commande ne se verrouille à droite que lorsque l’appareil est
branché.
Si du pain dépasse des grilles, il ne pourra être grillé.
Surveillez toujours votre toaster lors de son utilisation. Réchauffez ou grillez les
produits glacés ou fourrés (des pâtisseries à griller par exemple) avec grande
précaution. Veillez à ce que le bouton de réglage soit toujours positionné sur
son niveau minimum.
Avant toute utilisation, assurez-vous que le toaster n’est pas disposé en dessous
de placards ou de tout autre matériau inflammable tel que des rideaux.
Réduisez le réglage si vous ne grillez qu’une seule tranche de pain.
• Le toaster s’arrête automatiquement en fin de grillage, le levier de commande revient
au centre et les tranches de pain remontent
- (fig. 5).
N’utilisez pas le levier de commande pour interrompre le cycle de grillage.
FONCTION STOP ET SÉCURITÉ ENFANT :
• Vous pouvez interrompre à tout moment le fonctionnement en appuyant sur la
touche STOP.
N’utilisez pas le levier de commande pour interrompre le cycle de grillage.
L’écran digital se met en veille automatiquement au bout d’une dizaine de
minutes et se rallume en cas d’enclenchement du levier de commande ou
de pression sur l’une des touches de commande.
• Mise en marche de la fonction sécurité enfant en appuyant 3 secondes sur la touche STOP,
le symbole apparaît sur l’écran digital, les fonctions sont alors désactivées, le toaster une
fois verrouillé ne peut être utilisé.
• Arrêt de la fonction sécurité enfant en appuyant de nouveau 3 secondes sur la touche
STOP, le symbole disparaît de l’écran et la position 5 apparaît par défaut sur l’écran.

15
FRA
* selon modèle ** pince et gants non fournis
FONCTION HI-LIFT
• Pour saisir plus facilement les petites tranches de pain,
3 possibilités de remontées vous sont proposées :
- Tournez le levier de commande à gauche sur le premier « pictogramme » pour
les tranches moyennes.
- Tournez le levier de commande à gauche sur le 2°« pictogramme » pour les
petites tranches.
- Tournez le levier de commande à gauche sur le 3°« pictogramme » pour les très
petites tranches - (fig. 6).
Un deuxième appui sur une fonction choisie annule celle-ci.
FONCTION GRILLAGE PAIN CONGELE*
• Sélectionnez le degré de grillage souhaité avec touches + et -.
• Appuyez sur la touche , le picto apparaît sur l’écran - ( fig. 7)
•
Dans le cas d’un bagel congelé appuyez sur la touche , le picto apparait.
• Abaissez le levier de commande. Un temps de grillage plus long sera automatiquement
sélectionné afin de décongeler votre pain avant de le griller.
Une fois le cycle enclenché le décompte du temps de grillage apparaît sur l’écran digital.
• Lorsque le toaster s’arrête, la fonction choisie est annulée.
FONCTION BAGEL*
• Positionnez votre bagel ou petit pain coupé en deux dans les fentes de votre grille-
pain, la mie orientée vers le centre et la croûte vers l’extérieur.
• Sélectionnez le degré de grillage souhaité avec touches + et -.
• Appuyez sur la touche , le picto apparaît sur l’écran - ( fig. 8)
• Abaissez le levier de commande.
• La durée du cycle est adaptée au degré de brunissage choisi*. Une fois le cycle enclen-
ché le décompte du temps de grillage apparaît sur l’écran digital.
• Une fois grillé, le bagel remonte et le toaster s'arrête automatiquement.
• Lorsque le toaster s’arrête, la fonction choisie est annulée.
FONCTION RECHAUFFAGE*
• Appuyez sur la touche le picto apparaît sur l’écran - (fig. 9)
• Abaissez le levier de commande. (il n’est pas nécessaire de sélectionner un niveau de
grillage).
• L’appareil va fonctionner pendant un temps court prédéterminé, pour simplement
réchauffer votre pain déja grillé.
Une fois le cycle enclenché le décompte du temps de grillage apparaît sur l’écran digital.
• Lorsque le toaster s’arrête, la fonction choisie est annulée.

16
FRA
* selon modèle
FONCTION RECHAUFFAGE DES CROISSANTS,
petits pains et viennoiseries
• Votre toaster possède 2 programmes de réchauffages :
position croissant utilisé pour les viennoiseries fragiles type croissants.
position buns utilisé pour les buns et autres petits pains à croûte plus épaisse.
• Posez directement les croissants, petits pains, brioches, pains au lait… sur le toit
réchauffeur prévu à cet effet - (fig. 10).
• Selon le type de viennoiseries :
- Pour les viennoiseries fragiles type croissants :
• Appuyer sur la touche warming rack 1 fois , le picto s’affichera sur l’écran -
(fig. 11).
- Pour les buns et autres petits pains à croûte plus épaisse:
• Appuyer sur la touche warming rack 2 fois , le picto s’affichera sur l’écran -
(fig. 12).
• Tournez le levier de commande à droite jusqu’à le verrouiller - (fig. 4).
• Il n’est pas nécessaire de sélectionner un niveau de grillage.
• Une fois le cycle enclenché le décompte du temps de réchauffage programmé apparaît
sur l’écran digital.
La chaleur monte et se diffuse à travers le toit réchauffeur pour réchauffer les viennoise-
ries de façon homogène.
• Lorsque le toaster s’arrête, le levier de commande revient au centre et les fonctions choi-
sies sont annulées.
• Selon le type de pain, pour réchauffer l’autre côté, retournez les pains sur le toit réchauf-
feur encore chaud en utilisant des gants ou une pince à pain* - (fig. 13).
• Relancez un deuxième cycle si nécessaire de la même manière depuis le début.
ATTENTION :
N’utilisez pas en même temps les fonctions de grillage dans les fentes et le
réchauffage sur le toit réchauffeur de votre toaster.
Ne grillez et ne réchauffez pas de denrées (grasses ou sucrées...) susceptibles de
fondre ou de couler dans le grille-pain, ne grillez pas de petits morceaux de pain
ou croûtons, cela pourrait causer des dommages voire un risque de feu.
Le toit réchauffeur reste chaud.

NETTOYAGE, ENTRETIEN, RANGEMENT
• Avant tout entretien, nettoyage ou rangement, débranchez et laissez refroidir
l’appareil.
• Pour essuyer l’extérieur de l’appareil, le cordon et le toit réchauffeur : utilisez un
chiffon doux ou une éponge légèrement humide avec un produit vaisselle. Séchez -
(fig. 14).
• Le Toit réchauffeur est amovible : saisissez ce support par le milieu, tirez vers le haut
pour l’enlever et nettoyez le avec de l’eau et un produit vaiselle puis laissez sécher -
(fig. 15-16).
• Pour le remettre en place, introduisez les 4 languettes du toit réchauffeur dans les
fentes correspondantes du grille-pain et vérifiez qu’il est correctement placé avant
chaque utilisation - (fig. 17).
N’utilisez jamais le toaster sans le toit réchauffeur.
• Pour nettoyer le tiroir ramasse-miettes : retirez-le et enlevez les miettes - (fig. 18).
• Ne passez pas le tiroir ramasse-miettes au lave vaisselle.
• Faites-le régulièrement, idéalement après chaque utilisation (grillage ou réchauffage).
• S’il reste des croûtes, miettes ou débris entre les éléments chauffants ou dans l’appa-
reil, retirez le toit réchauffeur puis retournez l’appareil, ouverture vers le bas pour faire
tomber ces résidus. Remettre bien en place le tiroir ramasse-miettes et le toit réchauf-
feur dans leur logement.
Pour l’entretien, n’utilisez ni produit agressif (décapant à base de soude, produit
d’entretien des métaux, eau de javel etc.), ni d’ustensiles métalliques, ni d’épon-
ge grattoir, ni de tampon abrasif.
Pour les appareils avec finitions métallisées* : N’utilisez pas de produits d’entre-
tien spécifiques pour métaux (inox, cuivre...), mais un chiffon doux avec un pro-
duit nettoyant pour les vitres.
• Attendez le refroidissement complet de l’appareil avant de le ranger, n’enroulez pas le
cordon autour de l’appareil, un logement prévu à cet effet se trouve derrière le toas-
ter, faites glisser le cordon à l’intérieur du toaster - (fig. 1).
PROTECTION DE L'ENVIRONNEMENT
L’emballage de votre produit est composé de matériaux recyclables, ne le jetez pas dans
votre poubelle habituelle, mais apportez-le dans un centre de collecte sélective mis en
place à proximité.
Les centres de services après-vente agréés vous reprendront votre appareil usagé afin de
procéder à sa destruction dans le respect des règles de l’environnement ou apportez-le au
point de collecte spécialisé prévu à cet effet.
FRA
17

NED
18
VEILIGHEIDSVOORSCHRIFTEN
• De veiligheid van dit apparaat voldoet aan de geldende technische voorschriften en normen.
• Controleer of de netspanning overeenkomt met die op het apparaat vermeld staat (uitsluitend wissel-
spanning).
• Rekening houdend met de grote verscheidenheid aan geldende normen, dient u het apparaat door een
erkende servicedienst te laten controleren als u het in een ander land gebruikt dan waar u het gekocht
heeft (zij bijgevoegde lijst).
• Gebruik een stevig werkblad, ver van waterspatten en installeer het apparaat in geen geval in een nis
van een inbouwkeuken.
• Het apparaat niet dragen of verplaatsen wanneer het aanstaat.
• Trek niet aan het snoer om de stekker uit het stopcontact te trekken.
ELEKTRICITEITSSNOER
(a) • De elektriciteitskabel is kort gehouden, om te voorkomen dat het in de knoop raakt, wat bij te lange
kabels kan gebeuren.
(b) • U kunt een verlengsnoer gebruiken, indien u hier voorzichtig mee omgaat.
(c) • Indien u een verlengsnoer gebruikt, moet u bepaalde voorzorgsmaatregelen nemen:
- Het elektrisch vermogen van het verlengsnoer moet minstens gelijk zijn aan dat van uw brood-
rooster.
- Het verlengsnoer moet buiten het bereik van kinderen worden geplaatst, zodanig dat niemand hier-
over kan struikelen of zich eraan kan bezeren.
(d)• Trek niet aan het snoer om de stekker uit het stopcontact te trekken. Houd de stekker vast en trek
deze uit de muur.
(e)• Rol het snoer niet om het broodrooster heen. Gebruik de hiervoor bedoelde snoerkast onder het apparaat.
BELANGRIJKE INSTRUCTIES
Tijdens het gebruik van elektrische apparatuur moeten bepaalde elementaire regels in acht
genomen worden, met name de navolgende:
WAT U WEL MOET DOEN
• Lees de gehele gebruiksaanwijzing en volg de gebruiksinstructies nauwkeurig op.
• Het apparaat dient uitsluitend rechtop, niet liggend, schuin of omgekeerd gebruikt worden.
• Controleer voor ieder gebruik of de kruimellade goed op zijn plaats zit.
• Verwijder regelmatig de broodkruimels uit de kruimellade.
• De bedieningshendel van de slede moet in de hoogste stand staan wanneer u de stekker van het appa-
raat in of uit het stopcontact trekt.
• Haal de stekker uit het stopcontact wanneer het apparaat niet gebruikt wordt en alvorens dit te reinigen.
Wacht tot het afgekoeld is, alvorens het apparaat te reinigen of op te bergen.
• Als aan het einde van het roosteren het brood tussen de roosters vast blijft zitten, haal dan de stekker
uit het stopcontact en wacht tot het apparaat is afgekoeld alvorens het brood te verwijderen.
• Haal de stekker uit het stopcontact indien er een storing in werking treedt.

19
NED
WAT U NIET MOET DOEN
• Het apparaat mag niet zonder toezicht door jonge kinderen of onbekwame personen gebruikt worden.
• Er moet toezicht op jonge kinderen zijn, zodat zij niet met het apparaat kunnen spelen.
• Laat nooit het apparaat zonder toezicht werken en met name tijdens de eerste keer dat u roostert of na
het wijzigen van de afstelling.
• Gebruik het apparaat niet voor andere doeleinden dan waarvoor het ontworpen is.
• Raak de metalen of warme delen van het apparaat niet aan wanneer het in gebruik is, gebruik de hand-
grepen.
• Steek geen metalen hulpmiddelen (lepel, mes,…), te dikke voedingsmiddelen of aluminium verpakkin-
gen in het broodrooster, deze zouden tot kortsluiting kunnen leiden.
• Voeg geen accessoires aan het broodrooster toe die niet door de fabrikant aanbevolen zijn, dit kan
gevaarlijk zijn.
• Dompel het snoer, de stekker of het apparaat zelf niet in het water of een andere vloeistof, teneinde
elektrische schokken te voorkomen.
• Rooster geen brood met zoetwaren die kunnen smelten en in het broodrooster lopen en rooster geen
kleine stukjes brood of soldaatjes, dit zou tot schade of brand kunnen leiden.
• Doe geen te dikke boterhammen in het apparaat die het mechanisme van het broodrooster zouden kun-
nen doen vastlopen.
• Gebruik het apparaat niet indien:
- het snoer hiervan defect is;
- het apparaat gevallen is, zichtbaar beschadigd is of niet goed meer functioneert.
In al deze gevallen moet het apparaat naar de dichtst bijzijnde servicedienst gestuurd worden om risi-
co's te vermijden.
• Laat het snoer niet naar beneden hangen of hete oppervlakken raken.
• Gebruik het apparaat uitsluitend in huis. Vermijd vochtige plaatsen.
• Plaats uw broodrooster niet op een warme ondergrond of in de buurt van een warme oven.
• Brood kan verbranden, dek het apparaat dan ook niet af tijdens de werking en houd het uit de buurt van
brandbare materialen, zoals gordijn, behangsel of hout (rekken, meubels…). Het apparaat moet onder
toezicht gebruikt worden.
• Plaats nooit papier, karton of plastic in, op of onder het apparaat.
• Probeer bij brand nooit de vlammen te blussen met water. Haal de stekker uit het stopcontact en doof
de vlammen met een vochtige doek.
• Probeer nooit het brood te verwijderen terwijl het roosterproces ingeschakeld is.
• Gebruik het broodrooster niet als hittebron of droger.
• Gebruik het broodrooster niet voor het bakken, grillen, opwarmen of ontdooien van diepvriesmaaltijden.
Dit apparaat is uitsluitend geschikt voor huishoudelijk gebruik.
Bij ondoelmatig of verkeerd gebruik of gebruik voor semi-professionele doeleinden kan de
fabrikant geen aansprakelijkheid erkennen en is de garantie niet geldig.
BEWAAR DEZE INSTRUCTIES
ZORGVULDIG.

20
NED
Wij danken u voor uw keuze van een apparaat uit het assortiment van KRUPS, dat uit-
sluitend bestemd is voor het roosteren van brood en het opwarmen van bakkerswaren.
BESCHRIJVING:
A Digitaal display: geeft de geselecteerde functies en de roostertijd aan
B Bedieningshendel met HI-LIFT functie met 3 standen
C STOP-toets
D +-toets (verhoogt het roosterniveau)
E --toets (verlaagt het roosterniveau)
F « Opwarm » -toets*
G « Ontdooi »-toets *
H « Bagel »-toets *
I Toets, 2 programma's , (croissants of buns)*
J AFNEEMBARE warmtekap
K Kruimellade
L Snoerkast
VOOR DE EERSTE INGEBRUIKNAME:
• Haal het apparaat uit zijn verpakking en verwijder alle stickers.
• Reinig de buitenzijde van het apparaat en het snoer met een vochtige doek en droog
deze af.
• Rol vóór gebruik het netsnoer volledig af en steek de stekker in het stopcontact
- (fig1).
Nimmer het apparaat laten werken indien het snoer slechts gedeeltelijk is afge-
rold.
• Schakel de toaster één of twee keer in op het maximum niveau, teneinde de "nieuwe"
geur te verwijderen. Dit moet met een lege toaster gebeuren. (Laat het vertrek luchten).
•
Praktische tips
- Het vochtgehalte kan van brood tot brood verschillen, de tijd die nodig is om te
roosteren en een bruine kleur te krijgen kan derhalve variëren. Hierbij geven wij u
enkele aanbevelingen van algemene aard:
- Brood dat enigszins droog is, moet bij voorkeur op een lage stand geroosterd wor-
den.
- Zeer vers brood en bruinbrood moeten daarentegen op een wat hogere stand
geroosterd worden. Bij brood met een onregelmatig oppervlak, zoals Engelse muf-
fins, is het aanbevolen een wat bruinere kleur te geven.
- Verwijder bij het roosteren van krentenbrood de krenten die los zouden kunnen
raken, want deze zouden het apparaat kunnen beschadigen en tot kortsluiting lei-
den.
- Snij bagels in twee gelijke delen alvorens ze in de gleuven te plaatsen.
- Indien u maar één boterham roostert, kunt u de roosterstand lager zetten.
- Wees zeer voorzichtig bij het opwarmen of roosteren van bevroren of gevulde pro-
ducten (zoals gebak dat geroosterd moet worden). Zorg dat de afstelknop altijd op
de minimum stand staat.
* afhankelijk van het model
Seite wird geladen ...
Seite wird geladen ...
Seite wird geladen ...
Seite wird geladen ...
Seite wird geladen ...
Seite wird geladen ...
Seite wird geladen ...
Seite wird geladen ...
Seite wird geladen ...
Seite wird geladen ...
Seite wird geladen ...
-
 1
1
-
 2
2
-
 3
3
-
 4
4
-
 5
5
-
 6
6
-
 7
7
-
 8
8
-
 9
9
-
 10
10
-
 11
11
-
 12
12
-
 13
13
-
 14
14
-
 15
15
-
 16
16
-
 17
17
-
 18
18
-
 19
19
-
 20
20
-
 21
21
-
 22
22
-
 23
23
-
 24
24
-
 25
25
-
 26
26
-
 27
27
-
 28
28
-
 29
29
-
 30
30
-
 31
31


Krups Convection Oven FEM3 Benutzerhandbuch
- Kategorie
- Toaster
- Typ
- Benutzerhandbuch
- Dieses Handbuch eignet sich auch für
in anderen Sprachen
- English: Krups Convection Oven FEM3 User manual
- français: Krups Convection Oven FEM3 Manuel utilisateur
- Nederlands: Krups Convection Oven FEM3 Handleiding
Verwandte Artikel
Andere Dokumente
-
Tefal TT222030 Benutzerhandbuch
-
Rowenta TL681830 noir Bedienungsanleitung
-
Tefal TL600860 Benutzerhandbuch
-
-
-
Electrolux EAT5010 Benutzerhandbuch
-
Electrolux EAT5010 Benutzerhandbuch
-
-
-
Moulinex A15454 Bedienungsanleitung