Juno-Electrolux JCZ94181 Benutzerhandbuch
- Kategorie
- Gefrierschränke
- Typ
- Benutzerhandbuch

user manual
benutzerinformation
Fridge-Freezer
Kühl-Gefrierschrank
JCZ 94181

Electrolux. Thinking of you.
Share more of our thinking at www.electrolux.com
CONTENTS
Safety information 2
Control panel 4
First use 6
Daily Use 6
Helpful hints and tips 9
Care and cleaning 10
What to do if… 12
Technical data 13
Installation 14
Environmental concerns 14
Subject to change without notice
SAFETY INFORMATION
In the interest of your safety and to ensure
the correct use, before installing and first us-
ing the appliance, read this user manual
carefully, including its hints and warnings. To
avoid unnecessary mistakes and accidents,
it is important to ensure that all people using
the appliance are thoroughly familiar with its
operation and safety features. Save these in-
structions and make sure that they remain
with the appliance if it is moved or sold, so
that everyone using it through its life will be
properly informed on appliance use and safe-
ty.
For the safety of life and property keep the
precautions of these user's instructions as
the manufacturer is not responsible for dam-
ages caused by omission.
Children and vulnerable people safety
• This appliance is not intended for use by
persons (including children) with reduced
physical, sensory or mental capabilities, or
lack of experience and knowledge, unless
they have been given supervision or in-
struction concerning use of the appliance
by a person responsible for their safety.
Children should be supervised to ensure
that they do not play with the appliance.
• Keep all packaging well away from chil-
dren. There is risk of suffocation.
• If you are discarding the appliance pull the
plug out of the socket, cut the connection
cable (as close to the appliance as you
can) and remove the door to prevent play-
ing children to suffer electric shock or to
close themselves into it.
• If this appliance featuring magnetic door
seals is to replace an older appliance hav-
ing a spring lock (latch) on the door or lid,
be sure to make that spring lock unusable
before you discard the old appliance. This
will prevent it from becoming a death trap
for a child.
General safety
Caution! Keep ventilation openings
clear of obstruction.
• The appliance is intended for keeping
foodstuff and/or beverages in a normal
household as explained in this instruction
booklet.
• Do not use a mechanical device or any ar-
tificial means to speed up the thawing
process.
• Do not use other electrical appliances
(such as ice cream makers) inside of re-
frigerating appliances, unless they are ap-
proved for this purpose by the manufac-
turer.
• Do not damage the refrigerant circuit.
• The refrigerant isobutane (R600a) is con-
tained within the refrigerant circuit of the
appliance, a natural gas with a high level of
environmental compatibility, which is nev-
ertheless flammable.
During transportation and installation of
the appliance, be certain that none of the
components of the refrigerant circuit be-
come damaged.
If the refrigerant circuit should become
damaged:
– avoid open flames and sources of igni-
tion
– thoroughly ventilate the room in which
the appliance is situated
• It is dangerous to alter the specifications or
modify this product in any way. Any dam-
age to the cord may cause a short-circuit,
fire and/or electric shock.
2 electrolux

Warning! Any electrical component
(power cord, plug, compressor) must be
replaced by a certified service agent or
qualified service personnel.
1. Power cord must not be lengthened.
2. Make sure that the power plug is not
squashed or damaged by the back of
the appliance. A squashed or dam-
aged power plug may overheat and
cause a fire.
3. Make sure that you can come to the
mains plug of the appliance.
4. Do not pull the mains cable.
5. If the power plug socket is loose, do
not insert the power plug. There is a
risk of electric shock or fire.
6. You must not operate the appliance
without the lamp cover
1)
of interior
lighting.
• This appliance is heavy. Care should be
taken when moving it.
• Do not remove nor touch items from the
freezer compartment if your hands are
damp/wet, as this could cause skin abra-
sions or frost/freezer burns.
• Avoid prolonged exposure of the appli-
ance to direct sunlight.
•
Bulb lamps
2)
used in this appliance are
special purpose lamps selected for house-
hold appliances use only. They are not
suitable for household room illumination.
Daily Use
• Do not put hot pot on the plastic parts in
the appliance.
• Do not store flammable gas and liquid in
the appliance, because they may explode.
• Do not place food products directly
against the air outlet on the rear wall.
3)
• Frozen food must not be re-frozen once it
has been thawed out.
• Store pre-packed frozen food in accord-
ance with the frozen food manufacturer's
instructions.
• Appliance's manufacturers storage rec-
ommendations should be strictly adhered
to. Refer to relevant instructions.
• Do not place carbonated or fizzy drinks in
the freezer compartment as it creates
pressure on the container, which may
cause it to explode, resulting in damage to
the appliance.
• Ice lollies can cause frost burns if con-
sumed straight from the appliance.
Care and cleaning
• Before maintenance, switch off the appli-
ance and disconnect the mains plug from
the mains socket.
• Do not clean the appliance with metal ob-
jects.
• Do not use sharp objects to remove frost
from the appliance. Use a plastic scraper.
• Regularly examine the drain in the refriger-
ator for defrosted water. If necessary,
clean the drain. If the drain is blocked, wa-
ter will collect in the bottom of the appli-
ance.
Installation
Important! For electrical connection
carefully follow the instructions given in
specific paragraphs.
• Unpack the appliance and check if there
are damages on it. Do not connect the ap-
pliance if it is damaged. Report possible
damages immediately to the place you
bought it. In that case retain packing.
• It is advisable to wait at least four hours
before connecting the appliance to allow
the oil to flow back in the compressor.
• Adequate air circulation should be around
the appliance, lacking this leads to over-
heating. To achieve sufficient ventilation
follow the instructions relevant to installa-
tion.
• Wherever possible the back of the product
should be against a wall to avoid touching
or catching warm parts (compressor, con-
denser) to prevent possible burn.
• The appliance must not be located close
to radiators or cookers.
• Make sure that the mains plug is accessi-
ble after the installation of the appliance.
•
Connect to potable water supply only.
4)
1) If the lamp cover is foreseen
2) If the lamp is foreseen
3) If the appliance is Frost Free
4) If a water connection is foreseen
electrolux 3

Service
• Any electrical work required to do the serv-
icing of the appliance should be carried out
by a qualified electrician or competent per-
son.
• This product must be serviced by an au-
thorized Service Centre, and only genuine
spare parts must be used.
Environment Protection
This appliance does not contain gasses
which could damage the ozone layer, in
either its refrigerant circuit or insulation
materials. The appliance shall not be dis-
carded together with the urban refuse
and rubbish. The insulation foam con-
tains flammable gases: the appliance
shall be disposed according to the ap-
plicable regulations to obtain from your
local authorities. Avoid damaging the
cooling unit, especially at the rear near
the heat exchanger. The materials used
on this appliance marked by the symbol
are recyclable.
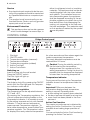
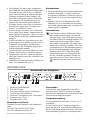
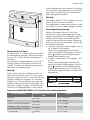
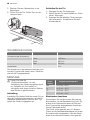
CONTROL PANEL
Fridge Control panel
1 2 3 4 5 6 7
1. Pilot light
2. ON/OFF switch
3. Temperature regulator (warmest)
4. Temperature indicator
5. Temperature regulator (coldest)
6. Action Cool light
7. Action Cool switch
Switching on
Insert the plug into the wall socket.
Press the ON/OFF switch .
The Pilot Light will light up.
Switching off
The fridge is shut off by pressing the ON/OFF
switch until the Pilot light and the Tempera-
ture indicator switched off.
Temperature regulation
The temperature can be adjusted between
+2°C and +8°C.
By pressing the Temperature regulators, the
current temperature setting flashes on the
Temperature indicator. It is possible to mod-
ify the setting temperature only with flashed
indicator. To set a warmer temperature,
press warmest Temperature regulator. To
set a colder temperature, press coldest Tem-
perature regulator. The Temperature indica-
tor displays the newly selected temperature
for a few seconds and then shows again the
inside compartment temperature.
The newly selected-temperature must be
reached after 24 hours.
Caution! During the stability period by
the first starting the temperature
displayed can not correspond to the
setting temperature. During this time it is
possible that the temperature displayed
is lower than the setting temperature.
Temperature indicator
During normal functioning the Temperature
indicator shows the temperature inside the
fridge.
Important! Difference between the
temperature displayed and temperature
setting is normal. Especially when:
• a new setting has recently been selected.
• the door has been left open for a long time.
• warm food has been placed in the com-
partment.
Action Cool function
The maximum performance is obtained by
setting the Action Coolfunction. It’s recom-
mended when loading large quantities of
food.
You can activate the Action Cool function by
pressing the Action Cool switch.
4 electrolux

The Action Cool light will light up.
Important! The internal temperature goes
down to +2°C.
After about 6 hours the Action Cool function
switches off automatically.
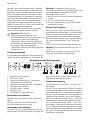
Freezer Control panel
1 2 3 4 5 6 7 8 9
1. Pilot light
2. ON/OFF switch
3. Temperature regulator (warmest)
4. Temperature indicator
5. Temperature regulator (coldest)
6. Action Freeze light
7. Action Freeze switch
8. Alarm light
9. Alarm reset switch
Switching on
Insert the plug into the wall socket.
Press the ON/OFF switch .
The Pilot Light will light up.
Switching off
The freezer is shut off by pressing the ON/
OFF switch until the Pilot light and the Tem-
perature indicator switched off.
Temperature regulation
The temperature can be adjusted between
-15°C and -24°C.
By pressing the Temperature regulators , the
current temperature setting flashes on the
Temperature indicator. It is possible to mod-
ify the setting temperature only with flashed
indicator. To set a warmer temperature,
press warmest Temperature regulator . To
set a colder temperature, press coldest Tem-
perature regulator. The Temperature indica-
tor displays the newly selected temperature
for a few seconds and then shows again the
inside compartment temperature.
The newly selected-temperature must be
reached after 24 hours.
Caution! During the stability period by
the first starting the temperature
displayed can not correspond to the
setting temperature.
Temperature indicator
During normal functioning the Temperature
indicator shows the temperature inside the
freezer.
Important! Difference between the
temperature displayed and temperature
setting is normal. Especially when:
• a new setting has recently been selected.
• the door has been left open for a long time.
• warm food has been placed in the com-
partment.
Action Freeze function
You can activate the Action Freeze function
by pressing the Action Freeze switch.
The Action Freeze light will light up.
This function stops automatically after 52
hours.
It is possible to deactivate the function at any
time by pressingAction Freeze switch.
The Action Freeze light will switch off.
Excessive temperature alarm
In the event of an abnormal temperature rise
inside the freezer (e.g. power cut) Alarm light
will start to flash and a buzzer will sound.
After the temperature has returned to nor-
mal, the Alarm light will continue to flash, al-
though the buzzer has stopped.
When the Alarm reset switch is pressed, the
warmest temperature reached in the com-
partment flashes on the Temperature indica-
tor .
If the power has been off for a long time, fro-
zen food should be consumed as quickly as
possible, or cooked and then re-frozen.
electrolux 5

FIRST USE
Cleaning the interior
Before using the appliance for the first time,
wash the interior and all internal accessories
with lukewarm water and some neutral soap
so as to remove the typical smell of a brand-
new product, then dry thoroughly.
Important! Do not use detergents or abra-
sive powders, as these will damage the fin-
ish.
DAILY USE
Freezing fresh food
The freezer compartment is suitable for
freezing fresh food and storing frozen and
deep-frozen food for a long time.
To freeze fresh food activate the Action
Freeze function at least 24 hours before plac-
ing the food to be frozen in the freezer com-
partment.
Place the fresh food to be frozen in the in the
upper part of the freezer, as this is the coldest
point.
The maximum amount of food that can be
frozen in 24 hours is specified on the rating
plate , a label located on the inside of the
appliance.
The freezing process lasts 24 hours: during
this period do not add other food to be fro-
zen.
Important! When use the Action Freeze
function:
about 6
hours be-
fore
Introducing small quantities of
fresh food (about 5 kg)
about 24
hours be-
fore
Introducing the maximum quanti-
ty of food (see rating plate)
not needed Introducing frozen food
not needed Introducing small quantities of
fresh food daily 2 kg maximum
Storage of frozen food
When first starting-up or after a period out of
use, before putting the products in the com-
partment let the appliance run at least 2
hours on the higher settings.
Important! In the event of accidental
defrosting, for example due to a power
failure, if the power has been off for longer
than the value shown in the technical
characteristics chart under "rising time", the
defrosted food must be consumed quickly or
cooked immediately and then re-frozen (after
cooling).
Ice-cube production
This appliance is equipped with one or more
trays for the production of ice-cubes. Fill
these trays with water, then put them in the
freezer compartment.
Important! Do not use metallic instruments
to remove the trays from the freezer.
Cold accumulators
The freezer contains at least one cold accu-
mulator which increases storage time in the
event of a power cut or breakdown.
Thawing
Deep-frozen or frozen food, prior to being
used, can be thawed in the refrigerator com-
partment or at room temperature, depending
on the time available for this operation.
Small pieces may even be cooked still frozen,
directly from the freezer: in this case, cooking
will take longer.
Movable shelves
The walls of the refrigerator are equipped
with a series of runners so that the shelves
can be positioned as desired.
6 electrolux

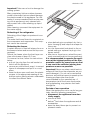
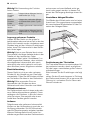
Positioning the door shelves
To permit storage of food packages of vari-
ous sizes, the door shelves can be placed at
different heights.
To make these adjustments proceed as fol-
lows:
gradually pull the shelf in the direction of the
arrows until it comes free, then reposition as
required.
Natura fresh 0°C Compartment
In the Natura fresh 0°C compartment the
temperature is controlled automatically. It
stays constantly at about 0°C, no adjustment
is necessary.
The constant storage temperature of about
0°C and the relative humidity of between 45
and 90 % provide optimal conditions for the
various kinds of food.
Important!
You can therefore store a variety of fresh food
in the Natura fresh 0°C compartment, where
it will last up to 3 times longer with better
quality compared to normal refrigerator com-
partments. This allows you to stock more
fresh food. Taste, degree of freshness, qual-
ity and nutritional values (vitamins and min-
erals) are well preserved. Loss of weight in
vegetables and fruit diminishes. Food yields
a higher degree of nutritional value.
Important!
The Natura fresh 0°C compartment is also
suitable for defrosting food.
In this case the thawed food can be stored
up to two days .
Humidity control
Both drawers can be used according to the
desired storage conditions independently of
each other with lower or higher humidity.
Regulation for each drawer is separate and
is controlled using the slide valve at the front
of the drawer.
• „Dry“: low air humidity - up to 50 % relative
humidity
This humidity level is reached when both
sliders are set into this position
and the
ventilation openings are wide open.
• Humid“: high relative humidity - up to 90%
This humidity level is reached when both
sliders are set in this position
and the
ventilation openings are closed. Humidity
is kept and can not escape.
electrolux 7

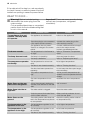
Storage time in the NATURAFRESH 0°C compartment for fresh food
Type of food Air humidity adjustment Storage time
Onion
"dry”
up to 5 months
Butter
“dry”
up to 1 month
Large pork cuts
“dry”
up to 10 days
Beef, venison, small pork cuts,
poultry
“dry”
up to 7 days
Tomato sauce
“dry”
up to 4 days
Fish, shellfish, cooked meat
products
“dry”
up to 3 days
Cooked seafood
“dry”
up to 2 days
Salad, vegetables Carrots,
herbs, Brussels sprouts, celery
“humid”
up to 1 month
Artichokes, cauliflower, chico-
ry, iceberg lettuce, endive,
lamb’s lettuce, lettuce, leeks,
radicchio
“humid”
up to 21 days
Broccoli, Chinese leaves, kale,
cabbage, radishes, Savoy cab-
bage
“humid”
up to 14 days
Peas, kohlrabi
“humid”
up to 10 days
Spring onions, radishes, aspar-
agus, spinach
“humid”
up to 7 days
Fruit
1)
Pears, dates (fresh), strawber-
ries, peaches
1)
“humid”
up to 1 month
Plums
1)
rhubarb, gooseberries
“humid”
up to 21 days
Apples (not sensitive to cold),
quinces
“humid”
up to 20 days
Apricots, cherries
“humid”
up to 14 days
Damsons, grapes
“humid”
up to 10 days
Blackberries, currants
“humid”
up to 8 days
Figs (fresh)
“humid”
up to 7 days
Blueberries, raspberries
“humid”
up to 5 days
1) The riper the fruit, the shorter the storage time
Important!
Cakes containing cream and other kinds of
pastry products can be stored in the NA-
TURAFRESH 0°C compartment for 2 or 3
days.
Important!
Not to be placed in the NATURAFRESH 0°C
compartment:
• cold sensitive fruit which have to be stored
at cellar or room temperature like pineap-
ple, bananas, grapefruit, melons, mango,
papaya, oranges, lemons, kiwi fruit.
• The types of food not mentioned above
should be stored in the refrigerator com-
partment (e.g. all sorts of cheese, cold
cuts, etc.)
Important!
8 electrolux

The level of air humidity in the drawers de-
pends on the content of humidity in the stor-
ed food, vegetable and fruit and on the fre-
quency of door opening
The NATURAFRESH 0°C compartment is al-
so suitable for slow thawing of food. In this
case the thawed food can be stored in the
NATURAFRESH 0°C compartment for up to
two days.
Tips:
• Pay attention to the freshness of the food,
especially on the expiry date. Quality and
freshness influence the storage time.
• The whole storage cycle time will depend
on the preservation conditions made prior
to the final storage in the fridge.
• Food, fruit or vegetables should always be
packed or wrapped up before storage.
• Animal food always store packed and dry.
• Food rich in proteins will go bad quicker.
This means seafood will spoil before fish
which in turn will spoil before meat. While
storing food in a NATURAFRESH 0°C
compartment storage time for that kind of
food can be increased by up to three times
as well without loss on quality.
• All food stored in a NATURAFRESH 0°C
compartment should be taken out of the
drawers roughly 15-30 min before con-
sumption, particularly fruit and vegetables
to be consumed without any additional
cooking process. Allowing fruit and vege-
tables to return to room temperature will
improve the texture and flavour.
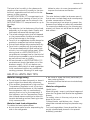
Drawer
The wire shelves inside the drawers permit
that air can circulate freely and consequently
a better conservation of foods.
The compartment has stops to prevent the
drawers from falling out when fully extended.
To remove the drawers (e.g. for cleaning pur-
poses), pull them out as far as the stops, lift
and extract.. .
HELPFUL HINTS AND TIPS
Hints for energy saving
• Do not open the door frequently or leave it
open longer than absolutely necessary.
• If the ambient temperature is high and the
Temperature Regulator is set to low tem-
perature and the appliance is fully loaded,
the compressor may run continuously,
causing frost or ice on the evaporator. If
this happens, set the Temperature Regu-
lator toward warmer settings to allow au-
tomatic defrosting and so a saving in elec-
tricity consumption.
Hints for fresh food refrigeration
To obtain the best performance:
• do not store warm food or evaporating liq-
uids in the refrigerator
• do cover or wrap the food, particularly if it
has a strong flavour
• position food so that air can circulate freely
around it
Hints for refrigeration
Useful hints:
Meat (all types) : wrap in polythene bags and
place on the glass shelf above the vegetable
drawer.
For safety, store in this way only one or two
days at the most.
Cooked foods, cold dishes, etc..: these
should be covered and may be placed on any
shelf.
Fruit and vegetables: these should be thor-
oughly cleaned and placed in the special
drawer(s) provided.
electrolux 9

Butter and cheese: these should be placed
in special airtight containers or wrapped in
aluminium foil or polythene bags to exclude
as much air as possible.
Milk bottles: these should have a cap and
should be stored in the bottle rack on the
door.
Bananas, potatoes, onions and garlic, if not
packed, must not be kept in the refrigerator.
Hints for freezing
To help you make the most of the freezing
process, here are some important hints:
• the maximum quantity of food which can
be frozen in 24 hrs. is shown on the rating
plate;
• the freezing process takes 24 hours. No
further food to be frozen should be added
during this period;
• only freeze top quality, fresh and thorough-
ly cleaned, foodstuffs;
• prepare food in small portions to enable it
to be rapidly and completely frozen and to
make it possible subsequently to thaw only
the quantity required;
• wrap up the food in aluminium foil or pol-
ythene and make sure that the packages
are airtight;
• do not allow fresh, unfrozen food to touch
food which is already frozen, thus avoiding
a rise in temperature of the latter;
• lean foods store better and longer than
fatty ones; salt reduces the storage life of
food;
• water ices, if consumed immediately after
removal from the freezer compartment,
can possibly cause the skin to be freeze
burnt;
• it is advisable to show the freezing in date
on each individual pack to enable you to
keep tab of the storage time.
Hints for storage of frozen food
To obtain the best performance from this ap-
pliance, you should:
• make sure that the commercially frozen
foodstuffs were adequately stored by the
retailer;
• be sure that frozen foodstuffs are transfer-
red from the foodstore to the freezer in the
shortest possible time;
• not open the door frequently or leave it
open longer than absolutely necessary.
• Once defrosted, food deteriorates rapidly
and cannot be refrozen.
• Do not exceed the storage period indica-
ted by the food manufacturer.
CARE AND CLEANING
Caution! Unplug the appliance before
carrying out any maintenance operation.
This appliance contains hydrocarbons in
its cooling unit; maintenance and re-
charging must therefore only be carried
out by authorized technicians.
Periodic cleaning
The equipment has to be cleaned regularly:
• clean the inside and accessories with luke-
warm water and some neutral soap.
• regularly check the door seals and wipe
clean to ensure they are clean and free
from debris.
• rinse and dry thoroughly.
Important! Do not pull, move or damage any
pipes and/or cables inside the cabinet.
Never use detergents, abrasive powders,
highly perfumed cleaning products or wax
polishes to clean the interior as this will dam-
age the surface and leave a strong odour.
Clean the condenser (black grill) and the
compressor at the back of the appliance with
a brush or a vacuum cleaner. This operation
will improve the performance of the appli-
ance and save electricity consumption.
The lowest shelf, dividing the cooler com-
partment from the Natura fresh 0°C com-
partment can be removed only for cleaning.
To remove pull out the shelf straight.
The cover plates above the drawers in the
compartment can be taken out for cleaning.
Important!
To make sure fully functionality of the Natura
fresh 0°C compartment the lowest shelf and
cover plates must be put back in their original
position after cleaning.
10 electrolux

Important! Take care of not to damage the
cooling system.
Many proprietary kitchen surface cleaners
contain chemicals that can attack/damage
the plastics used in this appliance. For this
reason it is recommended that the outer cas-
ing of this appliance is only cleaned with
warm water with a little washing-up liquid
added.
After cleaning, reconnect the equipment to
the mains supply.
Defrosting of the refrigerator
Defrosting of the fridge compartment is au-
tomatic.
The water that forms flows into a recipient on
the compressor and evaporates. This recip-
ient cannot be removed.
Defrosting the freezer
A certain amount of frost will always form on
the freezer shelves and around the top com-
partment.
Defrost the freezer when the frost layer rea-
ches a thickness of about 3-5 mm.
To remove the frost, follow the instructions
below:
• pull out the plug from the wall socket or
switch off the appliance
• remove any stored food, wrap it in several
layers of newspaper and put it in a cool
place
• leave the door open and insert the plastic
scraper in the appropriate seating at the
bottom centre, placing a basin underneath
to collect the defrost water
• when defrosting is completed, dry the in-
terior thoroughly and keep the scraper for
future use
• turn the thermostat knob back to the re-
quired setting or replace the plug in the
power socket
• after two or three hours, reload the previ-
ously removed food into the compartment.
It is recommended to operate the appli-
ance at the highest position of the ther-
mostatic control for some hours so that
it can reach the sufficient storing tem-
perature as soon as possible.
Important! Never use sharp metal tools to
scrape off frost from the evaporator as you
could damage it. Do not use a mechanical
device or any artificial means to speed up the
thawing process other than those
recommended by the manufacturer. A
temperature rise of the frozen food packs,
during defrosting, may shorten their safe
storage life.
Periods of non-operation
When the appliance is not in use for long pe-
riods, take the following precautions:
• disconnect the appliance from elec-
tricity supply
• remove all food
•
defrost
5)
and clean the appliance and all
accessories
• leave the door/doors ajar to prevent un-
pleasant smells.
5) If foreseen.
electrolux 11

If the cabinet will be kept on, ask somebody
to check it once in a while to prevent the food
inside from spoiling in case of a power failure.
WHAT TO DO IF…
Warning! Before troubleshooting,
disconnect the mains plug from the
mains socket.
Only a qualified electrician or competent
person must do the troubleshooting that
is not in this manual.
Important! There are some sounds during
normal use (compressor, refrigerant
circulation).
Problem Possible cause Solution
The appliance does not
operate. The lamp does
not operate.
The appliance is switched off. Switch on the appliance.
The mains plug is not connected
to the mains socket correctly.
Connect the mains plug to the
mains socket correctly.
The appliance has no power.
There is no voltage in the mains
socket.
Connect a different electrical appli-
ance to the mains socket.
Contact a qualified electrician.
The buzzer sounds. The temperature in the freezer is
too high.
Refer to "Excessive Temperature
Alarm"
The lamp does not work. The lamp is in stand-by. Close and open the door.
The lamp is defective. Refer to "Replacing the lamp".
The compressor operates
continually.
The temperature is not set cor-
rectly.
Set a higher temperature.
The door is not closed correctly. Refer to "Closing the door".
The door has been opened too
frequently.
Do not keep the door open longer
than necessary.
The product temperature is too
high.
Let the product temperature de-
crease to room temperature before
storage.
The room temperature is too
high.
Decrease the room temperature.
Water flows on the rear
plate of the refrigerator.
During the automatic defrosting
process, frost defrosts on the rear
plate.
This is correct.
Water flows into the re-
frigerator.
The water outlet is clogged. Clean the water outlet.
Products prevent that water flows
into the water collector.
Make sure that products do not
touch the rear plate.
Water flows on the
ground.
The melting water outlet does not
flow in the evaporative tray above
the compressor.
Attach the melting water outlet to
the evaporative tray.
The temperature in the
appliance is too low.
The temperature regulator is not
set correctly.
Set a higher temperature.
The temperature in the
appliance is too high.
The temperature regulator is not
set correctly.
Set a lower temperature.
The door is not closed correctly. Refer to "Closing the door".
12 electrolux

Problem Possible cause Solution
The product temperature is too
high.
Let the product temperature de-
crease to room temperature before
storage.
Many products are stored at the
same time.
Store less products at the same
time.
The temperature in the re-
frigerator is too high.
There is no cold air circulation in
the appliance.
Make sure that there is cold air cir-
culation in the appliance.
The temperature in the
freezer is too high.
Products are too near to each
other.
Store products so that there is cold
air circulation.
There is too much frost. Food is not wrapped correctly. Wrap the food correctly.
The door is not closed correctly. Refer to "Closing the door".
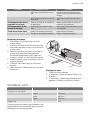
Replacing the lamp
1. Disconnect the mains plug from the
mains socket.
2. Press on the rear hook and at the same
time slide the lamp cover in the direction
of the arrow.
3. Replace the lamp with one of the same
power and specifically designed for
household appliances. (the maximum
power is shown on the light lamp cover)
4. Install the lamp cover by sliding it into its
original position.
5. Connect the mains plug to the mains
socket.
6. Open the door. Make sure that the lamp
comes on.
Closing the door
1. Clean the door gaskets.
2. If necessary, adjust the door. Refer to "In-
stallation".
3. If necessary, replace the defective door
gaskets. Contact the Service Center.
TECHNICAL DATA
Dimension of the recess
Height 1780 mm
Width 560 mm
Depth 550 mm
Rising Time 24 h
The technical information are situated in the
rating plate on the internal left side of the ap-
pliance and in the energy label.
electrolux 13

INSTALLATION
Read the "Safety Information" carefully
for your safety and correct operation of
the appliance before installing the
appliance.
Positioning
Install this appliance at a location where the
ambient temperature corresponds to the cli-
mate class indicated on the rating plate of the
appliance:
Climate
class
Ambient temperature
SN +10°C to + 32°C
N +16°C to + 32°C
ST +16°C to + 38°C
T +16°C to + 43°C
Electrical connection
Before plugging in, ensure that the voltage
and frequency shown on the rating plate cor-
respond to your domestic power supply.
The appliance must be earthed. The power
supply cable plug is provided with a contact
for this purpose. If the domestic power sup-
ply socket is not earthed, connect the appli-
ance to a separate earth in compliance with
current regulations, consulting a qualified
electrician.
The manufacturer declines all responsibility if
the above safety precautions are not ob-
served.
This appliance complies with the E.E.C. Di-
rectives.
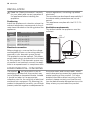
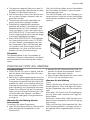
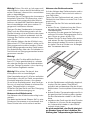
Ventilation requirements
The airflow behind the appliance must be
sufficient.
min.
200 cm
2
min.
200 cm
2
ENVIRONMENTAL CONCERNS
The symbol on the product or on its
packaging indicates that this product may
not be treated as household waste. Instead
it should be taken to the appropriate
collection point for the recycling of electrical
and electronic equipment. By ensuring this
product is disposed of correctly, you will help
prevent potential negative consequences for
the environment and human health, which
could otherwise be caused by inappropriate
waste handling of this product. For more
detailed information about recycling of this
product, please contact your local council,
your household waste disposal service or the
shop where you purchased the product.
14 electrolux

Electrolux. Thinking of you.
Mehr zu unserem Denken finden Sie unter www.electrolux.com
INHALT
Sicherheitshinweise 15
Bedienblende 17
Erste Inbetriebnahme 19
Täglicher Gebrauch 19
Praktische Tipps und Hinweise 23
Reinigung und Pflege 24
Was tun, wenn … 26
Technische Daten 28
Montage 28
Hinweise zum Umweltschutz 29
Änderungen vorbehalten
SICHERHEITSHINWEISE
Lesen Sie zu Ihrer Sicherheit und für die op-
timale Geräteanwendung vor der Installation
und dem Gebrauch des Gerätes die vorlie-
gende Benutzerinformation aufmerksam
durch, einschließlich der Ratschläge und
Warnungen. Es ist wichtig, dass zur Vermei-
dung von Fehlern und Unfällen alle Personen,
die das Gerät benutzen, mit der Bedienung
und den Sicherheitsvorschriften vertraut
sind. Heben Sie die Benutzerinformation gut
auf und übergeben Sie sie bei einem Weiter-
verkauf des Gerätes dem neuen Besitzer, so
dass jeder während der gesamten Lebens-
dauer des Gerätes über Gebrauch und Si-
cherheit informiert ist.
Halten Sie sich zu Ihrer Sicherheit und zum
Schutz Ihres Eigentums strikt an die Vor-
sichtsmaßnahmen der vorliegenden Benut-
zerinformation, da der Hersteller bei Miss-
achtung derselben von jeder Haftung freige-
stellt ist.
Sicherheit von Kindern und
hilfsbedürftigen Personen
• Das Gerät darf von Personen (einschließ-
lich Kindern), deren physische, sensori-
sche Fähigkeiten und deren Mangel an Er-
fahrung und Kenntnissen einen sicheren
Gebrauch des Gerätes ausschließen nur
unter Aufsicht oder nach ausreichender
Einweisung durch eine verantwortungsbe-
wusste Person benutzt werden, die sicher-
stellt, dass sie sich der Gefahren des Ge-
brauchs bewusst sind.
Kinder müssen beaufsichtigt werden, da-
mit sie nicht am Gerät herumspielen kön-
nen.
• Halten Sie das Verpackungsmaterial un-
bedingt von Kindern fern. Erstickungsge-
fahr!
• Ziehen Sie vor der Entsorgung des Gerä-
tes den Netzstecker, schneiden Sie das
Netzkabel (so nah wie möglich am Gerät)
ab und entfernen Sie die Tür, so dass
spielende Kinder vor elektrischem Schlag
geschützt sind und sich nicht in dem Gerät
einschließen können.
• Wenn dieses Gerät mit magnetischer Tür-
dichtung ein älteres Modell mit Schnapp-
verschluss (Türlasche) an der Tür oder auf
dem Deckel ersetzt, machen Sie den
Schnappverschluss vor dem Entsorgen
des Altgerätes unbrauchbar. So verhin-
dern Sie, dass das Gerät nicht zu einer To-
desfalle für Kinder wird.
Allgemeine Sicherheitshinweise
Vorsicht! Die Belüftungsöffnungen
müssen immer frei zugänglich sein.
• Das Gerät ist für die Aufbewahrung von
Lebensmitteln und/oder Getränken in ei-
nem normalen Haushalt bestimmt, wie in
der vorliegenden Gebrauchsanweisung
beschrieben wird.
• Benutzen Sie keine mechanischen oder
sonstigen Hilfsmittel, um den Abtaupro-
zess zu beschleunigen.
• Verwenden Sie keine anderen Elektroge-
räte (wie Speiseeisbereiter) in Kühlgeräten,
wenn solche Geräte nicht ausdrücklich
vom Hersteller für diesen Zweck zugelas-
sen sind.
• Achten Sie darauf, den Kältekreislauf nicht
zu beschädigen.
electrolux 15

• Das Kältemittel Isobutan (R600a) im Käl-
tekreislauf des Gerätes ist ein natürliches
und sehr umweltfreundliches Gas, das je-
doch leicht entflammbar ist.
Achten Sie beim Transport und bei der
Aufstellung des Gerätes darauf, nicht die
Komponenten des Kältekreislaufs zu be-
schädigen.
Bei einer eventuellen Beschädigung des
Kältekreislaufs:
– Offene Flammen und Zündfunken ver-
meiden
– Den Raum, in dem das Gerät installiert
ist, gut lüften
• Änderungen der technischen Eigenschaf-
ten oder am Gerät sind gefährlich. Ein de-
fektes Netzkabel kann Kurzschlüsse und
einen Brand verursachen und/oder zu
Stromschlägen führen.
Warnung! Elektrische Bauteile (Netzka-
bel, Stecker, Kompressor) dürfen nur
vom Kundendienst oder einer Fachkraft
ausgewechselt werden.
1. Das Netzkabel darf nicht verlängert
werden.
2. Vergewissern Sie sich, dass der Netz-
stecker nicht von der Geräterückseite
gequetscht oder beschädigt wird. Ein
gequetschter oder beschädigter Netz-
stecker überhitzt und kann einen
Brand verursachen.
3. Vergewissern Sie sich, dass der Netz-
stecker des Gerätes frei zugänglich ist.
4. Ziehen Sie nicht am Netzkabel.
5. Stecken Sie den Netzstecker nie in ei-
ne lockere Steckdose. Es besteht
Brand- und Stromschlaggefahr.
6. Betreiben Sie das Gerät nicht ohne
Lampenabdeckung,
6)
der Innenbe-
leuchtung.
• Dieses Gerät ist schwer. Vorsicht beim
Transport.
• Entnehmen oder berühren Sie nie mit nas-
sen/feuchten Händen Tiefkühlgut, da dies
zu Hautverletzungen oder Kälteverbren-
nungen führen kann.
• Das Gerät nicht direkter Sonneneinstrah-
lung aussetzen.
•
Die Leuchtmittel
7)
in diesem Gerät sind
Speziallampen, die nur für Haushaltsgerä-
te geeignet sind. Sie eignen sich nicht zur
Raumbeleuchtung.
Täglicher Gebrauch
• Stellen Sie keine heißen Töpfe auf die
Kunststoffteile des Gerätes.
• Lagern Sie keine feuergefährlichen Gase
oder Flüssigkeiten in dem Gerät. Explosi-
onsgefahr.
• Legen Sie Lebensmittel nicht direkt vor
den Luftauslass auf der Rückwand.
8)
• Ein aufgetautes Produkt darf nicht wieder
eingefroren werden.
• Abgepackte Tiefkühlkost immer entspre-
chend den Herstellerangaben aufbewah-
ren.
• Die Lagerempfehlungen des Gerätehers-
tellers sollten strikt eingehalten werden.
Halten Sie sich an die betreffenden Anwei-
sungen.
• Keine kohlensäurehaltigen Getränke oder
Sprudel in den Tiefkühlschrank stellen, da
der Druckanstieg in den Behältern zur Ex-
plosion führen und das Gerät beschädigen
kann.
• Eis am Stiel kann Kälteverbrennungen ver-
ursachen, wenn es direkt nach der Ent-
nahme aus dem Gefrierschrank gegessen
wird.
Reinigung und Pflege
• Schalten Sie vor Wartungsarbeiten immer
das Gerät ab und ziehen Sie den Netzste-
cker aus der Steckdose.
• Reinigen Sie das Gerät nicht mit Metallge-
genständen.
• Keine scharfen Gegenstände zum Entfer-
nen von Reif und Eis im Gerät verwenden.
Verwenden Sie einen Kunststoffschaber.
• Kontrollieren Sie den Tauwasserabfluss im
Kühlraum in regelmäßigen Abständen.
Reinigen Sie den Ablauf, falls nötig. Bei
verstopftem Wasserabfluss sammelt sich
das Wasser auf dem Boden des Geräts
an.
Montage
Wichtig! Halten Sie sich für den elektrischen
Anschluss strikt an die Anweisungen der
betreffenden Abschnitte.
6) Falls vorhanden.
7) Falls vorhanden.
8) No-Frost-Geräte
16 electrolux

• Kontrollieren Sie nach dem Auspacken
das Gerät auf eventuelle Beschädigungen.
Nehmen Sie das Gerät nicht in Betrieb,
wenn es beschädigt ist. Melden Sie die
Schäden umgehend dem Händler, bei
dem Sie es erworben haben. Bewahren
Sie in diesem Fall die Verpackung auf.
• Lassen Sie das Gerät mindestens vier
Stunden stehen, bevor Sie es elektrisch
anschließen, damit das Öl in den Kom-
pressor zurückfließen kann.
• Ausreichenden Freiraum zur Luftzirkulati-
on um das Gerät lassen; anderenfalls be-
steht Überhitzungsgefahr. Halten Sie sich
für die Belüftung an die Installationsanwei-
sungen.
• Das Gerät sollte zur Vermeidung von Ver-
brennungen durch Berührung von heißen
Bauteilen (Kompressor, Kondensator)
möglichst mit der Rückseite gegen eine
Wand aufgestellt werden.
• Das Gerät darf nicht in der Nähe von Heiz-
körpern oder Kochern installiert werden.
• Vergewissern Sie sich, dass der Netzste-
cker des Gerätes nach der Installation frei
zugänglich ist.
• Verbinden Sie das Gerät ausschließlich mit
einer Trinkwasserzuleitung.
9)
Kundendienst
• Sollte die Wartung des Gerätes elektrische
Arbeiten verlangen, so dürfen diese nur
von einem qualifizierten Elektriker oder ei-
nem Elektro-Fachmann durchgeführt wer-
den.
• Wenden Sie sich für Reparaturen und
Wartung nur an Fachkräfte der autorisier-
ten Kundendienststellen und verlangen Sie
stets Original-Ersatzteile.
Umweltschutz
Das Gerät enthält im Kältekreis oder in
dem Isoliermaterial keine ozonschädi-
genden Gase. Das Gerät darf nicht wie
normaler Hausmüll entsorgt werden. Die
Isolierung enthält entzündliche Gase:
das Gerät muss gemäß den geltenden
Vorschriften entsorgt werden; sie erhal-
ten diese bei Ihrer Gemeindeverwaltung.
Nicht das Kälteaggregat beschädigen,
insbesondere nicht in der Nähe des
Wärmetauschers. Die Materialien, die
bei der Herstellung dieses Geräts ver-
wendet wurden und mit dem Symbol
markiert sind, können recycelt wer-
den.
BEDIENBLENDE
Bedienblende des Kühlgerätes
1 2 3 4 5 6 7
1. Betriebs-Kontrolllampe
2. EIN-/AUS-Taste
3. Taste zur Erhöhung der Temperatur
4. Temperatur-Kontrolllampe
5. Taste zur Verringerung der Temperatur
6. Anzeige Action Cool
7. Schalter Action Cool
Einschalten des Geräts
Stecken Sie den Stecker in die Netzsteck-
dose.
Drücken Sie die EIN-/AUS-Taste.
Die Kontrolllampe leuchtet auf.
Ausschalten
Drücken Sie zum Ausschalten des Kühl-
schranks den EIN/AUS-Schalter so lange,
bis die Kontrolllampe aufleuchtet und sich die
Temperaturanzeige abschaltet.
Temperaturregelung
Die Temperatur ist zwischen +2 und +8 °C
einstellbar.
Durch Drücken der Temperaturregler be-
ginnt die aktuelle Temperatureinstellung auf
der Temperaturanzeige zu blinken. Die Tem-
peratureinstellung kann nur vorgenommen
9) Falls ein Wasseranschluss erforderlich ist
electrolux 17

werden, wenn die Anzeige blinkt. Drücken
Sie den Temperaturregler für wärmere Tem-
peraturen, wenn Sie eine wärmere Tempe-
ratur einstellen möchten. Drücken Sie den
Temperaturregler für niedrigere Temperatu-
ren, wenn Sie eine kältere Temperatur ein-
stellen möchten. Die Temperaturanzeige
zeigt jetzt für einige Sekunden die neu ge-
wählte Temperatur an. Dann wird wieder die
aktuelle Temperatur angezeigt.
Die neu gewählte Temperatur muss inner-
halb von 24 Stunden erreicht werden.
Vorsicht! Während der
Stabilisierungsperiode nach der
Erstinbetriebnahme des Geräts kann es
vorkommen, dass die angezeigte
Temperatur nicht mit der eingestellten
übereinstimmt. Während dieser Zeit ist
es möglich, das die angezeigte
Temperatur niedriger als die eingestellte
Temperatur ist.
Temperaturanzeige
Im Normalbetrieb zeigt die Temperaturanzei-
ge die aktuelle Temperatur im Kühlraum an.
Wichtig! In folgenden Fällen ist die
Abweichung zwischen der angezeigten und
der eingestellten Temperatur normal.
Besonders dann, wenn:
• erst kürzlich eine neue Einstellung gewählt
wurde.
• die Tür längere Zeit offen stand.
• warme Lebensmittel in den Gefrierraum
eingestellt wurden.
Action Cool-Funktion
Mit der Action Cool-Funktion lässt sich die
maximale Leistung erzielen. Die Verwendung
dieser Funktion wird empfohlen, wenn Sie
große Mengen an Lebensmitteln einlagern.
Sie können die Action Cool-Funktion aktivie-
ren, wenn Sie die Action Cool-Taste drü-
cken.
Die Action Cool-Kontrolllampe leuchtet auf.
Wichtig! Die Innentemperatur sinkt auf +2
°C ab.
Nach ca. 6 Stunden wird die Action Cool-
Funktion automatisch abgeschaltet.
Bedienblende des Gefriergerätes
1 2 3 4 5 6 7 8 9
1. Betriebs-Kontrolllampe
2. EIN-/AUS-Taste
3. Taste zur Erhöhung der Temperatur
4. Temperatur-Kontrolllampe
5. Taste zur Verringerung der Temperatur
6. Anzeige Action Freeze
7. Schalter Action Freeze
8. Alarmleuchte
9. Löschtaste für den Alarmton
Einschalten des Gerätes
Stecken Sie den Stecker in die Netzsteck-
dose.
Drücken Sie den EIN-/AUS-Schalter.
Die Kontrolllampe leuchtet auf.
Ausschalten des Gerätes
Drücken Sie zum Ausschalten des Gefrier-
gerätes den EIN/AUS-Schalter so lange, bis
die Kontrolllampe aufleuchtet und sich die
Temperaturanzeige abschaltet.
Temperaturregelung
Die Temperatur ist zwischen -15 und -24 °C
einstellbar.
Durch Drücken der beiden Tasten Tempera-
tureinstellung beginnt die aktuelle Tempera-
tureinstellung auf der Temperaturanzeige zu
blinken. Die Temperatureinstellung kann nur
vorgenommen werden, wenn die Anzeige
blinkt. Drücken Sie auf die Taste +, wenn Sie
eine wärmere Temperatur einstellen möch-
ten. Drücken Sie auf die Taste - , wenn Sie
eine kältere Temperatur einstellen möchten.
Die Temperaturanzeige zeigt jetzt für einige
Sekunden die neu ausgewählte Temperatur
an. Dann wird wieder die aktuelle Innenraum-
temperatur angezeigt.
18 electrolux

Die neu ausgewählte Temperatur muss in-
nerhalb von 24 Stunden erreicht werden.
Vorsicht! Während der
Stabilisierungsperiode nach der
Erstinbetriebnahme des Gerätes kann
es vorkommen, dass die angezeigte
Temperatur nicht mit der eingestellten
übereinstimmt.
Temperaturanzeige
Im Normalbetrieb zeigt die Temperaturanzei-
ge die akuelle Temperatur im Gefriergerät an.
Wichtig! In diesem Fall ist die Abweichung
zwischen der angezeigten und der
eingestellten Temperatur normal. Besonders
dann, wenn:
• erst kürzlich eine neue Einstellung gewählt
wurde,
• die Tür längere Zeit offen stand,
• oder warme Lebensmittel in den Gefrier-
raum eingestellt wurden.
Action Freeze Funktion
Sie können die Action Freeze Schnellgefrier-
Funktion aktivieren, indem Sie die Action
Freeze Taste drücken.
Die Action Freeze Kontrolllampe leuchtet auf.
Diese Funktion endet automatisch nach 52
Stunden.
Diese Funktion kann jederzeit durch Drücken
der Action Freeze Taste (Schnellgefrieren)
ausgeschaltet werden.
Die Action Freeze Kontrolllampe schaltet sich
aus.
Temperaturwarnung (Temperatur zu
hoch)
Bei einem außergewöhnlichen Temperatur-
anstieg innerhalb des Gefriergeräts (z. B. bei
Stromausfall) beginnt die Alarmleuchte zu
blinken, und ein Warnton ertönt.
Nach erneutem Erreichen der normalen
Temperatur blinkt die Alarmleuchte zwar wei-
terhin, doch der Warnton ist verstummt.
Wird die Alarm-Löschtaste gedrückt, blinkt
die wärmste Temperatur im Gefrierraum auf
der Temperaturanzeige.
Kam es zum Beispiel zu einem langen Strom-
ausfall, müssen die gefrorenen Lebensmittel
sehr rasch verbraucht oder sofort gekocht
und nach dem Abkühlen erneut eingefroren
werden.
ERSTE INBETRIEBNAHME
Reinigung des Innenraums
Bevor Sie das Gerät in Betrieb nehmen, be-
seitigen Sie den typischen "Neugeruch" am
besten durch Auswaschen der Innenteile mit
lauwarmem Wasser und einem neutralen
Reinigungsmittel. Sorgfältig nachtrocknen.
Wichtig! Verwenden Sie keine Reinigungs-
mittel oder Scheuerpulver, da hierdurch die
Oberfläche beschädigt wird.
TÄGLICHER GEBRAUCH
Einfrieren frischer Lebensmittel
Der Gefrierraum eignet sich zum Einfrieren
von frischen Lebensmitteln und zum Lagern
von gefrorenen und tiefgefrorenen Lebens-
mitteln für einen längeren Zeitraum.
Um frische Lebensmittel einzufrieren, aktivie-
ren Sie bitte die Action Freeze-Funktion min-
destens 24 Stunden, bevor Sie die Lebens-
mittel in das Gefrierfach legen.
Legen Sie bitte die zu gefrierenden frischen
Lebensmittel in den oberen Teil des Gerätes,
da dies die kälteste Stelle ist.
Die maximale Menge an Lebensmitteln, die
in 24 Stunden eingefroren werden kann, ist
auf dem Typenschild angegeben; eine Pla-
kette befindet sich im Innern des Geräts.
Der Gefriervorgang dauert 24 Stunden. Le-
gen Sie während dieses Zeitraums keine wei-
teren einzufrierenden Lebensmittel in den
Gefrierraum.
electrolux 19

Wichtig! Bei Verwendung der Funktion
Action Freeze:
etwa 6
Stunden
vorher
Einlegen kleiner Mengen frischer
Lebensmittel (ca. 5 kg)
etwa 24
Stunden
vorher
Einlegen der maximalen Menge
an Lebensmitteln (siehe Typen-
schild)
Nicht erfor-
derlich
Einlegen gefrorener Lebensmittel
Nicht erfor-
derlich
Einlegen kleiner Mengen frischer
Lebensmittel, ca. 2 kg täglich ma-
ximal
Lagerung gefrorener Produkte
Lassen Sie das Gerät vor der ersten In-
betriebnahme oder nach einer Zeit, in der das
Gerät nicht benutzt wurde, mindestens zwei
Stunden lang auf den höheren Einstellungen
laufen, bevor Sie Lebensmittel in das Gefrier-
fach hinein legen.
Wichtig! Kam es zum Beispiel durch einen
Stromausfall, der länger dauerte als der in der
Tabelle mit den technischen Daten
angegebene Wert (siehe "Ausfalldauer") zu
einem ungewollten Abtauen, dann müssen
die aufgetauten Lebensmittel sehr rasch
verbraucht oder sofort gekocht und (nach
dem Abkühlen) erneut eingefroren werden.
Eiswürfelbereitung
Dieses Gerät ist mit einer oder mehreren
Schalen für die Herstellung von Eiswürfeln
ausgestattet. Füllen Sie die Schalen mit Was-
ser und stellen Sie diese in das Gefrierfach.
Wichtig! Bitte verwenden Sie zum
Herausholen der Schalen aus dem
Gefrierschrank keine Utensilien aus Metall.
Kälteakkumulatoren
Der Gefrierschrank wird mit einem oder meh-
reren Gefrierakkumulatoren geliefert. Diese
verlängern die Zeitdauer, in der die Lebens-
mittel bei einem Stromausfall oder einem
Ausfall des Gerätes gekühlt werden.
Auftauen
Tiefgefrorene oder gefrorene Lebensmittel
können vor der Verwendung je nach der zur
Verfügung stehenden Zeit im Kühlschrank
oder bei Raumtemperatur aufgetaut werden.
Kleinere Gefriergutteile können unter Um-
ständen sogar direkt aus dem Gefrierschrank
entnommen und anschließend sofort ge-
kocht oder gegart werden: in diesem Fall
dauert der Garvorgang allerdings etwas län-
ger.
Verstellbare Ablagen/Einsätze
Die Wände des Kühlschranks sind mit einer
Anzahl von Führungsschienen ausgestattet,
die verschiedene Möglichkeiten für das Ein-
setzen der Ablagen bieten.
Positionierung der Türeinsätze
Die Türeinsätze können in verschiedener Hö-
he positioniert werden; damit ermöglichen
Sie das Lagern verschieden großer Lebens-
mittelpackungen.
Bitte nehmen Sie die Einstellungen wie folgt
vor:
ziehen Sie den Einsatz langsam in Richtung
der Pfeile soweit heraus, bis er ganz aus der
Führung ist, und setzen Sie ihn dann nach
Wunsch wieder ein.
20 electrolux
Seite wird geladen ...
Seite wird geladen ...
Seite wird geladen ...
Seite wird geladen ...
Seite wird geladen ...
Seite wird geladen ...
Seite wird geladen ...
Seite wird geladen ...
Seite wird geladen ...
Seite wird geladen ...
Seite wird geladen ...
Seite wird geladen ...
-
 1
1
-
 2
2
-
 3
3
-
 4
4
-
 5
5
-
 6
6
-
 7
7
-
 8
8
-
 9
9
-
 10
10
-
 11
11
-
 12
12
-
 13
13
-
 14
14
-
 15
15
-
 16
16
-
 17
17
-
 18
18
-
 19
19
-
 20
20
-
 21
21
-
 22
22
-
 23
23
-
 24
24
-
 25
25
-
 26
26
-
 27
27
-
 28
28
-
 29
29
-
 30
30
-
 31
31
-
 32
32


Juno-Electrolux JCZ94181 Benutzerhandbuch
- Kategorie
- Gefrierschränke
- Typ
- Benutzerhandbuch
in anderen Sprachen
- English: Juno-Electrolux JCZ94181 User manual
Verwandte Artikel
Andere Dokumente
-
Electrolux IK275010LI Benutzerhandbuch
-
Novamatic EKI1221-IB Benutzerhandbuch
-
-
-
Aeg-Electrolux ST401CNN10 Bedienungsanleitung
-
-
Electrolux IK3030Z Benutzerhandbuch
-
-
-