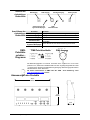
CHAUVET DJ Foot-C 2 Benutzerhandbuch
- Kategorie
- Flutlichter
- Typ
- Benutzerhandbuch
Dieses Handbuch eignet sich auch für

User Manual

Page 2 of 90 Foot-C 2 User Manual Rev. 2
TABLE OF CONTENTS
Warranty/Garantía/Garantie .............................................................................................. 8
Limited Warranty ............................................................................................................................. 8
Garantía Limitada ............................................................................................................................ 8
Garantie Limitée .............................................................................................................................. 8
Eingeschränkte Garantie................................................................................................................. 9
Beperkte Garantie ........................................................................................................................... 9
Before You Begin .............................................................................................................10
What Is Included ........................................................................................................................... 10
Unpacking Instructions .................................................................................................................. 10
Claims ................................................................................................................................................... 10
Text Conventions .......................................................................................................................... 10
Symbols ........................................................................................................................................ 10
Disclaimer ..................................................................................................................................... 10
Product at a Glance ...................................................................................................................... 11
Safety Notes .................................................................................................................................. 11
2. Introduction ..................................................................................................................12
Features ........................................................................................................................................ 12
Product Description ....................................................................................................................... 12
Mounting ....................................................................................................................................... 12
Programming Concepts ................................................................................................................ 12
Front Panel Overview .................................................................................................................... 13
Front Panel View .................................................................................................................................. 13
Front Panel Controls ............................................................................................................................. 13
Control Descriptions ............................................................................................................................. 14
Back Panel View ................................................................................................................................... 15
Back Panel Ports .................................................................................................................................. 15
DMX Polarity Switch Diagram ....................................................................................................... 15
Product Dimensions ...................................................................................................................... 15
3. Setup .............................................................................................................................16
AC Power ...................................................................................................................................... 16
Mounting ....................................................................................................................................... 16
Setting Up the Board ..................................................................................................................... 16
DMX Cabling ................................................................................................................................. 16
DMX Cabling Diagram .......................................................................................................................... 16
Fixture Addressing ........................................................................................................................ 16
4. Programming ................................................................................................................17
Program Mode .............................................................................................................................. 17
Entering Program Mode ........................................................................................................................ 17
Exiting Program Mode .......................................................................................................................... 17
Programming a Scene or Scenes ................................................................................................. 18
Editing a Scene or Scenes ................................................................................................................... 18
Deleting a Scene or Scenes ................................................................................................................. 18
Programming a Chase .................................................................................................................. 19
Add Mode ............................................................................................................................................. 19
Deleting a Step or Steps in a Chase ..................................................................................................... 20
Edit Mode ............................................................................................................................................. 20
5. Playback .......................................................................................................................21
Playback Mode .............................................................................................................................. 21
Chase Playback ............................................................................................................................ 21
Speed ............................................................................................................................................ 21

Foot-C User 2 Manual Rev. 2 Page 3 of 90
Fade .............................................................................................................................................. 21
Auto Mode ..................................................................................................................................... 22
Audio Triggering ............................................................................................................................ 22
Blackout ........................................................................................................................................ 22
Tap Sync ....................................................................................................................................... 22
Manual Override ............................................................................................................................ 22
MIDI Operation .............................................................................................................................. 23
MIDI Map .............................................................................................................................................. 23
6. Maintenance .................................................................................................................24
Product Maintenance .................................................................................................................... 24
7. Technical Specifications ..............................................................................................24
Returns .............................................................................................................................25
1. Antes de empezar .........................................................................................................26
Qué va incluido ............................................................................................................................. 26
Instrucciones de desembalaje ...................................................................................................... 26
Reclamaciones ..................................................................................................................................... 26
Convenciones de texto.................................................................................................................. 26
Símbolos ....................................................................................................................................... 26
Exención de responsabilidad ............................................................................................................. 26
El producto de un vistazo .............................................................................................................. 27
Notas de seguridad ....................................................................................................................... 27
2. Introduction ..................................................................................................................28
Características .............................................................................................................................. 28
Descripción del producto............................................................................................................... 28
Montaje.......................................................................................................................................... 28
Conceptos de programación ......................................................................................................... 28
Vista general del panel frontal ...................................................................................................... 29
Vista del panel frontal ........................................................................................................................... 29
Controles del panel frontal .................................................................................................................... 29
Descripciones del control ...................................................................................................................... 30
Vista del panel posterior ....................................................................................................................... 31
Puertos del panel posterior ................................................................................................................... 31
Diagrama de conmutador de polaridad DMX ............................................................................... 31
Dimensiones del producto ............................................................................................................ 31
3. Instalación ....................................................................................................................32
Corriente alterna ........................................................................................................................... 32
Montaje.......................................................................................................................................... 32
Instalación de la mesa .................................................................................................................. 32
Cableado DMX .............................................................................................................................. 32
Diagrama de cableado DMX ................................................................................................................. 32
Asignación de dirección al aparato ............................................................................................... 32
4. Programación ...............................................................................................................33
Modo Programa ............................................................................................................................ 33
Entrar en el modo Programa ................................................................................................................ 33
Salir del modo de programa. ................................................................................................................ 33
Programar una escena o escenas ................................................................................................ 33
Editar una escena o escenas ............................................................................................................... 33
Borrar una escena o escenas ............................................................................................................... 34
Programar una secuencia ............................................................................................................. 35
Modo Añadir ......................................................................................................................................... 35
Borrar un paso o varios pasos en una secuencia ................................................................................. 36
Modo Edición ........................................................................................................................................ 36

Page 4 of 90 Foot-C 2 User Manual Rev. 2
5. Reproducción ...............................................................................................................37
Modo Reproducción ...................................................................................................................... 37
Reproducción de secuencia .......................................................................................................... 37
Velocidad ...................................................................................................................................... 37
Fade .............................................................................................................................................. 37
Modo Automático .......................................................................................................................... 38
Activación por audio ...................................................................................................................... 38
Blackout ........................................................................................................................................ 38
Tap Sync (sincronización al toque) ................................................................................................. 38
Control manual .............................................................................................................................. 38
Funcionamiento MIDI ..................................................................................................................... 39
Mapa MIDI ............................................................................................................................................ 39
6. Mantenimiento ..............................................................................................................40
Mantenimiento del producto .......................................................................................................... 40
7. Especificaciones técnicas ...........................................................................................40
Devoluciones ....................................................................................................................41
1. Avant de commencer ...................................................................................................42
Contenu ......................................................................................................................................... 42
Instructions de déballage .............................................................................................................. 42
Réclamations ........................................................................................................................................ 42
Conventions de Texte ................................................................................................................... 42
Symboles ...................................................................................................................................... 42
Clause de non Responsabilité ...................................................................................................... 42
Bref descriptif de l'unité ................................................................................................................. 43
Consignes de Sécurité .................................................................................................................. 43
2. Introduction ..................................................................................................................44
Caractéristiques ............................................................................................................................ 44
Description de l'appareil ................................................................................................................ 44
Montage ........................................................................................................................................ 44
Concept de Programmation .......................................................................................................... 44
Vue d'ensemble du panneau frontal ............................................................................................. 45
Vue du panneau avant .......................................................................................................................... 45
Commandes du panneau avant ............................................................................................................ 45
Description des commandes ................................................................................................................ 46
Vue du panneau arrière ........................................................................................................................ 47
Ports du panneau arrière ...................................................................................................................... 47
DMX Polarity Switch Diagram ....................................................................................................... 47
Dimensions de l'appareil ............................................................................................................... 47
3. Installation ....................................................................................................................48
Alimentation CA ............................................................................................................................ 48
Montage ........................................................................................................................................ 48
Configuration de la console .......................................................................................................... 48
Câblage DMX ................................................................................................................................ 48
Schéma de câblage DMX ..................................................................................................................... 48
Adressage des projecteurs ........................................................................................................... 48
4. Programmation .............................................................................................................49
Mode programmation ....................................................................................................................... 49
Passer en mode programmation........................................................................................................... 49
Sortie du Mode Programmation ............................................................................................................ 49
Programmation d'une ou plusieurs scènes .......................................................................................... 50
Édition d'une ou plusieurs scènes ........................................................................................................ 50
Suppression d'une ou plusieurs scènes ............................................................................................... 50

Foot-C User 2 Manual Rev. 2 Page 5 of 90
Programmation d'un chenillard ........................................................................................................... 51
Mode ajout ............................................................................................................................................ 51
Supprimer un ou plusieurs pas dans un chenillard ............................................................................... 52
Mode édition ......................................................................................................................................... 52
5. Lecture ..........................................................................................................................53
Mode lecture ................................................................................................................................. 53
Lecture de chenillards ................................................................................................................... 53
Vitesse........................................................................................................................................... 53
Fondu (Fade) ................................................................................................................................ 53
Mode automatique ........................................................................................................................ 54
Déclenchement audio ....................................................................................................................... 54
Noir général ................................................................................................................................... 54
Tap Sync (Synchro par pression) ................................................................................................. 54
Forçage manuel ............................................................................................................................ 54
Fonctionnement MIDI ....................................................................................................................... 55
Configuration MIDI ................................................................................................................................ 55
6. Entretien .......................................................................................................................56
Entretien de l'appareil ................................................................................................................... 56
7. Spécifications techniques ...........................................................................................56
Renvois .............................................................................................................................57
1. Erste Schritte ................................................................................................................58
Packungs-inhalt ............................................................................................................................. 58
Anweisungen für das Auspacken .................................................................................................. 58
Schadens-meldung ............................................................................................................................... 58
Text-konventionen ......................................................................................................................... 58
Symbole ........................................................................................................................................ 58
Haftungs-ausschluss ..................................................................................................................... 58
Produkt-überblick .......................................................................................................................... 59
Sicherheits-hinweise ..................................................................................................................... 59
2. Einleitung ......................................................................................................................60
Eigenschaften ............................................................................................................................... 60
Produkt-beschreibung ................................................................................................................... 60
Montage ........................................................................................................................................ 60
Programmierungs-konzepte .............................................................................................................. 60
Übersicht Bedienfeld Vorderseite ................................................................................................. 61
Ansicht des vorderen Bedienfelds ........................................................................................................ 61
Steuerungs-möglichkeiten vorderes Bedienfeld ................................................................................... 61
Beschreibungen der Steuerungs-funktionen ............................................................................................ 62
Ansicht des rückwärtigen Bedienfelds .................................................................................................. 63
Anschlüsse des rückwärtigen Bedienfelds ............................................................................................ 63
DMX-Polaritäts-schalter – Diagramm ........................................................................................... 63
Abmessungen des Produkts ......................................................................................................... 63
3. Einrichten des Geräts ..................................................................................................64
Wechselstrom ............................................................................................................................... 64
Montage ........................................................................................................................................ 64
Einrichten des Geräts .................................................................................................................... 64
DMX-Verkabelung ......................................................................................................................... 64
Übersicht DMX-Verkabelung ................................................................................................................ 64
Adressierung des Geräts .............................................................................................................. 64
4. Programmierung ..........................................................................................................65
Programm-Modus ......................................................................................................................... 65
Aufrufen des Programm-Modus ............................................................................................................ 65

Page 6 of 90 Foot-C 2 User Manual Rev. 2
Beenden des Programm-Modus ........................................................................................................... 65
Programmieren einer Szene oder mehrerer Szenen ............................................................................ 66
Bearbeiten einer Szene oder mehrerer Szenen ................................................................................... 66
Löschen einer Szene oder mehrerer Szenen ....................................................................................... 66
Program-mieren eines Chase ....................................................................................................... 67
Hinzufügen-Modus................................................................................................................................ 67
Löschen eines oder mehrerer Schritte in einem Chase ........................................................................ 68
Bearbeitungs-Modus ............................................................................................................................. 68
5. Wiedergabe ...................................................................................................................69
Wiedergabe-Modus ....................................................................................................................... 69
Wiedergabe von Chases ............................................................................................................... 69
Geschwindig-keit ........................................................................................................................... 69
Fade .............................................................................................................................................. 69
Auto-Modus ................................................................................................................................... 70
Audio-Auslösung ........................................................................................................................... 70
Verdunkelung ................................................................................................................................ 70
Tap Sync ....................................................................................................................................... 70
Manueller Vorrang ......................................................................................................................... 70
MIDI-Betrieb .................................................................................................................................. 71
MIDI-Zuordnung.................................................................................................................................... 71
6. Wartung ........................................................................................................................72
Wartung des Geräts ...................................................................................................................... 72
7. Technische Daten .........................................................................................................72
Reklamationen ....................................................................................................................73
1. Voordat u begint ...........................................................................................................74
Wat is er inbegrepen ..................................................................................................................... 74
Uitpak-instructies ........................................................................................................................... 74
Claims ................................................................................................................................................... 74
Tekst-conventies ........................................................................................................................... 74
Symbolen ...................................................................................................................................... 74
Disclaimer ..................................................................................................................................... 74
Product in het kort ......................................................................................................................... 75
Veiligheids-instructies ................................................................................................................... 75
2. Inleiding ........................................................................................................................76
Eigen-schappen ............................................................................................................................ 76
Product-beschrijving ...................................................................................................................... 76
Montage ........................................................................................................................................ 76
Programmerings-concepten .............................................................................................................. 76
Overzicht van het voorpaneel ....................................................................................................... 77
Voorpaneel-aanzicht ............................................................................................................................. 77
Bedienings-elementen van het voorpaneel ........................................................................................... 77
Beschrijvingen van de bedienings-elementen ...................................................................................... 78
Achterzijde Aanzicht ............................................................................................................................. 79
Poorten op het achterpaneel ................................................................................................................ 79
Diagram van de DMX-polariteits-schakelaar ................................................................................ 79
Afmetingen van het product .......................................................................................................... 79
3. Instelling .......................................................................................................................80
AC-stroom ..................................................................................................................................... 80
Montage ........................................................................................................................................ 80
Instellen van het bord .................................................................................................................... 80
DMX-kabels ................................................................................................................................... 80
DMX-kabeldiagram ............................................................................................................................... 80

Foot-C User 2 Manual Rev. 2 Page 7 of 90
Adressering van de armatuur ........................................................................................................ 80
4. Programmeren ..............................................................................................................81
Programmerings-modus ................................................................................................................... 81
Naar de programmerings-modus gaan ................................................................................................. 81
De programmerings-modus afsluiten .................................................................................................... 81
Programmeren van een scène of scènes ........................................................................................ 82
Bewerken van een scène of scènes ..................................................................................................... 82
Verwijderen van een scène of scènes .................................................................................................. 82
Programmeren van een achtervolging ............................................................................................ 83
Toevoegings-modus ............................................................................................................................. 83
Een stap of stappen in een achtervolging verwijderen .......................................................................... 84
Modus bewerken .................................................................................................................................. 84
5. Afspelen ........................................................................................................................85
Afspeelmodus ............................................................................................................................... 85
Afspelen van een achtervolging .................................................................................................... 85
Snelheid ........................................................................................................................................ 85
Fade .............................................................................................................................................. 85
Automodus .................................................................................................................................... 86
Audio-triggering ............................................................................................................................. 86
Blackout ........................................................................................................................................ 86
Tap Sync ....................................................................................................................................... 86
Handbediening ............................................................................................................................... 86
MIDI-bediening .............................................................................................................................. 87
MIDI Map .............................................................................................................................................. 87
6. Onderhoud ....................................................................................................................88
Product-onderhoud ....................................................................................................................... 88
7. Technische Specificaties .............................................................................................88
Retouren ...........................................................................................................................89

Page 8 of 90 Foot-C 2 User Manual Rev. 2
WARRANTY/GARANTÍA/GARANTIE
Limited Warranty
FOR WARRANTY REGISTRATION AND COMPLETE TERMS AND CONDITIONS PLEASE VISIT OUR WEBSITE.
For Customers in the United States and Mexico: www.chauvetlighting.com/warranty-registration.
For Customers in the United Kingdom, Republic of Ire
land, Belgium, the Netherlands, Luxembourg, France,
and Germany: www.chauvetlighting.eu/warranty-registration.
Chauvet warrants that this product shall be free from defects in material and
workmanship under normal use, for the
period specified in, and subject to the exclusions and limitations set forth in the full limited warranty on our website.
This warranty extends only to the original purchaser of the product and is not transferable. To
exercise rights under
this warranty, you must provide proof of purchase in the form of an original sales receipt from an authorized dealer that
shows the product name and date of purchase. THERE ARE NO OTHER EXPRESS OR IMPLIED WARRANTIES.
This warranty gi
ves you specific legal rights. You may also have other rights that vary from state to state and country
to country. This warranty is valid only in the United States, United Kingdom, Republic of Ireland, Belgium, the
Netherlands, Luxembourg, France, Germany
and Mexico. For warranty terms in other countries, please consult your
local distributor.
Garantía Limitada
PARA VER EL REGISTRO DE GARANTÍA Y LOS TÉRMINOS Y CONDICIONES COMPLETOS, VISITE NUESTRO
SITIO WEB.
Para clientes en los Estados Unidos y México: www.chauvetlighting.com/warranty-registration
.
Para clientes en Reino Unido, República de Irlanda, Bélgica, Países Bajos, Luxemburgo, Francia y Alemania:
www.chauvetlighting.eu/warranty-registration
.
Chauvet garantiza que este producto estará libre de defectos de material y mano de obra en condiciones de uso
normales, durante el periodo especificado, sujeto siempre a las
exclusiones y limitaciones establecidas en la garantía
limitada completa de nuestro sitio web. Esta garantía se concede únicamente al comprador original del producto y no
es transferible. Para ejercer los derechos que otorga esta garantía, usted debe prop
orcionar una prueba de compra
en forma de un recibo de compra original, expedido por un distribuidor autorizado, donde figure el nombre del
producto y la fecha de compra. NO EXISTEN OTRAS GARANTÍAS EXPRESAS NI IMPLÍCITAS. Esta garantía le
otorga derechos l
egales específicos. Es posible que a usted le asistan otros derechos, que variarán dependiendo del
estado o del país. Esta garantía solamente es válida en los Estados Unidos, Reino Unido, República de Irlanda,
Bélgica, Países Bajos, Luxemburgo, Francia, Al
emania y México. Para conocer los términos de garantía en otros
países, consulte a su distribuidor local.
Garantie Limitée
VEUILLEZ VISITER NOTRE SITE INTERNET POUR CONSULTER LES MODALITÉES D'ENREGISTREMENT DE
LA GARANTIE ET LES CONDITIONS GÉNÉRALES COMPLÈTES.
Pour les clients aux États-Unis et au Mexique: www.chauvetlighting.com/warranty-registration.
Pour les clients du Royaume-Uni, de la République d'Irlande, de la Belgique, des Pays-
Bas, du Luxembourg,
de la France et de l'Allemagne: www.chauvetlighting.eu/warranty-registration.
Chauvet garantit que cet appareil est exempt de défauts de matériaux et de fabricatio
n dans des conditions normales
d'utilisation, pendant la période spécifiée dans la garantie limitée complète consultable sur notre site Internet et sous
réserve des exclusions et limitations qui y sont énoncées. Cette garantie ne s'applique qu'à l'acheteur
initial du produit
et n'est pas transférable. Pour exercer les droits prévus par cette garantie, vous devez fournir une preuve d'achat sous
la forme d'un reçu de vente original d'un revendeur autorisé qui indique le nom du produit et la date d'achat. IL
N
'EXISTE AUCUNE AUTRE GARANTIE EXPRESSE OU IMPLICITE. Cette garantie vous confère des droits légaux
spécifique. Vous pouvez également bénéficier d'autres droits qui varient selon les états et les pays. Cette garantie
n'est valable qu'aux États-Unis, au Royaume-Uni, en République d'Irlande, en Belgique, aux Pays-
Bas, au
Luxembourg, en France, en Allemagne et au Mexique. Pour connaître les conditions de garantie dans d'autres pays,
veuillez consulter votre revendeur local.

Foot-C User 2 Manual Rev. 2 Page 9 of 90
Eingeschränkte Garantie
ZUR
REGISTRIERUNG FÜR GARANTIEANSPRÜCHE UND ZUR EINSICHT IN DIE VOLLSTÄNDIGEN
GESCHÄFTSBEDINGUNGEN BESUCHEN SIE BITTE UNSERE WEBSITE.
Für Kunden in den USA und in Mexiko: www.chauvetlighting.com/warranty-registration.
Für Kunden im Vereinigten Königreich, in Irland, Belgien, den Niederlanden, Luxemburg,
Frankreich und Deutschland: www.chauvetlighting.eu/warranty-registration.
Chauvet
garantiert für die in der auf unserer Website veröffentlichten vollständigen eingeschränkten Garantie
genannten Dauer und unter Vorbehalt der darin genannten Haftungsausschlüsse und -
beschränkungen, dass dieses
Produkt bei normalen Gebrauch frei von Material-
und Verarbeitungsfehlern ist. Diese Garantie erstreckt sich nur auf
den Erstkäufer des Produkts und ist nicht übertragbar. Zur Ausübung der unter dieser Garantie gewährten Rechte ist
der Kaufbeleg in Form der Originalrechnung von einem autorisierten H
ändler vorzulegen, in der die
Produktbezeichnung und das Kaufdatum vermerkt sein müssen. ES BESTEHEN KEINE WEITEREN
AUSDRÜCKLICHEN ODER STILLSCHWEIGENDEN GARANTIEN. Diese Garantie gibt Ihnen besondere gesetzliche
Rechte. Und Sie haben möglicherweise weiter
e Rechte, die von Land zu Land unterschiedlich sein können. Diese
Garantie ist nur in den USA, im Vereinigten Königreich, in Irland, Belgien, den Niederlanden, Luxemburg, Frankreich,
Deutschland und Mexiko gültig. Bezüglich der Garantiebestimmungen in ande
ren Ländern wenden Sie sich bitte an
Ihren lokalen Händler.
Beperkte Garantie
GA NAAR ONZE WEBSITE VOOR REGISTRATIE VAN DE GARANTIE EN DE VOLLEDIGE ALGEMENE
VOORWAARDEN.
Voor klanten in de Verenigde Staten en Mexico: www.chauvetlighting.com/warranty-registration.
Voor klanten in het Verenigd Koninkrijk, Ierland, België, Nederland, Luxemburg, Frankrijk en Duitsland:
www.chauvetlighting.eu/warranty-registration
.
Chauvet garandeert dat dit product bij normaal gebruik vrij zal blijven van defecten in materiaal en vakmanschap, voor
de opgegeven periode en onder voorbehoud van de uitzonderingen en beperking
en die zijn uiteengezet in de
volledige beperkte garantie op onze website. Deze garantie geldt uitsluitend voor de oorspronkelijke koper van het
product en is niet overdraagbaar. Om onder deze garantie rechten uit te oefenen, moet u een aankoopbewijs
overl
eggen in de vorm van een origineel verkoopbewijs van een geautoriseerde dealer, waarop de naam van het
product en de aankoopdatum zichtbaar zijn. ER ZIJN GEEN ANDERE EXPLICIETE OF IMPLICIETE GARANTIES.
Deze garantie geeft u specifieke wettelijke rechten. M
ogelijk heeft u ook andere rechten die van staat tot staat en van
land tot land verschillen. Deze garantie is uitsluitend geldig in de Verenigde Staten, het Verenigd Koninkrijk, Ierland,
België, Nederland, Luxemburg, Frankrijk, Duitsland en Mexico. Neem co
ntact op met uw lokale verkoper voor
garantievoorwaarden in andere landen.

Page 10 of 90 Foot-C 2 User Manual Rev. 2
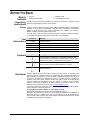
BEFORE YOU BEGIN
What Is
Included
• Foot-C 2
• External Power Supply
• Warranty Card
• Quick Reference Guide
Unpacking
Instructions
Carefully unpack the product immediately
and check the container to make sure all the
parts are in the package and are in good condition.
Claims
If the box or the contents (the product and included accessories) appear damaged from
shipping, or show signs of mishandling, notify the carrier immediately, not Chauvet.
Failure to report damage to the carrier immediately may invalidate your claim. In
addition, keep the box and contents for inspection.
For other issues, such as missing components or parts, damage not related to shipping,
or concealed damage, file a claim with Chauvet within 7 days of delivery.
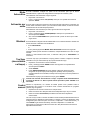
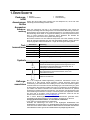
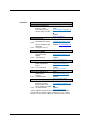
Text
Conventions
Convention Meaning
1—512
A range of values
50/60
A set of values of which only one can be chosen
Settings
A menu option not to be modified
Menu > Settings
A sequence of menu options to be followed
<ENTER>
A key to be pressed on the product’s control panel
ON
A value to be entered or selected
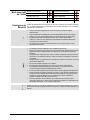
Symbols
Symbol Meaning
Critical installation, configuration, or operation information. Not
following these instructions may make the product not work, cause
damage to the product, or cause harm to the operator.
Important installation or configuration information. The product
may not function correctly if this information is not used.
Useful information.
Disclaimer
Chauvet believes that the information contained in this manual is accurate in all
respects. However, Chauvet assumes no responsibility and specifically disclaims any
and all liability to any party for any loss, damage or disruption caused by any errors or
omissions in this document, whether such errors or omissions result from negligence,
accident or any other cause. Chauvet reserves the right to revise the content of this
document without any obligation to notify any person or company of such revision,
how
ever, Chauvet has no obligation to make, and does not commit to make, any such
revisions. Download the latest version from www.chauvetlighting.com.
The works of authorship contained in this manual, including, but not limited to, all design,
text and images are owned by Chauvet.
© Copyright 2018 Chauvet & Sons, LLC. All rights reserved.
Electronically published by Chauvet in the United States of America.
CHAUVET, the Chauvet logo, and Foot-C 2 are registered tra
demarks or trademarks of
Chauvet & Sons LLC
. (d/b/a Chauvet and Chauvet Lighting) in the United States and
other countries. Other company and product names and logos referred to herein may be
trademarks of their respective companies.

Foot-C User 2 Manual Rev. 2 Page 11 of 90
Product at a
Glance
Use on Dimmer
Auto Programs
Outdoor Use
Auto-ranging Power Supply
Sound-Active
Replaceable Fuse
DMX
User-Serviceable
Master/Slave
Safety Notes
Please read the following Safety Notes carefully before working with the product. The
Notes include important safety information about installation, usage, and maintenance.
•
Always connect the product to a grounded circuit to avoid the risk of electrocution.
• Always disconnect the product from the power source before cleaning.
• Make sure the power cord is not crimped or damaged.
• Never disconnect the product from power by pulling or tugging on the cord.
• Make sure there are no flammable materials close to the product when operating.
•
Do not touch the product’s housing when operating because it may be very hot.
• The product is not intended for permanent installation.
• Always make sure that the voltage of the outlet to which you are connecting the
product is within the range stated on the decal or rear panel of the product.
• The product is for indoor use only! (IP20) To prevent risk of fire or shock, do not
expose the product to rain or moisture.
• Always install the product in a location with adequate ventilation, at least 20 in
(50 cm) from adjacent surfaces.
• Never connect the product to a dimmer.
• Never carry the product from the power cord.
• The maximum ambient temperature (Ta) is 104 °F (40 °C). Do not operate the
product at higher temperatures.
• In the event of a serious operating problem, stop using the product immediately.
• Never try to repair the product. Repairs carried out by unskilled people can lead to
damage or malfunction. Please contact the nearest authorized technical assistance
center.
• To eliminate unnecessary wear and improve its lifespan, during periods of non-use
completely disconnect the product from power via breaker or by unplugging it.
Keep this User Manual for future use. If you sell the product, be sure that they also
receive this document.

Page 12 of 90 Foot-C 2 User Manual Rev. 2
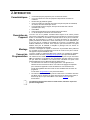
2. INTRODUCTION
Features
• Controls up to 6 fixtures, up to 36 channels total
• Designed to work with fixtures that have up to 6 channels
• Guitar pedal-style buttons
• Create and control a full light show of chases, scenes, fades, and more
• Built-in Tap Sync, Auto, and Sound modes
• MIDI input
• Direct audio line input for triggering scenes
• Fits in the CHS-25 VIP Gear Bag
Product
Description
Foot-C 2 is a compact 36-channel DMX foot controller that can control up to 6
six-channel fixtures and store 12 sets of chases with up to 24 steps each. Ideal for
6-channel fixtures, it has rugged guitar pedal-style buttons that can trigger Automated
and Sound-Active modes, as well as control chases and scenes. LED displays make it
easy to navigate the controller in any environment. Improved software offers more
versatility and makes it simpler than ever to shift between scenes or to blackout fixtures
instantly.
Mounting
The Foot-C 2 is designed with 4 rubber feet so it can be placed on a table top for
programming, and then floor-mounted for playback. The product is not rack-mountable.
Programming
Concepts
The Foot-C 2 uses DMX addressing and values to control products. See Fixture
Addressing for more information.
Looks are created by using the faders to send DMX values to the products. The looks
are saved into scenes or as steps in chases. The scenes and chases are played back
at different speeds and with different types of triggers.
• Looks are created in Program mode. The products are selected with the fixture
buttons. The knobs are moved to control the products and create looks. Then the
looks are saved to scenes or chases with the program button.
See Programming
for more information.
• Scenes and chases are played back in Playback mode. Timing of playback is set
with the speed and time functions, audio triggers, the Tap Sync function, or MIDI
input. See Playback
for more information.
Looks can be created in playback mode, but they cannot be saved.

Foot-C User 2 Manual Rev. 2 Page 13 of 90
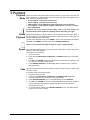
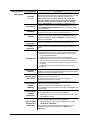
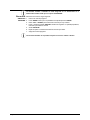
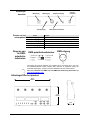
Front Panel
Overview
The Foot-C 2 is laid out with the Fixture buttons (<1>–<6>) on the top left, the color
and sensitivity knobs on the top right, the LED displays along the middle, and the guitar
pedal-style buttons along the bottom. The rear panel of the product has the ports and
power connection. See
Back Panel View for information about the back panel and its
ports.
Front Panel
View
Front Panel
Controls
Item Button or Knob
1
Fixture selection buttons 1–6 with indicator LEDs
2
Program button
3
Blackout button
4
Delete button/MIDI channel select. LED indicator will light orange when in
MIDI selection mode.
5
Color/control knobs: red, green, blue, amber, white, and UV
6
Audio sensitivity knob
7
Displays
8
Mode pedal-style button - switches between chases and scenes
9
Up (Auto) pedal-style button - navigates upward through a list or
increases numerical value when in a function or enables auto mode
10
Down (Music) pedal-style button - navigates downward through a list or
decreases numerical value when in a function or enables music (sound
active) mode
11
Enter (TAPSYNC) pedal-style button – sets/enables the currently selected
value or enables Tap Sync mode
12
BLACKOUT / FUNCTION pedal-style button. Also toggles program
modes.
12
7
11
10
8
9
1
2
3
4
5
6

Page 14 of 90 Foot-C 2 User Manual Rev. 2
Control
Descriptions
Button or Fader Description
FIXTURE
<1>–<6>
Buttons that select lights to control and set the default DMX
addresses of the channel faders. The corresponding LEDs indicate
when a light is selected.
Note: These buttons are inclusive. Pressing one, then
another, selects both lights. To deselect a light, press it again
and make sure the LED indicator is off.
BLACKOUT
The <BLACKOUT> button will darken all fixtures. To turn blackout
off, press the <BLACKOUT> button again. The <BLACKOUT /
FUNCTION> pedal will also activate and deactivate the blackout
feature.
PROGRAM
Button used to enter the programming mode. Allows you to
program a scene, chase, or sequence thereof.
DELETE
Button used to delete scenes individually. Delete a scene by
pressing and holding the <DELETE> button until the LED display
flashes. <DELETE> button also controls the MIDI channel select.
Color/Control
Knobs
Knobs to control the manual adjustment of red, green, blue, amber,
white and UV (000–255); or the DMX channel of the Fixtures 1–6.
Audio
Sensitivity
Knob
Knob that adjusts the board’s sensitivity to sound and music.
LED Displays
Display that shows various types of information about current
selections and whether it is in Program or Playback mode:
• Blackout - indicates that blackout is active and the board is not
sending DMX signals.
• Program - indicates that the board is in Program mode.
• Music - indicates that the board is in Music Trigger mode.
• Auto - indicates that the board is in Auto Trigger mode.
• Chase - shows the current chase in Playback or Program
mode.
• Scene - shows the current scene in Playback or Program
mode.
<MODE>
Pedal Button
Button that switches between Chase mode and Scenes mode.
<UP> (AUTO)
Pedal Button
Button that moves up through banks of scenes, or up through the
steps in a chase.
Also used to enable Auto mode, to automatically play back chases
or scenes.
<DOWN>
(MUSIC) Pedal
Button
Button that moves down through banks of scenes, or down through
the steps in a chase.
Also used to enable Music mode, to sets scenes/steps in chases to
respond to audio triggers from a source.
< ENTER
(TAPSYNC)>
Pedal Button
Button used while programming to switch between the Speed and
Fade functions, or to confirm a selection. Hold to activate the Tap
Sync feature.
• While in Tap Sync mode, press the <UP> or <DOWN> pedal
buttons to the beat to set your chase timing.
<BLACKOUT /
FUNCTION>
Pedal Button
Button used in playback to quickly switch between Music mode,
Auto mode, or to blackout all fixtures.
• To turn the blackout off, you must press <BLACKOUT /
FUNCTION> pedal button again.
Also used for toggling program modes. With program activated,
press to switch between Add and EdIT.

Foot-C User 2 Manual Rev. 2 Page 15 of 90
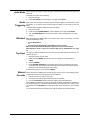
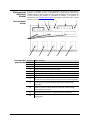
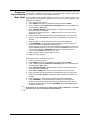
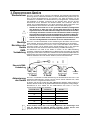
Back Panel View
Back Panel
Ports
Port Function
MIDI In
5-pin MIDI port for connecting a MIDI signal.
DMX Out
3-pin DMX port for connecting to other products.
DC Power In
Connects to the external power supply.
Power On/Off Switch
Toggle switch that turns the Foot-C 2 on and off.
Audio Line Input
RCA Input for external audio triggering.
DMX Polarity Switch
Toggle switch for changing DMX polarity.
DMX Polarity
Switch
Diagram
All Chauvet lights use a negative pin 2 and positive pin 3, so the polarity switch should
be set as shown above—towards the DMX Control Out port. Other manufacture’s lights
might be different.
For more information about DMX, download the DMX Primer from
www.chauvetlighting.com.
Product Dimensions
14.2 in
360 mm
7.2 in
183 mm
2.6 in
66 mm
MIDI In
DMX Out
DC Power In
Power On/Off
Switch
Audio Line
Input
DMX Polarity
Switch

Page 16 of 90 Foot-C 2 User Manual Rev. 2
3. SETUP
AC Power
The Foot-C 2 has an external auto-ranging power supply and it can work with an input
voltage range of 100 to 240 VAC, 50/60 Hz. To determine the product’s power
requirements (
circuit breaker, power outlet, and wiring), use the current value listed on
the label affixed to the power supply’s back panel, or refer to the product’s specifications
chart. The listed current rating indicates the product
’s average current draw under
normal conditions.
•
Always connect the product to a protected circuit (circuit breaker or fuse).
Make sure the product
has an appropriate electrical ground to avoid the risk
of electrocution or fire.
• To eliminate
unnecessary wear and improve its lifespan, during periods of
non-
use completely disconnect the product from power via breaker or by
unplugging it.
• Never connect the product
to a rheostat (variable resistor) or dimmer circuit,
even if the rheostat or dimmer channel serves only as a 0 to 100% switch.
Mounting
The Foot-C 2 is designed only for floor or table mounting. Make sure adequate
ventilation is provided around the product.
Setting Up the
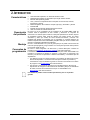
Board
In order to use the controller it must be connected to the products with DMX cables and
the products must be addressed correctly. The sections below described DMX cabling
and DMX addressing.
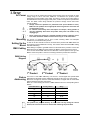
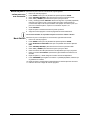
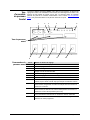
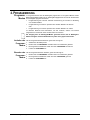
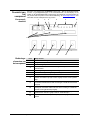
DMX Cabling
DMX cabling is required to get DMX values from the board to the products. Connect the
DMX cable from the DMX Out of the board to the DMX In of the first product in the rig.
Then connect another DMX cable from the DMX Out of the first product in the rig to the
DMX In of the next product. Continue connecting until all the products are connected.
DMX Cabling
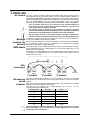
Diagram
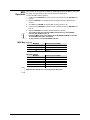
Fixture
Addressing
The Foot-C 2 uses DMX addressing. The Foot-C 2 controls lights with specific DMX
addresses and the lights must be addressed correctly for the Foot-C 2 to control them.
More than one light can have the same DMX address, but
lights with the same DMX
address should be the same type of light.
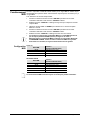
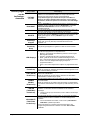
Below is a chart showing the Foot-C 2
DMX addresses and the corresponding fixture
buttons:
FIXTURE Button
Starting Address Range
<1>
1 1–6
<2>
7 7–12
<3>
13 13–18
<4>
19 19–24
<5>
25 25–30
<6>
31 31–36
This product has program memory. All looks exist not only during the current
session, but can also be saved or recalled after switching the power OFF.
DMX
In
DMX
Out
1
st
Product
2
nd
Product
3
rd
Product
Additional
Products
DMX
In
DMX
Out
DMX
In
DMX
Out

Foot-C User 2 Manual Rev. 2 Page 17 of 90
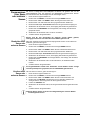
4. PROGRAMMING
Program
Mode
Program mode is used to
program for playback. In Program mode, lighting looks are
created and saved for playback. There are three parts to programming for playback.
• Programming lights: selecting and controlling them to create looks.
• Programming scenes: saving the looks into scenes.
or
• Programming chases: saving the looks into steps in a chase.
The next section describes how to program lights, scenes, and chases, and how to
modify and delete scenes and chases.
Output can be adjusted in Playback mode, but the looks created in Playback mode
cannot be saved to memory.
Entering
Program Mode
To enter program mode, do the following:
1. Turn the board on.
2. Press and hold <PROGRAM> for three seconds.
3. The program indicator light, next to the <PROGRAM> button, will light up.
4. Release <PROGRAM>.
Exiting Program
Mode
To exit program mode, follow the instructions below:
1. Press and hold <PROGRAM> for three seconds.
2. The program indicator light, next to the <PROGRAM> button, will turn off.
3. Release <PROGRAM>.

Page 18 of 90 Foot-C 2 User Manual Rev. 2
Programming
a Scene or
Scenes
The Foot-C 2 has one bank of scenes, separate from the chase banks
, for saving and
playing back recorded scenes. To record a scene, follow the instructions below:
1. Enter program mode.
2. Press <MODE> until the left display reads SCENE.
3. Use <UP> and <DOWN> to select the desired scene.
4. Use buttons <1>–<6> to select the fixture(s) to be programmed.
5. Use the Color/Number knobs to set the desired output.
6. Repeat steps 4 and 5 until all fixtures output as desired.
7. Press <PROGRAM>. The displays will flash, showing the scene was saved.
8. Repeat steps 3–7 for up to 24 scenes.
9. Exit program mode.
Scenes are intended to be used for static looks, as opposed to chases which are
intended for changing looks.
Editing
a Scene
or Scenes
After being recorded, any scene can be re-programmed. To edit a scene, do the
following:
1. Enter program mode.
2. Press <MODE> until the left display reads SCENE.
3. Use <UP> and <DOWN> to select the scene to be edited.
4. Use buttons <1>–<6> to select the fixture(s) to be programmed.
5. Use the Color/Number knobs to set the desired output.
6. Repeat steps 4 and 5 until all fixtures output as desired.
7. Press <PROGRAM>. The displays will flash, showing the scene was saved.
8. Repeat steps 3–7 for all scenes that require editing.
9. Exit program mode.
Looks created or edited in program mode will not be stored in the system memory
until <PROGRAM> has been pressed.
Deleting a Scene
or Scenes
To delete a scene, do the following:
1. Enter program mode.
2. Press <MODE> until the left display reads SCENE.
3. Use <UP> and <DOWN> to select the scene to be deleted.
4. Press and hold <DELETE> for three seconds. The displays will flash, indicating the
scene was deleted.
5. Release <DELETE>.
6. Repeat steps 3–5 until all desired scenes have been deleted.
7. Exit program mode.
Deleted scenes cannot be restored.

Foot-C User 2 Manual Rev. 2 Page 19 of 90
Programming
a Chase
Chase mode gives the user access to a bank of 12 chases, each with up to 24 steps. The
distinction between chases and scenes allows the user to switch between moving chases
and static scenes at will.
Add Mode
Add mode allows the user to record new steps in a chase, either to a previously
unrecorded chase, or to an already established chase. To program a chase:
1. Enter program mode.
2. Press <MODE> until the left display reads CHASE.
3. Press and hold <BLACKOUT / FUNCTION> until the display on the right reads Add.
4. Use <ENTER (TAPSYNC)> to scroll through the chase bank until the desired chase
is selected.
A chase with no recorded steps will show _ _ 00/00 (chase 1–12 step 0 out of 0) on
the middle display.
5. Use buttons <1>–<6> to select the fixture(s) to be programmed.
6. Use the Color/Number knobs to set the desired output.
7. Repeat steps 5 and 6 until all fixtures output as desired.
8. Press <PROGRAM>. The displays will flash, showing the step was saved. The
product will automatically move on to the next step.
The last step that was saved to memory will show on the middle display. For
example: 03 03/03 (chase 3, step 3 of 3) will change to 03 04/04 (chase 3, step 4
of 4) after pressing <PROGRAM>, indicating the next step to be programmed will be
03 05/05 (chase 3, step 5 of 5).
9. Repeat steps 5–8 for up to 24 steps.
10. Exit program mode.
To add a step in the middle of a chase:
1. Enter program mode.
2. Press <MODE> until the left display reads CHASE.
3. Press and hold <BLACKOUT / FUNCTION> until the display on the right reads Add.
4. Use <ENTER (TAPSYNC)> to scroll through the chase bank until the desired chase
is selected.
5. Use <UP> and <DOWN> to select the step before the step to be inserted.
6. Use buttons <1>–<6> to select the fixture(s) to be programmed.
7. Use the Color/Number knobs to set the desired output.
8. Repeat steps 6 and 7 until all fixtures output as desired.
9. Press <PROGRAM>. The displays will flash, showing the inserted step was saved.
The middle display will indicate the inserted step. For example, if the display read
01 07/13 before pressing <PROGRAM>, it will read 01 08/14 after saving the new
step.
Chases are intended to be used
for changing looks, as opposed to scenes which
are intended for static looks

Page 20 of 90 Foot-C 2 User Manual Rev. 2
Deleting a Step
or Steps in a
Chase
To delete a step or steps in a chase, do the following:
1. Enter program mode.
2. Press <MODE> until the left display reads CHASE.
3. Use <ENTER (TAPSYNC)> to select the chase to be shortened.
4. Use <UP> and <DOWN> to select the step to be deleted.
5. Press and hold <DELETE> for three seconds. The displays will flash, indicating the
step was deleted. All steps after the deleted step will move down the queue to
replace it. For example: If step 3 is deleted, step 4 will become step 3, step 5 will
become step 4, etc.
6. Release <DELETE>.
7. Repeat steps 4–6 until all desired steps have been deleted.
8. Exit program mode or continue programming chases/scenes.
Deleted steps cannot be restored without redesigning the look.
Edit Mode
To edit a step or steps in a chase, follow the instructions below:
1. Enter program mode.
2. Press <MODE> until the left display reads CHASE.
3. Press <BLACKOUT / FUNCTION> until the display on the right reads EdIT.
4. Use <ENTER (TAPSYNC)> to select the chase to be edited.
5. Use <UP> and <DOWN> to select the step to be edited.
6. Use buttons <1>–<6> to select the fixture(s) to be programmed.
7. Use the Color/Number knobs to set the desired output.
8. Repeat steps 6 and 7 until all fixtures output as desired.
9. Press <PROGRAM> to record the changes. The displays will flash, indicating the
changes were saved.
10. Repeat steps 5–9 until all desired changes to this chase are completed.
11. Edit another chase or exit program mode.
Seite wird geladen ...
Seite wird geladen ...
Seite wird geladen ...
Seite wird geladen ...
Seite wird geladen ...
Seite wird geladen ...
Seite wird geladen ...
Seite wird geladen ...
Seite wird geladen ...
Seite wird geladen ...
Seite wird geladen ...
Seite wird geladen ...
Seite wird geladen ...
Seite wird geladen ...
Seite wird geladen ...
Seite wird geladen ...
Seite wird geladen ...
Seite wird geladen ...
Seite wird geladen ...
Seite wird geladen ...
Seite wird geladen ...
Seite wird geladen ...
Seite wird geladen ...
Seite wird geladen ...
Seite wird geladen ...
Seite wird geladen ...
Seite wird geladen ...
Seite wird geladen ...
Seite wird geladen ...
Seite wird geladen ...
Seite wird geladen ...
Seite wird geladen ...
Seite wird geladen ...
Seite wird geladen ...
Seite wird geladen ...
Seite wird geladen ...
Seite wird geladen ...
Seite wird geladen ...
Seite wird geladen ...
Seite wird geladen ...
Seite wird geladen ...
Seite wird geladen ...
Seite wird geladen ...
Seite wird geladen ...
Seite wird geladen ...
Seite wird geladen ...
Seite wird geladen ...
Seite wird geladen ...
Seite wird geladen ...
Seite wird geladen ...
Seite wird geladen ...
Seite wird geladen ...
Seite wird geladen ...
Seite wird geladen ...
Seite wird geladen ...
Seite wird geladen ...
Seite wird geladen ...
Seite wird geladen ...
Seite wird geladen ...
Seite wird geladen ...
Seite wird geladen ...
Seite wird geladen ...
Seite wird geladen ...
Seite wird geladen ...
Seite wird geladen ...
Seite wird geladen ...
Seite wird geladen ...
Seite wird geladen ...
Seite wird geladen ...
Seite wird geladen ...
-
 1
1
-
 2
2
-
 3
3
-
 4
4
-
 5
5
-
 6
6
-
 7
7
-
 8
8
-
 9
9
-
 10
10
-
 11
11
-
 12
12
-
 13
13
-
 14
14
-
 15
15
-
 16
16
-
 17
17
-
 18
18
-
 19
19
-
 20
20
-
 21
21
-
 22
22
-
 23
23
-
 24
24
-
 25
25
-
 26
26
-
 27
27
-
 28
28
-
 29
29
-
 30
30
-
 31
31
-
 32
32
-
 33
33
-
 34
34
-
 35
35
-
 36
36
-
 37
37
-
 38
38
-
 39
39
-
 40
40
-
 41
41
-
 42
42
-
 43
43
-
 44
44
-
 45
45
-
 46
46
-
 47
47
-
 48
48
-
 49
49
-
 50
50
-
 51
51
-
 52
52
-
 53
53
-
 54
54
-
 55
55
-
 56
56
-
 57
57
-
 58
58
-
 59
59
-
 60
60
-
 61
61
-
 62
62
-
 63
63
-
 64
64
-
 65
65
-
 66
66
-
 67
67
-
 68
68
-
 69
69
-
 70
70
-
 71
71
-
 72
72
-
 73
73
-
 74
74
-
 75
75
-
 76
76
-
 77
77
-
 78
78
-
 79
79
-
 80
80
-
 81
81
-
 82
82
-
 83
83
-
 84
84
-
 85
85
-
 86
86
-
 87
87
-
 88
88
-
 89
89
-
 90
90


CHAUVET DJ Foot-C 2 Benutzerhandbuch
- Kategorie
- Flutlichter
- Typ
- Benutzerhandbuch
- Dieses Handbuch eignet sich auch für
in anderen Sprachen
- français: CHAUVET DJ Foot-C 2 Manuel utilisateur
- español: CHAUVET DJ Foot-C 2 Manual de usuario
- Nederlands: CHAUVET DJ Foot-C 2 Handleiding
Verwandte Artikel
-
CHAUVET DJ Foot-C Benutzerhandbuch
-
-
-
Chauvet Obey 40 Benutzerhandbuch
-
-
-
-
-

