Dell POWER VAULT 130T LIBRARY 130T Installationsanleitung
- Kategorie
- Rack-Zubehör
- Typ
- Installationsanleitung
Dieses Handbuch eignet sich auch für

www.dell.com
™
Dell
™
PowerVault
™
130T
Storage System Rack Kit
INSTALLATION GUIDE

Notes, Cautions, and Warnings
Throughout this guide, blocks of text may be accompanied by an icon and printed in
bold type or in italic type. These blocks are notes, cautions, and warnings, and they
are used as follows:
NOTE: A NOTE indicates important information that helps you make better use of
your computer system.
CAUTION: A CAUTION indicates either potential damage to hardware or
loss of data and tells you how to avoid the problem.
WARNING: A WARNING indicates the potential for bodily harm and tells
you how to avoid the problem.
Some warnings may appear in alternate formats and may be unaccompanied by an
icon. In such cases, the specific presentation of the warning is mandated by regula-
tory authority.
____________________
Information in this document is subject to change without notice.
© 1998 Dell Computer Corporation. All rights reserved.
Reproduction in any manner whatsoever without the written permission of Dell Computer
Corporation is strictly forbidden.
Trademarks used in this text: Dell and the DELL logo, and PowerVault are trademarks of Dell
Computer Corporation.
Other trademarks and trade names may be used in this document to refer to either the entities
claiming the marks and names or their products. Dell Computer Corporation disclaims any propri-
etary interest in trademarks and trade names other than its own.
December 1998 P/N 1187D Rev. A01

Dell PowerVault 130T Storage System Rack Kit Installation Guide 1-1
Dell
™
PowerVault
™
130T
Storage System Rack Kit
Installation Guide
This guide provides instructions for installing a rack kit and a PowerVault 130T system
in a Dell rack. One PowerVault 130T rack kit is required for each PowerVault 130T sys-
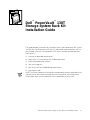
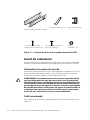
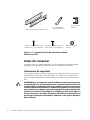
tem installed in the rack. The PowerVault 130T rack kit includes the following items
(see Figure 1-1):
• One pair of adjustable mounting rails
• Eight 10-32 x 0.5-inch counter-sink Phillips-head screws
• Eight #10 formed-metal washers
• Four 10-32 cage nuts
• Four 10-32 x 0.5-inch flanged Phillips-head screws
• One cage nut tool
NOTE: The screws called out in illustrations and procedural steps are identified first by
size and then by the number of threads per inch. For example, a #10 counter-sink
Phillips-head screw with 32 threads per inch is identified as a 10-32 screw.

1-2 Dell PowerVault 130T Storage System Rack Kit Installation Guide
Figure 1-1. PowerVault 130T System Rack Kit Contents
Before You Begin
Before you install your PowerVault 130T system in the rack, read the safety informa-
tion and tool requirement in the following subsections.
Safety Information
This PowerVault 130T system rack kit is intended to be installed in a Dell rack by
trained service technicians. If you install the kit in any other rack, be sure that the rack
meets the specifications of the Dell rack.
WARNING: Dell server systems are components for use in Dell racks with
the Dell customer PowerVault 130T system rack kit. The final installation of
Dell servers and PowerVault 130T system rack kits in any other brand of
rack has not been approved by any safety agencies. It is the customer’s
responsibility to have the final combination of Dell servers and
PowerVault 130T system rack kits for use in other brands of racks
evaluated for suitability by a certified safety agency.
Recommended Tool
To install the PowerVault 130T system rack kit, use a #2 Phillips-head screwdriver.
adjustable mounting rails (1 pair)
10-32 cage nut (4)cage-nut tool (1)
10-32 x 0.5-inch counter-sink
Phillips-head screw (8)
10-32 x 0.5-inch flanged
Phillips-head screw (4)
#10 formed-metal
washer (8)

Dell PowerVault 130T Storage System Rack Kit Installation Guide 1-3
Installing the PowerVault 130T Kit
Use the following procedure to install the PowerVault 130T system rack kit in the rack:
1. Remove the doors from the rack.
2. Install the adjustable mounting rails in the rack.
NOTE: If you purchased a Dell rack along with your PowerVault 130T system, the
mounting rails are preinstalled in the rack.
3. Install the cage nuts in the rack.
4. Install the PowerVault 130T system.
5. Replace the doors.
The subsections that follow include instructions for performing these tasks.
Removing the Doors From the Rack
You must remove the front and back doors from the rack to provide access to the inte-
rior of the rack and to prevent damage to the doors while installing the kit. Use the
following procedure to remove the doors.
WARNING: To prevent personal injury due to the size and weight of the
doors, never attempt to remove the doors by yourself.
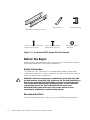
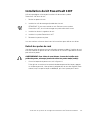
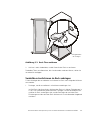
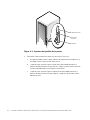
1. Open the latch on the front door (see Figure 1-2).
Slide the latch’s push button cover up as far as it will go, press the push button,
rotate the handle clockwise until the latch releases, and then pull the door open.

1-4 Dell PowerVault 130T Storage System Rack Kit Installation Guide
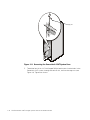
Figure 1-2. Opening the Latch on the Door
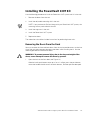
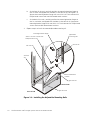
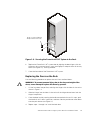
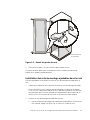
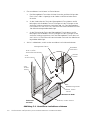
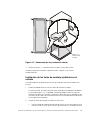
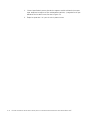
2. Remove the front door as shown in Figure 1-3:
a. One person should grasp the top of the door to stabilize it. The other person
should grasp the bottom of the door.
b. The person holding the bottom of the door should press the hinge release
lever on the bottom hinge and then pull the bottom of the door away from
the rack a few inches.
c. The person holding the top of the door should press the hinge release lever
on the top hinge and then pull the door away from the rack.
push button
push button
cover
handle

Dell PowerVault 130T Storage System Rack Kit Installation Guide 1-5
Figure 1-3. Removing the Rack Doors
3. Perform steps 1 and 2 to remove the back door from the rack.
Store the two doors where they will not injure someone if they accidentally fall over.
Installing the Adjustable Mounting Rails in the Rack
Use the following procedure to install the adjustable mounting rails in the rack:
1. Determine where you want to install the adjustable mounting rails.
In the Dell rack, the vertical rails are marked by small indentations in 1-U
(1.75-inch) increments. Determine where to install the adjustable mounting rails
in the rack and mark the locations of the vertical rail indentation on the rack’s ver-
tical rails with a felt-tipped marker or masking tape.
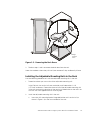
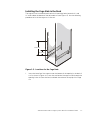
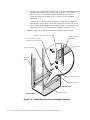
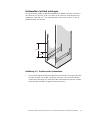
2. Install the adjustable mounting rails in the rack:
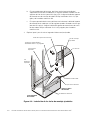
a. Insert the rail’s mounting-bracket flange behind the rack’s vertical rail (as
shown in Figure 1-4) at the front and back of the rack.
hinge
release
lever

1-6 Dell PowerVault 130T Storage System Rack Kit Installation Guide
b. At the front of the rack, vertically position the mounting-bracket flange so
that its holes are aligned with the holes in the vertical rail (see Figure 1-4).
Secure the mounting-bracket flange with two 10-32 x 0.5-inch counter-sink
Phillips-head screws and two #10 formed-metal washers.
c. At the back of the rack, vertically position the mounting-bracket flange so
that its two holes are aligned with the holes in the vertical rail. Secure the
mounting-bracket flange with two 10-32 x 0.5-inch counter-sink Phillips-head
screws and two #10 formed-metal washers.
3. Repeat step 2 to install the second adjustable mounting rail.
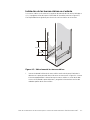
Figure 1-4. Installing the Adjustable Mounting Rails
mounting-bracket flange
10-32 x 0.5-inch counter-sink
Phillips-head screw
vertical rail
front of rack
#10 formed-metal
washer
right front rail
back of rack
left front
rail
left rear rail
right rear rail
adjustable
mounting rail

Dell PowerVault 130T Storage System Rack Kit Installation Guide 1-7
Installing the Cage Nuts in the Rack
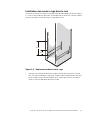
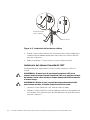
The cage nuts are installed on both vertical-rail mounting holes located at 4.3 and
13 inches above the bottom of the adjustable rail (see Figure 1-5). Use the following
procedure to install the cage nuts in the rack.
Figure 1-5. Locations for the Cage Nuts
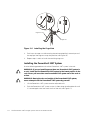
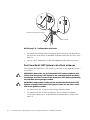
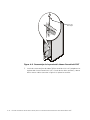
1. Insert the lower lip of the cage nut over the bottom of the opening in the back of
a rail as shown in Figure 1-6. Insert the small end of the cage-nut tool through the
opening in the rail (from the front) and hook the tool over the top lip of the cage
nut.
13 inches
4.3 inches

1-8 Dell PowerVault 130T Storage System Rack Kit Installation Guide
Figure 1-6. Installing the Cage Nuts
2. Push in on the cage nut while rotating the tool up and pulling it toward you until
the top lip of the cage nut snaps into position (see Figure 1-6).
3. Repeat steps 1 and 2 to install the remaining cage nuts.
Installing the PowerVault 130T System
Use the following procedure to install the PowerVault 130T system in the rack.
WARNING: If you are installing more than one PowerVault 130T system in
a rack, install the first PowerVault 130T system in the lowest position in the
rack. Never pull more than one PowerVault 130T system out of the rack at
a time.
WARNING: Due to the size and weight of the PowerVault 130T system,
never attempt to lift the PowerVault 130T system by yourself.
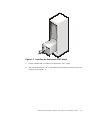
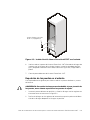
1. Lift the PowerVault 130T system onto the adjustable rails.
2. Push the PowerVault 130T system so that it slides along the adjustable rails until
it is seated against the front vertical rails of the rack (see Figure 1-7).
cage-nut tool
cage-nut

Dell PowerVault 130T Storage System Rack Kit Installation Guide 1-9
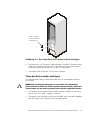
Figure 1-7. Installing the PowerVault 130T System
3. Unlock and open the front door of the PowerVault 130T system.
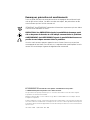
4. Remove the PowerVault 130T system door by pulling up on and removing the two
hinge pins (see Figure 1-8).

1-10 Dell PowerVault 130T Storage System Rack Kit Installation Guide
Figure 1-8. Removing the PowerVault 130T System Door
5. Thread the four 10-32 x 0.5-inch flanged Phillips-head screws into the holes in the
PowerVault 130T system, through the vertical rails, and into the cage nuts (see
Figure 1-9). Tighten the screws.
hinge pin

Dell PowerVault 130T Storage System Rack Kit Installation Guide 1-11
Figure 1-9. Securing the PowerVault 130T System to the Rack
6. Replace the PowerVault 130T system door by aligning the door hinges with the
hinges on the system enclosure. Insert the hinge pins and push them all the way
down (see Figure 1-8), securing the door.
7. Close the front door of the PowerVault 130T system.
Replacing the Doors on the Rack
Use the following procedure to replace the rack’s front and back doors.
WARNING: To prevent personal injury due to the size and weight of the
doors, never attempt to replace the doors by yourself.
1. Lift the front door into position, and align the hinges with the holes in the rack as
shown in Figure 1-3.
2. Slide the hinges into the holes in the rack until the hinge release levers lock the
hinges into position.
3. Close the door latch by rotating the handle counterclockwise until it stops, push
the handle in until it locks in position, and then slide the push button cover down
over the push button (see Figure 1-2).
4. Repeat steps 1 through 3 to install the back door.
10-32 x 0.5-inch flanged
Phillips-head screws (4)

1-12 Dell PowerVault 130T Storage System Rack Kit Installation Guide

www.dell.com
™
Kit de rack du système de stockage
Dell
™
PowerVault
™
130T
GUIDE D’INSTALLATION

Remarques, précautions et avertissements
Dans ce guide, des blocs de texte peuvent être accompagnés d’une icône et impri-
més en gras ou en italique. Ces blocs sont des remarques, des précautions et des
avertissements qui sont utilisés comme suit:
REMARQUE: Une REMARQUE indique des informations importantes qui vous aident
à utiliser votre ordinateur au mieux.
PRÉCAUTION: Une PRÉCAUTION signale la possibilité de dommage maté-
riel ou de pertes de données et vous indique comment éviter le problème.
AVERTISSEMENT: Un AVERTISSEMENT signale la possibilité de blessure cor-
porelle et vous indique comment éviter le problème.
Certains avertissements peuvent apparaître sous d’autres formats et ne pas être
accompagnés d’une icône. Dans de tels cas, la représentation spécifique de l’avertis-
sement est autorisée par l’agence de réglementation concernée.
____________________
Les informations de ce document sont sujettes à modification sans préavis.
© 1998 Dell Computer Corporation. Tous droits réservés.
La reproduction de quelque manière que ce soit sans l’autorisation écrite de Dell Computer
Corporation est strictement interdite.
Marques utilisées dans ce texte: Dell et le logo DELL et PowerVault est une marque de Dell
Computer Corporation.
D’autres marques et noms commerciaux peuvent être utilisés dans ce document pour faire réfé-
rence aux entités se réclamant de ces marques et de ces noms ou à leurs produits. Dell Computer
Corporation dénie tout intérêt propriétaire vis-à-vis des marques et des noms commerciaux autres
que les siens.
décembre 1998 P/N 1187D Rév. A01

Kit de rack du système de stockage Dell PowerVault 130T Guide d’installation 2-1
Kit de rack du système de
stockage Dell
™
PowerVault
™
130T
Guide d’installation
Ce guide fournit des instructions pour l’installation d’un kit de rack et d’un système
PowerVault 130T dans un rack Dell. Un kit de rack PowerVault 130T est nécessaire
pour chaque système PowerVault 130T installé dans le rack. Le kit de rack Power-
Vault 130T comprend les éléments suivants (voir la figure 2-1):
• Une paire de rails de montage ajustables
• Huit vis cruciformes à perçage conique 10-32 x 0,5 pouce
• Huit rondelles métalliques n
o
10
• Quatre écrous à cage 10-32
• Quatre vis cruciformes à collerette 10-32 x 0,5 pouce
• Un outil pour écrou à cage
REMARQUE: Les vis indiquées dans les illustrations et les étapes de la procédure
sont d’abord identifiées par la taille puis par le nombre de pas par pouce. Par exem-
ple, une vis cruciforme à perçage conique n
o
10 avec 32 pas par pouce est appelée
une vis 10-32.

2-2 Kit de rack du système de stockage Dell PowerVault 130T Guide d’installation
Figure 2-1. Contenu du kit de rack du système PowerVault 130T
Avant de commencer
Avant d’installer votre système PowerVault 130T dans le rack, lisez les informations
concernant la sécurité et les besoins en outillage dans les sous-sections suivantes.
Informations concernant la sécurité
Ce rack de système PowerVault 130T est conçu pour être installé dans un rack Dell
par des techniciens de service qualifiés. Si vous installez le kit dans un autre rack,
assurez-vous que le rack répond aux spécifications du rack Dell.
AVERTISSEMENT: Les systèmes serveurs Dell sont des composants qui doi-
vent être utilisés dans des racks Dell avec le kit de rack de système Dell
PowerVault 130T client. L’installation finale des serveurs Dell et des kits de
rack de système PowerVault 130T dans un rack de marque différente n’a
pas été approuvée par des agences de sécurité. Il est de la responsabilité
du client de faire évaluer conforme par une agence de sécurité certifiée la
combinaison finale de serveurs Dell et de kits de rack de système Power-
Vault 130T pour l’utilisation de racks de marques différentes.
Outil recommandé
Pour installer le kit de rack du système PowerVault 130T, utilisez un tournevis cruci-
forme n
o
2.
rails de montage ajustables (1 paire)
écrou à cage 10-32 (4
)
outil pour écrou à cage (1)
vis cruciforme à perçage
conique 10-32 x 0,5 pouce (8)
vis cruciforme à collerette
10-32 x 0,5 pouce (4)
rondelle
métallique n
o
10

Kit de rack du système de stockage Dell PowerVault 130T Guide d’installation 2-3
Installation du kit PowerVault 130T
Utilisez la procédure suivante pour installer le kit de rack du système
PowerVault 130T dans le rack:
1. Retirez les portes du rack.
2. Installez les rails de montage ajustables dans le rack.
REMARQUE: Si vous avez acheté un rack Dell avec votre système
PowerVault 130T, les rails de montage sont préinstallés dans le rack.
3. Installez les écrous à cage dans le rack.
4. Installez le système PowerVault 130T.
5. Remettez les portes en place.
Les sous-sections suivantes fournissent les instructions pour réaliser ces tâches.
Retrait des portes du rack
Vous devez retirer les portes avant et arrière du rack pour accéder à l’intérieur du rack
et éviter d’abîmer les portes lors de l’installation du kit. Utilisez la procédure suivante
pour retirer les portes.
AVERTISSEMENT: Pour éviter de vous blesser à cause de la taille et du
poids des portes, n’essayez jamais de retirer les portes tout(e) seul(e).
1. Ouvrez le loquet de la porte avant (voir la figure 2-2).
Faites glisser au maximum le couvercle du bouton-poussoir du loquet, appuyez
sur le bouton-poussoir, faites pivoter la poignée dans le sens des aiguilles d’une
montre jusqu’à ce que le loquet se débloque, puis tirez la porte pour l’ouvrir.

2-4 Kit de rack du système de stockage Dell PowerVault 130T Guide d’installation
Figure 2-2. Ouverture du loquet de la porte
2. Retirez la porte avant comme indiqué à la figure 2-3:
a. Quelqu’un doit tenir le haut de la porte pour la stabiliser. Quelqu’un d’autre
doit tenir le bas de la porte.
b. La personne tenant le bas de la porte doit appuyer sur le levier d’éjection de
charnière sur la charnière inférieure, puis tirer le bas de la porte hors du rack
sur plusieurs centimètres.
c. La personne tenant le haut de la porte doit appuyer sur le levier d’éjection de
charnière sur la charnière supérieure, puis tirer la porte hors du rack.
bouton-
poussoir
couvercle du
bouton-poussoir
poignée
Seite wird geladen ...
Seite wird geladen ...
Seite wird geladen ...
Seite wird geladen ...
Seite wird geladen ...
Seite wird geladen ...
Seite wird geladen ...
Seite wird geladen ...
Seite wird geladen ...
Seite wird geladen ...
Seite wird geladen ...
Seite wird geladen ...
Seite wird geladen ...
Seite wird geladen ...
Seite wird geladen ...
Seite wird geladen ...
Seite wird geladen ...
Seite wird geladen ...
Seite wird geladen ...
Seite wird geladen ...
Seite wird geladen ...
Seite wird geladen ...
Seite wird geladen ...
Seite wird geladen ...
Seite wird geladen ...
Seite wird geladen ...
Seite wird geladen ...
Seite wird geladen ...
Seite wird geladen ...
Seite wird geladen ...
Seite wird geladen ...
Seite wird geladen ...
Seite wird geladen ...
Seite wird geladen ...
Seite wird geladen ...
Seite wird geladen ...
-
 1
1
-
 2
2
-
 3
3
-
 4
4
-
 5
5
-
 6
6
-
 7
7
-
 8
8
-
 9
9
-
 10
10
-
 11
11
-
 12
12
-
 13
13
-
 14
14
-
 15
15
-
 16
16
-
 17
17
-
 18
18
-
 19
19
-
 20
20
-
 21
21
-
 22
22
-
 23
23
-
 24
24
-
 25
25
-
 26
26
-
 27
27
-
 28
28
-
 29
29
-
 30
30
-
 31
31
-
 32
32
-
 33
33
-
 34
34
-
 35
35
-
 36
36
-
 37
37
-
 38
38
-
 39
39
-
 40
40
-
 41
41
-
 42
42
-
 43
43
-
 44
44
-
 45
45
-
 46
46
-
 47
47
-
 48
48
-
 49
49
-
 50
50
-
 51
51
-
 52
52
-
 53
53
-
 54
54
-
 55
55
-
 56
56


Dell POWER VAULT 130T LIBRARY 130T Installationsanleitung
- Kategorie
- Rack-Zubehör
- Typ
- Installationsanleitung
- Dieses Handbuch eignet sich auch für