G.I. Sportz LVL LOADER Bedienungsanleitung
- Typ
- Bedienungsanleitung

HIGH PERFORMANCE LOADER SYSTEM
USER MANUAL

ENGLISH
Ū WARNING
This is not a toy. Misuse may cause serious injury or death.
Eye protection designed specically for paintball must be
worn by the user and persons within range. Recommend
18 years of age or older to purchase. Persons under 18
years of age must have adult supervision.
ŧ READ THIS MANUAL BEFORE USING.
TABLE OF CONTENTS
1. RULES FOR SAFE MARKER HANDLING
• Treat every marker as if it were loaded.
• Never look down the barrel of a paintball marker.
• Keep your nger off the trigger until ready to shoot.
• Never point the marker at anything you don’t wish to shoot.
• Keep the marker on “SAFE” until ready to shoot.
• Keep the barrel-blocking device in/on the marker’s muzzle
when not shooting.
• Always remove paintballs and propellant source before
disassembly.
• After removing propellant source, point marker in safe
direction and discharge until marker is degassed.
• Store the marker unloaded and degassed in a secure
place.
Designed for Paintball use only.
- Careless use or misuse may result in serious bodily injury or death!
- Eye protection designed for paintball must be worn by the user and all persons within range.
- Must be 18 years of age or older to operate or handle any paintball gun and paintball gun
accessories without adult or parental supervision.
- Read and understand all cautions, warnings, and operating manuals before using any paintball
gun or paintball gun accessory.
- Do not aim paintball gun at eyes or head of people or at animals.
- Paintball guns are to be used with Paintballs only
- To prevent fire or shock hazard, do not expose unit to rain or moisture.
- To prevent fire or shock hazard, do not immerse unit in liquids.
- To prevent fire or shock hazard, do not disassemble any electronic paintball device.
- The disposal of the battery used to power this product may be regulated in your area.
- Please conform to all local or state regulations with regard to battery disposal.
- Use common sense and have fun.
Any tampering with the unit voids your warranty. There are no consumer serviceable parts
inside the unit. The use of non factory authorized components within this product may
cause a fire or shock hazard.
IN NO EVENT SHALL SELLER BE LIABLE FOR ANY DIRECT, INCIDENTAL OR CONSEQUENTIAL
DAMAGES OF ANY NATURE, OR LOSSES OR EXPENSES RESULTING FROM ANY DEFECTIVE
PRODUCT OR THE USE OF ANY PRODUCT.
WARNING: This product contains one or more chemicals that are known to the State of California to
cause cancer and birth defects or other reproductive harm. Wash hands after handling.
PAINTBALL GUNS AND PAINTBALL GUN
ACCESSORIES ARE NOT TOYS!
WARNING!
Conçu pour une utilisation de Paintball seulement.
- Une manipulation sans précaution ou une mauvaise utilisation peut provoquer des lésions ou la mort !
- La protection oculaire conçue pour le paintball doit être portée par l’utilisateur et par toutes les personnes qui se
trouvent à distance de tir.
- Il faut avoir 18 ans ou plus pour manipuler ou utiliser une arme de paintball et les accessoires des armes de
paintball sans contrôle parental ou
la supervision d’un adulte.
- Lisez et comprenez toutes les précautions, avertissements et manuels d’utilisation avant d’utiliser toute arme de
paintball ou tout accessoire
d’arme de paintball.
- Ne visez pas les yeux ou la tête de personnes ou d’animaux avec l’arme de paintball.
- Les armes de paintball doivent être utilisées avec des billes de peinture.
- Pour éviter les risques d’incendie ou d’électrocution, n’exposez pas les unités à la pluie ou à l’humidité.
- Pour éviter les risques d’incendie ou d’électrocution, ne plongez pas les unités dans des liquides.
- Pour éviter les risques d’incendie ou d’électrocution, ne démontez aucun dispositif électronique de l’équipement
de paintball.
- Le traitement et l’élimination de la batterie utilisée pour fournir l’énergie nécessaire à ce produit doivent être
réglementés dans votre région.
- Veuillez respectez tous les règlements locaux ou gouvernementaux concernant le traitement et l’élimination des
batteries.
- Faites preuve de bons sens et amusez-vous.
Toute modification non autorisée de l’unité annule votre garantie. L’unité ne contient aucune pièce
réparable par l’utilisateur. L’utilisation, avec ce produit, de composants qui ne sont pas autorisés par le
fabricant peut provoquer un incendie ou une électrocution.
DANS AUCUN CAS LE VENDEUR N’EST RESPONSABLE DE DOMMAGES DIRECTS, ACCIDENTELS OU
CONSÉCUTIFS D’AUCUNE NATURE OU DE PERTES OU FRAIS ISSUS DE TOUT PRODUIT DEFFECTUEUX OU DE
L’UTILISATION DE TOUT PRODUIT.
AVERTISSEMENT : Ce produit peut contenir des produits chimiques de distribution d'un ou plusieurs connue à l'Etat
de Californie pour causer le cancer et la naissance ou toute autre reproducion troubles. Lavez vos mains après
manipulation.
LES ARMES DE PAINTBALL ET LES ACCESSOIRES DES
ARMES DE PAINTBALL NE SONT PAS DES JOUETS
AVERTISSEMENT !
Propósito juego de guerra con pelota de pintura.
- Su uso sin cuidado o de manera inadecuada puede provocar heridas graves o la muerte.
- Los usuarios y todas las personas situadas en el radio de alcance deben llevar puestos protectores oculares diseñados
específicamente para paintball.
- Se deben tener 18 años o más para manejar un arma de paintball sin la supervisión de los padres o de un adulto.
- Lea y comprenda todas las precauciones, advertencias y manuales de funcionamiento antes de usar un arma de
paintball o uno de sus accesorios.
- No apunte con el arma a los ojos o a la cabeza de una persona o animal.
- Las armas de paintball se deben usar únicamente con bolas de pintura.
- Para evitar riesgos de fuego o de descargas eléctricas, no exponga la unidad a la lluvia o a la humedad.
- Para evitar riesgos de fuego o de descargas eléctricas, no sumerja la unidad en líquidos
- Para evitar riesgos de fuego o de descargas eléctricas, no desmonte ningún dispositivo electrónico de paintball.
- Es posible que la eliminación de la batería usada para proporcionar energía a este producto esté regulada en su zona.
- Cumpla con toda la normativa local y estatal respecto a la eliminación de la batería.
- Use el sentido común y diviértase.
Cualquier alteración de la unidad anula su garantía. No hay piezas dentro de la unidad que puedan ser
reparadas por el usuario. El uso de componentes no autorizados de fábrica en este producto puede
provocar riesgos de fuego o de descarga eléctrica.
EN NINGÚN CASO EL VENDEDOR SERÁ REPONSABLE DE CUALQUIER DAÑO DIRECTO, ACCIDENTAL O
CONSECUENTE DE CUALQUIER NATURALEZA O DE CUALQUIER PÉRDIDA O GASTO RESULTANTE DE UN
PRODUCTO DEFECTUOSO O DEL USO DE CUALQUIER PRODUCTO.
ATENCIÓN: Este producto una o más sustancias químicas conocidas en el Estado de California por producir cáncer
y defectos congénitos u otros problemas relacionados con la reproducción. Lávese siempre las manos después
de manipularlo.
¡LAS ARMAS DE PAINTBALL Y SUS
ACCESORIOS NO SON JUGUETES!
¡ATENCIÓN!

• Follow warnings listed on propellant source for handling
and storage.
• Do not shoot at fragile objects such as windows.
• Every person within range must wear eye, face, and ear
protection designed specically to stop paintballs and
meeting ASTM standard F1776.
• Always measure your marker’s velocity before playing
paintball and never shoot at velocities in excess of 91.44
meters/sec (300 feet/second).
ŧ FULLY READ OWNER’S MANUAL BEFORE USING.
2. SPECIFICATIONS AND FEATURES
Specications:
Model: G.I. SPORTZ LEVEL Loader System
Power Requirements: 4 AA Batteries (not included)
Capacity: Approximately 200 paintballs
Weight (w/batteries): 19 ounces (539 grams)
Feed Rate: 15bps+
Construction: Composite
Features:
• Innovative feed system never jams
• No tools needed for assembly and disassembly
• Speed feed with rain lid included
• Break Beam optical sensors for on-demand activation
• Reliable and consistent hi-speed feed rates
• Low prole shape draws fewer loader hits
• Wide mouth makes re-loading easier
• Adjustable Speed setting for maximum performance
• Multi-color LED indicators
• Auto-Off after 30 minutes
• Low battery indication
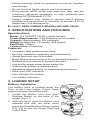
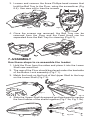
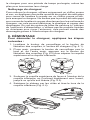
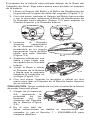
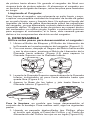
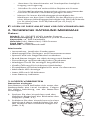
3. LOADER SETUP
Battery Installation
The battery pack is located under the
Floor of the Level loader. Follow these
steps to access the battery pack:
1. Locate the Button Lock and Shell
Release Button on the back of the
loader (Fig 3.1).
2. With one hand, push the Button Lock
upwards and with the other hand,
press the Shell Release Button inward
(Fig 3.2) to split the Upper Shell and
Lower Shell.
Fig 3.1
2
1
Fig 3.2

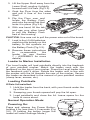
3. Lift the Upper Shell away from the
Lower Shell, angling it slightly
forward until it is free (Fig 3.3).
4. Grab the Floor from the sides
and pull it free of the Lower
Shell.
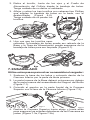
5. Flip the Floor over and
locate the Battery Pack
and note the small tab that
locks it in place (Fig 3.4).
6. With one hand, lift the tab
and use your other hand
to pull the Battery Pack
free of the housing.
CAUTION: Use care not to pull the power wire out of the board.
7. Load in the (4) AA batteries,
matching the polarity on the
battery to the symbols on
the Battery Pack (Fig 3.5).
8. Reverse these instructions
to re-assemble the
loader (or see Section
7 – ASSEMBLY for more
details).
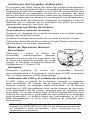
Loader to Marker Installation
The Level loader will load paintballs directly into the feedneck
of your paintball marker. Match the loader neck with the
feedneck on the top of your marker. Press the Level loader into
the feedneck until it stops. Rotate the loader until in-line with
the marker with the lid towards the rear of the marker. Secure
the loader as described in the manual of your paintball marker
(clamp lever, screws, etc).
Loading Paintballs
If Rain lid installed:
1. Hold the loader from the back, with your thumb under the
lip of the lid.
2. Sweeping your thumb upward will pop the lid open.
3. Load paintballs and close the lid. Leave space for the
balls to move about.
Normal Operation Mode:
Powering On:
Press and release the Power Button,
holding it for less than 2.5 seconds (Fig
3.6). (If holding the button longer the
loader will enter Settings Mode.)
2
1
Fig 3.3
Fig 3.4
Fig 3.5
Fig 3.6

Powering Off:
Press and hold the Power Button for approximately 2.5
seconds, until the LED glows red, and then release the button
to power off.
LED Indication and Battery Status:
The LED will indicate the battery status while the loader is on.
The loader battery status is detected when the loader is turned
on. If battery is good the LED will icker green when it is turned
on and glow solid green while the loader is on. If the battery is
low the LED will icker red when it is turned on and blink red
while the loader is on. The battery should be replaced if the LED
is blinking red when the loader is running.
Note: If LED On/Off setting is set to OFF the LED will
not glow while the loader is on. It will only show on
startup and shutdown.
Button Controls:
While the loader is On in Normal Operating Mode, users may
tap the button to jump start or restart feeding.
Empty Loader Logic:
You may notice when the loader runs empty for an elongated
amount of time, it will run at a slower speed then ultimately
stop running. This is to protect the electronics and save battery
power. After the loader has stopped due to being empty, the
button must be tapped to restart feeding. The eyes are disabled
in this state.
4. SETTINGS MODE
Entering Settings Mode
To enter settings mode press and hold the power button for
more than 8.0s until it begins to cycle through an array of colors.
Release the button and settings mode is activated.
Exiting Settings Mode
Press and hold the button for approx 4-5s. While holding the
button the led will turn off then shortly after turn solid red to
indicate shutdown. You may then release the button and the
LED will turn off.
Note: Programming Mode will “time out” and return to
Run Mode if it is idle for 4.0 seconds (no activity).
Settings Mode Navigation: Press and release the button to
cycle through the settings. The LED color and blinking speed
with change according to the setting selected.
Changing a setting:
Press and hold the button until the LED turns off then
release the button. While the LED is off you may enter the
new value you desire by pressing and releasing the button.

1 press & release = +1 to value. Each time the button is
pressed the LED will glow green. When the maximum limit of
the setting is reached the LED will glow Red/Green when the
button is pressed. When nished release button and wait. After
approximately 3 seconds the LED will blink the number of times
according to the value entered then ash an array of colors
indicating the setting has been saved.
Note: If a new value is not entered the setting will
remain at its previous value.
LED State Setting Range
Solid Red Speed 1 (low) to 3 (high)
Solid Green Eye Sensitivity 1 (low) to 3 (high)
Solid Red/Green LED On / Off 1 (OFF) or 2 (ON)
Slow Blinking Red Software Version see description below
Speed / Level (Default 3 = High): Determines maximum
rotation speed of loader. The higher the setting the higher the
rotation speed.
Eye Sensitivity (Default 2 = Medium): Under most
circumstances this setting should not need changing. Should
the loader be seeing false activations or not enough activations
due to paintballs or external factors this setting may need
adjustment. Adjusting too high may cause more activations and
low will have the opposite effect.
LED On / Off (default 2 = ON): Allows user to have LED off
during normal operation for night games or as desired
Software Version (No Default): This setting indicates software
version on the board by blinking the LED in a specic color and
count combination.
For example software version 2.3 would blink Green 2 twice
and Red 3 times. Green blinks indicate the rst number in the
version and red blinks indicate the number after the decimal
point.
LVL Factory Reset:
Performing a Factory Reset on the LVL loader will change all
the settings back to the default values.
To perform a factory reset, follow these steps:
1. Turn the loader ON in the normal manner, by pressing
and releasing the Power Button.
2. Once the loader is ON, press and hold the Power Button.
You will see the light turn RED, and continue to hold the
power button for approximately 10 more seconds until
the LED light blinks GREEN 3 times. This indicates the
Factory Reset is complete and you may now release the
Power Button.

5.GENERAL MAINTENANCE
Emptying the Loader for Storage
With the loader turned OFF, turn it upside down to dump the
paintballs out. Do not store your Level loader with any paintballs
remaining inside. When storing the loader for an extended
period of time, remove the batteries to save their charge.
Cleaning the Loader
To clean the loader, use only a clean, dry cloth, or apply a
small amount of goggle lens cleaner to a clean, dry cloth and
wipe clean. Do not apply goggle lens cleaner directly to loader
surfaces, as too much contact will deteriorate plastic and cause
damage. If any paintballs break inside the hopper; do not use
any liquids or chemicals to rinse out the hopper; doing so will
cause severe damage to the loader electronics.
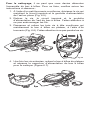
6. DISASSEMBLY
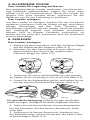
Use these steps to disassemble the loader:
1. Locate the Button Lock and Shell Release Button on the
back of the loader (Fig 6.1).
2. With one hand, push the Button Lock upwards and with
the other hand, press the Shell Release Button inward
(Fig 6.2) to split the Upper Shell and Lower Shell.
3. Lift the Upper Shell away from the Lower Shell, angling it
slightly forward until it is free (Fig 6.3).
4. Grab the Floor from the sides and pull it free of the Lower
Shell (Fig 6.4).
For cleaning, you may need to disassemble the Tray assembly.
To do this, please follow these steps:
1. Using a small Phillips-head screwdriver, loosen the screw
that holds the Eye Board and Eye Feedneck in place (Fig
6.5).
2. Remove the screw, Eye Board and Eye Feedneck from
the Ball Tray. Use care not to damage the wiring.
Fig 6.1
2
1
Fig 6.2
2
1
Fig 6.3
Fig 6.4

3. Loosen and remove the three Phillips-head screws that
hold the Ball Tray to the Floor, using the screwdriver (Fig
6.6). Use care not to lose the screws
4. Once the screws are removed, the Ball Tray can be
removed from the Floor and the Feed Hood can be
separated from the Ball Tray for cleaning (Fig 6.7).
7. ASSEMBLY
Use these steps to re-assemble the loader:
1. Hold the Floor from the sides and place it into the Lower
Shell rear-ward rst.
2. The rear of the Floor should be placed under the backside
of the Button Lock assembly (Fig 7.1).
3. Match the hook on the front of the Upper Shell to the loop
on the Lower Shell (Fig 7.2).
4. Slide the Upper Shell downward and backward to secure
the front halves of the shells together (Fig 7.3a, Fig 7.3b).
Fig 6.5
Fig 6.6
Fig 6.7
Fig 7.1
Fig 7.2
Fig 7.3a
Fig 7.3b

5. Squeeze the two shells together at the back of the loader
and press the upper part of the Shell Release Button to
lock them together (Fig 7.4).
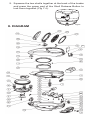
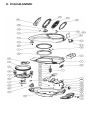
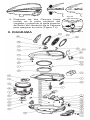
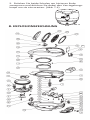
8. DIAGRAM
Fig 7.4
49
50

9. PARTS LIST
Diagram #
Part Description
SKU #
1
Gear Top Ring
79900
2
Lower Bracket
79899
3
Ball Tray
79995
4
Floor (Black)
79981
5
Back Cover (Black)
79989
6
Eye Feedneck
79905
7
Drive Gear Top
79906
8
Drive Gear Bottom
79907
9
Main Gear
79908
10
Bottom Shell
79991
11a
Top Shell - 200ct
79992
11b
Top Shell - 250ct
79997
12a
Front Lock Top - 200ct Shell
79911
12b
Front Lock Top - 250ct Shell
79998
13
Rear Lock Slide
79912
14
Lid Bracket
79913
15
Front Lock Bottom
79914
16
On/Off Button
79915
17
Release Button Block (Black)
79983
18
Shell Release Button (Black)
79984
19
Slide Cover (Black)
79985
20
Feed Hood
79994
21
On/Off Button Housing
79920
22
Speed feed lock ring
79993
23
Lid
79922
24
Rain Lid
79923
25
Speed Feed (Black)
80001
26
Feed Ring
79925
27
Motor Cushion
79926
28
Circuit Board
79927
29
Eye Board
79928
30
Motor
79929
31
Battery Pack
79930
32
Gear Bearing Pin
79931
33
Worm Gear
79932
34
Button Release Pin
79933
35
Lid Pin
79934
36
Drive Pulley
79935
37
Pulley O-ring 015 BUNA
79936
38
Bearing 6.35x2.74
79937
39
Lid Spring
79938
40
Button Release Spring
79939
41
Slide Spring
79940
42
Screw BH 2 x 4
79941
43
Screw BH 2.6 x 6
79942
44
Screw BH 2.6 x 8
79943
45
Screw BH 2.6 x 14
79944
46
Screw BH 2.6 x 16
79945
47
Screw BH 3 x 6
79946
48
Screw BH P+3.8 3PT ZB(S) W/7.5
79947
49
Screw BH 2.6 x 18
79974
50a
Lid Lock - 200ct Shell
79996
50b
Lid Lock - 250ct Shell
79999

10. TROUBLESHOOTING
Make sure batteries are installed in correct orientation shown
in battery pack. Conrm that the battery pack wire harness is
connected to the pack and the circuit board.
Use only 4 quality alkaline or lithium AA batteries. Using budget
batteries will severely affect the performance of the loader. Note
that some battery cells may be bad from the package.
Make sure there are no foreign objects trapped in the feed area
preventing balls from being fed.
Clean loader of excessive paint and debris.
Ensure that the loader settings are set properly for your playing
conditions (see settings mode).
Ensure feedneck between eyes is clean allowing eyes to
properly detect each other.
Ensure exible Friction Ring is secured properly in the Drive
Gear and is not spinning freely in Drive Gear. If necessary
remove Friction Ring and clean the ring and gear.
11. WARRANTY
G.I. SPORTZ is dedicated to providing you with products of the
highest quality and the industry’s best product support available
for satisfactory play.
G.I. SPORTZ
11723 Lime Kiln Rd.
Neosho, MO 64850
www.gisportz.com
G.I. SPORTZ Paintball is a brand of G.I. SPORTZ Direct, LLC.
PATENT(S): See www.paintballsolutions.com/patents © 2016
G.I. SPORTZ. All rights reserved. This G.I. SPORTZ product is
protected by one or more United States patents. G.I. SPORTZ
Trademarks, Designs and Copyrights are protected by one or
more United States patents and International Law. For more
information contact G.I. SPORTZ at info@ GISportz.com
Warranty Registration
To activate the Limited Warranty, you must register the
Loader within thirty (30) days of the date of original retail
sale by completing the form found of the Paintball Solutions
website: http://www.paintballsolutions.com/index.php/warranty-
registration/
The Limited Warranty for G.I. SPORTZ Accessories does not
require activation or registration; by registering the Loader, you
activate the warranty for the Accessories.
Limited Warranty
G.I. SPORTZ warrants to the original purchaser that it will make
any repairs or replacements necessary to correct defects in

material or workmanship, at no charge to you, for the Loader
for a period of one (1) year from the date of original retail sale.
All G.I. SPORTZ asks is that you properly maintain and care
for the Loader and Accessories (collectively, the “Product”) and
that you have warranty repairs performed by G.I. SPORTZ or
a G.I. SPORTZ Certied Tech Center. This Limited Warranty is
non-transferable, and it does not cover damage or defects to
the Product caused by (a) improper maintenance; (b) alteration
or modication; (c) unauthorized repair; (d) accident; (e) abuse
or misuse; (f) neglect or negligence; and/or (g) normal wear
and tear. G.I. SPORTZ does not authorize any person or
representative to assume or grant any other warranty obligation
with the sale of this Product.
THIS IS THE ONLY EXPRESS WARRANTY GIVEN WITH
THE PURCHASE OF THIS PRODUCT; ANY AND ALL OTHER
EXPRESS WARRANTIES ARE DISCLAIMED. THE IMPLIED
WARRANTIES OF MERCHANTABILITY AND FITNESS FOR A
PARTICULAR PURPOSE ARE LIMITED TO THE APPLICABLE
LIMITED WARRANTY PERIOD SET FORTH HEREIN, AND
NO WARRANTIES, WHETHER EXPRESS OR IMPLIED,
SHALL APPLY AFTER EXPIRATION OF SUCH PERIOD.
Some states and nations do not allow limitations on the duration
of implied warranties, so the above limitation may not apply to
you. The sole and exclusive liability of G.I. SPORTZ and/or its
authorized dealers under this Limited Warranty shall be for the
repair or replacement of any part or assembly determined to be
defective in material or workmanship.
G.I. SPORTZ SHALL NOT BE LIABLE FOR, AND YOU
EXPRESSLY DISCLAIM, ANY DIRECT, INDIRECT,
CONSEQUENTIAL OR INCIDENTAL DAMAGES
(COLLECTIVELY, “DAMAGES”) ARISING OUT OF THE SALE
OR USE OF, OR YOUR INABILITY TO USE, THE PRODUCT.
NO PAYMENT OR OTHER COMPENSATION WILL BE MADE
FOR DAMAGES, INCLUDING INJURY TO PERSON OR
PROPERTY OR LOSS OF REVENUE WHICH MIGHT BE
PAID, INCURRED OR SUSTAINED BY REASON OF THE
FAILURE OF ANY PART OR ASSEMBLY OF THE PRODUCT.
Some states and nations do not allow the exclusion or limitation
of incidental or consequential damages, so the above limitation
or exclusion may not apply to you. This warranty gives you
specic legal rights, and you may also have other rights that
may vary from state to state or nation to nation.
Warranty and Non-Warranty Repairs
For Warranty parts, service, information or manuals in other
languages, (where applicable) contact Paintball Solutions:
www.paintballsolutions.com
E-Mail: [email protected]
US: 1-800-220-3222
11723 Lime Kiln Rd., Neosho, MO 64850

When shipping the Product to G.I. SPORTZ for warranty or non-
warranty repair:
• If you have aftermarket parts on your Loader, please test
the Loader with original stock parts before returning the
Loader for service or repair.
• Always unload and remove the paintballs from the loader.
• Ship the Product to the G.I. SPORTZ address identied.
• You must pre-pay postage and delivery charges, use a
carrier that provides tracking information.
• Provide the date of purchase for the Product.
• Briey describe the repair requested.
• Include your name, return address and a telephone number
where you can be reached during normal business hours,
if possible.
G.I. SPORTZ makes every effort to complete its repair work
within twenty-four (24) hours of receipt. G.I. SPORTZ will return
the Product to you via regular ground UPS. If you wish to have
it returned using a faster service, you can request NEXT DAY
AIR UPS or SECOND DAY AIR UPS, but you will be charged for
this service and must include your credit card number with the
expiration date. Your credit card will be charged the difference
in additional cost over regular ground shipping service.

FRANÇAIS
Ū AVERTISSEMENT
Ceci n’est pas un jouet. Une mauvaise utilisation peut
causer des blessures graves ou la mort. Les utilisateurs
et personnes se trouvant à portée de tir doivent porter
des lunettes de protection spécialement conçues pour le
paintball. Les personnes qui achètent cet article devraient
être âgées de 18 ans au moins. Les personnes âgées de
moins de 18 ans doivent être sous la supervision d’adultes.
ŧ LIRE CE MANUEL AVANT L’EMPLOI.
1. RÈGLES POUR UNE MANIPULATION
SÉCURITAIRE DU MARQUEUR
• Traitez chaque marqueur comme s’il était chargé.
• Ne regardez jamais dans le canon d’un marqueur de
paintball.
• Ne placez le doigt sur la détente que lorsque vous êtes
prêt à tirer.
• Ne visez en aucun cas avec le marqueur un objet sur
lequel vous ne souhaitez pas tirer.
• Maintenez le marqueur en position de « Sécurité » jusqu’à
ce que vous soyez prêt à tirer.
• Maintenez le dispositif de blocage du canon dans/sur la
bouche du canon du marqueur lorsque vous ne tirez pas.
• Retirez toujours les billes et la source de propulsion avant
le démontage.
Designed for Paintball use only.
- Careless use or misuse may result in serious bodily injury or death!
- Eye protection designed for paintball must be worn by the user and all persons within range.
- Must be 18 years of age or older to operate or handle any paintball gun and paintball gun
accessories without adult or parental supervision.
- Read and understand all cautions, warnings, and operating manuals before using any paintball
gun or paintball gun accessory.
- Do not aim paintball gun at eyes or head of people or at animals.
- Paintball guns are to be used with Paintballs only
- To prevent fire or shock hazard, do not expose unit to rain or moisture.
- To prevent fire or shock hazard, do not immerse unit in liquids.
- To prevent fire or shock hazard, do not disassemble any electronic paintball device.
- The disposal of the battery used to power this product may be regulated in your area.
- Please conform to all local or state regulations with regard to battery disposal.
- Use common sense and have fun.
Any tampering with the unit voids your warranty. There are no consumer serviceable parts
inside the unit. The use of non factory authorized components within this product may
cause a fire or shock hazard.
IN NO EVENT SHALL SELLER BE LIABLE FOR ANY DIRECT, INCIDENTAL OR CONSEQUENTIAL
DAMAGES OF ANY NATURE, OR LOSSES OR EXPENSES RESULTING FROM ANY DEFECTIVE
PRODUCT OR THE USE OF ANY PRODUCT.
WARNING: This product contains one or more chemicals that are known to the State of California to
cause cancer and birth defects or other reproductive harm. Wash hands after handling.
PAINTBALL GUNS AND PAINTBALL GUN
ACCESSORIES ARE NOT TOYS!
WARNING!
Conçu pour une utilisation de Paintball seulement.
- Une manipulation sans précaution ou une mauvaise utilisation peut provoquer des lésions ou la mort !
- La protection oculaire conçue pour le paintball doit être portée par l’utilisateur et par toutes les personnes qui se
trouvent à distance de tir.
- Il faut avoir 18 ans ou plus pour manipuler ou utiliser une arme de paintball et les accessoires des armes de
paintball sans contrôle parental ou
la supervision d’un adulte.
- Lisez et comprenez toutes les précautions, avertissements et manuels d’utilisation avant d’utiliser toute arme de
paintball ou tout accessoire
d’arme de paintball.
- Ne visez pas les yeux ou la tête de personnes ou d’animaux avec l’arme de paintball.
- Les armes de paintball doivent être utilisées avec des billes de peinture.
- Pour éviter les risques d’incendie ou d’électrocution, n’exposez pas les unités à la pluie ou à l’humidité.
- Pour éviter les risques d’incendie ou d’électrocution, ne plongez pas les unités dans des liquides.
- Pour éviter les risques d’incendie ou d’électrocution, ne démontez aucun dispositif électronique de l’équipement
de paintball.
- Le traitement et l’élimination de la batterie utilisée pour fournir l’énergie nécessaire à ce produit doivent être
réglementés dans votre région.
- Veuillez respectez tous les règlements locaux ou gouvernementaux concernant le traitement et l’élimination des
batteries.
- Faites preuve de bons sens et amusez-vous.
Toute modification non autorisée de l’unité annule votre garantie. L’unité ne contient aucune pièce
réparable par l’utilisateur. L’utilisation, avec ce produit, de composants qui ne sont pas autorisés par le
fabricant peut provoquer un incendie ou une électrocution.
DANS
AUCUN CAS LE VENDEUR N’EST RESPONSABLE DE DOMMAGES DIRECTS, ACCIDENTELS OU
CONSÉCUTIFS D’AUCUNE NATURE OU DE PERTES OU FRAIS ISSUS DE TOUT PRODUIT DEFFECTUEUX OU DE
L’UTILISATION DE TOUT PRODUIT.
AVERTISSEMENT : Ce produit peut contenir des produits chimiques de distribution d'un ou plusieurs connue à l'Etat
de Californie pour causer le cancer et la naissance ou toute autre reproducion troubles. Lavez vos mains après
manipulation.
LES ARMES DE PAINTBALL ET LES ACCESSOIRES DES
ARMES DE PAINTBALL NE SONT PAS DES JOUETS
AVERTISSEMENT !
Propósito juego de guerra con pelota de pintura.
- Su uso sin cuidado o de manera inadecuada puede provocar heridas graves o la muerte.
- Los usuarios y todas las personas situadas en el radio de alcance deben llevar puestos protectores oculares diseñados
específicamente para paintball.
- Se deben tener 18 años o más para manejar un arma de paintball sin la supervisión de los padres o de un adulto.
- Lea y comprenda todas las precauciones, advertencias y manuales de funcionamiento antes de usar un arma de
paintball o uno de sus accesorios.
- No apunte con el arma a los ojos o a la cabeza de una persona o animal.
- Las armas de paintball se deben usar únicamente con bolas de pintura.
- Para evitar riesgos de fuego o de descargas eléctricas, no exponga la unidad a la lluvia o a la humedad.
- Para evitar riesgos de fuego o de descargas eléctricas, no sumerja la unidad en líquidos
- Para evitar riesgos de fuego o de descargas eléctricas, no desmonte ningún dispositivo electrónico de paintball.
- Es posible que la eliminación de la batería usada para proporcionar energía a este producto esté regulada en su zona.
- Cumpla con toda la normativa local y estatal respecto a la eliminación de la batería.
- Use el sentido común y diviértase.
Cualquier alteración de la unidad anula su garantía. No hay piezas dentro de la unidad que puedan ser
reparadas por el usuario. El uso de componentes no autorizados de fábrica en este producto puede
provocar riesgos de fuego o de descarga eléctrica.
EN NINGÚN CASO EL VENDEDOR SERÁ REPONSABLE DE CUALQUIER DAÑO DIRECTO, ACCIDENTAL O
CONSECUENTE DE CUALQUIER NATURALEZA O DE CUALQUIER PÉRDIDA O GASTO RESULTANTE DE UN
PRODUCTO DEFECTUOSO O DEL USO DE CUALQUIER PRODUCTO.
ATENCIÓN: Este producto una o más sustancias químicas conocidas en el Estado de California por producir cáncer
y defectos congénitos u otros problemas relacionados con la reproducción. Lávese siempre las manos después
de manipularlo.
¡LAS ARMAS DE PAINTBALL Y SUS
ACCESORIOS NO SON JUGUETES!
¡ATENCIÓN!

• Après avoir retiré la source de propulsion, visez le
marqueur dans une direction sûre déchargez-le jusqu’à ce
qu’il soit entièrement dégazé.
• Entreposez le marqueur déchargé et dégazé dans un
endroit sûr.
• Respectez les avertissements gurant sur la source de
propulsion pour la manutention et le stockage.
• Ne tirez pas sur des objets fragiles comme les fenêtres.
• Toute personne se trouvant à portée de tir doit porter des
protections pour les yeux, le visage et les oreilles conçues
spéciquement pour arrêter les billes de paintball et
conformes à la norme F1776 de l’ASTM.
• Mesurez toujours la vitesse de votre marqueur avant
de jouer au paintball et ne tirez jamais à des vitesses
supérieures à 91,44 mètres (300 pieds par seconde).
ŧ VEUILLEZ LIRE LE MANUEL D’UTILISATION EN
ENTIER AVANT TOUTE MANIPULATION.
2. SPÉCIFICATIONS ET CARACTÉRISTIQUES
Spécications :
Modèle : système de chargeur à plat G.I. SPORTZ
Alimentation électrique requise : 4 piles AA (non comprises)
Capacité : environ 200 billes
Poids (avec les piles) : 539 grammes (19 onces)
Taux d’alimentation : > 15 b/s
Matériaux : composite
Caractéristiques :
• Système d’alimentation innovant qui ne s’enraie jamais
• Aucun outil nécessaire pour le montage ou le démontage
• Alimentation rapide avec couvercle de protection contre
la pluie inclus
• Capteurs photoélectriques de rupture de faisceau pour
activation à la demande
• Taux d’alimentation haute vitesse ables et cohérents
• Prol mince, réduit les risques d’être touché
• Col large pour un rechargement plus facile
• Réglage de la vitesse pour des performances maximales
• Voyants lumineux de plusieurs couleurs
• Arrêt automatique après 30 minutes
• Indication de piles faible
3. CONFIGURATION DU CHARGEUR
Installation des piles
Le bloc-piles se trouve sous le plateau du chargeur à plat.
Suivez les étapes ci-dessous pour accéder au bloc-piles :

1. Localisez le bouton de verrouillage et le bouton de
libération des coquilles, à l’arrière du chargeur (Fig. 3.1).
2. D’une main, poussez le bouton de verrouillage vers
le haut et, de l’autre main, appuyez sur le bouton de
libération des coquilles (Fig. 3.2) pour séparer la coquille
supérieure et la coquille inférieure.
3. Soulevez la coquille supérieure de façon à l’écarter de la
coquille inférieure, en l’inclinant légèrement vers l’avant,
jusqu’à ce qu’elle soit libérée (Fig. 3.3).
4. Saisissez le plateau par les côtés et tirez-le hors de la
coquille inférieure.
5. Retournez le plateau et localisez le bloc-piles.
Remarquez la petite languette qui sert à le verrouiller en
place (Fig. 3.4).
6. Soulevez la languette d’une main et, de l’autre, retirez le
bloc-piles de son logement.
ATTENTION : prenez garde à ne pas arracher le l
d’alimentation de la carte du circuit imprimé.
7. Installez-les (4) piles AA, en faisant correspondre les
polarités des piles avec les symboles sur le bloc-piles
(Fig. 3.5).
8. Pour remonter le
chargeur, suivez ces
instructions en sens
inverse (ou reportez-
vous à la Section 7
- ASSEMBLAGE pour
plus de détails).
Installation du chargeur sur le marqueur
Le chargeur à plat alimente les billes de peinture directement
dans la goulotte d’alimentation de votre marqueur de paintball.
Alignez la goulotte du chargeur avec la goulotte d’alimentation
sur le dessus de votre marqueur. Appuyez le chargeur à plat
Fig 3.5
2
1
Fig 3.3
Fig 3.1
2
1
Fig 3.2
Fig 3.4

dans la goulotte d’alimentation jusqu’à ce qu’elle bloque. Faites
tourner le chargeur jusqu’à ce qu’il soit aligné avec le marqueur,
avec le couvercle vers l’arrière du marqueur. Fixez le chargeur
comme décrit dans le manuel de votre marqueur de paintball
(levier de serrage, vis, etc.).
Chargement des billes
Si le couvercle de protection contre la pluie est installé :
1. Maintenez le chargeur par l’arrière, en plaçant votre
pouce sous le rebord du couvercle.
2. Faites glisser votre pouce vers le haut et le couvercle
s’ouvre.
3. Chargez des billes de peinture, puis refermez le couvercle.
Laissez de l’espace pour que les billes puissent bouger.
Mode de fonctionnement normal :
Mise en marche :
Appuyez, puis relâchez le bouton
marche-arrêt, en le maintenant enfoncé
pendant moins de 2,5 secondes (si vous
maintenez le bouton enfoncé pendant
plus longtemps, le Chargeur se met en
mode de réglages) (Fig. 3.6).
Arrêt :
Appuyez sur le bouton marche-arrêt et maintenez-le enfoncé
pendant environ 2,5 secondes, jusqu’à ce que le voyant
lumineux devienne rouge, puis relâchez le bouton pour éteindre
l’appareil.
Voyant lumineux et état des piles :
Le voyant lumineux indique l’état des piles lorsque que le
chargeur est allumé. L’état des piles du chargeur est détecté à la
mise en marche du chargeur. Si les piles sont bonnes, le voyant
lumineux clignote en vert pendant l’activation du chargeur, puis
reste allumé en vert en continu tant que le chargeur est en
marche. Si les piles sont faibles, le voyant lumineux clignote
en rouge pendant l’activation du chargeur, puis continue à
clignoter en rouge tant que le chargeur est en marche. Les piles
ont besoin d’être remplacées si le voyant lumineux clignote en
rouge lorsque le chargeur est en marche.
Remarque : si le réglage Marche-arrêt du voyant
lumineux est réglé sur Désactivé, le voyant lumineux
ne s’allume pas lorsque le chargeur est en marche.
Il s’allume uniquement lors de la mise en marche
et l’arrêt.
Boutons :
Lorsque le chargeur est en marche en mode de fonctionnement
normal, l’utilisateur peut appuyer sur le bouton pour démarrer
ou redémarrer l’alimentation.
Fig 3.6

Logique de vidage du chargeur :
Vous remarquerez peut-être que lorsque le chargeur est
presque vide pendant un certain temps, il se met à fonctionner
à une vitesse plus lente, puis nalement s’arrête de fonctionner.
Cela a pour but de protéger les composants électroniques et
d’économiser les piles. Une fois le chargeur vide, il s’arrête
et l’utilisateur doit appuyer sur le bouton pour redémarrer
l’alimentation. Dans cet état, les yeux sont désactivés.
4. MODE RÉGLAGES
Accès au mode Réglages
Pour accéder au mode Réglages, appuyez sur le bouton
marche-arrêt et maintenez-le enfoncé pendant plus de
8,0 secondes, jusqu’à ce qu’il commence à faire déler une
grande variété de couleurs. Relâchez alors le bouton, le mode
Réglages est activé.
Quitter le mode Réglages
Appuyez sur le bouton et maintenez-le enfoncé pendant environ
4-5-secondes. Tandis que vous maintenez le bouton enfoncé,
le voyant lumineux s’éteint, puis se rallume peu de temps après
en rouge continu pour indiquer l’arrêt du chargeur. Vous pouvez
alors relâcher le bouton et le voyant s’éteint.
Remarque : Le mode Programmation revient
automatiquement en mode Exécution au bout de 4
secondes d'inactivité.
Navigation dans le mode Réglages : appuyez sur le bouton
et maintenez-le enfoncé pour faire déler les paramètres. La
couleur du voyant lumineux et sa fréquence de clignotement
changent selon le paramètre sélectionné.
Modication d’un paramètre :
Appuyez sur le bouton et maintenez-le enfoncé jusqu’à ce
que le voyant s’éteigne. Relâchez alors le bouton. Lorsque
le voyant s’éteint, vous pouvez entrer la nouvelle valeur
souhaitée en appuyant, puis en relâchant le bouton. 1 Appuyez
et relâchez le bouton = ajoute +1 à la valeur. Chaque fois que
le bouton est enfoncé, le voyant s’allume en vert. Quand la
limite maximum du paramètre est atteinte, le voyant s’allume
en rouge/vert lorsque le bouton est enfoncé. Lorsque vous
avez terminé, relâchez le bouton et patientez. Après environ
3 secondes, le voyant lumineux se met à clignoter le nombre de
fois correspondant à la valeur saisie, puis clignote une série de
couleurs pour indiquer que le paramètre a été enregistré.
Remarque : si une nouvelle valeur du paramètre n’est
pas saisie, celui-ci conserve sa valeur précédente.

État du voyant Paramètre Valeurs
Rouge continu Vitesse 1 (faible) à 3 (élevée)
Vert continu Sensibilité de l’œil 1 (faible) à 3 (élevée)
Rouge/vert continu Marche/arrêt du voyant 1 (Désactivé) ou 2 (Activé)
Rouge clignotant
lentement
Version du logiciel
voir la description
ci-dessous
Vitesse/niveau (défaut = 3 = élevé) : détermine la vitesse de
rotation maximale du chargeur. Plus la valeur est élevée plus la
vitesse de rotation est rapide.
Sensibilité de l’œil (défaut = 2 = moyenne) : sauf circonstances
exceptionnelles, ce paramètre n’a pas besoin d’être changé. Si
le chargeur fait preuve de fausses activations ou ne présente
pas sufsamment d’activations à cause de billes ou de facteurs
externes, il peut s’avérer nécessaire de changer ce paramètre.
Un réglage trop élevé peut entraîner trop d’activations, tandis
qu’un réglage trop faible peut avoir l’effet inverse.
Activation/désactivation du voyant lumineux (défaut = 2
= activé) : permet à l’utilisateur de garder le voyant lumineux
éteint pendant le fonctionnement normal, lors de jeux nocturnes
ou lorsque cela est préférable.
Version du logiciel (aucune par défaut) : ce paramètre
indique la version du logiciel sur la carte en faisant clignoter le
voyant lumineux dans une combinaison spécique de couleurs
et de clignotements.
Par exemple, pour la version 2.3 du logiciel, le voyant lumineux
clignote 2 fois en vert et 3 fois en rouge. Le clignotement en
vert indique le premier numéro de la version, tandis que le
clignotement en rouge indique le numéro après la virgule.
Réinitialisation aux valeurs d'usine du LVL :
En réinitialisant le chargeur LVL aux valeurs d'usine, vous
revenez aux réglages par défaut.
Pour procéder à une réinitialisation aux valeurs d'usine,
procédez ainsi :
1. Activez le chargeur de manière classique, en pressant
puis en relâchant le bouton de marche.
2. Une fois le chargeur activé, maintenez le bouton de
marche enfoncé. La LED passe au ROUGE, maintenez le
bouton de marche enfoncé encore 10 s, environ, jusqu'à
ce que la LED clignote 3 fois en VERT. Ceci indique que
la réinitialisation aux valeurs d'usine est terminée. Vous
pouvez alors relâcher le bouton de marche.
5. ENTRETIEN GÉNÉRAL
Vider le chargeur avant de le ranger
Vériez que le chargeur est éteint, puis retournez-le pour vider
les billes de peinture. Ne rangez pas votre chargeur à plat avec
des billes de peinture restant à l’intérieur. Lorsque vous rangez

le chargeur pour une période de temps prolongée, retirez les
piles pour économiser leur charge.
Nettoyage du chargeur
Pour nettoyer le chargeur, utilisez uniquement un chiffon propre
et sec, ou appliquez une petite quantité de produit de nettoyage
pour verres de lunettes à coques sur un chiffon propre et sec,
puis essuyez le chargeur. Ne mettez pas le produit de nettoyage
pour verres de lunettes à coques directement sur les surfaces du
chargeur, car cela pourrait détériorer le plastique et causer des
dommages. En cas de rupture de billes de peinture à l’intérieur
de l’entonnoir d’alimentation, n’utilisez pas de produits liquides
ou chimiques pour rincer l’entonnoir, cela pourrait causer des
dommages graves à l’électronique du chargeur.
6. DÉMONTAGE
Pour démonter le chargeur, appliquez les étapes
suivantes :
1. Localisez le bouton de verrouillage et le bouton de
libération des coquilles, à l’arrière du chargeur (Fig. 6.1).
2. D’une main, poussez le bouton de verrouillage vers le
haut et, de l’autre main, appuyez sur le bouton de
libération des coquilles (Fig. 6.2) pour séparer la coquille
supérieure et la coquille inférieure.
3. Soulevez la coquille supérieure de façon à l’écarter de la
coquille inférieure, en l’inclinant légèrement vers l’avant,
jusqu’à ce qu’elle soit libérée (Fig. 6.3).
4. Saisissez le plateau par les côtés et tirez-le hors de la
coquille inférieure (Fig. 6.4).
Fig 6.1
2
1
Fig 6.3
2
1
Fig 6.2
Fig 6.4
Seite wird geladen ...
Seite wird geladen ...
Seite wird geladen ...
Seite wird geladen ...
Seite wird geladen ...
Seite wird geladen ...
Seite wird geladen ...
Seite wird geladen ...
Seite wird geladen ...
Seite wird geladen ...
Seite wird geladen ...
Seite wird geladen ...
Seite wird geladen ...
Seite wird geladen ...
Seite wird geladen ...
Seite wird geladen ...
Seite wird geladen ...
Seite wird geladen ...
Seite wird geladen ...
Seite wird geladen ...
Seite wird geladen ...
Seite wird geladen ...
Seite wird geladen ...
Seite wird geladen ...
Seite wird geladen ...
Seite wird geladen ...
Seite wird geladen ...
Seite wird geladen ...
Seite wird geladen ...
Seite wird geladen ...
Seite wird geladen ...
Seite wird geladen ...
-
 1
1
-
 2
2
-
 3
3
-
 4
4
-
 5
5
-
 6
6
-
 7
7
-
 8
8
-
 9
9
-
 10
10
-
 11
11
-
 12
12
-
 13
13
-
 14
14
-
 15
15
-
 16
16
-
 17
17
-
 18
18
-
 19
19
-
 20
20
-
 21
21
-
 22
22
-
 23
23
-
 24
24
-
 25
25
-
 26
26
-
 27
27
-
 28
28
-
 29
29
-
 30
30
-
 31
31
-
 32
32
-
 33
33
-
 34
34
-
 35
35
-
 36
36
-
 37
37
-
 38
38
-
 39
39
-
 40
40
-
 41
41
-
 42
42
-
 43
43
-
 44
44
-
 45
45
-
 46
46
-
 47
47
-
 48
48
-
 49
49
-
 50
50
-
 51
51
-
 52
52


G.I. Sportz LVL LOADER Bedienungsanleitung
- Typ
- Bedienungsanleitung
in anderen Sprachen
Andere Dokumente
-
Empire AXE PRO Bedienungsanleitung
-
-
Tippmann STORMER TACTICAL Bedienungsanleitung
-
JT TAC 5 Recon M Bedienungsanleitung
-
-
-
Tippmann TMC .50Cal Bedienungsanleitung
-
-
-